HAE43B - Tripod iOptron - Free user manual and instructions
Find the device manual for free HAE43B iOptron in PDF.

User questions about HAE43B iOptron
0 question about this device. Answer the ones you know or ask your own.
Ask a new question about this device
Download the instructions for your Tripod in PDF format for free! Find your manual HAE43B - iOptron and take your electronic device back in hand. On this page are published all the documents necessary for the use of your device. HAE43B by iOptron.
USER MANUAL HAE43B iOptron
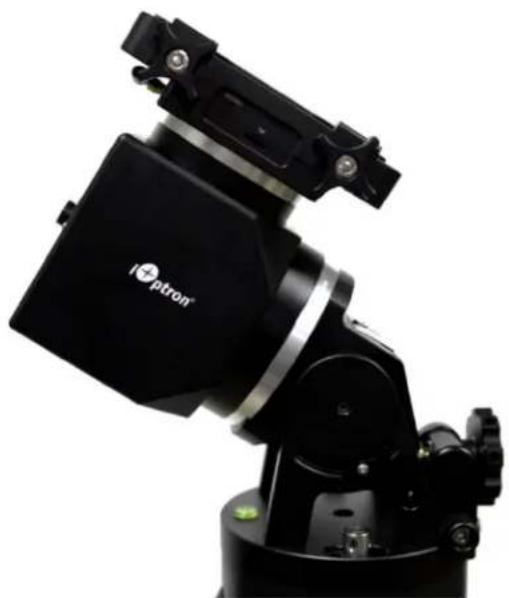
HAE Strain Wave Gear AZ/EQ GoTo Mount with iMate™
Models: HAE29B/EC, HAE43B/EC, and HAE69B/EC
natural_image
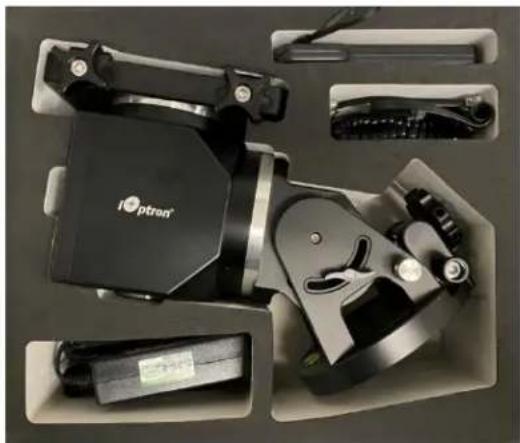
Close-up of a black optical instrument with a labeled 'i+ption' logo (no additional text or symbols visible)PACKAGE CONTENTS ^1
- Dual strain wave gear altazi/equatorial mount with built-in iMate computer
• High precision optical encoder on RA axle (for EC version) - AC adapter - 100-240V, 12V 6A DC output for mount (for indoor use only)
- Carrying case
OPTIONAL PARTS (not included)
• #8411 handset with OLED display
• iPolar™ electronics polar scope (#3339)
- Tripod/Tri-pier
• External iGuider for autoguiding (#3360)
- Counterweight shaft(#P-SGP-CWS) and counterweight (#3006-10)
ONLINE RESOURCES (www.iOptron.com)
- User's Manual
- Hand controller and mount firmware upgrades (check online for the latest version)
- Computer control
HAE is operated under unbalanced condition and could be tipped off if tripod is not secured.
- Remove mount head from package.
natural_image
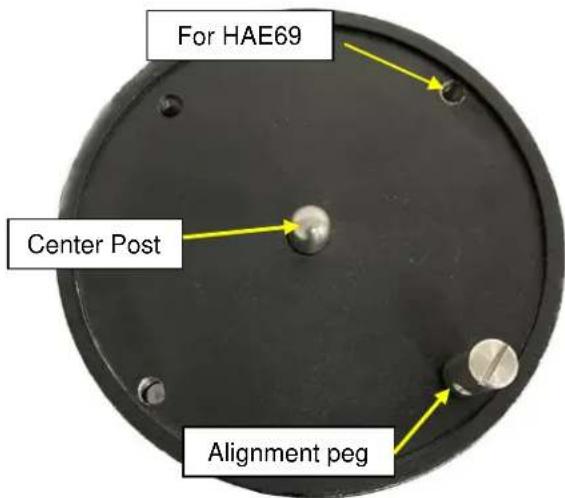
Product photo of a IoT scanner device with visible internal components and accessories (no text or symbols)- Set up tripod: An HAE69, as shown here, has a 150mm base. An optional LiteRoc tripod #8023ACC or a tri-pier #8034 may be used. Setup and level the tripod. Adjust the tripod height. Tighten tripod locking knob to secure the tripod. Remove the Alignment Peg from the mount base and thread it onto the tripod head, on top of a tripod leg or between two legs depending on the latitude. Use two outside threaded holes to secure the mount head.
text_image
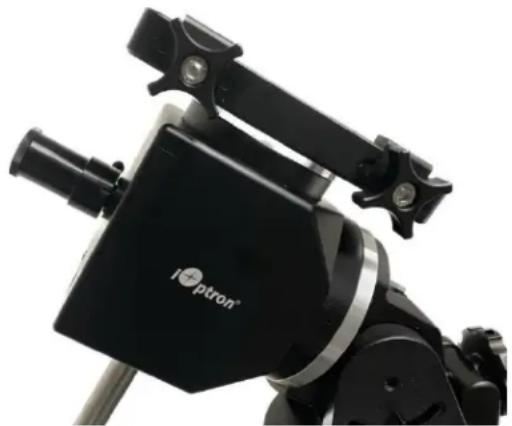
For HAE69 Center Post Alignment peg- Attach mount head: Retract the 2X Azimuth (Azi) Adjustment Screws from both sides to leave ample space for the alignment peg to be fitted in between the 2X Azi Adjustment Screws.

text_image
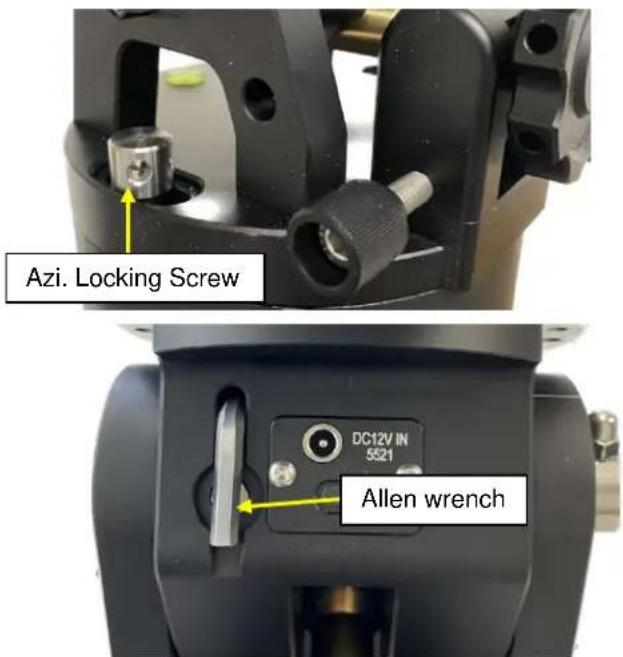
Azi. Locking Screw Azi. Adj. Screw Alignment pegRemove Azi Locking Screws from the mount altitude arm. Secure the mount head by tightening the Azi Locking Screws into the M8 holes on the tripod. There is an Allen wrench stored on the mount base for tightening the screws.
text_image
Azi. Locking Screw DC12V IN 5521 Allen wrenchLevel the mount by adjusting the tripod legs. Use the built-in Bubble Level Indicator on the mount base or an external leveler for this purpose.
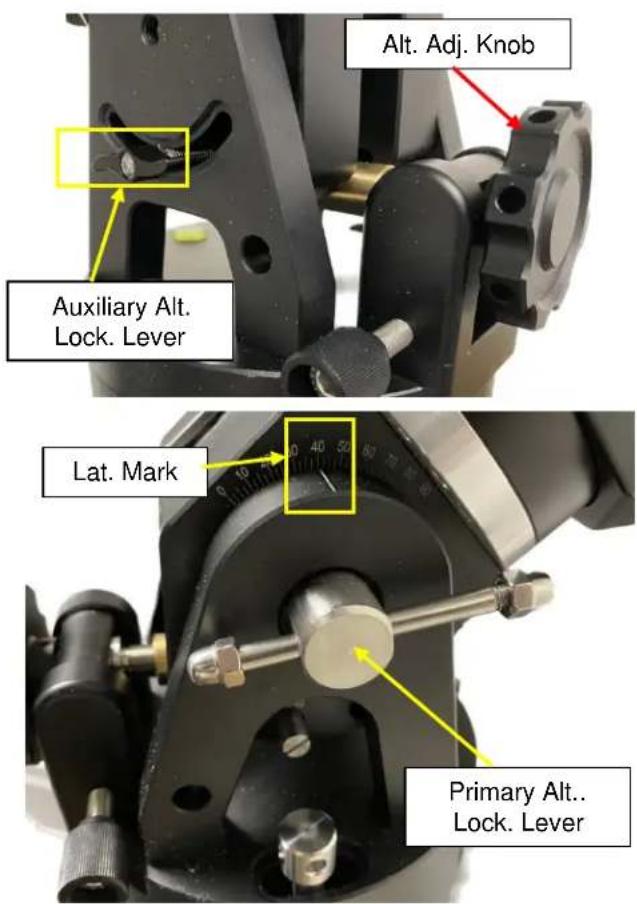
- Adjust latitude: The HAE69 has three latitude range settings: 0°\~34°, 28°\~62° and 56°\~90°. To adjust the latitude, loosen both the Primary and Auxiliary Alt. Locking Lever on the RA base. An HAE29B or HAE43B does not have the auxiliary locking lever.
text_image
Alt. Adj. Knob Auxiliary Alt. Lock. Lever Lat. Mark Primary Alt.. Lock. LeverUse the Altitude Adjustment Knob to move the mount to the desired latitude by aligning the scale to the Latitude Mark Line. Tighten both Primary and Auxiliary Locking Lever.
There are holes on the Altitude Adjustment Knob. An Allen wrench may be inserted for increased adjustment torque, if needed.
natural_image
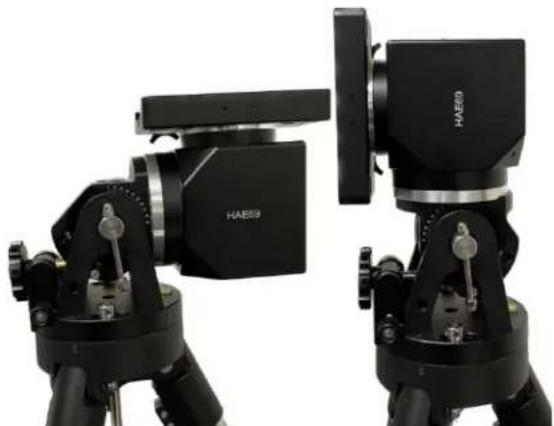
Two black HAEB camera modules mounted on tripod stands, no visible text or symbols on the devices themselves.To use the mount near the equator, change the latitude range settings to 0^34^ . To use the mount at
AA mode, change the range to 56°\~90°. Please refer to on-line instruction for detailed procedures.
-
Install telescope: An HAE69B is equipped with a Vixen/Losmandy-D dual dovetail saddle. It accepts a Vixen or a Losmandy-D dovetail mounting bar.
-
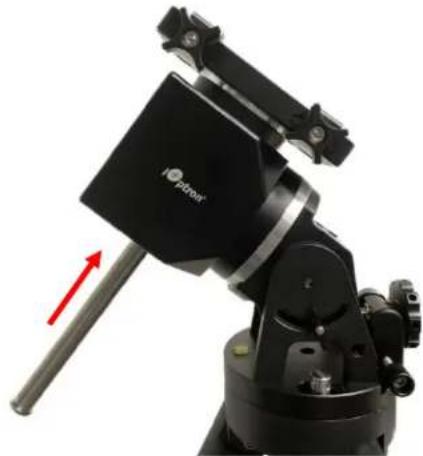
Install counterweight bar and CW: The mount is designed to operate without a counterweight (CW). If you want to use an optional CW, the CW shaft mounting hole is 3/8"-16 threaded. Thread in a CW shaft and install a 10 lbs CW.
natural_image
Close-up of a black optical instrument with a red arrow pointing to a shaft (no visible text or symbols)- Connect DC power and hand controller: Plug in a 12V DC power supply to the DC12V IN socket on the base.

text_image
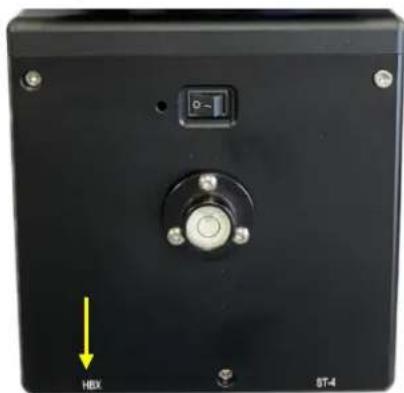
DC12V IN 5521If you have an optional Go2Nova ^® 8411 handset, plug it into the HBX port on the mount.
natural_image
Close-up of a black electronic device back panel with a central button and labeled buttons (no readable text or symbols beyond labels)- Mount control via a on-board iMate computer: The HAE69B has a built-in iMate computer which has an open source Kstar/EKOS, an advanced cross-platform (Windows, OSX, Linux) observatory control and automation tool with particular focus on Astrophotography.
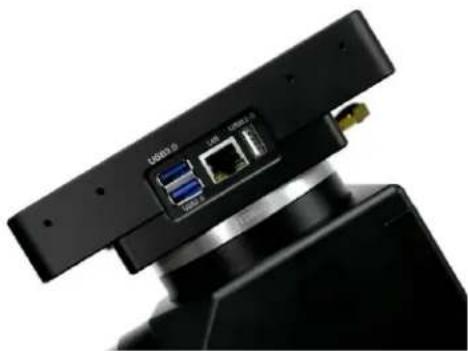
natural_image
Close-up of a black electronic device with ports and connectors (no visible text or symbols)A computer/tablet/SmartPhone can be connected to the iMate using NoMachine Remote Access via WIFI connection.

flowchart
graph LR
    A["NoMachine Remote Access"] --> B["iMate PowerBox\niMate SetTime\niPolarServer"]
    B --> C["Kstars/Ekos INDI"]
    C --> D["Mount Camera\nGuidier\nEAF\nFilter Wheel\niPolar"]
Turn the mount power on. From your computer WIFI network list, choose iMate_XXXXXX. Enter password 12345678 to connect the computer to iMate Wi-Fi network.

text_image
iMate_2DA7F7 No Internet, secured Properties DisconnectDownload, install and launch NoMachine, connect it to iMate. Now you can use the iMate for power management, Polar alignment using iPolar and astronomy imaging via KStars!
NoMachine
Machines


Windows, third party INDI driver for MacOS or Pi. Some software also has an iOptron mount driver embedded. The WIFI of the iMate is not for this purpose.
- Zero Position: The Zero Position is the mount GOTO reference. Without setting the mount zero position properly, it may cause a large GOTO error or even cause the scope to hit the tripod leg. The simplest way to find the mount Zero Position of the EQ mode is using the zero position sensors. If you have an 8411 hand controller, press MENU=>Zero Position =>Search Zero Position, then press ENTER. Follow the online instruction to complete the process. The Zero Position also can be set via the iOptron Commander or the built-in iMate computer (Home Position).
Check the online manual for AA mode Zero Position.
- Polar alignment: When an HAE mount operating at EQ mode, if no iPolar is installed or the pole star is not in sight, you may use two bright stars for coarse polar alignment if you have the optional handset.
You may also use Kstars/EKOS polar alignment routine from the built-in iMate computer or planetarium software for polar alignment.
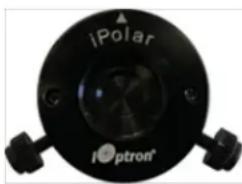
An HAE mount may use an external iPolar electronic polar scope. Just place the iPolar over the bubble level on top of the mount and secure the thumb screws.
natural_image
Close-up of a black optical instrument with a labeled 'I+ptron' component (no additional text or symbols visible)Make sure that the arrow key is facing upward:
text_image
iPolar i•optron®Refer to the iPolar Operation Manual from iOptron's website to perform the polar alignment, or steps briefly outlined below:
- Download and install iPolar Software (first time use);
- Connect a miniUSB cable between the iPolar USB port and a computer USB port;
- Click Connect and start polar alignment by following on screen instructions.
The built-in iMate computer has an integrated iPolar software.
- Manual operation: Now the mount can be used to observe astronomical objects with the HC. Use the arrow keys (▶,◀,▼, and▲) form your hand controller, Commander or Mount Control Panel from Kstars/EKOS to point the telescope to the desired object. Use the number keys to change the slewing speed. Press the 0 button on hand controller, or click on the Tracking box in Commander to start tracking.
- Go to an object: The mount is now ready for GOTO and tracking targets. Press MENU on the hand controller, select and ENTER Select and Slew. Select a category (e.g., Solar System), then select an object of interest (e.g., Mars). Press ENTER and the telescope will slew to the object and automatically start tracking. You may also using iOptron Commander or Kstars/Ekos from the built-in iMate computer to perform GOTO function.
- Sync to Target: If the object is not in the center of the eyepiece, use this function in hand controller or Commander to center and synchronize the object to improve local GOTO accuracy. You may use Plate-solving from Kstars/EKOS.
- Put the mount back into the package/carrying case: It is recommended to return the mount to Zero Position at the end of the observing session. Thread the dovetail saddle locking screws all the way in. You may need to adjust the latitude a little bit to fit the mount into the carrying case.
Use support@ioptron.com for technical supports.
Rev. 2.0 April 2024
A. iOptron warrants your telescope, mount, or controller to be free from defects in materials and workmanship for two years. iOptron will repair or replace such product or part which, upon inspection by iOptron, is found to be defective in materials or workmanship. As a condition to the obligation of iOptron to repair or replace such product, the product must be returned to iOptron together with proof-of-purchase satisfactory to iOptron.
B. The Proper Return Merchant Authorization Number must be obtained from iOptron in advance of return. Contact iOptron at support@ioptron.com to receive the RMA number to be displayed on the outside of your shipping container.
All returns must be accompanied by a written statement stating the name, address, and daytime telephone number of the owner, together with a brief description of any claimed defects. Parts or product for which replacement is made shall become the property of iOptron.
The customer shall be responsible for all costs of transportation and insurance, both to and from the factory of iOptron, and shall be required to prepay such costs.
iOptron shall use reasonable efforts to repair or replace any telescope, mount, or controller covered by this warranty within thirty days of receipt. In the event repair or replacement shall require more than thirty days, iOptron shall notify the customer accordingly. iOptron reserves the right to replace any product which has been discontinued from its product line with a new product of comparable value and function.
This warranty shall be void and of no force of effect in the event a covered product has been modified in design or function, or subjected to abuse, misuse, mishandling or unauthorized repair. Further, product malfunction or deterioration due to normal wear is not covered by this warranty.
This warranty is automatically void if it is sold as an open box, used, auction, or discount over 20%; unless specified by iOptron.
IOPTRON DISCLAIMS ANY WARRANTIES, EXPRESS OR IMPLIED, WHETHER OF MERCHANTABILITY OF FITNESS FOR A PARTICULAR USE, EXCEPT AS EXPRESSLY SET FORTH HERE. THE SOLE OBLIGATION OF IOPTRON UNDER THIS LIMITED WARRANTY SHALL BE TO REPAIR OR REPLACE THE COVERED PRODUCT, IN ACCORDANCE WITH THE TERMS SET FORTH HERE. IOPTRON EXPRESSLY DISCLAIMS ANY LOST PROFITS, GENERAL, SPECIAL, INDIRECT OR CONSEQUENTIAL DAMAGES WHICH MAY RESULT FROM BREACH OF ANY WARRANTY, OR ARISING OUT OF THE USE OR INABILITY TO USE ANY IOPTRON PRODUCT. ANY WARRANTIES WHICH ARE IMPLIED AND WHICH CANNOT BE DISCLAIMED SHALL BE LIMITED IN DURATION TO A TERM OF TWO YEARS FROM THE DATE OF ORIGINAL RETAIL PURCHASE.
Some states do not allow the exclusion or limitation of incidental or consequential damages or limitation on how long an implied warranty lasts, so the above limitations and exclusions may not apply to you.
This warranty gives you specific legal rights, and you may also have other rights which vary from state to state.
iOptron reserves the right to modify or discontinue, without prior notice to you, any model or style telescope.
If warranty problems arise, or if you need assistance in using your telescope, mount, or controller contact:
iOptron Corporation
Customer Service Department
6F Gill Street
Woburn, MA01801
www.ioptron.com
support@ioptron.com
NOTE: This warranty is valid to U.S.A. and Canadian customers who have purchased this product from an authorized iOptron dealer in the U.S.A. or Canada or directly from iOptron. Warranty outside the U.S.A. and Canada is valid only to customers who purchased from an iOptron Distributor or Authorized iOptron Dealer in the specific country. Please contact them for any warranty.