CVI118RWS2 - Wine cellar SMEG - Free user manual and instructions
Find the device manual for free CVI118RWS2 SMEG in PDF.

| Product Type | Wine Cellar |
| Brand | Smeg |
| Model | CVI118RWS2 |
| Total Bottle Capacity | 118 bottles (standard 0.75 L) |
| Dimensions (H x W x D) | 1850 x 595 x 575 mm |
| Net Weight | 68 kg |
| Installation Type | Freestanding or built-in |
| Energy Source | Electrical: 220-240 V, 50 Hz |
| Energy Class | G (on a scale of A to G) |
| Annual Energy Consumption | 216 kWh |
| Number of Temperatures Zones | 2 independent zones |
| Temperature Range | +5°C to +20°C |
| Control Type | Electronic with digital display |
| Interior Lighting | LED interior light |
| Door Type | Reversible door with stainless steel finish |
| Noise Level | 42 dB(A) |
| Climate Class | SN-ST (from +10°C to +38°C) |
| Refrigerant | R600a |
| Shelving Material | Chrome-plated wire shelves |
| Number of Shelves | 12 wooden sliding shelves |
| Security Lock | Key lock included |
| Anti-Vibration System | Compressor with anti-vibration technology |
| Maintenance & Cleaning | Clean with soft cloth and mild detergent; defrost manually |
| Spare Parts Availability | Original Smeg spare parts available for at least 10 years |
| Repair Index (if applicable) | 8.2/10 |
Frequently Asked Questions - CVI118RWS2 SMEG
User questions about CVI118RWS2 SMEG
0 question about this device. Answer the ones you know or ask your own.
Ask a new question about this device
Download the instructions for your Wine cellar in PDF format for free! Find your manual CVI118RWS2 - SMEG and take your electronic device back in hand. On this page are published all the documents necessary for the use of your device. CVI118RWS2 by SMEG.
USER MANUAL CVI118RWS2 SMEG
1.1 General safety instructions 30
1.2 Appliance purpose 32
1.3 Disposal 33
1.4 Identification plate 33
1.5 This user manual 33
1.6 How to read the user manual 34
2 Description 35
2.1 General Description 35
2.2 Description of parts 36
2.3 Control panel 37
3 Use 38
3.1 Instructions 38
3.2 Preliminary operations 38
3.3 First use 38
3.4 Opening and closing the door 39
3.5 Using the control panel 40
3.6 Using the wine cellar 42
3.7 Alarms 44
3.8 Food storage advice 45
4 Cleaning and maintenance 48
4.1 Instructions 48
4.2 Cleaning the appliance 48
4.3 What to do if... 50
5 Installation
5.1 Electrical connection 51
5.2 Positioning 51
Apple, App Store and iOS marks belong to Apple Inc.
Google Play Store and Android marks belong to Google Inc.
Wi-Fi is a mark belonging to Wi-Fi Alliance.
TRANSLATION OF THE ORIGINAL INSTRUCTIONS
We advise you to read this manual carefully, as it contains all the instructions for maintaining the appliance's aesthetic and functional qualities.
For further information on the product: www.smeg.com
1 Instructions
1.1 General safety instructions
Risk of personal injury
- Keep children under the age of 8 at a safe distance unless they are constantly supervised.
- According to the current regulations, children between 3 and 8 years of age can take or load food from the appliance, but it is strongly advised against allowing children under 8 years of age to perform these operations and in general to use the appliance.
• Children must never play with the appliance. - Never try to put out a fire or flames with water: turn off the appliance and smother the flames with a fire blanket or other appropriate cover.
- Cleaning and maintenance must not be carried out by unsupervised children.
- Have qualified personnel carry out installation and assistance interventions according to the standards in force.
- Do not modify this appliance.
-
Do not insert pointed metal objects (cutlery or utensils) into the slots in the appliance.
-
Do not try to repair the appliance yourself or without the intervention of a qualified technician.
- Do not pull the cable to remove the plug.
- If the power supply cable is damaged, contact technical support immediately and they will replace it.
- If it is necessary to replace the power cable, this must be performed by an authorised technician from Technical Support Service.
• DO NOT USE OR STORE FLAMMABLE MATERIALS NEAR THE APPLIANCE. - DO NOT USE AEROSOLS IN THE VICINITY OF THIS APPLIANCE WHILST IT IS IN USE.
• DO NOT MODIFY THIS APPLIANCE. - Have qualified personnel carry out installation and assistance interventions according to the standards in force.
Risk of damaging the appliance
- Never rest sharp metal objects such as knives, forks, spoons and lids on the appliance during use.
- Do not use abrasive or corrosive detergents (e.g. scouring powders, stain removers and
metallic sponges) on glass parts.
- Do not use rough or abrasive materials or sharp metal scrapers.
- Do not sit on the appliance.
- Do not rest any weight or sit on the open door of the appliance.
• Take care that no objects are stuck in the doors.
- Do not store inflammable, explosive or volatile substances.
- Organic compounds, acids and essential oils can corrode the seals and plastic surfaces if left in contact with them for extended periods.
- Bottles with a high alcohol content must be tightly closed.
- Do not use steam jets to clean the appliance.
- Do not spray any spray product near the appliance.
- Do not obstruct ventilation openings and heat dispersal slots.
- Do not use electrical appliances inside food storage compartments unless these are of the type recommended by the manufacturer.
• DO NOT USE THE APPLIANCE TO COOL ROOMS FOR ANY REASON.
- Never use mechanical devices or any other means not recommended by the
manufacturer to accelerate the defrosting process.
• Always unplug the appliance in the event of a fault or when performing cleaning or maintenance.
- Never use the door to lever the appliance into place when fitting.
- Avoid exerting too much pressure on the door when open.
- Do not use the handle to lift or move this appliance.
- WARNING: When positioning the appliance, ensure the supply cord is not trapped or damaged.
- WARNING: Do not locate multiple portable socket-outlets or portable power supplies at the rear of the appliance.
Installation and maintenance
- THIS APPLIANCE MUST NOT BE INSTALLED IN A BOAT OR CARAVAN.
• This appliance must not be installed on a pedestal. - Position the appliance into the cabinet cut-out with the help of a second person.
- To prevent any possible overheating, the appliance should not be installed behind a decoration door or a panel.
• Have qualified personnel carry
out installation and assistance interventions according to the standards in force.
- Have the electrical connection performed by authorised technicians.
- The appliance must be connected to ground in compliance with electrical system safety standards.
- Use cables withstanding a temperature of at least 90 °C.
- The tightening torque of the screws of the terminal board leads must be 1.5 - 2 Nm.
- Before any operation on the appliance (installation, maintenance, positioning or movement) always wear PPM.
- Before performing any operation on the appliance, switch off the power supply.
- Opening the door for long periods can cause a significant increase of the temperature in the compartments of the appliance.
- If the refrigerating appliance is left empty for long periods, switch off, defrost, clean, dry, and leave the door open to prevent mould developing within the appliance.
1.2 Appliance purpose
- This appliance has been designed exclusively for storing wine in a domestic setting. Every other use is
considered inappropriate.
- This appliance may be used by children aged at least 8 and by people of reduced physical, sensory or mental capacity, or lacking in experience in the use of electrical appliances, provided that they are supervised or instructed by adults who are responsible for their safety.
- This appliance is not suitable for use by persons (including children) with reduced physical, sensory or mental capacity, or by those without experience or knowledge, unless they are supervised or instructed on the use of the appliance by a person responsible for their safety.
- Children should be supervised to ensure that they do not play with the appliance.
- Do not install/use the appliance outdoors.
- The appliance is not designed to operate with external timers or with remote-control systems.
The appliance is designed for use in a domestic or similar environment, for instance:
- Staff kitchen areas in shops, offices and other working environments;
- Farm houses and by guests in hotels, motels and other residential type environments;
• bed and breakfast establishments;
• catering and similar non-retail applications.
1.3 Disposal
This appliance must be disposed of separately from other waste (Directives 2002/95/EC, 2002/96/EC, 2003/108/EC).
The appliance does not contain substances in quantities sufficient to be considered hazardous to health and the environment, in accordance with current European directives.
To dispose of the appliance:
- Cut the power supply cable and remove it along with the plug.

Power voltage Danger of electrocution
- Disconnect the mains power supply.
- Unplug the appliance.
- Deliver the appliance to the appropriate recycling centre for electrical and electronic equipment waste, or return it to the retailer when purchasing an equivalent product, on a one for one basis.
Our appliances are packaged in non-polluting and recyclable materials.
- Deliver the packing materials to the appropriate recycling centre.

Plastic packaging Danger of suffocation
- Do not leave the packaging or any part of it unattended.
- Do not let children play with the plastic bags.
1.4 Identification plate
The identification plate bears the technical data, serial number and brand name of the appliance. Do not remove the identification plate for any reason.
1.5 This user manual
This user manual is an integral part of the appliance and must therefore be kept in its entirety and within the user's reach for the whole working life of the appliance.
Read this user manual carefully before using the appliance.
1.6 How to read the user manual
This user manual uses the following reading conventions:
Instructions

General information on this user manual, on safety and final disposal.
Description

Description of the appliance and its accessories.
Use

Information on the use of the appliance and its accessories.
Cleaning and maintenance

Information for proper cleaning and maintenance of the appliance.
Installation

Information for the qualified technician: Installation, operation and inspection.

Safety instructions

Information

Advice
- Sequence of instructions for use.
- Standalone instruction.
2 Description
2.1 General Description
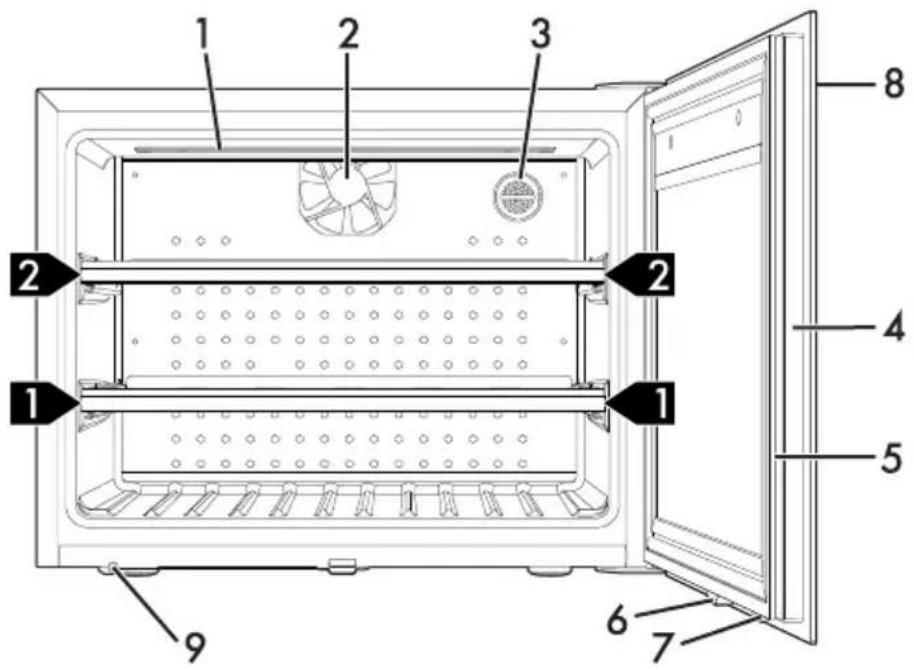
text_image
1 2 3 2 2 1 1 8 4 5 6 7 91 Interior lighting
2 Fan (not visible)
3 Activated charcoal filter
4 Door
5 Door seal
6 Magnet
7 Lock
8 Control panel
9 Push-pull mechanism
1,2,3... Removable shelf
2.2 Description of parts
Smeg Connect
The appliance is equipped with the
Smeg Connect technology so that the user can control its operation through an App on his smartphone or PC tablet.
For further information, refer to the supplied brochure and/or visit the site
www.smeg.com
Interior lighting
The interior lighting of the appliance turns on when the door is opened (maximum
brightness) or when the Light key

the control panel is pressed (medium brightness).
Activated charcoal filters
Ensure optimum air quality for wine storage.
Fan (not visible)
Distribute the temperature and reduce condensation on the shelves and other surfaces.
Power consumption rises when the fan is operating.
Door
Fitted with a seal and magnet, this provides perfect insulation of the wine cellar from the surrounding environment.
Removable shelves
The removable shelves allow easy removal of the bottles of wine.
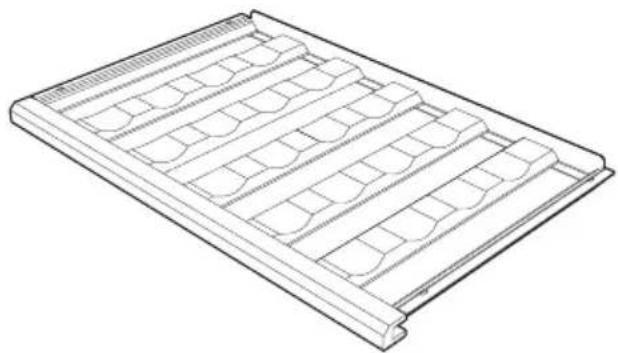
natural_image
Line drawing of a rectangular tray with multiple curved compartments and side panels (no text or symbols)2.3 Control panel

text_image
- 12 °C + Light W Wi Power Lock FanZ
The control panel allows the user to interact with the appliance. Touch the keys with symbols to access the available functions.

Alarm key
This key turns off the audible warning when an alarm is activated.

Decrease key
This key lowers the temperature inside the upper or lower compartment.

Display
The display shows the temperature inside the wine cellar.

Increase key
This key increases the temperature inside the upper or lower compartment.

Light key
This key turns the lighting inside the wine cellar on and off. The lighting turns off after a maximum period of 15 minutes.

Connection key
By this key you can activate the connectivity functions.

ON/OFF key
It switches on and off the appliance and activates the control panel.

Control lock key
This key disables the control panel keys.

Fan key
The fan activates and deactivates automatically depending on the software settings.
Through this button you can activate or deactivate the manual ventilation mode to increase humidity inside the wine cellar.
3 Use
3.1 Instructions
Improper use Risk of damage to the appliance
- Do not rest any weight or sit on the appliance door.
- Do not store inflammable, explosive or volatile substances.
- Organic compounds, acids and essential oils can corrode the seals and plastic surfaces if left in contact with them for extended periods.
- Do not obstruct the openings of the ventilation grille in any way.
- Bottles with a high alcohol be tightly closed.
3.2 Preliminary operations
- Remove any protective film from the outside or inside of the appliance, including accessories.
- Remove any labels (apart from the technical data plate) from the accessories and shelves.
- Remove and wash all the appliance's accessories (see 4 Cleaning and maintenance).
3.3 First use
To turn on the appliance:
- insert the plug into the power socket;
- press the ON/OFF (on the control panel:
- select the required temperature for the interior of the wine cellar by pressing the Increase + or Decrease - keys (from 5°C to 20°C).
Each press of the Increase

Decrease keys changes the temperature by 1°C.

The set temperature will flash on the display for around 5 seconds, and then it remains steadily displayed.
To turn off the appliance:
- press and hold the ON/OFF key on the control panel for a few seconds.
3.4 Opening and closing the door
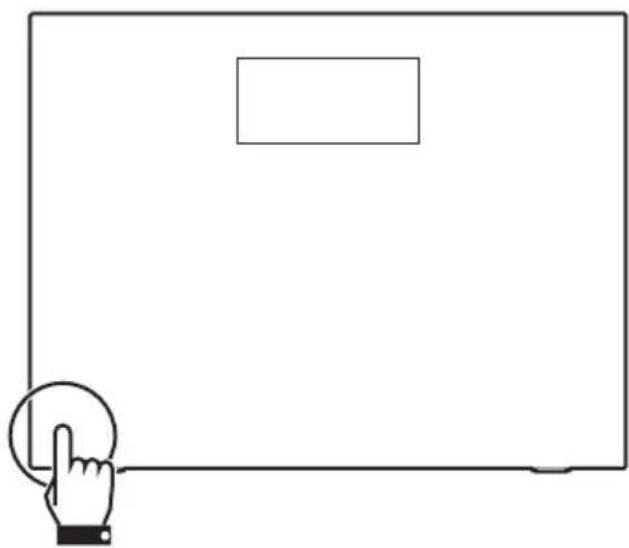
- To open the door, just apply light pressure to the bottom left area. A push-pull mechanism will delicately push the door, detaching it from the magnet.
natural_image
Simple line drawing of a hand pointing at a blank rectangular area with a rectangle on top (no text or symbols)It will then be possible to fully open the door.
- To close the door, rest the lock against the push-pull mechanism and apply light pressure to the bottom left area.
Push-pull mechanism
It may be necessary to adjust the push-pull mechanism to optimise door opening and closing.
-
Open the door.
-
Rotate the piston of the push-pull mechanism to the right or left to obtain the required adjustment.

text_image
-1 mm +4 mm- Close the door and check that the push-pull mechanism is correctly adjusted.
- If the adjustment is still not satisfactory, repeat the procedure above, starting from step 1.

The piston rotation adjustment ranges from -1 mm to the right and +4 mm to the left.
3.5 Using the control panel
Interior lighting

The interior lighting is provided by an LED light bar installed at the top of the wine cellar.
To activate and deactivate the interior lighting:
- press the ON/OFF the control panel.

o activate
- press the Light the Light key v

The symbol on
To deactivate the interior lighting:
- Press the Light

again.
Manually operated interior lighting will stay on for a maximum of 15 minutes.
• The lighting also comes on when the door is opened.
The internal lighting activated when the door is opened is brighter than the lighting activated
via the Light

key.
Manual ventilation

natural_image
Technical line drawing of a mechanical fan or impeller assembly (no text or symbols)
The fans switch on and off automatically to guarantee a constant temperature and provide suitable climate control for conservation of the wine.
To increase the level of humidity inside the wine cellar it is possible to activate and deactivate the manual ventilation mode.
Once activated, the manual ventilation mode forces the continuous operation of the fan. If the manual ventilation mode is deactivated, the fan goes back to the standard operation managed by the electronics.
It is advisable to select this option from time to time in order to prevent corks from drying out when bottles are stored for long periods.
To activate manual ventilation:
- press the ON/OFF the control panel.

o activate
the fan key will flash.
To deactivate manual ventilation:
- Press the fan

again.

If the door is opened, the fans will be deactivated. The fans then reactivate when the door is closed.
Connectivity

Connectivity requirements:
- Smartphone or PC tablet with IOS version 10.x or higher or Android version 5.1 or higher.
- Wi-Fi connection (2.4 GHz band, WPA2 security) active and available in the location where the device is installed.
- Internet connection.
- Name and password of the home Wi-Fi.
For further information, please read the
Connectivity Manual.
Control lock
This function prevents the appliance from being accidentally switched off. When active, the control panel will not react when any key is pressed.

To activate the control lock:
- press the ON/OFF the control panel.

o activate
- Press and hold the Control lock key for at least 3 seconds.

To deactivate the control lock:
- Press and hold the Control lock key for at least 3 seconds.

Demo mode (for showrooms only)
Turns off the appliance's fans and compressor while keeping the control panel active.
To activate demo mode:
- press the ON/OFF the control panel.
o activate - Press and hold the fan and control lock keys simultaneously for around five seconds. The text will appear on the display.

- Press the fan key. The text will appear on the display.

To deactivate demo mode:
-
Press and hold the fan and control lock keys simultaneously for around five seconds. The text will appear on the display.
-
Press the fan key. The text will appear on the display.


When demo mode is active, the display will show the message for 2 seconds every 2 minutes.
3.6 Using the wine cellar
Bottle arrangement

natural_image
Diagram of a multi-tiered storage rack with circular components and a small circular object on top (no text or symbols)(max 18 bottles)
Each shelf can hold up to 6 standard 0.75 litre wine bottles.
natural_image
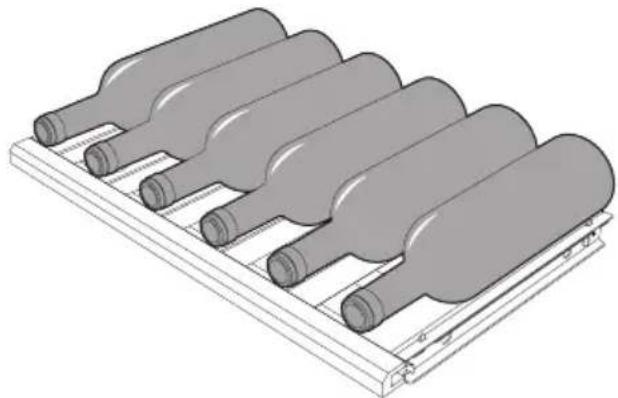
3D illustration of a row of cylindrical objects on a wooden rack (no text or symbols)Tall bottles (champagne for instance) can also be placed sideways, up to a maximum of four bottles per shelf.

natural_image
3D technical illustration of two cylindrical components mounted on a grid base (no text or symbols)Up to 6 x 0.75 litre bottles can also be placed on the base of the wine cellar.

natural_image
3D technical illustration of a mechanical component with multiple cylindrical parts and a hatched patterned area (no text or symbols)
Improper use Damage and injury hazard
- Do not place bottles sideways on the base of the wine cellar. They could fall when the door is opened.

natural_image
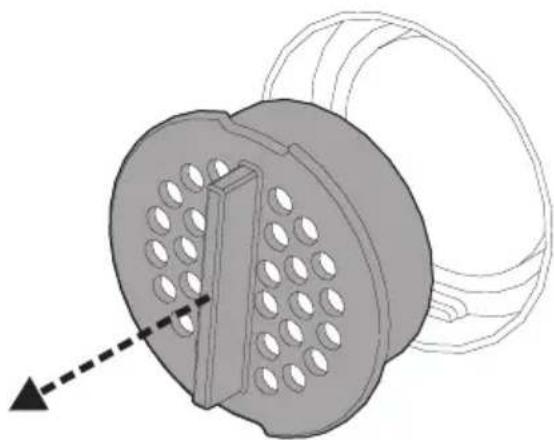
Diagram showing a device with a curved arrow and directional arrows, no text or symbols presentActivated charcoal filter

To maintain optimum air quality inside the wine cellar, the activated charcoal filter must be replaced at least once a year.
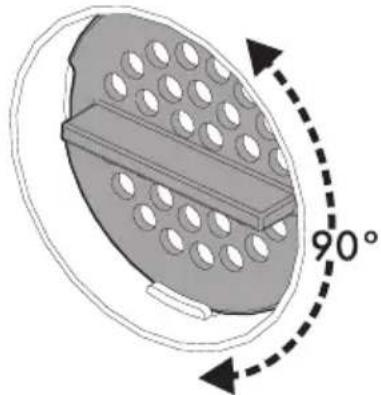
To replace the activated charcoal filter:
- Turn the filter cap 90^ to the left or right.
natural_image
Diagram of a circular device with perforated panel and 90-degree angle标注 (no text or symbols beyond the angle indicator)- Extract the cap from its seat.
natural_image
3D mechanical component diagram showing a circular housing with perforated inner cavity and internal slot, with a dashed arrow indicating direction (no text or symbols)- Replace the activated charcoal filter with a new one.
- Replace the filter cap following the indications in points 1 and 2.

Replacement filters can be ordered from Authorised Service Centres.
Noises during operation
The wine cellar is cooled by means of a compression system. In order to maintain the preset temperature inside the wine cellar, the compressor comes into operation in response to the level of cooling required, and may operate continuously if necessary. When the compressor starts to function, it creates a buzzing noise which generally diminishes in intensity after a few minutes.
Another normal wine cellar operating noise is a gurgling due to the refrigerant flowing through the pipes in the circuit. This noise is normal and does not indicate an appliance malfunction.
Turning the appliance off
Whenever the appliance is to remain unused for long periods, it should be switched off.
- Press and hold the ON/OFF
on the control panel for a few seconds until the appliance turns off. - Unplug the appliance from the wall socket.
- Empty the wine cellar.
- Dry any residual moisture which has accumulated with a soft cloth.
- Leave the door ajar to prevent the humidity and trapped air from creating unpleasant smells.

3.7 Alarms

The alarms help protect the wine from temperatures which could compromise its quality.
Each alarm consists of a message flashing
on the display, the Alarm key lighting up and an audible warning.
The display continues to flash until the alarm condition finishes.
• To deactivate the alarm, press the Alarm

key.
Temperature alarm
The temperature on the display may start to flash. This means that the temperature inside the wine cellar compartment is too high or too low in relation to that set.
This may occur:
- when the appliance is first turned on;
- if a temperature much higher or much lower than the previous one is set;
- if the wine cellar is loaded with many bottles at ambient temperature;
- in the event of an extended interruption in mains voltage.
These conditions may occur during normal operations of the appliance and are not caused by problems/faults.
In this case, deactivate the alarm with the
Alarm

and wait for the
temperature to return within the normal storage values. It may be necessary to repeat this operation 1–2 times.
If the alarm continues to occur, call Technical Support.
Alarm for door open
The display shows

oor has
been left open for more than 60 seconds
- Close the door.

The alarm will reactivate in the same way 60 seconds after it is shut off if the door is still open.
Fault alarms
The display shows from


ded) or or


ance fault.
- Switch off the appliance and call Technical Support.
Connectivity alarms
The display shows

ance
failure.
The APP shows

ance failure.
- Call Technical Support. For further information, please read the Connectivity Manual.

In case of alarm

appliance continues cooling wines.
3.8 Food storage advice
White wines
White wines are generally more acidic than reds and contain less tannin. To be enjoyed at its best, an acidic drink should usually be stored at a slightly lower temperature than other types, and so these wines should be stored at a temperature between 10^ C and 14^ C.
Young, fresh, aromatic white wines can be served at a temperature as low as 10^ C, while for less aromatic wines 12^ C is recommended. For full, mature white wines which have aged in the bottle for a few years, higher temperatures are acceptable and they can be served at between 12^ C and 14^ C.
Serving a white wine at a higher temperature means emphasising its "sweet" properties, while the acidity and sharpness considered pleasant and desirable in wines of this kind will be less noticeable.

Rosé wines
Generally, the rules for serving rosé wines are the same as for whites. However, it is important to consider these wines' tannin content and serve them at a higher temperature if necessary so that their flavour is not too sharp. Tannin content permitting, young, fresh rosé wines are served between 10°C and 12°C, while more robust, full-bodied types, including more mature wines, can be served between 12°C and 14°C.
Red wines
The serving temperature for red wines depends on a great deal of factors, but in view of their higher tannin and lower acidity than whites, they are usually served at higher temperatures. Young red wines with low tannin are usually served between 14° and 16°C, while for more full-bodied types 16°C or in exceptional cases even 18°C may be recommended.
Young red wines high in tannins and with a fairly uncomplicated structure can be served at between 12°C and 14°C without tasting too sharp, and will still be very pleasant. This rule applies to "nouveau" wines, made by a special method which reduces their tannin content; they can be appreciated to the full at cooler temperatures than other red wines.
Sparkling wines
In view of the large number of types of sparkling wines on the market, there would be little sense in laying down one rule to fit them all. Sweet, aromatic white sparkling wines can be served at a temperature as low as 8°C. Their aromatic nature means they are excellent at low temperatures.
Sweet red sparkling wines such as Brachetto may be served at temperatures between 10^ C and 12^ C. Here again, the more aromatic sparkling wines are suitable for lower temperatures, even down to 8^ C, while those with a slightly higher tannin content require temperatures as high as 14^ C.
Dry sparkling wines made by the "Charmat method" or "Martinotti method", such as some Prosecco wines, can be served at temperatures between 8°C and 10°C. Sparkling wines made by the "traditional method" and the "méthode Champenoise", such as Champagne, require special consideration: in general these sparkling wines are served at temperatures between 8°C and 10°C. However, for prestige wines marked with the vintage, or sparkling wines that have been aged for a long time, even 12°C may be advisable to allow the development of the complex bouquet that has been slowly and painstakingly built up over the years.
Dessert wines and fortified wines
These two types of wine generally both contain a high alcohol percentage and they are both often also sweet. However, there are dry dessert wines, such as Marsala, with a sugar content so low as to be almost imperceptible on the palate. For these wines, the serving temperature depends on which features you wish to emphasise. If you prefer to accentuate the wine's sweetness, the complexity of its bouquet and its austerity, it should be served at a high temperature, between 14°C and 18°C. Remember that in this case its alcohol content will also be more in evidence.
If you require a fresher sensation, or to reduce the sweetness of over-sweet wines, serve at a lower temperature, between 10^ C and 14^ C.
Young, fresh, dry dessert wines can be served at colder temperatures, below 10^ C. This makes the alcohol content considerably less noticeable. However, remember that as the temperature is reduced the bouquet also becomes less evident. One of these wines' key characteristics is the charm and complexity of their bouquet; serving them too cold also means sacrificing this important feature.
Storage temperatures
To enjoy the flavour and bouquet of each wine at its best, it should be stored and drunk at a specific temperature. The recommended temperatures for different kinds of wines are given below.
| Type of wine Temperature | |
| Young whites 10°C - 12°C | |
| Mature whites 12°C - 14°C | |
| Young, light rosés 10°C - 12°C | |
| Mature, full-bodied rosés 12°C - 14°C | |
| Nouveau reds 10°C - 14°C | |
| Young, light reds with low tannin | 14°C - 16°C |
| Mature, full-bodied reds with high tannin | 16°C - 18°C |
| Very mature and cask-aged reds | 16°C - 18°C |
| Sweet and aromatic sparkling wines | 8°C |
| Sweet and aromatic red sparkling wines | 10°C - 12°C |
| "Charmat method" sparkling wines | 8°C - 10°C |
| "Long Charmat method" sparkling wines | 10°C - 12°C |
| "Traditional method" sparkling wines without year | 8°C - 10°C |
| "Traditional method" sparkling wines with year | 10°C - 12°C |
| Dessert wines 10°C - 18°C | |
| Fortified or liqueur wines 10°C - 18°C | |
4 Cleaning and maintenance
4.1 Instructions

Improper use Risk of damage to surfaces
- Do not use steam jets to clean the appliance.
- Do not use cleaning products containing chlorine, ammonia or bleach on parts made of steel or that have metallic surface finishes (e.g. anodizing, nickel- or chromium-plating).
- Do not use abrasive or corrosive detergents (e.g. scouring powders, stain removers and metallic sponges) on glass parts.
- Do not use rough or abrasive materials or sharp metal scrapers.

Power voltage Danger of electrocution
- Turn off the appliance and unplug it from the mains before cleaning.
- Do not pull the cable to remove the plug.
4.2 Cleaning the appliance
A special antibacterial protection on the appliance's interior walls prevents bacterial growth and keeps them clean. They must nevertheless be cleaned regularly in order to keep them in good condition.
Cleaning the outside of the appliance
- The appliance may be cleaned with water or alcohol-based liquid detergents (e.g. window cleaning products).
- Avoid aggressive detergents and rough sponges in order not to damage the surfaces.
Cleaning the inside of the appliance
- Clean the inside of the appliance with diluted liquid detergent and warm water, adding a little bit of vinegar.
Cleaning the removable shelves
- Use a soft, damp cloth to clean the removable shelves. Avoid the use of soaps and detergents and/or sponges which could damage both the wooden and steel surfaces.
Cleaning and maintenance
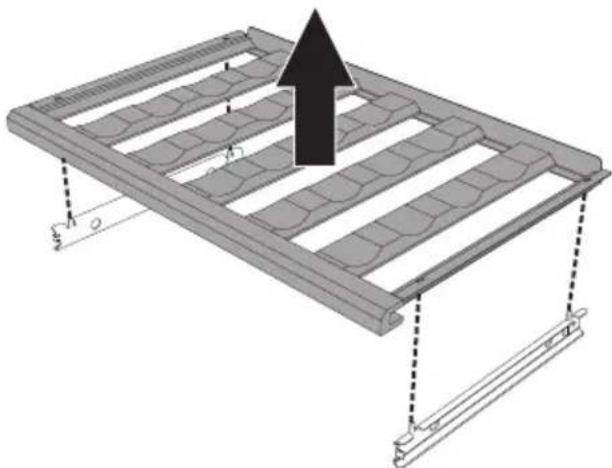
Removing the removable shelves
The removable shelves can be extracted from the interior of the wine cellar to facilitate cleaning.
To extract the removable shelves
- Open the door.
- Extract one of the two shelves.

natural_image
3D diagram of a multi-tiered storage rack with curved internal panels and directional arrows indicating flow or movement (no text or symbols)- Lift the shelf removed upwards.
natural_image
3D diagram of a roof structure with grid patterns and support beams, no text or symbols present- Repeat the operation for the other shelf.
To refit the removable shelves
- Line up the shelf with the four pins of the guide and rest it on this.

natural_image
3D diagram of a roof structure with grid patterns and a downward arrow indicating compression or damage (no text or symbols)- Push the shelf inside the wine cellar.

natural_image
3D diagram of a mechanical assembly with layered structure and directional arrows indicating movement (no text or symbols)- Repeat the operation for the other shelf.
- Close the door.
4.3 What to do if...
The appliance does not work:
- Make sure that the appliance is plugged in and that the main switch is turned on.
The compressor starts to function too often or functions continuously:
• The room temperature is too high.
- The door is being opened too often or for too long.
- The door is not closing/sealing properly.
- There is an excessive quantity of warm bottles.
- Check that the back of the freezer is properly ventilated and that the condenser is not too dirty.
There is excessive condensate build-up inside the wine cellar:
- The door is being opened too often or for too long.
- Warm bottles have been placed inside the wine cellar.
- The door seal is damaged or dirty. Clean or replace it.
Water builds up inside the wine cellar:
- The drainage channel or opening is blocked.
The wine cellar cooling is insufficient: - The temperature set on the display is too high.
- The door is being opened too often or for too long.
- The door is not closing/sealing properly.
• The room temperature is too high.
5 Installation
5.1 Electrical connection

Power voltage Danger of electrocution
- The appliance must be connected to ground in compliance with electrical system safety standards.
- Do not pull the cable to remove the plug.
General information
- Check the mains characteristics against the data indicated on the plate. The identification plate bearing the technical data, serial number and brand name is visibly positioned inside the appliance. Do not remove this plate for any reason.
• Make sure that the plug and socket are of the same type.
- Avoid using adapters, gang sockets or extensions as these could cause overheating and a risk of burns.
• The plug must alw when the appliance is installed.
- Leave the appliance standing vertically for at least two hours before turning it on for the first time.
- If it is necessary to replace the power cable, this must be performed by an authorised technician from Technical Support Service.
5.2 Positioning
Heavy appliance Crushing hazard
- Position the appliance with the aid of a second person.

Pressure on the open door Risk of damage to the appliance
- Never use the open door to lever the appliance into place when fitting.
- Avoid exerting too much pressure on the door when open.
- The appliance must not be exposed to direct sunlight.
- The appliance must not be installed near heat sources. If this is not possible, suitable insulation must be used.
- Do not use the appliance outdoors.
Choice of location
Always install the appliance in a dry place with satisfactory ventilation. Depending on its climate class (stated on the nameplate inside), the wine cellar can be used in different temperature conditions.
Class Room temperature
| SN + 10°C to + 32°C |
| N + 16°C to + 32°C |
| ST + 16°C to + 38°C |
| T+16°C to +43°C |
| SN-ST + 10°C to + 38°C |
| SN-T + 10°C to + 43°C |
$$ S N = \text { Subnormal } - N = \text { Normal } $$
$$ S T = \text { Subtropical } - T = \text { Tropical } $$
- Install the appliance at least 3 cm away from electrical or gas cookers and at least 30 cm away from combustion heaters or radiators.
- The appliance must not be installed near heat sources. If this is not possible, suitable insulation must be used.
- Ensure that the appliance is located with sufficient space for the door to open and for the internal drawers and shelves to be removed, if necessary.
- To ensure correct cooling of the condenser, respect the clearance requirements when mounting.
Appliance overall dimensions (mm)

text_image
456,5 453 596 3,5 (front view)
text_image
435 448 31,2 523 (side view)Mounting (mm)

text_image
min. 5mm
text_image
557 50 605 93°(top view)

text_image
min. 200 cm² 550 560-570 450 min. 200 cm²
Do not cover the ventilation holes.
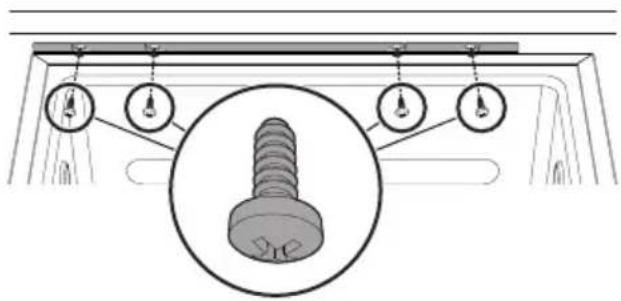
Fastening trim bar
The appliance is fitted with a (removable) fastening trim bar to fasten it below the kitchen worktop.
To fasten the appliance to a kitchen worktop:
- Open the door.
- Use the 4 screws supplied to fasten the appliance.