NVR-7402-29HD-B - Television NEVIR - Free user manual and instructions
Find the device manual for free NVR-7402-29HD-B NEVIR in PDF.

User questions about NVR-7402-29HD-B NEVIR
0 question about this device. Answer the ones you know or ask your own.
Ask a new question about this device
Download the instructions for your Television in PDF format for free! Find your manual NVR-7402-29HD-B - NEVIR and take your electronic device back in hand. On this page are published all the documents necessary for the use of your device. NVR-7402-29HD-B by NEVIR.
USER MANUAL NVR-7402-29HD-B NEVIR
natural_image
Front view of a modern flat-screen monitor with blank screen and stand (no text or symbols visible)Manual de Usuario
natural_image
Simple line drawing of a computer monitor with a floral symbol above it (no text or labels)natural_image
Cartoon illustration of a computer monitor with lightning bolts and broken-out paper (no text or symbols)text_image
Diagram illustrating heat mitigation with a sun, monitor crossed out, and warning lightnatural_image
Illustration of a computer monitor with a crossed-out X symbol, no text or symbols presenttext_image
Diagram showing a computer monitor with lightning bolts and a crossed-out X symbol, likely indicating a warning or prohibition.text_image
Image showing a computer monitor with a crossed-out 'S' symbol and a person holding a device, suggesting a misleading or misleading image.natural_image
Line drawing of a flat-screen computer monitor with no text or symbols on the screen or standTV LED Mando a distancia

text_image
Black remote control with labeled buttons and ports, including red, green, yellow, and blue indicatorsManual de Usuario
Pilas AAA
Manual de Usuario
4. VISTA FRONTAL Y CONEXIONES TRASERAS
Vista Frontal
text_image
COAX RF IN CI Port YPbPr AV USB USB Portnatural_image
Close-up of a dark gray mechanical part with an arrow pointing to it, no visible text or symbols.natural_image
Close-up of a dark gray plastic component with an arrow pointing to it (no text or symbols visible)text_image
Picture Picture Mode Standard Brightness Contrast Sharpness Colour Tint Colour Temperature Standard Noise Reduction Middle Move Enter Enter Exit Exit Menu Returntext_image
/udska1/test/music Get down.mp3 God is a girl.mp3 Never grow old.mp3 Dying in the sun.mp3 Pretty boy.mp3 Over the rainbow.mp3 Caseblance.mp3 Forever.mp3 Delete 4.27MB Backstreet boy Applesmjtext_image
Music Player Get down.mp3 God is a girl.mp3 Never grow old.mp3 Dying in the sun.mp3 Pretty boy.mp3 Over the rainbow.mp3 Caseblance.mp3 Forever.mp3 00:03:34/00:14:03 Move Enter Enter Exit ReturnMenú de Película
text_image
/udska1/test/movie 148_CONT-3E.mp4 149_CONT-3F.mp4 VersaEmerge_Toxic_Cover_0.avi you give love a bad name.avi Delete 6.25MB Andrew Sixty Unknown Move Ctrl+ Page+/- Enter Enter Exit Returntext_image
PVR M6(20081114_135146) Delete 001/001 11.02MBtext_image
Time/ Exit Recorder Ctrl Type Channel Start Time 00:00 Duration Date 00:00/0000 Mode Weeklytext_image
Record List Delete Menu Return Move Enter Entertext_image
Message Device speed not enough, RECORD anyway? OK Canceltext_image
Message Do you want to start Recording? OK Canceltext_image
DTV Initiating Recorder....text_image
Hotel Mode 2 Hotel Mode Adj Hotel Mode Off Max Volume Off 50 Default Volume On 20 Aspect Ratio Lock Off Channel Scan Lock Off Picture User Lock Off Main Menu Lock Off Keypad Lock Off Power On Standby Off Power On Source Off Clear Hotel Lock ->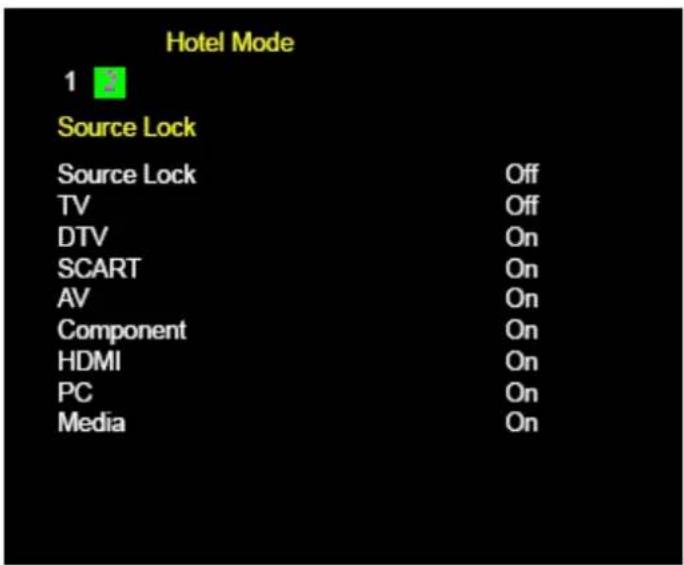
text_image
Hotel Mode 1 Source Lock Source Lock Off TV Off DTV On SCART On AV On Component On HDMI On PC On Media On29" (73.66CM) DLED TV WITH HD DVBT

natural_image
Front view of a modern flat-screen computer monitor with blank screen and stand (no text or symbols visible)USER MANUAL
- PREFACE 2
2.SAFETY PRECAUTIONS 2 - IN THE CARTON 4
- FRONT BACK CONNECTIONS OF LED 5
- TV INSTALLATION DRAWINGS
Power Cord Connection 6
Antennas Connection 6
HDMI Connection 7
VGA Connection 7
USB Connection 8
SCART Connection 8
Eearphone Connection 8
AV Connection 9
YPbPr Connection 9
6.REMOTE CONTROL
Remote Control Instructions in DTV mode 10
Remote Control Instructions in Teletext/Media mode 12
Remote Control Setup 13
7. Menu Operation
Select Input Source 14
Picture Menu 14
Sound Menu 15
Channel Menu 16
Feature Menu 17
Setup Menu 17
Media Menu 19
PVR Menu 22
Hotel Mode 25
8. TROUBLESHOOTING AND ADVICE 28
9. SPECIFICATIONS 29
1.PREFACE
Thank you for buying this TV! Please read this manual thoroughly before operating the TV. Make sure the TV was not damaged in transit. Should the TV is damaged, do no install it and contact your dealer. Check that you have all the accessories according to the model.
2.SAFETY PRECAUTIONS

Put the TV on a stable surface.

natural_image
Simple line drawing of a computer monitor with a cross symbol above it (no text or labels)Do not place any material on the TV.

text_image
Minimum distances 10cm 10cm 5cm 20cmDo not use the TV with fixtures other than those provided or suggested by the manufacturer.
Do not block or cover the ventilation openings on the TV. If you have a wall mount, check that it is steady.

Power cord and cables must be properly routed and protected to prevent people from stepping on them and causing the TV to fall.

natural_image
Cartoon illustration of a computer monitor with lightning bolts and a stack of documents (no text or symbols)Keep the TV dry and away from humidity.

text_image
Warning symbol with sun, monitor, and warning light iconKeep the TV away from heat sources.

text_image
Diagram showing a computer monitor with arrows indicating light and a hand holding a device, accompanied by a crossed-out 'No' symbol.Unplug the Before cleaning it. Do not use solvent or liquid clean the TV.
Only clean the TV with a soft and dry cloth.

text_image
Diagram showing a computer monitor with a crossed-out X symbol and a Chinese text box, likely indicating a warning or prohibition.In case of troubleshooting, do not use spare parts other than those suggested by the manufacturer. Using inadequate spare parts can lead to electric shocks, short-circuits fire or other incidents.

text_image
Black-and-white warning sign with crossed-out 'No' symbol and a chef holding a plate, next to a computer monitor.Unplug the TV during lightening storms or when unused for long periods of time.

This designation worning user to the presence of "high voltage" within the device, and the risk of electric shock.
This symbol warns the user to the presence of important operating instructions and maintenance, you'll find this in the instructions.
-Different types of batteries, new and used batteries should not be mixed.
-The battery must be installed according to the polarity.
-If the battery is worn, it must be removed from the product.
-The battery must be disposed of safely. Always use the collection bins provided (check with your dealer) to protect the environment.
-If the cord is damaged, have it repaired by the manufacturer, its service or a similarly qualified person in order to avoid any hazard.
- An apparatus with CLASS I construction shall be connected to a MAINS socket outlet with a protective earthing connection.
- Batteries (battery pack or batteries installed) shall not be exposed to excessive heat such as sunshine, fire or the like.
- Where the MAINS plug is used as the disconnect device, the disconnect device shall remain readily operable.
- To reduce the risk of fire or electric shock, do not expose this apparatus to rain or moisture.
The apparatus shall not be exposed to dripping or splashing and that objects filled with liquids, such as vases, shall not be placed on the apparatus.
WARNING: To prevent the spread of fire, keep candles or other open flames away from this product all times.
3. IN THE CARTON

natural_image
Line drawing of a flat-screen computer monitor with no text or symbols on the screen or baseTV SET

natural_image
Black remote control with black buttons and a red play button (no visible text or symbols)Remote Control
USER'S MANUAL
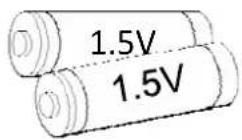
1.5V
1.5V
User's Manual
AAA Batteries
4. FRONT & BACK CONNECTIONS OF LED
Front View
(Pictures are for reference only.)
(The sample is subject to the real product.)

natural_image
Line drawing of a flat-screen TV with a male gender symbol on the screen (no text or labels)
text_image
SOERCE MENU CH+ CH- VOL+ VOL- POWER Remote Control Sensor Standby LED- Press"SOURCE" to select the input source.
- Press "MENU" to bring up the main menu on the screen.
- Press"CH+"or "CH-"to change channels.
- Press"VOL+"or "VOL-"to increase or decrease the sound level.
- Press"POWER" button to turn standby mode on or off.
- ON/OFF LED Indicator: Shows red in standby mode and green while your TV is turned on.
- IR Sensor: Infrared sensor for the remote control.
Back View and Control Connections

natural_image
Technical line drawing of a mechanical assembly with mounting holes and a central component (no text or symbols)
text_image
HDMI HDMI HDMI SCART PC AUDIO VGA 1 2 3 4 5 6 7 8 9 10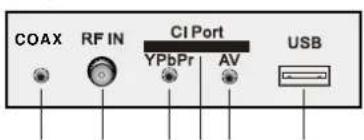
text_image
COAX RF IN CI Port YPbPr AV USB- HDMI : Connecting for HDMI signal.
- SCART: Connected to the SCART output jack of VCR or DVD.
3.PC Audio :Connected to the audio output jack on a Personal computer. - VGA: Connected to the VGA output jack on apersonal computer.
5.CAOXIAL:Connecting for headphone.
6.RF In:Connected to external antenna to receive.
7.CI Port:Connect to the CI card. - YPbPr:Connecting for the Y/Pb/Pr Input in Component mode.
- AV : Connecting for AV signal input in Composite mode.
- USB: Connecting for USB device.
5. TV INSTALLATION DRAWINGS
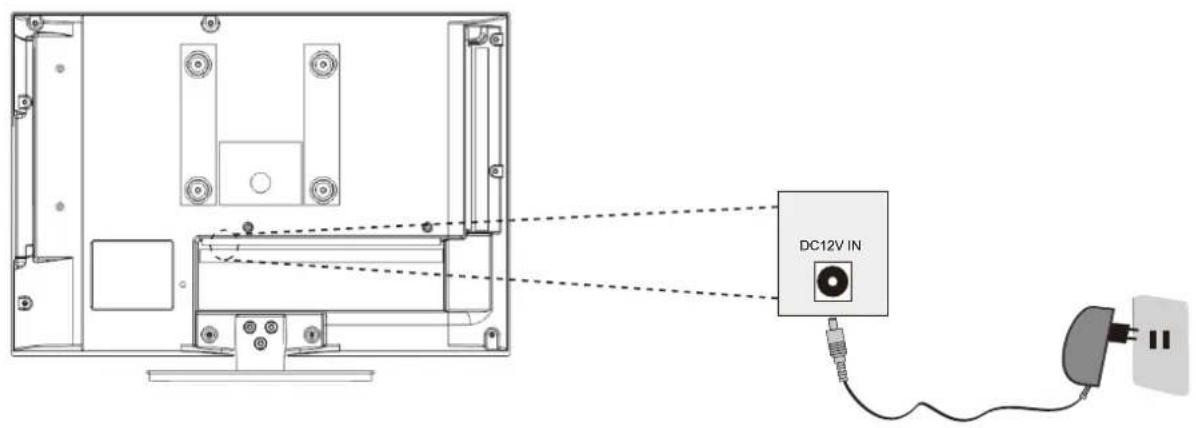
Power Cord Connection
text_image
DC12V IN- Connect the power cord correctly as shown.
- Press the POWER switch of your LED TV to switch on the LED TV. The power indicator on the front panel lights up in Green or Blue.
Antennas Connection

flowchart
graph TD
    A["VHF"] --> B["OUTDOOR ANTENNA AMPLIFIER"]
    C["ANTENNA"] --> B
    D["UHF"] --> E["INDOOR ANTENNA AMPLIFIER"]
    F["ANTENNA"] --> E
    G["POWER PLUG OF ANTENNA AMPLIFIER"] --> H["RF IN"]
    I["75 OHM ANTENNA PLUG"] --> J["RF IN"]
To ensure good picture and sound, TV antenna system needs to be installed. The antenna system as Shown can be soured from TV equipment shops, which will provide service for correct installation and connection. After installation, insert the 75-ohm antenna plug into the antenna jack as shown.
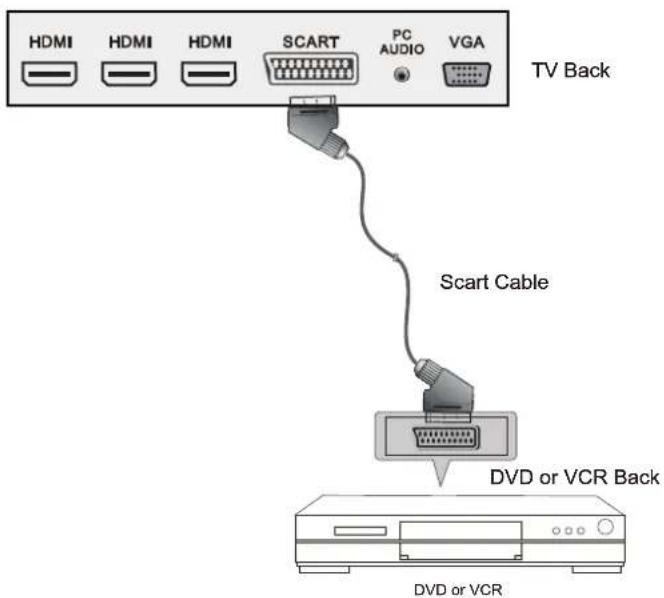
HDMI Connection

text_image
HDMI HDMI HDMI SCART PC AUDIO VGA TV Back HDMI Cable HDMI OUT DVD or VCR Back DVD or VCRThe HDMI input connection enables the digital transfer of audio/video/control signals through one cable only.
VGA Connection

text_image
HDMI HDMI HDMI SCART PC AUDIO VGA TV Back Audio Cable VGA Cable Audio PC OUTPUTConnect the RGB output of the PC to the VGA jack on the set. Connect the AUDIO output of the PC to the PC AUDIO jack on the set. Select the VGA input source with using INPUT button on the remote control.
USB Connection

text_image
COAX RF IN CI Port YPbPr AV USB TV Back USB PortInsert the USB flash drive to the USB port. Select USB channel source via the SOURCE button on the remote control.
SCART Connection
text_image
HDMI HDMI HDMI SCART PC AUDIO VGA TV Back Scart Cable DVD or VCR Back DVD or VCRConnect the SCART connector to the external video item and the SCART connector on the tv. The SCART lead operates as an Input/Output connection. If the tv does not select the SCART input automatically, select SCART using the INPUT button on the remote control or tv.
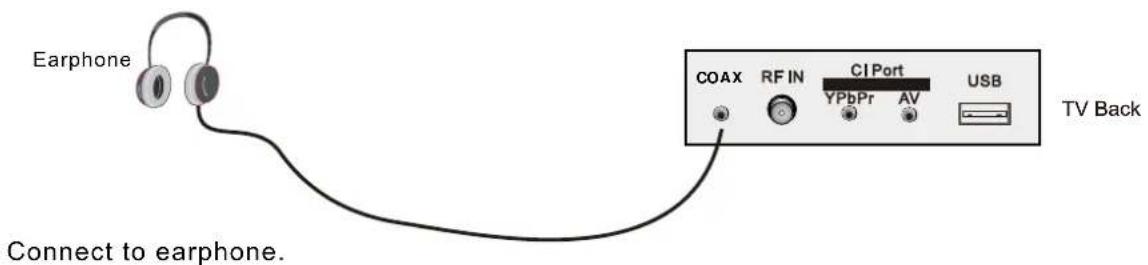
Earphone Connection
text_image
Earphone COAX RF IN CI Port USB YPbPr AV TV Back Connect to earphone.AV Connection

text_image
COAX RF IN CI Port USB YPbPr AV TV Back Mini video transfer cable AUDIO input connector Video cable (RCA) DVD or VCR back DVD or VCRConnect the VIDEO and AUDIO output jack of the DVD or VCR to the VIDEO jacks on the V set using the RCA cable. Match the jack colors: Video is yellow, Audio left is white, and Audio right is red. Select the AV input source via the SOURCE button on the remote control.
YPbPr Connection

text_image
COAX RF IN CI Port USB YPbPr AV TV Back AUDIO input connector Video Cable (RCA) VIDEO L R Y Pb Pr AUDIO input Connector Mini video transfer cable DVD or VCR back DVD or VCRConnect the YPbPr output of the DVD or VCR to the YPbPr input on the TV set. Connect the Audio output of the DVD or VCR to the Audio input jacks on the TV set using the RCA cable. Match the jacks colors : Y is green, Pb is blue, Pr is red, Audio left is white and Audio right is red. Select Component input source via the SOURCE button on the remote control.
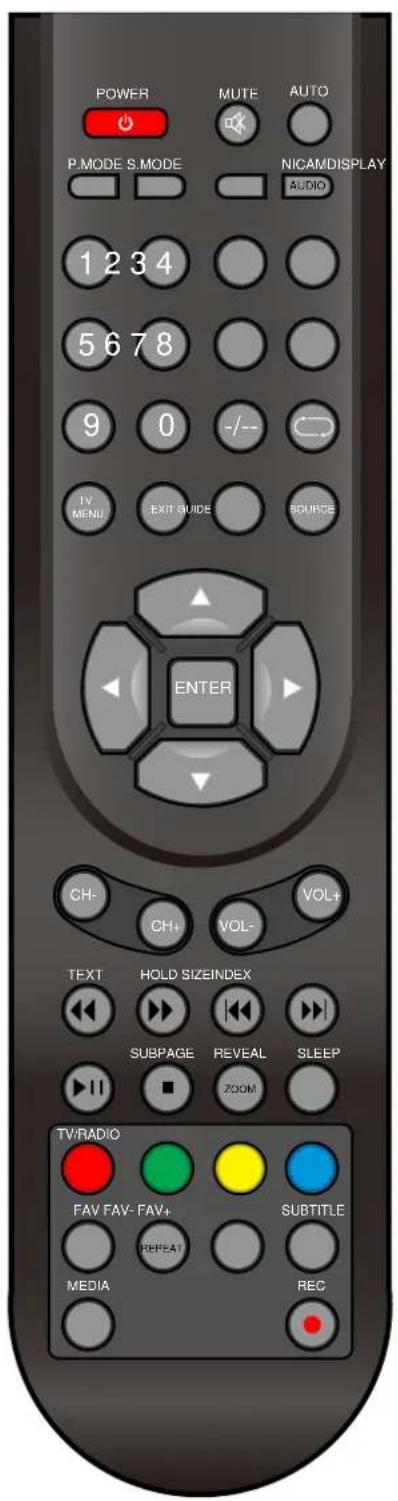
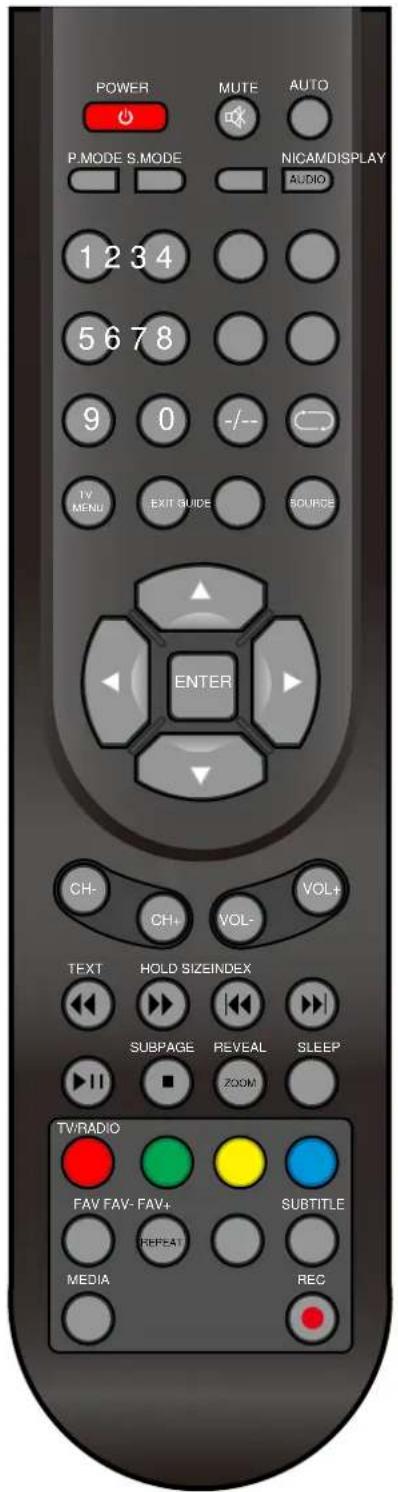
6. REMOTE CONTROL
Remote Control Instructions in DTV mode
text_image
POWER MUTE AUTO P.MODE S.MODE NICAMDISPLAY AUDIO 1 2 3 4 5 6 7 8 9 0 -/- TV MENU EXIT GUIDE SOURCE ENTER CH- CH+ VOL- VOL+ TEXT HOLD SIZEINDEX SUBPAGE REVEAL SLEEP ZOOM. TV/RADIO FAV FAV- FAV+ REPEAT SUBTITLE MEDIA RECPOWER
Turn the LED TV ON or OFF.
MUTE
Press to mute the sound. Press again or press VOL+ to un-mute the TV.
P.MODE
Press to select the picture modes.
S.MODE
Press this button to change the audio mode.
DISPLAY
Press to display the source and channel's information. NICAM
Press to select the NICAM modes.
AUDIO
Audio select button.
NUMBER BUTTONS
The numerical keys are used for editing the name of the channel.
O
Return to the previous channel viewed.
-/-
Press this button to enter Channel List.
TV MENU
Press to enter or exit the setup menu.
EXIT
Press to exit all the OSD on the screen.
GUIDE
Press to display the channel guide menu.
SOURCE
Press SOURCE to display the OSD input source, Press ▲▼ to select an input source, and then press ENTER to confirm.
THUMBSTICK( ▲/ ▼/◀ / ▶ / ENTER)
Allows you to navigate the on-screen menus and adjust the system settings to your preference.
CH+/CH-
Press to scan through channels.
VOL+/VOL-
Press to increase/decrease the sound level.
Remote Control Instructions in DTV mode
text_image
POWER MUTE AUTO P.MODE S.MODE NICAMDISPLAY AUDIO 1 2 3 4 5 6 7 8 9 0 -/- TV MENU EXIT GUIDE SOURCE ENTER CH- CH+ VOL- TEXT HOLD SIZEINDEX SUBPAGE REVEAL SLEEP ZOOM TV/RADIO FAV FAV- FAV+ REPEAT SUBTITLE MEDIA REC
Playing backward fast in timeshift mode.

Playing forward fast in timeshift mode.
▶ (Timeshift)
Press to perform the Timeshift function.
NOTE: Select Time Shifting Mode "off" in the menu, then the "teletext" can be available.

Press to stop recording.
ZOOM
Zoom can change display size.
SLEEP
Lets you select amount of time before your TV turn itself off automatically.
Color button
Color buttons (respectively red, green, yellow and blue) used in a few sub-menus.
TV/RADIO
When watching a channel, allows you switch between TV and Radio modes.
FAV
Displays the selected favorite programmers.
FAV-
Displays the selected favorite down programmers.
FAV+
Displays the selected favorite up programmers.
SUBTITLE
In DTV mode, Press to select alternate subtitle languages during view/playback of a DTV program.

Record button.
Remote Control Instructions in Teletext/Media mode

text_image
POWER MUTE AUTO P.MODE S.MODE NICAMDISPLAY AUDIO 1 2 3 4 5 6 7 8 9 0 -/-- TV MENU EXIT GUIDE SOURCE ENTER CH- CH+ VOL+ TEXT HOLD SIZEINDEX SUBPAGE REVEAL SLEEP ZOOM TV/RADIO FAV FAV- FAV+ REPEAT SUBTITLE MEDIA RECNUMBER BUTTONS
Press 0-9 to select a teletext page.

Page up and page down.
CH+/CH-
Page up and page down.
SUBTITLE
In Teletext mode, press to display P.100.
TEXT
Switch on or off the teletext mode.
Select Time Shifting Mode "off" in the menu, then the
"teletext" can be available.
HOLD
Hold on or off for current page display.
SUBPAGE
Sub coded page access.
REVEAL
Reveal or hidden the hidden words.

Playing backward fast.

Playing forward fast.
INDEX
Request the index page.
SIZE
Change display size in teletext mode.

Skip backward button.

Skip forward button.

Press to pause the playback.

Press to stop playing.
ZOOM
Zoom can change display size.
REPEAT
Repeatedly play the title or chapter continuous.
MEDIA
Press to display the MEDIA menu.
Color button
Color buttons (respectively red, green, yellow and blue)
used in a few sub-menus.
Remote Control Setup
- Open the cover.
- Uses two AAA size batteries. When inserting the batteries make sure correct polarities "+" and "-" marks on the batteries line up correctly with compartment markings.
- Replace the battery cover.
Place the remote control on a even surface and
insert the supplied batteries into the remote control as follows.
- Softly push the back cover to open the battery compartment.

natural_image
Close-up of a dark gray object with a white arrow pointing to it, no visible text or symbols.- Insert two batteries(1.5V size AAA Batteries), please make sure the polarity matches the marks inside the compartment.

natural_image
Two 3D-rendered objects: a rectangular block and a circular vent-like structure, with no visible text or symbols.- Softly press the back cover to close it.
natural_image
Close-up of a dark gray rectangular object with a gray arrow pointing to it, no visible text or symbols.7. Menu Operation
Select Input Source
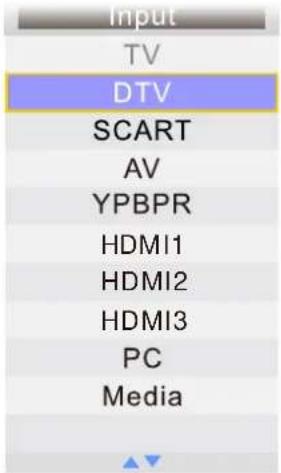
text_image
Input TV DTV SCART AV YPBPR HDMI1 HDMI2 HDMI3 PC MediaPress INPUT button to display the input source list; Press ▼/▲ button to select the input source you want to watch; Press OK button or ▶ button to enter the input source;
Picture Menu
Press MENU button to display the main menu.
Press ▼ / ▲ button to select Picture in the main menu, then press OK button or ▶ button to enter.
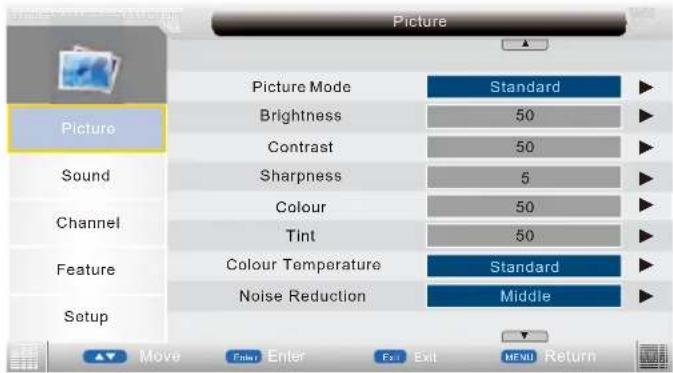
text_image
Picture Picture Mode Standard Brightness 50 Contrast 50 Sound Sharpness 5 Colour 50 Tint 50 Colour Temperature Standard Noise Reduction Middle Setup Move Enter Enter Fall Exit MENU Return- Press ▼/▲ button to select the option that you want to adjust in the Picture menu, then press OK button or ▶ button to enter.
- Press ◀/▶ button to adjust or press ▼/▲ button to select.
- After finishing your adjustment, Press MENU button to save and return back to the previous menu, and press EXIT button to exit the entire menu.
Picture Mode
Press ▼ / ▲ button to select Picture Mode, then press OK button or ▶ button to enter and press ▼/▲ button to select. Picture mode: Standard, Vivid, Soft, Optimal, User).
You can change the value of brightness, contrast, sharpness, colour, when the picture is Standard mode.(You can press PICTURE button on the remote control to change the Picture Mode directly.) Brightness
Press ▼/▲ button to select Brightness, then press OK button or ▶ button to enter and press ◀/▶ button to adjust.
Contrast
Press ▼/▲ button to select Contrast, then press OK button or ▶button to enter and press◀ / ▶button to adjust.

text_image
Contrast + 50Sharpness
Press ▼/▲ button to select Sharpness, then press OK button or ▶ button to enter and press ◀/▶ button to adjust.
Colour
Press ▼/▲ button to select Colour, then press OK button or ▶ button to enter and press ◀/▶ button to adjust.
Tint(Not available in DTV)
Press ▼/▲ button to select Tint, then press ◀/▶ button to enter and press ◀/▶ button to adjust. Colour Temperature
Press ▼/▲ button to select Colour Temperature, then press ◀/▶ button to select standard, warm, cool.
Noise Reduction
Press ▼/▲ button to select Noise Reduction, then press ◀/▶ button to select Off, Low, Middle, High.
Reset
Press ▼/▲ button to select Reset, then press OK button or ▶ button to enter to reset sub-menu.
Sound Menu
Press MENU button to display the main menu.
Press ▼ / ▲ button to select Sound in the main menu, then press OK button or ▶ button to enter.
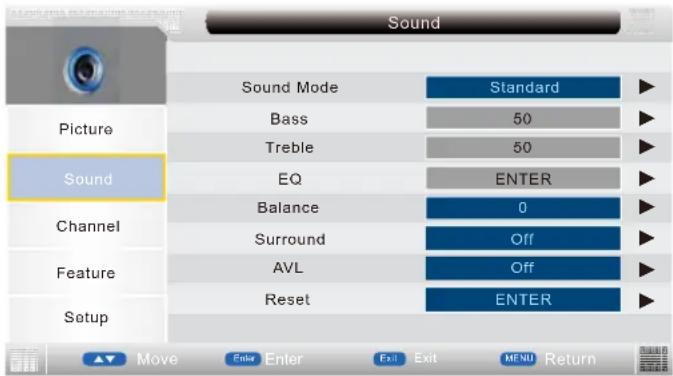
text_image
Sound Sound Mode Standard Picture Bass 50 Sound Treble 50 EQ ENTER Channel Balance 0 Surround Off Feature AVL Off Setup Reset ENTER Move Enter Enter Exit Exit MENU Return- Press ▼/▲ button to select the option that you want to adjust in the Sound menu, then press OK button or ▶ button to enter.
- Press ◀/▶ button to adjust or press ▼/▲ button to select.
- After finishing your adjustment, Press MENU button to save and return back to the previous menu, and press EXIT button to exit the entire menu.
Sound Mode
Press ▼/▲ button to select Sound Mode, then press ◀/▶ button to select. (Available Sound mode: User, Speech, Music, Movie, Standard).
You can change the value of bass and treble, Balance, when the sound is in Standard mode.
TIPS: You can press SOUND button on the remote control to change the Sound Mode directly.
Bass(Avaliable just in USER Mode)
Press ▼/▲ button to select Bass, then press OK button or ▶ button to enter and press ◀/▶ button to adjust.
Treble(Avaliable just in USER Mode)
Press ▼/▲ button to select Treble, then press OK button or ▶ button to enter and press ◀/▶ button to adjust.
EQ/Balance/Surround
Press ▼/▲ button to select EQ/Balance/Surround, then press OK button or ▶ button to enter and press ◀/▶ button to adjust.
AVL
Press ▼/▲ button to select Auto Volume Level, then press ◀/▶ button to select On or Off.
Reset
Press ▼/▲ button to select Reset, then press OK button or ▶ button to enter to reset sub-menu.
Channel Menu
Press MENU button to display the main menu.
Press ▼/▲ button to select Channel in the main menu, then press OK button or ▶ button to enter.

text_image
Channel Picture Sound Channel Feature Setup Channel Management Favorite Management Country Auto Search Digital Manual Search Analogue Manual Search LCN On/Off ENTER ENTER Hungary ENTER ENTER ENTER On Move Enter Enter Exit Exit MENU Return-
Press ▼/▲ button to select the option that you want to adjust in the Channel menu, then press OK button or ▶ button to enter.
-
Press ◀/▶ button to adjust or press ▼/▲ button to select.
-
After finishing your adjustment, press MENU button to save and return back to the previous menu, and press EXIT button to exit the entire menu.
Channel Management
Press ▼/▲ button to select Channel Management, then press OK button or ▶ button to enter. Favorite Manager
Press ▼ / ▲ button to select Favorite Manager, then press OK button or ▶ button to enter. Country
Press ▼/▲ button to select Country, then press OK button or ▶ button to enter and press ▼/▲ button to adjust.
Auto Search
Press ▼ / ▲ button to select Auto Search, then press OK button or ▶ button to enter.
Digital Manual Search
Press ▼ / ▲ button to select Digital Manual Search, then press OK button or ▶ button to enter. Analogue Manual Search
Press ▼ / ▲ button to select Analogue Manual Search, then press OK button or ▶ button to enter. LCN On/Off
Press ▼/▲ button to select LCN On/Off then press OK button or ▶ button to enter and press ▼/▲ button to adjust.
Feature Menu
Press MENU button to display the main menu.
Press ▼/▲ button to select Feature in the main menu, then press OK button or ▶ button to enter.

text_image
Feature Child Lock ENTER Picture Language ENTER Clock ENTER Sound Sleep Timer Off Channel Auto Power Off Off Hearing Impaired Off Feature CI Info ENTER Setup PVR ENTER- Press ▼/▲ button to select the option that you want to adjust in the Feature menu, then press OK button or ▶ button to enter.
- Press ◀/▶ button to adjust or press ▼/▲ button to select.
- After finishing your adjustment, Press MENU button to save and return back to the previous menu, and press EXIT button to exit the entire menu.
Child Lock
Press ▼/▲ button to select Child Lock, then press ◀/▶ button to select On or Off (when the default child lock is on, please input the default password "0000").
Sleep Timer
Press ▼/▲ button to select Sleep Timer, then press OK or ▶ enter and press ▼/▲ button to select the 15Mins, 30Mins, 45Mins, Off ...etc..
Auto Power Off
Press ▼/▲ button to select Auto Power Off, then press OK or ▶ enter and press ▼/▲ button to select the 1Hour, 2Hours, 3Hours, 4Hours and Off.
Hearing Impaired
Select the On/Off.
CI Info
Display the Common Interface card information.
Setup Menu
Press MENU button to display the main menu.
Press ▼/▲ button to select Setup in the main menu, then press OK button or ▶ button to enter.
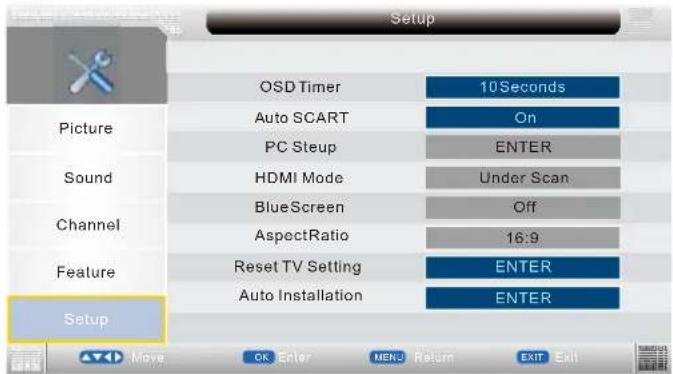
text_image
Setup OSD Timer 10Seconds Picture Auto SCART On PC Steup ENTER Sound HDMI Mode Under Scan Channel BlueScreen Off AspectRatio 16:9 Feature Reset TV Setting ENTER Auto Installation ENTER Setup- Press ▼/▲ button to select the option that you want to adjust in the Setup menu, then press OK button or ▶button to enter.
- Press ◀/▶ button to adjust or press ▼/▲ button to adjust.
- After finishing your adjustment, Press MENU button to save and return back to the previous menu, and press EXIT button to exit the entire menu.
OSD Timer
Press ▼/▲ button to select OSD Timer, then press OK or ▶ enter and press ▼/▲ button to adjust. Auto SCART
Select the On/Off.
PC Setup(Select the source in PC)

text_image
Setup Auto Adjust ENTER Picture H Position 50 V Position 50 Sound Phase 50 Channel Clock 50 Feature Setup Move OK Enter MENU Return EXIT ExitAutoAdjust: Press ▼/▲ button to select Auto Adjust, then press ▶ button, the menu will appear a few second.
H Position: Press ▼/▲ button to select H Position, then press ▶ button to enter and press ◀/▶ button to adjust. Adjusts the picture horizontally.
V Position: Press ▼/▲ button to select V Position, then press ▶ button to enter and press ◀/▶ button to adjust. Adjusts the picture vertically.
HDMI Mode
Press ▼ / ▲ button to select HDMI Mode, then press OK or ▶ enter and press ▼/▲ button to adjust. Blue Screen
Press ▼ / ▲ button to select Blue Screen, then press OK or ▶ enter and press ▼/▲ button to select On/Off.
Aspect Ratio
Press ▼ / ▲ button to select Aspect Ratio, then press OK or ▶ enter and press ▼/▲ button to adjust. Reset TV Setting
Press ▼ / ▲ button to select Reset TV Setting, then press OK button or ▶ button enter the password menu will appear (when the child lock is on).
Auto Installation
Press ▼ / ▲ button to select Auto Installation, then press OK button or ▶ button to enter the auto installation menu.
Software Upgrade
Press ▼ / ▲ button to select Software Upgrade, then press OK button or ▶ button to enter the software upgrade menu.
Media Menu
Note: Before operation MEDIA menu, Plug in USB device, then press SOURCE button to set the Source to Media.
Press ▼/▲ button to select MEDIA in the Source Menu, and then press ENTER or ▶ to enter. You can also enter the Media by pressing MEDIA button on the remote control.
Photo Menu
Press ◀/▶ button to select Photo in the main menu, then press ENTER button to enter. Press EXIT button to return back to the previous menu.

text_image
Photo- Press ▼/▲ button to select the option that you want to adjust in the Media menu, then press ENTER or ▶ button to enter.
- Press ▼/▲ button to adjust or press ▼/▲ button to select.
- After finishing your adjustment, press MENU button to save and return back to the previous menu and press EXIT button to exit the entire menu.
Press ▼/▲ to select the photos, press ENTER or ▶ button or ▶ button to view.

text_image
/udska1/test/Photo 01.jpg 02.jpg 03.jpg 04.jpg Delete Move CH+ - Page+/- Enter Enter Exit ReturnYou can see the information of the current playing photo after press INFO button, then press ▶ button to play or pause, you can see the playing state in the right.
Then press ▼/▲ or ◀/▶ button to ratite the picture.
Notes: Other menu and description are the same as that for Movie menu.
Music Menu
Press button to select Music in the main menu, then press ENTER button to enter.
Press EXIT button to return back to the previous menu.

text_image
MusicPress button to select the sonny you want to listen, and then press ENTER or button to play.
Press ◀ button to return back to the previous menu.
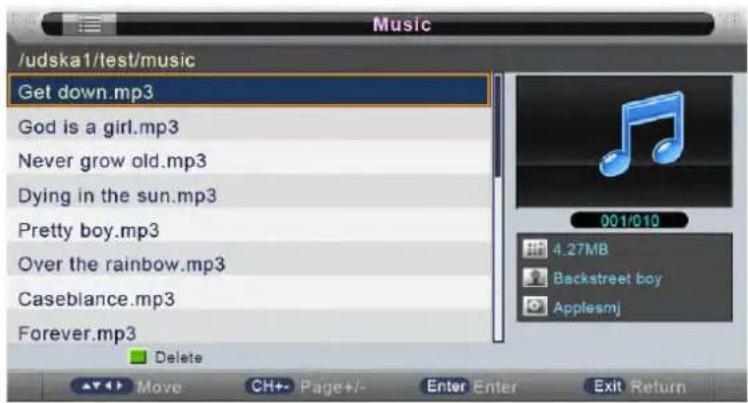
text_image
/udska1/test/music Get down.mp3 God is a girl.mp3 Never grow old.mp3 Dying in the sun.mp3 Pretty boy.mp3 Over the rainbow.mp3 Casebiance.mp3 Forever.mp3 Delete 001/010 4.27MB Backstreet boy ApplesmjYou can see the information of the current playing sonny at the left of the menu.
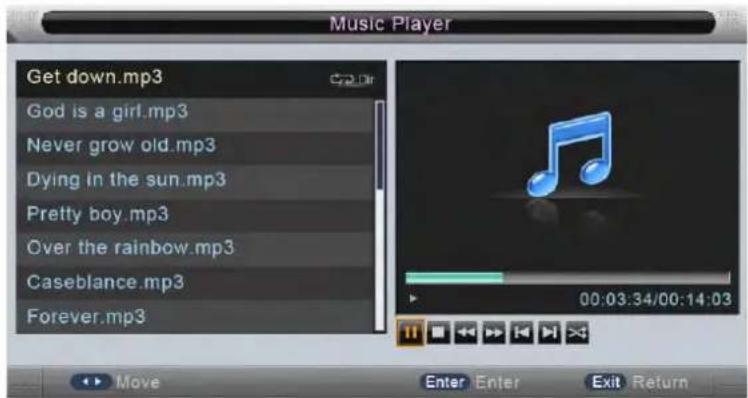
text_image
Music Player Get down.mp3 God is a girl.mp3 Never grow old.mp3 Dying in the sun.mp3 Pretty boy.mp3 Over the rainbow.mp3 Caseblance.mp3 Forever.mp3 00:03:34/00:14:03 Move Enter Enter Exit ReturnMovie Menu
Press ◀/▶ button to select Movie in the main menu, then press ENTER button to enter.
Press EXIT button to return back to the previous menu.

text_image
MoviePress ▼/▲ button to select the folder that you want to view.
Press ENTER button to select the sub folder.

text_image
/udska1/test/movie 148_CONT-3E.mp4 149_CONT-3F.mp4 VersaEmerge_Toxic_Cover_0.avi you give love a bad name.avi Delete 6.25MB Andrew Sixty Unknown Move CH+ Page+/- Enter Enter Exit ReturnPress ENTER button or ▶ button to play,
Press ■ button or EXIT button to stop playing.
Press the ◀ button to return back to previous page.
You can see the information of the current playing media at the first flew second or after press INFO button.

text_image
_CONT-3F.mp4 720 x 400 2012/3/20 25 fps 4.79MB MP4 Container Format Compatibility Test MPEG4 ASP & LC-AAC 2.0 CBR & Subtitles Test Answers for the test: Yes/Partial/NoEbook
Press button to select Music in the main menu, and then press ENTER button to enter.
Press EXIT button to return back to the previous menu.

text_image
e-BookPress ▼/▲ to select the Video, press ENTER or ▶ button or ▶ button to play.
PVR Menu
Press button to select PVR in the main menu, then press ENTER button to enter.
Press EXIT button to return back to the previous menu.
Press ▼/▲ to select the Video, press ENTER or ▶ button or ▶ button to play.

text_image
PVR M6(20081114_135146) 001/001 11.02MB Delete Move CH+ - Page+/- Enter Enter Exit ReturnYou can see the information of the current video playing at the first few seconds or after press INFO button.
Then press ▶button to play, you can see the playing state in the right.
Notes: Other menu and description are the same as that for Movie menu.
text_image
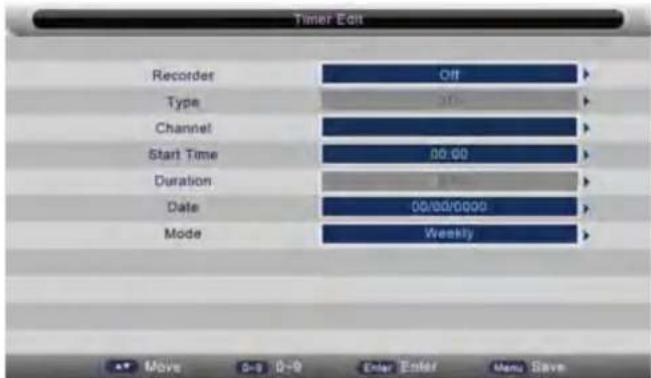
Timer Edit Recorder Off Type Channel Start Time 00:00 Duration Date 00:00/0000 Mode Weekly Move 0-3 0-9 Clear+Eater Menu SaveRecorder [When the PVR format support]
Press ▲/▼ button to select Recorder, then press ENTER button or ▶ button to enter and press▲/▼ button to select Recorder or Reminder., MENU ENU button to save the settings, press EXIT button to exit.
Press ▲/▼ button to select channel that you want to edit,
Press BLUE button to edit selected channel, the timer edit menu will appear.
Type
Press ▲/▼ button to select Type, then press ENTER button or ▶ button to enter and press ▲/▼ button to select DTV or Radio.
Program
Press ▲/▼ button to select Channel, then press ENTER button or ▶ button to enter and press ▲/▼ button to select channel which you want to add to the timer list.
Start Time
Press ▲/▼ button to select StartTime, then press ENTER button or ▶ button to enter and press 0-9 button to input time.
Duration
Press ▲/▼ button to select Duration then press ENTER button to enter and press 0-9 button to input Duration.
Date
Press ▲/▼ button to select Date, then press ENTER button to enter and press 0-9 button to input date.
Mode
Press ▲/▼ button to select Mode, then press ENTER button or ▶ button to enter and press ▲/▼ to select Once,,Daily, Weekly, Monthly.
Record List
Press ▲/▼ button to select Record List, then press ENTER button or ▶button to enter. Then will appear as Follows:
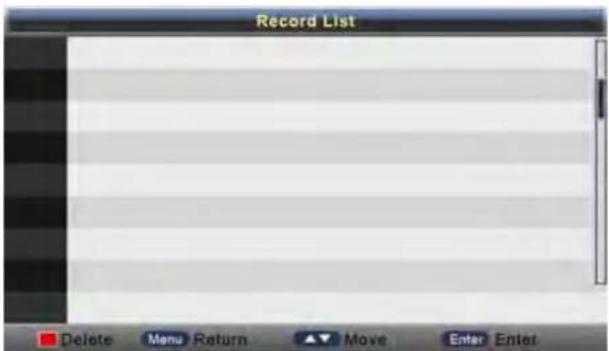
text_image
Record List Delete Menu Return ▲ Move Enter EnterYou can press ● on the remote control under the DTV Source.
If your device speed is not enough, there will be a dialog as follows:

text_image
Message Device speed not enough, RECORD anyway? OK CancelYou'd better change a high speed device or select "OK" to continue. follow: Press □ on the remote control again to start record, there will be a dialog as

text_image
Message Do you want to start Recording? OK CancelSelect "Yes" to start recording. You'll see the dialog:

text_image
DTV Initiating Recorder...During Recording, There will be a small dialog on the left:

Press ● on the remote control again to set the Recorder duration time.

Press □ on the remote control to stop recording.
Hotel Mode
Enter: enter the hotel mode menu:
- Press password "4588" under the source menu.
Exit:Press the Key"MENU" to return to the previous page, and press the key "EXIT" to exit the menu
Select: use direction key to select the different items.
confirm: Press the key "ENTER" or right direction key to confirm.
| Hotel Mode | |
| 12 | |
| Hotel Mode Adj | |
| Hotel Mode | Off |
| Max Volume | Off |
| 50 | |
| Default Volume | On |
| 20 | |
| Aspect Ratio Lock | Off |
| Channel Scan Lock | Off |
| Picture User Lock | Off |
| Main Menu Lock | Off |
| Keypad Lock | Off |
| Power On Standby | Off |
| Power On Source | Off |
| Clear Hotel Lock | --> |
| Hotel Mode | |
| 1 2 | |
| Source Lock | |
| Source Lock | Off |
| TV | Off |
| DTV | On |
| SCART | On |
| AV | On |
| Component | On |
| HDMI | On |
| PC | On |
| Media | On |
- Function description of hotel mode:
| REGLAGES MODE HOTEL | ||
| Items | Value | Function |
| Hotel Mode | On/off | On/off If set to “On”, the next functions in the list will be activate or adjustable. |
| Max Volume | On/off50/60/.../100 | If set to “On” and choose a Max volume value, the volume value which the user want to adjusted is limited to this value.If set to “Off”, the volume value which the user want to adjusted is limited to 100.The default value is Off. This item’s default value is 50. |
| Default Volume | On/off10/20/30/.../100 | If set it “On” and Select one of 10/20/30..../100 except Off, then TV will output the Selected value.If Off, then TV will output the value of the Default Volume last shutdown after boot-strap. And the volume value can not exceed the maximum volume setting.The default is Off.This item’sdefault value is 20. |
| Aspect Ratio Lock | On/off | If set to “On”, the “ASPECT” can not be adjusted and which is locked on “16:9”.If set to “Off”, all aspect items is effective.The default value is Off. |
| Channel Scan Lock | On/off | If set to “On”, then the user can’t scan or search the TV.If set to “Off”, Channel Scan item is effective.The default is Off. |
| Picture User Lock | On/off | If set to “On”, the user can’t adjust brightness,contrast, tone,definition etc. picture mode.If set to “Off”, all picture mode items is effective.The default is Off. |
| Main Menu Lock | On/off | If set it to “On”, the button of main menu is locked, then the OSD of main menu is useless.If set to “Off”, main Menu item is effective.The default is Off. |
| Keypad Lock | On/off | If set to “On”, the keypad is locked, then the user can not using anyone button on the keypad.If set to “Off”, all keypad items is effective.The default is Off. |
| Power On standby | On/off | If set to “On”, the TV will keep Standby after get Power until the “POWER” button be pressed.If set to “Off”, the TV will direct work on.The default is Off. |
| Power on source | Off/ATV/DTV/AV/SV/HMDI/YPbPr/SCART | If one of TV/AV/PC except Off is selected, and then TV will show the SOURCE item when boot-strap.If “Off” item is Selected, and then TV will show the SOURCE item last shutdown after boot-strap.The defaultvalue is Off . |
| Clear Hotel Lock | --> | Press right direction key to execute. All user’ lock setting will be clear and reset to default value after executing this. |
| Source Lock | ||
| Source Lock | On/off | To use this setting, user must firstly set the hotel mode to "on", otherwise this item can not be adjustable. If this item is set to "on" the next sources lock will be activated.the default value is off. |
| TV | On/off | This item is used to set TV source lock, if set to on, ATVsource will be hide in the source menu. And user can not enter ATV source. The default value is off. |
| DTV | On/off | This item is used to set DTV source lock, if set to on, DTV source will be hide in the source menu. And user can not enter DTV source. The default value is off. |
| SCART | On/off | This item is used to set SCART source lock, if set to on, SCART source will be hide in the source menu. And user can not enter SCART source. The default value is off.If there is one more SCART source, then all SCART source will be locked after set this item on. |
| AV | On/off | This item is used to set AV source lock, if set to on, AV source will be hide in the source menu. And user can not enter AV source. The default value is off. If there is one more AV source, then all AV source will be after set this item on. |
| Component | On/off | This is used to set Component source lock, if set to on, Component source will be hide in the source menu. And user can not enter Component source. The default value is off.If there is one more Component source, then all Component source will be locked after set this itemon. |
| HDMI | On/off | This item is used to set HDMI source lock, if set to on, HDMI source will be hide in the source menu. And user can not enter HDMI source. The default value is off.If there is one more HDMI source, then all HDMI source will be locked after set this item on. |
| PC | On/off | This item is used to set PC source lock, if set to on, PC source will be hide in the source menu. And user can not enter PC source.The default value is off. |
| Media | On/off | This item is used to set Media source lock, if set to on, Media source will be hide in the source menu. And user can not enter Media source.The default value is off. |
8. TROUBLESHOOTING AND ADVICE
Please check if you can solve the troubleshooting by yourself.
| Troubleshooting | Control |
| No signal | Please check that all cables are correctly plugged in. |
| No color shades | Adjust the contrast, the color and the brightness. |
| Stain show on the screen | Maybe result from a lighting signal from car, motor, neon light and other electrical devices or appliances. |
| Double or multiple display image | Maybe the result of an electrical wave disturb from other TV, Computer and Game machine or Radio |
| Snow on the screen | The cables of the antenna are not correctly plugged in. |
| The remote control does not work | Please check the batteries order and alignment.Check that the IR of the remote control is not hidden by something. |
| "Zip" made noise on TV cover | Even if the display image is correct, the noise may come from an unsteady fixation of the panel. |
| No sound | Make sure that you have not press the MUTE button of the panel or of the remote control. |
9. SPECIFICATIONS
This manual is only for your reference, any change to the design and specification will not be advised.
| Size | 29"(73.66cm) | |
| Display Type | TFT LED | |
| Resolution(Pixel) | 1366x768 | |
| Aspect Ratio | 16:9 | |
| Power Supply | AC110-240V | |
| Power Consumption | 50W | |
| TV System | PAL | |
| Video Input Format | PAL/NTSC | |
| Audio Output Power | L / R W2X8 | |
| SUPPORT | ANTENNA | YES |
| AV-IN | YES | |
| YPbPr - IN | YES | |
| HDMI - IN | YES | |
| VGA(PC) - IN | YES | |
| VGA(PC) AUDIO IN - | YES | |
| SCART IN - | YES | |
| EARPHONE - OUT | YES | |
| S-VIDEO - IN | -- | |
| COAXIAL - OUT | -- | |
| COMMON INTERFACE | YES | |
| USB | YES | |
| DVD | Disc Physical Format | -- |
| DVD Video Output Format | -- | |
The European directive 2002/96/EC on Waste Electrical and Electronic Equipment (WEEE), requires that old household electrical appliances must not be disposed of in the normal unsorted municipal waste stream. Old appliances must be collected separately in order to optimize the recovery and recycling of the materials they contain, and reduce the impact on human health and the environment. The crossed out "wheeled bin" symbol on the product reminds you of your obligation, that when you dispose of the appliance, it must be separately collected.
At full volume, prolonged listening to the portable audio device may damage the user's hearing.
The LED panel is a very high technology product with a about a million thin film transistors, giving you fine picture details. Occasionally, a few non-active pixels may appear on the screen as fixed blue, green or red point. Please note that this does not affect the performance of your product.
Warning! Do not leave your TV in standby or operating mode when you leave your house.
In order to fulfill ruling UNE EN-60065, we indicate that if the flexible wire is damaged, it can only be substituted by a technical service recognized by NEVIR, S.A., as per special tooling is required.
CE

2004/108/EC 2006/95/EC