NVR-7507-19HD-B - Television NEVIR - Free user manual and instructions
Find the device manual for free NVR-7507-19HD-B NEVIR in PDF.

| Product Type | LED TV |
| Brand | Nevir |
| Model | NVR-7507-19HD-B |
| Screen Size | 19 inches (48 cm) |
| Resolution | 1366 x 768 (HD) |
| Aspect Ratio | 16:9 |
| Refresh Rate | 60 Hz |
| Connectivity | HDMI, USB, VGA, AV, RF |
| Built-in Tuner | DVB-T/T2, DVB-C |
| Sound Output | 2 x 3 W |
| Power Supply | AC 100-240V, 50/60 Hz |
| Power Consumption (Operating) | 30 W |
| Power Consumption (Standby) | < 0.5 W |
| Dimensions (with stand) | 450 x 290 x 150 mm |
| Dimensions (without stand) | 450 x 270 x 40 mm |
| Weight (with stand) | 2.5 kg |
| VESA Mount | 100 x 100 mm |
| Energy Class | A+ |
| Remote Control | Included |
| Accessories | Remote control, batteries, stand, user manual |
Frequently Asked Questions - NVR-7507-19HD-B NEVIR
User questions about NVR-7507-19HD-B NEVIR
0 question about this device. Answer the ones you know or ask your own.
Ask a new question about this device
Download the instructions for your Television in PDF format for free! Find your manual NVR-7507-19HD-B - NEVIR and take your electronic device back in hand. On this page are published all the documents necessary for the use of your device. NVR-7507-19HD-B by NEVIR.
USER MANUAL NVR-7507-19HD-B NEVIR
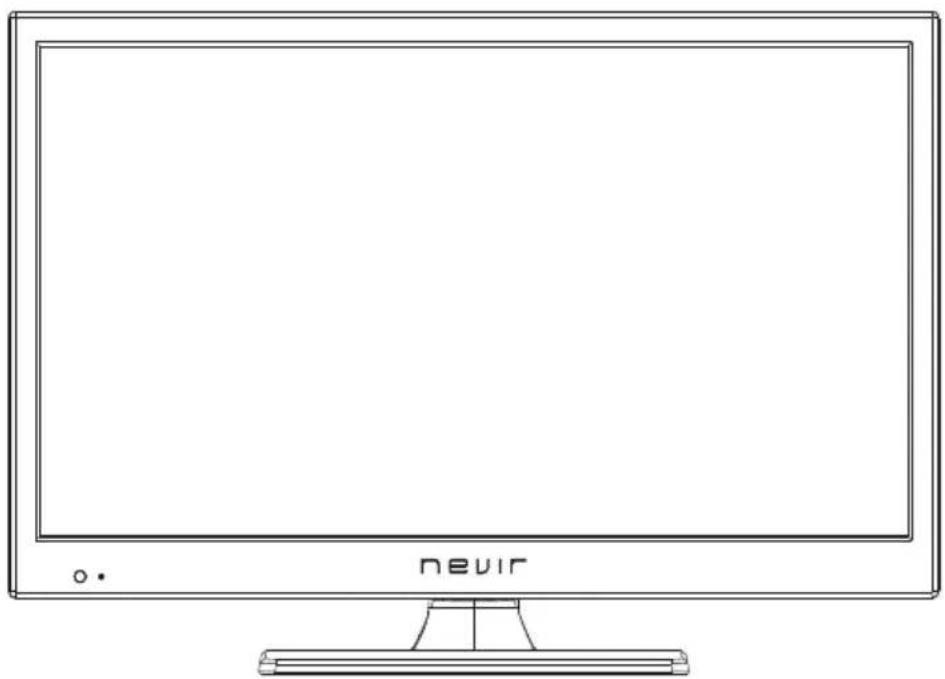
TV LED 19" (48.26cm) DVB-T HD/USB-R/HDMI
text_image
nevirtext_image
Warning symbol with exclamation mark inside triangle, commonly used to indicate caution or hazardnatural_image
Warning symbol of a lightning bolt inside a triangle (no text or numbers)Advertencia
natural_image
Top-down schematic of a computer monitor layout showing front, top, and side panels (no text or labels)1
natural_image
Top-down schematic of a computer room layout with monitor, keyboard, and drive unit (no text or labels)2
flowchart
graph TD
    A["•"] --> B["•"]
    B --> C["•"]
    C --> D["•"]
    D --> E["•"]
    E --> F["•"]
    style A fill:#fff,stroke:#000
    style B fill:#fff,stroke:#000
    style C fill:#fff,stroke:#000
    style D fill:#fff,stroke:#000
    style E fill:#fff,stroke:#000
    style F fill:#fff,stroke:#000
3

text_image
Bracket Wall Cement bolt 4Nota:
text_image
Diagram illustrating a box with an open book, a pie chart, and a bag labeled '1', likely illustrating a concept of sharing or packing.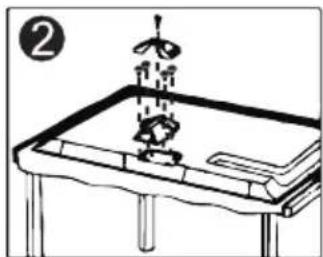
natural_image
Simple line drawing of a mechanical setup with a lever and base, no text or symbols present
text_image
Diagram showing mechanical assembly with labeled parts and a magnified inset of a component with bolts and arrows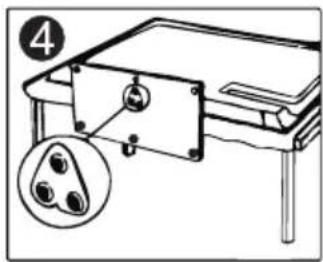
text_image
4Mando a distancia
text_image
Source DTV ATV SCART AV YPbPr HDMI PC USB SOURCE: Exittext_image
Picture Picture Mode Standard Brightness 50 Contrast 45 Sharpness 60 Saturation 45 Move 0 Color Temp Standard Aspect Ratio Auto Move + Adjust MENU Return EXIT Exit
text_image
Picture Sharpness 60 Saturation 45 Type Color Temp Standard Aspect Ratio Full PC Setting Screen Voice Auto Advanced Settings Move Adjust MENU: Return EXIT: Exittext_image
Audio Sound Mode Standard Finds OFF Rings 2% Balance OFF Ground Sound OFF G20 Setting AFL OFF SUPPORT OK OK OK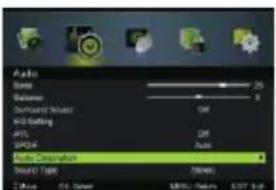
text_image
Audio Sound Wireless Dramount Sound W3400 AVL AVL Audio Disruption Sound Type 200MHz Diffuse 0.1x Speed 0.0000 MHz, 100% 1/6Agudos/Graves/Balance
text_image
Channel Auto Scan Manual Scan Channel Exit Common Interface Signal Informationtext_image
Channel Edit 800 ONE HD 801 TEN Digital 802 ONE HD 803 ONE Digital Delete Skip Move Move OK, Select MENU Return EXIT Exit


text_image
Lock System Enter Password Enable Channel Locks Parental Rating Lock Keypad Hotel mode New Password Clear Lock Move 0-9: Input MENU: Return EXIT: Exit Lock System Enter Password Enable Channel Locks Parental Rating Lock Keypad Hotel mode New Password Clear Lock Move 11 Adjust MENU: Return EXIT: Exittext_image
Hotel mode Active Hotel Mode On Max Vol. 100 Default Vol. 20 Source Lock Default source DTV Default Dtv program — Default ATV program — Backup to USB Restore from USB Recall Move Adjust EXIT: Exittext_image
Setup OSD Language Audio Languages Subtitle Textext Mode Setting Time Settings PVR Settings Home Mode Move Adjust MENU: Return EXIT: Exit Setup Teletext Mode Setting Time Settings HDMI CEO Control PVR Settings First Time Setup OAD Reset Move OK: Select MENU: Return EXIT: Exittext_image
PVR Settings Move Left Move Right OK Select EXIT Exit File Manager Device List Scheduled Recordtext_image
File Manager Summary Name: Radio Switch Grid Dialo 43 Scan White View Show-up Show Date Send Null Out Background Channel Name Program Name Recircled Time Total Timetext_image
Subtitle Toletext Mode Setting Time Settings PVR Settings First Time Setup OAD Reset Yes No Mode OK: Select MENU: Return EXIT: Exitnatural_image
Tropical beach scene with palm trees and clear blue sky (no text or symbols visible)Música
text_image
Text URL:https://digital.English.txt English-English.txt English Unicode.txt English Unicode@English.txt auth long syne Arabic.txt english.txt The Sorrows of Young Whether by J.W. van Goethe Translated by Thomas Caryle and P.O. Bo yom Edited by Nahen Harkerl Code The Sorrows of Young Whether PREFACE I have carefully effected whatever I have been able to learn if Move Change Page OK Select Quick Menu EXIT Returnnatural_image
Line drawing of a flat-screen monitor with 'nevir' branding and a small 'o.' mark at the base (no additional text or symbols)INSTRUCTION MANUAL
Table Of Contents
Preparations Guide
Safety Information....2
Important Safety Precautions....3
Installed And Connected TV
TV Bracket assemble....4
TV Buttons And Terminal Interface....5
External device connection diagram.... 6
Install And Connect TV....7
TV Stand installation Instructions....7
Remote Controller
Remote Controller....8
TV Menu
Input Source....10
Picture Menu....10
Sound Menu....11
Channel Menu....11
Lock System Menu 13
Setup Menu.... 13
USB Menu 15
Other Information
Specifications....17
This user manual for reference only
Safety Information
CAUTION
RISK OF ELECTRIC SHOCK DO NOT OPEN
High voltages are used in the operation of this product. to reduce the risk of electric shock, do not remove cover of the cabinet, refer servicing to qualified service personal
If the TV any changes or coarse adjustment, electric shocks to be hurt, do not attempt to open a machine-maintenance, customer contact centres needed overhaul.

text_image
Warning symbol image with exclamation mark inside triangleThe exclamation point within an equilateral triangle is intended to alert the user to the presence of important operating in the literature accompanying the appliance.

natural_image
Warning symbol of a lightning bolt inside a triangle (no text or numbers)Warning The lightning flash with arrowhead symbol within an equilateral triangle, is intended to alert the user to the presence of uninsulated dangerous voltage within the products enclosure that may be of sufficient magnitude to constitute a risk of electric shock to persons.
Important Safety Precautions
- Read these instructions.
- Keep these instructions.
- Heed all warnings.
- Follow all instructions.
- Do not use this apparatus near water.
-
Clean only with dry cloth.
-
Do not block any ventilation openings. Install in accordance with the manufacturer's instructions.
-
Do not install near any heat sources such as radiators, heat registers, stoves, or other apparatus (including amplifiers) that produce heat.
-
Do not defeat the safety purpose of the polarized or grounding-type plug. A polarized plug has two blades with one wider than the other. A grounding type plug has two blades and third grounding prong. The wide blade or third prong are provided for your safety. When the provided plug does not fit into your outlet, consult an electrician for replacement of the obsolete outlet.
-
Protect the power cord from being walked on or pinched, particularly at plugs, convenience receptacles, and the point where they exit from the apparatus.
-
Only use attachments/accessories specified by the manufacturer.
-
Use only with the cart, stand, tripod, bracket, or table specified by the manufacturer, or sold with the apparatus. When a cart is used caution when moving the cart/apparatus combination to avoid injury tip-over.
-
Unplug this apparatus during lightning storms or when unused for long periods of time.
-
Refer all servicing to qualified service personnel. Servicing is required when the apparatus has been damaged in any way, such as power-supply cord or plug is damaged, liquid has been spilled or objects have fallen into the apparatus, the apparatus has been exposed to rain or moisture, does not operate normally, or has been dropped. Warning to reduce the risk of fire or electric shock, do not expose this apparatus to rain or moisture.
-
The apparatus shall be disconnected from the mains by placing the power/standby switch in the standby position and unplugging the power cord of the apparatus from the AC mains receptacle.
-
The socket-out shall be installed near the equipment and shall be easily accessible.
-
This product should never be placed in a built-in installation such as a bookcase or rack unless proper ventilation is provided or the manufacturer's instructions have been adhered to.
-
Apparatus shall not be exposed to dripping or splashing.
-
Do not place any sources of danger on the apparatus (e.g. liquid filled objects, lighted candles).
-
Wall or Ceiling Mounting - The appliance should be mounted to a wall or ceiling only as recommended by the manufacturer.
-
Never place the TV, remote control or batteries near naked flames or other heat sources, including direct sunlight. To prevent the spread of fire, keep candles or other flames away from the TV, remote control and batteries at all times.
-
The USB terminal should be loaded with 0.5 A under normal operation.

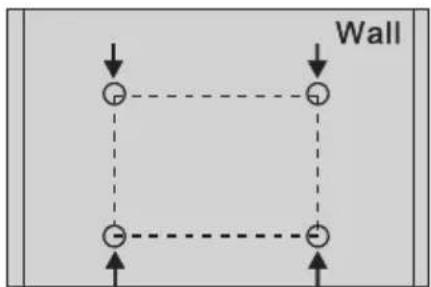
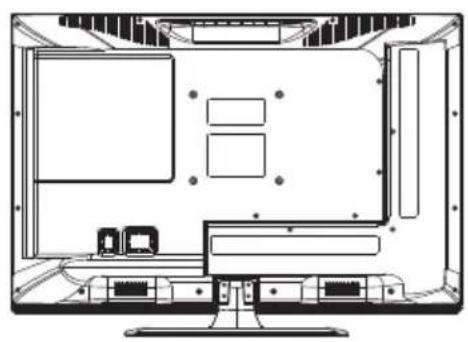
TV Bracket assemble Bracket items not provided)(
Fix the TV on the wall
- First, put the TV on the table smoothly and put some soft cloth on the table to avoid scratching the screen.
- User the screw driver to take off the screws which are fixed on the bottom stand (the direction of the arrow, refer to the ptoto1). And take off the bottom stand (please take off the screws and bottom stand carefully).
- Make one bracket which can fix on the wall according to the size of arrow direction of photo2 and photo3.
- Drill four holes properly on the wall (the size only for reference) and put into four screws.(optional parts) Drill four holes properly on the wall (the size only for reference) and put into four screws.(optional parts)
- according to the step 4, use the screwdriver to lock the screw on the back of the TV. then hang the TV on the wall.
natural_image
Top-down schematic of a computer monitor layout showing front, top, and side views (no text or labels)1

natural_image
Top-down schematic of a computer room layout with monitor, keyboard, and monitor unit (no text or labels)2

flowchart
graph TD
    A["●"] --> B["●"]
    B --> C["●"]
    C --> D["●"]
    D --> A
    style A fill:#fff,stroke:#000
    style B fill:#fff,stroke:#000
    style C fill:#fff,stroke:#000
    style D fill:#fff,stroke:#000
3
text_image
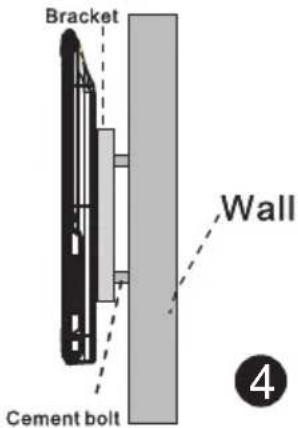
Bracket Wall Cement bolt ④Note:
- The bracket fixed on the wall is optional part.
- when you assemble the TV, there should be no other articles on the around and front and please keep the distance from other articles.
- When assemble the TV, please ask the career man to fix in order to avoid the danger.
- The fixing picture is only for reference.
- Please follow the use manual about bracket assemble to fix the TV.
- Attach the mounting bracket from the VESA compatible wall mounting kit.
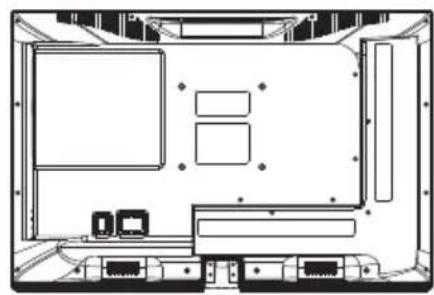
TV Buttons And Terminal Interface
TV Buttons
Note: The following is only functional schematic, And the actual position and arrangement of different models may be different.
| VOL+ | VOL- | CH+ | CH- | MENU | SOURCE |
Turn ON/OFF Power.
SOURCE: External Signal Input Selection.
MENU: Display Main MENU And Confirm MENU Item Selection.
CH+/-:Selecting Channel.
VOL+/-:Adjusting Volume.
Terminal Interface
Note: The following are the various terminal interface, the actual position and arrangement, the number of different models may be different.
 | AV inputExternal AV Signal Input AndRelevant Rith/Left Sound Channel |  | EARPHONE outputWhen earphones are plugged in,speakers are disabled |
 | AV outputExternal AV Signal output AndRelevant Right/Left Sound Channel(Some models without this interface) |  | USB inputConnect a USB device here to playits media files or to recordprogramsvia the PVR function. |
 | Y Pb Pr inputConnect to the composite terminal ofyour DVD/VCR(Some models without this interface) |  | SCART inputstandard,it supports composite andRGBsignal input.It is a connectionfor european(Some models without this interface) |
 | HDMI inputDigital signal input from HDMI videoconnector. | ||
 | ANT 75Connect the antennal/cadle tv input(75/VHF/UHF) | ||
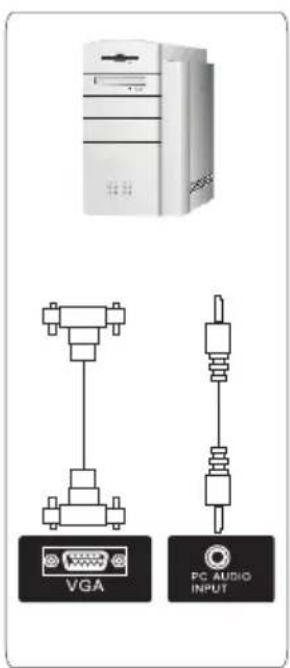
 | VGA inputPC analog signal input | ||
 | PC AUDIO INPUTVGA input and audio input when VGAinput |
External device connection diagram
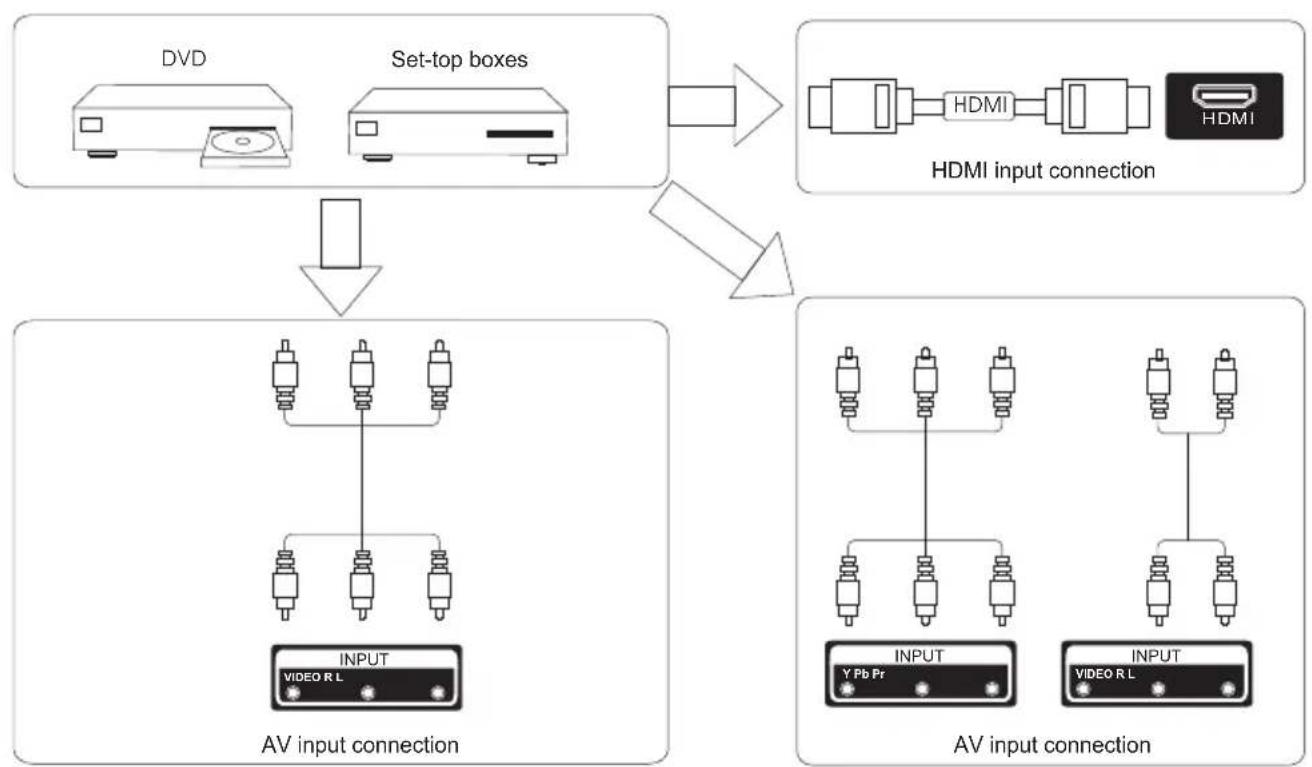
flowchart
graph TD
    A["DVD"] --> C["Set-top boxes"]
    B["HDMI"] --> C
    C --> D["AV input connection"]
    D --> E["AV input connection"]
    E --> F["Output"]
    style A fill:#f9f,stroke:#333
    style B fill:#f9f,stroke:#333
    style C fill:#ccf,stroke:#333
    style D fill:#cfc,stroke:#333
    style E fill:#cfc,stroke:#333
text_image
VGA PC AUDIO INPUT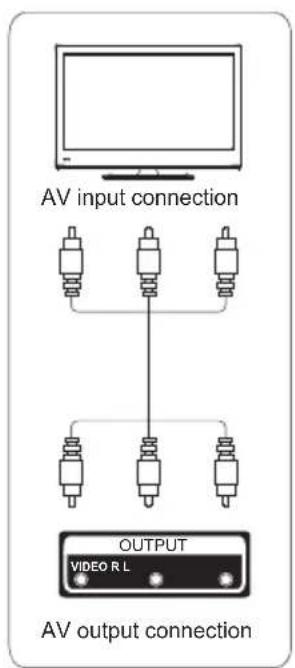
text_image
AV input connection OUTPUT VIDEO R L AV output connection
text_image
USB connection Set-top boxes SCART connection TV connectionInstall And Connect TV
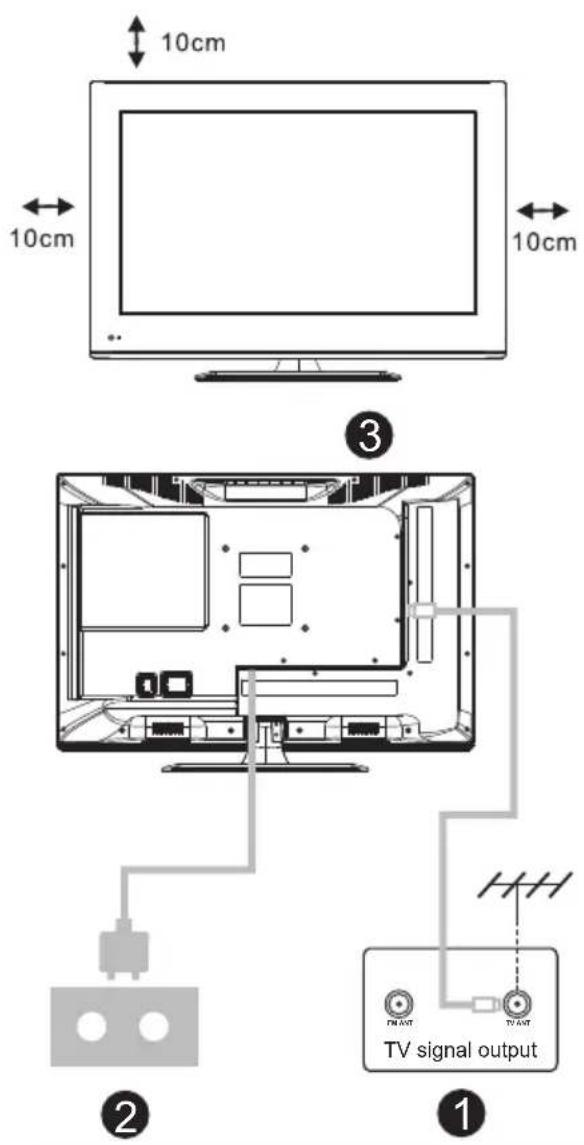
Set your TV
To put your TV in a firm place which can bear the weight of the TV. To avoid danger, please don't expose the TV near water or heating place (such as light, candle, heating machine), do not block the ventilation at the back of TV.
Connect antenna and power
- Connect the antenna cable to the antenna socket on the back of the TV.
- To plug the power cord of TV (AC 100-240V\~50/60Hz).
Turn on TV
- Press the power button of the TV the indication light will turn to green. if it is on standby mode (the light is red), press the power button on the remote control to turn on the TV.
Note:
Picture for reference purposes only.
TV Stand Installation Instructions
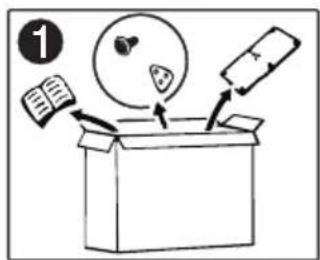
- Open the carton and remove the TV and scattered accessories and base (some models without base).
- to avoid the injury of the TV, covered with a soft mattress, put it on the table, face down on a soft mattress, the base of the neck is fixed on the TV with screws.
3.screw the base and connected to the TV. - the installation is complete.
text_image
①
natural_image
Simple line drawing of a mechanical setup with a lever and base, no text or symbols present
text_image
Diagram showing mechanical assembly with labeled parts and directional arrows, including a magnified inset of four pins.
text_image
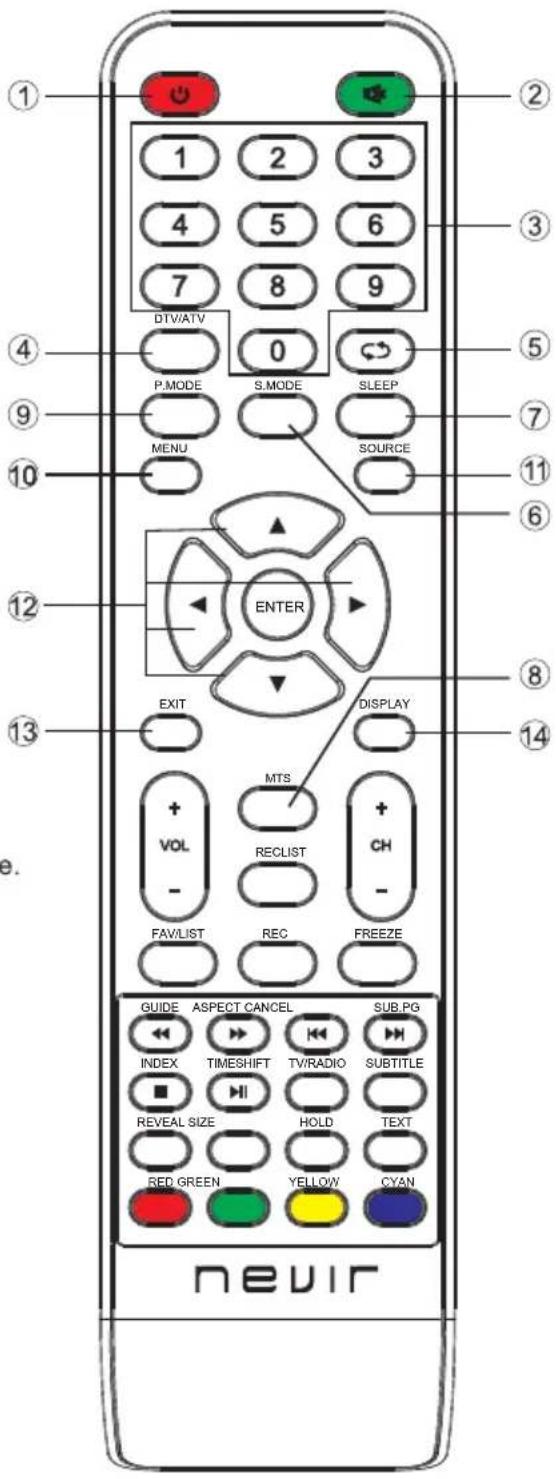
4Remote Controller
- POWER : Set your TV to power on or standby mode.
- MUTE : Press to mute the sound. Press again or press VOL+ to unmute.
- 0-9: Press 0\~9 to select a TV channel directly while watching TV. The channel will change after 2 seconds. Applicable for entering page number in teletext mode and so on.
- DTV/ATV: Switch between Analog and Digital TV
- Return to the previous viewed program.
- S.MODE: Press to cycle through the different sound settings
- SLEEP: Select amount of time before TV turn itself off automatically.
8 MTS : Press to search the NICAM modes. - P.MODE: Press to cycle through the different picture settings
- MENU: Allow you to navigate the on-screen menus.
- SOURCE: Open the main menu, press to list the sources
- ▲▼◀▶ ENTER: Allow you to navigate the on-screen menus and adjust the system settings to your preference.
- EXIT: Exit from the menu or sub-menu and cancel the function in process (if applicable)
- DISPLAY: Press to display the source and channel's info.
Battery Installation:
Remove the battery compartment lid on the rear of the remote control by sliding the lid down, then off. Put two AAA batteries inside the battery compartment with their + and - ends aligned as indicated. Do not mix old and new batteries or different types of batteries.
Slide the lid until you hear it click into place.
Using the Remote Control:
Unless stated, otherwise, the remote control can operate all the features of the TV.
Always point the remote control directly at the remote sensor in front of the TV.
text_image
1 2 3 4 5 6 7 8 9 DTV/ATV 0 P.MODE S.MODE SLEEP MENU SOURCE ENTER EXIT DISPLAY MTS + VOL - RECLIST + CH - FAV/LIST REC FREEZE GUIDE ASPECT CANCEL SUB.PG INDEX TIMESHIFT TV/RADIO SUBTITLE REVEAL SIZE HOLD TEXT RED GREEN YELLOW CYAN nevirRemote Controller
- VOL+/VOL-: Press to increase / decrease the sound level.
- TV/RADIO : When watching channel, allows you to switch between TV and Radio modes
- GUIDE:1. Launches the EPG (Electronic Program Guide) 2. Fast reverse in PVR or Media Player mode.
- TIME SHIFT: 1.DTV channel time shift Function. 2.play on PVR or Media Player mode.
- CANCEL: 1. When a page is selected in the mode of text, it may take some time before it becomes available, pressing the CANCEL key will return to the TV mode. When the required page is found, the page number will appear at the top of the TV picture, press the CANCELkey to return to the mode of text for you to browse this page.
- Previous chapter in PVR or Media Player mode
- INDEX:1. Request the Index page in Teletext mode. 2.Exit the playing function in PVR or Media Player mode.
- SIZE: Change the size of display in Teletext mode.
- REVEAL: Reveal or Hide the hidden words.
- COLOR BUTTONS: Teletex switch of the analog parts, the items selection in the menu of the digital parts and the practice of the MHEG5 in the DVB menu.
- CH+/CH- : Press to scan through channels.
- FAV/LIST: press to open the favorite list. then you can select the favorite channel.
- ASPECT: 1. Select picture scale.
- fast forward in PVR or Media Player mode.
- FREEZE: press to freeze the picture
- SUB. PG 1. Press to access sub page.
- Next chapter in PVR or Media Player mode.
- SUBTITLE: To show and set the language of current DTV.
- HOLD: HOLD On or Off for current page display.
- TEXT: Switch the teletext on and off.
- RECLIST: Show the recorded list.
- REC: Record begin in PVR mode.

text_image
1 2 3 4 5 6 7 8 9 DTWATV 0 P.MODE S.MODE SLEEP MENU SOURCE ENTER EXIT DISPLAY + VOLT MTS + CH - - RECLIST - FAVLIST REC FREEZE GUIDE ASPECT CANCEL SUB.PG INDEX TIMESHIFT TV/RADIO SUBTITLE REVEAL SIZE HOLD TEXT RED GREEN YELLOW CYAN nevirTV Menu
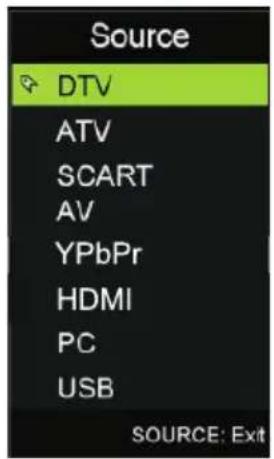
Input Source
text_image
Source DTV ATV SCART AV YPbPr HDMI PC USB SOURCE: ExitPress INPUT button to display the input source list,
Press ▼ / ▲ or INPUT button to select the input source you want to,
Press ENTER button to enter the input source,
Press EXIT button to quit.
Picture Menu
Press MENU button to display the main menu.
Press ◀ / ▶ button select PICTURE in the main menu, then press ENTER / ▼ to enter.

text_image
Picture Picture Mode Standard Brightness 50 Contrast 45 Sharpness 60 Saturation 45 Blue Color Temp Standard Aspect Ratio Auto Move Adjust MENU: Return EXIT: Exit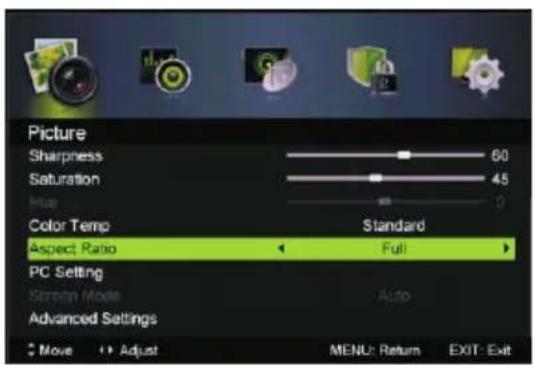
text_image
Picture Sharpness 60 Saturation 45 Hue 0 Color Temp Standard Aspect Ratio Full PC Setting Screen Mode Auto Advanced Settings Move Adjust MENU: Return EXIT: Exit- Press ▼ / ▲ button to select the option that you want to adjust in the PICTURE menu.
- Press Enter/◄ /► button to adjust.
- After finishing your adjustment, Press MENU button to save and return back to the previous menu.
Picture MODE
Press ▼ / ▲ button to select Picture Mode, then press ◀ / ▶ button to select.
TIPS: You can press PMODE button to change the Picture Mode directly.
Brightness/Contrast/ Sharpness/Saturation/Hue
Press ◀ / ▶ button to select option, then press ◀ / ▶ button to adjust.
Brightness Adjust the optical fiber output of the entire picture, it will effect the dark region of the picture.
Contrast Adjust the highlight intensity of the picture, but the shadow of the picture is invariable.
Sharpness Adjust the peaking in the detail of the picture.
Saturation Adjust the saturation of the color based on your own like.
Hue Use in compensating color changed with the transmission in the NTSC code.
Color Temp
Change the overall color cast of the picture.
Press ▼ / ▲ button to select Color Temp, then press ◀ / ▶ button to select Standard/Cool/Warm.
Standard Produces a vivid image.
Cool Produces a gentle blue-hued image.
Warm Produces a red-hued image.
Aspect Ratio
Press ▼ / ▲ button to select Aspect Ratio, then press ◀ / ▶ button to select.
Auto Automatically adjust Aspect Ratio based on TV size and TV program.
Full/4:3 /Zoom1/Zoom2 To select the available display format.
PC Setting
Press INPUT to select PC source.
Press MENU to enter the main menu, then press ◀/▶ button to select PICTURE menu.
Press ENTER / ▼ ▼ to enter and press to select PC Setting.
Advanced Settings
Adjust advanced video features to fine tune the picture.
Press ▼ / ▲ button to select Advanced Settings, then press
Enter / ▶ button to enter sub-menu.
TV Menu
SOUND MENU
Press MENU button to display the main menu.
Press ◀ / ▶ button select SOUND in the main menu, then press ENTER / ▼ to enter.

text_image
Sound Audio Mode Standard Treble 25 Bass 25 Balance 0 Surround Sound Off EQ Setting AVL Off SPDF Auto Move Adjust MENU: Return EXIT: Exit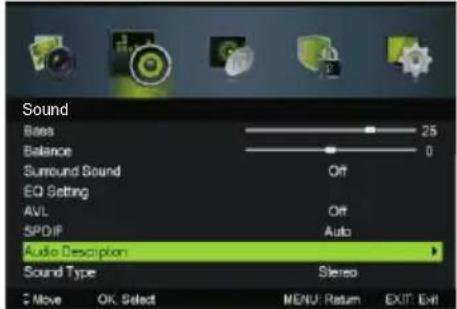
text_image
Sound Bass Balance Surround Sound EQ Setting AVL 5PDF Audio Description Sound Type Stereo Move OK Select MENU: Return EXIT: Exit- Press ▼ / ▲ button to select the option that you want to adjust in the
SOUND menu.
2. Press Enter/◄/► button to adjust.
3. After finishing your adjustment, Press MENU button to save and return back to the previous menu.
Sound Mode
Press ▼ / ▲ button to select Sound Mode, then press ◀ / ▶ button to select.
Treble/Bass/Balance
Press ▼ / ▲ button to select option, then press ◀ / ▶ button to adjust.
Treble Adjust the treble effect. Increases or decreases high-pitched sounds.
Bass Adjust the bass effect. Increases or decreases lower-pitched sounds.
Balance Adjust the balance between left and right speakers to adapt to your listening position.
Surround Sound
Press ▼ / ▲ button to select Surround Sound, then press ◀ / ▶ button to select On or Off.
EQ Setting
Adjust the curve of 7 bands equalizer.
Press ▼ / ▲ button to select EQ Setting, then press Enter /▶ button to enter sub-menu.
AVL
Set the auto volume control.
Press ▼ / ▲ button to select AVL, then press ◀ / ▶ button to select On or Off.
SPDIF
Press ◀/▶ button to select SPDIF, then press ◀/▶ button to select Off / Auto / PCM.
Audio Description
Press ▼ / ▲ button to select Audio Description, then press Enter / ▶ button to enter sub-menu.
Sound Type
Press ▼ / ▲ button to select Sound Type, then press ◀ / ▶ button to select. (Available Sound Type: Stereo, Dual I, Dual II, Mixed).
Channel Menu
Press MENU button to display the main menu.
Press ◀ / ▶ button to select CHANNEL in the main menu, then press
ENTER / ▼ to enter.
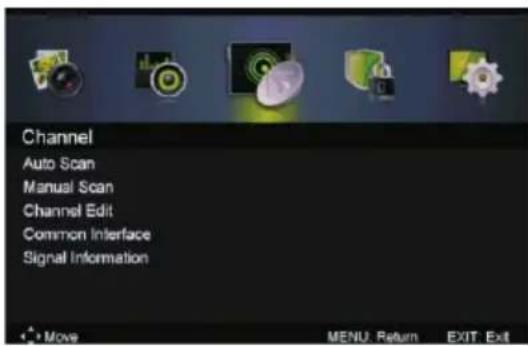
text_image
Channel Auto Scan Manual Scan Channel Edit Common Interface Signal Information *Move MENU Return EXIT Exit- Press ▼ / ▲ button to select the option that you want to select in the CHANNEL menu.
- Press Enterbutton to enter sub-menu.
- Press MENU button to return back to the previous menu.
Auto Scan
Press ▼ / ▲ button to select Auto Scan, then press Enter / ▶ button to enter sub-menu.

text_image
Auto Scan Country UK Mode DTV+ATV Start Move Adjust MENU: Return EXIT: ExitManual Scan
Press ▼ / ▲ button to select Manual Scan, then press Enter / ▶ button to enter sub-menu.

text_image
Manual Scan Digital Manual Scan Analog Manual Scan Move OK Select MENU: Return EXIT: ExitTV Menu
Digital Manual Scan
Press ▼ / ▲ button to select Digital Manual Scan, then press
Enter / ▶ button to enter sub-menu.
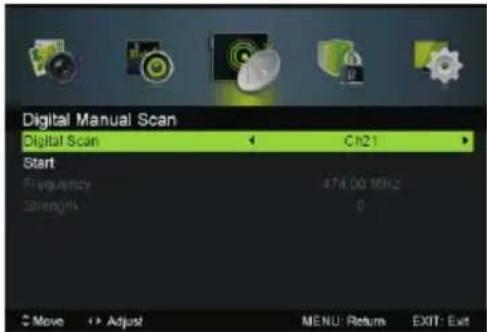
text_image
Digital Manual Scan Digital Scan ← Ch21 Start Frequency 474.00 MHz Strength 0 Move + Adjust MENU: Return EXIT: ExitAnalog Manual Scan
Press ▼ / ▲ button to select Analog Manual Scan, then press
Enter / ▶ button to enter sub-menu.
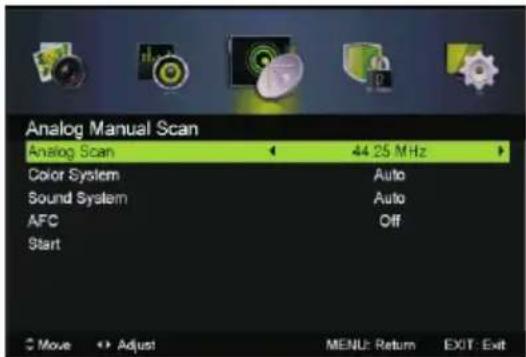
text_image
Analog Manual Scan Analog Scan 44.25 MHz Color System Auto Sound System Auto AFC Off Start Move Adjust MENU: Return EXIT: ExitAnalog Scan
Press ◀/▶ button to select Analog Scan.
Color System
Press ◀/▶ button to select Color System:Auto,PAL or SECAM.
Sound System
Press ◀/▶ button to select Sound System :Auto,DK,BG,I or L.
Modulation
Press ◀/▶ button to select Modulation:Auto,16QAM,32QAM,
64QAM,128QAM,256QAM.
AFC
Automatic Fine tuning.
press ◀/▶ button to select On or Off.
Start
Press Enter / ▶ button to start the channel searching.

text_image
Analog Manual Scan Analog Scan 44.25 MHz Color System Auto Sound System Auto AFC Off Stop Searching 48.25 MHz ... Move OK Select MENU: Return EXIT: ExitChannel Edit
Press ▼ / ▲ button to select Channel Edit, then press Enter /▶ button to enter sub-menu.

text_image
Channel Edit 800 ONE HD 801 TEN Digital 802 ONE HD 803 ONE Digital Delete Skip Move Move OK: Select MENU: Return EXIT: Exit


The three colored key is the shortcut key for channel.
First press ▼ / ▲ to highlight the channel you want to delete or move or skip, then:
Press the button to delete the channel.
Press the Cutton to skip the select channel.
(Your TV set will skip the channel automatically when using
CH+/- to view the channels.)
Press the Button to to set the channel to moving state.
then press ▼ / ▲ to move it to the position you want to put.
Common interface
Press ▼ / ▲ button to select Common interface, then press Enter button to enter sub-menu.
Only available with is CI card under TDT mode.
Signal Information
Press ▼ / ▲ button to select Signal Information, then press the Enter button to see the detail information about the signal. Only available under TDT mode.
TV Menu
LOCK SYSTEM MENU
Press MENU button to display the main menu.
Press ◀/▶ button select Lock System in the main menu, then
preENTER/enter.
text_image
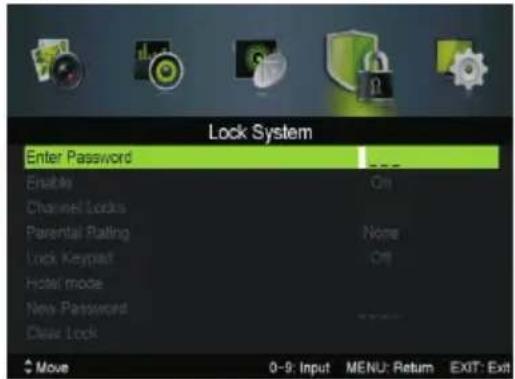
Lock System Enter Password Enable Channel Locks Parental Rating Lock Keypad Hotel mode New Password Clear Lock Move 0-9: Input MENU: Return EXIT: Exit
text_image
Lock System Enter Password Enable On Channel Locks Parental Rating None Lock Keypad Off Hotel mode New Password ---- Clear Lock Move Appro Adjust MENU: Return EXIT: Exit-
Press ▼ / ▲ button to select the option that you want to adjust in the Lock System menu.
-
Press Enter/◄/► button to adjust.
-
After finishing your adjustment, Press MENU button to save and return back to the previous menu.
Default password is 0000, and if forget what you set, please call the service center.
Press ▼ / ▲ button to select Enable then press ◀ / ▶ button to select On or Off.
Channel Locks, Parental Rating and Lock Keypad are available when Enable is On.
Channal Locks
Press ▼ / ▲ button to select Channal Locks, then press
Enter /▶ button to enter sub-menu.
Parental Rating
Press ▼ / ▲ button to select Parental Rating, then press
◀ / ▶ button to select.
Lock Keypad
Set to prevent it from being used by young children, or other unexpected usage.
Press ▼ / ▲ button to select Lock Keypad, then press ◀ / ▶ button to select On or Off.
Hotel mode
Press ▼ / ▲ button to select Hotel mode.
New Password
Press ▼ / ▲ button to select New Password theme
4-digital number you want to set twice.
Clear Lock
Press ▼ / ▲ button to select Clear Lock.
HOTEL MODE

text_image
Hotel mode Active Hotel Mode On Max Vol. 100 Default Vol. 20 Source Lock Default source DTV Default Div program -- Default Div program -- Backup to USB Restore from USB Recall Move Adjust EXIT ExitActive Hotel Mode
Set hotel mode On or Off.
Note: The following settings work only when Active Hotel Mode is set to be ON.
Max Vol.
Set the max volume that you can adjust.
Default Vol.
Set the default volume for every time you open the TV, the default volume is 20.
Source Lock
To lock the input sources that you want.
Default Source
Set the default input source when turning on your TV.
Default Dtv Program
Only available when the Default Source is set to DTV.
Default Atv Program
Only available when the Default Source is set to ATV.
Backup to USB
Backup data to USB.
Restore from USB
Restore data from USB.
Recll
Recall the default settings of Hotel mode.
SETUP MENU
Press MENU button to display the main menu.
Press ◀ / ▶ button select SETUP in the main menu, then press ENTER / ▼ to enter.

text_image
Setup OSD Language Audio Languages Subtitle Textext Mode Setting Time Settings PVR Settings English Home Mode Move Adjust MENU: Return EXIT: ExitTV Menu

text_image
Setup Teletext Mode Setting Home Mode Time Settings PVR Settings First Time Setup OAD Reset Move OK: Select MENU: Return EXIT: Exit- Press ▼ / ▲ button to select the option that you want to adjust in the SETUP menu.
- Press Enter/ ◀ / ▶ button to adjust.
- After finishing your adjustment, Press MENU button to save and return back to the previous menu.
OSD Language
Press ▼ / ▲ button to select OSD Language, then press ◀ / ▶ button to select.
Audio Languages
Press ▼ / ▲ button to select Audio Languages, then press Enter button to enter sub-menu.
Press ▼ / ▲ / ◀ / ▶ button to select the Audio Primary Language and Audio Secondary Language.
Subtitle
Press ▼ / ▲ button to select Subtitle, then press Enter button to enter sub-menu.
Teletext
Adjust Teletext settings. Only available under DTV and ATV source. Press ▼ / ▲ button to select Telteexpress Enter / button▶ to enter sub-menu.
Mode Setting
Press ▼ / ▲ button to select Mode Setting.
Time Settings
Press ▼ / ▲ button to select Time Settings, then press Enter / ▶ button to enter sub-menu.
PVR Settings
Press ▼ / ▲ button to select PVR Settings, then press Enter button to enter sub-menu. It will check the USB.

text_image
PVR Settings Move Left Move Right OK Select EXIT Exit File Manager Device List Scheduled RecordPress ◀ / ▶ button to select File Manager, then press Enter button to enter sub-menu.

text_image
File Browser Color Panel Preview Preview Preview Preview Preview Preview Preview Preview Preview Preview Preview Preview Preview Preview Preview Preview Preview Preview Preview Preview Preview Preview Preview Preview Preview Preview Preview Preview Preview Preview Preview Preview Preview Preview Preview Preview Preview Preview Preview Preview Preview Preview Preview Preview Preview Preview Preview Preview Preview Preview Previous Time Previous Time Previous Time Previous Time Previous Time Previous Time Previous Time Previous Time Previous Time Previous Time Previous Time Previous Time Previous Time Previous Time Previous Time Previous Time Previous Time Previous Time Previous Time Previous Time Previous Time Previous Time Previous Time Previous Time Previous Time Previous Time Previous Time Previous Time Previous Time Previous Time Previous Time Previous Time Previous Time Previous TimePress DeviceButton then preestEnter button to enter sub-menu.
text_image
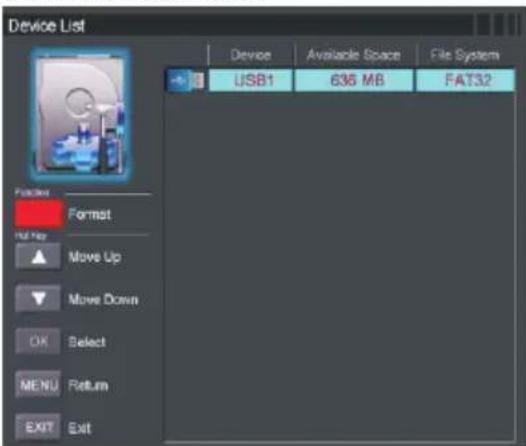
Device List Device Available Space File System USB1 636 MB FAT32 Packing Format Up/Up Move Up Move Down OK Select MENU Return EXIT ExitPress ScheduleToRecorethen press Enter button to enter sub-menu.
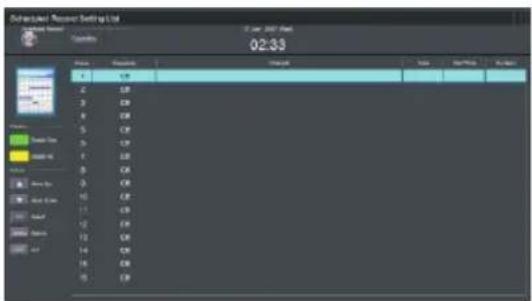
text_image
Software Status: Reason Setting Up Parameters: 02:33 Status: Status 1. C# 2. C# 3. C# 4. C# 5. C# 6. C# 7. C# 8. C# 9. C# 10. C# 11. C# 12. C# 13. C# 14. C# 15. C# 16. C# EndFirst Time Setup
Press ▼ / ▲ button to select First time Setup, then press Enter button to enter.
OAD
Press ▼ / ▲ button to select OAD, then press Enter button to enter sub-menu.
TV Menu
USB Menu
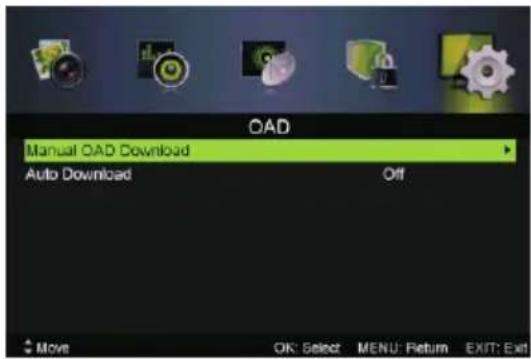
Auto Download
Press ▼ / ▲ button to select Auto Download, then press ◀ / ▶ button to select On or Off.
Manual OAD Download
Press ▼ / ▲ button to select Manual OAD Download, then press Enter button to enter sub-menu.
text_image
OAD Manual OAD Download Auto Download Off Move OK: Select MENU: Return EXIT: ExitReset
Press ▼ / ▲ button to select Reset, then press Enter button to enter sub-menu.

text_image
Subtitle Teletext Mode Setting Time Settings PVR Settings First Time Setup OAD Reset Reset Yes No Mode Move OK: Select MENU: Return EXIT: ExitIf you are sure to reset, press Yes to reset.
EPG Menu
Press the button EPG in the remote control to enter EPG menu.
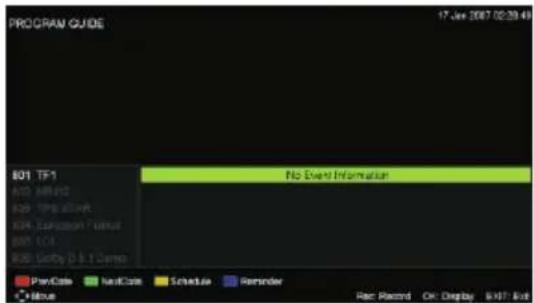
text_image
PROGRAM GUIDE 17 Jan 2007 02:28:43 #01 TF-1 #02 M#E-02 #03 SPB #V# #04 EMISSION #V# #05 UCI #06 Unity 0 & 1 Demo No Event Information PayCode NasCode Schedule Reminder None Rec Record OK Display #XIT ExitPress the Button to display previous date.
Press the button to display next date.
Press the button to see the setting you have done before.
Press the Button to set the time you want to remind the program you want to see.
USB OPERATION
Note: Before operating USB menu, Plug in USB device, then press INPUT button to set the Input Source to USB.
Press button to select USB in the Source menu, then press Enter button to enter.
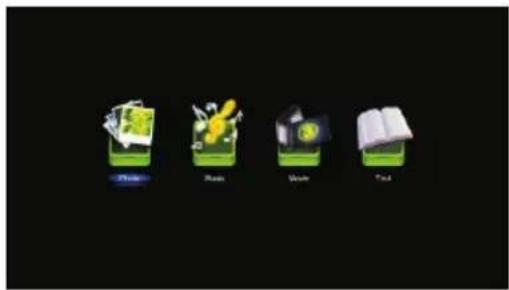
text_image
Phone Read Save FindPress button to select the option you want to adjust in the main USB menu, then press Enter button to enter.
Photo
Press ◀ / ▶ button to select PHOTO in the main menu, then press Enter button to enter. Press ▼ / ▲ button to select drive disk you want to watch, then press Enter button to enter. Press ▼ / ▲ button to select return option to back to the previous menu.

natural_image
Tropical beach scene with palm trees and turquoise water under a clear blue sky (no text or symbols visible)Music
Press ◀ / ▶ button to select MUSIC in the main menu, then press button to enter.Enter
Press Button to select drive disk you want to watch, then press Enter button to enter.
Press ▼ / ▲ button to select return option to back to the previous menu.
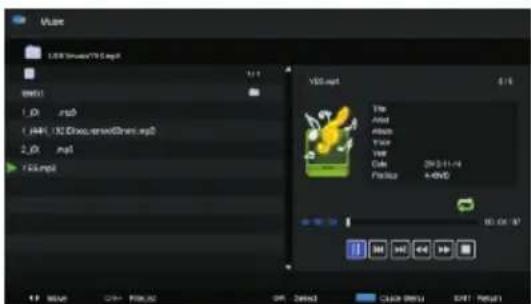
text_image
V50.mpt 1.00 mps 1.00, 100 mps 2.00 mps 755 mps V50.mpt File Add Add View View Code: 29-31-14 Paste: A+KND 10.00 MB OK Cancel OK Cancel OK Cancel OK Cancel OK Cancel OK Cancel OK Cancel OK Cancel OK Cancel OK Cancel OK Cancel OK Cancel OK Cancel OK Cancel OK Cancel OK Cancel OK Cancel OK Cancel OK Cancel OK Cancel OK Cancel OK Cancel OK Cancel OK Cancel OK Cancel OK Cancel OK Cancel OK Cancel OK Cancel OK Cancel OK Cancel OK Cancel OK Cancel OK Cancel OK Cancel OK Cancel OK Cancel OK Cancel OK Cancel OK Cancel OK Cancel OK Cancel OK Cancel OK Cancel OK Cancel OK Cancel OK Cancel OK Cancel OK Cancel OK Cancel OK Cancel Okn OK Cancel OK Cancel OK Cancel OK Cancel OK Cancel OknWhen highlighting the option you select, the file information will appear on the right.
USB Menu

Press to play or pause.

Press to play the previous song.

Press to play the next song.

Press to play backward.

Press to play faster.

Press to stop.
Press CH+/- to switch operation focus between File List and Player.
Movie
Press ◀ / ▶ button to select MOVIE in the main menu, then press Enter button to enter.
Press ▼ / ▲ button to select drive disk you want to watch, then press Enter button to enter.
Press ▼ / ▲ button to select return option to back to the previous menu.
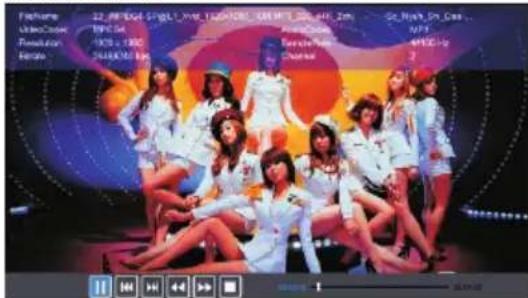
text_image
Fitchbox 22. RF ECG: 500 L, Wm. 123/128L 100 MHz 24K, 2Hz United Artist 1976.56 Revolution 4976.56 Estate 54400.00 MHz RallyGloss NPS Tercite News 49120.00 Charles 2 100 100 100 100 100 100 100 100 100 100 100 100 100 100 100 100 100 100 100 100 100 100 100 100 100 10 10 10 10 10 10 10 10 10 10 10 10 10 10 10 10 10 10 10 10 10 10 10 10 10 10 10 10 10 10 10 10 10 15
Press to play or pause.

Press to view the previous movie.

Press to view the next movie.

Press to play backward.

Press to play faster.

Press to stop and back to the previous folder.
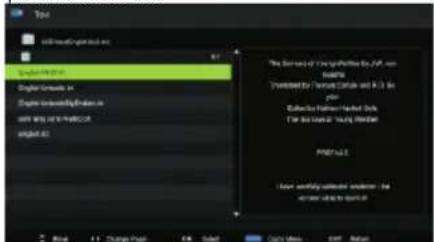
Text
Press ◀ / ▶ button to select TEXT in the main menu, then press button to enter.Enter
Press button to select drive disk you want to watch, then press Button to enter.
Press button to select return option to back to the previous menu.
text_image
Test Will not change it out English text English text in English text in the with text and other text English text The format of 'engang' files by JAF, non inlets Treatments by 'fametcclain' and 'A.3.1' in page Dialysis by 'fametcclain' filled-out For all times, I'm going to find Printed. I have mostly accepted documents: the version is to start itWhen highlighting the option you select, the file information will appear on the right.
Machine Technical Specifications
| Screen Size | TV System | Preset Channel s | Speaker Output | |
| 16" | PAL/SECAM | ATV:99 | DTV:1200 | 5W+5W |
| 19" | PAL/SECAM | ATV:99 | DTV:1200 | 5W+5W |
| 22" | PAL/SECAM | ATV:99 | DTV:1200 | 5W+5W |
| 24" | PAL/SECAM | ATV:99 | DTV:1200 | 5W+5W |
| 32" | PAL/SECAM | ATV:99 | DTV:1200 | 10W+10W |
| 39"/40" | PAL/SECAM | ATV:99 | DTV:1200 | 10W+10W |
| 42" | PAL/SECAM | ATV:99 | DTV:1200 | 10W+10W |
| 46" | PAL/SECAM | ATV:99 | DTV:1200 | 10W+10W |
| 50" | PAL/SECAM | ATV:99 | DTV:1200 | 10W+10W |
| Screen Size | power Con sump tion (LED) | power Con sump tion (LCD) | Main accessories |
| 16" | 24W | 36W | |
| 19" | 36W/48W | 48W/60W | |
| 22" | 36W/48W | 48W/60W | |
| 24" | 48W | 60W | |
| 28" | 36W | 100W | User's manual x1Remote controller x1Power cord x1AAA Batteries x2 |
| 32" | 56W/65W/100W | 100W/135W | |
| 39"/40" | 70W/75W | 135W | |
| 42" | 85W | 175W | |
| 46" | 110W | ||
| 50" | 135W | 280W | |

This symbol indicates that when the end-user wishes to discard this product, it must be sent to separate collection facilities for recovery and recycling. By separating this products from other householdtype waste, the volume of waste sent to incinerators or land fields is reduced and natural resources will thus be conserved.
In order to fulfill ruling UNE EN-60335, we indicate that if the flexible wire is damaged, it can only be substituted by a technical service recognized by NEVIR, S.A., as per special tooling is required.
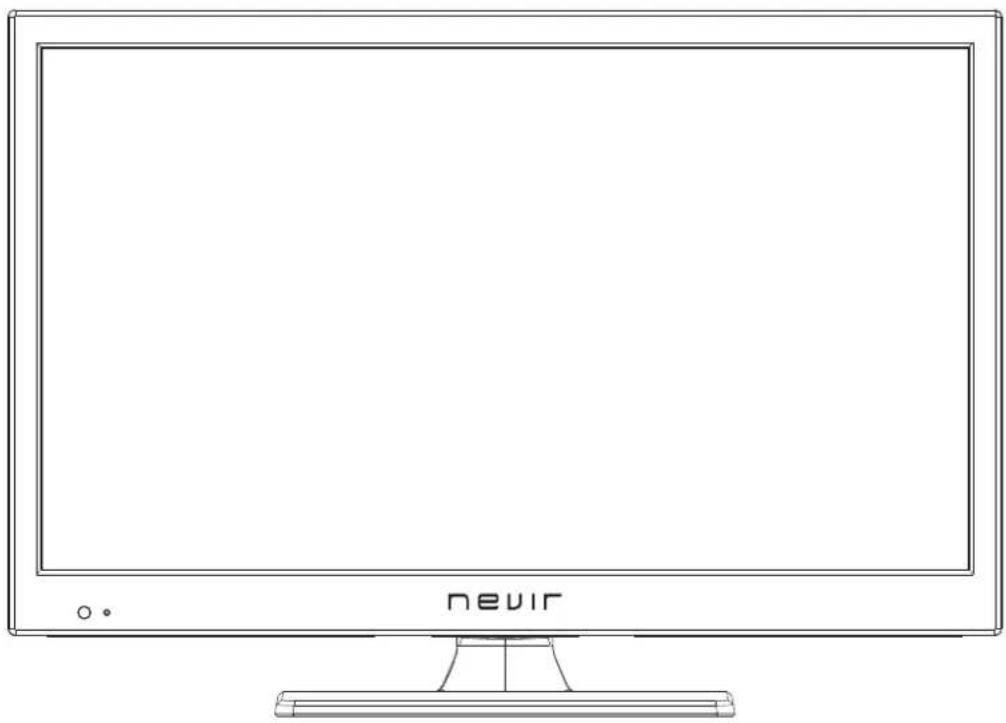
TV LED 19" (48.26cm) DVB-T HD/USB-R/HDMI
natural_image
Line drawing of a flat-screen monitor with 'nevir' branding and a small display base (no text or symbols on screen)Manual de Usuário
natural_image
Top-down architectural floor plan of a modern office or living room with furniture layout (no text or labels)1
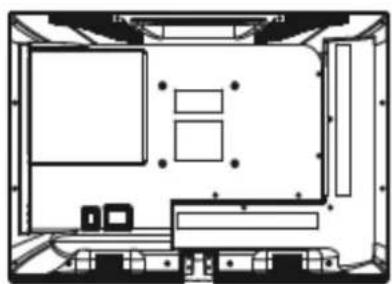
natural_image
Top-down schematic of a room layout with furniture and fixtures (no text or labels)2

text_image
Parede3
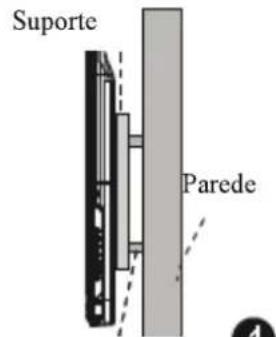
text_image
Suporte ParedePorca de cimento
Nota:
text_image
10cm 10cm 10cmAjuste o seu TV
natural_image
Simple line drawing of a laboratory setup with a tray, beaker, and stand (no text or symbols)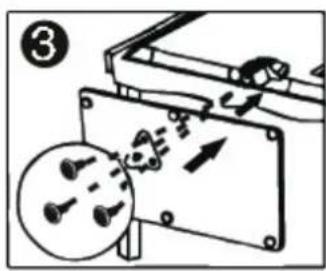
text_image
Diagram showing mechanical assembly with labeled parts and a magnified inset of a circular component with pins.