EM7095 - DVD player Eminent - Free user manual and instructions
Find the device manual for free EM7095 Eminent in PDF.

User questions about EM7095 Eminent
0 question about this device. Answer the ones you know or ask your own.
Ask a new question about this device
Download the instructions for your DVD player in PDF format for free! Find your manual EM7095 - Eminent and take your electronic device back in hand. On this page are published all the documents necessary for the use of your device. EM7095 by Eminent.
USER MANUAL EM7095 Eminent
natural_image
Two people smiling while looking at a laptop (no visible text or symbols)EM7095- DVB-T host
WWW.EMINENT-ONLINE.COM
EM7095- DVB-T host

Warnings and points of attention
Repairing of the product should be done by qualified Eminent staff!
Table of contents
1.0 Introduction ......3
1.1 Functions and features ...... 3
1.2 Packing contents .... 3
2.0 Explanation of the EM7095 4
3.0 Explanation of the remote control 5
4.0 Connecting the EM7095 DVB-T host 5
4.1 Connect the EM7095 to your television using HDMI (Recommended) 5
4.2 Connect the EM7095 to your television using composite 5
5.0 Audio Connections 6
5.1 HDMI connection on the television 6
5.2 Cinch cables....6
5.3 HDMI connection (digital receiver) 6
5.4 Coaxial (digital receiver) 6
5.5 Connecting the Antenna cable 6
6.0 Setting up the EM7095 DVB-T host 6
6.1 Language settings 7
6.2 Screen settings 7
6.3 Audio settings....7
6.4 Photo settings....8
6.5 Movie settings 8
7.0 Using the DVB-T function 8
7.1 Searching for channels 8
7.2 Editing channels 9
7.3 Using the received channels 9
8.0 Using the record function 9
8.1 Recording channels 10
8.2 Making recordings using 'Time scheduling' 10
8.3 Playing recorded channels.... 10
8.4 Use the Time Seek (Goto) function 11
9.0 Playing Media from USB devices 11
9.1.1 DVD playback 11
9.1.2 DVD Video_Ts 11
9.3 Playing other video formats 12
9.4 Playing music and other audio 12
9.5 Playing photos and images (slideshow) 12
10.0 Other functions....13
11.0 Frequently asked questions .... 13
12.0 Service and support 14
13.0 Warranty conditions 15
14.0 Declaration of Conformity 15
1.0 Introduction
Congratulations with the purchase of this high-quality Eminent product! This product has undergone extensive testing by Eminent's technical experts. Should you experience any problems with this product, you are covered by a five-year Eminent warranty. Please keep this manual and the receipt in a safe place.
Register your product now on www.eminent-online.com and receive product updates!
1.1 Functions and features
The EM7095 DVB-T host allows you to receive television broadcasts on an easy manner. Simply connect your indoor or outdoor antenna to the coaxial in connection of the EM7095. Connect your television to the EM7095 using a HDMI 1.3 cable to watch the broadcasting in glorious (Full) HD. Simply connect a USB hard disk to a USB port of the EM7095, and let the EM7095 record the broadcastings itself. Besides the DVB-T tuner, the EM7095 can also act as a media player. Streaming media from connected USB devices is also a feature of the EM7095. Media formats such as .AVI, .MKV, .MP3 etc are supported.
1.2 Packing contents
The following parts need to be present in the package:
• EM7095 DVB-t host
- Power supply
- Remote control
- Manual
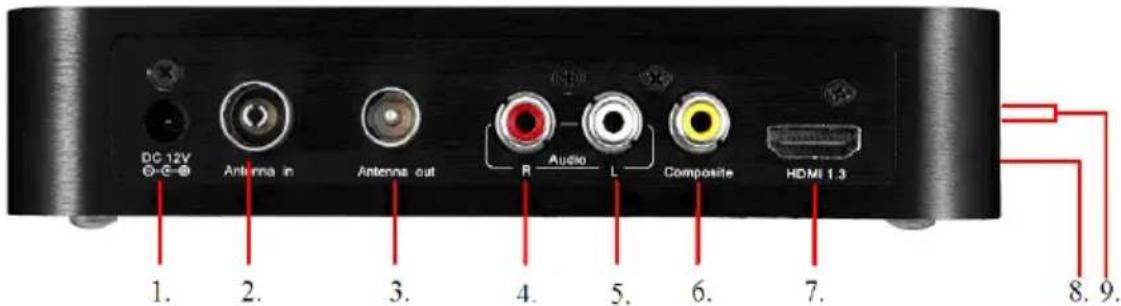
2.0 Explanation of the EM7095
The EM7095 DVB-T host has the following connections on the back of the casing:
text_image
DC 12V Antenna in Antenna out Audio Composite HDMI 1.3 1. 2. 3. 4. 5. 6. 7. 8. 9.- DC 12V: Connection for the power supply.
- Antenna in: Connection for the coaxial antenna cable.
- Antenna out: Used to connect another receiver or second television.
- Audio R: Connection for the red audio composite cable.
- Audio L: Connection for the white audio composite cable.
- Composite: Connection for the yellow video composite cable.
- HDMI 1.3: Connection for the HDMI 1.3 cable.
- Coaxial out: Coaxial Connection for connecting a digital receiver.
- USB host: Two connections for connecting USB devices.
3.0 Explanation of the remote control
Below you will find a description of the remote control and the mostly used buttons.
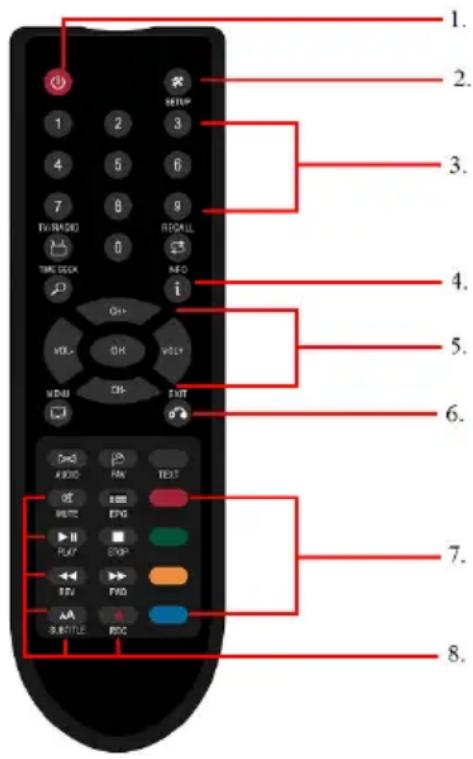
- Power button: Used to turn the EM7095 on and off.
- Setup button: Used to enter the setup menu of the EM7095.
- Alphanumeric buttons: Used to enter data and select channels.
- Info button: Used to show info about the played media file.
- Navigation buttons: Used to navigate through menus.
- Exit button: Used to exit the menu.
- Selection buttons: Used to copy, rename or delete data or channels.
- Standard buttons: Used during playback of media files and/or TV/Radio channels.
4.0 Connecting the EM7095 DVB-T host
4.1 Connect the EM7095 to your television using HDMI (Recommended)
The best image quality can be obtained by connecting the EM7095 DVB-T host to your television using a HDMI cable. Of course, your television needs to be equipped with a HDMI connection.
Note: Make sure your EM7095 and television are both turned off before connecting your cables. This way you can prevent any possible damage to your devices.
Connect the HDMI cable to the HDMI output of the EM7095.
Connect the other side of the HDMI cable to an available HDMI input of your television.
4.2 Connect the EM7095 to your television using
composite
If your television is not equipped with an HDMI connection, you can use the composite connection on the EM7095. Connect the yellow plug to the yellow cinch connection on the EM7095.
Now you can connect the yellow plug on the other side of the cable to the yellow cinch connection on your television.
5.0 Audio Connections
The EM7095 DVB-T host has several connections for audio. During the following chapter we will explain these connections and we will explain how to connect these audio connections.
5.1 HDMI connection on the television
If your television has HDMI audio support, you can make use of the HDMI cable order to receive both image and digital sound on your television, in stereo only.
5.2 Cinch cables
You can also connect the white and red cinch cables to your receiver in order to create a '2.0' stereo effect.
5.3 HDMI connection (digital receiver)
If you have a digital HDMI receiver, then you can enjoy the true digital sound by connecting the EM7095 over HDMI 1.3 to a HDMI input on your digital receiver.
5.4 Coaxial (digital receiver)
If you have a digital receiver with a Coaxial connection, then you can enjoy the EM7095's digital sound during movie and music play. Simply connect the coaxial cable to the coaxial connection on your digital receiver and EM7095 DVB-T host.
5.5 Connecting the Antenna cable
The EM7095 can receive so called ‘Free-to-air’ broadcastings, meaning the EM7095 can receive both television and radio broadcastings if available. Simply connect the antenna cable of your indoor or outdoor antenna to the ‘Antenna in’ connection of the EM7095 and start enjoying the EM7095.
6.0 Setting up the EM7095 DVB-T host
Before using the EM7095, you have to setup the EM7095 DVB-T host. There are many settings which you can change. Since the EM7095 is equipped with a HDMI 1.3
connection, you can setup the EM7095's resolution. Also, it is very convenient to use this device using your own native language. During the next chapter we will explain the main settings of the EM7095.
As soon as the EM7095 starts for the first time, the devices start searching for available broadcastings. Press the 'Exit' button on the remote to skip this part and directly enter the main menu of the EM7095.
6.1 Language settings
- Go to the 'Options' icon.
- Use the arrow keys to select 'OSD Language'.
- Select the desired language and press the 'OK' button, then press the 'Return' button.
- Select 'Subtitle Language'.
- Select the language of the subtitles. Press the 'OK' button, then press the 'Return' button.
6.2 Screen settings
- Go to the 'Picture' icon and press the 'OK' button.
- Use the arrow keys to select 'Aspect ratio'.
- Select the desired aspect ratio: Select 16:9 if you are using a widescreen television, select 4:3 if you are using an older, non widescreen television. Press the 'OK' button, then press the 'Return' button.
- Go to 'Resolution'. Select the desired resolution: Select 720p if you are using a HD Ready television. Press the 'OK' button, then press the 'Return' button.
- Go to 'TV Format'. Select 'PAL' if you are located in Europe. Select 'NTFS' if you are located in North-America. Press the 'OK' button, then press the 'Return' button.
- Go to 'Video Output'. Select 'RGB' is the EM7095 is connected to your television using HDMI. Use CVBS if the EM7095 is connected to your television using composite.
6.3 Audio settings
- Go to the 'Option' icon and press the 'OK' button.
- Select 'Audio Language'.
- Select the language of the audio streams and press the 'OK' button. Then press the 'Return' button.
- Select 'Digital Audio'.
- Select the desired sound setting. Select 'RAW' if the EM7095 is connected to a digital receiver. Select 'PCM' if you have connected the EM7095 using HDMI to your television. Press the 'OK' button, then press the 'return' button.
If you are using a Digital receiver, then you can use the 'RAW' settings in order to receive digital sound.
6.4 Photo settings
The EM7095 can display photos and images. You can also setup the EM7095 for a slideshow and the corresponding visual effects.
- Go to the 'USB' icon and press the 'OK' button.
- Use the arrow keys to select 'Photo Configure' and press the 'OK' button.
- Select the time interval between the images at 'Slide Time', for example: '5S (5 seconds). This means a new image will be shown every 5 seconds.
- Select 'Slide Mode'.
- Select 'aspect Ratio'. Select the desired manner how to display the images: Choose 'Keep' to display the images using the resolution as used on the EM7095, choose 'Discard' to use the original resolution as used in the image itself. Press the 'Return' button.
6.5 Movie settings
- Since the EM7095 can be used as a media player, you can make some settings regarding to watching movies.
- Go to the 'USB' icon.
- Use the arrow keys to select 'Movie configure' and press the 'OK' button.
- At 'Aspect Ratio' you can select whether you want to use the aspect ratio of the EM7095 or the aspect ratio of the video file you want to play. Select 'Keep' if you want to use the aspect ratio of the video file. Select 'Discard' to play the majority of the video files full screen without black borders.
- At the 'Subtitle' fields, you can choose whether the subtitles need to be big, normal or small. You can also set the transparency and the color of the subtitles.
7.0 Using the DVB-T function
The EM7095 is equipped with a DVB-T tuner. This means the EM7095 is able to receive free-to-air television and radio stations. During the following chapter we will explain how to setup the EM7095 in order to receive these cannels.
7.1 Searching for channels
- Go to the 'Channel Search' icon.
- Use the arrow keys to select 'Country'.
- Select the country where you are located. Press the 'OK' button, then press the 'Return' button.
- Now select 'Auto Search' and press the 'OK' button.
- The EM7095 DVB-T host starts searching for available broadcastings, both
television and radio broadcastings.
- Once the EM7095 has finished searching, the 'Installation Guide' appears.
- Press the 'Exit' button.
7.2 Editing channels
It is also possible to edit the found channels, move them to another position on the list and change the name of the channels.
- Go to the 'Program' icon.
- Select 'Program Edit' and press the 'OK' button.
- Select a channel. If you want to place a channel on top of the list, press the red 'Move' button and browse to the top of the list.
- Press the red 'Move' button again. The selected channel has now been placed on top of the list.
- If you want to 'lock' a channel, then press the yellow button on the remote. A lock icon appears behind the name of the channel. Watching a 'locked' channel requires a password to be watched. The default password is '000000'.
Hint: Press the blue button on the remote to delete a channel.
7.3 Using the received channels
Now the channels have been received and are stored, you are able to view the television channels and you can listen to the received radio channels.
- Press the 'Exit' button a few times. The EM7095 will exit the menu and you will see a television channel.
- Use the alphanumeric buttons to select another channel, you can also use the arrow keys to select another television channel.
- If you want to listen to a radio channel, press the 'TV/RADIO' button on the remote control to switch to the radio mode. Use the arrow keys to select another radio station.
8.0 Using the record function
You can also use the EM7095 as a recording device, meaning you can record TV channels. Use the following steps to record television channels.
- Go to the 'USB' icon.
- Use the arrow keys to select 'PVR Configure' and press the 'OK' button.
- Select 'Record Device' and press the right arrow key. The EM7095 will search for connected USB drives.
- If found, the USB drive will be mentioned behind 'Disk'. The used file system (media type), disk space and the amount of free disk space will also be
mentioned.
- Press the 'OK' button, then press the 'Return' button.
Hint: You can also format the hard disk using the 'Format' function.
8.1 Recording channels
- Select a channel and press the 'OK' button.
- The channel or broadcasting will be displayed.
- Press the 'REC' button to start recording. A notification appears: "Enter record...waiting". Press the 'OK' button. The device starts recording the current program.
- Once you have finished recording, press the 'Stop' button. A notification appears: 'Do you want to stop?' Press the 'OK' button.
While the EM7095 is recording, you can change the channel in order to watch another channel. The EM7095 keeps recording the other channel.
8.2 Making recordings using 'Time scheduling'
It is possible to make recordings using a preset time and channel using the 'Time schedule' function. This way, the EM7095 can make recordings on it's own. There is no need to stay at home! Use the following steps to make recordings using the 'time schedule' function.
- Select a channel and press the 'OK' button.
- The channel will be displayed.
- Press the 'EPG' button.
- Press the 'Info' button. A 'schedule' popup appears.
- Press the red button.
- Select the channel type you want to record at 'Channel type'. Choose 'TV' if you want to record a television broadcasting.
- Choose the channel at 'Channel no'.
- Set the start date at 'M/D/Y'. This means 'Month, Date, Year'.
- Set the starting time of the recording at 'Start Time'.
- Set the end time of the recording at 'End Time'.
- Set 'Mode' to 'Record'.
- Press the 'OK' button. The EM7095 will start recording at the set date and starting time and will stop recording at the set end time.
8.3 Playing recorded channels
Of course, it is possible to playback the recorded channels. Handy, in case you have recorded a movie or a football match.
- Go to 'USB' and press the 'OK' button.
- Select 'Multimedia' and press the 'OK' button.
- Select 'PVR' and press the 'OK' button. The USB device will be accessed automatically.
- Select the folder 'PVRRECORD' and press the 'OK' button.
- Select the recording you want to watch and press the 'OK' button. The recorder program will automatically start.
- Press the red button on the remote control to view the program full screen.
Hint: Use the yellow button to remove a recording from the USB device
8.4 Use the Time Seek (Goto) function
Once a recording is being played, you can use the 'Time Seek' button on the remote control to navigate to a specific timeframe within the recording. This is perfect if you want to rewind of move forward to a specific point in the recording.
- Press the 'Time Seek' button on the remote control.
- You will see a 'GoTo' popup. You can fill in the desired timeframe in the recording using the arrow keys of the remote control and press the 'OK' button.
- The recording will start the playback on the timeframe you have chosen.
9.0 Playing Media from USB devices
If you have connected a USB hard disk or USB memory stick, you can playback the available media from the connected USB devices, since the EM7095 DVB-T host can also be used as a media player. The EM7095 can play many sorts of video files. Video files like .MOV, .MKV, .AVI and VIDEO_TS files are supported. We will explain how to view or play the different media types.
9.1.1 DVD playback
The EM7095 is able to playback DVD files. DVD files made by yourself, can be played without any problems.
The EM7095 does not play commercial DVD's equipped with a CSS security. However, DVD's without security can be played.
9.1.2 DVD Video\_Ts
- Go to the 'USB' icon.
- Use the arrow keys to select 'Multimedia' en press the 'OK' button.
- Select 'Movie' and press the 'OK' button.
-
Select the folder where the DVD files are located and press the 'OK' button.
-
Select the name of the DVD and press the 'OK' button.
- Select the 'VIDEO_TS' folder and press the 'OK' button.
- Select a .VOB file and press the 'OK' button. The video files will automatically be started.
- Press the red button on the remote control to view the DVD in full screen.
9.3 Playing other video formats
The EM7095 plays almost all other video formats like .AVI, .MKV etc. Use the following steps to play other video formats.
- Go to the 'USB' icon.
- Use the arrow keys to select 'Multimedia' en press the 'OK' button.
- Select 'Movie' and press the 'OK' button.
- Select the folder where the video file is located, and press the 'OK' button.
- Select the name of the video file and press the 'OK' button. Playing the video file will start automatically.
- Press the red button on the remote control to view the video file in full screen.
Note: Press the 'Subtitle' button to activate the subtitles.
Note: Some MKV files do have subtitles in the MKV file itself. It is possible to add a SRT subtitle file, but then, the MKV file must not have a subtitle in the MKV itself. SRT subtitles can only be used without having the subtitles in the MKV itself. You can always put the SRT file into the MKV container using ‘MKVMERGE’ which you can download from the internet.
9.4 Playing music and other audio
- Go to the 'USB' icon.
- Use the arrow keys to select 'Multimedia' en press the 'OK' button.
- Go to 'Music' and press the 'OK' button.
- Select the folder where the files are located and press the 'OK' button.
- Select the name of the file you want to play and press the 'Play' button.
- The music or audio file will start to play.
- If you have multiple audio files listed, the EM7095 will playback these files once the selected file has finished playing.
Hint: You can playback a music file and then use the menu of the EM7095. The selected music or audio file will be heard as background music.
9.5 Playing photos and images (slideshow)
- Go to the 'USB' icon.
- Use the arrow keys to select 'Multimedia' en press the 'OK' button.
-
Go to 'Photo' and press the 'OK' button.
-
Select the folder where the images are located and press the 'OK' button.
- Select the image you want to play and press the 'OK' button.
- The image will be shown according to settings as you have setup in the chapter 'Photo Setup'.
Hint: If you want to see a slideshow with background music, then select an audio track as described in chapter ‘Playing music and other audio’.
10.0 Other functions
Besides the already mentioned functions, there are some functions which are not mentioned yet. Some of these functions are explained in the following chapter.
Time: Select the 'Time' icon to setup the time and time zone. You can also setup a timer which switches the device off.
System: Select the 'System' icon and set a parental control (Age indication). You can also set a password and restore the device to factory settings.
USB: Select the 'USB' icon. You can update the device using the 'Software update' option. A USB disk with firmware software is needed.
11.0 Frequently asked questions
Q: I am playing a file which has (digital) sound. My television is connected to the EM7095 using a DVI adapter plug, but I do not hear any sound. What is causing this?
A: DVI only delivers image, not sound. If you are using a DVI adapter plug, make sure you use the optical, coaxial or white and red composite cables for sound.
Q: The manual mentions the EM7095's ability to play media. What formats and codec's are supported by the EM7095?
A: The EM7095 supports the following:
Video formats: TS, TRP, VOB, AVI, MKV, MOV, MPG, DAT, DivX, MJPEG.
Video codec's: MPEG1, MPEG2, MPEG4, H.264, MOTION JPEG.
Audio format: DOLBY DIGITAL, DTS STEREO (Downmix), AAC, MP3, WMA.
Photo formats: JPG, JPEG, BMP, PNG.
Q: What file systems does the EM7095 support?
A: The EM7095 can read from FAT32, NTFS and EXT2/3 file systems.
Q: Does the EM7095 support EPG (Electronic Program Guide)?
A: Yes, the EM7095 does support EPG. Once a channel is selected, press the 'EPG' button on the remote to view the EPG function.
12.0 Service and support
This users manual has been carefully written by Eminent's technical experts.
If you have problems installing or using the product, please fill out the support form at the website. This users manual has been carefully written by Eminent's technical experts. If you have problems installing or using the product, please fill out the support form at the website www.eminent-online.com/support.
You can also contact us by phone. Below you will find a list with phone numbers for each supported country.
Country Phone number Rate per
minute*
Belgium (Dutch) 070 277 286 €0.30
Belgium (French) 070 277 286 €0.30
Denmark +45 69918565 Local Costs
Finland +35 8942415826 Local Costs
Germany 1805 982 234 €0.14
Italy +39 0240042016 Local Costs
Norway +47 21075033 Local Costs
Spain 807 080 042 €0.41
Sweden +46 840 309985 Local Costs
The Netherlands 0900-3646368 €0.45
UK 905 871 0013 £0.30
* Rates mentioned in this table do not include cell phone charges.
13.0 Warranty conditions
The five-year Eminent warranty applies for all Eminent products unless mentioned otherwise before or during the moment of purchase. When having bought a second-hand Eminent product the remaining period of warranty is measured from the moment of purchase by the product's first owner. The Eminent warranty applies to all Eminent products and parts inextricably connected to and/or mounted on the main product. Power supply adapters, batteries, antennas and all other products not integrated in or directly connected to the main product and/or products of which, without reasonable doubt, can be assumed that wear and tear show a different pattern than the main product are not covered by the Eminent warranty. Products are not covered by the Eminent warranty when exposed to incorrect/improper use, external influences and/or when opened by parties other than Eminent.
14.0 Declaration of Conformity
To ensure your safety and compliance of the product with the directives and laws created by the European Commission you can obtain a copy of the Declaration of Conformity concerning your product by sending an e-mail message to: info@eminent-online.com. You can also send a letter to:
Eminent Computer Supplies
P.O. Box 276
6160 AG Geleen
The Netherlands
Clearly state ‘Declaration of Conformity’ and the article code of the product of which you would like to obtain a copy of the Declaration of Conformity.

text_image
EMINENTWWW.EMINENT-ONLINE.COM
Trademarks: all brand names are trademarks and/or registered trademarks of their respective holders. The information contained in this document has been created with the utmost care. No legal rights can be derived from these contents. Eminent cannot be held responsible, nor liable for the information contained in this document.
Eminent is a member of the Intronics Group