DELV-SDI10-16X9 - Speaker Delvcam - Free user manual and instructions
Find the device manual for free DELV-SDI10-16X9 Delvcam in PDF.

| Product Type | Active Speaker |
| Model | DELV-SDI10-16X9 |
| Brand | Delvcam |
| Dimensions (W x H x D) | 16 x 9 x 7 inches (approx.) |
| Weight | 6.2 lbs (approx.) |
| Power Supply | AC 100-240V, 50/60Hz |
| Power Output | 30W RMS |
| Frequency Response | 60 Hz - 20 kHz |
| Impedance | 8 Ohms |
| Sensitivity | 88 dB |
| Connectivity | Bluetooth, 3.5mm aux, RCA input |
| Speaker Type | 2-way, bass reflex |
| Driver Size | 4 inch woofer, 1 inch tweeter |
| Controls | Volume, bass, treble (knobs) |
| Indicators | Power LED (blue) |
| Enclosure Material | MDF wood with vinyl finish |
| Placement | Bookshelf, desktop |
| Operating Temperature | 41°F - 95°F (5°C - 35°C) |
| Storage Temperature | -4°F - 140°F (-20°C - 60°C) |
| Cleaning | Wipe with dry soft cloth; avoid liquids |
| Safety | Do not expose to moisture; unplug during storms |
| Repairability | Replaceable fuse; contact support for other parts |
| Warranty | 1 year limited |
Frequently Asked Questions - DELV-SDI10-16X9 Delvcam
User questions about DELV-SDI10-16X9 Delvcam
0 question about this device. Answer the ones you know or ask your own.
Ask a new question about this device
Download the instructions for your Speaker in PDF format for free! Find your manual DELV-SDI10-16X9 - Delvcam and take your electronic device back in hand. On this page are published all the documents necessary for the use of your device. DELV-SDI10-16X9 by Delvcam.
USER MANUAL DELV-SDI10-16X9 Delvcam
natural_image
Motorcyclist riding a blue racing bike on a road, displayed on a monitor screen (no visible text or symbols)General Information
Thank you for choosing our TFT LCD (liquid crystal display) monitor. This product employs integrate circuits, low power consumption, and no radiation emission. It has fashion designed appearance and good portability. The TFT LCD screen is suitable for director in inspection of photography effect. Moreover, this product is able to be used in office, at home, or other proper positions. Please enjoy the benefits of convenience, safety, and space-saving from this TFT LCD monitor in different ways.

To ensure the best use of this product, please read this manual carefully
beforehand.
CAUTIONS
- Please use the adapter attached in the accessories.
- Please keep away from strong light while using this product in order to obtain the clearest and the most colorful pictures.
- Please avoid heavy impact or drop onto the ground.
- Please do NOT use chemical solutions to clean this product. Please wipe with a clean soft cloth to maintain the brightness of the surface.
- Please follow the instructions and trouble-shootings to adjust the product. Other improper adjustment may result in damage. Any further adjustment must be performed or conducted by a qualified technician.
- Please unplug the power and remove the battery if long-term no-use, or thunder weather.
Table of Contents
- PRODUCT DESCRIPTION ----
- REMOTE CONTROL----
- POWER SOURCE ----
- SETTING MENU ----
- ACCESSORIES ----
- PARAMETER ----
- TROUBLESHOOTING ----
- REMARK
1. PRODUCT DESCRIPTION

natural_image
Computer monitor displaying a sunset sky with control buttons, shown above an audio device labeled 8-2-1 (no readable text or symbols on the monitor itself)-
Power:ON/OFF ; switch concurrence battery indicator light (red while standby; green while working)。
-
Infrared signal receiver (work with remote control).
-
A/V: circularly switch among HDMI, YPbPr, Video 1, Video 2, and SDI (Note: SDI optional).
-
▶: Right selection key, to select items on OSD menu. Press to adjust brightness among 6 levels.
-
◀: Left selection key, to select items on OSD menu.
-
MENU: To activate OSD (on-screen display) menu. Long press to zoom in/out pictures automatically when receiving HDMI (High-Definition Multimedia Interface) signals.
-
+: Volume up, or value up while using menu setting functions.
-
-: Volume down, or value down while using menu setting functions.
text_image
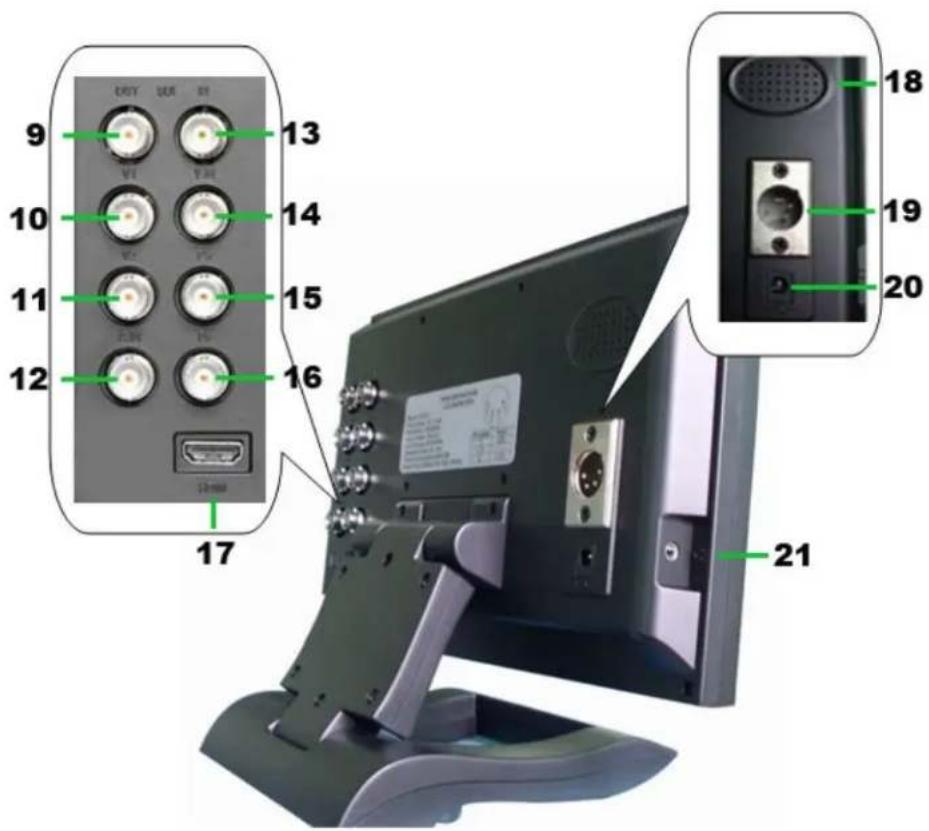
9 10 11 12 13 14 15 16 17 18 19 20 21| 9. SDI signal output. |
| 10. Video 1 signal input. |
| 11. Video 2 signal input. |
| 12. Audio signal input. |
| 13. SDI (Serial Digital Interface) signal input. |
| 14. Y signal input. |
| 15. Pb signal input. |
| 16. Pr signal input. |
| 17. HDMI (High Definition Multimedia Interface) signal input. |
| 18. Speakers |
| 19. 4-pin XLR DC power input. |
| 20. DC power input. |
| 21. EAR: Earphone jack |
2. REMOTE CONTROL

text_image
2 3 7 4 MENU 6 1 5 8 REMOTE CONTROL| 1. Power |
| 2. Mute button |
| 3. Display switch among HDMI、YPbPr、Video 1, Video 2, and SDI (optional, must with necessary equipment) circularly.(Note: SDI optional) |
| 4. MENU: enter menu function setting |
| 5. ▲: Up move; or change brightness among 6 levels |
| 6. ▼: Down move |
| 7. ◀: Left move; or volume down; or increase the function values in menu settings |
| 8. ▶: Right move; or volume up; or decrease the function values in menu settings |
3. POWER SOURCES
This product package comes with a 12V/1.5A DC adapter plug into the DC power input (See PRODUCT DESCRIPTION 20).
Also, this product is capable to use the power from your camcorder via the 4-pin XLR interface (See PRODUCT DESCRIPTION 19).
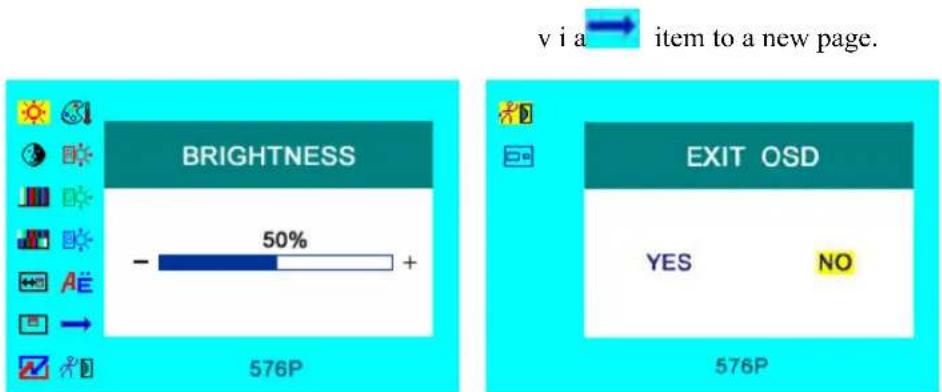
4. SETTING MENU
Before setting the menu functions, please make sure the device is connected correctly.
When power on, press "MENU" on the device (See PRODUCT DESCRIPTION 5) or on the remote controller (See REMOTE CONTROLLER 4). The menu of function setting will display on the screen.
Press ◀/▶ buttons on the device or ⚠️/▼ buttons on the remote controller to select items on the left of the display. Then press + / – buttons on the device or ⏻/▼ buttons on the remote controller to change the values.
The following pictures are the setting displays of different modes.
- OSDYPbPr/HDMI/SDI setting menu 2. Miscellaneous setting menu under
(Note: SDI optional)
YPbPr/HDMI/SDI modes enter
text_image
v i a → item to a new page. BRIGHTNESS 50% - + 576P EXIT OSD YES NO 576PPicture: YPbPr/HDMI/SDI setting screen
3. OSD AV setting menu (Video 1/Video 2)
The auto-detected AV format displays at the bottom of the screen.
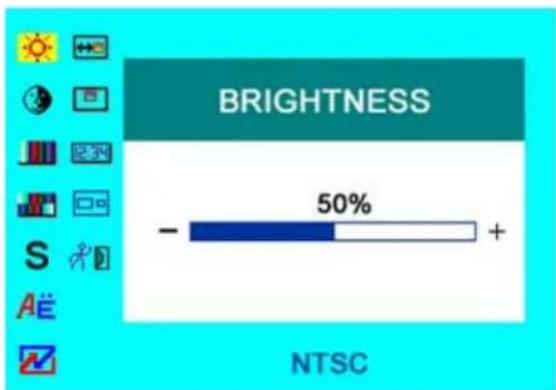
bar
BRIGHTNESS | Category | Value (%) | |---|---| | - | 50 | | + | 1 |Picture: AV setting screen
- Icon description:
| Icon | Name | Function |
 | Brightness Adjust the level | of brightness |
 | Contrast Adjust the level of contrast | |
 | Saturation Adjust the level of saturation | |
 | Tint Adjust the tint of image | |
 | OSD H-Position Adjust the on-screen-display horizontally | |
| [DSAD] | OSD V-Position Adjust the on-screen-display vertically | |
 | Reset Select “Yes” to reset the adjustment as manufacture parameters. | |
 | Color temperature | Choose the color temperature. Options: User, 6500°K, 7500 °K, or 9300 °K. |
 | Red | Note: Only can available under “User” mode to meet the color value you need. |
 | Green | |
 | Blue | |
 | Language Choose language between English and Chinese | |
 | Miscellaneous Enter to next page (See picture below) for miscellaneous selections | |
 | Exit OSD Select “Exit” to quit the on-screen-display menu. | |
 | Display mode Shift display mode between 4:3 and 16:9. | |
 | Sharpness Adjust the sharpness of picture | |
| 12:34 | OSD Duration | Adjust the display duration of OSD from 5-100 seconds. |
5. Accessories
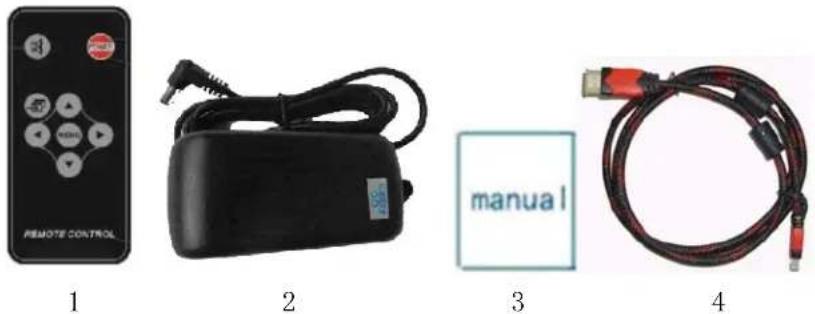
1
2
3
4
- Remote control
1 piece
- 12V DC adapter
1 piece
- User manual
1 piece
- HDMI cable (Optional).
1 piece
6. MAIN PARAMETERS
| Panel Size | 10.1” TFT LCD (16:9) |
| Screen Resolution | 1024×600 |
| Brightness | 250cd/m2 |
| Contrast | 500 : 1 |
| Viewing Angle | 140°/ 110°(H/V) |
| Input Voltage | DC 12V (XLR DC Connection) |
| Input Signal | HDMI,YPbPr,AV1/2,SDI(Note:SDI optional) |
| SDI/HDMI/YPbPr Mode | 480i/p、576i/p、720p、1080i(50/60)、1080p(50/60) |
| Color System | PAL/NTSC |
| Current | 500mA |
| Standby Current | ≤50mA |
| Power Consumption | ≤6W |
| Audio Output | ≥250mW |
| Mounts Process | Standard VESA (75mm) Sockets |
| Size:(long × wide × high) | 259mm×170mm×36.5mm |
| Weight | 1144g |
7. TROUBLE SHOOTING
1. Only black-and-white display:
Check whether the color saturation and brightness are properly setup.
2. Power on but no pictures:
Check whether the cables of Video, HDMI, DVI (Digital Visual Interface), and/or SDI (optional) are correctly connected. Please use the standard power adapter coming with the product package. Improper power input may cause the device.
3. Wrong or abnormal colors:
Check whether the cables are correctly and properly connected. Broken or loose pins of the cables may cause a bad connection.
4. Remote controller doesn't work:
Check whether the battery is well charged and properly installed into the device. The signal of the remote controller may interfered by some obstacles or obstructions.
5. When on the picture shows size error:
Long press “MENU” to zoom in/out pictures automatically when receiving HDMI (High-Definition Multimedia Interface) signals.
5. Other problems:
Please press "MENU" button and choose 📋 to reset to manufactory default values.
8. NOTE
It is normal to see some bright lines appear on the screen when turn off the device.