GPSlim 239 - Browser HOLUX - Free user manual and instructions
Find the device manual for free GPSlim 239 HOLUX in PDF.

User questions about GPSlim 239 HOLUX
0 question about this device. Answer the ones you know or ask your own.
Ask a new question about this device
Download the instructions for your Browser in PDF format for free! Find your manual GPSlim 239 - HOLUX and take your electronic device back in hand. On this page are published all the documents necessary for the use of your device. GPSlim 239 by HOLUX.
USER MANUAL GPSlim 239 HOLUX
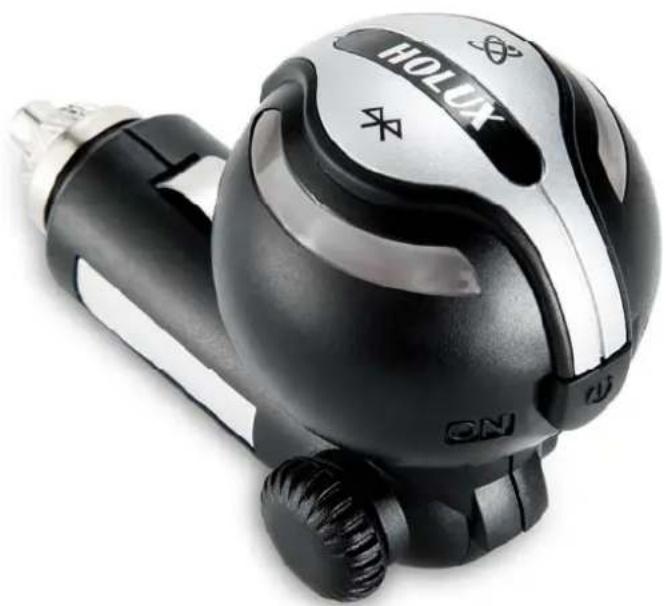
Bluetooth GPS Receiver
natural_image
Close-up of a black and silver HOLUX remote control device with visible branding and buttons (no text-heavy elements)
Bluetooth®
HOLUX
Technology, Inc.
GR-239 Bluetooth GPS Receiver Made in Taiwan
Bluetooth®


FCC ID: RJIGR-239XX
023730
CE
Declaration of Conformity
The following products is herewith confirmed to comply with the requirements set out in the Council Directive on the Approximation of the laws of the Member States relating to R&TTE Directive (1999/5/EC) that include the Electromagnetic Compatibility Directive (89/336/EEC) and Low Voltage Directive (73/23/EEC). The listed standard as below were applied:
The following Equipment:
Product : GR-239 Bluetooth GPS Receiver
Trade name : HOLUX
Model Number : GR-239××
This product is herewith confirmed to comply with the requirements set out in the Council Directive on the Approximation of the laws of the Member States relating to R&TTE Directive (1999/5/EC) that include the Electromagnetic Compatibility Directive (89/336/EEC) and Low Voltage Directive (73/23/EEC), the following standards were applied:
1999/5/EC:
ETSI EN 300 328 :
ETSI EN 301 489-17
ETSI EN 301 489-1 :
73/23/EEC:
EN 60950-1 :
The following importer/manufacturer is responsible for this declaration:
Company Name : HOLUX Technology, Inc
Company Address : 1F, No.30, R&D Rd. II, Hsinchu City 300, Taiwan (R.O.C.)
Telephone : 886-3-6687000 Facsimile : 886-3-6687111
Person is responsible for marking this declaration:
Wen Cheng Chung
Name (Full Name)
June-09-2006
Date
President
Position/ Title
Wenckenp
Legal Signature

About This Manual
Thank you for choosing Holux GR-239 Bluetooth GPS Receiver. This manual helps you to familiarize yourself with this product to best suit your needs. Keep this manual for future reference.
Warranty
The GPR-239 Bluetooth GPS Receiver is warranted to be free from defects in material and functions for a period of one year from the date of purchase. If there is a product failure of within this period (under normal conditions), a replacement will be provided at no charge to the customer.
Copyright Information
No part of this manual, including the products and software described in it, may be reproduced, transmitted, transcribed, stored in a retrieval system, or translated into any language in any form or by any mean, without the express written permission of Holux Technology, Inc.
Copyright© 2006 Holux Technology, Inc. All Rights Reserved.
Safety Information
- When using this product, heed the safety precautions to reduce the risk of fire, electric shock, or personal injury.
- Read and understand all instructions.
- Unplug this unit from the cigarette lighter adapter before cleaning. Use a dampen cloth for cleaning. Do not use liquid or aerosol cleaners.
- Do not disassemble the device. The product contains no user-replaceable parts.
Table of Contents
- Product Overview....1
- Package Contents ...... 2
- Main Features....3
- Getting Started .... 4
4.1. Hardware Overview....4
4.2. Using the GR-239 5
4.3. Data Port......6
4.4. Connecting the Antenna....7
4.5. Bluetooth Installation....7
4.6. Installing the Testing Program....10
4.7. Connecting to a Notebook....14
4.8. Driver Installation 15
-
Troubleshooting....17
-
Specifications....18
1. Product Overview
The HOLUX GR-239 Bluetooth GPS Receiver is a complete GPS solution featuring Bluetooth and UART interface for high sensitivity to tracking signals. The GR-239 design is based on SiRF Star III Single Chip Architecture and is powered directly from a cigarette lighter, which saves the trouble of charging the device.
The GR-239 is a dual-function GPS receiver. It not only transmit satellite information through the PDA or Notebook with Bluetooth capability but is also a G-Mouse GPS receiver and through a USB data cable to deliver satellite signal to the device without Bluetooth capability.
This positioning application meets your needs with car navigation, mapping, surveying, security, agriculture and features needed. The GR-239 connects to other device through Bluetooth or Serial Port Profile (SPP). It supports NMEA 2.2 output protocol, which helps to save satellite information such as the satellite signal status, the last location, date and time of last use.
With low power consumption, the GR-239 tracks up to 20 satellites at a time, re-acquires satellite signals in 100 ms and updates position data every second. Trickle-Power allows the instantaneous start and Push-to-Fix permits users to obtain a quick position fix even if the receiver is usually off.
2. Package Contents
Congratulations on your purchase of the GR-239 Bluetooth GPS Receiver. Before you start using your GR-239 Bluetooth GPS Receiver, check that your package contains the following items. If anything appears to be missing or damaged, contact your local Holux dealer or distributor for a replacement.
| GR-239 Bluetooth GPS Receiver | Warranty card Tool CD | |
 |  | |
| MMCX Active antenna (optional) USB data cable (optional) | ||
 |  | |
* USB data cable can be used for data transfer between GR-239 and Notebook / PC.
3. Main Features
- Compact design integrated with cigarette lighter adapter for easy use in car.
- 20 parallel satellite-tracking channels for fast acquisition and reacquisition. *①
• Supports NMEA0183 v2.2 data protocol or SiRF binary code. - 100% compatible with Bluetooth™ Serial Port Profile (SPP).
- Designed with SiRF Star III Single Chip architecture which draws power from car battery; no power adapter required.
- Function as a G-Mouse GPS receiver through a USB data cable to deliver satellite signals to device directly.
• Features MMCX Active antenna for getting better satellites signal.
4. Getting Started
This section describes the driver installation procedure, gives a brief introduction of the hardware and software, and covers the installation of testing program. Read this section carefully to learn more about your Bluetooth GPS receiver.
4.1. Hardware Overview
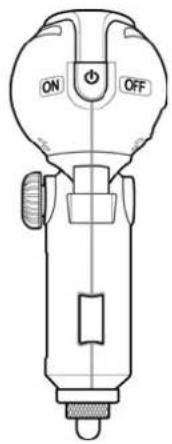
4.1.1 Front View

text_image
Bluetooth (Blue LED) GPS (Orange LED) Power Switch Locking Screw4.1.2 Rear View

text_image
Antenna Connector4.1.3 LED Status
| LED Name Status Definition | ||
| Bluetooth (Blue LED) | Flashing once per second | Offline/ Searching Bluetooth device |
| Flashing once every three seconds | Transferring data | |
| (Orange LED) | Constant light on Acquiring satellites GPS | |
| Flashing once per second Position fixed | ||
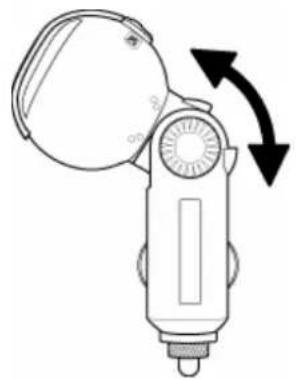
4.2. Using the GR-239
-
Adjust the Receiver Head.
-
Carefully unscrew the locking screw on the side of the receiver.
- Move the receiver head to the required position.
-
Screw the locking screw back tightly.
-
Insert the Receiver.
-
Insert the GR-239 into the lighter slot of your car.
- Adjust the receiver head vertically by 90 degrees.
natural_image
Line drawing of a mechanical device with a circular component and directional arrows indicating rotation (no text or symbols)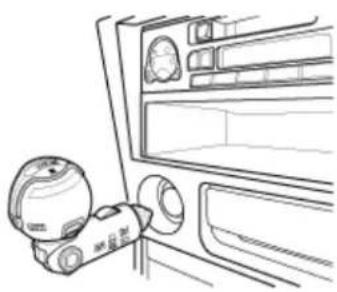
natural_image
Line drawing of a car interior showing dashboard, steering wheel, and rear seats (no text or symbols)- Switch on the Power.
Slide the power switch to the ON position.
- Establish Bluetooth Link.
- Refer to 4.5 Bluetooth Installation in the user manual for further details if you have any problems establishing the link.

text_image
ON OFF
WARNING:
Do not place the GR-239 under strong sunlight for a long time. Do not place it in a high temperature environment, or near heat radiating devices such as a stove or radiator. Doing so will cause the device to malfunction.
4.3. Data Port
Below listed the description of the GR-239 USB data port.

text_image
PIN 5 PIN 1| PIN Function | Signal and | description |
| 1 | GND | Power and |
| 2 | NC | N/A |
| 3 | TXD | Data output pin. Transfers data to external device. (Output voltage range: CMOS 3.0V Level) |
| 4 | RXD | Data input pin. Transfers data from external device to GPS. (Input voltage range: CMOS 3.0V Level) |
| 5 | NC | N/A |
syste
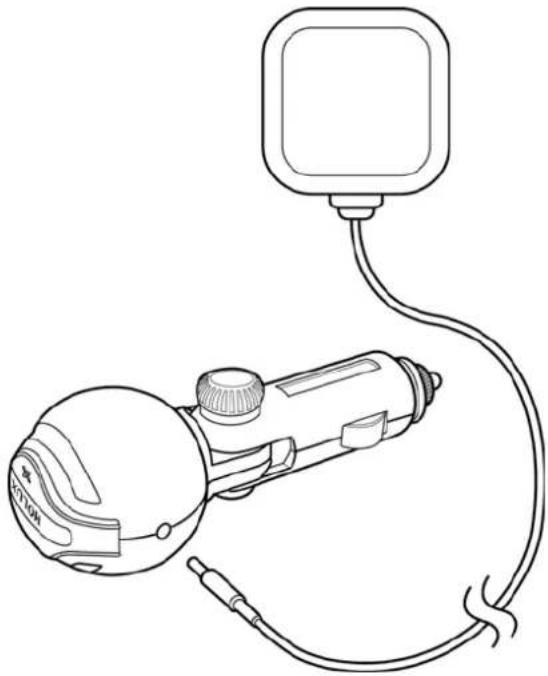
4.4. Connecting the Antenna
Connect the MMCX Active antenna to the antenna connector as shown.
natural_image
Line drawing of a handheld device connected to a wall-mounted device (no text or symbols)4.5. Bluetooth Installation
Follow the instructions below to link your GR-239 Bluetooth GPS Receiver to a PDA (Personal Digital Assistant).
- Activate "Bluetooth Manager" on your pocket PC. Tap New, Connect, to access other devices via Bluetooth.
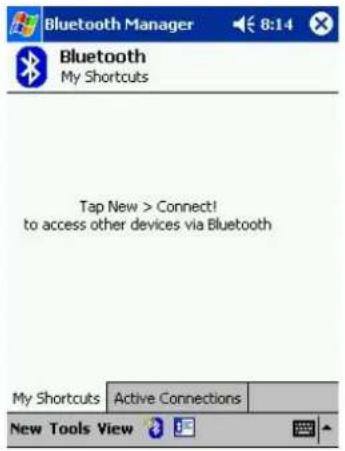
text_image
Bluetooth Manager 8:14 Bluetooth My Shortcuts Tap New > Connect! to access other devices via Bluetooth My Shortcuts Active Connections New Tools View
text_image
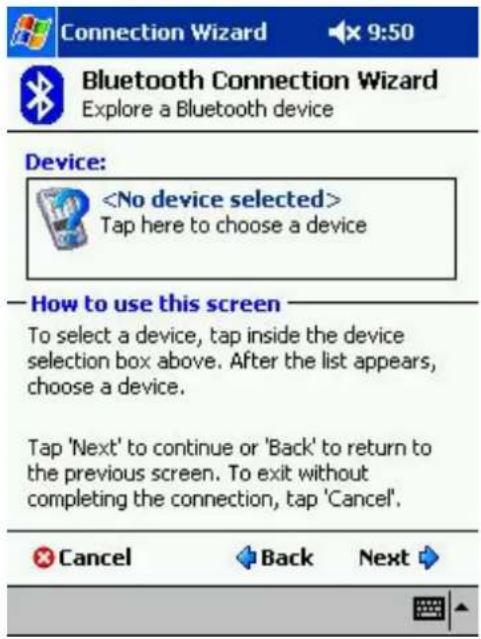
Bluetooth Manager 8:15 Bluetooth My Shortcuts Tap New > Connect! to access other devices via Bluetooth Connect! Active Connections New Tools View- Search Bluetooth device "Holux GR-239". Select Explore a Bluetooth device, and tap Next.
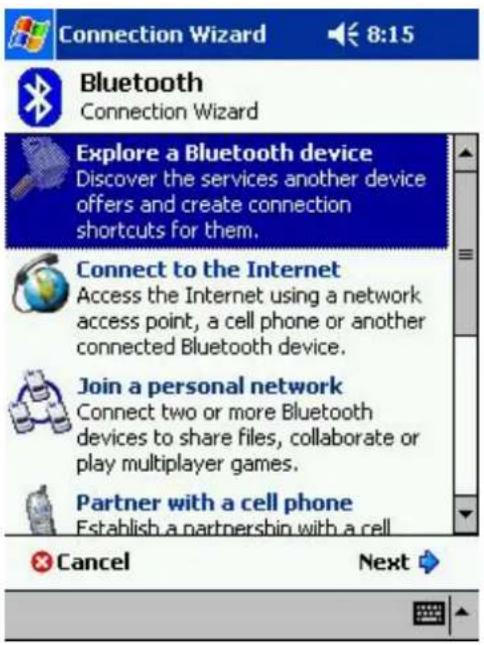
text_image
Connection Wizard 8:15 Bluetooth Connection Wizard Explore a Bluetooth device Discover the services another device offers and create connection shortcuts for them. Connect to the Internet Access the Internet using a network access point, a cell phone or another connected Bluetooth device. Join a personal network Connect two or more Bluetooth devices to share files, collaborate or play multiplayer games. Partner with a cell phone Establish a partnership with a cell Cancel Next- Search for the Bluetooth device. Tap Next, and then select Holux GR-239.
text_image
Connection Wizard 9:50 Bluetooth Connection Wizard Explore a Bluetooth device Device:
text_image
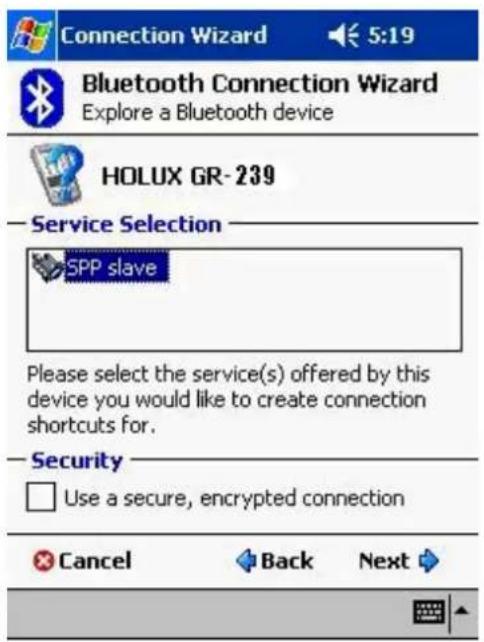
Connection Wizard 8:16 ok Bluetooth Browser Please select a device: HOLUX GR-239 Cancel View- To establish Bluetooth link, select Connect to SPP Slave, tap Next and then Finish.
text_image
Connection Wizard Bluetooth Connection Wizard Explore a Bluetooth device HOLUX GR-239 Service Selection SPP slave Please select the service(s) offered by this device you would like to create connection shortcuts for. Security Use a secure, encrypted connection Cancel Back Next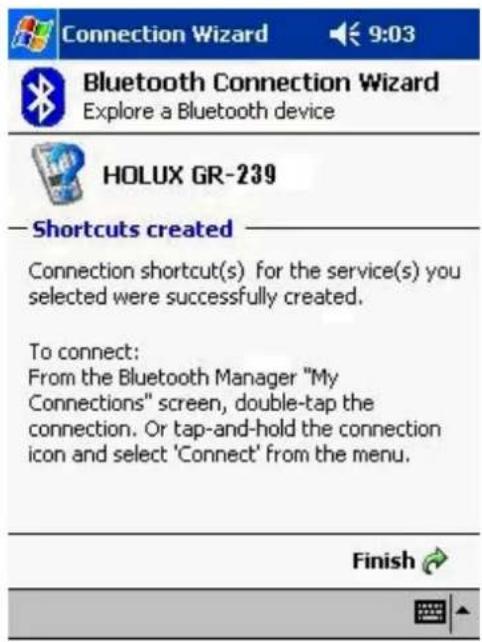
text_image
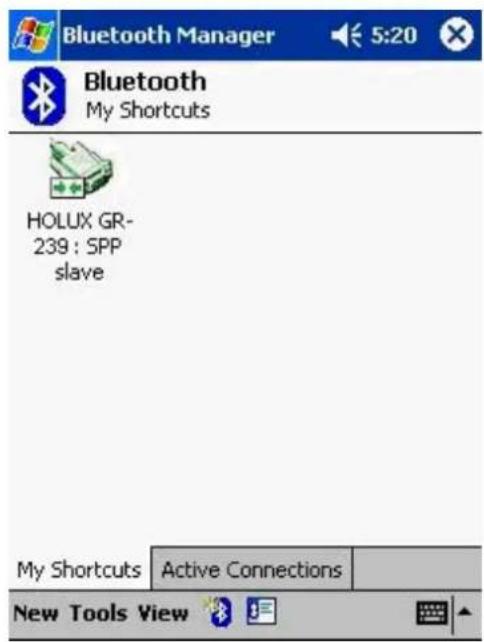
Connection Wizard 9:03 Bluetooth Connection Wizard Explore a Bluetooth device HOLUX GR-239 —Shortcuts created Connection shortcut(s) for the service(s) you selected were successfully created. To connect: From the Bluetooth Manager "My Connections" screen, double-tap the connection. Or tap-and-hold the connection icon and select 'Connect' from the menu. Finish- Tap Holux GR-239: SPP slave, and select Connect from the dropdown menu. The installation has been completed.
text_image
Bluetooth Manager 5:20 Bluetooth My Shortcuts HOLUX GR- 239 : SPP slave My Shortcuts Active Connections New Tools View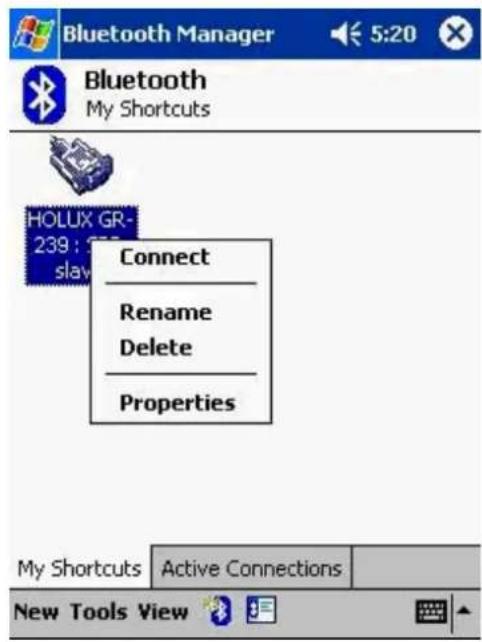
text_image
Bluetooth Manager 5:20 Bluetooth My Shortcuts HOLUX GR- 239 : slav Connect Rename Delete Properties My Shortcuts Active Connections New Tools View4.6. Installing the Testing Program
You can install the GPS viewer program from the supplied CD to check current positioning and satellite signal reception.
To install Microsoft Active Sync to your PC, refer to your Pocket PC manual for installation procedures.
- Connect your Pocket PC cradle to the UART port on your PC. The Microsoft ActiveSync will detect your Pocket PC automatically.
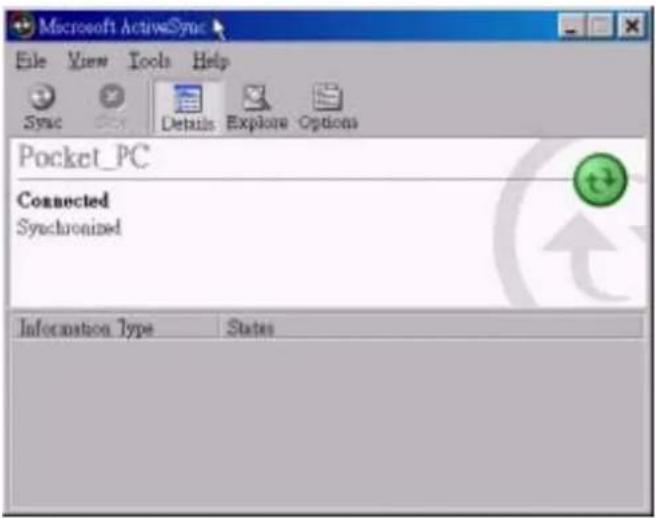
text_image
Microsoft ActiveSync File View Tools Help Sync Details Explore Options Pocket_PC Connected Synchronized Information Type States- Double-click the GPSViewer.exe on your PC. The Holux GPSViewer.exe program will install automatically.
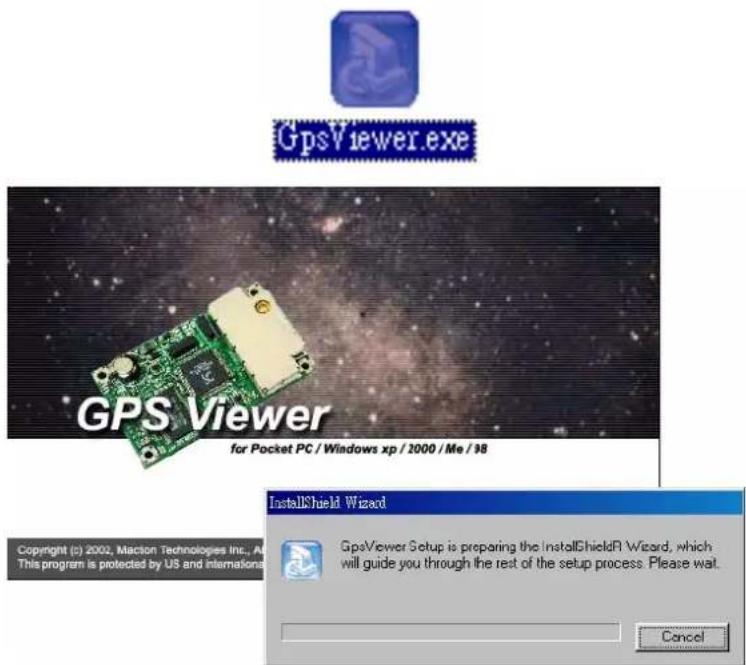
text_image
GPS Viewer.exe GPS Viewer for Pocket PC / Windows xp / 2000 / Me / 98 Copyright (c) 2002, Macion Technologies Inc., As This program is protected by US and internation InstallShield Wizard GpsViewer Setup is preparing the InstallShieldR Wizard, which will guide you through the rest of the setup process. Please wait. Cancel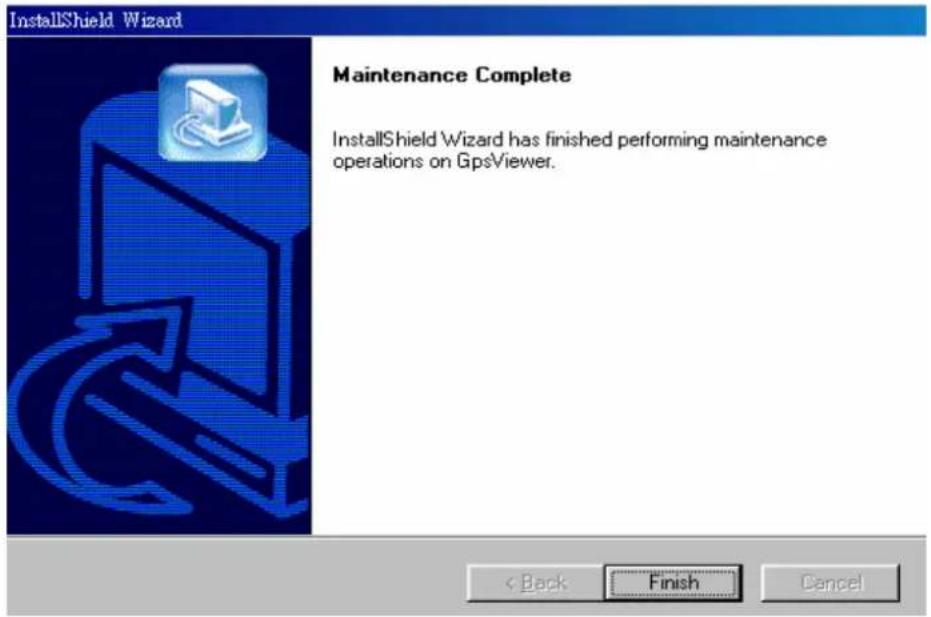
text_image
InstallShield Wizard Maintenance Complete InstallShield Wizard has finished performing maintenance operations on GpsViewer.3. Click Start, Programs, GPSViewer on your PDA.
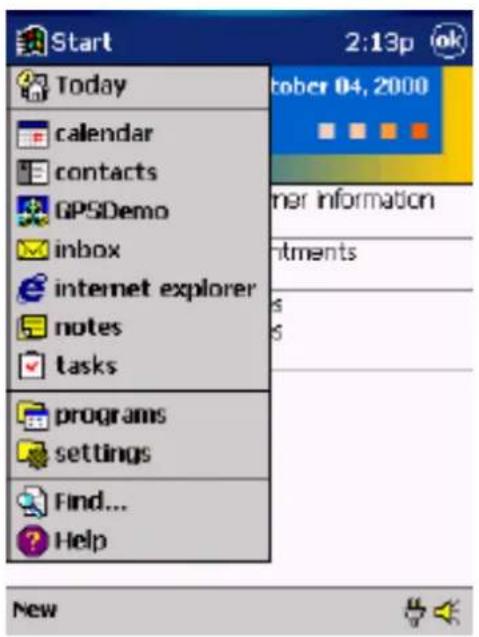
text_image
Start Today calendar contacts GPSDemo inbox internet explorer notes tasks programs settings Find... Help 2:13p October 04, 2000 Other information Instruments New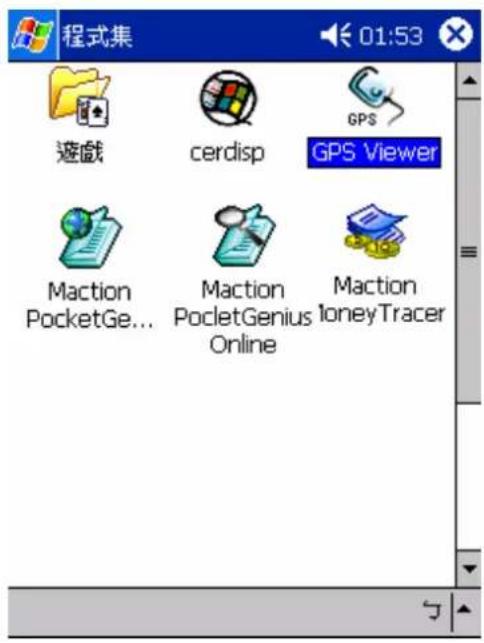
text_image
程式集 01:53 遊戲 cerdisp GPS GPS Viewer Maction PocketGe... Maction PocketGenius Online Maction IoneyTracer- The following screen appears after GPSViewer is opened.

text_image
GPS Viewer 10:02 Com Port: COM1: Baudrate: 38400 Scan... Open GPS Power Save WAAS/EGNOS Hot Start Cold Start Warm Start Setup GPS Status Tools- Set Baud rate to 38400. Click the Scan button to scan for COM Port. Select your COM Port (COM1\~COM10), and click Open GPS.
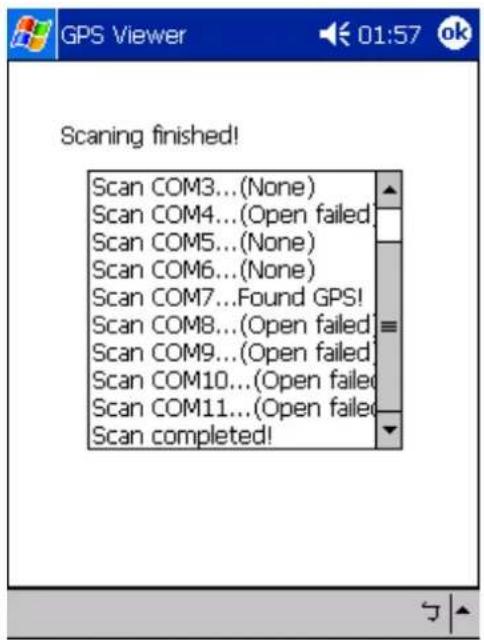
text_image
Scanning finished! Scan COM3...(None) Scan COM4...(Open failed) Scan COM5...(None) Scan COM6...(None) Scan COM7...Found GPS! Scan COM8...(Open failed) Scan COM9...(Open failed) Scan COM10...(Open failed) Scan COM11...(Open failed) Scan completed!
text_image
GPS Viewer Com Port: COM8: Baudrate: 38400 Scan... Open GPS Power Save WAAS/EGNOS Hot Chat Cold Chat Warm Chat Setup GPS Status Tools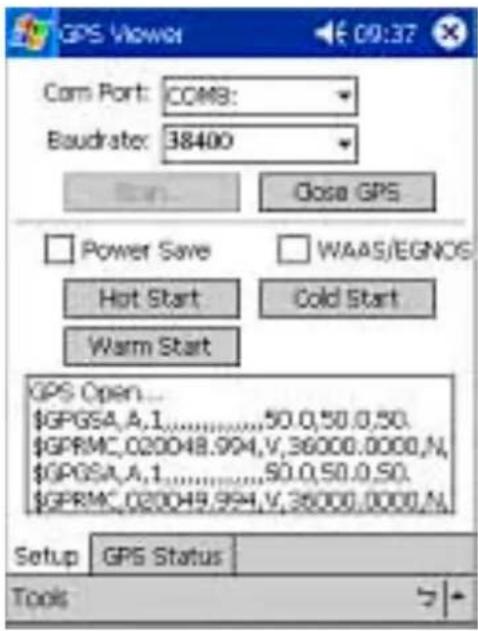
text_image
GPS Viewer Com Port: COMB: Baudrate: 38400 Close GPS Power Save WAAS/EGNOS Hot Start Cold Start Warm Start GPS Open... $GPGSA,A,1......50.0,50.0,50. $GPRMC_020048.994,V,36000.0000,N, $GPGSA,A,1......50.0,50.0,50. $GPRMC_020049.994,V,36000.0000,N Setup GPS Status Tools- Select GPS Status to view the satellite diagrams as shown below.
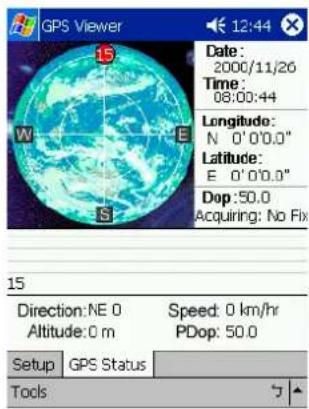
text_image
GPS Viewer 12:44 Date: 2000/11/26 Time: 08:00:44 Longitude: N 0'0'0.0" Latitude: E 0'0'0.0" Dop:50.0 Acquiring: No Fix 15 Direction:NE 0 Altitude:0 m Speed: 0 km/hr PDop: 50.0 Setup GPS Status Tools
text_image
GPS Viewer Date: 2000/11/26 Time: 08:01:07 Longitude: N 0'0'0.0" Latitude: E 0'0'0.0" Dop:50.0 Acquiring: No Fix 95 25 6 10 31 9 24 3 15 11 5 30 22 Direction:NE 0 Altitude:0 m Speed: 0 km/hr PDop: 50.0 Setup GPS Status Tools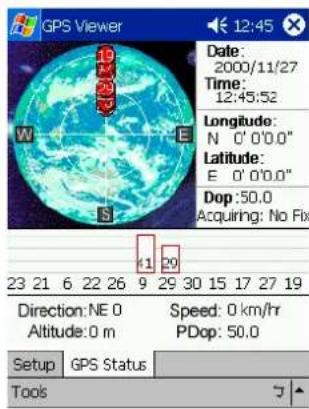
text_image
GPS Viewer Date: 2000/11/27 Time: 12:45:52 Longitude: N 0'0'0.0" Latitude: E 0'0'0.0" Dop:50.0 Acquiring: No Fix 23 21 6 22 26 9 29 30 15 17 27 19 Direction:NE 0 Altitude:0 m Speed: 0 km/hr PDop: 50.0 Setup GPS Status Tools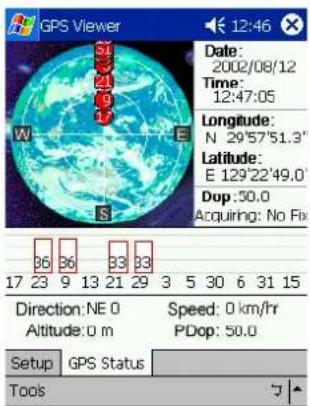
text_image
GPS Viewer Date: 2002/08/12 Time: 12:47:05 Longitude: N 29°57'51.3" Latitude: E 129°22'49.0" Dop: 30.0 Acquiring: No Fix Direction: NE 0 Altitude: 0 m Speed: 0 km/hr PDop: 50.0 Setup | GPS Status | Tools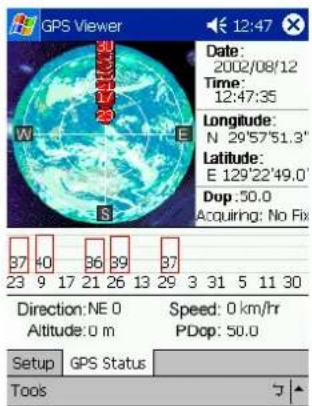
text_image
GPS Viewer Date: 2002/08/12 Time: 12:47:35 Longitude: N 29°57'51.3" Latitude: E 129°22'49.0" Dop: 50.0 Acquiring: No Fix 37 40 36 39 37 23 9 17 21 26 13 29 3 31 5 11 30 Direction: NE 0 Speed: 0 km/hr Altitude: 0 m PDop: 50.0 Setup GPS Status Tools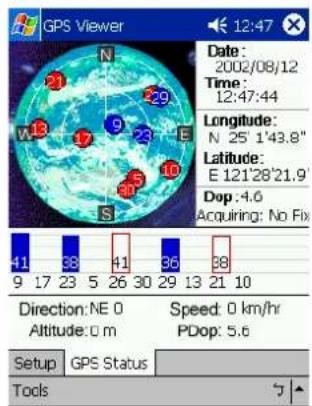
text_image
GPS Viewer Date: 2002/08/12 Time: 12:47:44 Longitude: N 25'143.8" Latitude: E 121'28'21.9" Dop: 4.6 Acquiring: No Fix Direction: NE 0 Altitude: 0 m Speed: 0 km/hr PDop: 5.6 Setup GPS Status Tools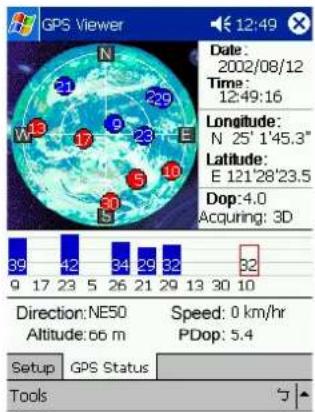
text_image
GPS Viewer Date: 2002/08/12 Time: 12:49:16 Longitude: N 25' 1'45.3" Latitude: E 121'28'23.5" Dop: 4.0 Acquiring: 3D Direction: NE50 Altitude: 56 m Speed: 0 km/hr PDop: 5.4 Setup GPS Status Tools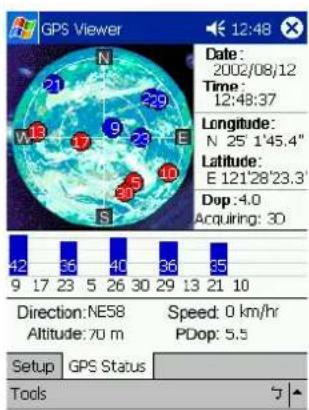
text_image
GPS Viewer Date: 2002/08/12 Time: 12:48:37 Longitude: N 25'1'45.4" Latitude: E 121'28'23.3" Dop: 4.0 Acquiring: 30 Direction: NE58 Altitude: 70 m Speed: 0 km/hr PDop: 5.5 Setup GPS Status Tools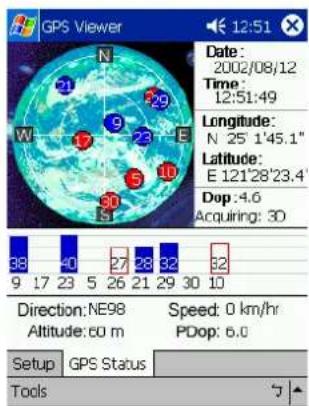
text_image
GPS Viewer Date: 2002/08/12 Time: 12:51:49 Longitude: N 25' 1'45.1" Latitude: E 121'28'23.4" Dop: 4.6 Acquiring: 30 Direction: NE98 Altitude: 60 m Speed: 0 km/hr PDop: 6.0 Setup GPS Status Tools4.7. Connecting to a Notebook
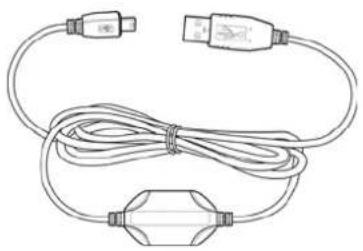
Connect your GR-239 Bluetooth GPS Receiver to your Notebook for data transfer as shown below.

text_image
Diagram showing a laptop connected to an astronaut's device via cable, with an inset magnified view of the device's internal components.4.8. Driver Installation
You need to install a driver for the USB data cable before using it to connect to your notebook or PC for data transfer.
System Requirement
CPU: IBM, Pentium, or other compatible PC
Memory: 16 MB or above
System: Windows 98/ME/2000/XP
Installation:
- Copy the driver file from <GR-239→ Choose the Language you want to install → USB Driver→Win98_2k_XP ∪USB-V2.1.0.exe from the tool CD provided to the hard disk on your computer.
- Run the USB-V2.1.0.exe file.
- Connect the USB data cable to the USB port of your computer. Your computer will detect a plug & play device and start installation automatically.
After the software installation has been completed, confirm the COM Port generated by your computer for the GR-239 USB device.
- Click
→ → . - In Control Panel, select
to display the System Properties window. Next, click tab. - Click
to display a list of all the hardware installed on your computer. - Select
and check if <USB to Serial Port (COM#), the virtual COM Port created by the USB driver is in the list. If so, the installation is successful and you can start using the GR-239.
Notes:
- The “#” represents the virtual COM port number. The default value for general UPS device is COM1. You need to configure the COM Port number in your navigation software in accordance with the USB COM port number generated by your computer. Failure to do so will result in the navigation software not being able to receive satellite signals.
- It is prohibited to operate this system while driving your car.
- Before you setting, while the car is stationary, ensure that you have searched for and fixed your position using the positioning function.
- GPS signals are unable to go through non-transparent objects, such as tall buildings, tunnels, underpasses, and forests. Bad weather may also effect the signal reception. If your car window heat shield contains metal, the receiver will not be able to pick up GPS signals.
- All wireless communication products, such as mobile phones and speed limit warning systems will interfere with the communication satellite and will affect signal reception.
- For further information, refer to the user's manual in the supplied CD-ROM.
- GR-239 passkey: 0000 (For security purpose, some PDAs will prompt users for the GR-239 passkey.)
5. Troubleshooting
| Problems | Reasons | Methods |
| No position output but the timer is counting. | Weak or no GPS signal can be received at the current location. | Connect an external antenna (optional) to the connector on top of your GR-239, and then run the GPSViewer with cold start again. |
| When outdoors, GPS signal is blocked by building or car roof. | Go to an open space and run GPSViewer Cold start function and try again, or connect an external antenna to improve signal reception. | |
| GPS doesn’t work. | Bluetooth function unstable. | Turn the GR-239 off and on again. Restart your PDA or PC. If it still fails to operate, reinstall the software as described in 4.5 Bluetooth Installation. |
| COM port cannot detect the GR-239 Bluetooth Receiver. | Incomplete installation or other device is using the same COM port. | Complete the installation of the GR-239 Bluetooth Receiver or stop the other device which is using the COM port. |
| Cannot detect GR-239 Bluetooth Receiver. | Poor connection. | Restart your PDA or PC and make sure the device is connected correctly. |
6. Specifications
| Item | Specification | |
| Receiver L1, C/A code | ||
| Update Rate 1 Hz | ||
| Acquisition Time *1 | Reacquisition: 0.1 sec. averagedHot Start: 1 sec. averagedWarm Start: 38 sec. averagedCold Start: 42 sec. averaged | |
| Position Accuracy *1 | Non DGPS (differential GPS) | |
| Position Velocity Time | 5-25 m CEP without SA0.1 m/sec.1 μ sec. sync. GPS Time | |
| EGNOS/WAAS< 2.2 meters, horizontal 95% of time< 5 meters, vertical 95% of time | ||
| Dynamic Conditions *1 | AltitudeVelocityAccelerationJerk | 18,000 meters (60,000 feet) max.736 m/s (1000 knots) max ±4G max.20 m/s max. |
| Antenna Type Built-in | patch antenna | |
| Minimum signal tracked *1 | -159 dBm | |
| Dimension | 41 mm (Diameter) x 105.3mm (total length)78 mm (length of cigarette lighter adapter) | |
| Weight | <56g | |
| External Antenna Type | MMCX | |
| LED Function Bluetooth, navigation update status indication | ||
| Operating Temp. -10°C to +60°C | ||
| Item | Specification | |
| Storage Temp. -20°C to +70°C | ||
| Operating humidity 5% to 95% non condensing | ||
| Protocol and interface | NMEA output protocol: V2.2StandardBaud rate 38400 bpsData bit 8Parity NStop bit 1Format GGA(1), GSA(5), GSV(5), RMC(1), VTG(1) | |
| OptionalFormat GLL, SiRF binary | ||
| InterfaceCompatible with Bluetooth device with Serial Port Profile (SPP)BluetoothTM version 1.2 compliantBluetoothTM Class 2 operation (10 meters)Frequency: 2.400 to 2.480 GHzModulation: FHSS/ GFSKRF channels: 79Output terminal: Mini-USB (Data I/O CMOS Level) | ||
- The specifications are subject to change without notice.
*① : Cit. SiRF's original chipset spec.
FEDERAL COMMUNICATIONS COMMISSION INTERFERENCE STATEMENT
This equipment has been tested and found to comply with the limits for a Class B digital device, pursuant to part 15 of the FCC Rules. These limits are designed to provide reasonable protection against harmful interference in a residential installation. This equipment generates, uses and can radiate radio frequency energy and, if not installed and used in accordance with the instructions, may cause harmful interference to radio communications. However, there is no guarantee that interference will not occur in a particular installation. If this equipment does cause harmful interference to radio or television reception, which can be determined by turning the equipment off and on, the user is encouraged to try to correct the interference by one or more of the following measures:
-Reorient or relocate the receiving antenna.
-Increase the separation between the equipment and receiver.
-Connect the equipment into an outlet on a circuit different from that to which the receiver is connected.
-Consult the dealer or an experienced radio/ TV technician for help.
CAUTION:
Any changes or modifications not expressly approved by the grantee of this device could void the user's authority to operate the equipment.
This device complies with Part 15 of the FCC Rules. Operation is subject to the following two conditions: (1) this device may not cause harmful interference, and (2) this device must accept any interference received, including interference that may cause undesired operation.
RF exposure warning
The equipment complies with FCC RF exposure limits set forth for an uncontrolled environment.
The equipment must not be co-located or operating in conjunction with any other antenna or transmitter.
English: This equipment is in compliance with the essential requirements and other relevant provisions of Directive 1999/5/EC.