EPO 500 - Microwaves Equator - Free user manual and instructions
Find the device manual for free EPO 500 Equator in PDF.

| Product Type | Microwave |
| Brand | Equator |
| Model | EPO 500 |
| Capacity | 20 Liters |
| Power Output | 800 Watts |
| Power Consumption | 1200 Watts |
| Voltage | 230V / 50Hz |
| Dimensions (H x W x D) | 26 x 45 x 34 cm |
| Weight | 12 kg |
| Control Type | Dial and buttons |
| Display | LED digital |
| Turntable | Yes, removable glass |
| Door Opening | Side hinge |
| Functions | Auto defrost, timer, multiple power levels, quick start |
| Child Lock | Yes |
| Auto Shut-off | Yes |
| Cleaning | Wipe interior with damp cloth, avoid abrasives |
| Spare Parts Available | Turntable, glass plate, fuse |
| Repairability | User manual includes basic troubleshooting, professional repair recommended |
| Manual | Free PDF download available on notice-facile.com |
Frequently Asked Questions - EPO 500 Equator
User questions about EPO 500 Equator
0 question about this device. Answer the ones you know or ask your own.
Ask a new question about this device
Download the instructions for your Microwaves in PDF format for free! Find your manual EPO 500 - Equator and take your electronic device back in hand. On this page are published all the documents necessary for the use of your device. EPO 500 by Equator.
USER MANUAL EPO 500 Equator
natural_image
Line drawing of a microwave oven with two side outlets and a front panel (no text or symbols)OWNER'S MANUAL
Read the instructions carefully and keep for future reference. Information maybe updated from time to time so please refer to the website for the latest version of the manual.
STOP
DO NOT RETURN TO STORE!
HAVE QUESTIONS OR NEED SERVICE?

1-800-776-3538

Service@ApplianceDesk.com
Warranty
Equator Appliances undertakes to the consumer-owner to repair or, at our option, to replace any part of this product which proves to be defective in workmanship or material under normal personal, family or household use, in USA and Canada, for a period of one year from the date of original purchase. For commercial use, the product is warranted for a period of 90 Days. During this period, we will provide all labor and parts necessary to correct such defect, free of charge, if the appliance has been Installed and operated in accordance with the written instructions with the appliance. Ready access to the appliance, for service, is the responsibility of the consumer-owner. Services would be provided from Monday to Friday between normal business hours.
Exclusions
In no event shall Equator Appliances be liable for incidental or consequential damages or for damages resulting from external causes such as abuse, misuse, incorrect voltage or acts of God. This warranty does not cover service calls which do not involve defective workmanship or materials covered by this warranty. Accordingly, diagnosis and repair costs for a service call which does not involve defective workmanship or materials will be the responsibility of the consumer-owner.
Specifically, the following work is not covered under warranty and does not constitute warranty work:
Installation - e.g. Insufficient spacing around appliance Maintenance - e.g. Cleaning the appliance using solvents Mishandling - e.g. Breakage of knobs, accessories or handle
Most work is covered. The defining factor is, has the machine malfunctioned (Equator Appliances is responsible) or has the customer omitted or done something to cause the machine to malfunction (customer is responsible). Some states do not allow the exclusion or limitation of incidental or consequential damages, so the above limitation of exclusion may not apply to you.
This warranty is given by:
Equator Appliances
10222 Georgibelle Drive, Suite 200
Houston, Texas 77043-5249
For Service:
Call: 1-800-776-3538
Email: service@ApplianceDesk.com
Web: www.ApplianceDesk.com
Business hours: 9:00 am to 5:00 pm weekdays
You can register your Warranty by either of the following methods:
-
Scan QR Code
-
Open Smart Phone
- Open Camera
- Click the Link

text_image
Chat-AI- Register online at ApplianceDesk.com/Warranty
Note: QR Code is also used to obtain Product Information, Manuals and Updates
GENERAL
Since it is a responsibility of the consumer-owner to establish the warranty period by verifying the original purchase date, Equator Appliances recommends that a receipt, delivery slip or some other appropriate payment record be kept for that purpose.
This warranty gives you specific legal rights, and you may also have other rights which vary from State to State.
All rights reserved. Manual subject to change without notice.
Congratulations on your new Electric Pizza Oven!
In addition to its contemporary design, this is a highly sophisticated engineered product that will give you many years of satisfaction.
Here are some of the best reasons for buying your appliance for the ultimate cooking experience:
- 6 styles of pizza, including an option for your custom pizza
- Brick oven uses conductive and radiant heat
• Accessories include baking stone, pizza pan, spatula and roller cutter - Customizable temperature and time settings
• Auto shut off for safety
Safety

- To prevent electric shock, unplug from the outlet when not in use and before cleaning. Allow cooling before cleaning or handling.
- Do not touch hot surfaces.
• To protect against electric shock, do not place any part of the appliance in water or other liquids. - Do not use if cord, plug or appliance is damaged.
- Do not let the cord hang over the edge of the table or countertop, where it could be pulled.
- Do not place appliance on or near a hot gas or electric burner.
- Use only oven safe cookware.
- To avoid burns, use extreme caution when removing items from appliance or disposing of hot grease.
- Do not place any of the following materials in the appliance: paper, cardboard, plastic, and similar products.
- Do not cover any part of the oven with metal foil. This will cause overheating of the oven.
• To prevent fire, do not operate around flammable materials and keep away from items such as curtains. Do not store any items on top of the appliance when in operation. - Do not operate under wall cabinets.
- NEVER leave the appliance unattended during use.
- Use extreme caution when removing pizza pan or pizza stone, as they may be extremely hot.
- Do not place cooking utensils or baking dishes on the glass door.
-
Do not move the appliance if it contains any cooked items.
• Always unplug the unit from the electrical outlet prior to storing. -
Children should be supervised to ensure that they do play with the appliance.
- This appliance is not intended for use by children or persons with reduced physical, sensory or mental capabilities, or lack of experience and knowledge, unless they have been given supervision or instruction concerning use of the appliance by a person responsible for their safety.
Safe Disposal
Eliminate the risk of choking for young children by removing and safely disposing of the power plug cover.
Before discarding the appliance, remove the door.
Please dispose of this appliance in accordance with local regulations.
California Proposition 65
WARNING: This product contains chemical known to the State of California to cause cancer and birth defects or other reproductive harm.
Installation
- Ensure the surface where the Pizza Oven is placed is stable, level, heat-resistant, and clean.
- Do not place the oven on a cloth-covered surface, near curtains, or other flammable materials.
- Do not place the appliance near the edge of a countertop or table.
- Ensure there is a minimum 4 inches (10 cm) of space on both sides of the oven and 6 inches (15 cm) above. This oven can be used outdoors, but it must be positioned away from weather elements that could cause damage. Do not store the oven outdoors.
- This appliance has a power cord that has a grounding wire with a grounding plug. The appliance must be grounded using a 3-hole properly grounded outlet.
- Never cut or remove the third prong from the power cord or use an adapter.
Parts and Accessories

Control Panel
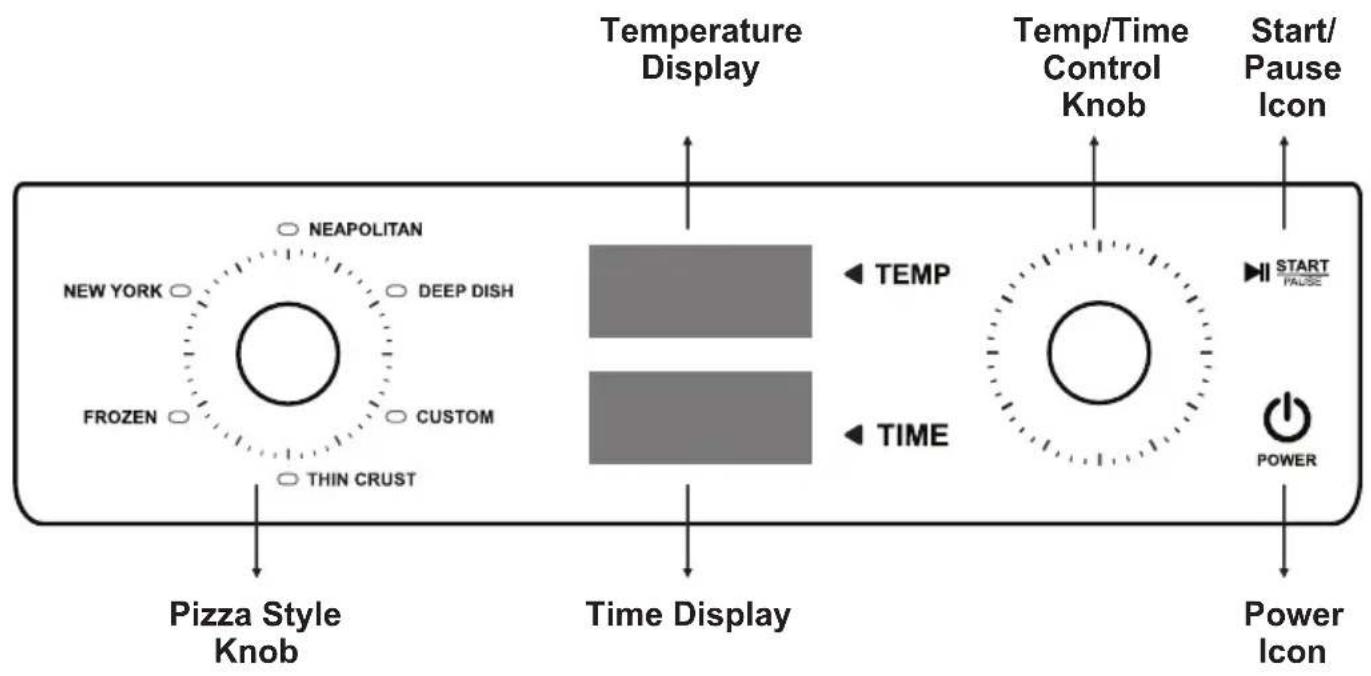
flowchart
graph LR
    A["NEAPOLITAN"] --> B["NEW YORK"]
    B --> C["FROZEN"]
    C --> D["CUSTOM"]
    D --> E["THIN CRUST"]
    E --> F["Pizza Style Knob"]
    G["DEEP DISH"] --> H["TEMP"]
    I["THIN CRUST"] --> J["TIME"]
    K["TEMP"] --> L["Temp/Time Control Knob"]
    M["TIME"] --> N["Temp/Time Control Knob"]
    O["START/Pause Icon"] --> P["POWER"]
    Q["Power Icon"] --> R["Power Icon"]
Before First Use
- Before using the pizza oven for the first time, remove and safely discard any packing materials and promotional labels.
- Remove the pizza stone from its packaging. Gently wipe the top surface with a damp cloth. Dry thoroughly and place the pizza stone in the oven.
- Wipe the inside of the oven with a soft, damp cloth.
When the pizza oven is plugged in, a beep will sound, and the Control Panel will illuminate.
- Press the Power icon
- Turn the Pizza Style Knob to Custom
- Press the Start icon. The temperature and time will flash on the Display and the heating process will begin.
- Ensure the oven is empty and leave it on for 20 minutes.
The pizza oven is now ready to use.
Operation
This appliance is intended for household use only.
Do not use non-stick or coated pans in the oven.
This pizza oven can prepare 6 styles of pizza:
Neapolitan (wood fired brick oven)
Achieve authentic Neapolitan pizza results at home!
Cooks with high heat.
Expect a malleable crust with distinct blisters and charring (leopard spotting).
Deep Dish
Amazing crunchy base, fluffy dough, and plenty of toppings with sauce almost to the edge. Use the pan provided with your pizza oven.
For a crispier crust, par bake your dough before applying sauces and toppings.
Custom
Although there are default settings, you can adjust temperature and time as preferred.
Thin Crust
Roll out the dough thinly which gives the pizza a crisp crust. The topping and sauce can be spread right to the edge.
Frozen
Adjust the temperature and time according to directions on the package of the pizza.
New York
The heat profile has been designed to achieve the iconic New York style pizza. The toppings and crust should be evenly browned, and the pizza should be chewy.
The table below lists the pre-set default temperature, time settings, and the ranges for changing the settings for each pizza style.
| Pizza Style | Default Temperature | Temperature Range | Default Time | Time Range |
| Neapolitan | 750°F | 395-750°F | 6 mins | 1-10 mins |
| Deep Dish | 450°F | 175-750°F | 25 mins | 1-30 mins |
| Custom | 350°F | 175-750°F | 20 mins | 1-60 mins |
| Thin Crust | 500°F | 175-750°F | 10 mins | 1-10 mins |
| Frozen | 450°F | 175-750°F | 15 mins | 1-20 mins |
| New York | 475°F | 175-750°F | 15 mins | 1-20 mins |
Steps for using the Pizza Oven:
- Press the Power icon. A beep will sound, and the Control Panel will illuminate.
- Turn the Pizza Style Knob, on the left side, to one of the 6 selections. The default temperature and cook time will display.*
- Press the Start icon. The cooking will begin.
* Should you want to change the temperature and time:
- Press the Temperature icon and turn the Right knob until the desired temperature is displayed.
- Press the Time icon and turn the Right knob until the desired time is displayed.
- Press the Start icon.
Note: It is recommended that you monitor and stay close to the pizza oven to ensure the pizza does not get overcooked or burned.
Specifications Table
| Model | EPO 500 |
| Capacity | 0.48 cu. ft. / 13.5 L |
| Electrical | 110V / 60Hz |
| Power Rating | 1500W |
| Temperature | 175° - 750° F |
| Net Weight | 24 lbs / 10.9 kg |
| Product Dimensions (HxWxD) inch | 22 x 21 x 15 |
Cleaning and Maintenance
Before cleaning, ensure the oven is turned off by removing the power plug from the power outlet. Allow the oven and all accessories to cool completely before cleaning.
The outer surface of the appliance, the door, interior, and other accessories should all be cleaned after each use.
Do not clean with metal scouring pads or abrasive materials.
Wipe the outer surface with a soft, damp sponge. A non-abrasive liquid cleaner or mild spray solution may be used to avoid the build-up of stains. Apply the cleaner to the sponge, not to the appliance surface, before cleaning.
To clean the glass door, use a glass cleaner or mild detergent and a soft, damp sponge or soft plastic scouring pad. Do not use an abrasive cleaner or metal scouring pad.
Wipe the control panel with a soft damp cloth.
The walls on the inside of the oven feature a non-stick coating for easy cleaning. To clean any splattering that may occur while cooking, wipe the walls with a soft, damp sponge. For stubborn stains, please use a mesh cleaning cloth. Avoid touching the heating elements.
To remove baked-on grease from the accessories, soak the item in warm soapy water then wash with a soft sponge or soft plastic scouring pad. Rinse and dry thoroughly.
To extend the life of your accessories, we do not recommend that these be placed in the dishwasher.
Let all surfaces dry thoroughly before inserting the power plug into a power outlet and turning the appliance on.
Troubleshooting
In most cases, when your Pizza Oven fails to work, the problems arising can be easily solved without having to call for a technician. Before calling for assistance, always check these points.
| Problem | Possible Cause and Solution |
| Oven will not turn on | ·Ensure that the power plug is securely inserted into the outlet. ·Plug the power cord into a different outlet or an independent outlet. ·Reset the circuit breaker if necessary. |
| The temperature light is flashing | ·This indicates that the oven is not yet at the desired temperature for cooking. ·Wait until the light stops flashing before placing your pizza in the oven. |
| Steam is coming out of the oven door | ·This is normal. The oven door is vented to release steam created from high temperatures and high moisture content of food. ·If there is moisture around the base, simply wipe it off. ·It is also recommended to use the oven in a well-ventilated area. |
| Noise from oven after it is off | ·During cooking, cooling fans operate to protect sensitive electronic components from overheating. These fans remain on after cooking until the oven cools down. ·Do not unplug the oven from the wall until these fans turn off. |
| Error codes E1 or E2 display | ·Sensor malfunction. Please call Customer Service. |

natural_image
Simple geometric diagram of a circle with a horizontal line crossing through it (no text or symbols)EQUATOR®
ADVANCED Appliances ≡
Equator Advanced Appliances USA, offers Efficient, High-Quality, and Innovative Easy to Use household appliances.
Our Mission is to simplify domestic chores and save Time, Space, and Energy.
Our Vision is to enhance our Customer's Quality of Life!