FD-39P - Food Dehydrator Nesco - Free user manual and instructions
Find the device manual for free FD-39P Nesco in PDF.

| Product Type | Food Dehydrator |
| Brand | Nesco |
| Model | FD-39P |
| Power Supply | 120V, 60Hz, 600W |
| Number of Trays | 4 standard trays, expandable up to 12 with add-on trays |
| Temperature Range | 95°F to 160°F (35°C to 71°C), adjustable thermostat |
| Heating Element | Rear-mounted, 600W |
| Airflow System | Top-mounted fan with Converga-Flow® technology for uniform drying |
| Dimensions | Approx. 12.5 inches diameter x 10 inches height (with 4 trays) |
| Weight | Approx. 7 lbs |
| Material | BPA-free plastic trays and cover |
| Functions | Drying fruits, vegetables, herbs, jerky, and more |
| Controls | On/off switch with adjustable temperature dial |
| Safety Features | Overheat protection, cool-touch exterior |
| Cleaning and Maintenance | Trays are dishwasher safe; wipe exterior with damp cloth |
| Spare Parts Availability | Replacement trays, mesh sheets, and fruit roll sheets available |
| Repairability | User-replaceable fuse and power cord; professional repair recommended for heating element |
| Warranty | 1-year limited warranty |
| Included Accessories | 4 plastic trays, 1 mesh screen, fruit roll sheet, instruction manual |
| Certifications | ETL listed |
Frequently Asked Questions - FD-39P Nesco
User questions about FD-39P Nesco
0 question about this device. Answer the ones you know or ask your own.
Ask a new question about this device
Download the instructions for your Food Dehydrator in PDF format for free! Find your manual FD-39P - Nesco and take your electronic device back in hand. On this page are published all the documents necessary for the use of your device. FD-39P by Nesco.
USER MANUAL FD-39P Nesco
text_image
outdoor enthusiastsRecipes & Instructions

natural_image
Close-up of a fruit with red and orange petals, no visible text or symbolshealthy eaters

natural_image
Close-up of fresh green leafy vegetables in a circular frame (no text or symbols)gardeners

natural_image
Close-up of a pink flower with a yellow center, no text or symbols visiblecrafters

natural_image
Close-up of several colorful, textured food items arranged in a circular frame (no text or symbols visible)pet owners
natural_image
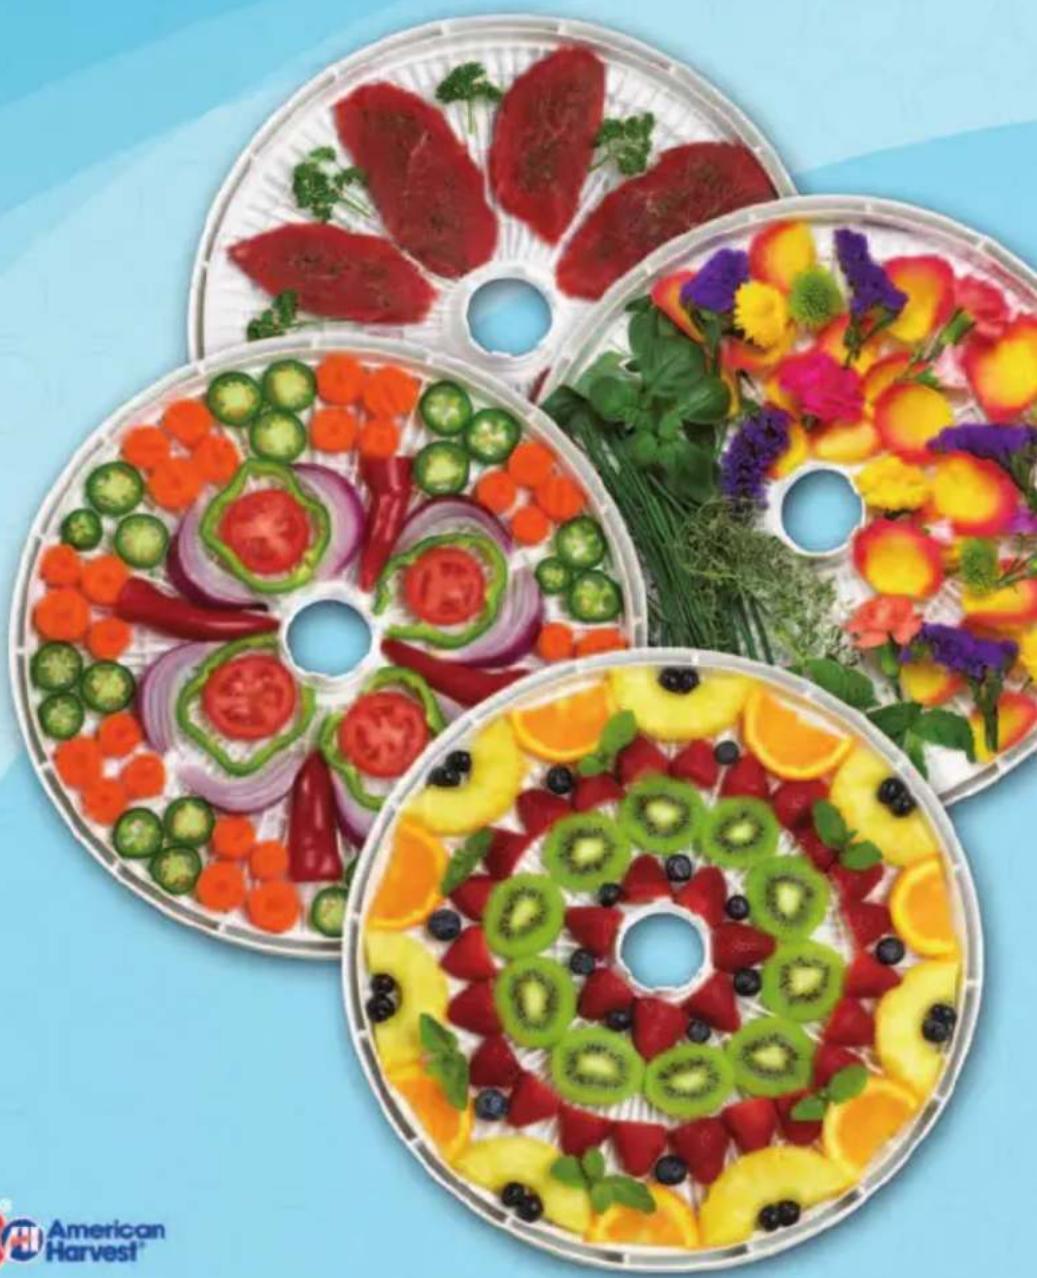
Three circular food cutlery plates with various fruit and vegetable patterns, arranged on a blue background (no text or symbols)NESCO American Harvest®
Dehydrator & jordy maker
& jerky maker
natural_image
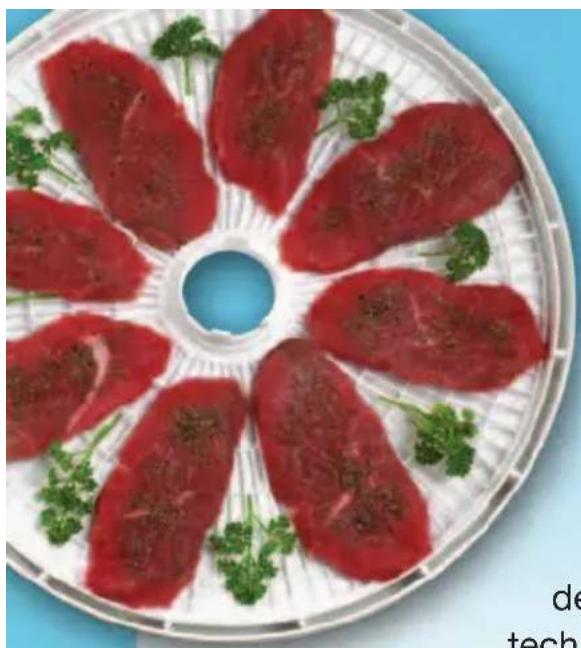
Circular arrangement of red meat slices with green herbs and a central hole, no text or symbols visibleThank you for choosing a Nesco American Harvestdehydrator. We
have been developing and producing dehydrators that provide the best drying technology for over three decades. Drying
food is inexpensive and one of the least timeconsuming of all food preserving methods. Dehydrating is superior to canning, as the high temperatures needed to process canned foods can destroy much of the original food value, especially vitamin C, thiamin and riboflavin. Today, you can enjoy the advantages of preparing dried food in the convenience of your own kitchen.
Nesco®/American Harve®dehydrators are designed with a patented Fan Flow™ Radial Air™ technology which generates fast, even drying with great results in less time. There is no need to rotate the trays. Solid plastic Fruit Roll Sheets may be placed on the tray surface to dry semi-liquids, such as applesauce, without stopping air flow. Flexible Clean-A-Screen are ideal for easy removal of sticky fruits (bananas, pineapples, etc.), as well as drying spices, nuts and herbs. Easy to operate, easy to clean...perfect for the experienced user as well as the beginner.
Your Nesco®/American Harvestdehydrator will provide both satisfying and incredibly nourishing food anytime... at home, at school, at work, at play. Be adventurous, experiment, and then enjoy the "fruits" of your labor!

natural_image
Colorful vegetable arranged on a circular plate, including carrots, tomatoes, cucumbers, and peppers (no text or symbols visible)Recipes & Instructions
Dehydrato & jerky maker

text_image
NESCO® TOGETHER Better Than Ever. American Harvest® Customer Satisfaction™Customer Satisfaction is our Goal
1-800-288-4545
www.nesco.com
Table of Contents
Important Safeguards . . . . . . . . . . . . . . . . . . .
Dehydrator Use and Care . . . . . . . . . . . . . . . .
General Drying Guidelines . . . . . . . . . . . . . . . . .
Selecting Foods To Dry . . . . . . . . . . . . . . . . . . .
Drying Fruits . . . . . . . . . . . . . . . . . . . . . . . .
Pretreating Fruits . . . . . . . . . . . . . . . . . . .
Drying Fruit Rolls . . . . . . . . . . . . . . . . . . . . .
Selection & Preparation .....
Drying & Storage . . . . . . . . . . . . . . . . . . .
Fruit Roll Recipes . . . . . . . . . . . . . . . . . . . .
Fruit Drying Guidelines . . . . . . . . . . . . . . . . .
Drying Vegetables . . . . . . . . . . . . . . . . . . . . . .
Selection & Preparation . . . . . . . . . . . . . . . . .
Drying . . . . . . . . . . . . . . . . . . . . . . . . . . .
Vegetable Drying Guidelines . . . . . . . . . . . . . . .
Recipes . . . . . . . . . . . . . . . . . . . . . . . . . . . . .
Drying Jerky . . . . . . . . . . . . . . . . . . . . . . . .
Selection & Preparation .....
Drying & Storage . . . . . . . . . . . . . . . . . . . .
Jerky Works™ Spice Kit . . . . . . . . . . . . . . .
Storing Your Dried Foods . . . . . . . . . . . . . . . . .
Rehydrating Dried Food . . . . . . . . . . . . . . . . . .
Drying Crafts . . . . . . . . . . . . . . . . . . . . . . . .
Warranty and Service Satisfaction . . . . . . . . . . . .
One Year Limited Warranty . . . . . . . . . . . . . . .
Accessories . . . . . . . . . . . . . . . . . . . . . . . . . .
The Metal Ware Corporation
1700 Monroe Street
P.O. Box 237
Two Rivers, WI 54241-0237
www.nesco.com
1-800-288-4545

text_image
Customer Satisfaction™Para descargar una version espanola de este manual, visite www.nesco.com/spanish
This product is covered by one or more of the following patents: U.S. 4,190,965; 5,420
5,423,249; Australia D102489; other patents pending. © 2007 The Metal Ware Corp. All
Reserved, including the right of reproduction in whole or part. Printed in the U.S.A.
Important Safeguards
This product is designed for household use only
When using electrical appliances, basic safety precautions should always be followed, including the following:
- Read all instructions.
- Do not touch hot surfaces.
- To protect against electrical hazards, do not immerse blower or part of the dehydrator cord or plug, in water or other liquid.
- Close supervision is necessary when any appliance is used by c near children.
- Unplug from outlet when not in use and before cleaning. Allow the unit to cool before putting on and taking off parts.
- Do not operate any appliance with a damaged cord or plug, or the appliance malfunctions, or has been damaged in any manner.
- The use of accessory attachments, not recommended by the appliance manufacturer, may cause hazards.
- Sharp utensils should not be used inside the dehydrator.
- Do not let cord hang over edge of table or counter, or touch
- Do not use outdoors.
- Do not place on or near a hot gas or electrical burner, or in
- Do not use this appliance for other than its intended use.
SAVE THESE INSTRUCTIONS
NOTE: This appliance has a polarized plug (one blade is wider than 1.5). As a safety feature, this plug will fit in a polarized outlet only one v plug does not fit fully in the outlet, reverse the plug. If it still does a qualified electrician. Do not attempt to defeat this safety feature.
Short Cord Instructions — a short power supply cord is provided to risk resulting from becoming entangled in or tripping over a longer cc Extension cords may be used if care is exercised in their use. If an cord is used, the marked electrical rating of the cord should be at I great as the electrical rating of the appliance. The longer cord should arranged so that it will not drape over the table top or counter when pulled on by children or tripped over unintentionally.
Dehydrator Use & Care
Before using your dehydrator for the first time, wash the trays and top cover in warm, soapy water, or in the dishwasher on the top rack (remove before drying cycle). Caution: Do not put the power unit/blower in water or in the dishwasher. Wipe with a damp cloth.
- Set base tray on a sturdy countertop or table, away from sinks or any source of
- Stack additional trays on base tray. Your dehydrator requires a minimum of 5 tray to operate properly, the base tray is included as one of your 5 trays. (You may your dehydrator to 7 total trays with the use of ^ AddeAsTries)
- Place top cover on top tray, insert blower into trays and rotate to lock in place.
- Plug cord into an electrical outlet, switch power to ON and you're ready to dehyd
Trays and Top Cover
Your dehydrator trays and top cover are easy to clean. Simply soak in warm water w detergent for several minutes. A soft bristle brush will loosen food particles that resist soaking. Do not clean with any metal objects or scouring pads, as they tend to dama
Trays and top cover can be washed on top rack of dishwasher, but remove before drying
Blower
It is important that the air vents on blower remain clean and unobstructed. UNPLUG E BEFORE CLEANING. Use a damp cloth or towel to remove dried food particles from b Do not use scouring pads, abrasive cleaners or sharp utensils. Avoid dripping any liquid electrical parts. Do not operate blower alone, or use in any capacity other than the in use. DO NOT OPERATE NEAR OR IMMERSE BLOWER IN WATER OR OTHER LIQUID.
Precautions
When drying meat and dairy products, blot frequently with a paper towel to absorb excess oils.
Follow these safety rules when dehydrating foods:
- Wash hands thoroughly prior to handling food.
- Clean all utensils and containers with a mild solution of detergent, bleach, and wa
- Make sure all counter surfaces and cutting boards are thoroughly cleaned.
- Keep foods in refrigerator before preparing for drying. Store dried foods in refrigeration
• After opening sealed containers of dried food, use food as soon as possible. - Store unused portions of dried food, tightly sealed, in refrigerator to maintain fresh
- Do not dehydrate foods that have been prepared with or marinated in alcohol.
- Trays are only intended to be used with®/Ameridasdarvestood Dehydrator.
Do not use in a conventional oven or with any other appliance. - Do not spray vegetable oil directly onto surface of trays.
General Drying Guidelines
There are no absolutes and quite a few variables in food dehydration. The only way to become proficient is to dry, dry, and dry some more! Certain varieties of produce, the humidity in the air, and even methods of food handling make a difference in the drying and quality of dried product.
- Experiment with different thicknesses of produce, pretreatment versus no pretreatment, and different rehydration methods.
You will determine what works best for your particular needs and preferences.
- To save nutrients and produce a quality product, it is necessary to work fast in preparing foods to dry. Once placed in the dehydrator, foods need to dry continuously for the recommended time. Do not turn off the dehydrator and leave partially dried foods sitting on the trays, as they may spoil or develop “off” flavors.
- Spread all foods evenly to dry in single layers. If slices overlap, the areas that are overlapping will take twice as long to dry.
- Do not add fresh produce to a partially dried batch. It will slow the rate of drying for both products. It is possible however, to combine partially dried foods onto fewer trays.
- Many people have more than one®/American Harvestdehydrator. If you have two, it's easy to combine a load from both dehydrators after a few hours and start a new batch in your second dehydrator using the remaining trays.
Selecting Foods To Dry
Select the best quality produce at the peak of ripeness and flavor. Wash carefully to remove debris, dust and insects. Cut away any bruised or damaged sections.
Labeling
All dehydrated foods should be labeled with the name of the product, date dried and quantity or weight. Clear labeling allows you to rotate foods to minimize waste and nutrient loss.
Storage
The storage area should be cool, dry, and as dark as possible. The darker and cooler storage area, the longer the dehydrated foods will last with good quality and nutritional value. For every 18^ F ( 10^ C) drop in storage temperature, the shelf life of dehydrated f increases three to four times. The ideal storage temperature for dehydrated food is 60^ ( 15^ C) to below freezing. The ideal storage place is your freezer or refrigerator, particularly for storing low-acid foods such as meats, fish, and vegetables.
All fruits dried with skins intact should be packaged and frozen for a minimum of 48 prevent any possibility of insect infestation. Onions and tomatoes are especially prone to absorbing moisture from the air and should be packaged immediately after removing from the dehydrator.
Record Keeping
Recording the following information can be helpful in improving your dehydrating technique and determining quantities of food to dry each season.
- Date dried.
• Quantity dried, including weight of produce before and after drying. - Drying time.
- Packaging: size of containers and packaging materials used.
- Storage temperature.
• Length of storage time before use.
By labeling storage containers with the contents and date dried, you can keep track of your supply, rotate as needed, and avoid mix-ups.
Note: For best operation, always use at least 4 trays when drying in your dehyd
Drying Time
Drying times may vary, depending on the type and amount of food, thickness and evenness of the slices, percentage of water in the food, humidity, temperature of the air and the altitude. Drying times may also vary greatly from one area of the country to another and from day-to-day, depending on the climatic conditions. Record keeping helps you predict future drying times for specific foods.
Testing For Dryness
Food must be carefully monitored near the end of the dehydration process to prevent over-drying. Over-dried foods lose quality in texture, nutrition and taste. To test for dryness, remove a piece of food, allow it to cool, and feel with your fingers to determine dryness:
- Fruits should be pliable and leathery with no pockets of moisture. To check if fruit is dry, tear a piece in half and watch for moisture beads along the tear. If there aren't any, it is sufficiently dry for long term storage.
- Fruit roll-ups should be leathery with no sticky spots.
- Jerky should be tough but not brittle.
- Dried fish should be tough. If the fish is high in fat, it may appear moist due to the high oil content.
- Vegetables should be tough or crisp.
Drying Fruit
Selection
Fruits are ideal to dry because they have a naturally high sugar content. They are high acid (and consequently less prone to spoilage and microorganisms), and taste delicious! Seasonally, fruit can be obtained in bulk from orchards or farms for considerably lower than you may find in the supermarket. Fruits picked at their prime have the highest n sugar content and the best nutritional value. For the best quality product, choose only ripe, unblemished fruits.
Preparation
Wash fruit thoroughly and remove any imperfections. Remove skins (if desired), stems, and stones. Halve or slice in 1/4" to 1/2" circles or slices (a food processor or slicer speed slicing and ensure more uniform slices, which will allow fruits to dry at the san Some fruits have a natural protective wax coating such as figs, prunes, grapes, bluebe cranberries, etc. If you want to dry these fruits whole, dip into boiling water for 1 to (amount of time needed depends on thickness and toughness of skin) to speed dehydr This makes skin more porous by removing the natural wax coating and thereby speeds drying time. This process is called checking. Small lines appear on fruit skin allowing it to escape but may be too fine to be visible.
Many fruits can be dried in halves with pits removed. If they are dried with the skins be sure to place skin-side down to prevent fruit juice and pulp from dripping down the trays. Check frequently near end of drying process and remove pieces as they become. To peel or not to peel is a decision only you can make (if the fruit has been artificial it should definitely be peeled to remove wax). The skin has nutritional value, but skins to be very tough when dried and fruits take longer to dry with skin on. Try fruits being peeled and not peeled – then decide for yourself. Pre-treat if desired and place fruit in preheated dehydrator to dry.
Should I Pre-Treat?
Pre-treatment isn't necessary for most fruits. The majority of fruits are simply sliced and dried. However, some fruits tend to oxidize more than others. Oxidation causes brown or of cut food surfaces when fruit is dried. This causes a loss in flavor and vitamins A Pre-treatment minimizes oxidation, and gives you a superior-quality, better tasting product with less vitamin loss.
Apples, pears, peaches and apricots are better when pre-treated. They are more appetitive have a longer shelf life, and higher nutritional value when pre-treated prior to drying. Fruits, that tend to brown, in a holding solution of ascorbic acid or pineapple juice to browning during preparation. Do not keep cut fruit in a holding solution for more than
Pre-Treatment
Pre-treatments can vary from soaking in fruit juice, ascorbic acid mixtures, syrup blanch steaming, to sulfating. The results of each of these methods also vary. Experiment and for yourself which one you like best.
Use one of the following methods of pretreatment
Natural Pre-Treatment
Fruit juices containing ascorbic acid may be used as a natural pre-treatment to reduce browning. Although there will still be some loss of color, pineapple, orange, lemon, or can be used. Ascorbic acid mixtures, available from your supermarket can also be used the directions on the package. Slice fruit directly into juice or ascorbic acid mixture. Six minutes and place on trays. Fruits can also be dipped in honey or a honey/fruit juice
Syrup Blanching
Fruit which has been syrup blanched is sweeter because it absorbs some of the sugar, the blanching solution. It also tends to be stickier, even though it is rinsed prior to d Prepare a sugar syrup by mixing 1 cup sugar, 1 cup white corn syrup, and 2 cups and add prepared fruit. Simmer for 10 minutes over low heat. Remove and allow to shot syrup 30 to 45 minutes. Drain fruit, rinse lightly with cold water, and place on dry
Sulfating
Soaking fruits in a solution of sodium bisulfite slows oxidation and reduces browning, as the loss of vitamins A and C. Sodium bisulfite may be obtained from wine-making houses. Sulfating isn't recommended for use if individuals are on restricted sodium diets have asthmatic or respiratory conditions. Dissolve 1 tablespoon sodium bisulfite in 1 gal water. Soak 5 to 10 minutes. Rinse.
Garnishes
After fruits have been prepared for drying, garnish with spices, gelatin powders or coco give fruits a snappy flavor. Granola, chopped nuts, poppy seeds, sesame seeds, or sur seeds can also be sprinkled on fruits. These adhere best to fresh fruits if the fruits h first been dipped in a fruit juice or honey. Use your imagination for other dips or spri
Conditioning
Moisture will tend to equalize throughout a container of dried fruit when left at room temperature for several days. If some pieces are drier than others, the conditioning pro will allow the moisture to equalize. If any condensation appears on the lid of the cont fruits are insufficiently dried. Return to the dryer and check periodically for dryness.
Drying Fruit Rolls
Fruit rolls, also known as fruit leathers, are a favorite snack for young and old alike. A chewy fruit product made from puréed fresh fruit which has been dried and rolled in snack sized pieces. Fruit rolls are easy to make and cost less than those bought at
Selection
Almost any fruit will make an excellent fruit roll. Most fruits can also be combined with some fruits, such as apples, are high in pectin and fiber and have an excellent texture dried. The combinations are limitless. Use your imagination and have fun! Use fresh fruit season. You can also use slightly overripe fruits, irregularly shaped fruits, or slightly bruce fruits which would be unsuitable for canning or drying.
Some fruits, such as citrus, should be used in combination with other fruits because they have so much liquid and very little pulp. If you find that a fruit is too runny, combine apple, applesauce or a similar fruit which will give it more substance. When fresh fruits not available, canned fruits (either sweetened or un-sweetened) can be used. Simply draw the liquid, and pour the fruit into the blender. Applesauce can be taken directly from a container for wonderful fruit rolls. Frozen fruits can also be used, although they tend to be a bit more runny. Simply thaw and follow directions for using fresh fruits.
Preparation
Wash fruits and cut away any bruised or spoiled portions. Purée fruit in a blender unt very smooth. In some blenders with some fruits, you may want to add a little juice o start the blending process. Fruits generally need no added sweetening, but if fruits are ripe or particularly tart, you may add light corn syrup or honey. Add 1 or more tables sweetening for each quart of purée, depending on your preference (sugar added to fruit tends to become brittle during storage).
Garnishes
For added variety, sprinkle different garnishes on fruit rolls before they are dried. Try c chopped dates, nuts, raisins, granola, poppy seeds, sesame seeds or sunflower seeds. these garnishes are used, fruit rolls should always be stored in the refrigerator or freez
Drying & Storage
Place a Fruit Roll Sheet on dehydrator tray and wipe lightly with a vegetable oil to pick sticking. Purée should be about 1/4" to 3/8" thick and evenly spread and dried until from leather-like and is pliable, approximately 4 to 8 hours. There should be no sticky spots or underneath the fruit. Remove the leather while it is still warm, roll, cut into smaller pieces (if desired) and wrap in plastic wrap. Individually wrapped pieces of fruit roll should stored in larger airtight and moisture proof containers.
STRAWBERRY RHUBARB FRUIT ROLL
1 cup rhubarb 2 cups strawberries
1/4 cup water 1/2 cup honey
Combine 1/4 cup water and 1 cup rhubarb. Simmer on stove over medium high heat 5 minutes. Add 2 cups strawberries and 1/2 cup honey. Purée to smooth consistency blender. Pour on a Fruit Roll Sheet and dry.
1 quart of boysenberries.
Purée boysenberries in a blender. Strain through cheesecloth to remove seeds.
Place on Fruit Roll Sheet and dry.
YOGURT FRUIT ROLL
Spread homemade or store-bought yogurt (approximately 1/4" thick) on a lightly oiled Fr Roll Sheet. Dry approximately 12 to 14 hours. Experiment until you find the brand which dries most evenly.
APPLESAUCE FRUIT ROLL
2 lbs. apples, peeled, cored and quartered 1/2 cup sugar
1/4 cup lemon juice 1 teaspoon cinnamon
Simmer apples in a saucepan with 1/2 cup water until softened (about 15-20 minutes). lemon juice in blender and gradually add apples. Purée. Add sugar and cinnamon. Mix pour on a Fruit Roll Sheet and dry. If you are going to rehydrate into applesauce, me purée when putting it on tray.
To rehydrate, add 1 cup of water to each cup of fruit roll.
Fruit Drying Guidelines
Expect a variance in time needed to dry different fruits. Drying times are affected by size of load, fruit thickness, moisture content of the food itself, as well as other variations discussed in Drying Time. If pre-treatment is suggested, use one of the pre-treatments, indicated on page 8. The guidelines below are general. For most accurate drying times, keep records of your own specific experiences in space provided under each average time guideline in table below.
Spread fruits in single layers unless otherwise noted.
| Food Preparation Drying Time Uses | |||
| Apples Pare, core, cut in 3/8" 6-12 hrs. Applesauce, pre-treat cobblers, rings, snacks, | pies,breads and cookies | ||
| Apricots Cut in half, remove 12-16 hrs. Desserts, muesli, meat pit and cut in quarters. Pre-treat | |||
| Bananas | Peel, cut in 3/8" slices or divide lengthwise | 12-16 hrs. | Snacks, baby food, granola, cookies, and banana bread |
| Blueberries | Wash and remove stems. Dip in boiling water until skins crack. | 12-16 hrs. | Breads, baked goods, snacks, ice cream, yogurt |
| Canned Drain well. If small, fruit place on mesh screen. | 10-14 hrs. | Snacks, breads, granola | |
| Cherries Wash, remove stems and pit | 20-26 hrs. | Breads, baked goods and snacks | |
| Citrus Peel, Fruits if desired. Slice 3/8" thick | 12-16 hrs. | Favorings when powdered | |
| Cranberries Wash and remove stems. Dip in boiling water until skins crack. | 14-22 hrs. | Breads, baked goods, snacks ice cream, yogurt | |
| Coconut Remove dark outer skin, slice 3/8" thick. | 6-10 hrs. | Cakes, cookies, desserts and granola | |
| Figs Remove stems and halve | 8-15 hrs | Fillings, cakes, puddings, breads and cookies | |
| Grapes Leave whole, remove 10-stems goods, cereals and 32 hrs. Raisins; use in baked snacks | |||
| Kiwi Peel, slice 3/8" to 13-17 hrs. Snacks 1/2" thick | |||
| Mangos Remove skin, slice 10-13 hrs. Snacks, cereals and 3/8" thick from seed baked goods | |||
| Melons Remove skin and 12-16 hrs. Snacks seeds.Slice 1/2" thick | |||
| Nectarines Quarter or slice 3/8" to 1/2" thick. Pre-treat | 6-16 hrs. | Snacks, desserts and baked goods | |
| Oranges, Limes, Lemons Slice 1/4" thick | 6-14 hrs. | Crafts, snacks, baking | |
| Peaches Peel if desired. Halve or quarter. Pre-treat. | 14-18 hrs. Snacks, breads, cobblers, cookies and granola | ||
| Pears Peel, core, and slice 3/8" thick. Pre-treat | 12-16 hrs. Snacks, breads, cookies, fritters and granola | ||
| Pineapple Peel, core, slice 3/8" to 1/2" thick | 12-20 hrs. | Snacks, baked goods, baked granola | |
| Plums Prunes Halve or quarter and remove pit | 12-20 hrs. Snacks, cookies, muffins, bread and granola | ||
| Rhubarb Slice in 1" lengths. Steam until slightly tender | 12-16 hrs. Pies, tarts | and other desserts | |
| Strawberries Halve or slice 1/2" thick | 10-14 hrs. Snacks, cereals, and baked goods | ||
* Times may vary depending on the wattage of the dehydrator.
Drying Vegetables
Some vegetables are quite good dried. Others lose their appeal and are better frozen. Vegetables have a low acid and sugar content that makes them more subject to spoil and tend to have a far shorter shelf life than dried fruits. Packaging and ideal storage conditions are key elements to producing dried vegetables which will taste as good in December as they did in the summer from your garden!
Selection
Choose fresh, crisp vegetables for a high quality dehydrated product. Just like fruits, vegetables should be picked ripe and dried as soon as possible to minimize nutritional
Preparation
Wash vegetables thoroughly and remove any blemishes. Peel, trim, core, and/or slice vegetables.
Blanching
Most vegetables must be blanched, either by steaming over boiling water or in the mix to slow the enzyme action which will continue during drying and storage. Water blanch not recommended because of the loss of water soluble vitamins and minerals.
Note: Blanching softens the cell structure, allowing the moisture to escape more easily and also allows vegetables to rehydrate faster. There is no need to blanch onions, garlic, pepi and mushrooms. Herbs also are not blanched.
Steam Blanching
Use a commercial steamer or a pan with a tight fitting lid and a steaming rack. Bring inch of water to a brisk boil and drop in sliced vegetables. Cover and steam until we are heated completely through, but not cooked. This is usually about 1/3 of the time it to cook the vegetable. Vegetables should still be crunchy. Drain in steamer rack and p immediately on dryer trays.
Microwave Blanching
A microwave is ideal for blanching vegetables. Prepare them in the same manner as for steam blanching. Place them in a microwave-safe dish, cover, and cook on high for at 1/2 of the time required to completely cook the fresh vegetable. Depending on the age design of your microwave, you may want to stop the cooking halfway through and stir vegetables to achieve a more even blanching.
Drying
Load blanched vegetables onto drying trays, making sure that air can move freely between the pieces. For vegetables that tend to clump together, such as corn or peas, stir oco to allow air to reach all of the pieces. Vegetables are dried until they are crisp, tough Package immediately after drying to prevent absorption of moisture from the air.
Hints and Suggestions
CARROTS
to save time grating, dry carrots for salads, carrot cake or coleslaw.
GREEN PEPPER, ONION, CELERY, CHIVES, ETC.,
chop and dry in a one-day effort for use instantly all year!
GREEN BEANS, WAX BEANS & GREEN PEAS
best when used in soups, stews or casseroles.
ONION POWDER
dry the whole vegetable slice until crisp, then either powder or chop in blend
TOMATO SLICES
use for color and crunch when crumbled over a tossed salad. They rehydrate
in soups, stews and casseroles. Tomato leathers can be powdered and used;
instant soup, sauces and paste.
ALL PURPOSE TOMATO SAUCE
Wash and core 15 lbs. of ripe tomatoes. Chop in blender. Chop or grind:
4 large green peppers 2 garlic cloves
3 large onions 1 jar pimentos
3 large carrots
Mix all ingredients together, then blend in portions until smooth. Press through a strain remove any pulp. In a very large kettle (12 qt. or larger) or 2 smaller kettles (6 qts.) mixture to a boil over medium heat. Boil gently, uncovered for about 5 hours. Stir often prevent scorching. Mixture should be thick enough to mound on a spoon. Ladle onto 5 Fruit Roll sheets and dry until crisp. Powder in blender.
Add different amounts of water to your powder mixture to make:
Tomato Paste - 1 t. powder and 1 t. water.
Tomato Sauce - 1 t. powder and 3 t. water.
Tomato Soup - 1 t. powder, 1 t. water and 2 t. cream.
Tomato Juice - 1 t. powder and 1/2 c. water or more.
Adjust amount of water to taste for soup and juice.
Vegetable Drying Guidelines
Vegetables will also vary in their drying times. Blanching decreases drying times, but not all vegetables are blanched. Again, the average drying times below are general and depend on different variables. For more accurate times, keep records of your own spec experience and record them in the space provided under each general time guideline.
Spread vegetables in single layers unless otherwise noted.
| Food Preparation Drying Time Uses | |||
| Artichoke Cut hearts into 1/8" 8-14 strips. Blanch. and fry | hrs. Marinade or dip in batter | ||
| Asparagus Wash and cut into 1" pieces. Blanch. cream | 8-12 hrs. Rehydrate, sauce | serve in | |
| Beans Green/Wax | Remove ends, cut into 1" pieces. Blanch. | 10-14 hrs. | Stews, soups and casseroles |
| Beets | Steam until tender.Cool and peel.Cut into 1/2" pieces | 8-10 hrs. | Soups and stews |
| Broccoli | Wash, cut as for serving.Blanch. | 4-10 hrs. | Soups, quiche or souffles, cream or cheese sauce |
| Carrots | Peel, cut ends, slice in 3/8" thick or shred.Blanch. | 8-12 hrs. | Salads, soups, stews and carrot cake |
| Cauliflower | Wash, cut as for serving.Blanch. | 18-24 hrs. | Soups and stews |
| Celery | Trim, wash and cut 1/2" slices. Blanch in solution of 1/2 t baking soda to 1 cup water. | 6-10 hrs. | Soups, stews, powder for celery salt (add equal celery and salt) |
| Corn | Husk, remove silk and blanch. Remove from cob | 10-14 hrs. | Fritters, soups, stews or grind for cornmeal |
| Eggplant | Peel, slice 1/4" thick.Blanch. | 8-14 hrs. Cream sauces, casseroles, dip in batter and fry | |
Vegetable Drying Guidelines (continued)
| Food Preparation Drying Time Uses | |||
| Garlic Separate and peel cloves 14-18 hrs. Powder for seasoning | |||
| Onions | Remove skins, tops, and root ends.Slice 3/8" thick | 9-13 hrs. Soups, stews and sauces.Powder for seasoningPackage immediately | |
| Peas | Shell, wash and blanch | 10-14 hrs. | Soups, stews and mixed vegetables |
| Peppers | Remove stem & seeds.Cut into 1/2" pieces | 14-18 hrs. | Soups, stews, pizza, meat dishes and seasoning |
| Peppers (hot) | Wash, slice or cut in half. Remove seeds if you desire a milder pepper. | 14-18 hrs. | Soups, stews, pizza, and seasoning |
| Potatoes | Use white potatoes.Peel and slice 3/8" thick. Blanch.Rinse and dry* | 6-10 hrs. Stews, soups and casseroles | |
| Tomatoes | Wash and slice 3/8" circles or dip in boiling water to loosen skins, halve or quarter | 10-14 hrs. | Soups and stews. Powder in blender and add water for paste or sauce.**Dry in roll-up form for pizza sauce |
| Zucchini or Squash | Wash, remove ends and slice 3/8" thick grate. Steam if you plan to rehydrate | 8-12 hrs. | Breads, chips with dip, soups and casserole.(1 week shelf life) |
* Blanch for 5 minutes or until translucent. If not steamed long enough, they will turn black during drying and storage.
** For information on rehydrating tomato powder and uses, see page 14.
Recipes
BEST BANANA BREAD
FRUIT HORS D' OEUVRES
Chunks of dried bananas, nuts, and dateServe these savory Hors d'Oeuvres make this a delightful breakfast bread. at your next party.
3/4 cup margarine or butter
2 cups flour
1-1/2 cups sugar
1 teaspoon baking soda
2 eggs
1/2 teaspoon salt
1 teaspoon vanilla
1-1/2 cups mashed ripe banana (4 to 6 medium size)
1/2 cup chopped dried banana
1/2 cup chopped pecans
1/2 cup buttermilk
1/2 cup chopped dates
2 Tablespoons brown sugar
24 pieces halved dried fruit (apricots, peaches, pears, or prunes)
1/8 teaspoon paprika
1/3 cup shredded Monterey Jack cheese
3 ounces cream cheese, softened
1/3 cup shredded sharp Cheddar cheese
3 Tablespoons plain yogurt
1/4 cup chopped slivered almonds
Dried fruits should be pliable. If too hard, allow to stand in boiling water 5 minutes to soften. Drain. In small bowl, beat cream cheese until fluffy. Stir in sour cream, paprika, Monterey Jack and Cheddar cheese and chopped almonds. Spoon 1 teaspoon
Preheat oven to 350°F (175°C). Generously, milling into pit cavity of each piece of dried grease and flour 3 small (3" x 5") loaf pans. Garnish with parsley. two medium (3-1/2" x 7-1/2") loaf pans. Cut Makes 24 appetizers.
waxed or parchment paper to fit bottoms and line pans. In a large bowl, cream margarine or butter with sugar. Add eggs and vanilla. Mash bananas in separate bowl with a fork. Add to margarine/egg mixture. In a separate bowl, combine flour, soda, and salt. Stir until well mixed. Add flour to creamed mixture alternately with 1/2 cup buttermilk, blending just until combined. Fold in dried banana chunks, pecans, and dates. Pour into prepared pans. Sprinkle brown sugar over tops of loaves. Bake in preheated oven about 45 minutes, until a wooden pick inserted in center comes out clean. Cool 10 minutes in pan. Remove from pan and cool on a cooling rack. Makes 3 small or 2 medium loaves.
Variation:Add dried pineapple
instead of dates
AWESOME BRAN MUFFINS
Make these for breakfast, and pop the extra in your children's lunch box!
1 cup bran
2-1/2 cups all-purpose flour
1 cup boiling water
2-1/2 teaspoons baking soda
1/2 cup margarine
1/2 teaspoon salt
2 cups buttermilk
1 cup chopped dried apple, dates, raisins or pineapple 1
2 eggs, beaten
1 cup granulated sugar
1/2 cup chopped walnuts or pecans
1/2 cup brown sugar, firmly packed
2 cups bran
1/4 cup sugar
HOMEMADE CHILI POWDER
Add to your favorite Mexican recipe or use in ground meat for tacos.
3 ounces dried chilies (mild peppers such as Anaheim, or a combination of mild and hot peppers)
1 Tablespoon ground cumin
2 teaspoons salt
1 teaspoon ground allspice
1 teaspoon garlic powder
as teaspoon onion powder
1 teaspoon ground oregano
1/2 teaspoon ground cloves
1 teaspoon ground coriander
Peppers dried in a dehydrator retain their original color and flavor. They may either be dried whole or in halves, skin side down.
Hotness and flavor will vary with the chilies
Preheat oven to 400°F (205°C). Fill 24 muffed. Removing the seeds will decrease the pans with muffin liners. Wipe muffin linerabotness. Make sure that peppers are with vegetable oil. In large bowl, pour bottimpletely dry and stored in airtight water over 1 cup bran and let stand. Addntafers. Remove and discard stems and cup margarine to bran/boiling water mixtuseeds. Whirl pods in a blender until finely Stir in buttermilk, eggs, white and browningground. Allow powder to settle. Add sugars and bran. In large bowl, sift together training ingredients and whirl briefly. Store dry ingredients: all-purpose flour, baking in an airtight container. Makes 1/2 cup.
soda, and salt. Add chopped dried fruit and
stir. Combine with wet ingredients and stir only until dry ingredients are moist. Mixture
should be lumpy. Spoon into prepared muffin
cups. Sprinkle sugar on tops. Bake at 400^ F
(205°C) for 20 to 25 minutes. Remove from
pan and place on rack to cool. Makes 24 of
the best bran muffins you've ever tasted!
Variation: Substitute 1 cup oat bran for
wheat bran for an oat taste.
CUP-OF-VEGETABLE SOUP
This soup cooks in your thermos and ready to eat by lunch time.
1/3 cup dried vegetable flakes (any combo
of tomatoes, peas, onions, broccoli, zucchini, celery, carrots)
1 Tablespoon bulgur wheat
1 Tablespoon small pasta
(spaghetti, linguini, etc.), broken
1/4 teaspoon dried parsley
1/4 teaspoon dried sweet basil
pinch garlic powder
pinch onion powder
salt and pepper to taste
2 cups boiling chicken or beef broth
olive oil, minced garlic, basil and oregano.
,Close jar with a canning lid and keep refrigerated up to 6 months. Makes 1 pint.
Caution: Do not add fresh garlic or fresh herbs to oil packed tomatoes.
The US Department of Agriculture
cautions against this because garlic
and herbs are low-acid, foods which
create a low-acid anacrobic environment
when placed in oil. This could result in the
perfect breeding ground for botulism.
CHEESY CORN CHIPS
Place the dried vegetables in a dry blender Great for after school munchies.
and whir until the size of flakes. Measure 1 €/p whole kernel or creamed corn cup. Save remaining vegetables for another cup sharp cheddar cheese, grated day. Place 1/3 cup flaked vegetables in a (the ready grated cheese is not as pint thermos. Add parsley, basil, garlic satisfactory)
powder, onion powder, salt and pepper. 1/2 cup red and green peppers, diced bulgur wheat and pasta to thermos. Bring tablespoon onion, chopped broth to a rolling boil and pour over dry ^1/8 teaspoon cayenne pepper
ingredients. Quickly cover thermos and close 1/8 teaspoon chili powder securely. Yield: 2 cups.
A/2d cup red and green peppers, diced
d tablespoon onion, chopped
1/8 teaspoon cayenne pepper
1/8 teaspoon chili powder salt to taste
In a blender or food processor, blend together all ingredients at high speed.
DRIED TOMATOES IN OLIVE
These tomatoes taste better than the expensive "sun dried" ones.
1 cup extra light olive oil
1 teaspoon fresh basil, chopped (or 1/2 teaspoon dried basil)
4 garlic cloves, minced
1 cup dried tomato flakes
1 teaspoon dried oregano
OIL Spread mixture thinly onto Fruit Roll sheets.
Dry for approximately 10 hours or until dry on one side. Lift entire corn ring off of the Fruit Roll sheet, turn over and dry for two hours longer or until crisp. Break into pieces.
Flake dried tomatoes in blender to make 1
cup. In 1 pint canning jar, add tomatoes,
HARVEST GRANOLA
Most often served as a breakfast food, also be a snack or an ingredient in de cookies, or main dishes.
5 cups rolled oats
3/4 cup brown sugar, firmly packed
1/2 cup wheat germ
1/2 cup dried apple, chopped
1/2 cup honey
1/2 cup sesame seeds
1 cup raisins
1/2 cup date crystals
1 cup pecans or almonds, chopped
1/3 cup salad oil
1 teaspoon vanilla
3/4 cup margarine, melted
1 teaspoon cinnamon
Mix together very well so that all ingredients are distributed evenly. Adding dry ingredients to wet ingredients makes a crunchier granola. Spread onto a Fruit Roll sheet. Dry until crunchy. Crumble and store in an airtight container.
FRUIT CARAMEL CORN
1 cup butter or margarine
2 cups brown sugar
1/2 cup light corn syrup
6 cups popped popcorn
2 cups finely chopped dried fruit (pineapple, apples, raisins, prunes, etc.)
1 teaspoon salt
1/2 teaspoon baking soda
1 teaspoon vanilla
Melt butter or margarine in large
heavy-bottom pot. Stir in brown sugar, syrup and salt. Bring to a boil, stirring constantly. Boil 5 minutes without stirring.
Remove from heat and stir in soda and vanilla. It foams. Pour over popped corn and mix well. Pour into a shallow 11" x 14" baking pan. Bake in a 250°F (129°C) oven for 1 hour, stirring every 20 minutes. During last 5 minutes, stir in finely chopped dried fruit. Remove from oven, cool, and break apart. Makes 7 cups caramel corn.
ENERGY BARS
Grind Together:
1/3 cup carob chips
1 cup slivered almonds
4 cups dried fruit (pliable)
(apple, raisin, date, pear, peach, apricot, pineapple)
Mix In:
3/4 cup unsweetened pineapple juice
1/2 teaspoon almond extract
1/2 cup honey wheat germ
1 cup carob chips
Mix all ingredients thoroughly. More juice may be needed to allow mixture to stick together. Put onto Fruit Roll sheet. Dry for approximately 14 hours. Cut into small squares and place on unlined tray to finish drying. May be coated with melted chocolate, yogurt coating, or carob to make candy bars. Makes 24 squares.
PET TREATS
clear or holiday colored cellophane and gather the cellophane at the top of the plate. Tie the gathered cellophane with a holiday colored
TURKEY & SWEET POTATO
TREATS FOR DOGS This recipe can eribbon. Variations: Use fresh or frozen served at any time of the year but they make wonderful treats at Thanksgiving so you can blueberries instead of cranberries. Use cooked potatoes instead of sweet potatoes.
include your dog in the festivities. They are also
attractive treats and packaged with clear
TINY SHRIMP TREATS FOR CATS
cellophane and a ribbon, will make great gifts friends with dogs.
This very simple recipe was a favorite with many of our taste test cats. Havoc, a huge, 13 year ol Russian Blue, ate this with gusto and he's
Makes about 3 dozen treats, depending upon usually very picky! the size of the treats.
2 cups of turkey, cooked
1 cup water
1 cup sweet potato, cooked until soft
1 tablespoon molasses
1- 12 cup oatmeal, dry, uncooked
3 dozen cranberries, fresh or frozen
Makes as many treats as there are shrimp in the can; usually at least two dozen.
1 four ounce can small peeled shrimp
1/3 cup catnip flowers, fresh
Open the can of shrimp and pour out the water the shrimp were packed in. Put the shrimp in a
Shred or chop the cooked turkey so that it's small pieces. Put the turkey and water into the food processor or blender until a thick paste. There should be no meat chunks. Add the sw potato and molasses to the meat and puree some of the flowers will stick to the shrimp; a thick paste. Pour or spoon the mixture into others will not and that's fine. Put the shrimp and large bowl. Add the oatmeal and mix well. The flowers onto the dehydrator rack. The shrimp dough should not be too wet or runny; if it is, add flowers should remain in the dehydrator for a little more oatmeal. Spoon the dough onto about two hours or until thoroughly dry. dehydrator rack by teaspoonful. Place a
cranberry on top of each treat, pressing it in slightly so that the berry stays on the treat. Leave treats in the dehydrator for four to five hours or until thoroughly dry but not crispy.
Remove shrimp and flowers from the rack and store in an airtight container in the refrigerator.
One or two shrimp and a pinch of flowers makes a good treat for most cats. Variation: If you can't find any fresh catnip flowers, you can use
Store in an airtight container in the refrigerator Treats will be good for about three weeks.
dehydrated or dried catnip, just add it to the dehydrated shrimp as you serve your cat a treat.
To give as a gift, place the treats (cranberry side up) on a decorative holiday paper plate. Wrap in
Drying Jerky
Jerky is a favorite snack for school, lunch, trail or just about anywhere! It is made by seasoning raw meat in a salt mixture, and then drying it without cooking. You won't have to pay the exorbitant prices for jerky slices or sticks at the supermarket. Most lean meats will yield about 1 pound of jerky from 2 pounds of fresh meat.
Selection
Jerky may be made from a variety of different meats. When purchasing meats for make jerky, choose lean meats with minimal fat, as fat tends to go rancid during storage. A cut of flank steak or round steak makes excellent jerky.
Using the Nesco®/American Harvest®'s Jerky WorksKit, you can make delicious jerky from ground meat. Use ground round or extra lean ground beef. Season with a Nesco®/American Harvest® Jerky Seasoning Mix and follow package directions.
Preparation
If you are making jerky from a ground meat, add one package each Americanesco Harvest® Jerky Spice seasoning and cure per pound of ground meat. Mix well and form strips by using the Jerky Workress or a cookie press. Place on trays in your dehydrator and dry. See detailed instructions on page 23.
If making jerky from meat, remove all fat and cut into cubes or thin strips 1/4" to 3/ It is easier to slice partially frozen meat for jerky. If meats are cut on the cross-wise jerky is less chewy than if meats are cut on the lengthwise grain.
Marinate cut meats in store-bought or your own recipe marinade for 6 to 8 hours in refrigerator before drying. If you are using your own recipe, be sure to include 1 teaspoon of salt for each pound of meat. The salt slows surface bacterial growth during the initial stages of drying. To use Nesco®/American Harvest® Jerky Spice seasoning and cure, a 1/4 cup water, mix well and put mix and meat in plastic storage bag to marinate.
Drying and Storage
Depending on how thick the meat is cut, how heavily the dryer is loaded and the hu it will take from 4 to 15 hours to dry. Pat jerky with clean paper towels several time dries to remove the oil which accumulates on the top of the jerky. When removing jer from the dryer, wrap it in paper towels and let it stand for a couple of hours prior to packaging. Beef jerky that is stored on the shelf will start to go rancid at room temperature after 3 or 4 weeks. Refrigerate or freeze for longer storage.
Note: After drying poultry, pork or fresh game, heat them in your oven at 160^ F ( 71^ C for 30 minutes to avoid the risk of salmonella.
22 1-800-288-4545
Simple steps to fresh delicious jerky
USING NESCO/AMERICAN HARVESTSPICES & JERKY WORKS™ KIT
-
Blend one pack seasoning and one pack cure with one pound extra lean ground b game, or poultry. For spicier jerky: add 1/4 tsp. or more of cayenne pepper. For spicy jerky, add 1/2 pound extra meat.
-
While holding the silver tab down, pull the white knob all the way out on the Jerky Works™ gun.
-
Unscrew the red ring from the end of the white tube. Place meat mixture into the
-
Place desired tip into the red ring and screw the ring tightly back onto the tube.
-
Press the white knob until it pushes against the meat. Hold the jerky gun over the dehydrator tray and squeeze the silver trigger repeatedly to release mixture onto the tray. When desired length is reached, cut end with scissors or knife.
-
Depending on meat thickness, dehydrator load and humidity, it will take from 4 to 15 hours to dry. However, other brand dehydrators may take longer to dry and additional care must be used. When dry, remove jerky and pat with paper towels to absorb oil. Make sure jerky is dried until “leathery,” not brittle. Allow jerky to cool before packaging.
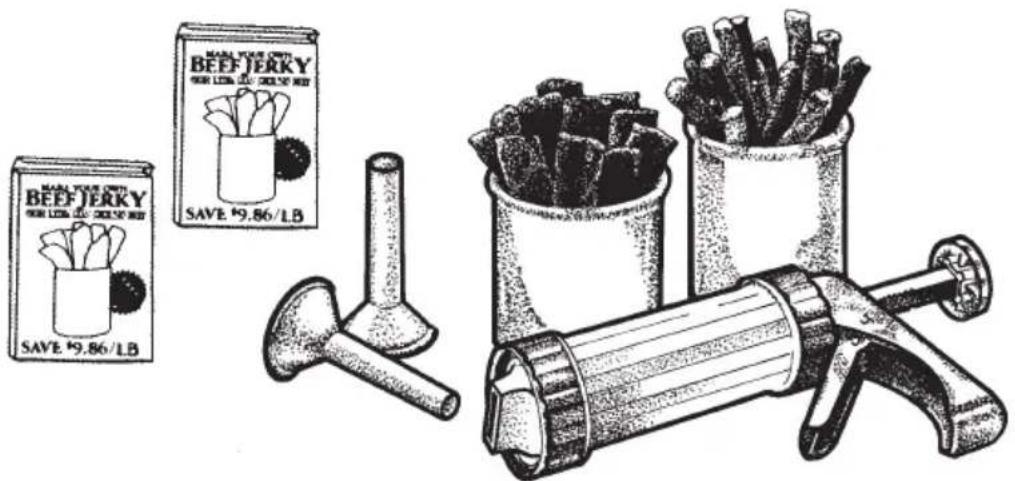
text_image
BEEF JERKY SAVE $9.86/LB BEEF JERKY SAVE $9.86/LBStoring Your Dried Food
Some pieces may dry in a shorter time than others and should be removed and placed in an airtight container while allowing the rest of the pieces to remain in the dehydrator until sufficiently dry.
Package all dried foods promptly to prevent contamination by insects and to prevent stickiness and rehydration caused by humidity. Store dried foods in airtight, moisture-proof containers.
Home vacuum packaging devices are ideal for packaging dried foods. They extend the shelf life of dried foods three to four times. Home vacuum packaging can be done in or glass jars. Manufacturers' bags, designed for use in home vacuum packaging, are moisture-proof and airtight. Glass jars are vacuum sealed using a lid with a rubber gas. Only glass jars which have been tempered for canning should be used. Other storage may explode under the pressure of vacuum packaging.
Bag sealers can also be used to package dehydrated foods. Bag sealers do not remove air within the package, but the bags are moisture-proof and airtight. Squeeze the pouch tightly against the food to remove as much air as possible before sealing.
Plastic freezer bags can be used. Plastic storage bags, not labeled for use in the free generally are not airtight nor moisture-proof and should not be used to store dried foo
Since most packaging materials are transparent, store packaged dried foods in a plastic or metal container which will not allow the light to penetrate. Do not store fruits and vegetables together in the same storage container because flavor and moisture may transfer.
fruit roll is best if removed while still warm. Wrap in plastic wrap and place in airtight moisture-proof containers for storage.
If foods are insufficiently dried, or are exposed to moisture from incomplete packaging, they can lose quality and nutrition, and can even mold during storage.
For more information, please visit our internet web site at www.nesco.com or call 1-800-288-4545
Rehydrating Dried Food
Eat dehydrated foods dry or rehydrate for use in recipes. Rehydrate by placing dried foods in a container (with enough water to cover food) and soaking for 30 minutes to 2 hours. Boiling water rehydrates foods more quickly than cold water or water at room temperature. Fruits or vegetables may also be rehydrated in liquids other than water, including fruit juices, cider, vegetable juices, milk, consomme, etc. Refrigerate these foods while they are soaking to reduce any risk of spoilage. Do not add seasonings, especially salt or sugar, during rehydration because they slow the rehydration process.
Cooking with Dried Food
After rehydrating food, cook it as you would normally. If foods are cooked before they fully rehydrated, they will cook in a shriveled state and will not be plump. Most fruits vegetables will rehydrate to about 80% of their fresh state. Consequently, they are a li more chewy than a fresh or frozen fruit or vegetable, even when rehydrated.
Dried food used in cooking will absorb additional liquid, so adjust the recipe according by adding more water.
- vegetables — add one additional cup of water for one cup dried food.
- stewed fruits — add 2 additional cups of water for each cup of fruit, allow to stand for 1 hour and simmer until tender.
- pies or fillings — use 1 additional cup of water per 1 cup of fruit — less, if y desire a thicker consistency.
Note: When using fruits in baking or for ice cream, they may be softened by covering with boiling water and allowing them to stand for 5 minutes. Then chop or blend, depending upon use.
Drying Crafts
You've all seen a flower so perfect in form, color, and texture that you wish you could forever. With a dehydrator, it now can become a reality.
Drying Flowers
Preserve garden and natural favorites for attractive dried flower arrangements, Christmas and holiday decorations, party favors, place cards and corsages. Help your children dry specimens for their science class. Many lovely flowers, foliage, flowering grasses, seedhe cones, and non-flowering plants may be dried simply by placing on drying trays and d until no moisture is evident. This is wonderful for those of us who are too busy to e with other techniques, and also for the beginner who has not attempted preserving flow before. Quite interesting arrangements can be made with these dried materials. Materials suitable for drying by this method are bracts, cultivated and wild grasses, seedheads, f and everlasting flowers.
Using Desiccant
For flowers with petals, leaves, ferns, fungi, and some varieties of mosses, the best was to preserve them is to use a desiccant powder. A desiccant is a substance which absorb moisture. It speeds the drying process, especially when used in a dehydrator, preserving vibrant colors and delicate structure of the flower. The longer the drying process, the colors will fade. Using a desiccant in your dehydrator will allow flowers to dry in a day of a week or two. There are several brands of flower desiccants available from craft s. They may seem a little expensive, but can be reused indefinitely. Silica gel is the gen name and absorbs up to 50 percent of its own weight in moisture. Use perfect flower and free of moisture. Yellows and blues maintain their color better than reds or whites
- Remove stems from flowers and insert a short 20-gauge stub wire.
(Add a longer stem when arranging later.)
- Place 1/2" desiccant in bottom of containers that are no higher than 3-1/4".
- Place flat-faced flower face-down, with petals resting easily on the sand. Rounded double flowers such as roses and daffodils should be dried with their heads upwa Flowers which are trumpet or bell-shaped should be laid on their sides.
- Gently sprinkle desiccant between the flowers and into every petal and crevice, with about 1/2" desiccant covering top. Do not cover. When desiccant drying is done of the dehydrator, containers should be covered.
- Place containers on the dehydrator tray. Place lid on top of dryer and plug in dehy Most flowers will be totally dry in 24 hours or less.
- To test for dryness, gently scrape back the desiccant and remove one flower. Hold flower to your ear and give it a gentle tap. If it is dry, it will sound crisp and
- Remove remaining flowers by carefully pouring off desiccant, letting it fall slowly throw
your fingers, catching each flower and carefully removing it by its stem. Stand preflowers in a block of flower foam until arranged.
- Store in airtight tins until ready to use. In humid climates, protect loose-petal flowers with a light application of finishing spray to prevent moisture absorption.
Dried Apple Wreath
Supplies:
Mod Podge sealer (available in craft supply stores)
brush
1500 mgs. vitamin C (dissolved in 1 gallon of water or lemon or pineapple juice.)
8 or more apples (depending on the size of wreath)
hot glue gun & glue sticks
styrofoam wreath
grapevines
straw
cardboard
ribbon
thin wire
baby's breath
cinnamon sticks
Slice apples into 1/8 inch uniform slices. A meat slicer, apple slicer, or potato slicer are even slices (do not core apples since the core forms an attractive star shape when dry). As you slice each apple, immediately place slices in a solution of pineapple or lemon and water (50/50 mix) or vitamin C and water solution. Soak apples 10 minutes, drain, place on trays to dry. They will take 4 to 8 hours to dry. Remove apples when they like with no pockets of moisture, but before they become crisp.
Secure a hanging device on the back of the styrofoam wreath form. Working a small time from the outside in, squeeze a line of glue on the outside edge, place an apple repeating, over-lapping the slices slightly for a more full look. Continue around the outer the wreath form, until the row is completed. Repeat process with the inside row, until 2 rows of apples side by side. When apples are glued in place, seal with Mod Podgesides of the wreath, one side at a time. Add a ribbon bow and any other decorative
Dough Ornaments
This basic recipe is also called "Baker's Clay." Once mixed, it has a satiny texture, a delicious aroma and begs to be touched and shaped. Do not be surprised if everyone in the family gets involved in making ornaments!
4 cups flour
1 cup salt
1-1/2 cups water
Using a dough mixer or by hand, mix flour with salt in large mixer bowl. Add water dough is a good consistency for kneading. If it is too dry, it will crack. If it's too we will be sticky. Knead the dough by pressing and turning it with your hands until it be satiny smooth. It will take five to ten minutes or more, depending on the consistency of the dough and how smooth you want your finished objects to appear.
Dough that is insufficiently kneaded is difficult to form and may fall apart during drying baking. The dough dries out quickly so keep unused dough in a plastic bag. For sma projects, mix only half a recipe. Dough is best when used in about four hours. It may refrigerated, but results from refrigerated dough are unpredictable.
Creating Ornaments
Shape objects directly on pieces of aluminum foil. All dough parts must be joined with which acts as a glue. If parts are not joined properly, the dough may separate during and split when cooled. Use water sparingly.
To attach thin pieces of dough, adhere them firmly by pushing a toothpick or paper through them in addition to moistening them with water. Large ornaments should be strengthened with wire. Dough has no strength and requires support for larger ornaments. If the dough connects in small pieces (head and neck, arms or legs), insert toothpicks wires between parts to keep the portions from separating over time.
Make impressions on dough with a variety of instruments. Impressions hold up best wi stiffer dough. All kinds of instruments can be used to make impressions to give texture design to ornaments. Push dough through a garlic press or grater to make hair and c decorative effects. Cake decorating tubes with large nozzles can be used for making d Add extra water to soften dough to a good consistency.
Add a hanging device to the top or back of an ornament, before baking and drying, is to be hung. Use Christmas ornament hooks, bent wire, circles from pop-top drink c or paper clips. Push hanging device into dough at top center, close to the back of the Remember, the final dough shape is the shape which will be baked. If there are loose or undesirable marks in the dough, they will exist in the finished product.
Precoloring Dough
Before baking, raw dough can be precolored by adding drops of food coloring, watercoinks, and fabric dyes. Powdered colors should be mixed with the flour and salt before water. Liquid shoe polish or leather dye can also be brushed on lightly during the first minutes of baking.
Baking and Drying Dough
Dough should be baked for 2 hours at 300^ (150°C) in your oven. Then transfer to dehydrator. Dry for an additional 4 to 12 hours until completely dry (until you become experienced with drying dough-art in your®/American Harvestdehydrator, it is wise to place a piece of dough, the same size as the largest /thickest piece of your ornament as a test piece. To test for dryness, break apart the test piece. It is done when it is dry inside). Remove ornaments when totally dry and cool prior to applying paint.
Painting Dough
Acrylic paints are the most popular and easily applied. They are available in jars, spray and tubes. They mix easily and dry quickly. If you are adding different colored layers another, use a coat of sealer between them to prevent them from running or smearing painting is complete, dry in your dehydrator for 1 to 2 hours until thoroughly dry.
Sealing
It is extremely important to seal salt dough ornaments to prevent moisture from reenter causing mold and disintegration. There is a wide variety of final coatings which can be but they should be transparent and non-penetrating so surface of dough-art is strengthened with a hard protective coating. The best choice is a polyurethane varnish. Be sure to ornaments from dehydrator and place in a well ventilated area (preferably out-of-doors) applying varnish. Carefully place objects (on aluminum foil making sure that no foil cover center hole or outer ring vents) in dehydrator to dry.
CAUTION: Make sure your dehydrator is placed in a room with adequate ventilation or open window. Place ornaments in dehydrator. Most varnishes will dry in an hour or so dehydrator. Repeat varnishing process until a minimum of 4 complete coats (both sides object) have been applied, allowing ornament to dry thoroughly between coats. Again, it handy to use dehydrator for this process to speed drying time.
Potpourri
Pick flowers when they are about three-quarters open – when they are fully open, they fragrance. Gather about twice the amount you believe you'll need, since they shrink as dry. Remove petals from flower heads and pull herb leaves from their stems. Spread in single layer on a Clean-A-S® necessary and place in dehydrator.
Dry until brittle-dry, which may take from 2 to 12 hours, depending upon the plants, t amount, and the model of dehydrator you are using.
Store different flowers and herbs separately in covered jars until you're ready to mix. It is a cool place, out of direct sunlight.
Experiment with different combinations, mixing small quantities and recording the results you come up with a blend that you like.
To blend ingredients, measure and stir dried materials into a large bowl. When you have right blend of color and fragrance, add fixative, spices, and oil. Age in a tightly sealed for 2 - 6 weeks, shaking occasionally to blend fragrances. Package in smaller decorative containers or bags for gifts or personal use.
Sweet & Spice Potpourri
For a perfect holiday gift, place one cup of this recipe in a lace bag tied with a col
1 cup dried rose petals 1 tbl. whole cloves
1/4 cup dried lavender blossoms 1 stick cinnamon, crumbled
1/8 cup dried rosemary 1/3 tsp. ground cloves
1/8 cup dried chamomile 1/4 tsp. ground nutmeg
1/2 cup dried grated orange peel 2 drops rose oil
1 tsp. powdered orrisroot 1 drop orange oil
2 tsp. orange-spice tea 1 drop lavender oil
1 tbl. coriander seed 1/2 cup dried bachelor's button petals
(for color)
In a large bowl, combine rose petals, lavender, rosemary, chamomile, and orange peel. orrisroot, tea, and spices. Add oils, sprinkling lightly over mixture. Mix in bachelor's but petals. Makes about 2 cups potpourri.
About Your Warranty and Service Satisfaction
Mail in your registration card, phone us, or register online at www.nesco.com to file your Nesco®/American Harvest® dehydrator model number and serial number now!
Your serial number and dehydrator model number are located on the power unit/blower your dehydrator.
We enter this number into our database. It registers your product and identifies your n specifically by its individual code. Should you call in for help on our 800 toll free line registration number helps us identify your machine and speeds up our assistance to yo

text_image
Customer Satisfaction™1-800-288-4545
www.nesco.com
One Year Limited Warranty
This appliance is warranted for one year from date of original purchase against defects material and workmanship. This warranty does not cover transportation damage, misuse, accident or similar incident. This warranty gives you specific legal rights and you may other rights which vary from state to state. This product is intended for household use not for commercial use. Warranty does not cover commercial use.
Your new food dehydrator comes equipped with numerous safety features. Any attempt interfere with the operation of these safety features makes this warranty null and void. event we receive a dehydrator for service that has been tampered with, we reserve them to restore it to its original state and charge for the repair.
Defective products may be returned, postage prepaid, with a description of the defect Metal Ware Corporation, 1700 Monroe Street, Two Rivers, Wisconsin 54241, for no charge repair or replacement at our option. Must include proof of purchase when returning product for warranty service.
Please call Customer Satisfaction at 800-288-4545 to obtain a return authorization before shipping.
Service and genuine Nesco American Harvest replacement parts may be obtained from Nesco Factory Service Department.
For service in warranty, follow instructions set forth in warranty. When ordering new pa make sure that you always mention the model number of the product.
- Call us on our toll-free number, 1-800-288-4545, and tell us about your problem.
- If we instruct you to send us all or part of your appliance for repair or replacement the Customer Satisfaction representative will give you a Return Authorization number (this number notifies our receiving department to expedite your repair.) Pack your unit carefully in a sturdy carton to prevent damage because any damage caused in shipping is not covered by the warranty.
- Print your name, address and Return Authorization number on carton.
- Write a letter explaining the problem. Include the following: your name, address and of the original bill of sale.
- Attach the sealed envelope containing the letter inside carton. Insure package for the of dehydrator and ship prepaid to:
Attn: Repair Department
The Metal Ware Corporation
1700 Monroe Street
Two Rivers, WI 54241
ACCESSORIES
natural_image
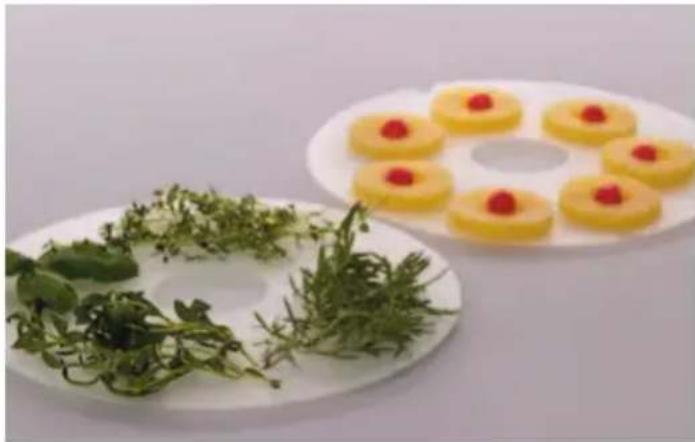
Plate of fresh herbs and round yellow food items with red garnishes, no visible text or symbolsCLEAN-A-SCREEN
Flexible screens make drying sticky foods easier to remove.
Screen flexes for easy removal of sticky fruits like pineapple. Perfect for drying small items like spices and herbs that would normally fall through the spokes of the tray, too.
Item Number: LM-2-6
text_image
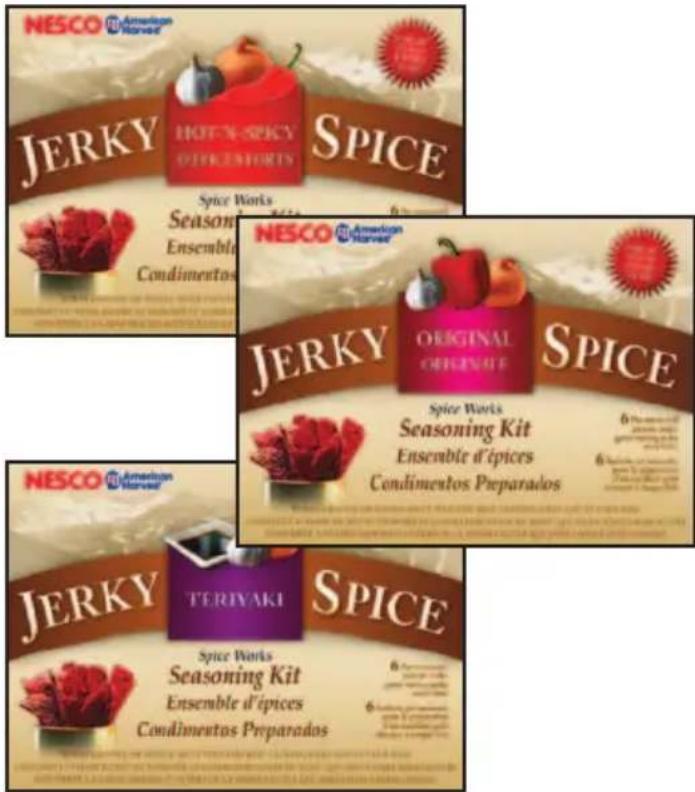
NESCO American Harvard JERKY HOT-NE SKY SPICE OFFRENTHY Spice Works Seasoning Kit Ensemble Condimentos JERKY ORIGINAL SPICE ORIGINAL ORIGINATE Spice Works Seasoning Kit Ensemble d'épices Condimentos Preparados JERKY TERIYAKI SPICE SPICE Spice Works Seasoning Kit Ensemble d'épices Condimentos PreparadosJERKY SPICE WORKS
Hot & Spicy, Original or Teriyaki Flavor
Make great tasting Beef Jerky or Venison Jerky at Home!
Item Number: BJ-6
HJ-6
TJ-6

natural_image
Two circular objects, one yellow and one red, placed on a plain white surface (no text or symbols visible)FRUIT ROLL SHEET
Great for making Fruit Rolls for the kids and for other messy foods.
Exclusive "no spill" lip allows you to dry liquids and semi liquids. Dry up to 3 cups of pureed fruit on each sheet. Make fruit leather with no added sugar or preservatives.
It's as easy as pouring applesauce on the Fruit Roll Sheet. Also great to dry soups and sauces. Perfect to use (if you're making messy foods) on the bottom tray of your dehydrator (without food on it) to catch the drips and make clean-up easier.
Item Number: LSS-2-6
NESCO American Harvest
Dehydrator & jorky maker
& jerky maker

natural_image
Three circular trays filled with colorful fruit and vegetable cutouts, arranged on a light blue background (no text or symbols visible)Customer Satisfaction 1-800-288-4545
www.nesco.com
"The World's fastest, most even drying Dehydrators"®
Para descargar una version espanola de este manual, visite www.nesco.com/spanish