BL RACKMOUNT 4U - Uncategorized Phoenix Contact - Free user manual and instructions
Find the device manual for free BL RACKMOUNT 4U Phoenix Contact in PDF.

| Product Type | Rackmount Enclosure |
| Brand | Phoenix Contact |
| Model | BL RACKMOUNT 4U |
| Category | Industrial Enclosure |
| Height | 4U (177.8 mm) |
| Width | 19 inches (482.6 mm) |
| Depth | 400 mm |
| Weight | Approx. 10 kg |
| Material | Steel with powder coating |
| Mounting | 19-inch rack |
| Front Panel | Removable, with ventilation slots |
| Cooling | Passive ventilation, optional fan mounting |
| Protection Rating | IP20 |
| Operating Temperature | -20°C to +55°C |
| Storage Temperature | -40°C to +85°C |
| Compliance | CE, RoHS |
| Included Accessories | Mounting brackets, screws |
| Main Functions | Housing for electronic components, protection, organization |
| Maintenance | Clean with dry cloth, check ventilation regularly |
| Safety | Ensure proper grounding, do not exceed load capacity |
| Spare Parts | Front panel, screws, mounting brackets |
| General Information | Designed for industrial environments, durable construction |
Frequently Asked Questions - BL RACKMOUNT 4U Phoenix Contact
User questions about BL RACKMOUNT 4U Phoenix Contact
0 question about this device. Answer the ones you know or ask your own.
Ask a new question about this device
Download the instructions for your Uncategorized in PDF format for free! Find your manual BL RACKMOUNT 4U - Phoenix Contact and take your electronic device back in hand. On this page are published all the documents necessary for the use of your device. BL RACKMOUNT 4U by Phoenix Contact.
USER MANUAL BL RACKMOUNT 4U Phoenix Contact
natural_image
Product display of multiple electronic devices including a front panel, front-mounted server, and a connected chassis (no visible text or symbols)UWF Administrator application
User manual
UM ENVL UWF ADMIN
User manual
UWF Administrator application
UM EN VL UWF ADMIN, Revision A
2019-09-24
This user manual is valid for:
Designation
UWF Administrator
Table of contents
1 For your safety....5
1.1 Labeling of warning notes....5
1.2 Qualification of users....5
1.3 Intended use....5
1.3.1 Product changes ....6
2 Unified Write Filter 7
2.1 Overview 7
2.2 Considerations 7
2.3 Overlay....7
2.3.1 Overlay limitations ....7
2.3.2 Overlay size 8
2.3.3 Paging file 8
2.4 UWF overlay exclusions ....8
2.4.1 UWF overlay exclusions limitations .....9
2.4.2 Moving or deleting excluded files or folder 9
2.5 UWF commit or deletion ....10
2.5.1 File commit limitations ....10
2.6 Applying updates and installing software with UWF 11
2.7 UWF management option....11
3 Recommendations for prolonging UWF overlay life ....13
3.1 Increasing RAM overlay life ....13
3.1.1 Disabling Windows services 13
3.1.2 Excluding files or directories 14
3.1.3 Configuration before enabling UWF .....14
3.1.4 Choosing a size for the overlay 14
3.2 Debugging excessive overlay consumption....15
4 UWF Administrator 17
4.1 Overview 17
4.2 Installing UWF Administrator 17
4.2.1 Requirements ....17
4.2.2 Optional features ....18
4.3 UWF Administrator components....19
4.3.1 UWF overlay monitor 19
4.3.2 UWF notify 19
4.3.3 UWF Administrator configuration interface 20
4.4 Configuration....20
4.4.1 Overview ......20
4.4.2 Filter Setting ......21
4.4.3 Overlay setting 23
4.4.4 Commit File ....24
4.4.5 Exclude File/Folder 25
4.4.6 Miscellaneous 26
A Technical appendix....27
A 1 UWF Administrator events in other systems .... 27
B Appendixes....29
B 1 List of figures ...... 29
B 2 List of tables 31
1 For your safety
Read this user manual carefully and keep it for future reference.
1.1 Labeling of warning notes

This symbol indicates hazards that could lead to personal injury.
There are three signal words indicating the severity of a potential injury.
DANGER
Indicates a hazard with a high risk level. If this hazardous situation is not avoided, it will result in death or serious injury.
WARNING
Indicates a hazard with a medium risk level. If this hazardous situation is not avoided, it could result in death or serious injury.
CAUTION
Indicates a hazard with a low risk level. If this hazardous situation is not avoided, it could result in minor or moderate injury.

This symbol together with the NOTE signal word alerts the reader to a situation which may cause damage or malfunction to the device, hardware/software, or surrounding property.

Here you will find additional information or detailed sources of information.
1.2 Qualification of users
The use of products described in this manual is oriented exclusively to qualified application programmers and software engineers. The users must be familiar with the relevant safety concepts of automation technology as well as applicable standards and other regulations.
1.3 Intended use
Unified Write Filter (UWF) is an optional feature in Windows ^© 10 Enterprise operating systems. UWF replaces the Enhanced Write Filter (EWF) feature provided in the Windows Embedded Standard 7 operating system. Much like EWF, UWF redirects all data writes from physical media to a virtual overlay which is often placed in RAM. Since all data writes are redirected from the physical media to RAM, this provides a way to reduce wear on solid-state drives with limited write cycles.
Along with reducing wear on solid-state drives, UWF provides a simple way to restore to a system by simply rebooting. This can be useful on systems that are preconfigured and would benefit from restoring to the same known good state upon every reboot cycle.
However, a drawback to UWF is exhaustion of the virtual overlay which usually resides in system RAM, a limited resource. When UWF exhausts all available overlay space, applications will begin to crash and eventually Windows will usually crash or hang.
Phoenix Contact UWF Administrator is a utility that provides an easy way to manage and monitor the virtual overlay. UWF Administrator will also monitor the overlay and run user specified actions when a configurable consumption threshold is reach.
1.3.1 Product changes
Changes or modifications to hardware and software of the device are not permitted.
Incorrect operation or modifications to the device can endanger your safety or damage the device. Do not repair the device yourself. If the device is defective, please contact Phoenix Contact.
2 Unified Write Filter
2.1 Overview
Unified Write Filter (UWF) is a built-in optional feature provided in the Windows ^® 10 Enterprise operating system. This section will go over a brief overview of some of the most critical UWF aspects. For a more detailed and up-to-date overview, please refer to Microsoft documentation at
https://docs.microsoft.com/en-us/windows-hardware/customize/enterprise/unified-write-filter
2.2 Considerations
When enabling UWF, the operating system automatically disables:
- Paging files
- System restore
- Superfetch
- File indexing service
- Fast startup
- Defragmentation service

It is recommended to test on one system with UWF protection enabled before deploying to a set of systems. This testing ensures that the configuration does not consume the overlay in an unreasonably short amount of time. See “Debugging excessive overlay consumption” on page 15 for more information.
2.3 Overlay
To enable UWF protection on a system, a user must specify which volume to redirect to a virtual overlay. UWF supports two locations where the overlay can be configured:
- RAM: All writes to a disk volume are redirected to system RAM. Since RAM is in limited supply compared to disk space, an overlay configured on RAM will exhaust faster than one configured on disk.
- DISK: All writes to a volume are redirected to a temporary location on a drive. This temporary location is cleared on a system reboot.
2.3.1 Overlay limitations
There are limitations on which volumes can be protected by UWF.
– FAT, FAT32, and NTFS are the only file system formats supported. UWF will still protect a volume with other file system formats, but a user will not be able to commit files to physical media or create exclusions to the virtual overlay.

During initial startup, the Windows operating system may write system journal files before UWF is protecting the volume. This means that during a limited time at start up, NTFS formatted drives are not protected by UWF.
- Up to 16 terabytes may be protected by UWF.
- Removable drives cannot be protected by UWF.
2.3.2 Overlay size
When using a RAM overlay the user should leave enough space in system RAM to properly run the operating system. Please refer to the Microsoft documentation for current RAM requirements for the Windows 10 operating system. For example, if 2 GB of RAM is required with Windows 10 64-bit and 4 GB of RAM installed, the user should only set the overlay to a maximum size of 2 GB (see "Filter Setting" on page 21).
2.3.3 Paging file
UWF turns off the page file when installing UWF. Without the page file, certain high-resource tasks may fail with a "Low Memory" warning. The more RAM that is installed the less likely this issue will appear. If resources are running low, programs may have unpredictable behavior. Furthermore, memory dump files will not be saved without a page file.
To mitigate this issue, the user may place the page file on an unprotected volume. This volume must not be a "removable" drive. If creating a page file, it is recommended to let the system manage the size. However, if a custom size is required, follow the recommendations outlined in https://support.microsoft.com/en-us/help/2860880/how-to-determine-the-appropriate-page-file-size-for-64-bit-versions-of
To move the page file to a new location:
- Press the
+ keys to open a "Run" window. - In the "Open" field type SystemPropertiesAdvanced.exe and click the "OK" button.
- The "System Properties" dialog box opens. Click the "Advanced" tab, and then, in the "Performance" group, click the "Settings" button.
- Click the "Advanced" tab.
- In the "Virtual memory" group click the "Change" button.
- In the "Virtual Memory" window, select a volume that is not protected by UWF.
- Click either the "System managed size" button or the "Custom size" button and enter the desired values in the size fields.
- Click the "Set" button, and then click the "OK" button to apply the settings and close the window.
2.4 UWF overlay exclusions
UWF allows users to exclude files and folders from the overlay, which is used to retain changes to folders or files between reboots. When excluding a folder, all subfolders and files contained in that folder are also excluded from UWF protection. This is useful when a user may want to retain log history, such as in the case of a log file.
Along with file and folder exclusions, UWF allows user to exclude certain registry keys. This is useful for programs that store settings in the registry which the user wants to retain between reboots.
For more information and useful overlay exclusions see https://docs.microsoft.com/en-us/windows-hardware/customize/enterprise/uwfexclusions.
2.4.1 UWF overlay exclusions limitations

WARNING:
Excluding any prohibited files, folders, or registry values can result in unpredictable system behavior.
Supported Registry Exclusions: A user can only exclude registry subkeys from the following keys:
• HKEY\LOCAL\MACHINE\BCD00000000
• HKEY\LOCAL\MACHINE\SYSTEM
• HKEY\LOCAL\MACHINE\SOFTWARE
• HKEY\LOCAL\MACHINE\SAM
• HKEY\LOCAL\MACHINE\SECURITY
• HKEY\LOCAL\MACHINE\COMPONENTS
Registry exclusions from any other keys are not supported.
Supported File Exclusions: The following directories and files are prohibited from being excluded from the overlay:
- \Windows\System32\config\DEFAULT
- \Windows\System32\config\SAM
- \Windows\System32\config\SECURITY
- \Windows\System32\config\SYSTEM
- \User\
\NTUSER.DAT
The root of a volume (C: or D:, for example)
- \Windows
- \Windows\system32
- \Windows\System32\Drivers
- Page Files
A user may still exclude file or subdirectories in the prohibited list above.
2.4.2 Moving or deleting excluded files or folder
Moving files or folders
Users should not move excluded folders or files to protected locations since exclusion settings are tightly bound to a specific path. For example, if C:\example.txt is excluded from UWF protection and it is moved to C:\Test\example.txt, which is a protected location, then:
- the file C:\example.txt is permanently deleted.
- a new copy of the file is created at C:\Test\example.txt. Since C:\Test\ is protected, the copy of example.txt is moved to the virtual overlay. Since the virtual overlay resets after a reboot, all copies of example.txt will then be lost.
The above scenario is also valid for excluded folders.
To move excluded files or folders you must follow these steps:
- Disable UWF protection.
- Delete the old exclusion entry.
- Move the file or folder to the desired location.
- Add an UWF exclusion entry for the new location.
5. Re-enable UWF protection.
Deleting files or folders
When deleting excluded folders or files with File Explorer the folder or file is moved to the Recycle Bin, which is protected. This can sometimes result in an access denied error.

text_image
Folder Access Denied You'll need to provide administrator permission to delete this folder New folder Date created: 8/28/2019 6:01 PM Continue Skip Cancel More detailsFigure 2-1 "Folder Access Denied" message
To work around this, a user can exclude the recycle bin from UWF protection or press the
2.5 UWF commit or deletion
A feature of UWF is to allow users to commit changes made to, or delete files from, the virtual overlay back to the physical drive. This allows any changes made to be retained between reboots. Registry key values can also be deleted and committed in the same way as files.
2.5.1 File commit limitations
This feature can only commit files and not directories. For this reason, this feature is not recommended for use when making a significant change, such as when installing a program.
Files are deleted permanently after committing the deletion; they are not copied to the recycling bin.
A user can only delete a file already committed to the UWF overlay or created before UWF protection was enabled. An error will result if a user attempts to delete a file created when UWF protection was enabled and it has not been committed to the overlay using the "Commit File" feature.

Since excluded files are not committed to the overlay, they cannot be removed using UWF file delete option. Section 2.4 describes file exclusions.
2.6 Applying updates and installing software with UWF
UWF protection should not be enabled when applying Windows Updates or installing software. In the case where large changes need to be made to the operating system, the following steps should be followed:
- Disable UWF protection, and then reboot the system.
- Apply updates or install software while UWF protection is disabled.
- Once done, re-enable UWF protection, and then reboot the system.
Changes should be applied and UWF is protecting the system again.
2.7 UWF management option
Along with the UWF Administrator utility software, Microsoft has a built-in command line tool, uwfmgr.exe which can be used to configure advanced settings that UWF Administrator does not support. You can find the details here:
https://docs.microsoft.com/en-us/windows-hardware/customize/enterprise/uwfmgrexe
3 Recommendations for prolonging UWF overlay life
The UWF overlay is a limited resource that can be exhausted. This section outlines recommendations for limiting the number of writes to the UWF overlay that will prolong the useful life of the overlay.
3.1 Increasing RAM overlay life
Since the RAM overlay will often be only a few gigabytes, consumption of the overlay should be considered. This section outlines some ways to prolong the life of the UWF RAM overlay. This section is only a brief overview and further investigation may be required to prolong the overlay life in certain configurations.
3.1.1 Disabling Windows services
The Windows operating system has many background tasks and services that can quickly consume the overlay. The following features are disabled automatically by the operating system once the user installs UWF to prolong the life of the overlay (no action is needed):
- Paging Files
- System Restore
- Superfetch
- File Indexing Services
- Fast Start
- Defragmentation Service
Other services that can be disabled manually to prolong overlay life are:
Table 3-1 Group Policy Editor settings
| Function Path Setting Action | |||
| Windows update1 | Computer Configuration/Administrator Templates/Windows Components/Windows Update | Configure Automatic Update Click the “Disable” button | |
| Specify intranet Microsoft update service location | Local host 127.0.0.1 | ||
| Windows Defender | Computer Configuration/Administrator Templates/Windows Components/Windows Defender | Turn off Windows Defender Click the “Enable” button | |
| OneDrive Computer | Configuration/Administrator Templates/Windows Components/OneDrive | Prevent usage of OneDrive for file storage | Click the “Enable” button |
1 It is not sufficient to disable the update service since the operating system will re-enable it.
Table 3-2 Task Scheduler settings
| Function Path Setting Action | |||
| RegidleBackup | Microsoft/Windows/Registry RegidleBackup | Click the “Disable” button | |
| Cleanmgr.exe | Microsoft/Windows/DiskCleanup SilentCleanUp | Click the “Disable” button | |
| Component Store Cleanup | Microsoft/Windows/Servicing | StartComponentStoreClean up | Click the “Disable” button |
3.1.2 Excluding files or directories
If a program is writing consistently to a specific directory or file, excluding it from the overlay will increase the life of the overlay.
For example, directories containing log, temp, or program files could be excluded.
Exclude C:\Windows\assembly to exclude changes made when the operating system compiles “.NET” libraries.
3.1.3 Configuration before enabling UWF
Certain tasks should be completed before enabling UWF protection. These should be run before enabling UWF.
If enough time is available, let the PC run for a day or two. This will allow libraries to compile and cleanups to run. To speed up the process the following can be done:
- Pre-compile .NET framework libraries.
Open CMD window with Administrator rights:
a) Navigate to "C:\Windows\Microsoft.Net\Framework\
b) Execute "ngen eqi"
c) Execute ngen queue status - see if status is paused
Alternatively go to task scheduler
a) Microsoft->Windows->.NET Framework
b) Run all ".NET Framework NGEN" process in the menu until completion.
– Cleanup Component store.
Open CMD window with Administrator rights
a) Dism.exe /online /Cleanup-Image /StartComponentCleanup
b) You can also mount the image and clean the component store offline.
Make sure all required updates and application are installed beforehand.
3.1.4 Choosing a size for the overlay
Overlay life can vary greatly depending on may factors, however, one of the largest factors is the size of the UWF overlay. Generally, as the configured overlay size gets smaller, the overlay will exhaust quicker. For this reason, it is recommended to configure the overlay as large as possible.
3.2 Debugging excessive overlay consumption
Further debugging may be required to determine the cause of excessive overlay consumption. Running the following PowerShell command will output all files in the overlay to a .csv file:
$wmiobject = get-wmiobject -Namespace "root\standardcimv2\embedded" -Class UWF_Overlay
files =wmiobject.GetOverlayFiles("c:")
$files.OverlayFiles | select-object -Property FileName,FileSize | export-csv -Path D:\output.csv
By looking at which files are stored in the overlay you can determine which programs are writing most to the overlay and consuming space.
4 UWF Administrator
4.1 Overview
Phoenix Contact UWF Administrator provides a graphical user interface for monitoring and configuring the Unified Write Filter (UWF) overlay. The application also provides threshold-based protection to avoid overlay exhaustion. Finally, the tool allows users to configure file exclusions that are useful in preventing overlay exhaustion.
4.2 Installing UWF Administrator
4.2.1 Requirements
The following is required to install the Phoenix Contact UWF Administrator application.
– Phoenix Contact industrial PC (IPC).
- 4 GB RAM for 64-bit systems and 2 GB RAM for 32-bit systems.
- .NET Framework 4.6.1, which is installed by default with the Windows 10 2019 LTSC and Windows 10 2016 LTSB operating systems. The Windows 10 2015 LTSB operating system requires that .NET Framework version 4.6.1 be installed manually.
- Windows 10 (may be 32-bit or 64-bit) operating system.
- Windows 10 2016 LTSB operating system must be build 14393.3085 or higher.
- Apply KB4507460 or greater.
- Verify build number by calling winver.exe from a cmd window.
- Windows 10 2015 LTSB operating system must be build 10240.18275 or higher
- Apply KB4507458 or greater.
- Verify build number by calling winver.exe from a cmd window.
- Windows UWF feature must be enabled. During the install, if the UWF feature is not enabled, the installer will prompt the user to enable it.

text_image
UWF Administrator Window's Unified Write Filter Feature is not enabled and is a requirement for UWF Administrator. Would you like to install it now? Yes NoFigure 4-1 UWF Administrator prompt message to enable UWF
- Click the "Yes" button to automatically enable the UWF.
- Click the "No" button to stop and exit the installation process.
Once UWF is enabled, a message appears to prompt the user to reboot the IPC.
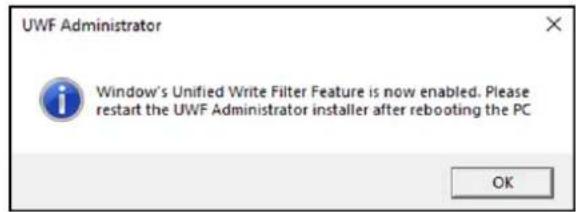
text_image
UWF Administrator Window's Unified Write Filter Feature is now enabled. Please restart the UWF Administrator installer after rebooting the PC OKFigure 4-2 UWF Administrator confirmation message
During installation the UWF Administrator:
- stores settings in the registry. The registry keys are excluded from the overlay to allow the UWF Administrator settings to be retained between reboots.
- enables the UWF Notify application to execute at startup. Double-click the icon in the system tray.
4.2.2 Optional features
When installing UWF Administrator, you have the option of excluding the Windows Event Log from the UWF overlay.
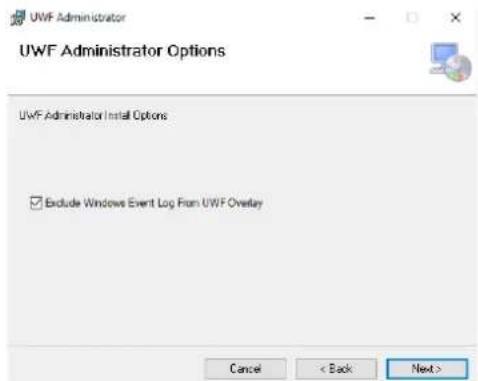
text_image
UWF Administrator UWF Administrator Options UWF Administrator Install Options Exclude Windows Event Log From UWF Overlay Cancel < Back Next >Figure 4-3 UWF Administrator options
Check the box to exclude the Event Log from the UWF overlay. Note that this will prevent you from viewing any errors that may happen while UWF is enabled.
4.3 UWF Administrator components
UWF Administrator has three components to monitor and configure the UWF overlay.
4.3.1 UWF overlay monitor
This component is a background Windows service which interfaces with all UWF Administrator user dialogs and the system. This service runs automatically at startup and is required for all other UWF Administrator components to work.
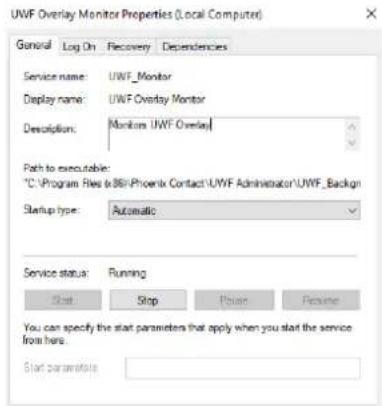
text_image
UWF Overlay Monitor Properties (Local Computer) General Log On Recovery Dependencies Service name: UWF_Monitor Display name: UWF Overlay Monitor Description: Monitors UWF Overlay Path to executable: "C:\Program Files\086\Phoenix Contact\UWF Administrator\UWF_Backsign" Startup type: Automatic Service status: Running Start Stop Pause Resume You can specify the start parameters that apply when you start the service from here. Start parametersFigure 4-4 "UWF Overlay Monitor Properties" dialog box
4.3.2 UWF notify
The UWF notify component notifies the user if overlay consumption reaches a configured threshold value. This component will start automatically after the user is logged on. An icon is placed in the system tray.

Figure 4-5 UWF tray icon
Hover over the icon to view the status of the overlay.
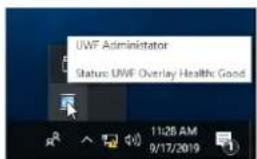
text_image
UWF Administrator Status: UWF Overlay Health: GoodFigure 4-6 UWF Administrator status
Right click the icon to show the menu or double-click to open the UWF Administrator application.
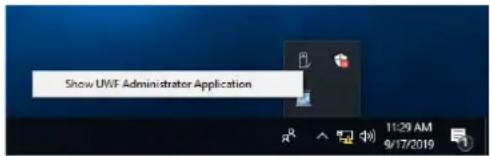
text_image
Show UWF Administrator Application 11:29 AM 9/17/2019Figure 4-7 UWF Administrator menu
4.3.3 UWF Administrator configuration interface
The UWF Administrator allows the user to configure UWF settings and to see UWF status in a convenient graphical interface. 4.4 "Configuration" describes, in detail, each tab in the UWF Administrator. The status bar at the bottom of UWF Administrator (see Figure 4-8) shows the status of the UWF.
- Good = Overlay consumption < Warning threshold
- Warning = Overlay consumption > Warning threshold
- Critical = Overlay consumption > Critical threshold
If the connection status shows disconnected, UWF data is not getting updated in the UWF Administrator application. This could possibly be caused by the UWF overlay monitoring service being stopped.
To set overlay threshold values see "Overlay setting" on page 23.
4.4 Configuration
Click the appropriate tab to go to the selected page within the UWF Administrator application.
4.4.1 Overview
The "Overview" page provides a snapshot of the status and health of the UWF when the filter is enabled.

text_image
UWF Administrator Overview Filter Setting Overlay Setting Exclude File/Folder Commit File Miscellaneous www.phoenixcontact.com PHOENIX CONTACT Filter Status: On Reboot Pending: No Protected Volume: C: Overlay Health: Good Overlay Size: 1024 MB Overlay Free: 1009 MB Overlay Consumption: 15 MB Overlay Used: 1.46% Connection Status: Connected Overlay Health: GoodFigure 4-8 UWF "Overview" page with filter enabled
With the filter disabled, less information is provided.
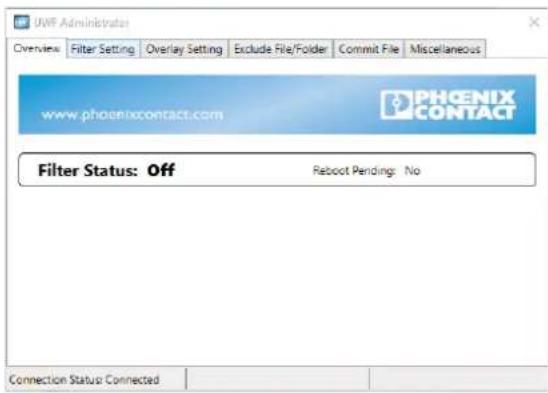
text_image
UWF Administrator Overview Filter Setting Overlay Setting Exclude File/Folder Commit File Miscellaneous www.phoenixcontact.com PHOENIX CONTACT Filter Status: Off Reboot Pending: No Connection Status: ConnectedFigure 4-9 UWF "Overview" page with filter disabled
The filter status is stored from the last time the UWF Administrator was closed.
4.4.2 Filter Setting
The "Filter Setting" page allows the user to enable and disable UWF protection on a specified volume. When the "Filter Status" field is Off the user can set the overlay size. When UWF protection is enabled, the field is hidden. Any changes made on this page will require a reboot to become effective.
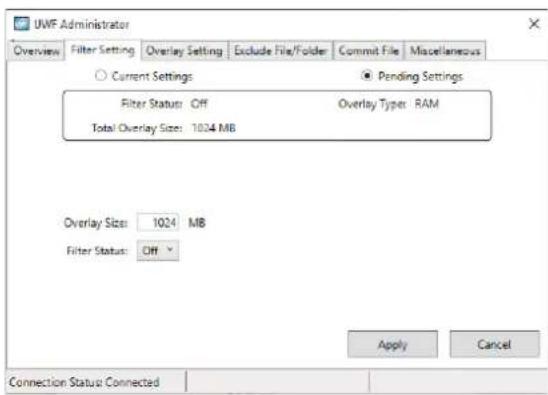
text_image
UWF Administrator Overview Filter Setting Overlay Setting Exclude File/Folder Commit File Miscellaneous Current Settings Pending Settings Filter Status: Off Overlay Type: RAM Total Overlay Size: 1024 MB Overlay Size: 1024 MB Filter Status: Off Apply Cancel Connection Status ConnectedFigure 4-10 "Filter Setting" page with UWF filter disabled
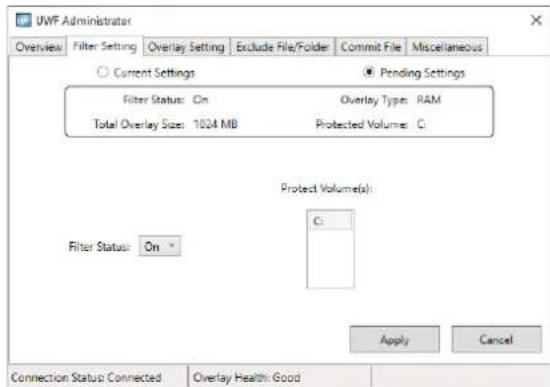
text_image
UWF Administrator Overview Filter Setting Overlay Setting Exclude File/Folder Commit File Miscellaneous Current Settings Pending Settings Filter Status: On Overlay Type: RAM Total Overlay Size: 1024 MB Protected Volume: C. Protect Volumes: Filter Status: On Apply Cancel Connection Status: Connected Overlay Health: GoodFigure 4-11 "Filter Setting" page with UWF filter enabled
To view either the current or pending settings click the appropriate button at the top of the page. Pending settings will not become effective until the device is rebooted.
The "Protected Volume(s)" field lists all volumes that UWF is able to protect. Double-click the desired volume to alternately select or unselect it.

Removable disks, such as USB thumb drives, will not be listed since removable drives cannot be protected by UWF. Multiple volumes may be selected. Note that at least one volume must be selected to enable the filter.
The "Filter Status" drop-down menu selects the status of the UWF protection.
- On means on the next boot the filter will be enabled to protect the selected volume(s). No changes will be saved to the selected volume.
- Off disables UWF protection to all volumes.
The "Total Overlay Size" field sets the size of the UWF overlay in Megabytes (MB). When the filter is enabled all writes will be redirected to the overlay. Note that UWF Administrator can only configure a RAM overlay which means the following should be taken into consideration:
- Keep at least 2 GB of system RAM free on 64-bit operating system and 1 GB free on a 32-bit operating system. For example, on a 64-bit system with 4 GB of system RAM it is recommended to have a maximum overlay size of 2 GB. UWF Administrator will warn the user if the overlay size is configured for a value greater than the recommend maximum size.
UWF Administrator Configuration Warning

It is recommended to have a Overlay size less than: 100MB due to your current system configuration. It is recommended to leave at least 2GB of memory available to 64-bit Windows 10. Would you like to continue anyways?

Figure 4-12 "UWF Administrator Configuration Warning" message
- You cannot set the overlay size higher than the total amount of system RAM.
- You cannot set the overlay size lower than 100 MB.
A warning message appears if the settings are greater than the maximum overlay size.
4.4.3 Overlay setting
The “Overlay Setting” page configures which actions are performed when UWF overlay consumption reaches the configured thresholds.

text_image
UWF Administrator Overview Filter Setting Overlay Setting Exclude File/Folder Commit File Miscellaneous Overlay Consumption: 0 MB Overlay Free: 0 MB Warning Threshold: 512 MB Critical Threshold: 1024 MB Warning Action: Do Nothing Critical Action: Notification Warning Threshold: 512 MB Critical Threshold: 1024 MB Warning Action: Do Nothing Critical Action: Notification Apply Cancel Connection Status: ConnectedFigure 4-13 "Overlay Setting" page
A "Warning Threshold" and a "Critical Threshold" are available. The actions for each threshold is set separately through a drop-down menu.
Table 4-1 Action options
| Warning Action Critical Action Result | |
| Do Nothing Do Nothing Event is logged but no action is taken. | |
| – Restart 30 second timeout message appears. If no action is taken, the system restarts. | |
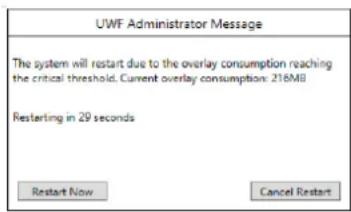
| Notification Notification A message appears but no action is taken.Event is logged (default action). | |
| – Shutdown 30 second timeout message appears. If no action is taken, the system shuts down. | |
| Event Event An event is fired to notify third-party applications to respond (see “UWF Administrator events in other systems” on page 27). | |
text_image
UWF Administrator Message The system will restart due to the overlay consumption reaching the critical threshold. Current overlay consumption: 216MB Resterling in 29 seconds Restart Now Cancel RestartFigure 4-14 Warning message about restart or shutdown
UWF overlay thresholds
The threshold values are used to warn the user of overlay consumption and to provide corrective action before the overlay is completely consumed. If the overlay is completely consumed undesirable behavior will start to manifest such as system crashes and freezes.
Warning Threshold: The recommended minimum warning threshold is 20% of the maximum overlay. A warning message appears when the value is set lower than 20%.
The warning threshold must be less than the critical threshold.
Critical Threshold: The recommended minimum critical threshold is 25% of the maximum overlay size. A warning message appears when set lower than 25%.
The critical threshold needs to be less than the maximum overlay size.

NOTE:
The minimum recommended threshold values are to prevent unnecessary or excessive overlay warning messages from UWF Administrator. A user can choose to ignore the warning messages when setting threshold values less than the recommended values.
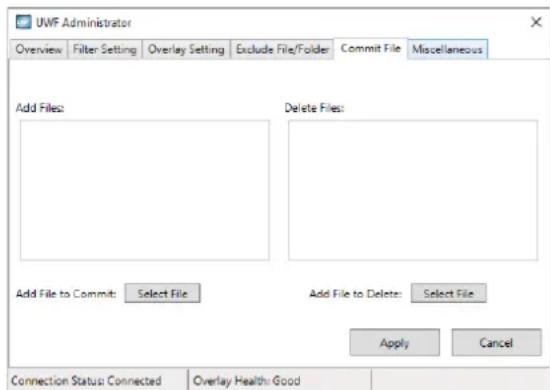
4.4.4 Commit File
The “Commit File” page is editable only while the UWF filter is enabled. If the disabled, changes are not allowed.
text_image
UWF Administrator Overview Filter Setting Overlay Setting Exclude File/Folder Commit File Miscellaneous Add Files: Delete Files: Add File to Commit: Select File Add File to Delete: Select File Apply Cancel Connection Status: Connected Overlay Health: GoodFigure 4-15 "Commit File" page with UWF protection enabled
The "Add File" field allows entry of files so they are not lost.
The "Delete File" field allows entry of files are deleted from the overlay.
Listing files in the "Add File" and "Delete File" fields is not intended to commit entire volumes. When making a large change, such as program installation, it is recommended to disable UWF protection.
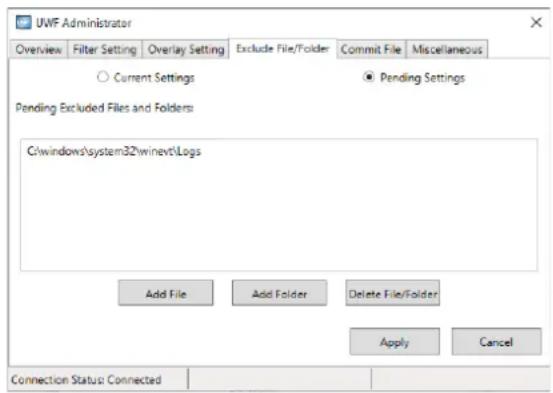
4.4.5 Exclude File/Folder
The "Exclude File/Folder" page allows permanent exclusion of files or folders from the overlay. The page is only editable when UWF protection is disabled.
text_image
UWF Administrator Overview Filter Setting Overlay Setting Exclude File/Folder Commit File Miscellaneous ○ Current Settings ● Pending Settings Pending Excluded Files and Folders: C:\windows\system32\winevt\Logs Add File Add Folder Delete File/Folder Apply Cancel Connection Status: ConnectedFigure 4-16 "Exclude File/Folder" page
To view either the current or pending settings, click the appropriate button at the top of the page. Current settings are active. Pending settings will become effective when UWF protection is enabled, which requires the device to be booted.
This page allows selection of files and folders to be excluded from the overlay.
- Click the "Add File" or "Add Folder" button to open a "Browse" window.
- Navigate to the desired file or folder, highlight the file or folder, and then click the "Add" button to select it and close the "Browse" window.
- Repeat step 2 until all files and folders are displayed in the field.
- Click the "Apply" button.
To remove a file or folder from the excluded list, highlight it in the field and then click the "Delete File/Folder" button.

The "Delete File/Folder button does not delete any files or folders from storage drives. It only removes them from the UWF exclusion list.
5.5.1 Exclusion recommendations
Root volumes, such as C:, cannot be excluded.
The "\Windows", "\Windows\System32", and "\Windows\System32\Drivers" folders cannot be excluded.
Paging files cannot be excluded. This can result in unpredictable behavior.
You cannot move an excluded file or folder to an unexcluded area. For example, if a user excludes "C:\test.txt" they cannot move it to "C:\example\test.txt" unless "C:\example\" is also in the exclusion list.
See “UWF overlay exclusions” on page 8 for more details about UWF folder and file exclusions.
4.4.6 Miscellaneous
The "Miscellaneous" page sets the refresh interval and displays the version.

text_image
UWF Administrator Overview Filter Setting Overlay Setting Exclude File/Folder Commit File Miscellaneous Refresh Interval: 5 seconds UWF Administrator Version: 10.1.5 Apply Cancel Connection Status: ConnectedFigure 4-17 "Miscellaneous" page
The "Refresh Interval" field must be set between 1 and 30 seconds. Note that an interval less than 5 seconds will cause higher CPU usage.
A Technical appendix
A 1 UWF Administrator events in other systems
It may be desirable to pass a UWF Administrator event to a third-party application to cause an external response or notification.
EventWaitHandle UWFkarnEvent = EventWaitHandle.OpenExisting{
    "Global\\UWFadmin_WarningThresholdEvent", System.Security.AccessControl.EventWaitHandleRights.Synchronize);
if(UWFkarnEvent == null)
{
    MessageBox.Show("Failed to create Warning event handle");
}
if(UWFkarnEvent.WaitOne())
{
    MessageBox.Show("Detected a Warning Event!");
}
Figure A-1 Monitoring a warning event in C#
EventWaitHandle UWFCriticalEvent = EventWaitHandle.OpenExisting(
    "Global"\\UWFAmin_CriticalThresholdEvent", System.Security.AccessControl.EventWaitHandleRights.Synchronize);
if(UWFCriticalEvent == null)
{
    MessageBox.Show("Failed to create Critical event handle");
}
if(UWFCriticalEvent.WaitOne())
{
    MessageBox.Show("Detected a Critical Event!");
}
Figure A-2 Monitoring a critical event in C#
B Appendixes
B 1 List of figures
Section 2
Figure 2-1: "Folder Access Denied" message ....10
Section 4
Figure 4-1: UWF Administrator prompt message to enable UWF ....17
Figure 4-2: UWF Administrator confirmation message ....18
Figure 4-3: UWF Administrator options ....18
Figure 4-4: "UWF Overlay Monitor Properties" dialog box ....19
Figure 4-5: UWF tray icon ....19
Figure 4-6: UWF Administrator status ....19
Figure 4-7: UWF Administrator menu ....20
Figure 4-8: UWF "Overview" page with filter enabled ....20
Figure 4-9: UWF "Overview" page with filter disabled ....21
Figure 4-10: "Filter Setting" page with UWF filter disabled ....21
Figure 4-11: "Filter Setting" page with UWF filter enabled ....22
Figure 4-12: "UWF Administrator Configuration Warning" message .....22
Figure 4-13: "Overlay Setting" page ....23
Figure 4-14: Warning message about restart or shutdown .....23
Figure 4-15: "Commit File" page with UWF protection enabled ....24
Figure 4-16: "Exclude File/Folder" page 25
Figure 4-17: "Miscellaneous" page 26
Section A
Figure A-1: Monitoring a warning event in C# 27
Figure A-2: Monitoring a critical event in C# 27
B 2 List of tables
Section 3
Table 3-1: Group Policy Editor settings....13
Table 3-2: Task Scheduler settings ....14
Section 4
Table 4-1: Action options ......23
Please observe the following notes
General terms and conditions of use for technical documentation
Phoenix Contact reserves the right to alter, correct, and/or improve the technical documentation and the products described in the technical documentation at its own discretion and without giving prior notice, insofar as this is reasonable for the user. The same applies to any technical changes that serve the purpose of technical progress.
The receipt of technical documentation (in particular user documentation) does not constitute any further duty on the part of Phoenix Contact to furnish information on modifications to products and/or technical documentation. You are responsible to verify the suitability and intended use of the products in your specific application, in particular with regard to observing the applicable standards and regulations. All information made available in the technical data is supplied without any accompanying guarantee, whether expressly mentioned, implied or tacitly assumed.
In general, the provisions of the current standard Terms and Conditions of Phoenix Contact apply exclusively, in particular as concerns any warranty liability.
This manual, including all illustrations contained herein, is copyright protected. Any changes to the contents or the publication of extracts of this document is prohibited.
Phoenix Contact reserves the right to register its own intellectual property rights for the product identifications of Phoenix Contact products that are used here. Registration of such intellectual property rights by third parties is prohibited.
Other product identifications may be afforded legal protection, even where they may not be indicated as such.
How to contact us
Internet
Up-to-date information on Phoenix Contact products and our Terms and Conditions can be found on the Internet at: phoenixcontact.com
Make sure you always use the latest documentation. It can be downloaded at: phoenixcontact.net/products
Subsidiaries
If there are any problems that cannot be solved using the documentation, please contact your Phoenix Contact subsidiary. Subsidiary contact information is available at phoenixcontact.com.
Published by PHOENIX CONTACT GmbH & Co. KG Flachsmarktstraße 8 32825 Blomberg GERMANY
PHOENIX CONTACT Development and Manufacturing, Inc. 586 Fulling Mill Road Middletown, PA 17057 USA
Should you have any suggestions or recommendations for improvement of the contents and layout of our manuals, please send your comments to: tecdoc@phoenixcontact.com