WTR-110 - Uncategorized Antari - Free user manual and instructions
Find the device manual for free WTR-110 Antari in PDF.

| Product Type | Fog Machine |
| Brand | Antari |
| Model | WTR-110 |
| Dimensions (L x W x H) | 520 x 310 x 310 mm |
| Weight | 10.5 kg |
| Power Supply | AC 100-240V, 50/60Hz |
| Power Consumption | 1500 W |
| Heating Element | 1500 W |
| Fluid Consumption | 100 ml/min |
| Fluid Tank Capacity | 2.5 liters |
| Max Output | 2000 cfm |
| Warm-up Time | 4 minutes |
| Control Methods | DMX, Manual, Remote Control |
| Functions | Continuous output, variable output, timer |
| Safety Features | Overheat protection, auto-off |
| Maintenance | Clean with distilled water, check fluid level |
| Spare Parts | Pump, heater, fuse, remote control |
| Accessories Included | Remote control, power cord, user manual |
Frequently Asked Questions - WTR-110 Antari
User questions about WTR-110 Antari
0 question about this device. Answer the ones you know or ask your own.
Ask a new question about this device
Download the instructions for your Uncategorized in PDF format for free! Find your manual WTR-110 - Antari and take your electronic device back in hand. On this page are published all the documents necessary for the use of your device. WTR-110 by Antari.
USER MANUAL WTR-110 Antari
natural_image
Exterior view of a black FTX SMAZE air conditioning unit with fan and wheels (no visible text or symbols on main body)- Introduction ...... 1
- Safety Information....1
- Package Contents & Inspection....2
- Machine Details....3
- Technical Label Information....3
- Fog Fluid....3
- Setting and Manual Operation....4
- Control Settings 4
- DMX Connection 6
- RDM Function....6
- EasySwitch Wireless Remote (Optional)....7
- EasySwitch W-DMX Receiver (Optional) 8
- Service and Maintenance....9
- Technical Specifications.... 10
- Warranty Disclaimer.... 10
- Machine Dimension....11
- 前言 12
- 安全注意事項 12
- 包裝內容與檢查....13
- 機器訊息 14
- 技術標籤資訊....14
- 煙霧水....14
- 設定與手動操作說明....15
- 控制設定....15
- DMX 說明 ..... 17
- RDM 功能 ..... 17
- EasySwitch 無線控制器(選配).... 18
- EasySwitch 無線 DMX 接收器(選配).... 19
- 維護和保養....20
- 技術規格....21
- 保固聲明 .... 21
- 機器尺寸圖 21
Appendix I Grounding Instruction 22

text_image
FTX SMAZEUser Manual
1. Introduction
Please read all the user manual before operating the machine, and place the manual where the user can refer to it at all time. The manual includes how to install and operate the machine under safe conditions and explain all the labels printed on the machine. If you encounter any problem, contact your local Antari dealer for assistant immediately.
2. Safety Information
| ! | DANGER | If the danger is not avoided, it will cause death or serious injury |
 | WARNING | If the warning is not heeded, it can cause death or serious injury. |
 | CAUTION | If the precaution is not taken, it may cause minor or moderate injury. |

DANGER
- Must connect the machine to the correct rated voltage or it might lead to an electrical shock or a burn and may cause serious consequences.
- Must connect the machine to a protected circuit and ensure it is properly grounded to avoid the risk of electrocution. For grounding instruction, please refer to Appendix I on page 22.
● Do not operate the machine with a bundled power cord, it could lead to a fire hazard.
● When operating the machine, do not point at people, animals, or fire.

WARNING
- Please operate the machine on a flat, level hard and well-ventilated surface area, reserve at least 50cm space around the machine and make sure there is no flammable gas or material nearby.
- Do not disassemble, repair or modify the machine, it may cause damages, malfunction, risk of electrical shock or result in fire.
● The machine can only be operated by adults or professionals, is not intended for use by person with reduced physical sensory, mental capabilities, or lack of experience and knowledge including children. - Do not leave the machine running unattended, make sure all powers are off when leaving.
● Children should be supervised to ensure that they do not play with the machine.
● Do not use the machine upside down or tilt it, it might cause damages or malfunction. - Please store the fluid inside in a well-ventilated area without direct sunlight and keep out of reach of children. In case of eye contact or accidentally swallow the fluid, please seek medical attention immediately.

CAUTION
- Keep the machine dry at all time. The machine is not waterproof, do not expose the machine to water, rain or moisture environment.
● Please make sure the power outlet is not damaged or loose before plug in the power cord. - If the power cord is damaged, it must be replaced by Antari or its local dealers, otherwise the warranty will be void
● Before transporting the machine, please make sure the fluid is drained and tank is empty. (Recommend using original package)
● The machine is for indoor use only.
● Do not operate the machine in any area with unstable voltage.
- If you experience strange sound or malfunction, turn off the power and unplug the power cord immediately and contact your local Antari dealer for assistant.
- Do not contact any moving part.
● Only use accessories recommended or sold by Antari.
- Please make sure the power is off when not using the machine and unplug the power cord if not intend to use for a long period of time.
● To disconnect, turn all controls to the off position, then remove plug from outlet.
- Do not unplug by pulling on cord. To unplug, grasp the plug, not the cord.
● Unplug from outlet before servicing or cleaning.
- Do not operate the machine with a damaged cord or plug, or after the machine malfunctions or is dropped or damaged in any manner. Return machine to the nearest authorized service facility for examination, repair, or electrical or mechanical adjustment.
- To ensure the lifespan of the machine, please only use the fluid manufactured by Antari, do not use other fluid or additive, otherwise it may cause malfunction.
Before operating the machine, please read all warning labels on the machine, description as below;
Rear Cover Printing
WARNING!
DISCONNECT POWER BEFORE CHANGING FUSE.
USE ONLY WITH ADULT SUPERVISION.
DO NOT OPERATE WITHOUT LIQUID.
FOR INDOOR USE ONLY. KEEP DRY.
NO USER SERVICEABLE PARTS INSIDE.
CAUTION!
ONLY USE MANUFACTURER DESIGNATED FLUID.
NEVER ADD FLAMMABLE SUBSTANCES.
3. Package Contents & Inspection
Immediately upon receiving the machine, carefully unpack the carton, check the content to ensure it is the correct model and all parts are included. If any part appears to be damaged or missing during transportation, please contact your local dealer and return in original package for inspection.
3.1 Package Contents
1 x F-7X Smaze Machine
2 x 5 Liter Fluid Tank
2 x Neutrik powerCON Power Cable
1 x User Manual or Scan QR Code on the Machine
3.2 Optional Accessories
| Item Code | Description |
| ES-W2-RECEIVER | EasySwitch Wireless Remote (Wireless Receiver/W-2 Wireless Transmitter) |
| ES-W-DMX | EasySwitch Wireless DMX Receiver |
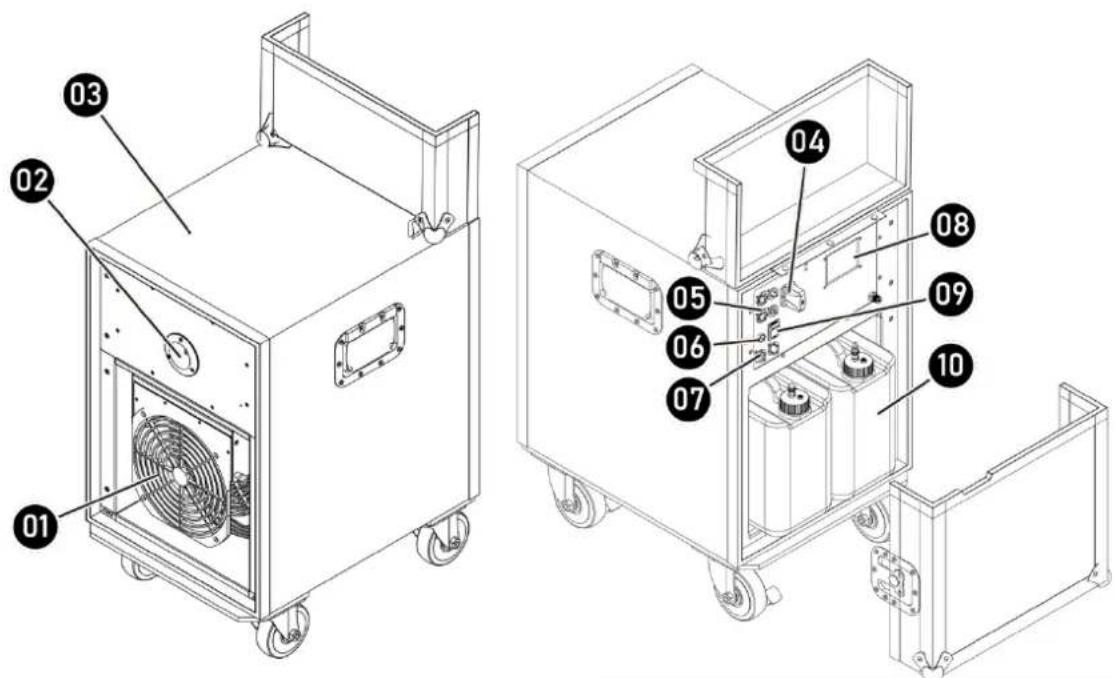
4. Machine Details
text_image
Technical diagram of a mechanical device with numbered components for identification| 01. Fan | 06. Fuse |
| 02. Nozzle | 07. Neutrik powerCON Connector (Power) |
| 03. Flight Case | 08. LCD Touch Screen |
| 04. Wireless / W-DMX (Optional) | 09. Two in One Power & Breaker Switch |
| 05. XLR 3-Pin/5-Pin Connector (DMX) | 10. 5 Liter Fluid Tank |
5. Technical Label Information
Please read the technical label information on the back of the machine before operating it.

text_image
1 XXXX 2 INPUT VOLTAGE: XXXX Vac 3 FREQUENCY: 50/60Hz 4 RATED POWER: XXXW 5 BREAKER/FUSE: XXA 250V MADE IN TAIWAN Scan It for User Manual XXXXMMYYXXXXXX 17 1. Model Name 5. Breaker/Fuse 2. Input Voltage 6. QR CODE for User Manual 3. Frequency 7. Serial No. 4. Rated Power6. Fog Fluid
 | CAUTION | Always turn off the power before filling the fluid tank. Do not add flammable liquid to the fluid tank. If fluid gets inside the machine, please contact your loca Antari dealer for assistant. |
-
Only the fog fluid manufactured by Antari can be used, do not mix or dilute the fog fluid. Due to improper storage or using other fluid might cause malfunction.
● The machine is tested and calibrated with the specific fog fluid to get the best performance. -
Please empty the fluid in the tank before switching to another fluid to avoid mixing.
● The warranty on your fog machine will be void if you use fog fluid not manufactured by Antari.
7. Setting and Manual Operation
 | WARNING | Machine falling off might cause serious injury, please make sure it is secure and firm on the overhead. |
Step 1. Place the machine on a flat, level hard and well-ventilated surface area and reserve at least 50cm open space around the machine, and make sure there is no flammable gas or material nearby;
Step 2. Fill the fluid tank with Antari approved fog fluid, and make sure the tube is not twisted;
Step 3. Connect the machine to the power outlet. Please read the technical label on the back of the machine and make sure the power outlet is the correspond to the rated voltage for the machine;
Step 4. Turn on the machine, warm up process takes approximately 8 minutes. Once the machine is ready for operation, the LCD display will show “Ready To Faze”;
Step 5. Please refer to "8. Control Settings" for control panel operation;
Step 6. To turn off the machine, please make sure the machine is not operating then turn of the power. If you will not use the machine a long period of time, please remove the power cord.
8. Control Settings
F-7X Smaze Machine can be operated in the following modes. The machine can only accept 1 type of signal at a time.
- Manual
- Timer
- DMX512
- Wireless
W-DMX
8.1 Control Panel Description

text_image
TIMER MANUAL DMX MENUF-7X Smaze Machine can be operated with LCD Touch Screen.
| Icon | Operating Method | Action | |
| [X0H5] | Press | Confirmed Selection | |
 | Press | Adjust Values | |
 | Press | Back to Last Page | |
 | Press | Start | |
 | Press | Stop | |
 | Press | Enter Configuration | |
 | N/A | Selected Mode in Action | |
| (Green Background Color) | |||
8.2 Menu Options Description
| Main Menu | Item | Description | |
| Timer | Operation Mode | Fog / Faze | |
| Interval | 1 – 300 sec | ||
| Duration | 1 – 120 sec | ||
| Fog Output | 20 – 100% | ||
| Faze Output | 20 – 100% | ||
| Fan Level | 20 – 100% | ||
| Manual | Operation Mode | Fog / Faze | |
| Fog Output | 20 – 100% | ||
| Faze Output | 20 – 100% | ||
| Fan Level | 20 – 100% | ||
| DMX | Address | 001 - 510 | |
| WDMX On | On / Off | ||
| WDMX Reset | On | ||
| Menu | Information | Software Version | |
| Setting | Operation Mode | Fog / Faze | |
| Fan Level | 20 – 100% | ||
| Fluid Selection | FLG / FLZ / FLH | ||
| Fluid Detection | On / Off | ||
| WRC Pairing | Pair / Unpair | ||
| Quick Start | On / Off | ||
| Language | 中文 / English / 日本語 | ||
| LCD Backlight | High / Normal / Low / Auto Off | ||
| Self-Cleaning Mode | Count Down 180 sec | ||
9. DMX Connection
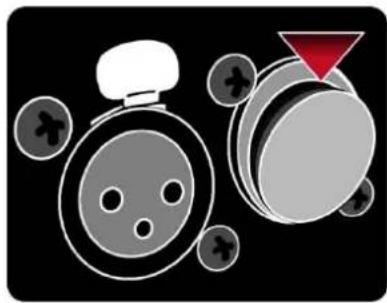
9.1 DMX Connector Pin Assignment
The machine has a XLR 3-Pin and 5-Pin for DMX connection. The diagram below indicates pin assignment information.

** There is a protection cap on DMX IN, please remove it with your finger before operation.
natural_image
Illustration of a casino game controller with a red triangle and circular buttons (no text or symbols)| Pin | Function |
| 1 | Ground |
| 2 | Data- |
| 3 | Data+ |
| 4 | N/A |
| 5 | N/A |
9.2 DMX Channel Function
The machine provides 3 DMX Channels to select from, please see chart below.
| Channel Mode | Channel | DMX Value Range | Function |
| Channel 1 | 1 | 0 – 127 | Faze Mode |
| 128 – 255 | Fog Mode | ||
| Channel 2 | 2 | 0 – 5 | Output Off |
| 6 – 255 | Output 21%– 100% | ||
| Channel 3 | 3 | 0 – 5 | Fan Speed 20% |
| 6 – 255 | Fan Speed 21% – 100% |
10. RDM Function
M-12 Universal Voltage Fog Machines is RDM enabled, allowing control system to configure, monitor and manage. See below table for supported RDM categories and parameters.
10.1 RDM UID
| ESTA Manufacturer ID(16-bit) | Device ID (32-bit) | ||||
| Fixed | Fixed | RDM UIDRange: 0x0000 ~ 0xFFDC | |||
| 0x1E | 0xD8 | 0x00 | 0x0C | 0x00 | 0x01 |
※RDM UID can be set in Factory Mode
10.2 RDM Categories/Parameter ID Defines
| GET Allowed | SET Allowed | Category | RDM Parameter ID's | Value | Required |
| Network Management | DISC_UNIQUE_BRANCH | 0x0001 | O | ||
| DISC_MUTE | 0x0002 | O | |||
| DISC_UN_MUTE | 0x0003 | O | |||
| O | RDM Information | STATUS_MESSAGES | 0x0030 | ||
| O | SUPPORTED_PARAMETERS | 0x0050 | O | ||
| O | Product Information | DEVICE_INFO | 0x0060 | O | |
| O | PRODUCT_DETAIL_ID_LIST | 0x0070 | |||
| O | DEVICE_MODEL_DESCRIPTION | 0x0080 | |||
| O | MANUFACTURER_LABEL | 0x0081 | |||
| O | O | DEVICE_LABEL | 0x0082 | ||
| O | SOFTWARE_VERSION_LABEL | 0x00C0 | O | ||
| O | O | DMX512 Setup | DMX_PERSONALITY | 0x00E0 | |
| O | DMX_PERSONALITY_DESCRIPTION | 0x00E1 | |||
| O | O | DMX_START_ADDRESS | 0x00F0 | O | |
| O | O | Control | IDENTIFY_DEVICE | 0x1000 | O |
11. EasySwitch Wireless Remote (Optional)
EasySwitch Wireless Remote is an optional accessory for F-7X Smaze Machines, it included a W-2 wireless transmitter and an EasySwitch Wireless Receiver. If you already purchased the wireless model, it's ready to use. If you purchase the EasySwitch Wireless Remote afterwards, please follow the instruction below. If you encounter any problem, please contact your local Antari dealer for assistant.
11.1 W-2 Wireless Transmitter & EasySwitch Wireless Receiver
● Battery : 27A 12V
● Effective Range : The effective range is approximately 50 meter, depends on actual condition, it may vary.
● If effective range is significantly shorter, please change battery.
● W-2 wireless transmitter has 4 buttons, each function as follow:
| Button | Function |
| [A] | Start Fogging |
| [B] | Stop Fogging |
| [C] | Increase Fog Output |
| [D] | Decrease Fog Output |
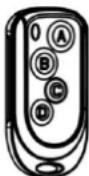
W-2 Wireless Transmitter
EasySwitch Wireless Receiver
11.2 EasySwitch Wireless Receiver Installation
If you purchased the EasySwitch Wireless Remote afterwards, please follow the instructions below to install the receiver. If you encounter any problem, please contact your local Antari dealer for assistant.
text_image
Diagram showing a door with Chinese character '工' and two circular buttons, each with a red arrow pointing to it.Graph 1
natural_image
Diagram of a mechanical component with internal blades and a red arrow indicating direction (no text or symbols)Graph 2
natural_image
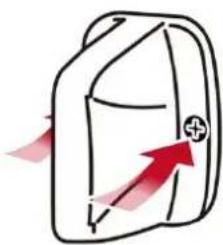
Simple line drawing of a bag with an arrow indicating direction (no text or symbols)Graph 3
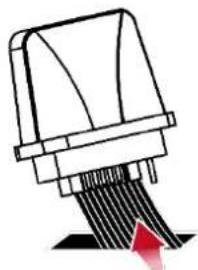
- Please see graph 1, remove the cover from the pointed place;
- You will see a white cable like graph 2, pull it out and connect to the EasySwitch wireless receiver;
- Screw it back to the machine show in graph 3 and follow the instruction on 11.3 for pairing.
11.3 Pair & Unpair
Each receiver can pair up to 5 transmitters, please follow the steps below to pair or unpair the transmitters;
Step 1. Press menu to enter;
Step 2. Press setting and find WRC Pairing;
Step 3A. Press Pair to pair the W-2 Wireless transmitter;
Step 3B. Press Unpair to unpair the W-2 Wireless transmitter;
12. EasySwitch W-DMX Receiver (Optional)
EasySwitch W-DMX Receiver is an optional accessory for F-7X Smaze Machines, it included a EasySwitch W-DMX receiver. If you already purchased the W-DMX model, it's ready to use. please follow the instruction below. If you encounter any problem, please contact your local Antari dealer for assistant.
12.1 EasySwitch W-DMX Receiver
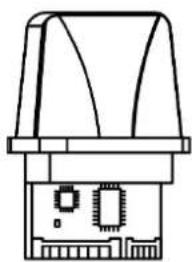
natural_image
Pure technical line drawing of a mechanical component without any text, numbers, or symbols12.2 EasySwitch W-DMX Receiver Installation
If you purchased the EasySwitch Wireless Remote afterwards, please follow the instructions below to install the receiver. If you encounter any problem, please contact your local Antari dealer for assistant.

natural_image
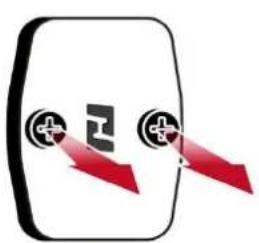
Pure diagram of a shield with two circular elements and red arrows pointing outward (no text or symbols)Graph 1

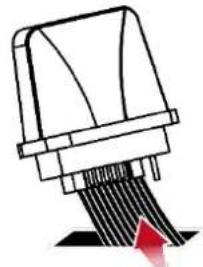
natural_image
Diagram of a mechanical component with internal blades and a red arrow indicating direction (no text or symbols)Graph 2

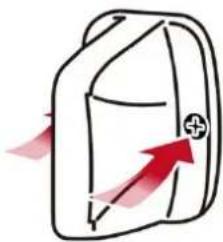
natural_image
Simple line drawing of a bag with a red arrow indicating direction (no text or symbols)Graph 3
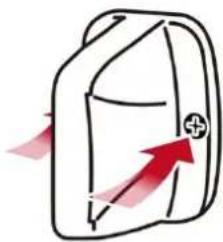
- Please see graph 1, remove the cover from the pointed place;
- You will see a white cable like graph 2, pull it out and connect to the EasySwitch wireless receiver;
- Screw it back to the machine like graph 3 and follow the instruction on 12.3 for pairing.
12.3 Pair & Unpair
Please follow the steps below to pair;
Step 1. Press DMX;
Step 2. Press WDMX On;
Step 3A. Press On to link for signal;
Step 3B. Press Off to unlink W-DMX signal;
Step 4. Or Press WDMX Reset and press On to reset.
12.4 Status of W-DMX
| Symbol on the Liquid Crystal Display | Status of W-DMX connection |
| ● | Transmitter assigned, DMX signal received |
| ◎ | Transmitter assigned, No DMX signal |
| ⊙ | Transmitter link lost or linking to transmitter |
| ○ | Transmitter not assigned |
13. Service and Maintenance
DANGER
Disconnect the power cord before starting maintenance operation.
● Always keep the machine clean and dry.
● Can use an air compressor, a vacuum or a soft brush to remove the dust on the machine.
● Can use a slightly damp cloth to clean the casing.
- It is recommended to run the machine at least once a month in order to maintain its best performance and output condition.
● Excessive dust and build up liquid residue will reduce the performance and cause overheat.
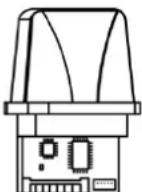
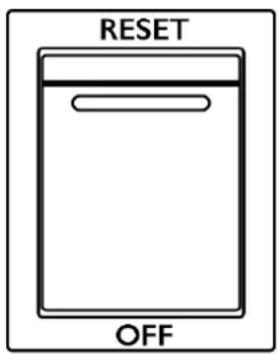
13.1 Breaker Reset (2 in 1 Power Switch)
The 2 in 1 power switch combines power and breaker function.
Please follow below steps to reset the breaker;
Step 1: Please switch to the OFF position;
Step 2: Wait 60 seconds;
Step 3: Flip switch to ON position.
**If the breaker (switch) still jumps off after reset, please contact your local Antari dealer for assistance.
Breaker Specification
100-120V = 15A 250V
220-240V = 9A 250V
text_image
RESET OFF14. Technical Specifications
| F-7X | |
| Input Voltage | US Model : AC 100-120V, 50/60Hz 13.5AEU Model : AC 220-240V, 50/60Hz 8.0A |
| Rated Power | 100V 1400W / 120V 1600W / 240V 1900W |
| Warming-up Time | 8 minutes (approx.) (Fog Mode) |
| Fluid Consumption | Fog Mode: 150 ml/min (100% Output)Faze Mode: 28 ml/min (100% Output) |
| Fluid Tank Capacity | 5 Liters (1.32 gallon) x 2 |
| Compatible Fluid | Antari FLG-5E、Antari FLH-5E、Antari FLZ-5E |
| Operating Time | 2.8 hrs (100% output) (Faze Mode) |
| Ambient Temp. Range | 0°C – 40°C (32°F – 104°F) |
| Control Methods | Manual、Timer、DMX512、Wirless (Optional)、W-DMX (Optional) |
| Interface | XLR 3-Pin/5-Pin Connector (DMX)、Neutrik powerCON Connector (Power) |
| DMX Channels | 3 Channels |
| Included Accessories | N/A |
| Optional Accessories | EasySwitch Wireless Remote、EasySwitch W-DMX |
| Dimension | L 728 W 428 H 719 mm (L 28.66 W 16.85 H 28.31 inch) |
| Weight | 53.0 kg (116.85 lbs.) |
15. Warranty Disclaimer
We guarantee the merchandise manufactured by us to be free from defect in material and workmanship for a period of one year. Our obligation and liability under this warranty shall be restricted to repair or replacement at our factory or local authorized dealer. We assume no liability of the products that are improperly used or used for any purpose other than that for which they are specially designed. This warranty shall not apply to any merchandise which has been repaired, altered or assembled outside our factory in any way so as in our judgment to affect its performance, nor which has been subjected to misuse, negligence, or accident nor to any merchandise operated contrary to our printed instructions. We will not allow or be liable of any loss or any damages of any kind in connection with the use, sale, or repair of any merchandise purchased from us.
16. Machine Dimension


text_image
FTX SMAZE中文使用說明書
1. 前言
text_image
Technical diagram of a two-part industrial machine with numbered components for identification.natural_image
Abstract illustration of mechanical parts and a red triangle on black background (no text or symbols)9.2 DMX 通道功能
natural_image
Pure technical line drawing of a mechanical component without any text, numbers, or symbolsEasySwitch 無線接收器
11.2 EasySwitch 無線接收器安裝說明
natural_image
Pure diagram of a door with two circular buttons and red arrows pointing to the door (no text or symbols)圖 1
natural_image
Diagram of a mechanical component with internal blades and a red arrow indicating direction (no text or symbols)圖 2
natural_image
Simple line drawing of a bag with a red arrow indicating upward motion (no text or symbols)圖 3
natural_image
Pure technical line drawing of a mechanical component without any text, numbers, or symbols12.2 無線 DMX 接收器安裝說明
natural_image
Pure diagram of a shield-like shape with two circular elements and red diagonal arrows pointing outward (no text or symbols)圖 1

natural_image
Diagram of a mechanical component emitting force lines, with a red arrow indicating direction (no text or symbols)圖 2
natural_image
Simple line drawing of a bag with a red arrow indicating direction (no text or symbols)圖 3
Appendix I Grounding Instruction
This appliance must be grounded. In the event of malfunction or breakdown, grounding provides a path of least resistance for electric current to reduce the risk of electric shock. This appliance is equipped with a cord having an equipment-grounding conductor and a grounding plug. The plug must be plugged into an appropriate outlet that is properly installed and grounded in accordance with all local codes and ordinances.
DANGER – Improper connection of the equipment-grounding conductor can result in a risk of electric shock. The conductor with insulation having an outer surface that is green with or without yellow stripes is the equipment-grounding conductor. If repair or replacement of the cord or plug is necessary, do not connect the equipment-grounding conductor to a live terminal. Check with a qualified electrician or serviceman if the grounding instructions are not completely understood, or if in doubt as to whether the appliance is properly grounded. Do not modify the plug provided with the appliance – if it will not fit the outlet, have a proper outlet installed by a qualified electrician.
This appliance is for use on a nominal 120 V circuit, and has a grounding plug that looks like the plug illustrated in sketch A in Figure. A temporary adaptor, which looks like the adaptor illustrated in sketches B and C, may be used to connect this plug to a 2-pole receptacle as shown in sketch B if a properly grounded outlet is not available. The temporary adaptor should be used only until a properly grounded outlet can be installed by a qualified electrician. The green colored rigid ear, lug, and the like, extending from the adaptor must be connected to a permanent ground such as a properly grounded outlet box cover. Whenever the adaptor is used, it must be held in place by the metal screw.

text_image
GROUNDING PIN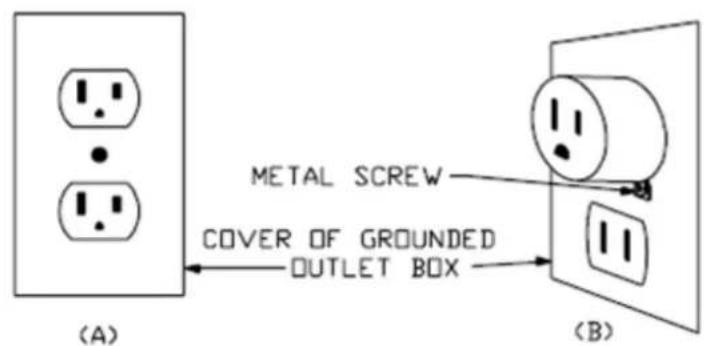
text_image
(A) METAL SCREW COVER OF GROUNDED OUTLET BOX (B)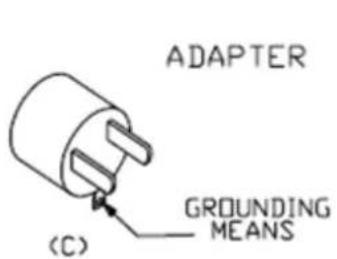
text_image
ADAPTER (€) GROUNDING MEANS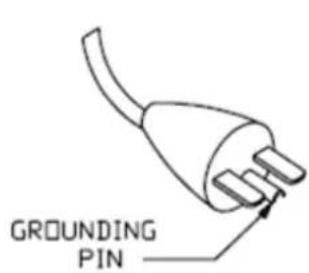
text_image
GROUNDING PIN
natural_image
Simple diagram of two identical electrical socket symbols with dots, labeled (D) below (no text or labels within the diagram itself)