PL616 - Air-conditioner Sheffield - Free user manual and instructions
Find the device manual for free PL616 Sheffield in PDF.

| Type de produit | Portable Air Conditioner |
| Modèle | PL616 |
| Marque | Sheffield |
| Capacité de refroidissement | 12,000 BTU/h |
| Puissance électrique | 1200 W |
| Tension | 220-240 V ~ 50 Hz |
| Dimensions (L x P x H) | 45 x 35 x 75 cm |
| Poids | 28 kg |
| Niveau sonore | 55 dB |
| Débit d'air | 400 m³/h |
| Classe énergétique | A |
| Réfrigérant | R410A |
| Contrôle | Télécommande + panneau tactile |
| Modes | Refroidissement, Ventilation, Déshumidification |
| Programmateur | 24 heures |
| Filtre | Lavable et réutilisable |
| Fonctions spéciales | Auto-restart, Minuterie, Oscillation |
| Entretien | Nettoyage du filtre toutes les 2 semaines |
| Sécurité | Protection contre les surcharges, arrêt automatique |
| Réparabilité | Pièces de rechange disponibles via service client |
| Accessoires inclus | Tuyau d'évacuation, kit de fenêtre, télécommande |
Frequently Asked Questions - PL616 Sheffield
User questions about PL616 Sheffield
0 question about this device. Answer the ones you know or ask your own.
Ask a new question about this device
Download the instructions for your Air-conditioner in PDF format for free! Find your manual PL616 - Sheffield and take your electronic device back in hand. On this page are published all the documents necessary for the use of your device. PL616 by Sheffield.
USER MANUAL PL616 Sheffield
living well, everyday

natural_image
White modular air conditioner unit with digital display and control buttons (no visible text or symbols)PORTABLE AIR CONDITIONER
HEATING AND COOLING
CONTENTS
02 Welcome
03 Package Contents
03 Technical Specification
04 Important Safety instructions
09 Assembly and parts
11 Installation
13 Operation
17 Cleaning and Maintenance
19 Troubleshooting
20 Safety Precautions for Servicing
WELCOME
Congratulations on choosing to buy a Sheffield product.
All products brought to you by Sheffield are manufactured to the highest standards of performance and safety, and, as part of our philosophy of customer service and satisfaction, are backed by our comprehensive 24 Month warranty.
We hope you will enjoy using your purchase for many years to come.
PACKAGE CONTENTS
1 x Portable Air Conditioner
1 x Exhaust Pipe
1 x Sliding Window Vent Kit
1 x Remote Control
1 x Warranty Card
Confirm all parts before disposing of the carton. Safely dispose of all plastic bags and other packaging components. They may be potentially dangerous to children.
TECHNICAL SPECIFICATION
| MODEL | PL616 | |
| POWER SUPPLY | 220-240V~ / 50Hz | |
| CLASS | I, IPX1 | |
| COOLING CAPACITY | 10000BTU/h (2.93kW) | |
| HEATING CAPACITY | 8500BTU/H (2.49 kW) | |
| REFRIGERANT/CHARGE | R290/200g | |
| COOLING RATED INPUT | 1115W, 5.0A | |
| HEATED RATED INPUT | 970W, 4.4A | |
| PERMISSABLE EXCESSIVE OPERATING PRESSURE | SUCTION | 0.7MPa |
| DISCHARGE | 3.2MPa | |
| MAX ALLOWABLE PRESSURE | 3.2MPa | |
| EER | 2.63 | |
| AIRFLOW | 360m3/h | |
| DIMENSION (WxHxD) | 350*701*348mm | |
Carefully read this manual before using this appliance.
- Ensure that you know how the appliance functions and how to operate it.
- Maintain the appliance in accordance with the instructions to ensure that it functions properly.
- Keep this manual with the appliance. If the appliance is to be used by a third party, this instruction manual must be supplied with it.
- The safety instructions do not by themselves eliminate any danger completely and proper accident prevention measures must always be used.
- No liability can be accepted for any damage caused by non-compliance with these instructions or any other improper use or mishandling.
Do not use this appliance if it has been dropped or damaged in any way, or if the supply cord is damaged.
Intended Use
- Indoor domestic use only: this appliance is intended for indoor domestic use only. Do not use it outdoors. Do not use in moving vehicles or boats.
- Do not use for commercial or industrial use.
- Intended Purpose: Do not use the appliance for anything other than its intended purpose, and only use it as described in this manual
This appliance is intended to be used in household and similar applications such as
- Staff kitchen areas in shops, offices and other working environments.
- Farm houses.
- By clients in hotels, motels and other residential type environments.
- Bed and breakfast type environments.
When using electric appliances always observe safety regulations where applicable to reduce the risk of fire, electric shock and personal injury. Always check that the power supply corresponds to the voltage on the rating plate.

WARNING
Any person who is involved with working on or breaking into a refrigerant circuit should hold a currently valid certificate from an industry-accredited assessment authority, which authorizes their competence to handle refrigerants safely in accordance with industry, recognized assessment specification.

warning
This unit uses a flammable refrigerant. R290
If refrigerant leaks and comes in contact with fire or heating part, it will create harmful gas and there is a risk of fire.

Read the USER MANUAL carefully before operation.

Service personnel are required to carefully read the USER MANUAL before operation.
Supply Cord and Plug
Always unplug from mains supply when not in use. Do not abuse or damage the power cord. If the supply cord is damaged, it must be replaced by the manufacturer or its service agent or a similarly qualified person in order to avoid a hazard. Do not turn this appliance on or off by inserting or removing the plug from a switched-on power outlet and always pull out the plug from the socket (pull on the plug, not the cable)
Ensure hands are dry before handling the plug or the main unit.
Earth Safety
This appliance must be earthed. Only connect to a suitably earthed 220-240V \~ 50Hz supply socket.
Use and Environment
Operate the Air Conditioner on a flat and stable surface. The appliance must be operated the right way up. Do not tip over. Do not use outdoors.
- Do not unplug while the unit is operating.
-
Never use the appliance to dry clothes.
-
Never place the appliance close to a radiant heat source.
- Avoid contact with the moving parts. Keep hands, hair, clothing, away from the blade of the fan during operation to reduce the risk of injury to person and/or damage to the unit.
- Never insert or allow foreign objects to enter any ventilation or exhaust opening, as this may cause an electric shock, fire or damage to the appliance.
- Never operate in areas where petrol, paint or other flammable liquids are used or stored.
- Never place the unit in wardrobes or other enclosed spaces as this may cause fire hazards.
- Do not use any means to accelerate the defrosting process or to clean, other than those recommended by the manufacturer.
Do not run cord under carpeting and do not cover cord with throw rugs, runners or the like. Arrange the cord away from traffic areas and where it will not be tripped over. Avoid the use of an extension cord as this may overheat and cause a risk of fire.
Pipe-work shall be protected from physical damage and shall not be installed in an unventilated space if that space is smaller than 10m^2 .
Supervision
This appliance is not intended for use by persons (including children) with reduced physical, sensory or mental capabilities, or lack of experience and knowledge unless they have been given supervision or instruction concerning the use of the appliance by a person responsible for their safety.
Children should be supervised to ensure that they do not play with the appliance.
Damaged or Dropped
Always inspect your appliance before use. Check parts are correctly attached. Do not use this appliance if it has been damaged, dropped, left outdoors or dropped in water. Return it to an authorised service dealer for examination and repair.
Water
Do not immerse the appliance or its supply cord in water. Do not use with wet hands or use in damp or humid situations.
Never use this appliance in the immediate surrounds of a bath, a shower, or a swimming pool or other liquids. The appliance must not be immersed in any liquids.
Cleaning
Turn off and unplug the appliance when not in use and before cleaning or maintenance.
Do not try to clean the inner part of the air inlet or outlet with a sharp object. Never use abrasive cleaning products on this appliance. Clean with a damp cloth (not wet) rinsed in hot soapy water only. Always remove the plug from the mains supply before cleaning. Do not pierce or burn, even when disposing of.
THE FOLLOWING SHOULD ALWAYS BE OBSERVED FOR SAFETY
The environmentally friendly R290 is used as the refrigerant. R290 has no damaging influence on the ozone layer (ODP), a negligible greenhouse effect (GWP) and is available worldwide. Because of its efficient energy properties, R290 is highly suitable as a coolant for this application. Special precautions must be taken into consideration due to the coolant's high flammability.
- The unit is designed only for use with R-290(propane) gas as the designated refrigerant
- The refrigerant loop is sealed.
- Only a qualified technician should attempt to service!
- Do not discharge the refrigerant into the atmosphere.
- R-290 (propane) is flammable and heavier than air. It collects first in low areas but can be circulated by the fans.
- If propane gas is present or even suspected, do not allow untrained personnel to attempt to find the cause.
- The propane gas used in the unit has no odour. The lack of smell does not indicate a lack of escaped gas.
- If a leak is detected, immediately evacuate all persons from the store, ventilate the room and contact the local fire department to advise them that a propane leak has occurred.
- Do not let any persons back into the room until the qualified service technician has arrived and that technician advises that it is safe to return to the room.
- No open flames, cigarettes or other possible sources of ignition should be used inside or in the vicinity of the units.
- Component parts are designed for propane and non-incentive and non-sparking. Component parts shall only be replaced with identical repair parts.
- Be aware that refrigerants do not have any odour.
FAILURE TO ABIDE BY THIS WARNING COULD RESULT IN AN EXPLOSION, DEATH, INJURY AND PROPERTY DAMAGE.
Do not use the appliance in any other orientation other than upright as shown in this manual.
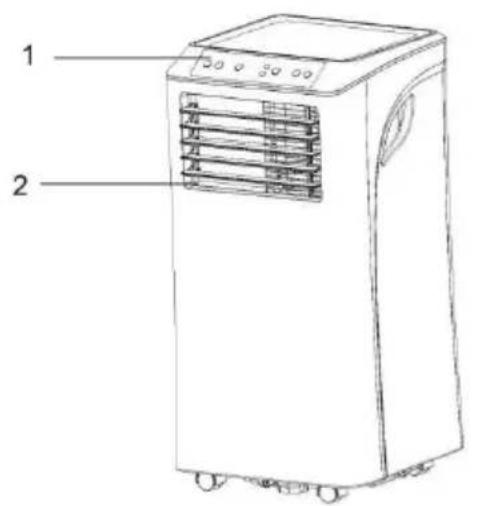
ASSEMBLY AND PARTS
text_image
1 2
text_image
3 5 8 6 4 7- Control Panel
- Air Outlet
- Air intake with washable filter
- Power Cord
①
Exhaust Hose
②
Hose Connector
- Handle
- Air Exhaust
- Bottom Drain Outlet
- Top Drain Outlet
3

Window Kit Adapter
4
Remote Control
5

Sliding Window Kit
text_image
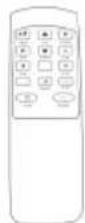
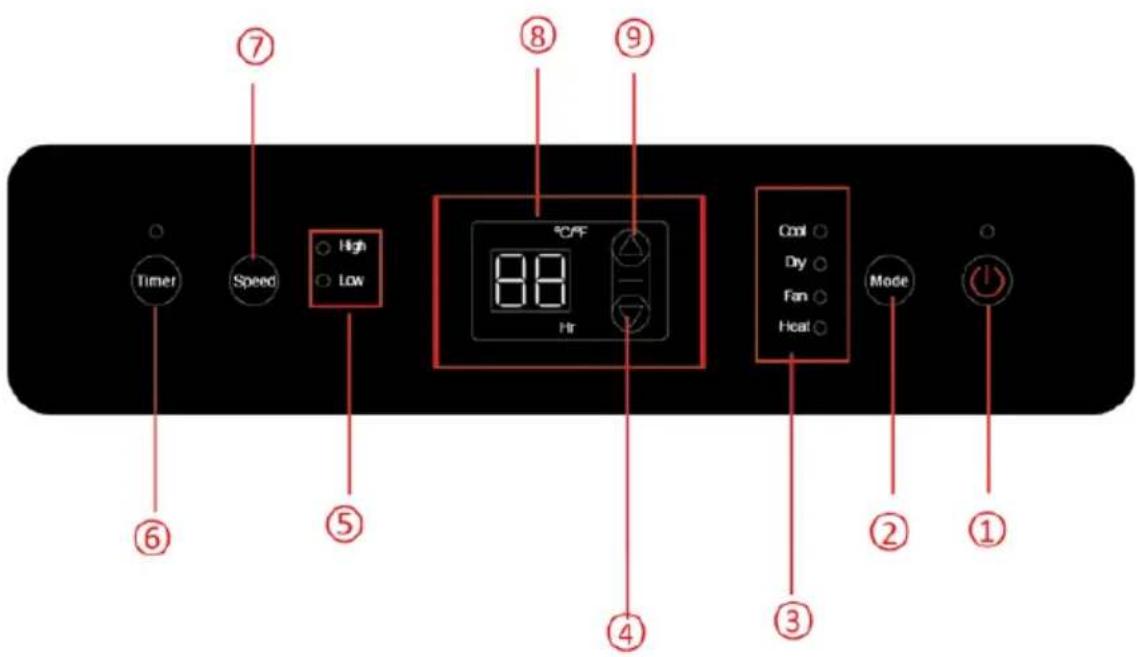
Timer Speed High Low °C/°F 88 Hr Cool Dry Fan Heat Mode ① ② ③ ④ ⑤ ⑥ ⑦ ⑧ ⑨| 1. POWER | Press to switch the machine on or off. |
| 2. MODE | Press to switch the operation mode between cool, dry, fan, and heating. |
| 3. INDICATORS | Indicator for showing what MODE is selected |
| 4. DECREASE | Press to decrease the desired temperature or timer setting. |
| 5. INDICATORS | Indicator for showing what speed is selected |
| 6. TIMER | Sets a time for the unit to automatically start or stop. The range of the timer is 1-24 hours. |
| 7. SPEED | Press to adjust the fan speed between HIGH and LOW. |
| 8. DIGITAL DISPLAY | Displays timer, temperature setting and room temperature. |
| 9. INCREASE | Press to increase the desired temperature or timer setting. |
INSTALLATION
Note: If the exhaust is not vented either out of the window or into the Roof space this unit will not effectively cool down the room.
- If tipped more than 45^ , allow the unit to sit upright for at least 24 hours before start-up.

WARNING!
Install the unit in rooms that exceed 10 m^2 .
Do not install the unit in a place where inflammable gas may leak.
- Place the unit on a firm, level surface in an area with at least 50cm of free space around it to allow for proper air circulation.
- Do not operate in close proximity to walls, curtains, or other objects that may block air inlet and outlet. Keep the air inlet and outlet free of obstacles.
- Never install the unit where it could be subject to :

text_image
r=50cmHeat sources such as radiators, heat registers, stoves or other products that radiate heat.
Direct sunlight
Mechanical vibration or shock
Excessive dust
Lack of ventilation, such as cabinet or bookcase
Uneven surface
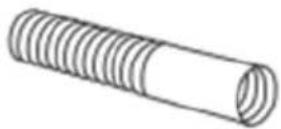
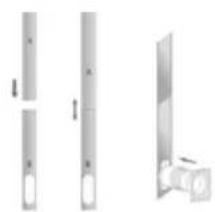
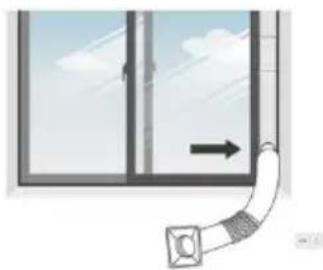
ATTACH THE EXHAUST HOSE
The air conditioner requires being vented outside so that the exhaust air can escape the room, the exhaust coming from the appliance contains waste heat and moisture.
- Connect the hose connector to one end of the exhaust hose.

natural_image
Line drawing of a cylindrical object with concentric grooves, mounted on a rectangular base (no text or symbols)- Connect the windows kit adapter to the other end of the exhaust hose.

natural_image
Diagram of a threaded bolt with a flanged head and rotation arrow (no text or labels)- Extend the adjustable sliding window kit to the length of your window. Connect the exhaust hose to the window kit.
natural_image
Pure mechanical assembly diagram showing vertical cylindrical components and a separate bracket (no text or symbols)- Close your window to secure the kit in place. It needs to hold the window kit firmly in place, secure the window kit with duct tape if required. It is recommended that the gap between the adapter and the sides of the window should be sealed off for maximum efficiency.
natural_image
Diagram showing a window with a curved pipe extending into the corner, indicating airflow or ventilation direction (no text or symbols)- Attach the hose connector to the exhaust air outlet of the unit.

- Adjusting the length of the flexible exhaust hose, and avoid bends in the hose. Then place AC near an electrical outlet.

natural_image
Illustration of an air conditioner unit with airflow direction and window view (no text or symbols)- Adjust the louvre at the air outlet, and then switch on the unit.
OPERATION
Before First Use
After unpacking, ensure that the contents are complete and check for any transit damage in order to avoid any danger. Do not use it if in any doubt, but contact our customer service team.
To protect against damage during transit, your appliance is packaged.
- Remove the appliance carefully from its sales packaging.
- Remove all packaging elements.
- Keep all packaging away from Children. Danger of suffocation.
- Clean the appliance and all accessories to remove all packaging dust according to the instructions in the chapter "CLEANING AND MAINTENANCE".
Operation of the appliance
Before each use of the appliance, ensure that all ventilation slots, gratings and filters are free of dirt and that they are not blocked. If required, clean the appliance and the accessories according to the "CLEANING AND MAINTENANCE" chapter.
- Connect the appliance mains plug to the electrical socket.
- To switch on, press the On/Off switch.
- The power-on lamp shows that the device is operating.
- To switch off the device, press the On/Off switch.
Cooling Mode
- After the machine turns on, press "MODE" to select cooling mode, cooling mode indicator turns on.
- Press "UP" or "DOWN" to adjust the temperature (from 16°C to 32°C).
- Press "SPEED" to select high or low fan speed.
To control the direction of the airflow horizontally, please adjust the inner louvre by hand.
Note : The air conditioner stops if the room temperature is lower than the selected temperature.
Heating Mode
Note: The drainage hose should be attached to the unit for continuous operation.
- After the machine turns on, press "MODE" to select heating mode, heating mode indicator turns on.
- Press "UP" or "DOWN" to adjust the temperature (from 16°C to 32°C).
- Press "SPEED" to select high or low fan speed.
To control the direction of the airflow horizontally, please adjust the inner louvre by hand.
Note: The air conditioner stops if the room temperature is higher than the selected temperature.
Fan mode
- Press "MODE" to select fan mode, the fan mode indicator turns on.
- Press "SPEED" to select high speed or low speed.
- Temperature and sleep function cannot be set up in fan mode.
Note: In fan mode, the room air is circulated, but not cooled
Dehumidifying mode
- Press "MODE" to select dehumidifying mode, DRY mode indicator turns on.
- In dehumidifying mode, the sleeping function cannot be used, and the fan speed is low.
Note: The user should connect the hose to the drain outlet at the bottom of the unit when using this mode.
Sleep mode (this function can only be used with a remote control)
The sleep mode can be activated when in cooling mode and heating mode.
- In cooling mode :
After 1 hour the pre-set temperature is increased by 1 °C, after another hour the pre-set temperature will again be increased by 1 °C.
- In heating mode
After 1 hour the pre-set temperature is decreased by 1 °C, after another hour the pre-set temperature will again be decreased by 1 °C.
The temperature is kept constant for 10 hours. And all the indicators dim to dark. The fan speed will switch over to low speed for silent operation and cannot be changed.
Timer mode
The timer has two ways of operation:
- To turn ON:
In standby mode, press "TIMER" to set up the power-on time.
Press "UP" or "DOWN" repeatedly to set the delay ON time.
The timer indicator turns on.
- To Turn OFF
When the unit is turned on, press "TIMER" to set up the power-off timer.
Press "UP" or "DOWN" repeatedly to set the delay OFF time.
The timer indicator turns on.
- To Cancel:
Press Timer
Press "UP" or "DOWN" repeatedly until the LED shows '00'.
Note: Pressing POWER will also exit the timer setting.
Compressor protection
To protect the life of the compressor there will be a three minutes delay after power on / restart, for the compressor to run.
Frost Protection Function
At low room temperatures, frost may build up at the evaporator during operation. The unit will automatically start defrosting and the POWER LED will blink. The defrost control sequence is as follows:
When the unit operates in the cooling function or drying operation, the ambient temperature sensor senses the evaporator coil temperature.
If it is below -1^ , the compressor will stop operating for 10 minutes
Once it is up to 7^ C, the unit restarts in cool operating mode.
Overflow Protection Function
When the water in the water pan exceeds the warning level, the machine will automatically sound an alarm, and the "FULL" indicator light will flash. At this point, you need to empty the water from the unit (refer to Drainage Instructions of this chapter). After the water is emptied, the machine will automatically return to the working state.
Drainage Instructions
Self- evaporating system
The self-evaporating system uses the collected water to cool the condenser coils for better, more efficient performance. There is no need to empty the drainage tank in cooling operation, only in heating operation, dehumidifying operation and high humidity conditions. The condensed water evaporates at the condenser and is evacuated through the exhaust hose.
Manual Drainage
This unit will stop if the internal water collection bowl is full. If this happens follow the below for manual drainage.
- Turn off the unit and unplug the power cord from the supply.
- Move the unit carefully so as not to spill the water in the water pan. NOTE: this may require two people.
- Find a place to drain the water or place a bucket below the water outlet on the back of the unit.
- Unplug the rubber plug and allow it to drain. During draining the body can be tilted back slightly.
- When the water is emptied the rubber plug can be re-inserted securely.
Allow to sit for at least 5 minutes before turning back on.
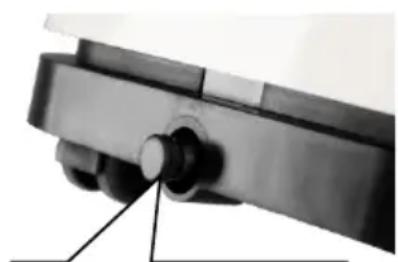
natural_image
Close-up of a mechanical component with a central cylindrical feature and flanged ends (no visible text or symbols)Remove the rubber seal.
Continuous Drainage
For continuous operation or unattended operating in drying operation, please connect a hose to the unit at the bottom drainage plug. NOTE: to operate permanent drainage you need to allow the water to drain outside via gravity.
When the appliance is in cooling or drying mode, the continuous drainage house needs to be inserted into the top drain hole.
When the appliance is in heating mode, the continuous drainage house needs to be inserted into the bottom drain hole.
- Turn off the unit and unplug the power cord from the supply.
- Remove the plug of the water outlet opening.
- Securely connect the drain hose and make sure it is not kinked and clear of obstruction.
- Place the outlet of the hose over a drain or bucket and ensure that water could freely flow out of the unit.
-
Do not submerge the end of the hose into the water; otherwise, it can cause an "Air Lock" in the hose.
-
As the condensate drain pan has negative pressure, tilt the drain hose down toward the floor. It is appropriate that the degree of inclination should exceed 20 degrees.

natural_image
Close-up of a black plastic mechanical component with a cylindrical port and flange (no visible text or symbols)Continuous drain hose (Inner diameter=16mm)
CLEANING and MAINTENANCE
This appliance contains no user-serviceable parts. Any servicing requiring disassembly other than cleaning must be performed by a qualified appliance repair technician.
Before Cleaning
- Before unplugging the unit ensure all controls are set off.
- When not in use or before cleaning, always disconnect the appliance from the mains supply.
Care and Cleaning
- Accumulated dust may be removed from the appliance surface with a dry soft cloth.
- For more thorough cleaning, use a cloth that is slightly moist with a solution of mild detergent and water.
- Never use rough scouring pads or abrasive cleansers on any plastic or metal parts as the surface may be damaged.
- Dry the appliance casing thoroughly with a soft, dry cloth before operating the unit again.
Filters
Dust collects on the filters and restricts the airflow. The restricted airflow reduces the efficiency of the system and if it becomes blocked it can cause damage to the unit. The air filter requires regular cleaning. The air filter is removable for easy cleaning.
Do not operate the unit without an air filter, or the evaporator may be contaminated.
- Press the POWER button to switch off the unit and unplug the power cord.
- Remove the filter mesh from the unit.
- Use a vacuum cleaner to suck dust from the filter.
- Turn the filter over and rinse the air filter under running water. Let the water run through the filter in the opposite direction of airflow. Set aside and allow the filter to air dry completely before reinstalling.
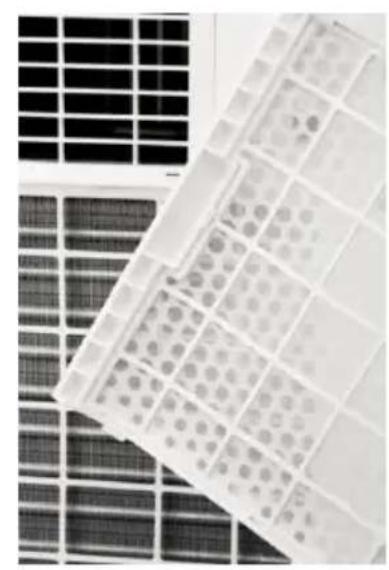
natural_image
Close-up of a grid of solar panels with circular patterns, no visible text or symbolsSwitch off the unit and remove the two air filters.

natural_image
Illustration of a faucet spraying water onto a black surface (no text or symbols)Rinse the air filter under running water.
Warning!!! Do not touch the evaporator surface with bare-hand, or may cause injury to your fingers.
Storing the Air Conditioner
If the machine will be unused for a long period store your appliance and all its accessories and instruction manual in a safe and dry place.
- Unplug the unit and remove the exhaust hose and window kit store with the unit.
- Drain the remaining water from the unit.
- Clean the filter and let the filter dry completely in a shaded area.
- Collect the power cord at the water tank.
- Re-install the filter at its position.
- The unit must be kept in an upright position when in storage.
- Preserving the machine in ventilating, dry, non-corrosive gas and safe place indoor.
ATTENTION:
The evaporator inside the machine has to be dried out before the unit is packed to avoid component damage and mould. Unplug the unit and place it in a dry open area for days to dry it out. Another way to dry the unit is to set the humidity point more than 5% higher than the ambient humidity to force the fan to dry the evaporator for a couple of hours.
TROUBLESHOOTING
If a condition listed below occurs, please check the following items before calling customer service.
| Symptom | Inspection | Solution | |
| The unit is not operating. | ✓ Check the power connection is secure. | ➢ Insert the power cord securely into the wall➢ Outlet. | |
| ✓ Check if the water level indicator lights up? | ➢ Empty the drain pan by removing the rubber plug. | ||
| ✓ Check the room temperature. | ➢ The range of operating temperature is 5-35°C. | ||
| The unit works with reduced capacity. | ✓ Check the air filter for dirt. | ➢ Clean the air filter as necessary. | |
| ✓ Check if the air duct is blocked. | ➢ To clear the obstacle. | ||
| ✓ Check if the room door or window is open. | ➢ Keep the door and windows closed. | ||
| ✓ Check if the desired operating mode is selected and the temperature is properly set. | ➢ Set the mode and temperature at the proper set-point according to the manual. | ||
| ✓ The exhaust hose is detached. | ➢ Make sure the exhaust hose is securely attached. | ||
| Water Leakage | ✓ Overflow while moving the unit. | ➢ Empty the water tank before transport. | |
| ✓ Check if the drain hose is kinked or bends. | ➢ Straighten the hose to avoid a trap existing. | ||
| Excessive Noise | ✓ Check if the unit is securely positioned. | ➢ Place the unit on horizontal and firm ground. | |
| ✓ Check if any loose, vibrating parts. | ➢ Secure and tight the parts. | ||
| ✓ The noise sounds like water flowing. | ➢ The noise comes from flowing refrigerant. This is normal. | ||
| Error Codes | E0 | ✓ Communication faults between the main PCB and display PCB. | ➢ Check the wire harness of the display PCB for damage. |
| E1 | ✓ Ambient temperature sensor failure | ➢ Check connection or replace it. To clean or replace the temperature sensor. | |
| E2 | ✓ Coil temperature sensor failures. | ➢ Check connection or replace it. To clean or replace the temperature sensor. | |
| Ft | ✓ Condensate water high-level alarm. | ➢ Empty the drain pan by removing the rubber plug. | |
SAFETY PRECAUTIONS ON SERVICING
Please follow these warnings when to undertake the following when servicing an appliance with R290.
Checks to the area
Before beginning work on systems containing flammable refrigerants, safety checks are necessary to ensure that the risk of ignition is minimized. For repair to the refrigerating system, the following precautions shall be complied with before conducting work on the system.
Work procedure
Work shall be undertaken under a controlled procedure to minimize the risk of flammable gas or vapour being present while the work is being performed.
General work area
All maintenance staff and others working in the local area shall be instructed on the nature of the work being carried out. Work in confined spaces shall be avoided. The area around the workspace shall be sectioned off. Ensure that the conditions within the area have been made safe by control of flammable material.
Checking for presence of refrigerant
The area shall be checked with an appropriate refrigerant detector before and during work, to ensure the technician is aware of potentially flammable atmospheres. Ensure that the leak detection equipment being used is suitable for use with flammable refrigerants, i.e. no sparking, adequately sealed or intrinsically safe.
Presence of fire extinguisher
If any hot work is to be conducted on the refrigeration equipment or any associated parts, appropriate fire extinguishing equipment shall be available to hand. Have a dry powder or CO^2 fire extinguisher adjacent to the charging area.
No ignition sources
No person carrying out work in relation to a refrigeration system that involves exposing any pipework that contains or has contained flammable refrigerant shall use any sources of ignition in such a manner that it may lead to the risk of fire or explosion. All possible ignition sources, including cigarette smoking, should be kept sufficiently far away from the site of installation, repairing, removing and disposal, during which flammable refrigerant can be released to the surrounding space. Prior to work taking place, the area around the equipment is to be surveyed to make sure that there are no flammable hazards or ignition risks. "No Smoking" signs shall be displayed.
Ventilated area
Ensure that the area is in the open or that it is adequately ventilated before breaking into the system or conducting any hot work. A degree of ventilation shall continue during the period that the work is carried out. The ventilation should safely disperse any released refrigerant and preferably expel it externally into the atmosphere.
Checks to the refrigeration equipment
Where electrical components are being changed, they shall be fit for the purpose and to the correct specification. At all times the manufacturer's maintenance and service guidelines shall be followed. If in doubt consult the manufacturer's technical department for assistance.
The following checks shall be applied to installations using flammable refrigerants:
- The charge size is in accordance with the room size within which the refrigerant containing parts are installed;
- The ventilation machinery and outlets are operating adequately and are not obstructed;
- If an indirect refrigerating circuit is being used, the secondary circuit shall be checked for the presence of refrigerant;
- Marking the equipment continues to be visible and legible. Markings and signs that are illegible shall be corrected;
- refrigeration pipe or components are installed in a position where they are unlikely to be exposed to any substance which may corrode refrigerant containing components unless the components are constructed of materials that are inherently resistant to being corroded or are suitably protected against being so corroded.
Checks to electrical devices
Repair and maintenance of electrical components shall include initial safety checks and component inspection procedures. If a fault exists that could compromise the safety, then no electrical supply shall be connected to the circuit until it is satisfactorily dealt with. If the fault cannot be corrected immediately but it is necessary to continue operation, an adequate temporary solution shall be used. This shall be reported to the owner of the equipment so all parties are advised.
Initial safety checks shall include:
- those capacitors are discharged: this shall be done in a safe manner to avoid the possibility of sparking;
- that there no live electrical components and wiring are exposed while charging, recovering or purging the system;
• that there is continuity of earth bonding.
WARNING! Install the unit in rooms that exceed 10 m².
WARNING! Do not install the unit in a place where inflammable gas may leak.
Cleaning up refrigerant
General Measures:
- Gas/vapour is heavier than air and may accumulate in confined spaces, particularly at or below ground level.
- Eliminate every possible source of ignition.
- Use appropriate personal protection equipment (PPE).
- Evacuate unnecessary personnel, isolate, and ventilate the area.
- Do not get in eyes, on the skin, or clothing. Do not breathe vapours or gas.
- Prevent entry to sewers and public waters.
- Stop the source of the release, if safe to do so. Consider the use of water spray to disperse vapours.
- Isolate the area until gas has dispersed. Ventilate and gas test area before entering. Contact competent authorities after a spill.
Disposal
WARNING!!! Releasing refrigerant into the atmosphere is strictly forbidden!
Do not dispose of electrical appliances as unsorted municipal waste, use separate collection facilities. Contact your local government for information regarding the collection systems available. If electrical appliances are disposed of in landfills or dumps, hazardous substances can leak into the groundwater and get into the food chain, damaging your health and well-being.