Invert 10 - Tent Zempire - Free user manual and instructions
Find the device manual for free Invert 10 Zempire in PDF.

| Brand | Zempire |
| Model | Invert 10 |
| Product Type | Tent |
| Capacity | 10 persons |
| Dimensions (L x W x H) | 500 x 300 x 200 cm |
| Packed Size | 75 x 40 x 40 cm |
| Weight | 20 kg |
| Material - Flysheet | Polyester 190T with PU coating |
| Material - Inner Tent | Breathable polyester mesh |
| Material - Floor | Polyethylene 120 g/m² |
| Poles | Fiberglass, 12 mm |
| Waterproof Rating | 2000 mm |
| Doors | 2 D-style doors |
| Windows | 2 mesh windows with covers |
| Vents | 2 high-level air vents |
| Vestibule | 2 large vestibules |
| Storage Pockets | 4 mesh pockets |
| Setup Type | Freestanding dome |
| Seam Sealing | Taped seams |
| UV Protection | 50+ UPF rating |
| Included Accessories | Carry bag, stakes, guy ropes |
| Recommended Use | Family camping, group trips |
| Warranty | 1 year limited warranty |
Frequently Asked Questions - Invert 10 Zempire
User questions about Invert 10 Zempire
0 question about this device. Answer the ones you know or ask your own.
Ask a new question about this device
Download the instructions for your Tent in PDF format for free! Find your manual Invert 10 - Zempire and take your electronic device back in hand. On this page are published all the documents necessary for the use of your device. Invert 10 by Zempire.
USER MANUAL Invert 10 Zempire
- Ensure guy copies are put at all times during use.
- Never pack your lent away wet, if you must leave your lent down when wet, ensure that it is dried completely as soon as possible to prevent mildew farming.
- If mildew does form on your lent, wash off with warm water and a soft brush to present further growth, do not use soap or detergents
- Do not use an open flame inside your tent. The fabric has been treated with a fire retardant out is in no way fire proof
- Clear all pegs and poles before storing
- This tent is not designed to withstand storm conditions. During strong winds, it is recommended that the tent be taken down
- Do not leave your bent pitched unnecessarily for extended periods of time, UV light carriages the fly and will shorten the life of your bent
Condensation -
It is important that lower vents are opened at all times to reduce the risk of condensation. During humid or damp conditions, it is recommended that inner door covers are opened to expose the mesh layer to allow additional airflow throughout your tent.
Do not use foam swabs or non bonded mats directly on the tent floor. This will cause condensation between the mat and floor and if not dried out can lead to mildew foaming.
2 Year Tent Guarantee -
Please take time to read about the protections we offer you
All our tenes come with a guarantee designed to protect you as our valued customer. How Imports Ltd, the makers of Zemplire Camping Equipment tents, will repair or replace this tent, at their discretion should it fall due to faulty materials or manufacture for a period of 2 years from the date of sale.
The Guarantee is subject to the following conditions:
- The Guarantee only applies to an original purchaser who purchased this term from an approved retail outlet
- The Guarantee does not apply if the tent has been used for anything other than reasonable personal camping use. Commercial use (e.g. rental) or continuous use as a residence are expressly excluded
- Damage due to normal wear and leaf accident, acts of God, negligence (other than by Flow Imports Ltd), failure by the purchaser to ensure instructions for selling up and care are observed, consideration due to abnormal exposure to ultraviolet light, insect or mildew attack, or any other cause reasonably beyond the control of Flow Imports Ltd are not covered
- If redress is sought under the terms of this Guarantee, then the rent must be returned by the purchaser to the parcel from where it was purchased within the Guarantee period, in a clean, dry state and with proof of purchase
- All transport costs and any other indirect costs are excluded from the Guarantee.
- Flow Imports Ltd reserves the right to make a reasonable charge for repairs which it determines are not within the scope of the Guarantee
The Guarantee does not limit, modify or exclude any rights under any law if doing so would contravene that law or make any part of this Guarantee invalid. However, Flow Imports Ltd. a) excludes (to the extent permitted by applicable law) all conditions and warranties that might otherwise be implied and b) limits its liability for breach of any such condition or Guarantee that it cannot exclude together with its liability under the Guarantee, to repairing or replacing the Goods or paying the cost of having the Goods repaired or replaced (at Flow Imports' option).
This bench has been made with meticulous care and attention to detail. Providing it's properly looked after and correctly stored, it will help you enjoy all that nature has to offer for years to come.
Get out more - you owe it to yourself.
For a detailed description of all the features and specifications of this product please visit our website.
WWW.ZEMPIRECAMPING.COM
Tested in New Zealand. Made with care in China

!NVERT10
INVERTSERIES
INSTRUCTIONS
!NVERT10
INVERTSERIES
INSTRUCTIONS
- Clear your site making sure there are no sharp objects where you are going to pitch you tent. Try to get a site that is as flat as possible. Spread out the inner tent (white). The round door is located at the front, the U door is located at the rear

text_image
2x 30k 2x 2x
-
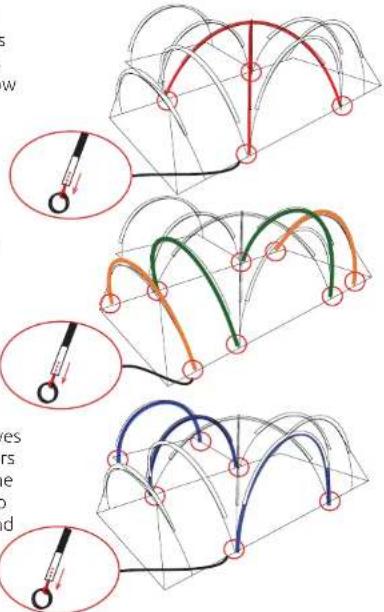
Assemble the 8 pole sections. Ensure that the poles do not snap together. Ensure the pole does not snap together. It is important that the poles are fully inserted into the ferrules. If the ferrules do not connect together correctly they can cause damage when tensioned.
-
Thread the RED poles through the pole sleeves that run diagonally across the centre of the tent. Insert the ends of the poles into the pins located below each pole sleeve. Attach the c-clips around the poles
- Thread the GREEN poles through the GREEN trimmed pole sleeves on either side of the dome you have just created. Thread the YELLOW poles through the YELLOW trimmed pole sleeves at the outside of the bedroom. Insert the pole ends into the pins at the base and clip the c-clips to the frame.
- Thread the remaining BLUE poles through the BLUE trimmed pole sleeves that run across the front and rear doors and above the rear bedroom. Insert the ends of the poles into the pins and clip the c-clips between the pole sleeve and the pin onto the pole.
text_image
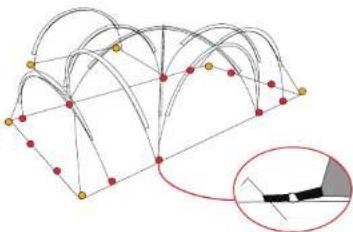
Technical diagram illustrating wire meshing and arc installation steps with labeled components and magnified views- Firstly peg out the corners of each room (●), then peg out the remaining peg loops (●). The peg points at the base of each pole should be pegged through the webbing loop rather than the ring. Try to get the floor sitting as flat as possible at each stage.
natural_image
Diagram of a 3D structural framework with nodes and connecting lines, showing a highlighted inset (no text or symbols)- Pull the fly over the inner tent. The Zempire logo should be at the front of the tent. Connect the Velcro loops inside the fly around the cut out on the corresponding pole sleeve or directly around the pole.

natural_image
Diagram of a tent structure with curved roof and side panel, showing airflow direction (no text or symbols)- Attach the elastic loops over the existing inner pegs. Where there is not existing peg, peg the fly directly into the ground ensuring there is significant space between the inner and fly.

natural_image
3D wireframe model of a tent structure with highlighted points and an inset showing a vehicle (no text or symbols)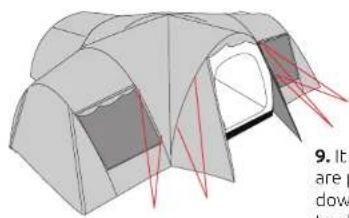
natural_image
3D diagram of a tent with red laser lines indicating illumination, no text or symbols present- It is recommended that guy ropes are pegged out at all times and windows are opened whenever possible to allow adequate ventilation. Try to have the guy ropes at a 45^ angle to the ground.