DVD3460N - Blu-ray player Lenoxx - Free user manual and instructions
Find the device manual for free DVD3460N Lenoxx in PDF.

| Product Type | Blu-ray Player |
| Model | DVD3460N |
| Brand | Lenoxx |
| Disc Compatibility | Blu-ray, DVD, CD |
| Video Output | 1080p Full HD |
| Audio Output | Stereo, 5.1 Surround |
| Connectivity | HDMI, USB, Composite AV |
| Power Supply | AC 100-240V, 50/60Hz |
| Power Consumption | 15W (typical) |
| Dimensions (W x D x H) | 28 x 20 x 4 cm |
| Weight | 1.2 kg |
| Playback Formats | BD, DVD, CD, MP3, JPEG |
| Region Code | Region A (Blu-ray) |
| Remote Control | Included (Battery: 2x AAA) |
| Maintenance | Clean with soft, dry cloth |
| Safety | CE, RoHS compliant |
| Spare Parts | Remote and power cord |
| Repairability | Standard screws, user-serviceable |
| General Info | User manual available in PDF |
Frequently Asked Questions - DVD3460N Lenoxx
User questions about DVD3460N Lenoxx
0 question about this device. Answer the ones you know or ask your own.
Ask a new question about this device
Download the instructions for your Blu-ray player in PDF format for free! Find your manual DVD3460N - Lenoxx and take your electronic device back in hand. On this page are published all the documents necessary for the use of your device. DVD3460N by Lenoxx.
USER MANUAL DVD3460N Lenoxx
natural_image
Black DVD remote control unit with digital display and control keypad (no visible text or symbols)Model no: DVD3460N
Batch no: PR4217
PLEASE READ AND RETAIN THESE INSTRUCTIONS FOR FUTURE REFERENCE.
The illustrations used in this manual are to illustrate the operation method and product structure of the product. Where there is a small difference between the physical item and the illustrations, please take the physical as the standard.
SAFETY INSTRUCTIONS:
- Check that the voltage indicated on the rating plate corresponds with that of the local network before connecting the unit to the mains power supply.
- Children aged from 8 years and people with reduced physical, sensory or mental capabilities or lack of experience can use this unit, only if they have been given supervision or instruction concerning use of the unit in a safe way and understand the hazards involved.
- Children should be supervised to ensure that they do not play with the unit. Unless they are older than 8 years of age and supervised, children should not perform cleaning or user maintenance. Close supervision is always necessary when an appliance is used by or near children.
- This unit is not a toy.
- This unit contains no user serviceable parts. If the unit and any of its accessories are malfunctioning or it has been dropped or damaged, only a qualified repairer should carry out repairs. Improper repairs may place the under at risk of harm.
- Keep the unit away from heat sources, direct sunlight, humidity, water and any other liquid.
- Do not immerse the unit in water or any other liquid.
- Do not operate the unit with wet hands.
- Do not operate the unit if it has been exposed to water, moisture or any other liquid, to prevent against electric shock, explosion and/or injury to yourself and damage to the unit.
- Do not remove the appliance from the mains power supply by pulling on the cord; switch it off and remove the plug by hand.
- Do not use the unit for anything other than it's intended use.
- Do not use this unit outdoors.
- Do not store the unit in direct sunlight or high humidity conditions.
- Do not move the unit whilst it is in use.
- Do not put any objects into any of the openings.
- The unit must be places on a stable, heat resistant surface.
- The unit is intended for domestic use only. It should not be used for commercial purposes.
- The unit may become hot during operation. Always leave sufficient space around the unit for ventilation.
- The voltage supplied to the unit should match the voltage that is printed on the back panel. If you have any doubts concerning this matter, consult an electrician.
- Avoid placing the unit in direct sunlight or close to any sources of heat. Also avoid locations subject to vibrations and excessive dust, heat, cold or moisture.
- Do not expose the unit to water.
- Do not place the unit on an amplifier or receiver.
- Do not open the cabinet as this might result in damage to the circuits or an electric shock. If a foreign object gets into the unit, contact your dealer or service company.
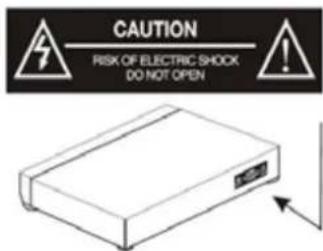
CAUTION:

CLASS I LASER PRODUCT
WARNING: DO NOT EXPOSE THIS APPLIANCE TO RAIN OR MOISTURE, DUE TO THE HIGH RISK OF FIRE OR ELECTRIC SHOCK, The lightning flash with an arrowhead symbol within an equilateral triangle is intended to alert the user to the presence of uninsulated "dangerous voltage" within the product's enclosure that may be of sufficient magnitude to constitute a risk of electric shock to persons.
text_image
CAUTION RISK OF ELECTRIC SHOCK DO NOT OPENThe exclamation point within an equilateral triangle is intended to alert the user to the presence of important operating and maintenance (servicing) instructions in the literature accompanying the appliance.
DO NOT OPEN THE CABINET DANGEROUS HIGH VOLTAGES ARE PRESENT INSIDE THE ENCLOSURE. ONLY QUALIFIED SERVICE PERSONNEL SHOULD ATTEMPT THIS.
• This unit utilises a laser.
- The use of optical instruments with the unit will increase eye hazard, as the laser used in the DVD player is harmful to eyes.
- Use of controls, adjustments or performance of procedures other than those specified herein may result in hazardous radiation exposure.
- Do not attempt to disassemble or repair the unit; refer servicing to qualified personnel only.
• This unit is classified as a class 1 laser product.
- The class 1 laser product marking is located on the laser protective housing inside the enclosure.
BOX CONTENTS:
1 x Lenoxx DVD PLAYER
1 x Remote control
1 x AV cable
1 x Instruction manual
CONTROLS AND FUNCTIONS:
FRONT PANEL:

text_image
① 2 3 DVD USB OPEN/CLOSE PLAY/PAUSE STOP POWER HI ④ ⑤ ⑥ ⑦ ⑧-
DVD Tray
-
Open/Close
-
Remote Sensor
-
Play/Pause
-
Display
-
Stop
-
USB Port
-
Power On /Off
REAR PANEL:
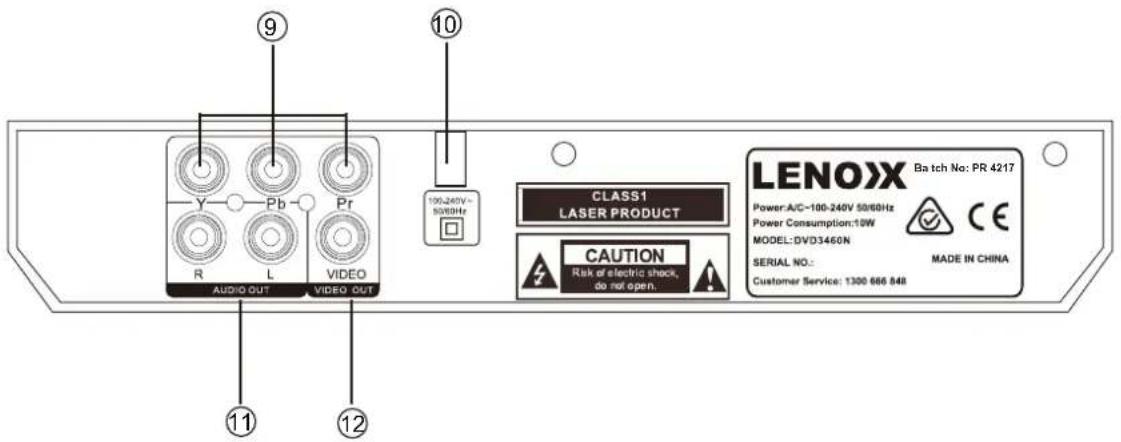
text_image
9 10 100-240V~ 50/60Hz CLASS1 LASER PRODUCT CAUTION Risk of electric shock, do not open. LENOXX Batch No: PR 4217 Power:A/C=100-240V 50/60Hz Power Consumption:10W MODEL:DVD3460N SERIAL NO.: MADE IN CHINA Customer Service: 1300 666 848-
(Y. Pb/Cb. Pr/Cr) Output
-
2 x Audio Outputs
-
Power Cable Outlet
-
Video Output
REMOTE CONTROL:

text_image
POWER OSD STEP DVD/USB MUTE TITLE 1 2 3 4 5 6 7 8 9 0/10 10+ TIME MENU ENTER ZOOM L/R N/P VOL- VOL+ VIDEO PROG CLEAR A-B REPEAT PBC RETURN SLOW LANGUAGE SUBTITLE ANGLE RESET LENOXXREMOTE CONTROL OPERATION:
Insert the batteries into the battery compartment. 2 x AAA batteries are required.
Point the remote at the remote sensor in front of the player and make sure there are no obstacles in the way between the remote and the player. The distance between the remote and the sensor must not exceed 3m.
To prevent damage to the remote control, please remove the batteries when not in use for long periods of time.
REMOTE CONTROLS AND FUNCTIONS:
- POWER ON/OFF
Press to Power On, press again for Standby mode.
- OSD
Press for information of the disc to display
- STEP
Press to play picture by picture. Press Play to return to normal playback.
- DVD/USB
Press to switch between DVD and USB play.
- MUTE
Mute sound during playback
- TITLE
When using DVDs, press to return to the title menu.
- LEFT (<)
Left direction within selection menu 8. SETUP
Press to get into Set Up menu
- L/R
Use for VCD or CD discs. Press button to select left or right channel, or stereo
- PREVIOUS (I<<)
In DVD mode, press to go to previous chapter. With SVCD, VCD, CD, MP3 discs, press to go to previous track.
-
VOLUME DOWN (-) Decrease volume
-
NEXT (>>I)
In DVD mode, press to go to next chapter. With SVCD, VCD, CD, MP3 discs, press to go to next track.
- PLAY/PAUSE
Press once to pause, press again to play
- VIDEO
Switch to video output mode (cvbs.yuv.rgb)
- PROGRAMME
If the disc has two or more tracks, chapters, or titles, set up playing order preference. Press the button to then input the number of the track, title or chapter. If the programmed tracks are over 10, press 'Next' to go on programming. Use the up/down/left/right key to move the cursor to 'Start'. Press 'Enter' to start programmed play.
With MP3 discs, press the button to enter 'Directory-Play' mode. Press 'Programme' again to enter file-list mode.
- REPEAT
Press repeatedly in DVD mode to scroll through: repeat a title, chapter, track or to the beginning. In SVCD, VCD or CD mode: track repeat, all repeat or repeat cancel.
- PBC
VCD mode: Playback control
18. LANGUAGE
Press to select on-screen display language options
19. SUBTITLE
Press to begin showing subtitles
20. OPEN/CLOSE
Press to load and remove discs. Place disc into tray with the title side facing up. Press button again to close.
21. NUMBERS 0-9/10+
While playing DVD/VCD/CD/MP3 discs, use key to select desired track/ chapter in menu selection.
22. TIME
Press to manually set up the time on the DVD player display unit
23. MENU
Enter menu settings in DVD mode
24. UP (∧)
Up direction within selection menu
25. RIGHT (>)
Right direction within selection menu
26. ENTER
Confirm your selection
27. ZOOM
Press to zoom in, press again to zoom out. Use arrow keys to move picture.
28. DOWN
Down direction within selection menu
29. N/P
Press to switch the TV system between NTSC and PAL.
30. REWIND
Press for rewind search
31. VOLUME UP (+)
Increase volume
32. FASTFORWARD
Press for quick forward search
33. STOP
Press to stop media. Press the Play/ Pause button to resume.
34. A-B
Press to repeat certain sections. Press button on start point (A) and the end point (B) to select section. Cancel by pressing button a third time.
35. CLEAR
Press to clear input selections
36. SLOW
Press to select slow speed playing.
37. RETURN
Press to return to VCD menu.
38. RESET
Press to reset your DVD player settings
39. ANGLE
Change angle in DVD mode
INSTRUCTIONS GUIDE:
Getting started:
Setting Up
Connect the power plug of the DVD player to a wall outlet. The power indicator and clock on the front panel will illuminate.
Follow the below guidance for cable connections to get your DVD player set up:
Cable Connection Options:
1a. Connect an RCA cable between the 2 channel Audio Output port and the RCA input on your TV.
1b. Connect a (Y Pb /Cb Pr /Cr) cable via the (Y/ Cb/Pb Cr/Pr) Output of the DVD player to your TV (R/L/Video port and cable).
DVD OPERATION:
Once your DVD player has been connected to the TV and to a power source, the product is ready for use.
The following DVD formats can be played: DVD, DVD-R-RW, CD Video. Mpeg4 and DivX must be converted to AVI format.
Please complete the following guidance to complete the set-up of the DVD player:
-
Ensure that your TV is set to the correct mode for DVD playback.
-
Plug in the DVD player and press the 'Power' button to turn the unit on. You can do this on the unit (Ref.8) or via the remote (Rem.1).
When the machine is switched on, pressing the POWER button on the remote control will make it go into standby mode. Press the button again and the machine will switch on.
WARNING: If the product is not going to be used for a long period of time, it is advisable to unplug it for safety
-
Press the Open/Close button on the front panel (Ref.5) or on the remote control (Rem.20) and place a DVD disc on the disc tray. Press the Open/Close button again to close the tray.
-
The DVD will read the DVD disc and begin play. You can control the playback and settings via the buttons of the remote control.
USB OPERATION:
This product has a USB port at the DVD front face for MP3/ Movies playback.
Insert a USB unit into the USB port on the front panel of the DVD player (Ref.4).
Press the DVD/USB button on the remote control (Rem.4) to enter the USB source. The DVD player will read and display the file list off the USB unit.
Browse the file list by pressing the ▲/▼/▲/▶ buttons (Rem. 7, 24, 25, 28) on the remote control. Select a file by pressing the Enter button (Ref.26) of the remote control.
THE MAX SIZE USB CAPACITY IS 16GB.
PLAYING JPEG/PICTURE CD DISCS AND MP3 DISCS:
The following formats can be played: Jpg, Jpeg, CD Photo
Press the STOP button and 12 small pictures will show on the TV screen.
Press the ▲/▼/▲/▲ buttons on the remote control to select the desired picture to view.
To access instructions menu, use the ▲/▼/◄/► on the remote control to
-
PROG - Select to change picture transform mode
-
STOP - Entering picture preview mode
-
PREV - Previous picture
-
NEXT - Next picture
-
PLAY - Play picture
-
UP - Mirror image in vertical
-
DOWN - Mirror image in horizontal
-
LEFT - Rotate 90 degrees anticlockwise
-
RIGHT - Rotate 90 degrees clockwise
-
ZOOM - Change zoom mode
-
FAST FORWARD - Zoom in the picture
-
FAST REWIND - Zoom out the picture
-
▲/▼/◄/► Move zoom focus for picture.
PLAYING MP3 DISCS:
The following formats can be played: Mp3, WMA, CD Audio, CD-R-RW, CD.
Whilst a MP3 disc is playing, there is a menu screen on the TV. Press the ▲/▼ buttons (Rem. 24/28) to scroll through tracks or folders. Press the ENTER button to select the track or folder.
Press the PROG button in files play mode. The screen will then display the total track number and the current playing track. Use the digit buttons (Ref.21) to key in and select the track or use the ▲/▼/◄/► buttons to shift to the track and press the ENTER button (Rem.26) to play the track.
SYSTEM SETUP: Menu operation
Press the SETUP button on the remote control to display the Setup (Main) Menu.
- Once the Setup Menu is on display, use the LEFT and RIGHT buttons to select an option, then press ENTER to enter the sub-menu.
Press the UP and DOWN buttons to select the desired setting then press ENTER to confirm your selection.
- To exit the Setup Menu, press the SETUP button again.
Note: The items in gray cannot be changed.
General setup page
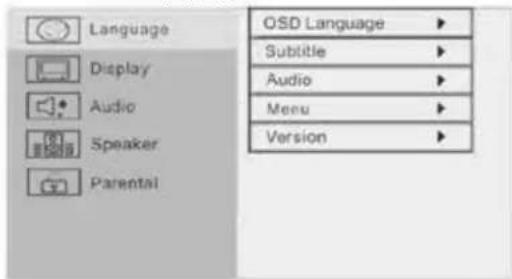
text_image
Language Display Audio Speaker Parental OSD Language ▶ Subtitle ▶ Audio ▶ Menu ▶ Version ▶- OSD Language
Select the on-screen display language.
- Subtitle, Audio, Menu
These are your initial settings and will only work if the disc supports these functions (will default to the disc value if not supported).
- Version
Software information.
Display setup page
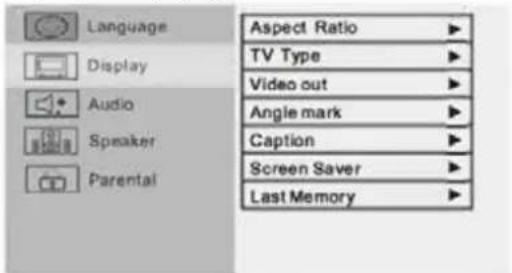
text_image
Language Display Audio Speaker Parental Aspect Ratio ▶ TV Type ▶ Video out ▶ Angle mark ▶ Caption ▶ Screen Saver ▶ Last Memory ▶- Aspect Ratio
16:9 : Use this aspect ratio when the unit is connected to the wide screen TV set.
4:3 / LB : Use this aspect ratio when the unit is connected to a normal TV set. Black bars will appear on the top and bottom of the screen.
4:2 / PS : Use this aspect ratio when the unit is connected to a normal TV set. The wide screen image will be shown on the full screen but some parts will be cut off.
- TV type
This unit is suitable for the following TV systems : AUTO, NTSC and PAL.
AUTO : The TV system will automatically switch according to the disc that is playing.
NTSC : This system is used in USA, Taiwan, Japan, etc.
PAL: This system is used in South Africa, Europe, etc.
Video Out
CVBS : Video output when connecting to video terminals.
YUV : Set video output in analogue component video format when connecting to Y /U/V terminals.
- Angle Mark
Appears when the DVD has multi-angles.
- Caption
This function does not work when the disc has no caption options. The default setup is caption off.
- Screen Saver
If the screen saver option is set to on and the unit is switched on without a disc playing, then a moving picture will appear on the screen. After about 20 minutes, the unit will go into Standby mode.
You can press any key on the remote control to activate the unit.
- Last Memory
If the last memory option is set to on and the unit is switched off, the last position on the DVD will be memorized.
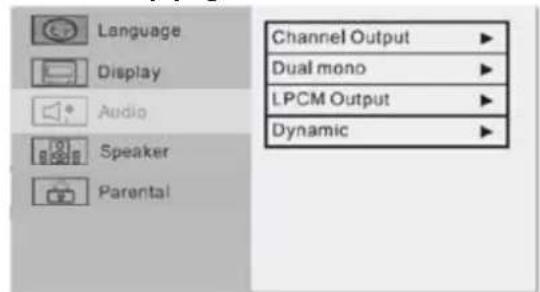
Audio setup page
text_image
Language Display Audio Speaker Parental Channel Output ▶ Dual mono ▶ LPCM Output ▶ Dynamic ▶- Channel Output
LT/RT : When you select this option, the left and right surround sounds are synchronously outputted to the left and right channels.
Stereo : When you select this option, the left and right surround sounds are respectively outputted to the left and right channels.
- Dual Mono
Stereo : Set audio output to the stereo output.
L-Mono : Set audio output to the mono-left channel.
R-Mono : Set audio output to the mono right channel.
Mix-Mono: Set audio output to the mix mono channel.
- LPCM Output
On LPCM output, can choose the frequency 48K and 96K, can down frequency, but only cannot up.
- Dynamic
If you are watching a largely dynamic sounding movie, select this mode to reduce the treble and bass while still maintaining the finer detailed sounds.
Speaker setup page

text_image
Language Display Audio Speaker Parental 3D/EQ3D/EQ
Seven EQ modes are available. You can select one according to your preference and the disc content.
Parental setup page

text_image
Language Display Audio Speaker Parental Change Rating Level Default Reset- Change
The control level is for parents to control the content being played. Any disc with a level higher than the set level cannot be played. You can only change the level when the password setup is set to off.
You can set your own password. Note that the initial factory password is 0000. If you forget your own password, you can use 0000 as a general password.
- Default reset
Return to original factory settings.
TROUBLESHOOTING:
| Malfunction | Possible causes/measures |
| No power / function | Check whether the power is switched on or off at the wall.Check whether the power adaptor is properly connected to power outlet or not. |
| No video | Make sure that the video cables are connected correctly.Reset the setups of the DVD player.Check that the input selection on the TV is correct. |
| No audio | Make sure that the audio cables are connected correctly.Make sure that the coaxial connected stereo is powered on.Reset the setups of the DVD player. |
| Distorted video | Clean DVD disc from dust/dirtThe playback is fast winding backward/forward. |
| Unable to play | Place a DVD disc in the disc tray.Place the disc in on the correct side up Clean DVD disc from dust/dirtClose the setup of the DVD player.Check that the file is compatible with the unit. |
| Remote Control does not work | Aim the Remote Control towards the front panel of the DVD player.Use the Remote Control closer to the DVD player.Check the battery level of the batteries |
SPECIFICATION:
| Power Supply | AC 100-240V |
| Frequency Response | ~5o/6oHz |
| Power Consumption | 10W |
| Compatible Connections | AN RCA Output USB Input(Y Pb/Cb Pr/Cr)R/L Video |
| Compatible Formats | DVD: DVD, DVD-R-RW, CD Video. Mpeg4 and DivX in AVI format.AUDIO: Mp3, WMA, CD Audio, CD-R-RW, CDPHOTO: Jpg, Jpeg, CD Photo |
LENOXX
www.lenoxx.com.au

1300 666 848

LenoxxElectronics

LenoxxElectronics

@LenoxxAustralia