YES - Uncategorized Anthro - Free user manual and instructions
Find the device manual for free YES Anthro in PDF.

| Product Type | Office Accessory |
| Brand | Anthro |
| Model | YES |
| Dimensions (W x D x H) | 20.0 x 15.0 x 5.0 cm (7.9 x 5.9 x 2.0 in) |
| Weight | 0.5 kg (1.1 lb) |
| Material | ABS plastic and aluminum |
| Power Supply | USB-C (5V, 1A) |
| Main Function | Adjustable document holder with integrated LED light |
| Adjustable Height | 10 cm (3.9 in) range |
| Rotation | 360° swivel |
| Light Color Temperature | 3000K to 6000K adjustable |
| Light Brightness | 5 levels |
| Compatibility | Fits devices up to 13 inches wide |
| Included Accessories | USB-C cable, clamp mount |
| Installation | Tool-free clamp assembly |
| Cleaning | Wipe with a soft, dry cloth |
| Safety | CE, FCC certified; overheat protection |
| Warranty | 2 years limited |
| Repairability | Modular design; spare parts available via support |
Frequently Asked Questions - YES Anthro
User questions about YES Anthro
0 question about this device. Answer the ones you know or ask your own.
Ask a new question about this device
Download the instructions for your Uncategorized in PDF format for free! Find your manual YES - Anthro and take your electronic device back in hand. On this page are published all the documents necessary for the use of your device. YES by Anthro.
USER MANUAL YES Anthro
Components at a Glance
natural_image
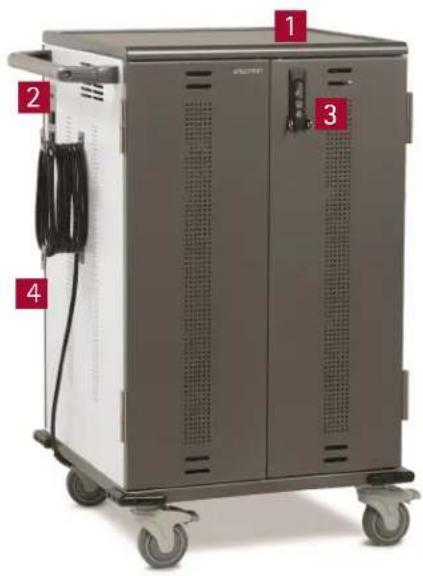
Exterior view of a gray industrial machine with four labeled parts (1, 2, 3, 4) and wheels, no visible text or symbols on the unit itself.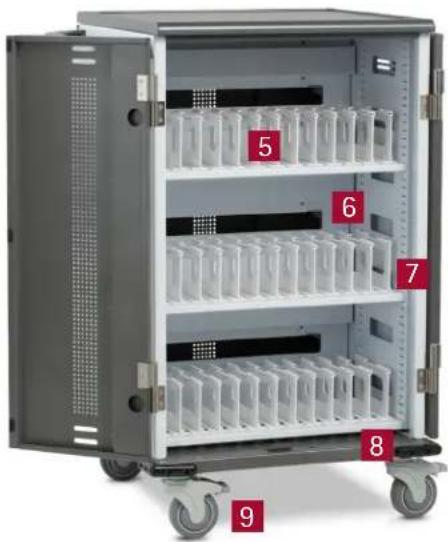
natural_image
Interior view of a multi-level medical or laboratory device with numbered compartments (5–9) and wheels, no visible text or symbols.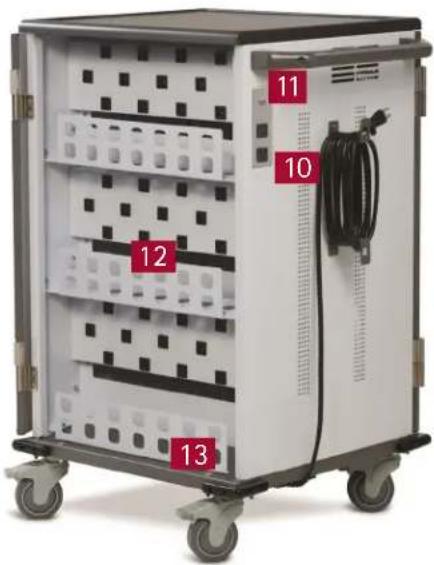
natural_image
Interior view of a multi-wheeled medical or laboratory device with numbered compartments (10–13), no visible text or symbols on the main body.Front of Cart (closed)
- Top shelf with 1/4"h lip
- Handle
- Locking door latch w/padlock bracket
- Cord wrap w/detachable power cord
Front of Cart (open)
- Device bays w/width adjustment
- Bay dividers w/cable channels
- Shelves w/height adjustment
- Corner bumpers
- 4" total-lock casters
Back of Cart (open)
- External power receptacles.
- Power switch w/indicator light
- Center panel w/power outlets and cord pass-through openings
- Power adapter storage trays
Ergotron's Yes Cart for Mini-laptops is designed to automatically charge and store 1-36 tablet, smart phone, and mini-laptop devices safely and efficiently. Adjustable shelves customize shelf height in 1" increments to fit a range of device heights; adjustable bays slide left to right to fit even the largest cases.
Please review this manual before installing your equipment to learn how to use the cart safely.
AC input: 120V\~60 Hz. Max Amps: 12A.
Table of Contents
Getting Started 2
Safety Notices 2
Loading Devices 3
Troubleshooting Guide ..... 4
Warranty 4
Getting Started
Important Safeguards – We want you to be safe!
These carts are electrical devices. Use care with them and follow these important safeguards:
• Intended for institutional use.
- Electrical devices are not toys. Children are often unaware of the hazards associated with electrical devices, so this unit must always be used by adults or with adult supervision.
- Do not use this unit outdoors.
- Liquids should not be stored in, set on or placed inside this unit.
- Never unplug this product from the outlet when your hands are wet.
- Be careful with the power cord. Do not jam the power cord against sharp edges. Do not use the unit if the cord appears to be damaged or if the ground prong is missing. When the unit is not plugged in, wrap the power cord around cord wraps.
- Wrap cord on cord wraps before moving cart.
- No TV/monitor to be used on top of cart.
- Do not use an extension cord with this unit.
- The socket outlet shall be installed near the equipment and shall be easily accessible.
- Inadequate repair can create significant hazards to users and
is not covered by the warranty. Repairs should always be performed by an Ergotron service representative or a qualified electrician.

- Elevated Operating Ambient - Consideration should be given to installing the cart in an environment compatible with the maximum ambient temperature Tma of 40 degree C.
- Reduced Air Flow - Instructions indicated to not block the ventilation openings so proper air flow required for safe operation of the equipment is not compromised.
- Mechanical Loading - Mounting of the equipment in the cart should be such that a hazardous condition is not achieved due to uneven mechanical loading.
- Special alerts for carts:
To protect the cart's contents and structural integrity, latch doors before moving the cart.
° Do not use power cord to pull the cart.
° Do not roll the cart over the power cord.
^a If the unit is misused, incorrectly operated or inadequately repaired, the warranty will be void.
Electrical Testing
- Test the contact integrity of the wall outlet using a receptacle tension tester such as a Woodhead 1760 or a Safeplug 1700.
- Test the branch circuit for ground integrity and branch circuit protection.
- Do not plug in the unit if the switch, receptacles, or power cord have been damaged or if the ground prong is missing from the plug. If repairs are ever needed, they should be performed by an Ergotron service representative or a qualified electrician.
- FCC Statement: This equipment has been tested and found to comply with the limits for a Class A digital device, pursuant to part 15 of the FCC Rules. These limits are designed to provide reasonable protection against harmful interference when the equipment is operated in a commercial environment. This equipment generates, uses, and can radiate radio frequency energy and, if not installed and used in accordance with the instruction manual, may cause harmful interference to radio communications. Operation of this equipment in a residential area is likely to cause harmful interference in which case the user will be required to correct the interference at his own expense.
CAN ICES-3(A)/NMB-3(A).
Changes or modifications not expressly approved by Ergotron could void the user's authority to operate the equipment.
External Power
The Yes Cart for Mini-laptops, Original, comes with two power receptacles on the side of the cart.
Doors and Locks
The doors on the cart feature a two-point keyed locking system to protect your devices. To open a door, lift the bottom of the handle and rotate it to the inside of the unit. Your cart shipped with 4 keys. Contact Ergotron, 800-888-8458, for replacements.
For added security, each front door features hasps to hold your own padlock (maximum shackle dia 5/16"; minimum shackle height 2"). When installed, your padlock restricts access to the handle so the unit can't be opened.
To protect the cart's contents and structural integrity, latch doors before moving the cart.
natural_image
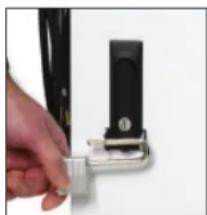
Close-up of a hand adjusting a black mechanical component with a metallic bracket (no visible text or symbols)Child Safety Warnings
WARNING - Death or serious injury may occur when children climb on audio and/or video equipment furniture. A remote control or toys placed on the furnishing may encourage a child to climb on furnishing and as a result the furnishing may tip over on to the child.
WARNING - Relocating audio and/or video equipment to furniture not specifically designed to support audio and/or video equipment may result in death or serious injury due to the furnishing collapsing or over turning onto a child.
Loading Devices, Cable Management
In the front User area of the cart
- Check that the vertical spacing of the shelves fits your devices. To adjust shelf height, use the hex driver provided to loosen
(not remove) the 2 screws that attach the left side of the shelf. Lift the left side off the screws and pull the shelf to the left to free the tabs on the right. Set aside the shelf. Remove and reinstall the screws and shelf at the desired height. [Image A]

natural_image
Close-up of a white metal shelving unit with vertical supports and a highlighted circular detail (no text or symbols)- Check that the horizontal spacing of the bay dividers fits your devices and cases. To move the dividers and adjust the bay width, press back on the divider tab under the shelf that connects the divider to the shelf until the divider pops free. If your fingers don't fit,

natural_image
Close-up of a metal shelf with a circular highlight on the shelf edge (no text or symbols visible)try a flat-head screwdriver. To install the divider, angle the divider into a slot at the back of the shelf, then tilt the divider into place at the front of the shelf. Label each bay with the bay numbers. [Image B]
- To route the cords, route one charging cord along the top of each divider. Make sure that the cord end that goes into the device is at the front of the bay and the power end goes through the center panel and into the IT area.

natural_image
Close-up of hands holding a black cable with metallic components, no visible text or symbols- Leave enough slack in front (approximately 4.5"; use the height of the divider as a measuring stick) so users can plug in the device without straining the cord. [Image C]
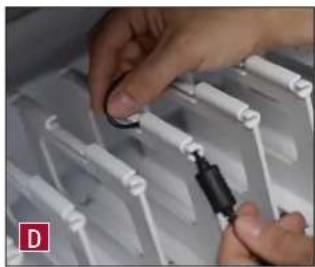
- Weave the cord around the short hook at the front of the divider, then back and forth through the three long channels along the top of the divider, including the center channel that's lower than the others, and finally through the short hook at the back of the divider and through the center panel and into the IT area. [Image D and E]
- Slide devices into bays so the power inlet is convenient to the front of the bay.
- Use the adhesive bay label stickers to number each bay.
In the back IT area of the cart
- Turn the power off by pushing the power button.
- One at a time, plug each adapter into the cart and, if they're separate, connect the adapter to the device charging cord. [Image F]
- Use the provided cable straps to organize each adapter and cord bundle to save space. [Image G]
- Place the cord bundle in the storage tray. [Image H] Maximum weight for each shelf is 12 lbs.
- When you're ready to charge devices, push the power button in to turn on power.
natural_image
Close-up of hands installing a mechanical component with white rods and a black connector (no visible text or symbols)
natural_image
Close-up of a hand holding a black cable over a grid-like structure (no visible text or symbols)
natural_image
Hand using a power tool to mark black square patches on white background (no text or symbols visible)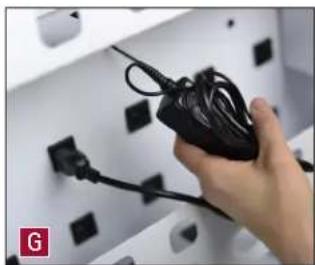
natural_image
Hand holding a black cable with attached plug, installed on a white wall with black connectors (no text or symbols visible)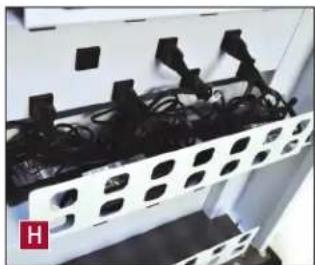
natural_image
Interior view of a server rack with black cables and connectors (no visible text or symbols)Troubleshooting Guide
The blue ON/OFF switch is flashing. What does that mean?
There is an over-current condition that cannot be resolved. Power has been removed to the devices. An over-current condition could be a defective device installed or possibly something plugged into external auxiliary outlet causing too much current. To correct, remove source of over-current condition, then unplug from wall and then plug back in, or push power switch OFF then back ON to reset.
The devices are all plugged in, but they won't charge. What do I do?
First, check the cart: Is the blue ON/OFF switch flashing? See steps above. If not, disconnect the main power cord from the wall and inspect the cord and plug to make sure that they're undamaged. Plug the cord into a working power outlet. Next, check the devices: Verify that each device is connected to its power adapter and that each adapter is plugged into the power column. Push the power button to power up the outlets. Still need some help? Call Ergotron at 800-888-8458 for assistance.
Someone tried to break into the unit and damaged a door. Can it be replaced?
Yes, you can order a replacement. Contact Customer Care. We'll ask you for the model number of your cart and whether it's for the front or back of the unit.
My power cord/plug is damaged. Are they under warranty?
For warranty information visit: www.ergotron.com/warranty
When I plug in the unit it trips the circuit breaker. Help!
The carts are designed to run on a 15 amp circuit. If you have other items plugged into the same circuit you may be overloading it. Have a qualified electrician check that adequate power is available.
My unit was damaged during shipment. What should I do?
Please contact Customer Care and we'll work with you.
How do I find the unit's serial number?
The serial number label is inside the IT compartment on the base.
Can I remove a bay divider?
Yes! See the instructions - including helpful pictures - on page 3!
How can I make the cart easier to steer?
This cart has two directional lock casters to make the cart easier to steer. How? Directional lock casters don't swivel - they lock the direction of the casters so they move in a straight line. Press the tabs of these casters (located under the handle) when you need to move the cart more than a few feet. When you need to maneuver into tight spaces, release the tabs so the casters swivel.

text_image
WARNING / AVERTISSEMENT Only Adults should move this cart! Tip Hazard! Do not allow children to use cart without adult supervision. Failure to follow this warning may result in injury or equipment damage. CAUTION / ATTENTION This cart is intended for use only with loading as indicated. Use with loads greater than indicated may result in instability causing possible injury. YESMOR2GMPW4 YESMUSGMPW4 ≤25 lb (11.3 kg) ≤60 lb (27.2 kg) ≤60 lb (27.2 kg) ≤60 lb (27.2 kg) Do not push side of cart. Do not pull cart. 725-5248-00For Warranty visit: www.ergotron.com/warranty
For Service visit: service.ergotron.com
For Customer Care call: 800-325-3841
Ergotron, Inc. – Anthro Site
10450 SW Manhasset Drive
Tualatin, OR 97062
800-325-3841
503-691-2556
www.ergotron.com
email: sales@ergotron.com
ERGOTRON®
BUILT WITH

While Ergotron, Inc. makes every effort to provide accurate and complete information on the installation and use of its products, it will not be held liable for any editorial errors or omissions (including those made in the process of translation from English to another language), or for incidental, special or consequential damages of any nature resulting from furnishing this instruction and performance of equipment in connection with this instruction. Ergotron, Inc. reserves the right to make changes in the product design and/or product documentation without notification to its users. For the most current product information, or to know if this document is available in languages other than those herein, please contact Ergotron. No part of this publication may be reproduced, stored in a retrieval system, or transmitted in any form or by any means, electronic, mechanical, photocopying, recording or otherwise without the prior written consent of Ergotron, Inc., 1181 Trapp Road, Eagan, Minnesota, S5121, USA Patents Pending and Patented U.S. & Foreign. Ergotron is a registered trademark of Ergotron, Inc.
© 2016 Ergotron, Inc. All rights reserved.
All trademarks are the property of their respective companies. Anthro is a registered trademark and brand of Ergotron Inc.
Anthro-DNA is a trademark of Ergotron Inc., Ergotron Inc. is a Nortek company.