617-1614 - Alarm clock radio LA CROSSE TECHNOLOGY - Free user manual and instructions
Find the device manual for free 617-1614 LA CROSSE TECHNOLOGY in PDF.

| Product Type | Alarm Clock Radio |
| Brand | La Crosse Technology |
| Model | 617-1614 |
| Display Type | LED Digital Display |
| Display Color | Blue/Green (adjustable) |
| Alarm Sound | Beep or Radio |
| Snooze Function | 9-minute snooze |
| Radio Bands | AM/FM |
| Preset Stations | 10 AM / 10 FM |
| Power Source | AC Adapter (included) |
| Battery Backup | 2 x AAA batteries (not included) |
| Time Format | 12-hour or 24-hour selectable |
| Dimming Control | High/Low/Off |
| Dimensions (HxWxD) | 3.5 x 6.5 x 4.5 inches |
| Weight | 0.6 lbs |
| Operating Temperature | 32°F to 122°F (0°C to 50°C) |
| Cleaning Instructions | Wipe with a soft, damp cloth. Do not use abrasive cleaners. |
| Safety Warnings | Keep away from water. Use only the provided adapter. |
| Warranty | 1-year limited warranty |
Frequently Asked Questions - 617-1614 LA CROSSE TECHNOLOGY
User questions about 617-1614 LA CROSSE TECHNOLOGY
0 question about this device. Answer the ones you know or ask your own.
Ask a new question about this device
Download the instructions for your Alarm clock radio in PDF format for free! Find your manual 617-1614 - LA CROSSE TECHNOLOGY and take your electronic device back in hand. On this page are published all the documents necessary for the use of your device. 617-1614 by LA CROSSE TECHNOLOGY.
USER MANUAL 617-1614 LA CROSSE TECHNOLOGY
Alarm Clock Charging Station
with 2 USB Charging Ports

text_image
PM 12:34 WEDNESDAY OCT 24 72°F 45.° LA CROSSE TECHNOODER
For online video support:
http://bit.ly/LaxTechTalk
Model: 617-1614
DC: 010417
Table of Contents
LCD Features 1
Setup 1
Buttons 2
Settings 2
Nap Feature 3
USB Charging Ports 4
Included USB to Micro USB | Lightning Cable 4
Cable Hooks 4
Backlight HI-LOW-OFF 4
Low Battery 4
Time Alarm 5
Activate | Deactivate Time Alarm 6
Snooze 6
Specifications 6
Visit Us on Social Media 6
Care and Maintenance 7
Warranty and Support 7
FCC Statement 7
LCD Features
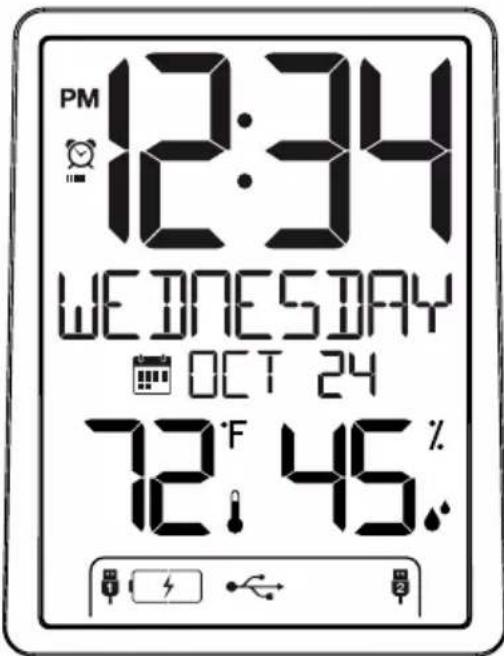
text_image
PM 12:34 WEDNESDAY OCT 24 72°F 45. %PM AM | PM

Alarm

Calendar

Temperature | Humidity

- Insert the 5.0 volt power cable into the wall outlet, then into the clock.
- (Optional), Insert 2 AAA batteries (not included) into the clock.
- Set language, time, calendar, temperature unit and snooze duration.
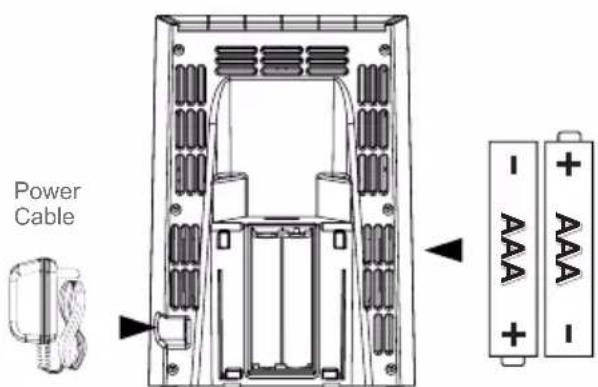
text_image
Power Cable - AAA + AAA -Buttons

text_image
+ - NAP SET PLUS MINUS ALARM NAP SET SNZ/LIGHTSettings
- Hold the SET button to enter the settings menu.
- Press the +/- buttons to adjust the values.
- Press the SET button to confirm adjustments and move to the next item.
- Press the SNZ/LIGHT button at any time to exit.
Setting menu order:
-
Language (English or Spanish)
-
Beep ON/OFF
-
Hour
-
Minutes
-
Year
-
Month
-
Date
-
Fahrenheit/Celsius
-
Snooze duration (5 minutes-120 minutes)
Begin: Hold the SET button for 3 seconds. ENGLISH will show.
Language: English or Español

text_image
ENGLISH
text_image
ESPAÑOLWhen Español is selected, the instructions on screen will be in Spanish.
Beep ON | OFF Hour | Minutes

text_image
ON BEEP617-1614

text_image
OFF BEEPwww.lacrossetechnology.com/support

text_image
AM 12: HOUR
text_image
:34 MINUTESYear Date
YEAR 2016
Month
10 MONTH

text_image
DATE 24Set the nap duration one time, then, a simple press of the NAP button starts the nap countdown.
Set Nap Duration:
- Hold the NAP button for 3 seconds. NAP and the nap duration will show (default is 10 minutes).
- Use the +/- buttons to select a nap duration (up to 120 minutes).
- Press the NAP button to confirm and start nap count down to zero.
- Press the SNZ/LIGHT button at any time to exit nap setting menu.

text_image
10 NAPReady for a Nap? Press the NAP button once, and the clock will wake you at the preselected time.
- From normal time display, press the NAP button once to start the nap feature for the preset time. NAP will show with the preset duration.
• Minutes and seconds will countdown. - When the alarm sounds NAP and 0m will flash. The alarm will sound for two minutes and then stop if no buttons are pressed.
- Press any button except SNZ/LIGHT, at any time to stop the nap countdown alarm.

text_image
PM 12:34 NAP 120m SB 72°F 45.℃
text_image
PM 12:34 NAP 120m SO 72°F 45.0USB Charging Ports
USB Output: 1 Amp output from each port.
- Charge devices that self-regulate.
- Do not charge multiple devices from the same USB port.
- Must operate clock with power cable to charge other devices.
- Plug your device into one of the USB ports.
- The clock will show HELLO for 3 seconds.
- The lightning bolt will flash while charging.
- When no device is connected, no battery will show.
- As your device becomes full and less current is drawn, solid battery icon may show, before the charge is complete.

text_image
HELLO
text_image
Charging Not Connected 1 2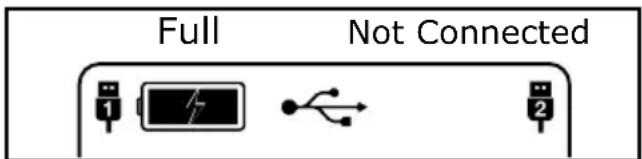
text_image
Full Not ConnectedIncluded USB to Micro USB or Lightning Cable
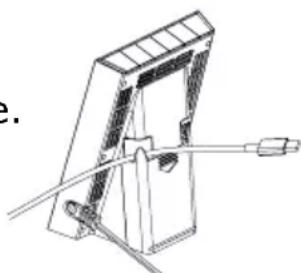
- The included USB cord offers a Micro USB connection or a Lightning connection on the same cord.
- Use your own charge cord or the included cord to charge your device.

natural_image
Technical line drawing of two types of USB connectors (no text or symbols)Cable Hooks
- On the back of the clock there are two cable hooks to secure your charging cables when not in use.
- Simply slide your cable into the hook and the end of your cable will be easy to find every time.
natural_image
Technical line drawing of a mechanical clamp or bracket assembly (no text or symbols)Backlight (HI-LOW-OFF)
- When operating with the power cable, the backlight is adjustable: HI-LOW-OFF.
- Press and release the SNZ/LIGHT button to adjust the backlight.
- When operating on batteries only, the backlight will come on briefly when the SNZ/LIGHT button is pressed.
Low Battery Icon

- The low battery icon will appear between the hour and minutes.
- This icon indicates it is time to replace the batteries.
Time Alarm
Note: Setting and activating the alarm are separate functions.
Set Alarm:
- Press and release the ALARM button to view alarm time.
- With alarm time showing, hold the ALARM button for 3 seconds to enter alarm time set mode.
- Press the +/- buttons to adjust the alarm hour.
- Press the ALARM button to confirm and move to the minutes.
- Press the +/- buttons to adjust the alarm minutes.
- Press the ALARM button to confirm and move to alarm type.
- Use the +/- to select SINGLE, MON-FRI or WEEKEND alarm.
- Press the ALARM button to confirm and exit.
Hour | Minutes Alarm Type

text_image
AM 6: ALARM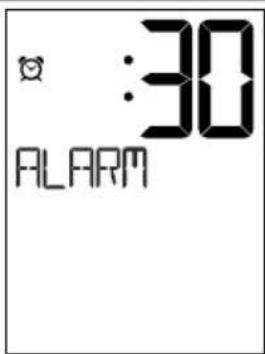
text_image
:30 ALARM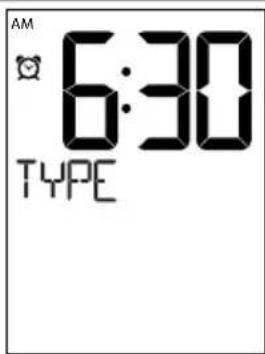
text_image
AM 6:30 TYPESingle
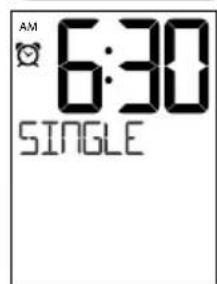
text_image
AM 6:30 SINGLEMon-Fri Weekend

text_image
AM - 6:30 MON-FRI
text_image
AM 6:30 WEEKENDAlarm Type (choose the type for each alarm):
• Daily/Single-Will alarm at the same time every day when active.
• Mon-Fri-Will only alarm Monday through Friday when active.
- Weekend- Will only alarm Saturday and Sunday when active.
| Daily | Single | Mon-Fri | Weekend |
Activate/Deactivate Alarm
- When you finish settings, the alarm is active.
- From the normal time display, press and release the ALARM button to view alarm.
- Press and release the ALARM button to deactivate or to activate the alarm.
- When active the alarm clock icon will show.
- The clock icon will not show if the alarm is not active.

Snooze
- When the alarm sounds, press the SNZ/LIGHT button. The alarm will be silent for the preselected snooze duration.
- SNOOZE - duration will show, and the snooze time will count down.
- When alarm sounds again, the SNOOZE - 0 will flash.

text_image
AM 6:30 5NOOZE 45 22
text_image
AM 7:15 SNOOZE 00 00Note: This is a crescendo alarm. It will sound for two minutes then shut off completely if no buttons are pressed.
Specifications
Temperature Range: 32°F to 122°F (0°C to 50°C)
Humidity Range: 10%RH to 99%RH
Power: 5.0V AC6: HX15-0502200-AU
Optional-2-AAA, IEC, LR3 batteries (not included)
USB Output: 1 Amp each charging port.
Battery Life: Battery life is over 24 months with reputable batteries
Dimensions: 3.74" W x 2.40" D x 5.24" H (95 x 61 x 133 mm)
Visit Us on Social Media

Latest video content
http://bit.ly/LaxTech_YouTube

For personalized interaction
http://bit.ly/LaxTech_Facebook

Join the conversation
http://bit.ly/LaxTech____Twitter

Pin and share
http://bit.ly/LaxTech_Pinterest
Care and Maintenance
- Do not mix old and new batteries.
- Do not mix Alkaline, Standard, Lithium, or Rechargeable Batteries.
• Always purchase the correct size and grade of battery most suitable for intended use. - Replace all batteries of a set at the same time.
- Clean the battery contacts and also those of the device prior to battery installation.
- Ensure the batteries are installed with correct polarity (+ and -).
- Remove batteries from equipment when it is not used for an extended period of time.
- Promptly remove expired batteries.
Warranty and Support
La Crosse Technology, Ltd. provides a 1-year limited time warranty (from date of purchase) on this product relating to manufacturing defects in materials & workmanship.
Before returning a product, please contact our friendly customer support with questions or visit our online help:
Phone: 1-608-782-1610
Online Product Support and Registration:
www.lacrossetechnology.com/support
View full warranty details online at:
www.lacrossetechnology.com/warranty_info.pdf
FCC Statement
This equipment has been tested and found to comply with the limits for a Class B digital device, pursuant to part 15 of the FCC Rules. These limits are designed to provide reasonable protection against harmful interference in a residential installation. This equipment generates, uses and can radiate radio frequency energy and, if not installed and used in accordance with the instructions, may cause harmful interference to radio communications. However, there is no guarantee that interference will not occur in a particular installation.
If this equipment does cause harmful interference to radio or television reception, which can be determined by turning the equipment off and on, the user is encouraged to try to correct the interference by one or more of the following measures:
- Reorient or relocate the receiving antenna.
- Increase the separation between the equipment and receiver.
- Connect the equipment into an outlet on a circuit different from that to which the receiver is connected.
- Consult the dealer or an experienced radio/TV technician for help.
This device must not be co-located or operating in conjunction with any other antenna or transmitter.
Operation is subject to the following two conditions:
(1) This device may not cause harmful interference, and
(2) This device must accept any interference received, including interference that may cause undesired operation.
Caution!
The manufacturer is not responsible for any radio or TV interference caused by unauthorized changes or modifications to this equipment. Such changes or modifications could void the user authority to operate the equipment.
This equipment must be installed and operated in accordance with provided instructions and the antenna(s) used for this transmitter must be installed to provide a separation distance of at least 20 cm from all persons and must not be co-located or operating in conjunction with any other antenna or transmitter
All rights reserved. This manual may not be reproduced in any form, even in part, or duplicated or processed using electronic, mechanical or chemical process without the written permission of the publisher. This booklet may contain errors or misprints. The information it contains is regularly checked and corrections are included in subsequent editions. We disclaim any responsibility for any technical error or printing error, or their consequences. All trademarks and patents are recognized.