VR500 - Dictaphone AUDIOLINE - Free user manual and instructions
Find the device manual for free VR500 AUDIOLINE in PDF.

| Product Type | Digital Voice Recorder (Dictaphone) |
| Brand | Audioline |
| Model | VR500 |
| Dimensions (approx.) | 10.0 x 3.0 x 1.5 cm |
| Weight (with batteries) | Approx. 50 g |
| Power Supply | 2 x AAA alkaline batteries (not included) |
| Battery Life | Up to 15 hours of continuous recording |
| Recording Format | MP3 / WAV (depending on settings) |
| Recording Modes | High quality (HQ) and Long play (LP) |
| Built-in Microphone | Electret condenser monaural microphone |
| Built-in Speaker | 0.5W dynamic speaker |
| Memory Capacity | Internal flash memory (approx. 4 GB, up to 280 hours in LP mode) |
| USB Interface | USB 2.0 for file transfer and charging (via PC) |
| Headphone Jack | 3.5 mm stereo headphone output |
| Voice Activation (VOX) | Yes, adjustable threshold |
| Key Lock | Slide switch to prevent accidental operation |
| Additional Functions | Repeat, A-B loop, playback speed control, date stamp |
| Maintenance & Cleaning | Wipe with a soft, dry cloth. Do not use solvents or abrasive cleaners. |
| Safety Precautions | Keep away from water, heat sources, and magnetic fields. Use only specified batteries. |
| Spare Parts & Repairability | Battery compartment cover available. Repairs only by authorized service centers. |
Frequently Asked Questions - VR500 AUDIOLINE
User questions about VR500 AUDIOLINE
0 question about this device. Answer the ones you know or ask your own.
Ask a new question about this device
Download the instructions for your Dictaphone in PDF format for free! Find your manual VR500 - AUDIOLINE and take your electronic device back in hand. On this page are published all the documents necessary for the use of your device. VR500 by AUDIOLINE.
USER MANUAL VR500 AUDIOLINE
User Instructions 21
text_image
Diagram of a remote control device showing battery and switch with directional arrows indicating charging or discharging process.text_image
A HQ 100 FULL E F A HQ 05 FULL E Fnatural_image
Diagram showing a device connected to a digital audio recording device via a cable (no text or symbols present)
natural_image
Illustration of a device connected via a cable to a digital audio recording device (no text or symbols visible)flowchart
graph TD
    A["Device with two ports"] --> B["Speaker with two speakers"]
    B --> C["Output: Display with control panel"]
    C --> D["Signal to output"]
text_image
Diagram showing audio recording setup with microphone, speaker, and digital device connected to a device with control buttonstext_image
1 2 LINEIN 3 OUTPUT 4 5 on recorder munHinweise:
Name: MANFRED ZINNOW
- Safety information 22
- Unpacking 23
- Product characteristics.... 23
- Fitting batteries....24
- User controls....25
- Display indicators.... 26
- Operation....27
7.1 Switching on....27
7.2 The archiving folder ....27
7.3 Recording quality ....27
7.4 Recording notes....28
7.5 Starting the next recording immediately....28
7.6 Direct recording....28
7.7 Adding to already existing recordings 29
7.8 Remaining recording time....29
7.9 VOS - Voice controlled recording....29
7.10 Playing back notes....30
7.11 Searching for a note automatically (AUTO-Scan) 31
7.12 Deleting individual notes....31
7.13 Deleting complete archiving folders ....31
7.14 Deleting all folders simultaneously....31
- Additional options ...... 32
8.1 User lock 32
8.2 Using the USB interface 32
8.3 Connecting the external microphone 32
8.4 External earpiece ....32
8.5 Recording from other signal sources 33
8.6 Playing back via other units....33
8.7 Recording telephone conversations....34
8.8 Using the VoiceRecorder as a hearing aid 34
-
Fault finding 35
-
Further information .... 36
10.1 Warranty....36
10.2 Technical data....37
10.3 Declaration of conformity ....38
- Safety information -
1. SAFETY INFORMATION
Operating Manual: Please read these operating instructions carefully. If you should have any questions, please call our Service Hotline on 0180 5 00 13 88. Do not open the unit yourself under any circumstances and do not try to carry out your own repairs. For any claims under the warranty, please refer to your dealer.
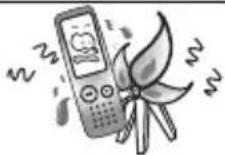 Avoid high temperatures above 40°C. Avoid proximity to sources of heat such as radiators and do not expose the unit to direct sunlight. Avoid high temperatures above 40°C. Avoid proximity to sources of heat such as radiators and do not expose the unit to direct sunlight. |  The manufacturer cannot be held liable for possible loss of data due to incorrect operation, repairs or other reasons. The manufacturer cannot be held liable for possible loss of data due to incorrect operation, repairs or other reasons. | 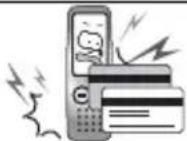 Do not place cash cards, credit cards or other storage media in the vicinity of the loudspeaker. Possible loss of data. Do not place cash cards, credit cards or other storage media in the vicinity of the loudspeaker. Possible loss of data. |
 Never use cleaning agents, particularly aggressive solvents. Never use cleaning agents, particularly aggressive solvents. |  Avoid high humidities above 75%. Avoid high humidities above 75%. |  Please remove the batteries immediately if you should notice smoke or high temperature. Please remove the batteries immediately if you should notice smoke or high temperature. |
| [3DBX]Do not use the unit in aircraft and in places where the use of electronic equipment is prohibited. |  Do not use the earpiece and do not operate the unit while you are driving a vehicle. Do not use the earpiece and do not operate the unit while you are driving a vehicle. |  Never listen with the volume too high, as this can lead to irreparable hearing damage. Never listen with the volume too high, as this can lead to irreparable hearing damage. |
 Do not try to open the unit. Do not try to open the unit. |  Do not allow the batteries to fall into the hands of children. Do not allow the batteries to fall into the hands of children. |  Please use new, high-quality alkaline batteries, Type AAA 1.5V. Please dispose of these carefully in accordance with the statutory requirements and in a manner friendly to the environment. Never open used batteries, short circuit them or throw them into the fire. Please use new, high-quality alkaline batteries, Type AAA 1.5V. Please dispose of these carefully in accordance with the statutory requirements and in a manner friendly to the environment. Never open used batteries, short circuit them or throw them into the fire. |
- Unpacking/Product characteristics -
2. UNPACKING
The following parts will be found in the package:
| Digital VoiceRecorder Microphone | |
| Two batteries Telephone adapter | |
| Power Voice II software Audio cable | |
| USB cable Operating manual | |
| Earpiece | Wrist strap |
3. PRODUCT CHARACTERISTICS
Compact size
Easy to carry due to compact size and low weight
Flash Memory
Recordings are retained even in the event of a power failure.
Automatic switch-off
Automatic switch-off saves battery capacity.
Long recording time
You can record in premium or standard quality. The digital recording time is 152 minutes in premium mode. A remarkable 504 minutes can be achieved in standard mode.
VOS - voice controlled recording
The unit only records while the user is speaking. This saves memory space.
Search and play back (scan)
The first 5 seconds of each recording are played back one after the other.
Connections to other recording sources
You can also record from other audio sources using the cable supplied.
Recording of telephone calls
Telephone calls can be recorded using the adapter supplied (not with ISDN telephones).
Using the VoiceRecorder as a hearing aid
The VoiceRecorder can be used in conjunction with the earpiece as a hearing aid.
Simple folder structure
Three folders A, B and C are available, each with up to 100 recordings.
USB interface
Recorded messages can be transferred to the computer where they can be managed or sent as e-mail. For further information, please refer to the operating manual for the POWER VOICE II software provided with the recorder.
- Fitting batteries -
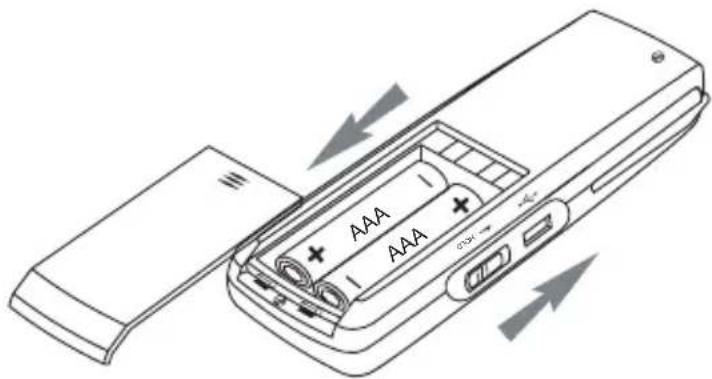
4. FITTING BATTERIES
■ Slide the battery cover on the rear downwards using slight pressure and open the battery compartment.
■ Now insert the batteries taking care to ensure that the polarity is correct. The wrong polarity can damage both the battery and the unit.
■ Close the battery compartment.
text_image
Diagram of a remote control device showing battery and switch with directional arrows indicating charging or discharging process.Indication of battery capacity
The battery capacity is indicated in several steps from full to discharged:

natural_image
Four battery icons in a row, no text or symbols presentWhen the indicator appears it is time to change the batteries.
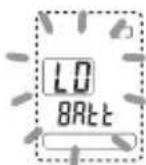
The batteries must be changed immediately when the adjacent indicator flashes in the display.
Operating times with AAA alkaline batteries
| Standard quality Premium quality | |
| Recording 18 hours 15 hours | |
| Playback via loudspeaker 10 hours 9 hours | |
| Playback via earpiece 20 hours 15 hours |
Notes:
- When changing the batteries, always use two new batteries of the same type.
- Never change the batteries during a recording, as otherwise a complete loss of data can occur.
- If rechargeable batteries are used, the operating times will be considerably less and it is possible that the VoiceRecorder may not work correctly.
- If you do not need the VoiceRecorder for an extended period, slide the HOLD switch upwards. In this way, the unit cannot be switched on accidentally.
- In order to save battery capacity, the VoiceRecorder switches itself off automatically after 1 minute if no button is pressed during this time.
- User controls -
5. USER CONTROLS

text_image
1 2 3 4 5 Digital RECORDER 6 7 8 9 10 11 12 13 14 15 161 Battery compartment 9 Menu button
2 Display 10 Erase button
3 START/STOP playback button 11 Fixing clip
4 Recording REC/STOP button 12 USB connector
5 Fast forward/Fast rewind buttons 13 Button lock (HOLD)
6 Wrist strap fixing 14 Earpiece connector
7 Volume button VOL 15 Microphone connector
8 On/Off, Pause, Hearing aid buttons 16 Built-in microphone
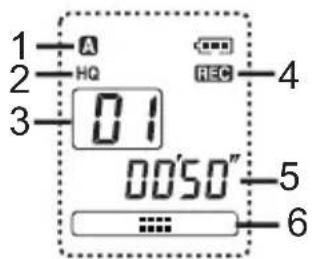
6. DISPLAY INDICATORS

text_image
1 HQ LPVOS 188 4 3:88888" 5 E F 6 7 8 9 REC PLAY 10 11 121 Indication of the selected archiving folder A, B, C, (D for USB only)
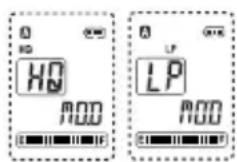
2 Indication of HQ (premium quality) and LP (standard quality)
3 Indication of the note number from 1 to 100 within the selective archiving folder
4 Minutes and seconds display
5 Memory indicator
6 Low memory capacity
7 High memory capacity
8 Appears for speech-controlled recording (VOS)
9 Indication of battery capacity
10 Appears during recording
11 Appears during playback
12 Lock active (Hold)
- Operation -
7. OPERATION
7.1 Switching on
To switch on the VoiceRecorder, press the PAUSE/HEAR button once. The unit is also switched on by pressing and holding the REC/STOP or PLAY/STOP buttons.
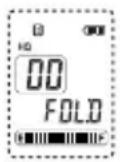
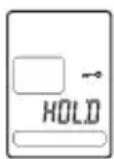
Make sure that the HOLD slide switch on the right-hand side has not been moved upwards. Otherwise, it will not be possible to switch the VoiceRecorder on and the display will show the message HOLD for a few seconds.

To switch off, press and hold the PAUSE/HEAR button for two seconds.
The VoiceRecorder is equipped with a circuit for extending the life of the batteries. If no control actions are performed within one minute, the unit will switch itself off automatically. The display will go off and the unit must be switched on once more.
7.2 The archiving folder
You can save notes, messages, ideas, private thoughts, etc. in three separate archiving folders in the VoiceRecorder. The archiving folders are identified by the letters A, B and C. Each archiving folder can store up to 100 recordings.
Selecting an archiving folder
■ Press the MENU button and select the required archiving folder A, B or C by means of the SEARCH buttons. The selection will be shown in the display.
Note: If all the recording capacity has already been used in the first folder, there will be no further recording capacity available for the other folders.
7.3 Recording quality
The maximum recording time is 504 minutes in standard mode and 152 minutes in premium mode. You will obtain the best recording quality in a premium mode.
Selecting the recording quality
■ Press the MENU button twice and select the required recording mode HQ (Premium/High Quality) or LP (Standard/Long-Play) by means of the SEARCH buttons. The selection will be shown in the display.
Note: You can set the recording quality as required before each recording.
- Operation -
7.4 Recording notes
■ Make sure that the HOLD slide switch is in the OFF position (slide switch down).
■ Press the REC/STOP button to switch the unit on.
■ Press the REC button again to start recording. The display will show the message "REC". During recording, the length of the message and the number of the message will be shown in the display. Now speak into the microphone at the top of the unit. The recording must be a minimum of 2 seconds long.
■ You can pause the recording for a maximum of 30 minutes with the PAUSE/HEAR button.
■ The recording is terminated by pressing the REC button again. Each recording is automatically identified with a number between 1 and 100.
1 Current recording folder A, B or C
2 Quality HQ=Premium, LP=Standard
3 Number of recording
4 Recording running
5 Current recording time
6 Progress indicator
text_image
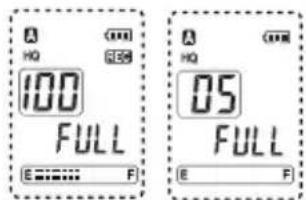
1 2 3 A HQ 01 REC 4 00'50" 5 6If the capacity of the selected archiving folder is reached or if the maximum recording time is exceeded, the display will show the message "FULL". In order to record new notes, you must first delete old or unimportant recordings.
text_image
A HQ 100 FULL E=...... F A HQ 05 FULL E F7.5 Starting the next recording immediately
You can start the next recording immediately while a recording is being made. To do this, press the ▶ button once. The present recording will be stopped and the next recording will be started immediately under a new number.
7.6 Direct recording
To start a recording directly even when the unit is switched off, press the REC button for 2 seconds.
- Operation -
7.7 Adding to already existing recordings
It is also possible to make retrospective additions to already existing recordings.
■ Select the required recording that you want to add to and press the PLAY/STOP button. The recording will be played back.
■ Press the REC/STOP button for 2 seconds at any point. The message "Add-R" will appear in the display and the additional recording will start immediately.
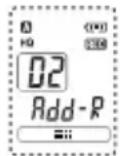
Note: The new recording will always be appended to the end of the selected recording. Under no circumstances will parts of the old recording be erased.
■ The recording is terminated by pressing the REC button again.
7.8 Remaining recording time
The remaining recording time is shown in the lower part of the display between the indicators E and F. The fewer bars there are visible, the less recording time there is remaining.
You can check the remaining memory capacity while a recording is being made. To do this, hold the PAUSE/HEAR button pressed for 2 seconds and the display will show the remaining recording time in minutes and seconds for ca. 10 seconds.
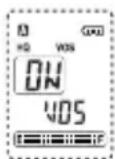
7.9 VOS - Voice controlled recording
When VOS is switched on, any pauses that occur during recording will not be recorded. When you are not speaking, the VoiceRecorder switches the recording to Pause (display shows "VOS"). When you speak again, the unit continues recording automatically.
Switching VOS on or off
■ Press the MENU button three times and choose whether you want to switch the function on or off by means of the SEARCH buttons. When the VOS mode is switched on, the VOS indicator will appear in the display.
- Operation -
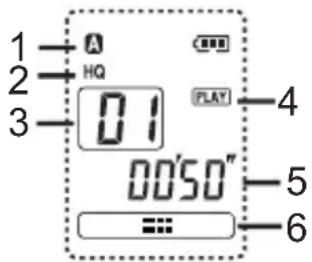
7.10 Playing back notes
■ Make sure that the HOLD slide switch is in the OFF position (slide switch down).
■ Press the PLAY/STOP button once.
■ Select the required archiving folder A, B, or C.
■ Now select the required message using the ▶ and ▶ buttons. The number of the note will be shown in the display.
■ The note will be played back after pressing the PLAY/STOP button.
■ You can pause the playback with the PAUSE/HEAR button and then continue with the PAUSE/HEAR or PLAY/STOP button.
■ Press the PLAY/STOP button to stop the playback.
1 Current recording folder A, B or C
2 Quality HQ=Premium, LP=Standard
3 Number of recording
4 Playback running
5 Current playback time
6 Progress indicator
text_image
1 2 3 A HQ 01 FLAT 4 00'50" 5 6Notes:
- The volume can be adjusted in 20 steps by means of the VOL double switch on the right-hand side.
○ If you want to fast forward or fast rewind within a long note, please hold the ◀ or ▶ buttons pressed. After 10 seconds, fast winding will take place in steps of 10 seconds. - If you want to jump forwards or backwards between different notes, press the ◀ or ▶▶ buttons BRIEFLY several times.
- You can check the remaining length of the message while the message is being played back. To do this, hold the PAUSE/HEAR button pressed for 2 seconds and the display will show the remaining length in minutes and seconds for ca. 10 seconds.
- Operation -
7.11 Searching for a note automatically (AUTO-Scan)
If you want to search for a particular note within an archiving folder, you can use the SCAN function. With this function, only the first 5 seconds of the note are played back in each case before changing automatically to the next note.
■ To do this, press the PLAY/STOP button for longer than one second. The display will show SCAN. The SCAN function always starts from the currently selected note number.
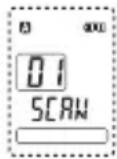
■ When you have found the right message, press the PLAY/STOP button again to listen to this note in full.
7.12 Deleting individual notes
■ First select the note that you want to delete.
■ Then press the ERASE button for one second. The note will be played back and the message "ERASE" will flash in the display.

■ Press the ERASE button again to erase the recording. If, however, you want to cancel the erase procedure, press any other button apart from ERASE or wait for 10 seconds until the ERASE message goes off.
Notes:
- When a recording has been erased, the following recordings will automatically be allocated a lower archiving number.
Once a recording has been erased, it cannot be reactivated.
7.13 Deleting complete archiving folders
■ Press the MENU button and select the required archiving folder A, B or C by means of the SEARCH buttons. The selection will be shown in the display.
■ Now press both the REC/STOP and the ERASE button simultaneously for three seconds. The display will show the message "AL ERASE".

■ Press the ERASE button again to erase all recordings in this folder. If, however, you want to cancel the ERASE procedure, press any other button apart from the ERASE button.
7.14 Deleting all folders simultaneously
■ Now press both the REC/STOP and the ERASE button simultaneously for seven seconds. The display will show the message "AL CLEAR".

■ Press the ERASE button again to delete all folders. If, however, you want to cancel the erase procedure, press any other button apart from the ERASE button.
8. ADDITIONAL OPTIONS
8.1 User lock
The HOLD slide switch is located on the left-hand side. If this function is switched on (switch in the direction of the arrow), the unit can no longer be used. In this way, accidental recording or playback cannot occur during transportation, for example. Whenever any button is pressed, the display will show the message "HOLD".
8.2 Using the USB interface
You can connect the VoiceRecorder to a PC with a USB connector using the USB cable supplied. In this way, messages that have already been recorded can be transferred to the computer where they can be managed or sent as e-mail. You will find further information in the operating manual for the "POWER VOICE II" software provided with the recorder.
When the VoiceRecorder is connected to the PC, the display will show the message:

8.3 Connecting the external microphone
The VoiceRecorder can be used with the external microphone provided. The microphone connector is located on the top of the recorder. The microphone is provided with a clip so that you can easily attach it to your clothing. When connecting, ensure that the plug audibly clicks into place.
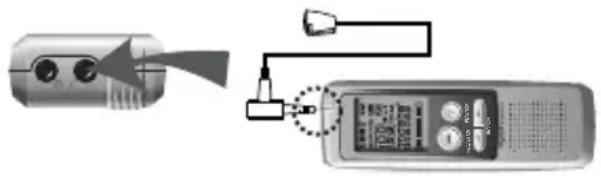
natural_image
Diagram showing a device connected to a digital audio recording device via cable (no text or symbols present)8.4 External earpiece
The VoiceRecorder can be used with the earpiece provided. The earpiece connector is located on the top of the recorder. The volume can normally be adjusted by means of the Vol. double switch. When connecting, ensure that the plug audibly clicks into place.

natural_image
Illustration of a device connected to a digital audio recording device with a cable (no text or symbols visible)NOTE: When making a recording, you will hear yourself in the earpiece. This volume cannot be changed.
- Additional features -
8.5 Recording from other signal sources
You can also use your VoiceRecorder to record other signal sources, such as a stereo system or a radio, for example. To do this, connect the cable supplied to the microphone input and to the matching connector for the audio output of the required unit. With these units, use either the headphones output or an audio output and never a loudspeaker connection.
flowchart
graph TD
    A["Device with two lenses"] --> B["Speaker with two speakers"]
    B --> C["Audio output with microphone"]
NOTE: The audio cable supplied has two mono plugs. Do not use this cable with stereo connectors, as otherwise damage can occur due to a possible short circuit. In this case, you will require a cable from mono mini jack to stereo mini jack.
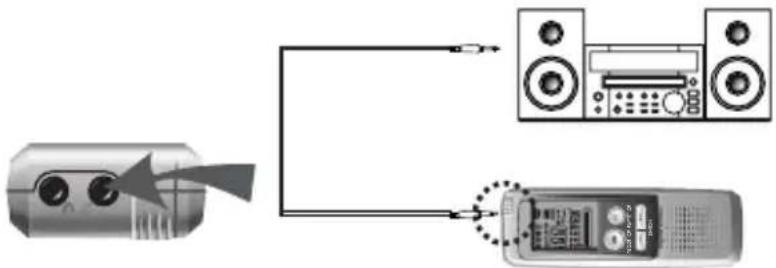
8.6 Playing back via other units
You can also play back recorded notes via other audio devices or, for example, save them digitally to a computer. To do this, connect the cable supplied to the earpiece connector and to the matching connector for the audio input of the required unit. The volume can be adjusted by means of the VOL double switch.

text_image
Diagram showing audio recording setup with microphone, speaker, and digital device connected to a device with control panelNOTE: The audio cable supplied has two mono plugs. Do not use this cable with stereo connectors, as otherwise damage can occur due to a possible short circuit. In this case, you will require a cable from mono mini jack to stereo mini jack.
- Additional features -
8.7 Recording telephone conversations
You can record telephone calls by means of the telephone adapter provided. To do this, connect the telephone adapter as described in the following drawing.
- Telephone socket
- Line on telephone adapter
- Permanently connected cable TEL to telephone
- Audio cable to OUTPUT
- Audio cable to microphone input on VoiceRecorder
You can now start a recording during a telephone call with REC/STOP.

text_image
1 2 LINEIN 3 OUTPUT 4 5 the orderNotes:
- VOS mode should be switched off.
During the recording with cordless telephones it can come to interferences.
If several telephones are connected in parallel to one telephone point, the recording volume may be lower. - It is not possible to make a recording with digital ISDN telephones.
8.8 Using the VoiceRecorder as a hearing aid
The VoiceRecorder can be used in conjunction with the earpiece supplied as a hearing aid.
■ Connect the earpiece to the appropriate socket on the top of the recorder.
■ Switch the VoiceRecorder on.
■ Press the PAUSE/HEAR button briefly once. The message HEAR will appear in the display. The signals received by the microphone will be amplified and reproduced via the earpiece.
■ The volume can be adjusted by means of the VOL. double switch.
■ Press the PAUSE/HEAR button briefly again to switch the function off.

- Fault finding -
9. FAULT FINDING
The display is blank.
- Switch the unit on by means of the REC button.
- Check the battery capacity.
- Check that the polarity of the batteries is correct.
No notes are recorded
- Check the setting of the HOLD switch.
- Check whether the maximum memory capacity or the maximum number of notes in an archiving folder has been exceeded.
- Check the battery capacity.
No notes are played back
- Check the setting of the HOLD switch.
- Check whether there are any recordings in the selected folder.
- Check the battery capacity.
Recordings cannot be heard.
- Check the volume setting.
- If you want to listen to the notes via the inbuilt loudspeaker, then an earpiece or headphones must not be connected.
- If you want to listen to the notes via another loudspeaker, then the cable must be connected correctly.
Display message ERROR
- Carry out a reset
- If you have connected a PC via USB, check the cable connection.
Display message REPAIR
- If the batteries should fail during a recording, the message REPAIR will appear in the display for a certain time in order to repair the recording.
Reset in the case of a fault
Note: All recordings will be erased!
- Remove the battery.
- Replace the battery and hold the ERASE and REC buttons pressed simultaneously for 7 seconds.
- The display will show "AL CLEAR".
- Press the ERASE button again and the reset is complete.
- Additional information -
10. FURTHER INFORMATION
10.1 Warranty
AUDIOLINE units are manufactured and tested in accordance with the most up-to-date manufacturing procedures. Selected materials and highly developed technologies ensure trouble-free operation and long life. If, however, your unit should develop a fault within the warranty period, please contact the shop where you bought your AUDIOLINE unit, taking with you your purchase receipt. The warranty period is 24 months calculated from the day of purchase. This warranty is not applicable to the batteries or battery packs used in the various products.
Warranty conditions:
All defects, which are the result of material or manufacturing faults, will be rectified free of charge within the warranty period. Claims under the warranty shall not be considered if the equipment has been tampered with by the purchaser or third parties. Damage, which results from improper handling or use, incorrect positioning or storage, inappropriate connection or Installation and through Act of God or other external influences are not covered by the warranty. In the case of complaints, we reserve the right to repair or to replace the defective parts or to exchange the unit. Parts or units that have been exchanged shall become our property. Claims for damages shall not be entertained unless they relate to intention or gross negligence on the part of the manufacturer. In accordance with these conditions, all claims under the warranty shall be made exclusively to your dealer. Rights under the warranty can no longer be enforced after the expiry of two years from the purchase and handing over of our products.
- Additional information -
10.2 Technical data
| Recording time Standard | mode (LP): 504 min. Premium mode (HQ): 152 min. |
| Internal memory 16 MB FL | ASH memory |
| Size 36 x 17 | .9 x 108 mm (WxDxH) |
| Weight 43g without batteries | |
| Power supply 1.5V | |
| Power supply, external DC | 3V, 2 x 1.5 AAA batteries |
| Operating time Recording | Standard quality 18 hours - Premium quality 15 hoursPlayback via loudspeakerStandard quality 10 hours - Premium quality 9 hoursPlayback via earpieceStandard quality 20 hours - Premium quality 15 hours |
| Number of recordings 100 | per archiving folder A, B, C |
| USB folder Folder D with free memory when connected via USB | |
| Output power 80mW at THD 10%, 8 Ohm | |
| Frequency range 500-5100Hz with Premium Quality (HQ)500-3400Hz with Standard Quality (LP) | |
| Recording source Built-in condenser microphone | |
| Outputs/Inputs | Earpiece, 3.5 mm monoMicrophone, 3.5 mm monoUSB PC Interface |
| Loudspeaker | 28 mm, 8 Ohm, dynamic |
| Ambient temperature | 0 to 40°C |
Technical data are subject to change without previous notice.
- Additional information -
10.3 Declaration of conformity
WE
OF
AUDIOLINE
Hellersbergstr.
D-41460
Neuss
GmbH
2a
DECLARE UNDER OUR SOLE RESPONSIBILITY AS EU DISTRIBUTOR THAT THE PRODUCT
MODEL: VR500
DESCRIPTION:
VoiceRecorder
IS IN CONFORMITY WITH THE BASIC REQUIREMENTS OF DIRECTIVE: 1999/5/EC
AUTHORISED SIGNATORY:
Signature:
Name: MANFRED ZINNOW
Position in the company: MANAGING DIRECTOR:
Date of issue: 23.06.2003
A copy of this declaration will be retained for 10 years after cessation of production.

AUDIOLINE GmbH, Hellersbergstr. 2a,
D-41460 Neuss
PRODUCT: VR500
This product has been developed for use on an analogue telephone line within Germany.
AUDIOLINE GmbH
Neuss
Service Hotline 0180 5 00 13 88