NAS520-8T - NAS ZYXEL - Free user manual and instructions
Find the device manual for free NAS520-8T ZYXEL in PDF.

| Product Type | Network Attached Storage (NAS) |
| Brand | ZyXEL |
| Model | NAS520-8T |
| Processor | Marvell 88F6707 1.2 GHz (ARM Cortex-A9) |
| RAM | 256 MB DDR3 |
| Drive Bays | 2 x SATA II (2.5" or 3.5") |
| Included Storage | 2 x 4TB (Seagate IronWolf or equivalent) for total 8TB |
| RAID Levels | JBOD, RAID 0, RAID 1 |
| Networking | 1 x Gigabit Ethernet (RJ-45) |
| USB Ports | 2 x USB 2.0 (front), 1 x USB 2.0 (rear) |
| Dimensions (W x D x H) | 168 x 110 x 220 mm (6.6 x 4.3 x 8.7 in) |
| Weight | 2.0 kg (4.4 lb) with drives |
| Power Supply | External adapter, 36W, 100-240V AC, 50/60 Hz |
| Power Consumption | 22 W (typical), 8 W (hibernation) |
| Supported File Systems | EXT3, EXT4, NTFS (external), FAT32 |
| Maximum Single Volume Size | 8 TB |
| Supported Protocols | FTP, CIFS/SMB, AFP, NFS, HTTP, HTTPS, WebDAV |
| Backup Features | Remote backup (Rsync, FTP), USB backup, cloud backup |
| Security | User/group permissions, SSL/TLS, AES 256-bit share encryption |
| Operating Environment | Temperature: 0-40°C, Humidity: 5-95% (non-condensing) |
| Maintenance | Keep vents clean, update firmware regularly, replace drives if faulty |
| Repairability / Spare Parts | User-replaceable: drives, power adapter; contact support for other parts |
Frequently Asked Questions - NAS520-8T ZYXEL
User questions about NAS520-8T ZYXEL
0 question about this device. Answer the ones you know or ask your own.
Ask a new question about this device
Download the instructions for your NAS in PDF format for free! Find your manual NAS520-8T - ZYXEL and take your electronic device back in hand. On this page are published all the documents necessary for the use of your device. NAS520-8T by ZYXEL.
USER MANUAL NAS520-8T ZYXEL
Related Documentation and Online Support
IMPORTANT!
READ CAREFULLY BEFORE USE.
KEEP THIS GUIDE FOR FUTURE REFERENCE.
Screenshots and graphics in this book may differ slightly from your product due to differences in your product firmware or your computer operating system. Every effort has been made to ensure that the information in this manual is accurate.
Related Documentation
- Quick Start Guide
The Quick Start Guide shows how to connect the NAS and get up and running right away.
• Web Configurator Online Help
The embedded Web Help contains descriptions of individual screens and supplementary information.
Online Support Information
Visit our product support website at http://www.zyxel.com/support/support_landing.shtml and choose from these topics:
- ZyXEL Support Center - Acquire firmware, software, FAQ, product application or other support files for ZyXEL devices.
- Downloads - Acquire firmware, software, driver or other support files for ZyXEL devices.
- Knowledge Base - Find articles related to product applications, FAQ, and user experience.
- Warranty Information - ZyXEL offers warranty to the original end user (purchaser) that the product is free from any material or workmanship defects for a specific period (the Warranty Period) from the date of purchase. The Warranty Period varies by region.
- Product Registration - Register your ZyXEL product to receive the latest drivers and firmware updates.
Contents Overview
Getting to Know Your NAS 14
Getting Started 19
Accessing Your Cloud Remotely 26
zCloud 30
Managing Users, Groups, and Shares 33
Backing Up, Retrieving, and Syncing Files ....34
Web Desktop at a Glance 36
Web Configurator 38
Storage Manager 47
Status Center 103
Control Panel 106
Videos, Photos, Music, & File Browser 124
Administrator 139
Managing Packages 144
Tutorials 146
Technical Reference 201
Status Screen 203
System Setting 205
Applications 213
Packages 246
Auto Upload 262
Dropbox 274
Using Time Machine with the NAS 278
Users 281
Groups 287
Shares 291
WebDAV 300
Maintenance Screens 302
Protect 321
Troubleshooting 337
Table of Contents
Related Documentation and Online Support 2
Contents Overview ....3
Table of Contents 4
Chapter 1 Getting to Know Your NAS....14
1.1 Overview ...... 14
1.2 LEDs 15
1.3 Hard Disks 16
1.4 SD Card 16
1.5 Power Button 16
1.6 COPY/SYNC Button 17
1.7 RESET Button 17
Chapter 2 Getting Started....19
2.1 Overview ...... 19
2.2 FindMe 19
2.3 NAS Starter Utility 19
2.3.1 NAS Seeker Screen 20
2.3.2 Main NAS Starter Utility Screen 21
2.3.3 Directory of the NAS 22
2.3.4 Network Drive 23
2.3.5 Configure System Settings 23
Chapter 3 Accessing Your Cloud Remotely....26
3.1 myZyXELCloud Service 26
3.2 ZyXEL Drive 26
3.2.1 ZyXEL Drive Welcome 26
3.2.2 NAS and File List 27
3.2.3 Uploading and Media Streaming 28
Chapter 4 zCloud....30
4.1 Using zCloud .... 30
4.2 zCloud TV Streaming 31
Chapter 5
Managing Users, Groups, and Shares 33
5.1 Managing Users, Groups, and Shares 33
Chapter 6
Backing Up, Retrieving, and Syncing Files....34
6.1 About Backups 34
6.2 Managing a USB Device and USB Backups 34
6.3 Remote Backups 34
6.4 Internal Backups ...... 34
6.5 Cloud Backups 35
6.6 Synchronizing Files 35
Part I: Web Desktop at a Glance....36
Chapter 7
Web Configurator....38
7.1 Overview ...... 38
7.2 Accessing the NAS Web Configurator ....38
7.3 Desktop 41
7.3.1 Status Zone 43
7.3.2 Grouping Icons 44
Chapter 8
Storage Manager....47
8.1 Overview 47
8.2 Storage Manager Overview 47
8.3 Internal Storage 49
8.3.1 Creating a Volume 55
8.3.2 Managing a Volume 56
8.3.3 Creating a Volume on Disk Group 64
8.3.4 Editing a Volume on Disk Group 69
8.3.5 Disk Group 69
8.3.6 Hard Disk 74
8.4 iSCSI 81
8.4.1 iSCSI LUNs Screens 82
8.4.2 iSCSI Targets Screens 86
8.5 External Storage 95
8.5.1 What You Need to Know About External Storage 95
8.5.2 External Storage Screen 95
8.5.3 Format the Volume 97
8.6 Technical Reference 98
Chapter 9
Status Center....103
9.1 Overview ...... 103
9.1.1 System Information .... 103
9.1.2 Network 104
Chapter 10
Control Panel 106
10.1 Overview 106
10.2 What You Can Do 106
10.3 What You Need to Know ....106
10.4 TCP/IP Screens 107
10.4.1 Configuring General TCP/IP Settings 107
10.4.2 Configuring Network Interface 108
10.4.3 Configuring Web Configurator 112
10.4.4 Configuring Network Diagnosis 113
10.5 UPnP Port Mapping Screen 113
10.5.1 UPnP and the NAS's IP Address 114
10.5.2 UPnP and Security 115
10.5.3 The NAS's Services and UPnP 115
10.5.4 UPnP Router 116
10.5.5 Configuring UPnP Port Mapping 116
10.6 Terminal Screen 119
10.7 DyDNS Screen 120
10.8 FW Upgrade Screen 122
Chapter 11
Videos, Photos, Music, & File Browser....124
11.1 Overview 124
11.2 File Browser 124
11.2.1 Configure Share Screen 126
11.2.2 Share and Folder Names ...... 128
11.3 Photo 128
11.3.1 Exif and Google Maps (Photos) 130
11.3.2 Slideshow (Photos) 131
11.4 Music 132
11.4.1 Now Playing (Music) 134
11.5 Video 134
11.6 Playzone Settings 136
11.7 Application Zone 138
11.8 Media Server 138
11.9 iTunes Server 138
Chapter 12
Administrator 139
12.1 Overview 139
12.2 Administrator Screens 139
12.2.1 Global Administrator Icons 140
12.2.2 Navigation Panel 140
12.2.3 Main Window 142
12.2.4 Status Messages 142
12.2.5 Common Administrator Screen Icons 142
12.2.6 Session Example (Windows) 142
Chapter 13
Managing Packages 144
13.1 About Packages .... 144
13.2 Managing Packages .... 144
13.3 Available Packages 145
Chapter 14
Tutorials....146
14.1 Overview 146
14.2 Windows 7 Network ....146
14.2.1 If the NAS Icon Does Not Display 148
14.2.2 NAS Icon Right-click Options 149
14.3 Windows 7 Network Map ....150
14.4 Playing Media Files in Windows 7 .... 152
14.5 Windows 7 Devices and Printers .... 152
14.5.1 Windows 7 Desktop Shortcut ...... 153
14.6 File Sharing Tutorials .... 155
14.6.1 Creating a User Account 155
14.6.2 Creating a Share 156
14.6.3 Creating a Group 157
14.6.4 Accessing a Share From Windows Explorer 158
14.6.5 Accessing a Share Using FTP 160
14.6.6 Accessing a Share Through the Web Configurator .... 161
14.7 Download Service Tutorial 162
14.7.1 Copying/Pasting a Download Link 162
14.7.2 Configuring the Download Service Preferences 165
14.7.3 Using Download Service Notification 168
14.8 Printer Server Tutorial .... 171
14.9 Copy and Flickr Auto Upload Tutorial 173
14.10 FTP Uploadr Tutorial 174
14.11 Web Configurator's Security Sessions 177
14.11.1 Customizing the NAS's Certificate 177
14.11.2 Downloading and Installing Customized Certificate 179
14.11.3 Turn on the NAS's Web Security 182
14.12 Using FTPES to Connect to the NAS 188
14.13 Using a Mac to Access the NAS 189
14.13.1 Finder 189
14.13.2 Go Menu 191
14.14 How to Use the BackupPlanner .... 191
14.14.1 Creating an Archive Backup .... 192
14.14.2 Creating a Synchronization Backup 194
14.14.3 Restoring Archived Files by Backup Job 196
14.14.4 Restoring by Backup Files .... 198
Part II: Technical Reference.... 201
Chapter 15
Status Screen 203
15.1 Overview 203
15.2 Status Screen 203
Chapter 16
System Setting....205
16.1 Overview 205
16.2 What You Can Do ....205
16.3 What You Need to Know ....205
16.4 Package Management Screen 207
16.4.1 Displaying the Package Information ....208
16.5 Server Name Screen 209
16.6 Date/Time Screen 210
Chapter 17
Applications 213
17.1 Overview ......213
17.2 What You Can Do 213
17.3 What You Need to Know ....213
17.4 FTP Server Screen 215
17.5 Media Server Screens 216
17.5.1 Media Server Share Publish Screen 217
17.5.2 Media Server Logitech® Media Server Screen 218
17.6 iTunes Server Screen 218
17.7 Download Service Screen 219
17.7.1 Adding a Download Task 222
17.7.2 Configuring General Download Settings 223
17.7.3 Configuring the P2P Download Settings 225
17.7.4 Edit IP Filter 227
17.7.5 Selecting Files to Download ......228
17.7.6 Displaying the Task Information ....229
17.8 Web Publishing Screen 230
17.9 Print Server Screen 231
17.9.1 Print Server Rename 232
17.10 Copy/Sync Button Screen 232
17.11 Technical Reference 234
17.11.1 Sharing Media Files on Your Network 234
17.11.2 Download Service ....235
17.11.3 Download Service Notification 236
17.11.4 P2P Download Security 236
17.11.5 Web Publishing Example ......238
17.11.6 Web Publishing 240
17.11.7 Printer Sharing 240
17.11.8 Copying Files ......241
17.11.9 Synchronizing Files ......242
17.12 Syslog Server Screen 243
Chapter 18
Packages 246
18.1 Overview ......246
18.2 What You Can Do ....246
18.3 NFS Screen 247
18.3.1 Add/Edit NFS Share 248
18.3.2 NFS Session 249
18.4 TFTP Server Screen 250
18.5 pyLoad Screen 251
18.6 ownCloud Setup 251
18.7 Memopal 254
18.8 GoogleDriveClient 256
18.8.1 Account Setting Screen 256
18.8.2 Account Setting Add Screen 258
18.8.3 Update Period Screen 261
Chapter 19
Auto Upload 262
19.1 Overview 262
19.2 What You Can Do 262
19.3 What You Need to Know 262
19.4 Flickr/YouTube Screen 262
19.4.1 Configuring the Flickr Settings ......263
19.4.2 Configuring the YouTube Settings 267
19.5 FTP Uploadr Screen 270
19.5.1 Adding or Editing an FTP Server Entry 271
19.5.2 FTP Uploadr Preferences Screen 272
Chapter 20
Dropbox 274
20.1 Overview ...... 274
20.2 Dropbox Screen 274
20.3 How to Use Dropbox with the NAS 276
Chapter 21
Using Time Machine with the NAS....278
21.1 Overview ......278
21.2 Time Machine Screen 278
21.3 Using Time Machine 278
Chapter 22
Users....281
22.1 Overview ......281
22.2 What You Can Do ....281
22.3 Users Screen 281
22.3.1 User Icons 283
22.3.2 Adding or Editing an Account 283
22.3.3 Usernames ....284
22.4 Displaying User Info 285
Chapter 23
Groups 287
23.1 Overview 287
23.2 What You Can Do ....287
23.3 Groups Screen 287
23.3.1 Adding or Editing a Group 288
23.3.2 Group Names ...... 289
Chapter 24
Shares 291
24.1 Overview ...... 291
24.2 What You Can Do ....291
24.3 Shares Screen 291
24.3.1 Adding or Editing Share ......293
24.3.2 Configuring Advanced Share Access 294
24.3.3 Public and ANONYMOUS Share Access Rights 295
24.4 Recycle Bin Configuration Screen 295
24.4.1 Recycle Bins 295
24.4.2 Configuring Recycle Bins ......296
24.5 Share Browser Screen 296
24.5.1 Moving or Copying Files 298
Chapter 25
WebDAV 300
25.1 Overview ....300
25.2 WebDAV Screen 300
25.3 How to Use NetDrive with the NAS ....301
Chapter 26
Maintenance Screens 302
26.1 Overview 302
26.2 What You Can Do ....302
26.3 Power Screen 302
26.3.1 Editing the Power Control Schedule Screen 304
26.4 Log Screen 306
26.4.1 Report Config Screen 307
26.4.2 Email Setting 308
26.4.3 Report Setting 308
26.4.4 Syslog Server Setting 309
26.5 Configuration Screen 310
26.6 SSL Certification 311
26.6.1 Modifying or Creating a Certificate 312
26.7 Shutdown Screen 313
26.8 Unpair myZyXELcloud Screen 314
26.9 Technical Reference 314
26.9.1 Log Classes ....314
26.9.2 Log Severity Levels 315
26.9.3 Log Messages .... 315
Chapter 27
Protect 321
27.1 Overview 321
27.2 What You Can Do ....321
27.3 Backup Screens ....321
27.3.1 Backup: Step 1 322
27.3.2 Backup: Step 2 323
27.3.3 Backup: Step 3 ....325
27.3.4 Backup: Step 4 326
27.3.5 Edit Job Screen 327
27.3.6 Edit Job: Step 1 ....328
27.3.7 Edit Job: Step 2 ....329
27.3.8 Restore Archive Screen 330
27.3.9 Restore Archive: Step 1 ....330
27.3.10 Restore Archive: Step 2 ....331
27.3.11 Restore Archive: Step 3 ....331
27.5 Configuration File Backup and Restoration 336
Chapter 28
Troubleshooting....337
28.1 Troubleshooting Overview ...... 337
28.2 Power, Hardware, Connections, and LEDs 337
28.3 NAS Starter Utility 339
28.4 NAS Login and Access 340
28.4.1 Enabling Scripting of Safe ActiveX Controls 341
28.5 | Cannot Access The NAS ....343
28.6 Users Cannot Access the NAS 344
28.7 External USB Drives 345
28.8 Storage 345
28.9 Firmware 346
28.10 File Transfer 346
28.11 Networking 347
28.12 Some Features' Screens Do Not Display 347
28.13 Media Server Functions ....348
28.14 Download Service Functions 350
28.15 Web Publishing 350
28.16 Auto Upload 351
28.17 Package Management 352
28.18 Backups 352
28.19 Google Drive 353
Appendix A Product Specifications 354
Appendix B Customer Support 355
Appendix C Legal Information 361
Table of Contents
Index 366
Getting to Know Your NAS
1.1 Overview
Use the NAS as your own personal cloud. Here are some key features:
Start using ZyXEL NAS instantly with FindMe - Use ZyXEL FindMe to discover your NAS on your home network and get in control in under 15 seconds. Then do an easy installation with no need to install a NAS utility.
Access and share files from your NAS wherever you are - Using the ZyXEL Drive mobile app makes it easy.
Create a shared cloud space for people without a NAS - Provide your cloud space for your friends or family members when you share a folder from the NAS with the ZyXEL Drive mobile app. Your friends and family members don't need to purchase an additional NAS - just install the ZyXEL Drive mobile app on their mobile devices.
Protect your data from drive failure - The NAS's RAID 1 capability clones contents from one drive to another. If a drive is damaged or corrupted, you still have another drive to restore from or use.
Get up and running quickly with the easy-to-use interface - The ZyXEL NSM (NAS Station Management) 5.1 intelligent desktop provides a rich feature set of tools with an easy-to-understand GUI design to help you get things done quickly. The multitasking capability through a multi-window interface enables you to quickly get applications up and running.
Check your NAS while you're away - Even if you have several ZyXEL NAS devices, visit the myZyXELcloud Web portal from anywhere to see their health status at a glance.
Stream multimedia contents to your big screen TV - Bring your favorite multimedia files on the NAS to the big screen. ZyXEL zCloud app lets you play your favorite videos, music, or photos on your big screen with TV streaming devices such as Apple TV, Google Chromecast, Roku 3, and Amazon Fire TV; or directly on smart TVs like those from Samsung and LG.
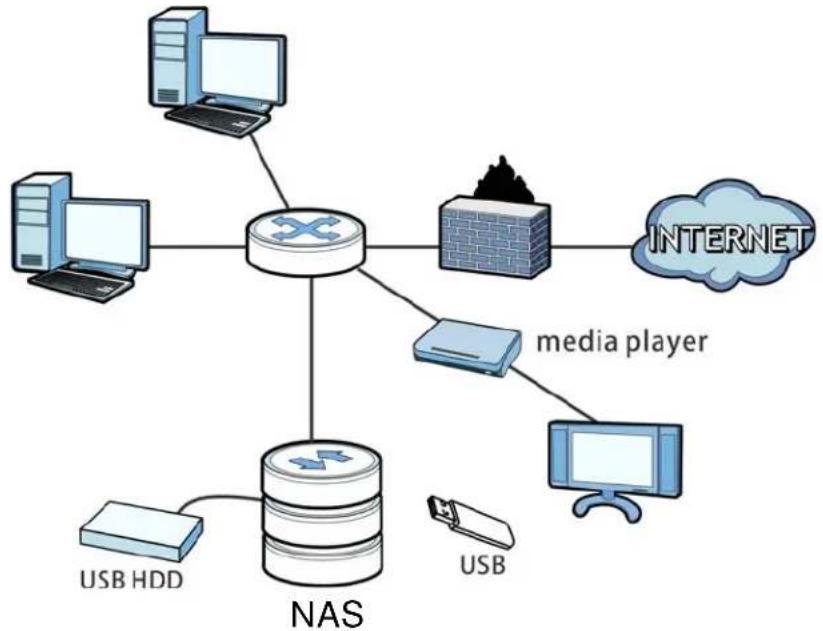
Figure 1 Example of the NAS in a Home Network
flowchart
graph TD
    A["Computer"] --> B["Switch"]
    C["Computer"] --> B
    D["Computer"] --> B
    E["Computer"] --> B
    F["Media Player"] --> G["Server"]
    H["Internet"] --> I["Cloud"]
    J["USB HDD"] --> K["NAS"]
    L["USB"] --> K
    B --> M["Server"]
    style B fill:#f9f,stroke:#333
    style M fill:#ccf,stroke:#333
Above is the NAS in a home network. Users back up and share data on the NAS. The media player plays the NAS's media files on the TV. A USB hard drive provides extra storage space and files are copied directly from the USB mass storage device to the NAS.
Place the NAS behind a firewall and/or IDP (Intrusion Detection and Prevention) device to protect it from attacks from the Internet.
Refer to the Quick Start Guide for hardware connections and how to install and remove hard drives from the disk trays.
Note: Turn off and disconnect the NAS before you install or remove the internal hard disk or disks.
1.2 LEDs
This table describes the NAS's LEDs.
Table 1 LEDs
| LED COLOR STATUS DESCRIPTION | |||||
| POWER | White On | The NAS is turned on and receiving power. | |||
| Off The NAS is turned off. | |||||
| SYSTEM | White On | The NAS has fully started and is operating normally. | |||
| Blinking The NAS is starting up or upgrading the firmware.Note: Do not turn off the NAS while it is upgrading the firmware or you may render it unusable. | |||||
| Red On | The NAS has a system error. | ||||
| LED | COLOR | STATUS | DESCRIPTION | ||
| HDD White | On The | hard disk drive | ve is connected properly to the NAS. This LED stays on white when the hard disk drive is in hibernation if you do not enable sleeping HDD LED blinking. | ||
| Blinking The NAS is saving data to the hard disk drive. | |||||
| Slow Blinking | Sleeping HDD LED blinking is enabled and the hard disk drive is in hibernation. | ||||
| Red On The NAS detected an error on the hard disk drive (like a bad sector for example). The NAS automatically tries to recover a bad sector, but the LED stays red until the NAS restarts. | |||||
| Off The NAS cannot detect a hard disk in the disk bay or the LED is disabled. | |||||
| COPY White | On A U | SB device is connected to the NAS and the NAS is ready to copy. | |||
| Blinking The NAS is copying or synchronizing files. | |||||
| Red On Copying or synchronizing files to or from the USB or SD failed. | |||||
| Off No USB device is connected. | |||||
| LAN1 / LAN2 | Green On | The NAS has a successful 10/100 Mbps Ethernet connection. | |||
| Blinking The 100M LAN is sending or receiving packets. | |||||
| Off The NAS does not have a 10/100 Mbps Ethernet connection. | |||||
| Amber On | The NAS has a successful 1000 Mbps Ethernet connection. | ||||
| Blinking The 1000 M LAN is sending or receiving packets. | |||||
| Off The NAS does not have a 1000 Mbps Ethernet connection. | |||||
1.3 Hard Disks
The NAS has internal hard disk bays. Install SATA (Serial Advanced Technology Attachment) hard disks. Note that the SATA hard disks are treated as internal or SATA volumes. Any hard disk connected to a USB port is considered an external or USB volume.
1.4 SD Card
Use up to a 128 GB SDXC card with the front panel SD card slot. The SD card slot works with the COPY/SYNC button (see Section 1.6 on page 17 for details).
1.5 Power Button
Use the power button on the front panel to turn the NAS on or off.
- Press the power button for one second to turn on the NAS.
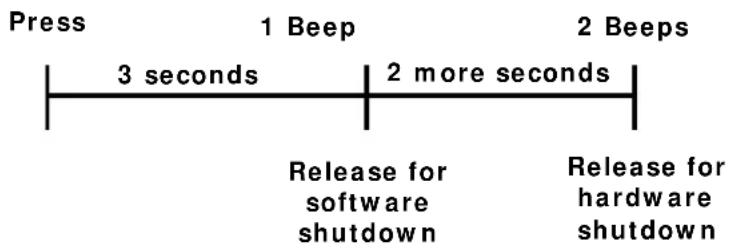
Figure 2 Using the Power Button to Turn Off the NAS
flowchart
graph LR
    A["Press"] --> B["1 Beep"]
    B --> C["2 Beeps"]
    B --> D["3 seconds"]
    B --> E["2 more seconds"]
    D --> F["Release for software shutdown"]
    E --> G["Release for hardware shutdown"]
- To have the NAS go through its normal software shutdown process and turn itself off, press the power button until you hear one beep (after about three seconds), then release it.
- To perform a hardware shutdown and have the NAS immediately turn itself off without going through the normal shutdown process, press the power button until you hear a second beep (after about five seconds), then release it.
1.6 COPY/SYNC Button
Use the COPY/ SYNC button on the front panel to copy or synchronize files between a connected USB or SD device and the NAS. See Section 17.10 on page 232 for more details on how to configure the copy/sync settings.
1.7 RESET Button
Use the RESET button on the rear panel to restore the NAS's default settings.
Figure 3 The RESET Button

flowchart
graph LR
    A["Press"] --> B["1 Beep"]
    B --> C["2 Beeps"]
    C --> D["5 more seconds"]
    D --> E["Release to Clear All Settings"]
    F["Release to Reset IP Address Password"] --> B
    G["Release to Clear All Settings"] --> C
- Press the RESET button until you hear one beep (after about two seconds), then release it. You will hear one more beep after you release the button.
This resets the NAS's IP address and password to the default values.
- Press the RESET button until you hear two beeps. After the second beep, continue pressing the button for five more seconds, then release it. You will hear three quick beeps after you release the button.
This resets the NAS to the factory default configuration. All settings you have configured on the NAS, including IP address, password, user accounts, groups, and so on will be reset to the factory defaults.
The reset process does NOT affect the volume settings, nor data stored on the NAS.
You should periodically back up your configuration file to your computer (see Section 26.5 on page 310 for details about managing the NAS's configuration file). You could then restore your configuration in the event that you or someone else reset the NAS to the factory defaults.
Note: Keep the NAS in a secure location in order to prevent unauthorized reset of the device.
You may need to close and re-open the NAS Starter Utility to discover the NAS. This is because the NAS automatically re-acquires IP address information, so its IP address may change. If no IP address information is assigned, the NAS uses Auto-IP to assign itself an IP address and subnet mask. For example, you could connect the NAS directly to your computer. If the computer is also set to get an IP address automatically, the computer and the NAS will choose addresses for themselves and be able to communicate.
2.1 Overview
Use FindMe or the NAS Starter Utility to find and access the NAS and the files on it.
The NAS Starter Utility supports Windows XP, Windows Vista, Windows 7, and Windows 8. Click Help to open a Web Help page about the NAS Starter Utility screens.
Note: Installing this version of the NAS Starter Utility uninstalls previous versions.
Note: Refer to the Quick Start Guide for your NAS's hardware connections and the steps for installing the NAS Starter Utility.
2.2 FindMe
1 Connect to https://findme.zyxel.com in your browser to find and connect to your NAS.
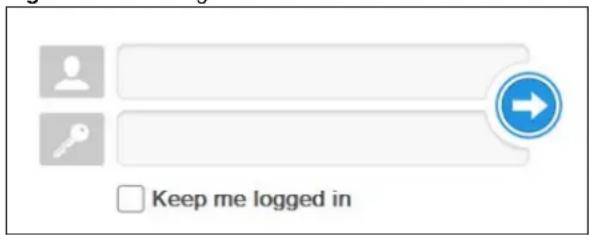
2 Use the default username "admin" and password "1234" to log in. See Chapter 7 on page 38 for more on the web desktop.
Figure 4 NAS Login Screen
text_image
Keep me logged in2.3 NAS Starter Utility
- The NAS Starter Utility broadcasts a request packet when you first run it. Each NAS has an NAS Starter Utility Agent that always listens and responds to requests from the NAS Starter Utility. The NAS Starter Utility receives the response packet that contains information, such as host name, IP, and so on.
- If you plan to use more than one NAS in your network, configure them with unique server names. This enables you to identify each NAS in the NAS Starter Utility screens.
2.3.1 NAS Seeker Screen
Use this screen to view the NASs in your network. The NAS's Server Name. The default is 'NAS' followed by the number of your model ('NAS540' for example). See Section 2.3.5 on page 23 for how to change it to a more recognizable one in your network.
Click the NAS Starter Utility icon on your desktop or in the Windows system tray to start the NAS Starter Utility. Alternatively you can click Start > Programs > ZyXEL > NAS Starter Utility.
Figure 5 NAS Starter Utility Desktop Icon
Figure 6 NAS Starter Utility Windows System Tray Icon
text_image
NAS Starter Utility Customize... EN 18:23 2014/10/21The first time you open the NAS Starter Utility the discovery screen appears as follows.
Figure 7 NAS Seeker

text_image
NAS Seeker The following shows the discovered device in the network Connect Refresh Status Server Name IP Address Online NAS540 192.168.1.5 Online NAS540The following table describes the labels in this screen.
Table 2 NAS Seeker
| LABEL DESCRIPTION | |
| Connect Select a NAS and click this to connect to it. | |
| Refresh | Click this to refresh the screen. The NAS Starter Utility does not automatically refresh. |
| Status | This shows whether the NAS is Online, Unreachable, Configuring, or Config Failed. |
| Server Name | This is the server name you configured for the NAS. If you have more than one NAS in your network, it is recommended that you give each one a unique name for identification purposes. |
| IP Address This is the current IP address of the NAS. | |
2.3.2 Main NAS Starter Utility Screen
The main NAS Starter Utility screen displays after you select an NAS in the NAS Seeker screen.
Figure 8 NAS Starter Utility Main Screen
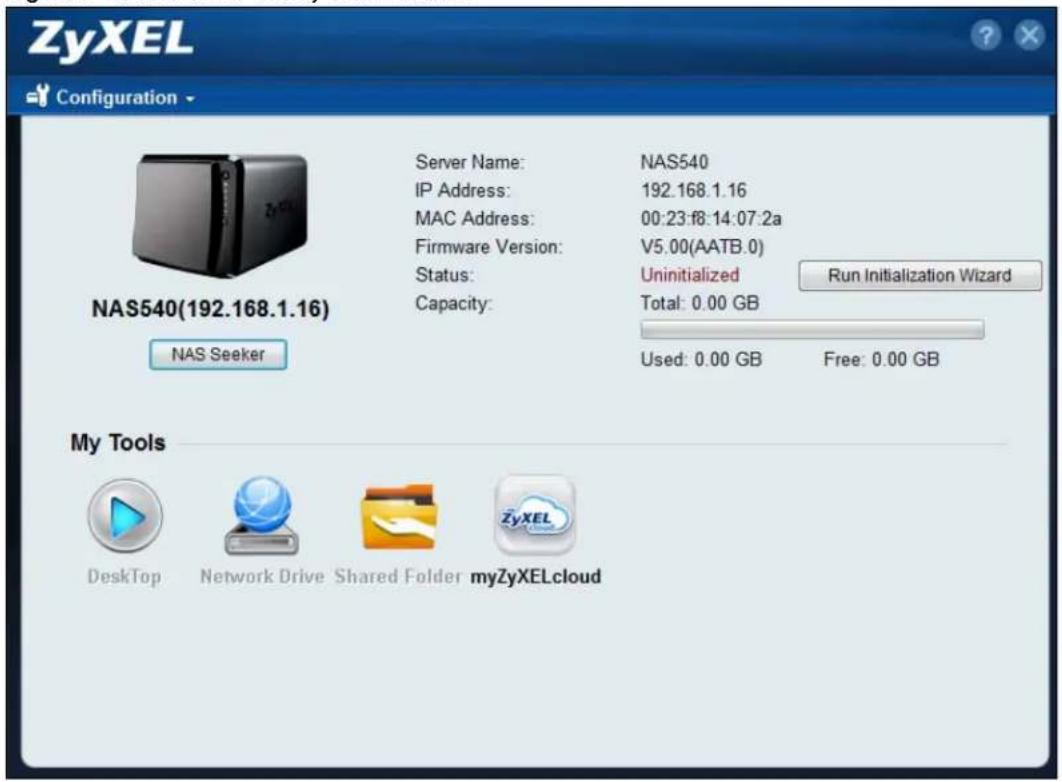
text_image
ZyXEL Configuration NAS540(192.168.1.16) Server Name: NAS540 IP Address: 192.168.1.16 MAC Address: 00:23:f8:14:07:2a Firmware Version: V5.00(AATB.0) Status: Uninitialized Capacity: Total: 0.00 GB NAS Seeker Used: 0.00 GB Free: 0.00 GB My Tools Desktop Network Drive Shared Folder myZyXELcloudThe following table describes the labels in this screen.
Table 3 NAS Starter Utility Main Screen
| LABEL DESCRIPTION | |
| ? Click this to display the utility help. | |
| Configuration | Click this to configure system settings (see Section 2.3.5 on page 23). |
| NAS Seeker | Click this to use the NAS Seeker screen (Section 2.3.1 on page 20) to find and connect to a different NAS on your network. |
| Server Name | This is the server name you configured for the NAS. If you have more than one NAS in your network, it is recommended that you give each one a unique name for identification purposes. |
| IP Address This is the current IP address of the NAS. | |
| MAC Address This is | the NAS's unique physical hardware address (MAC). |
| Firmware Version | This shows the version of firmware the NAS is currently using. |
| Status | This shows whether the NAS is Online, Uninitialized, Unreachable, Configuring, or Config Failed. |
| Run Initialization Wizard | This button displays if the NAS detects that the NAS has not yet configured any of the installed hard disks. Click this button to go to the Web Configurator login screen (see Section 7.2 on page 38). |
| Capacity This shows | the NAS's total, in-use, and remaining storage capacity. |
| DeskTop | Click this button to go to the Web Configurator login screen (see Section 7.2 on page 38). |
| Network Drive Click | this to add the NAS as a network drive in your computer's Windows Explorer. |
| Shared Folder Click | this to log into the NAS's file directory in Windows Explorer. |
| myZyXELcloud Click | this to go to mycloud.zyxel.com to set up a free DDNS hostname for the NAS so you can connect to it easily from the Internet. |
2.3.3 Directory of the NAS
In the main NAS Starter Utility screen click Shared Folder to log into the NAS's file directory in Windows Explorer. Enter the administrator user name and password and click Login.
Figure 9 Login

text_image
Login User Name Password Remember me Guest Ok CancelThe utility opens the NAS's directory in Windows Explorer.
Figure 10 Directory
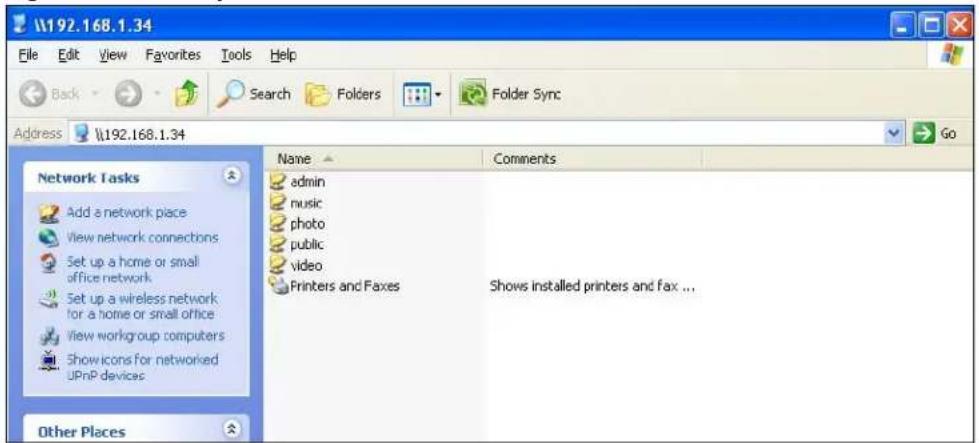
text_image
\192.168.1.34 File Edit View Favorites Tools Help Back Search Folders Folder Sync Address \192.168.1.34 Network Tasks Add a network place View network connections Set up a home or small office network. Set up a wireless network for a home or small office View workgroup computers Show icons for networked UPnP devices Other Places Name Comments admin music photo public video Printers and Faxes Shows installed printers and fax ...2.3.4 Network Drive
In the main NAS Starter Utility screen click Network Drive to add the NAS as a network drive in your computer's Windows Explorer.
Enter your user name and password and click Login to be able to add the NAS's shares to which you have access as network drives. Otherwise select Guest and click Login to be able to add the NAS's public shares as network drives.
Figure 11 Login
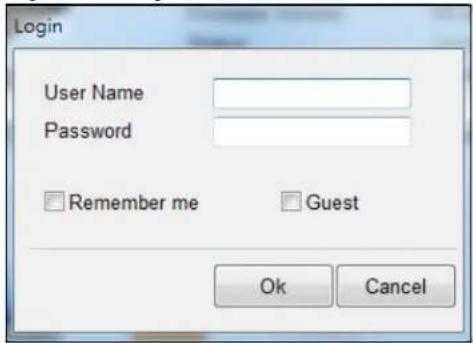
text_image
Login User Name Password Remember me Guest Ok CancelSelect a share on the NAS and the drive letter on your computer to which you want to map it. The shares that each user can select to map depends on the user's permissions. For example, if share1 is private to user1, then only user1 is allowed to map share1. The table displays the NAS shares that are already mapped to drive letters on your computer. After you click Apply you can see the new drive in Windows Explorer (My Computer) where you can access and use it like your computer's other drives.
Figure 12 Network Drive

text_image
To quickly and easily access the files that are stored in the NAS directly right from Windows Explorer or My Computer, you can map a drive letter to a Shared Drive Letter Z: Shared Folder Shared Folder Network Drive public video photo music Open the network drive after clicking Apply Reconnect at Windows login Apply Cancel2.3.5 Configure System Settings
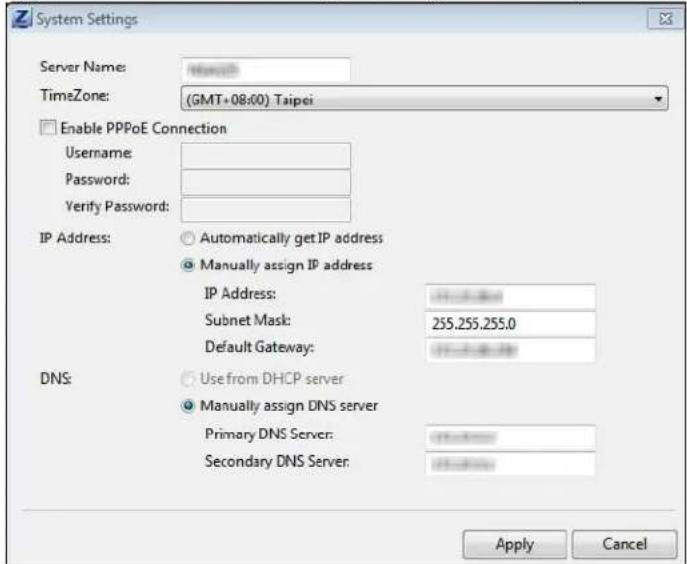
Use these screens to be able to change the NAS's server name, time zone, PPPoE, IP address, subnet mask, default gateway, or DNS settings.
Click Configuration > System Setting in the main utility screen to display the following screen.
Figure 13 NAS Starter Utility > Configuration > System Setting
text_image
System Settings Server Name: TimeZone: (GMT+08:00) Taipei Enable PPPoE Connection Username: Password: Verify Password: IP Address: ○ Automatically get IP address ○ Manually assign IP address IP Address: 255.255.255.0 Subnet Mask: Default Gateway: DNS: ○ Use from DHCP server ○ Manually assign DNS server Primary DNS Server: Secondary DNS Server: Apply CancelThe following table describes the labels in this screen.
Table 4 NAS Starter Utility > Configuration > System Setting
| LABEL DESCRIPTION | |
| Server Name | Specify a name to uniquely identify the NAS on your network. You can enter up to 15 alphanumeric characters with minus signs allowed but not as the last character. The name must begin with an alphabetic character (a-z) and is case sensitive. |
| Time Zone | Choose the time zone of your location. This will set the time difference between your time zone and Greenwich Mean Time (GMT). |
| Enable PPPoE Connection | Click this if your Internet connection requires you to enter a user name and password to connect to the Internet. Enter your user name and password |
| IP Address | Use these fields to configure the IP address of the LAN interface through which you are connected to the NAS.When the LAN interfaces are set to stand-alone, this configures the IP address of the LAN interface in the same subnet as your computer. It configures LAN1 if both LAN interfaces are in the same subnet as your computer.If you use the administrator configuration screens to set the LAN interfaces to link aggregation, this configures the IP address that both LAN interfaces share. |
| Automatically get IP address | Select this if the NAS is automatically assigned an IP address from the ISP or a DHCP server in your network. |
| Manually assign IP address | Select this if you want to assign the NAS a fixed IP address, subnet mask and default gateway.Note: Do not configure an IP address that is already in use in your network. This results to a network IP address conflict and makes the NAS inaccessible. |
| Use from DHCP server | Domain Name System (DNS) is for mapping a domain name to its corresponding IP address and vice versa. Select this if the NAS is automatically given DNS information from the ISP or a DHCP server in your network. |
| DNS | Domain Name System (DNS) is for mapping a domain name to its corresponding IP address and vice versa.Select Use from DHCP server if the NAS is automatically given DNS information from the ISP or a DHCP server in your network.Select Manually assign DNS server if you were given specific IP address(es) of the DNS server(s). Enter the primary and secondary DNS in the corresponding fields. |
Accessing Your Cloud Remotely
Use the NAS to set up your own secure personal cloud. Keep your videos, photos, music, and files safely at home and under your control. Access, share, and stream files from anywhere using your PC, Mac computer, and mobile devices.
3.1 myZyXELCloud Service
Use the myZyXELCloud service at https://mycloud.zyxel.com to set up a free hostname like name.zyxel.me and set the NAS to use it. This lets you easily access the NAS through the Internet. The myZyXELcloud Web portal also lets you monitor the NAS's health from anywhere.
3.2 ZyXEL Drive
Use the ZyXEL Drive app to stream or download photos, videos, and music to your Android or iOS phone through the Internet. You can also upload files from your phone to the NAS.
After setting up the myZyXELCloud service, go to http://zyxel.to/zdrive to get the ZyXEL Drive app for your Android or iOS phone.
Log in, sign-up, and start playing.
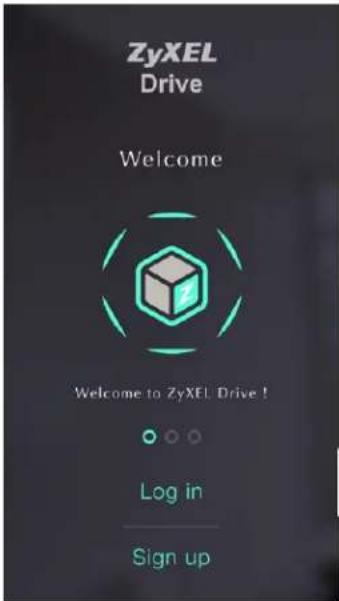
3.2.1 ZyXEL Drive Welcome
Community Sharing - Send invitation links to friends and family to conveniently share selected NAS folders.
DirectConnect - Privately and securely access your NAS content from anywhere.
Figure 14 ZyXEL Drive Welcome
text_image
ZyXEL Drive Welcome Welcome to ZyXEL Drive ! Log in Sign up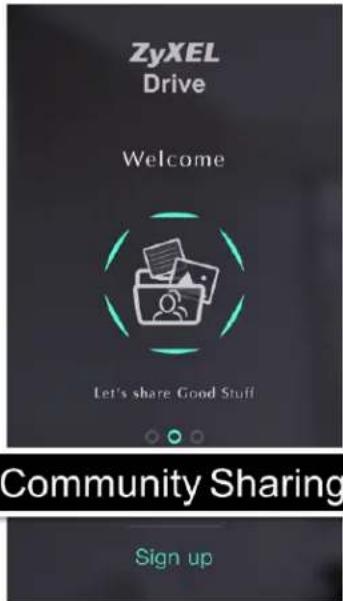
text_image
ZyXEL Drive Welcome Let's share Good Stuff Community Sharing Sign up
text_image
ZyXEL Drive Welcome See your stuff anywhere DirectConnect Sign up3.2.2 NAS and File List
My own NAS - Access and share files from your own NAS.
Shared With Me - Access files on someone else's NAS folder that they have shared with you.
Figure 15 NAS and File List
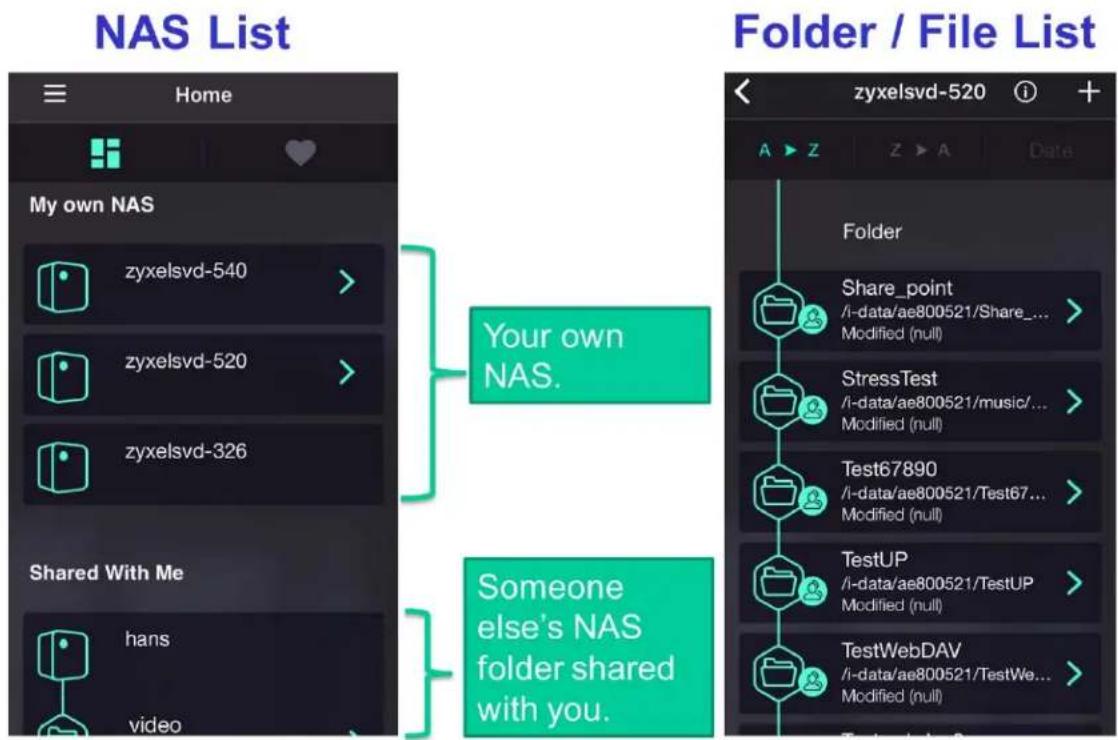
text_image
NAS List Home My own NAS zyxelsvd-540 > zyxelsvd-520 > zyxelsvd-326 Shared With Me hans video Folder / File List Your own NAS. Someone else's NAS folder shared with you. zyxelsvd-520 Folder Share_point /i-data/ae800521/Share_... Modified (null) StressTest /i-data/ae800521/music_... Modified (null) Test67890 /i-data/ae800521/Test67_... Modified (null) TestUP /i-data/ae800521/TestUP Modified (null) TestWebDAV /i-data/ae800521/TestWe_... Modified (null)3.2.3 Uploading and Media Streaming
Use ZyXEL Drive to upload photos and videos from your mobile device to the NAS. You can also stream videos and music stored on the NAS.
Figure 16 Uploading and Media Streaming

text_image
Upload Video Playback Play Music download Download Modified 2015-09-21 Upload Photos Upload Videos Create Folder Use Camera Cancel 台湾大哥大 4G 14:31 100% admin 完成 0:09 -0:08 作品牌 完成 0:22 -3:19ZyXEL zCloud app lets you play your favorite multimedia files on the NAS on your big screen TV. Use TV streaming devices such as Apple TV, Google Chromecast, Roku 3, and Amazon Fire TV; or play files directly on smart TVs like those from Samsung and LG.
- Browse your media contents from your NAS directly on your Android or iOS device.
- View photos stored on your NAS with the app's built-in slideshow.
- Play music stored on your NAS.
- Watch videos stored on your NAS.
- Upload files from your Android device to your NAS.
- Upload photos and videos from your iOS device to your NAS.
- Browse and manage files stored on the NAS.
- Compatibility: Requires Android 4.0.3 or later or iOS 7 or 8.
4.1 Using zCloud
Install the zCloud app from Google Play or the Apple App store. Then tap the zCloud icon to open it.
Figure 17 zCloud Icon
text_image
zCloudThe main menu displays.
Figure 18 zCloud Android and iOS Main Menus

text_image
16 10:40 NAS List Find a NAS NAS540 Download Downloaded Download Tasks Upload Upload Tasks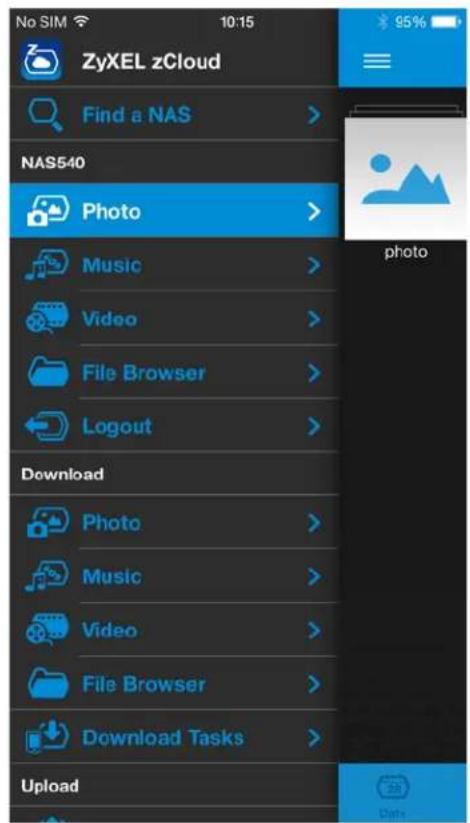
text_image
ZyXEL zCloud Find a NAS > NAS540 Photo > Music > Video > File Browser > Logout > Download Photo > Music > Video > File Browser > Download Tasks > Upload 95%Find a NAS - use your NAS's IP address and your user name and password to connect to it.
NAS540 - access the NAS's default photo, music, and video shares. You can play, download, upload and manage files.
Download - access and manage files downloaded from the NAS to your Android or iOS device and manage download tasks.
Upload - view and manage upload tasks.
4.2 zCloud TV Streaming
Here is an example of the zCloud app letting you choose a player to use to stream a video on your TV.
Figure 19 zCloud Android and iOS TV Streaming

text_image
Downloaded MUSIC | PHOTO | VIDEO | FILEBPOPSSER bbb-800 1) 1a 1a Remote Player Chromecast0574 Fire TV Roku 3 - 4E653S069579 NAS APP Chromecast Apple TV [TV][LG]42LB5800-DB Cancel
text_image
Photo Remote Player Apple TV_APP [TV][LG]42LB5800-DB Roku 3 - 4E653S069579 Fire TV Chromecast0574 Chromecast2-APPManaging Users, Groups, and Shares
5.1 Managing Users, Groups, and Shares
- Use the Users screens (Chapter 22 on page 281) to create and manage administrator and user accounts.
- Use the Groups screens (Chapter 23 on page 287) to create and manage groups of user accounts. You can assign users to groups and grant individual groups access rights to specific shares.
- Use the Shares screens (Chapter 24 on page 291) to manage access permissions mapped to specific folders on a volume. A share is equivalent to the Windows concept of a shared folder. Map a share to a network drive for easy and familiar file transfer for Windows users.
Backing Up, Retrieving, and Syncing Files
6.1 About Backups
Backup before you need it. The NAS's multiple backup methods make it easy to follow the 3-2-1 backup rule:
- At least 3 copies of data
- Stored on at least 2 different media
- With at least 1 copy off-site.
6.2 Managing a USB Device and USB Backups
Use the USB ports and SD card slot to copy or synchronize files between a connected USB or SD device and the NAS. You can use the USB drive or SD card for off-site backups.
- Use the Copy/ Sync button on the front panel to copy or synchronize files between a connected USB or SD storage device and the NAS. See Section 17.10 on page 232 to configure the copy/ sync settings.
- Use the NAS's Backup screens (Section 27.3 on page 321) to schedule backups of files and folders on your NAS to a USB device or SD card. See Section 14.14.2 on page 194 for an example.
6.3 Remote Backups
Use the NAS's Backup screens (Section 27.3 on page 321) to schedule backups of files and folders on your NAS to another ZyXEL NAS or a NAS using rsync.
• See Section 14.14.1 on page 192 for an example of backing up to a remote NAS.
- Use the Restore screens (Section 27.4 on page 332) to restore previous backups based on the backup job. See Section 14.14.3 on page 196 for an example.
- If you deleted an archive backup job or the NAS or the RAID array containing the backup job failed, you can restore by backup files. See Section 14.14.3 on page 196 for an example.
6.4 Internal Backups
Use the NAS's Backup screens (Section 27.3 on page 321) to schedule backups of files and folders on your NAS to another folder on the NAS.
• See Section 14.14.2 on page 194 for an example of how to back up the NAS to another NAS.
- Use the Restore screens (Section 27.4 on page 332) to restore previous backups based on the backup job. See Section 14.14.3 on page 196 for an example.
6.5 Cloud Backups
Use the NAS with cloud services for off-site backups and synchronization.
- Use Dropbox (Chapter 20 on page 274) to log the NAS into your Dropbox account to easily move files to your NAS and have the NAS download *.torrent files.
- Use Memopal (Section 18.7 on page 254) to back up files on the NAS to your Memopal online backup and storage account.
6.6 Synchronizing Files
Besides backups, the NAS also provides pure synchronization solutions.
Note: Synchronization is not backup. When you delete a file in one location, synchronization deletes it in the other location. Do not store your only copy of a document in a synchronized folder.
- Use the GoogleDriveClient package (Section 18.8 on page 256) to two-way synchronize local NAS folders and Google Drive accounts. Changes in the Google Drive account appear in the local sync folder and changes in the local sync folder appear in the Google Drive account.
- Use the ownCloud package (Section 18.6 on page 251) to host your own private cloud on the NAS. The ownCloud package lets the NAS work as an ownCloud server so computers and mobile devices using the ownCloud client can access, sync, and share files across devices.
PART I
Web Desktop at a Glance
7.1 Overview
This chapter describes how to access the NAS web configurator and provides an overview of its screens. The web configurator is an HTML-based management interface that allows easy NAS setup and management using an Internet browser.
Use Internet Explorer 11.0.9, Mozilla Firefox 31.0, Safari 5.1.7, Google Chrome 37.0.2, or later versions of these browsers. The recommended screen resolution is 1440 by 900 pixels or higher.
In order to use the web configurator you need to allow:
- Web browser pop-up windows from your device. Web pop-up blocking is enabled by default in Windows XP SP (Service Pack) 2.
- JavaScript (enabled by default).
7.2 Accessing the NAS Web Configurator
1 Make sure your NAS is properly connected and that your computer is in the same subnet as the NAS (refer to the Quick Start Guide or the appendices).
2 Open your browser and type in the server name of the NAS. The default is "nas" followed by the number of your model ("nas540" for example). Configure the server name of your NAS using the Network Configuration screen (Section 2.3.5 on page 23) of the NAS Starter Utility.
Figure 20 NAS URL
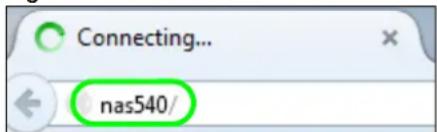
text_image
Connecting... nas540/3 The default username and password are "admin" and "1234" respectively. Enter your username and password. See Chapter 22 on page 281 for how to create other user accounts. If you use the option to stay logged in (assuming you do not log out), make sure you keep your computer secure from unauthorized access. Click the arrow to log in. Logging in with a (non-administrator) user account takes you to a different Desktop screen (see Section 7.3 on page 41 for details).
Figure 21 NAS Login Screen
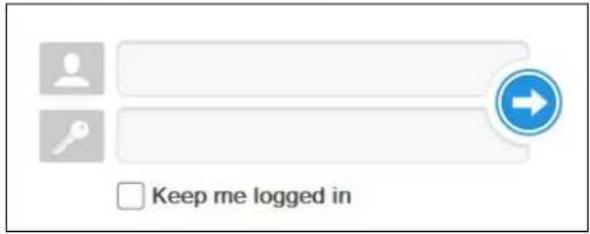
text_image
Keep me logged inMake sure you have a backup of any existing data in the hard disk before installing it in the NAS. Creating a volume formats the hard disk and deletes all data in the process.
4 This screen displays if you have not created a volume yet. Click Create Volume to make a volume or click the x to close the screen to go to the Desktop (Section 7.3 on page 41).
Figure 22 Welcome Screen

text_image
Welcome i Welcome! Before you start using your NAS, please create at least one volume first. Important: When planning your NAS storage, please note that the maximum volume size is 16 TB. Create Volume5 Select Create single volume on RAID for a simple set up. Go to Section 8.3.1 on page 55 for details.
Select Create Multiple volumes on disk group to be able to create more than one storage volume. Go to Section 8.3.3 on page 64 for details.
Figure 23 Create Volume

text_image
Create Volume Choose an Action ○ Create single volumes on RAID This type of volume is directly built on RAID. It has better access performance than a volume on a disk group. ○ Create Multiple volumes on disk group This type of volume is created on disk group. You can expand as size after creation if the disk group has unallocated storage. You can also expand a disk group to provide unallocated storage which you can use to expand a volume. ● Existing on disk group Disk Group 1 (unallocated 927.47 GB) Next CancelIf you choose Existing on disk group, you will go to the screens below after clicking Next.
Figure 24 Existing on Disk Group
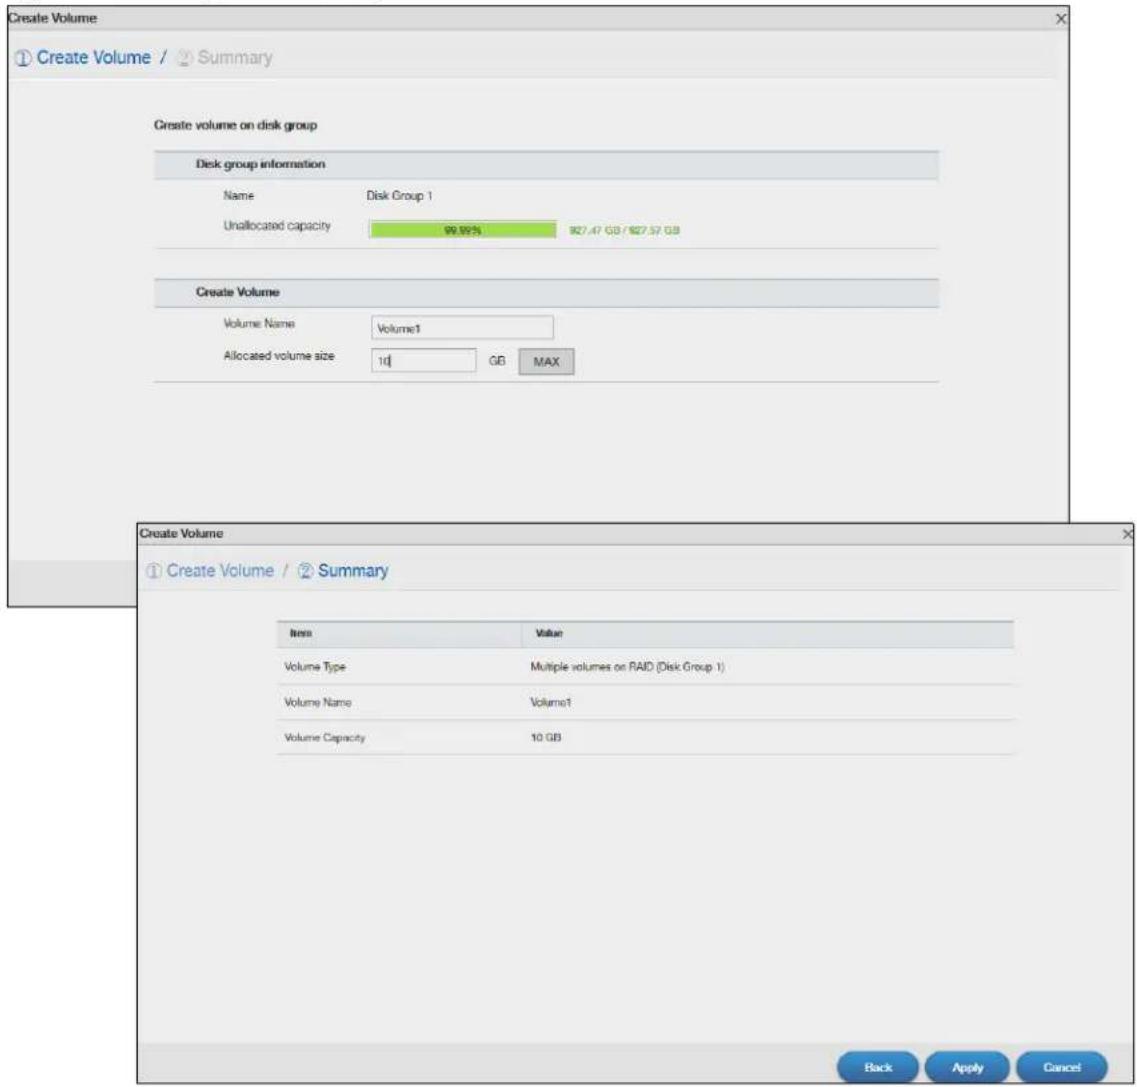
text_image
Create Volume ① Create Volume / Summary Create volume on disk group Disk group information Name Disk Group 1 Unallocated capacity 99.99% 927.47 GB / 927.57 GB Create Volume Volume Name Volume1 Allocated volume size 10 GB MAX Create Volume ① Create Volume / Summary Item Value Volume Type Multiple volumes on RAID (Disk Group 1) Volume Name Volume1 Volume Capacity 10 GB Back Apply CancelIf this is the first time the NAS has created a volume, it needs to reboot after the volume is created. Click Yes to reboot or No to go to the Desktop.
Figure 25 Reboot

text_image
Important! NAS will reboot after the first volume creation. Do you want to proceed now? Yes No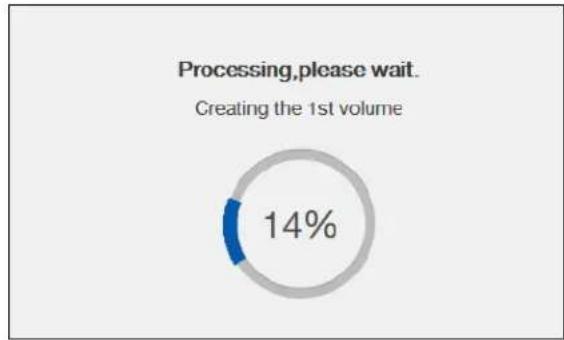
pie
Processing,please wait. Creating the 1st volume | Category | Value (%) | |---|---| | Processing,please wait. | 14 |7.3 Desktop
The Desktop screen displays after you log in. Hover your mouse over the heading bar icons to display their names.
Figure 26 Desktop (Administrator)
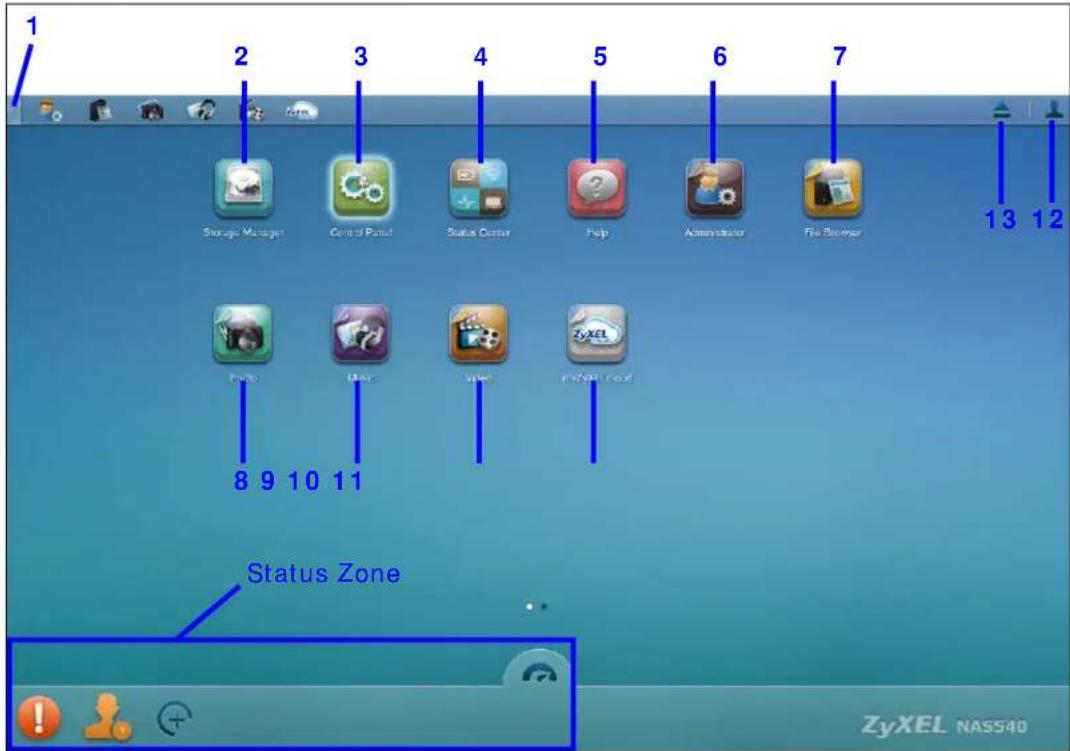
text_image
1 2 3 4 5 6 7 Storage Manager Control Panel Status Center Help Administrator File Browser 13 12 Polo Music Video MyBlock 8 9 10 11 Status Zone ZyXEL NAS540Figure 27 Desktop (User)

text_image
File Browser Photo Music Video Playbox Settings Application Zone 14 15 myZyXELNASS40 CPU 14% RAM 13%Note: The Web Configurator session automatically times out if left idle for 15 minutes. Simply log back into the NAS if this happens to you.
1 Desktop - click this to minimize all windows so you can see the desktop. Click it again to restore the windows to their previous state.
2 Storage Manager- click this to open the storage configuration screens.
3 Control Panel - click this to open the control panel screens to configure the network setting and upgrade firmware.
4 Status Center - click this to display NAS status information.
5 Help - click this to display the NAS' embedded help system screens.
6 Administrator - click this to open the administrator configuration screens in a new tab.
7 File Browser - click this to see files in a tree-folder structure.
8 Photo - click this to view photos in the shares that publish photos.
9 Music - click this to view and play music files in the shares that publish music.
10 Video - click this to view and play video files in the shares that publish videos.
11 myZyXELcloud - click this to go to mycloud.zyxel.com to set up a free DDNS hostname for the NAS so you can connect to it easily from the Internet.
12 User - click this to display the Logout link.
13 Eject NAS External Drives - click this to eject the connected external volumes.
14 Playzone Settings - click this to open the playzone configuration screen in a new tab.
15 Application Zone - click this to open the application zone in a new tab.
7.3.1 Status Zone
The Status Zone displays icons for various features you can access.
Table 5 Status Zone Icons
| ICON DESCRIPTION | |
 | Click System Status to open the Status Center screen. System Status displays the health state of the NAS. A green circle with a check mark indicates healthy. |
  | Web Sessions displays the current number of web sessions. Click this to go to the Network screen for more details.Click this to select widgets to show on the status bar. Select or clear the widgets to show or hide on the Status bar. Click OK to save your changes or Cancel to exit this screen without saving changes. Select or clear the widgets to show or hide on the Status bar. Click OK to save your changes or Cancel to exit this screen without saving changes. |
 | Click this to hide or show the status bar. |
7.3.2 Grouping Icons
You can drag one icon to another one and make them a group as shown below.
Figure 28 Grouping Icons
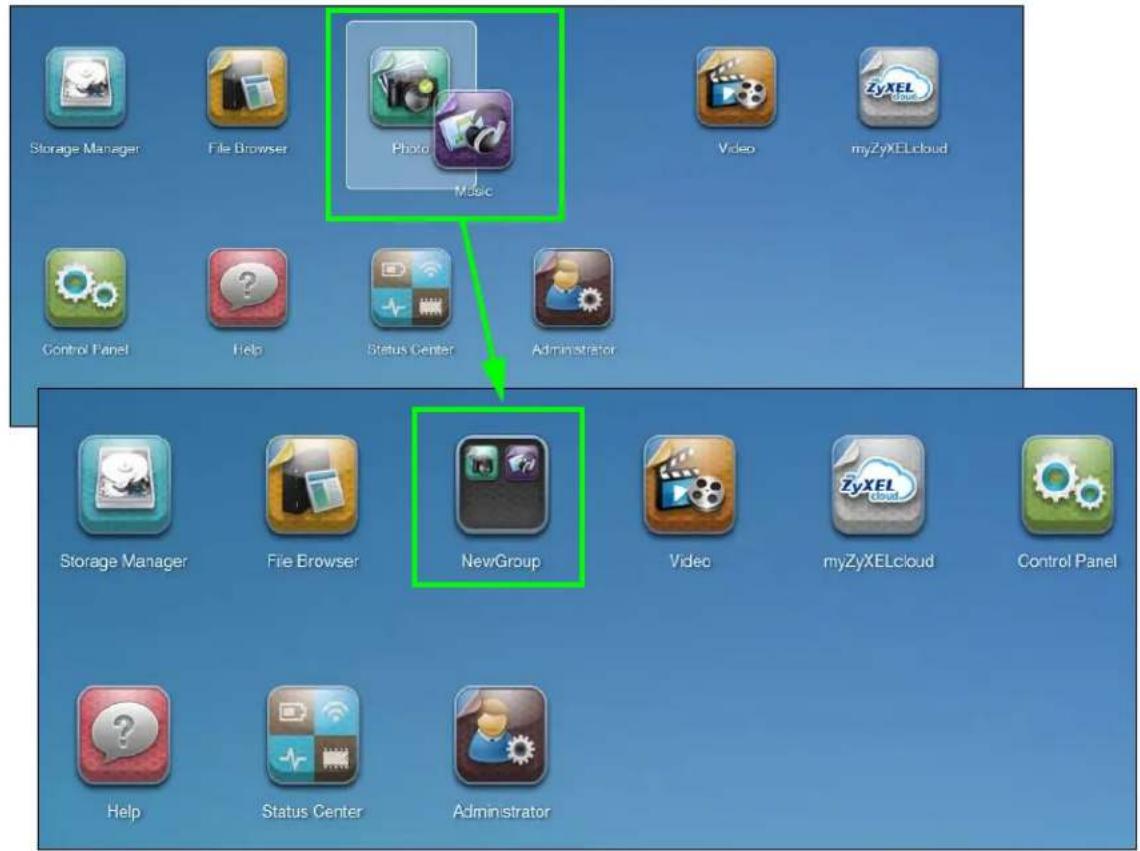
text_image
Storage Manager File Browser Photo Music Video myZyXELcloud Control Panel Help Status Center Administrator Storage Manager File Browser NewGroup Video myZyXELcloud Control Panel Help Status Center AdministratorAfter the group is created, the default group name is NewGroup. You can click the icon to change the group name. In the following example, the group name is changed to Media.
Figure 29 Change the Group Name

text_image
Storage Manager File Browser Media ZyxelCloud Control Panel Help Status Center Administ Media Photo MusicYou can also move the group to another page by right-clicking the icon as shown next.
Figure 30 Move the Group Location

text_image
Storage Manager File Browser Video myZyXELcloud Control Panel Help Status Center Administrator Media Move to Page 2 New PageStorage Manager
8.1 Overview
This chapter displays the status of both internal and external storage, and introduces how to configure disk groups, volumes, and iSCSI functions. Click Storage Manager on the Desktop to go to the following screens in a new window.
8.2 Storage Manager Overview
Click Storage Manager on the Desktop to display the status of both internal and external storage, and configure disk groups, volumes, and iSCSI functions.
The Storage Manager Overview screen displays the status, current storage configuration and volume usage of internal volumes and capacity usage of external volumes.
Figure 31 Storage Manager > Overview > Internal Volumes
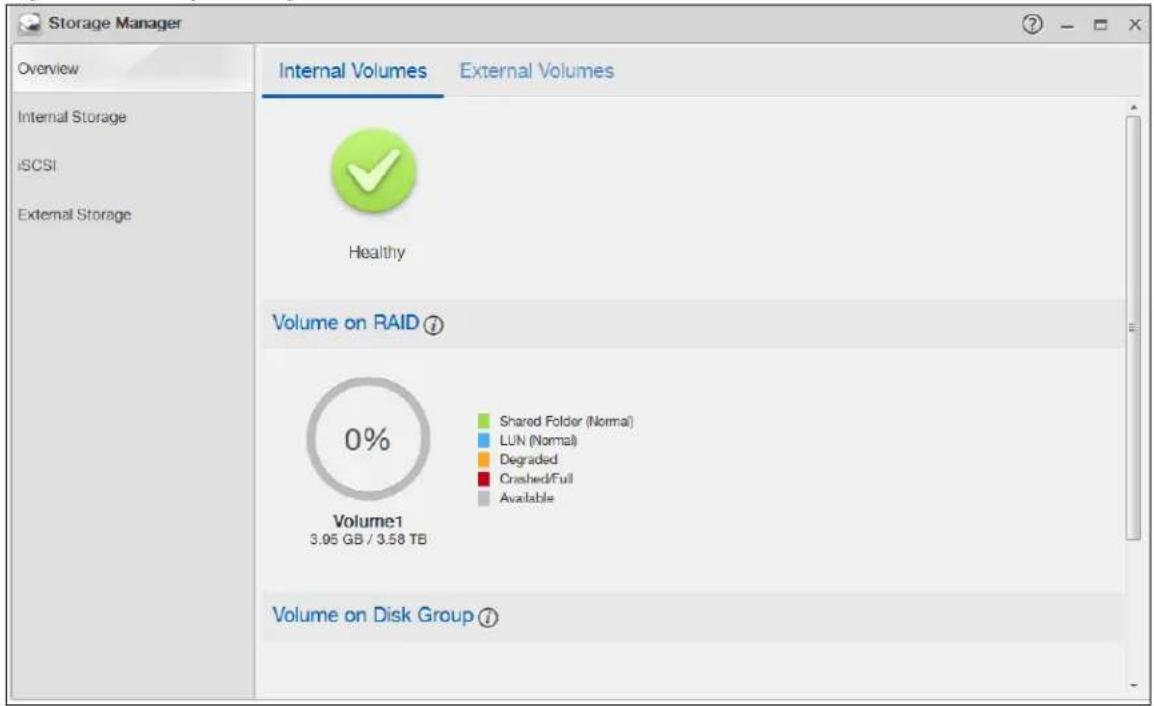
text_image
Storage Manager Overview Internal Volumes External Volumes Internal Storage iSCSI External Storage Healthy Volume on RAID 0% Shared Folder (Normal) LUN (Normal) Degraded Crashed/Full Available Volume1 3.95 GB / 3.58 TB Volume on Disk GroupFigure 32 Storage Manager > Overview > External Volumes

pie
| Category | Percentage | | -------------- | ---------- | | Used | 18% | | Full | 2.83 GB / 14.95 GB | | Unformatted | 2.83 GB / 14.95 GB | | Unsupported | 2.83 GB / 14.95 GB | | Available | 2.83 GB / 14.95 GB |The following table describes the labels in this screen.
Table 6 Storage Manager > Overview
| LABEL DESCRIPTION | |
| Storage | The circular icon displays the overall health state of the NAS.A green circle with a check mark indicates healthy.An orange circle with an exclamation mark indicates attention. This appears when a volume or disk group is degraded. ClickRepairto repair it.An red circle with an exclamation mark indicates danger. This appears when a volume or disk group is crashed. You cannot recover the volume. |
| Volume Usage This shows how much of each volume is currently used. | |
| Volume (for Internal Volumes) | This section shows the current storage usage for each volume built directly on top of a RAID. These volumes have higher access performance than volumes on a disk group but are less flexible in regards to size.Details include the currently used percentage of the volume.Shared Folder (Normal) - green on the circle represents the volume's percentage of used capacity in a healthy state.LUN (Normal) - blue on the circle represents the iSCSI LUN's percentage of used capacity.Degraded - orange on the circle represents the volume's percentage of used capacity in a degraded state. Degraded means one or more disks has failed but you can still replace a faulty disk to recover the volume.Crashed/ Full - a red exclamation point represents the volume is in a down state. Down means you cannot recover the volume. Full means the volume has run out of space.Available - gray on the circle represents the volume's percentage of unused capacity.This section also displays the volume's used capacity, and total capacity available. |
| Volume (for External Volumes) | Details include the currently used percentage of the volume.Used - green on the circle represents the volume's percentage of used capacity in a healthy state.Full - a red exclamation point represents the volume has run out of space.Unformatted - purple on the circle represents the connected USB storage device is not formatted with a file system.Unsupported - violet on the circle represents the connected USB storage device uses a file system the NAS does not support.Available - gray on the circle represents the volume's percentage of unused capacity.This section also displays the volume's used capacity, and total capacity available. |
| Volume on Disk Group | This section shows the current storage usage for each volume built on top of a disk group. You can expand a volume's size after creation if the disk group has unallocated space. You can also expand a disk group by adding hard disks. |
8.3 Internal Storage
A volume is a basic storage space on the NAS. To store data on the NAS, you must create at least one volume. Your NAS supports the following:
- Internal volumes (built on the hard disks installed in the NAS)
- External volumes (built on the external storage devices attached to the NAS)
Internal Volumes
Table 7 Internal Volumes
| OPTION DESCRIPTION | |
| Volume Allocates all | the available space to the volume.Provides better performance. |
| Volume on Disk Group | Allows you to create multiple volumes on a disk group.Allows you to customize the size of a volume. |
RAID Types
The following table describes RAID types.
Note: RAID 5, RAID 6, RAID 10, and the hot spare option apply to 4-bay NAS devices.
Table 8 RAID Types
| RAID TYPE | NO. OF HDD | NO. OF HDD ALLOWED TO FAIL | DESCRIPTION CAPACITY | |
| Basic 1 | 0 Use Basic | with one disk. It has | no fault tolerance. | 1 x (HDD size) |
| JBOD 2- | 4 0 Use JBOD | with two or more | disks for maximum capacity. This is just a collection of disks with no fault tolerance. | sum of HDD sizes |
| RAID 0 2 | -4 0 Use RAID 0 | with two or four | ur disks for maximum speed and no fault tolerance. | sum of HDD sizes |
| RAID 1 | 2-4 | (No. of HDD) -1 | Use RAID 1 to create an exact copy of data on one disk to a second disk. Use this with two to four disks to mirror primary data to another disk(s) with high performance.You can add a hot spare to a 2-disk RAID 1. | Smallest HDD size |
| RAID 5 3 | -4 1 Use RAID 5 | with three or four | disks to balance performance and hard disk capacity usage with data protection in case of disk failure.You can add a hot spare to a 3-disk RAID 5. | (No. of HDD – 1) x (smallest HDD size) |
| RAID 6 4 | 2 Use RAID 6 | with four disks for more data protection in case of disk failure. | (No. of HDD – 2) x (smallest HDD size) | |
| RAID 10 | 4 | 1 HDD in each RAID 1 group | Use RAID 10 with four disks to get better performance than RAID 6, with slightly less data protection. | (No. of HDD / 2) x (smallest HDD size) |
Repair Volumes or Disk Groups
If a hard disk in a RAID 1 with a hot spare or a RAID 5 with a hot spare fails, the NAS automatically uses the hot spare to re-build the volume or disk group. Later you can replace the failed hard disk and add the new disk as a hot spare.
A hard disk failure in a RAID 1, RAID 5, RAID 6, or RAID 10 degrades the volume or disk group. Replace the failed disk and use the Internal Storage screen's Repair link to repair the volume.
Change RAID Type
You can change the following RAID types without losing stored data. This can help you manage your storage capacity as you add more disks.
Table 9 Internal Volumes
| RAID TYPE WHAT YOU CAN CHANGE IT TO | |
| Basic RAID 1 | |
| RAID 1 RAID 1 with a hot spare | or RAID 5 |
| RAID 5 RAID 5 with a hot spare | or RAID 6 |
Expand Volumes or Disk Groups
As your content grows, you can do the following to expand the storage capacity of a volume or disk group without losing stored data.
Table 10 Expand Volumes and Disk Groups
| EXPANSION METHOD | DESCRIPTION |
| Using unallocated disk space | You can add more storage space to a volume if there is still some space unallocated on the same disk group. |
| Adding disks You | can add one or more disks to a JBOD, RAID 1 or RAID 5.The hard disk you want to add must have capacity equal to or greater than the smallest disk in the volume or disk group. |
| Replacing with larger disks | You can replace smaller disks in a RAID 1, RAID 5, or RAID 6 with larger disks.Replace disks one-by-one.Replace the smallest disk in the volume or disk group first.After replacing a disk, you must use the Internal Storage screen's Manage link to repair the volume.Wait for the repair process to complete before you replace another disk. |
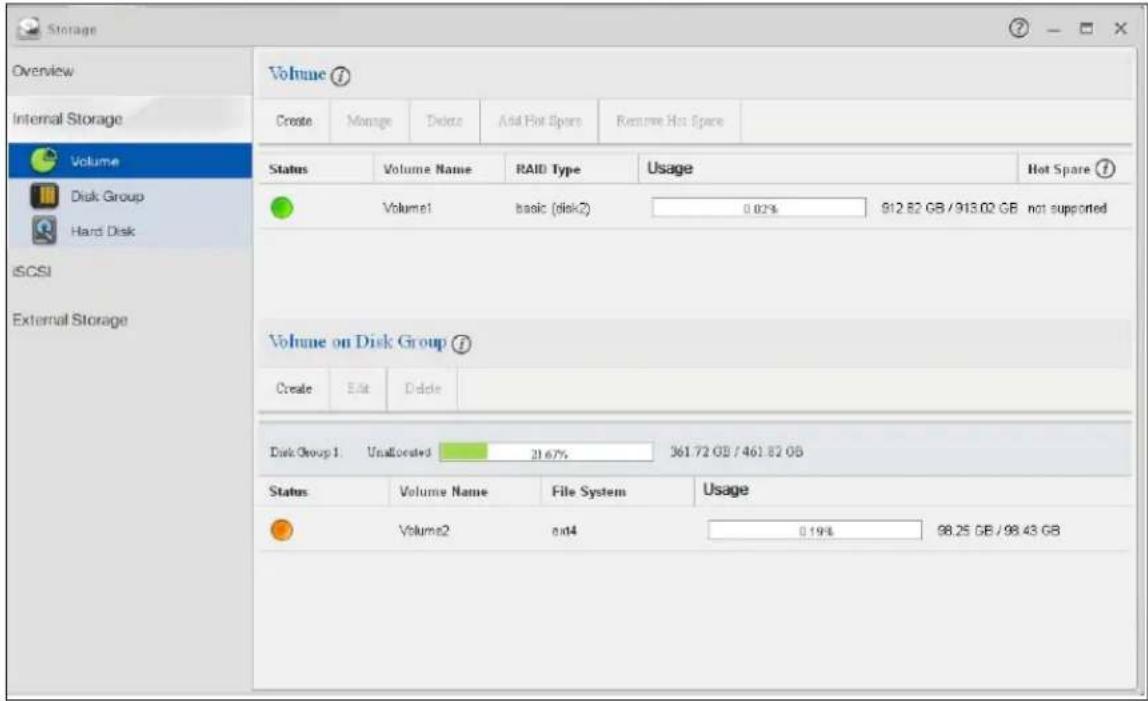
Use the Volume screen to configure and manage internal volumes. From the Internal Storage screen, click Volume to open the screen as shown.
Figure 33 Internal Storage Volume
text_image
Storage Overview Internal Storage Volume Disk Group Hard Disk iSCSI External Storage Volume ① Create Manage Delete Add Hot Spare Remove Hot Spare Status Volume Name RAID Type Usage Hot Spare ① Volume1 basic (disk2) 0.02% 912.82 GB / 913.02 GB not supported Volume on Disk Group ② Create Edit Delete Disk Group 1: Unallocated 21.67% 361.72 GB / 461.82 GB Status Volume Name File System Usage Volume2 on4 0.19% 98.25 GB / 98.43 GBThe following table describes the labels in this screen.
Table 11 Internal Storage > Volume
| LABEL DESCRIPTION | |
| VolumeUse this section to configure and manage volumes built on hard disks directly. | |
| Create | Click this to format internal hard disks and create a new volume. All data on the disk(s) will be lost.Note: This button is not available while the NAS is creating, deleting, or changing the RAID type of any volume or disk group.A pop-up screen appears if all installed hard disks are used by other volumes or disk groups. You will need to install another hard disk into the NAS if any disk tray is available or remove unnecessary volumes or disk groups to release the storage space. Click OK to close this screen.No Disk in NAS |
No Disk in NASX To create volumes on the NAS, you need to put hard disks into the NAS first.Note:This NAS support hot swapping, so you can put in disks without shutting down your NAS.OK To create volumes on the NAS, you need to put hard disks into the NAS first.Note:This NAS support hot swapping, so you can put in disks without shutting down your NAS.OK | |
| Manage | Select a volume and click Manage to edit, repair or expand the volume.Note: This button is available only when you can repair, expand or change RAID type. |
| Delete Select a volume | Name and click Delete to remove it.Note: If you delete a volume, all data in the volume disks is erased. |
| Add Hot Spare | Select a RAID 1 or RAID 5 volume and click Add Hot Spare to add another disk as a hot-spare (standby) to the RAID array. A pop-up screen displays.Figure 34 Add Hot Spare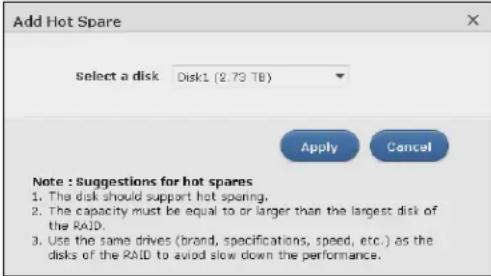 Select a disk from the drop-down list box and then click Apply.See Table 8 on page 50 for more information about RAID.Note: The capacity of the disk you are adding must be equal to or greater than the largest disk in the RAID 1 or RAID 5 array. Select a disk from the drop-down list box and then click Apply.See Table 8 on page 50 for more information about RAID.Note: The capacity of the disk you are adding must be equal to or greater than the largest disk in the RAID 1 or RAID 5 array. |
| Remove Hot Spare | Select a RAID 1 or RAID 5 volume and click Remove Hot Spare to remove the standby drive from the RAID array. |
| Status | This field shows whether the volume is normal, degraded, crashed, Creating, Deleting, Expanding, Repairing or Changing the RAID type.Normal: A green circle represents a healthy volume.Degraded: An orange circle represents a degraded RAID 1 volume.Crashed: A red circle represents a down volume.The following status also displays the percentage of an action has been completed.Creating: The NAS's percentage progress in creating the volume.Deleting: The NAS's percentage progress in deleting the volume.Expanding: The NAS's percentage progress in expanding the volume. For a RAID 1 volume, this also displays the percentage of resynchronizing the NAS has finished and the evaluated remaining time.Repairing: The NAS's percentage progress in repairing the volume. For a RAID 1 volume, this also displays the percentage of resynchronizing the NAS has finished and the evaluated remaining time.Changing: The NAS's percentage progress in changing the volume's RAID type. For a RAID 1 volume, this also displays the percentage of resynchronizing the NAS has finished and the evaluated remaining time. |
| Volume Name | This field shows the name of the volume. Click the column's heading cell to display an arrow. Use the arrow to sort the table entries in ascending or descending order. |
| RAID Type | This field shows what type of disk storage technology (Basic, a RAID level or JBOD) a volume uses. |
| Usage | This field shows the percentage of the volume being used, the percentage that is available, and the total disk size. |
| Hot Spare This field | shows the name of the standby disk if there is any for a RAID 1 or RAID 5 volume. Otherwise, it shows not supported. |
| Volume on Disk GroupUse this section to configure and manage volumes built on disk groups. | |
| Create | Click this to format internal hard disks and create a new volume on a disk group. All data on the disks will be lost.Note: This button is unavailable when a volume or disk group is being created, deleted or changing the RAID type. |
| Edit | Select a volume and click Edit to expand the volume's capacity. |
| Delete | Select a volume and click Delete to remove it.Note: If you delete a volume, all data in the volume disks is erased.Note: Deleting a volume on a disk group here does not delete the corresponding disk group. To delete a disk group, click Internal Storage > Disk Group. |
| Disk Group X | This field shows the name of the disk group, the percentage of the disk group size that is available, the disk group size being used, and the total disk group size. |
| Status | This field shows whether the volume is normal, degraded, crashed, Creating, Deleting, Expanding, Repairing or Changing the RAID type.Normal: A green circle represents a healthy volume.Degraded: An orange circle represents a degraded RAID 1 volume.Crashed: A red circle represents a down volume.The following status also displays the percentage of an action has been completed.Creating: The NAS's percentage progress in creating the volume.Deleting: The NAS's percentage progress in deleting the volume.Expanding: The NAS's percentage progress in expanding the volume. For a RAID 1 volume, this also displays the percentage of resynchronizing the NAS has finished and the evaluated remaining time.Repairing: The NAS's percentage progress in repairing the volume. For a RAID 1 volume, this also displays the percentage of resynchronizing the NAS has finished and the evaluated remaining time.Changing: The NAS's percentage progress in changing the volume's RAID type. For a RAID 1 volume, this also displays the percentage of resynchronizing the NAS has finished and the evaluated remaining time. |
| Volume Name | This field shows the name of the volume. Click the column's heading cell to display an arrow. Use the arrow to sort the table entries in ascending or descending order. |
| File System This field | shows what file system the volume uses. At the time of writing, your NAS uses the EXT4 file system for internal volumes. |
| Usage | This field shows the percentage of the volume being used, the percentage that is available, and the total disk group size. |
8.3.1 Creating a Volume
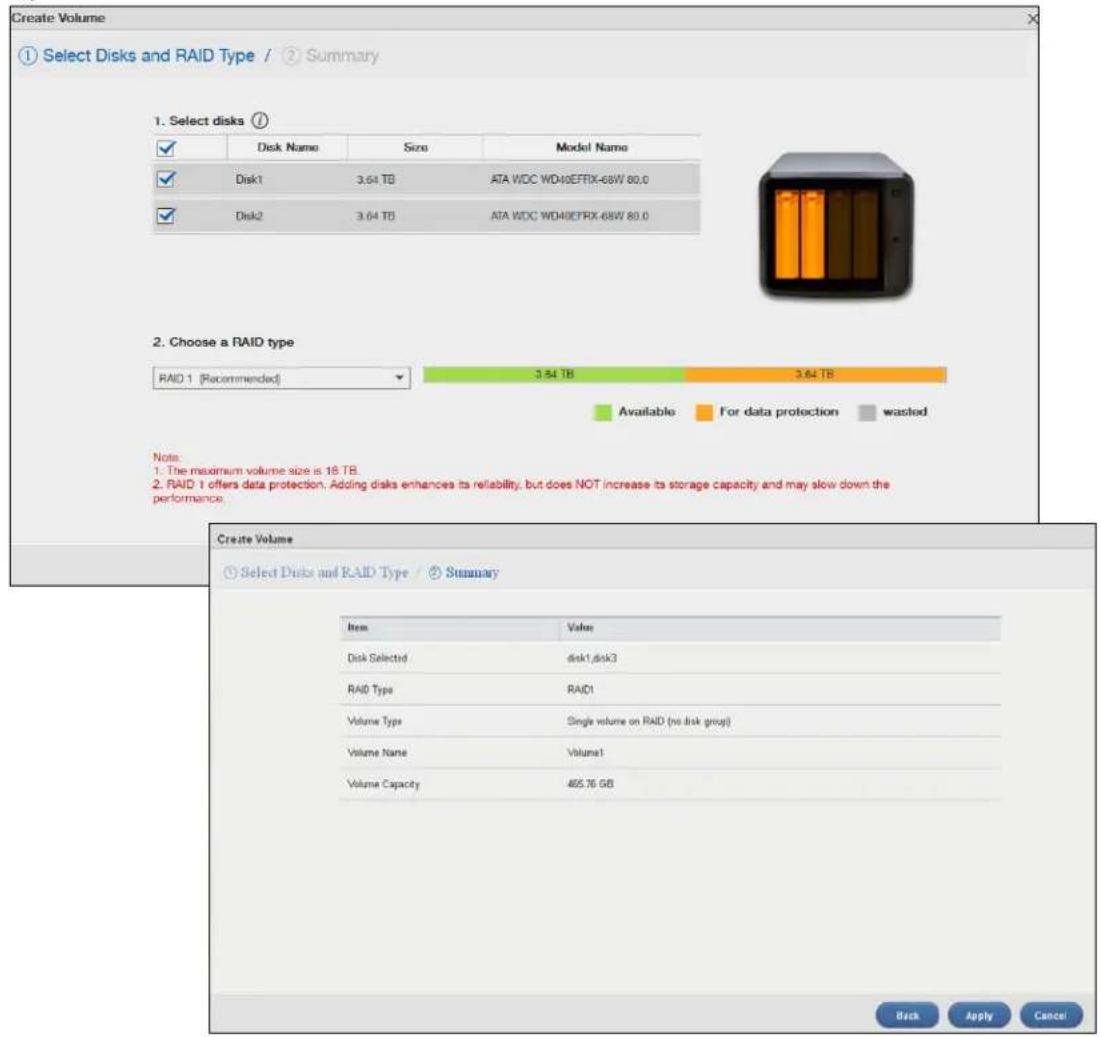
Use the Create Volume screen to configure a volume directly on a disk/RAID, which has better performance. Click Create in the Volume section of the Internal Storage > Volume screen to open the screen as shown.
Note: Create a volume on a disk group instead if you want to have multiple volumes on a disk. See Section 8.3.3 on page 64 for more information. Moreover, the maximum size for one volume is 16TB.
Figure 35 Create Volume
text_image
Create Volume ① Select Disks and RAID Type / ② Summary 1. Select disks Disk Name Size Model Name Disk1 3.64 TB ATA WDC WD40EFFRX-68W 80.0 Disk2 3.64 TB ATA WDC WD40EFFRX-68W 80.0 2. Choose a RAID type RAID 1 [Recommended] 3.54 TB 3.64 TB Available For data protection wasted Note: 1. The maximum volume size is 16 TB. 2. RAID 1 offers data protection. Adding disks enhances its reliability, but does NOT increase its storage capacity and may slow down the performance. Create Volume ① Select Disks and RAID Type / ③ Summary Item Value Disk Selected disk1,disk3 RAID Type RAID1 Volume Type Single volume on RAID (no disk group) Volume Name Volume1 Volume Capacity 465.76 GB Back Apply CancelThe following table describes the labels in this screen.
Table 12 Create Volume
| LABEL DESCRIPTION | |
| Step 1. Select Disks and RAID Type | |
| Select disks | This section lists all available hard disks in the table and displays the disk trays where they are currently installed on the graphic at the right.Select one or more hard disks where you want to create a volume. Use the check box on the top to select or unselect all entries in this column. |
| Disk Name This field shows the name of the hard disk. | |
| Size This field shows the total disk size. | |
| Model Name This field shows the model of the hard disk. | |
| Choose a RAID type | Select a RAID type from the drop-down list box. The corresponding space allocations of available size, data protection area, and wasted size display.Use Basic with one disk.Use JBOD with two or more disks for maximum capacity.Use RAID 0 with two or four disks for maximum speed.Use RAID 1 with two or more disks to mirror primary data to another disk(s) with high performance.Use RAID 5 with three or more disks to balance performance, hard disk capacity usage with data protection in case of disk failure.Use RAID 6 with four disks for more data protection in case of disk failure.Use RAID 10 with four disks to get better performance than RAID 6, with slightly less data protection.See Table 8 on page 50 or Section 8.6 on page 98 for more information.Note: Use the same capacity of hard disks for RAID 1, 5, 6, or 10 to avoid wasting space. |
| Back This button is not available at this step. | |
| Next Click Next to go to the next step. | |
| Cancel | Click Cancel to close the screen without saving any settings. |
| Step 2. SummaryUse this screen to review the settings you configured in the last step. | |
| Disk Selected This field displays the hard disks you have selected. | |
| RAID Type This field displays the type of RAID on which the volume will be built. | |
| Volume Type | This field displays the type of the volume, Single volume on RAID (no disk group). |
| Volume Name This field displays the name of the volume. | |
| Volume Capacity | This field displays the size of the volume. |
| Back Click Back to go to the previous step. | |
| Apply Click Apply to save the settings. | |
| Cancel | Click Cancel to close the screen without saving any settings. |
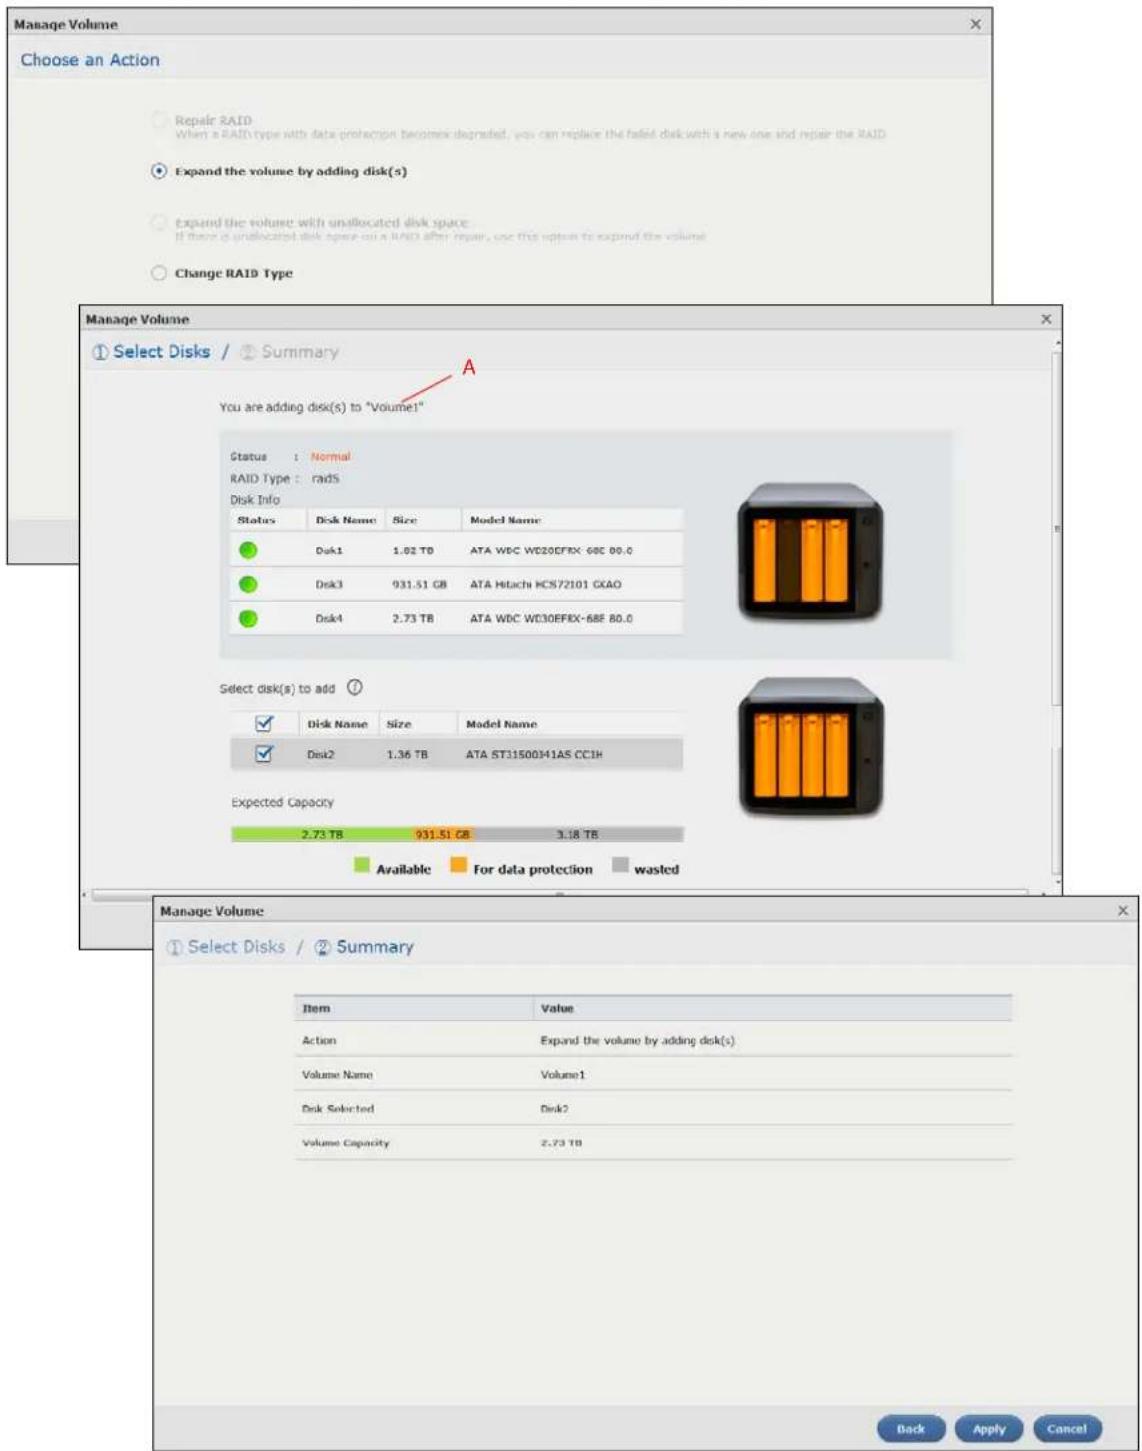
8.3.2 Managing a Volume
Use the Manage Volume screen to repair, expand a volume or change the volume's RAID type. In the Internal Storage > Volume screen, select a volume and then click Manage in the Volume section to open the screen as shown.
The available options vary depending on the conditions it matches. For example, the Repair RAID option is available only when a degraded volume is selected.
Figure 36 Manage Volume (Repair RAID)

text_image
Manage Volume Choose an Action Repair RAID When a RAID type with data protection becomes degraded, you can replace the failed disk with a new one and repair the RAID Expand the volume by adding disk(s) Expand the volume with unallocated disk space If there is unallocated disk space on a RAID after repair, use this option to expand the volume Change RAID Type Manage Volume ① Select Disks / ② Summary A You are repairing the RAID of "Volume1" status : Degraded RAID Type : rad5 Disk Info Status Disk Name Size Model Name Disk1 1.82 TB ATA WDC WD20EFKX-6BE 80.0 Disk4 2.73 TB ATA WDC WD30EFKX-6BE 80.0 Select a disk to replace the failed one Disk Name Size Model Name Disk2 1.36 TB ATA STJ1500341AS CC1H Disk3 931.51 GB ATA Hitachi HCS72J01 GKAO Expected Capacity 1.62 TB -931.51 GB 2.73 TB Available For data protection wasted Manage Volume ① Select Disks / ② Summary Item Value Action Repair RAID Volume Name Volume1 Disk Selected Disk3 Volume Capacity 1.82 TB Back Apply CancelFigure 37 Manage Volume (Expand the volume by adding disk(s))
text_image
Manage Volume Choose an Action Repair RAID When a RAID type with data protection becomes degraded, you can replace the failed disk with a new one and repair the RAID Expand the volume by adding disk(s) Expand the volume with unallocated disk space: If there is unallocated disk space on a RAID after repair, we this option to expand the volume. Change RAID Type Manage Volume Select Disks / Summary You are adding disk(s) to "Volume!" Status : Normal RAID Type : rads Disk Info Status Disk Name Size Model Name Disk1 1.02 TB ATA WDC WD20EFIX-68E 80.0 Disk3 931.51 GB ATA Hitachi HCS72101 GCAO Disk4 2.73 TB ATA WDC WD30EFIX-68E 80.0 Select disk(s) to add ? Disk Name Size Model Name Disk2 1.36 TB ATA STJ1500H1AS CCIH Expected Capacity 2.73 TB 931.51 GB 3.18 TB Available For data protection wasted Manage Volume Select Disks / Summary Item Value Action Expand the volume by adding disk(s) Volume Name Volume1 Disk Selected Disk2 Volume Capacity 2.73 TB Back Apply CancelFigure 38 Manage Volume (Change RAID Type)
text_image
Manage Volume Choose an Action Repair RAID When a RAID type with data protection becomes degraded, you can replace the failed disk with a new disk and repair the RAID Expand the volume by adding disk(s) Expand the volume with unallocated disk space If there is unallocated disk space on a RAID after repair, use this option to expand the volume Change RAID Type Manage Volume Summary Item Value Action Expand the volume with unallocated disk space Volume Name Volume1 Volume Capacity 1.92 TB Back Apply CancelFigure 39 Manage Volume (Change RAID Type)
text_image
Manage Volume Choose an Action Repair RAID when a RAID type with disk protection becomes degraded, you can replace the token disk with a new line and repair the RAID Expand the volume by adding disk(s) Expand the volume with unallocated disk space If there is unallocated disk space on a RAID after repair use this option to expand the volume Change RAID Type Manage Volume Select Disks and RAID Type / Summary You are changing the RAID type of "Volume1" status Normal RAID Type: basic Disk Info Status Disk Name Size Model Name Disk3 465.76 GB ATA ST3500*13AS JC*4S 1. Select disk(s) Disk Name size Model Name Disk4 465.76 GB ATA ST3500*13AS JC*4S 2. Choose a RAID type RAID 1 (recommended) 465.76 GB 465.76 GB Available For data protection wasted Manage Volume Select Disks and RAID Type / Summary Item Value Action Change RAID Type Volume Name Volume1 Disk Selected Disk4 New RAID Type RAID1 Volume Capacity 465.76 GB Back Apply CancelThe following table describes the labels in this screen.
Table 13 Manage Volume
| LABEL DESCRIPTION | |
| Repair RAID Select this to repair a degraded RAID volume. | |
| Expand the volume by adding disk(s) | Select this to add one or more disks to a JBOD, RAID 1 or RAID 5 volume. You can add a disk to increase an array's capacity or to use as a hot-spare (standby). When you add a disk to an existing array, you do not have to re-create shares, access rights and so on as you would if you create a new volume.Note: This option is available when a disk has not been allocated to any volume or disk group yet. |
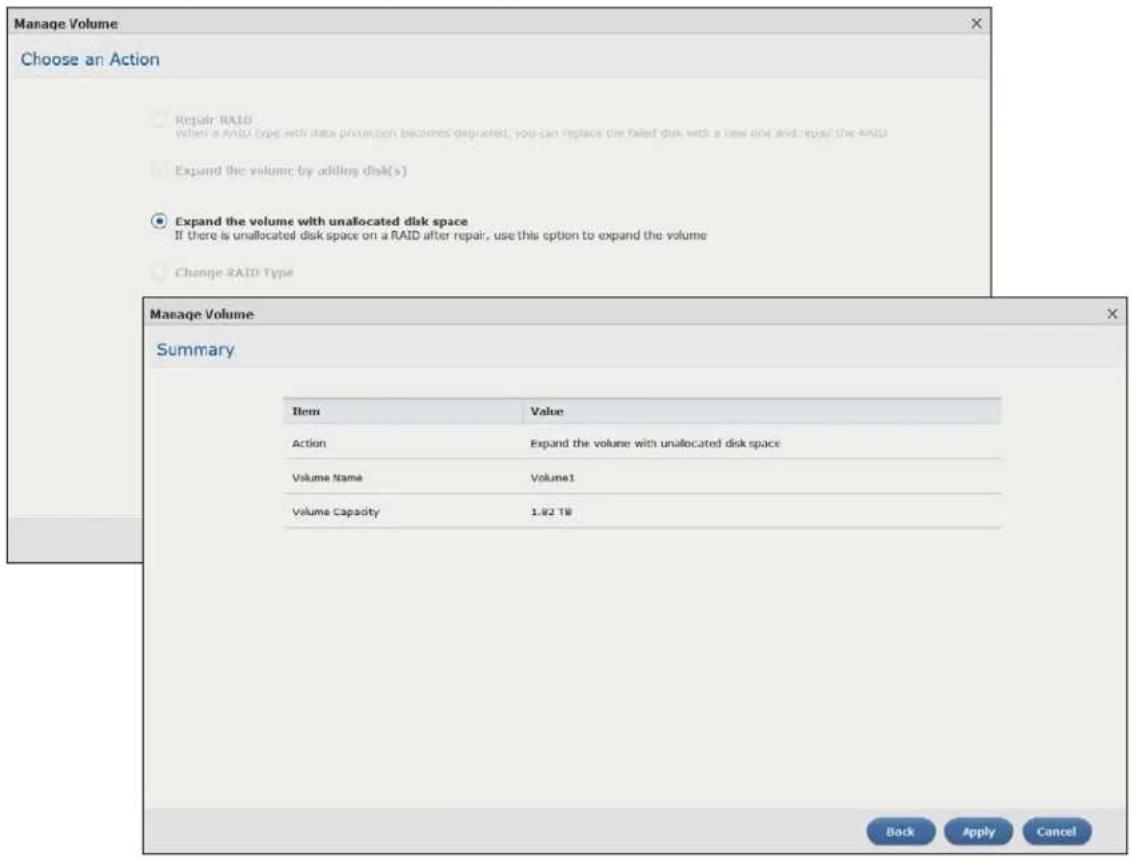
| Expand the volume with unallocated disk space | Select this to add more storage space to a volume if there is still some space unallocated on the same disk group. Select this if the NAS fails to expand a volume by adding disk(s) and the final volume capacity is not as expected. For example, you want to expand a 1 TB RAID 1 volume by adding two more 1 TB disks. The volume size should be 2 TB after expansion, however, you just see 1 TB. Use this option to fix the issue. |
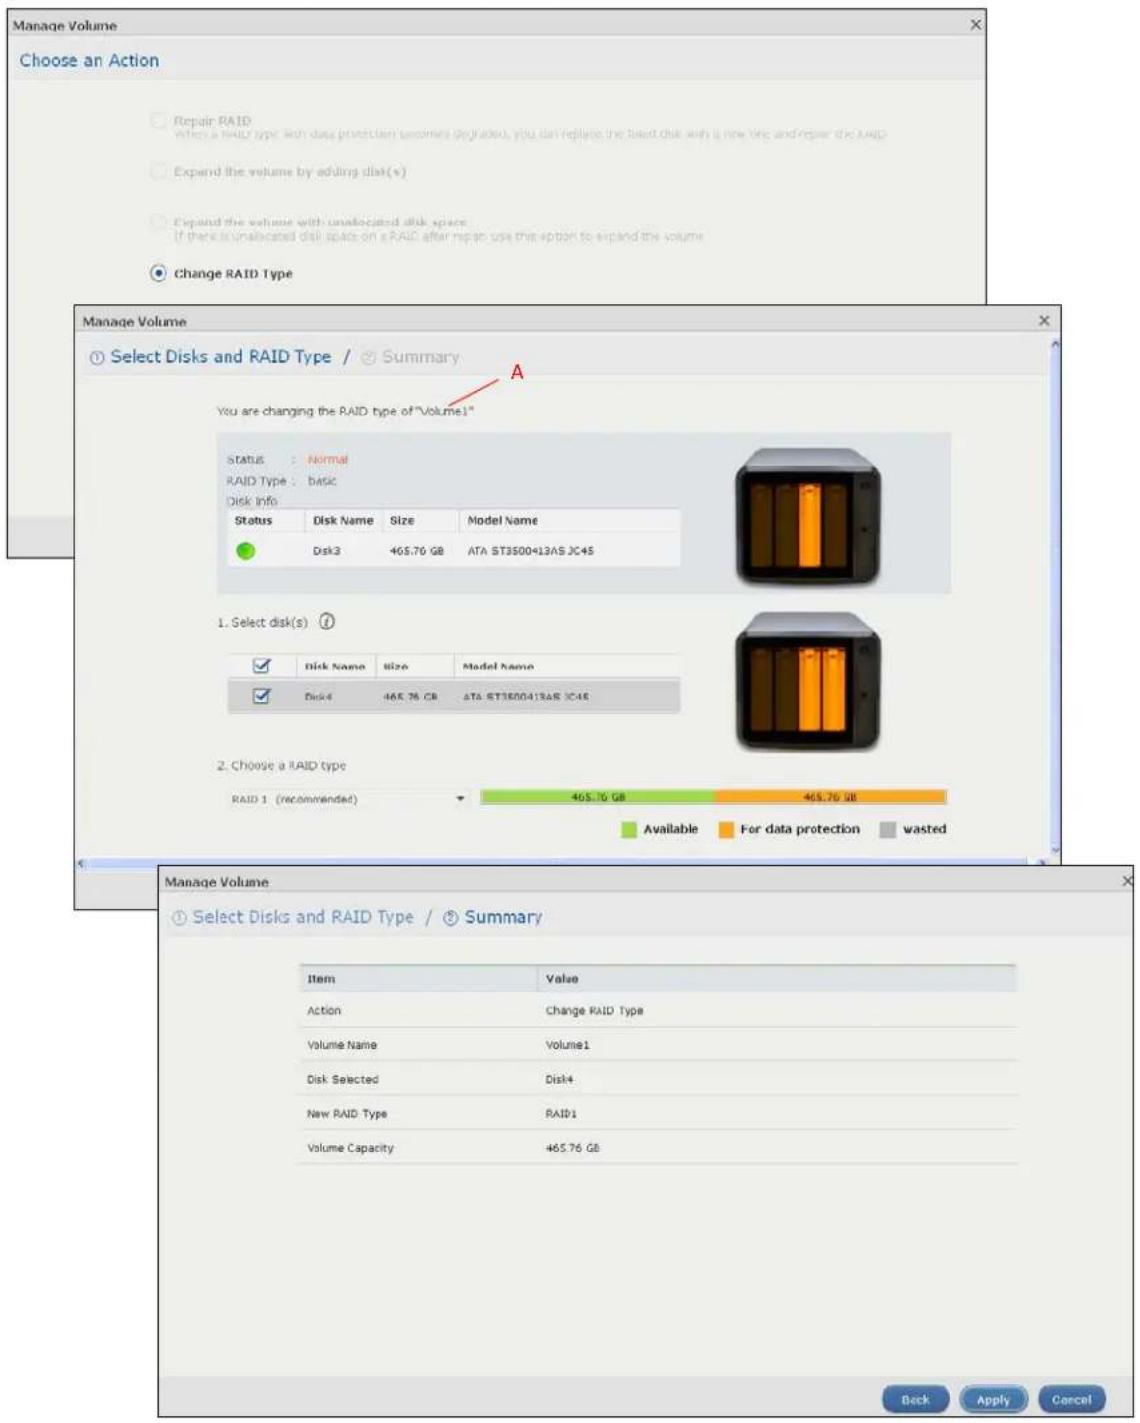
| Change RAID Type | Select this if you want to change the volume's RAID type from Basic to RAID 1, RAID 1 to RAID 5, or RAID 5 to RAID 6. |
| The following describes labels on the following screens after you select Repair RAID in this screen. | |
| Step 1. Select Disks | |
| A This shows the name of the volume you have selected. | |
| Status This field displays the status of the volume. | |
| RAID Type This field displays the type of RAID on which the volume is built. | |
| Disk Info | |
| Status This field displays the status of the disk. | |
| Disk Name This field displays the name of the disk. | |
| Size This field displays the total capacity of the disk. | |
| Model Name This field displays the model of the disk. | |
| Select a disk to replace the failed one | This section lists all available hard disks in the table and displays the corresponding disk tray of the disks you selected on the graphic at the right. |
| Select one or more hard disks for increasing the volume's capacity. Use the check box on the top to select or unselect all entries in this column. | |
| Disk Name This field shows the name of a hard disk. | |
| Size This field shows the total disk size. | |
| Model Name This field shows the model of the hard disk. | |
| Expected Capacity | This field shows the corresponding space allocations of available size, data protection area, and wasted size according to your selections on hard disks above.Note: Use the same capacity of hard disks for RAID 1, 5, 6, or 10 to avoid wasting space. |
| Back Click Back to go to the previous step. | |
| Next Click Next to go to the next step. | |
| Cancel | Click Cancel to close the screen without saving any settings. |
| Step 2. SummaryUse this screen to review the settings you configured in the last step. | |
| Action | This field displays for what the configuration is. |
| Volume Name | This field displays the name of the volume. |
| Disk Selected | This field displays the hard disks you have selected. |
| LABEL | DESCRIPTION |
| Volume Capacity | This field displays the total available size of the volume. |
| Back Click Back to go to the previous step. | |
| Apply Click Apply to save the settings. | |
| Cancel | Click Cancel to close the screen without saving any settings. |
| The following describes labels on the following screens after you select Expand the volume by adding disk(s) in this screen. | |
| Step 1. Select Disks | |
| A This shows the name of the volume you have selected. | |
| Status This field displays the status of the volume. | |
| RAID Type This field displays the type of RAID on which the volume is built. | |
| Disk Info | |
| Status This field displays the status of the disk. | |
| Disk Name This field displays the name of the disk. | |
| Size This field displays the total capacity of the disk. | |
| Model Name This field displays the model of the disk. | |
| Select disk(s) to add | This section lists all available hard disks in the table and displays the corresponding disk tray of the disks you selected on the graphic at the right. |
| Select one or more hard disks for increasing the volume's capacity. Use the check box on the top to select or unselect all entries in this column. | |
| Disk Name This field shows the name of a hard disk. | |
| Size This field shows the total disk size. | |
| Model Name This field shows the model of the hard disk. | |
| Expected Capacity | This field shows the corresponding space allocations of available size, data protection area, and wasted size according to your selections on hard disks above.Note: Use the same capacity of hard disks for RAID 1, 5, 6, or 10 to avoid wasting space. |
| Back Click Back to go to the previous step. | |
| Next Click Next to go to the next step. | |
| Cancel | Click Cancel to close the screen without saving any settings. |
| Step 2. SummaryUse this screen to review the settings you configured in the last step. | |
| Action This field displays for what the configuration is. | |
| Volume Name This field displays the name of the volume. | |
| Disk Selected This field displays the hard disks you have selected. | |
| Volume Capacity | This field displays the total available size of the volume. |
| Back Click Back to go to the previous step. | |
| Apply Click Apply to save the settings. | |
| Cancel | Click Cancel to close the screen without saving any settings. |
| The following describes labels on the following screens after you select Expand the volume with unallocated disk space in this screen. | |
| Summary | |
| Action This field displays for what the configuration is. | |
| Volume Name This field displays the name of the volume. | |
| Volume Capacity | This field displays the total available size of the volume. |
| Back Click Back to go to the previous step. | |
| Apply Click Apply to save the settings. | |
| Cancel | Click Cancel to close the screen without saving any settings. |
| The following describes labels on the following screens after you select Change RAID Type in this screen. | |
| Step 1. Select Disks and RAID Type | |
| A This shows the name of the volume you have selected. | |
| Status This field displays the status of the volume. | |
| RAID Type This field displays the type of RAID on which the volume is built. | |
| Disk Info | |
| Status This field displays the status of the disk. | |
| Disk Name This field displays the name of the disk. | |
| Size This field displays the total capacity of the disk. | |
| Model Name This field displays the model of the disk. | |
| Select disk(s) | This section lists all available hard disks in the table and displays the corresponding disk tray of the disks you selected on the graphic at the right. |
| Select one or more hard disks for changing the volume's RAID type. Use the check box on the top to select or unselect all entries in this column. | |
| Disk Name This field shows the name of a hard disk. | |
| Size This field shows the total disk size. | |
| Model Name This field shows the model of the hard disk. | |
| Choose a RAID type | Select a RAID type from the drop-down list box. The corresponding space allocations of available size, data protection area, and wasted size display.Use RAID 1 with two or four disks to mirror primary data to another disk(s) with high performance.Use RAID 5 with three or more disks to balance performance, hard disk capacity usage with data protection in case of disk failure.Use RAID 6 with four disks for more data protection in case of disk failure.See Table 8 on page 50 or Section 8.6 on page 98 for more information.Note: Use the same capacity of hard disks for RAID to avoid wasting space. |
| Back Click Back to go to the previous step. | |
| Next Click Next to go to the next step. | |
| Cancel | Click Cancel to close the screen without saving any settings. |
| Step 2. SummaryUse this screen to review the settings you configured in the last step. | |
| Action This field displays for what the configuration is. | |
| Volume Name This field displays the name of the volume. | |
| Disk Selected | This field displays the hard disks you have selected. |
| RAID Type This field displays the type of RAID on which the volume will be built. | |
| LABEL DESCRIPTION | |
| Volume Capacity | This field displays the total size of the volume. |
| Back Click Back to go to the previous step. | |
| Apply Click Apply to save the settings. | |
| Cancel | Click Cancel to close the screen without saving any settings. |
8.3.3 Creating a Volume on Disk Group
Use the Create Volume on Disk Group screen to configure a volume on an existing or new disk group. Click Create in the Volume on Disk Group section of the Internal Storage > Volume screen to open the screen as shown.
Note: It is suggested to create a volume directly on a disk instead of on a disk group if high performance is important to you. See Section 8.3.1 on page 55 for more information.
Figure 40 Create Volume on an Existing Disk Group
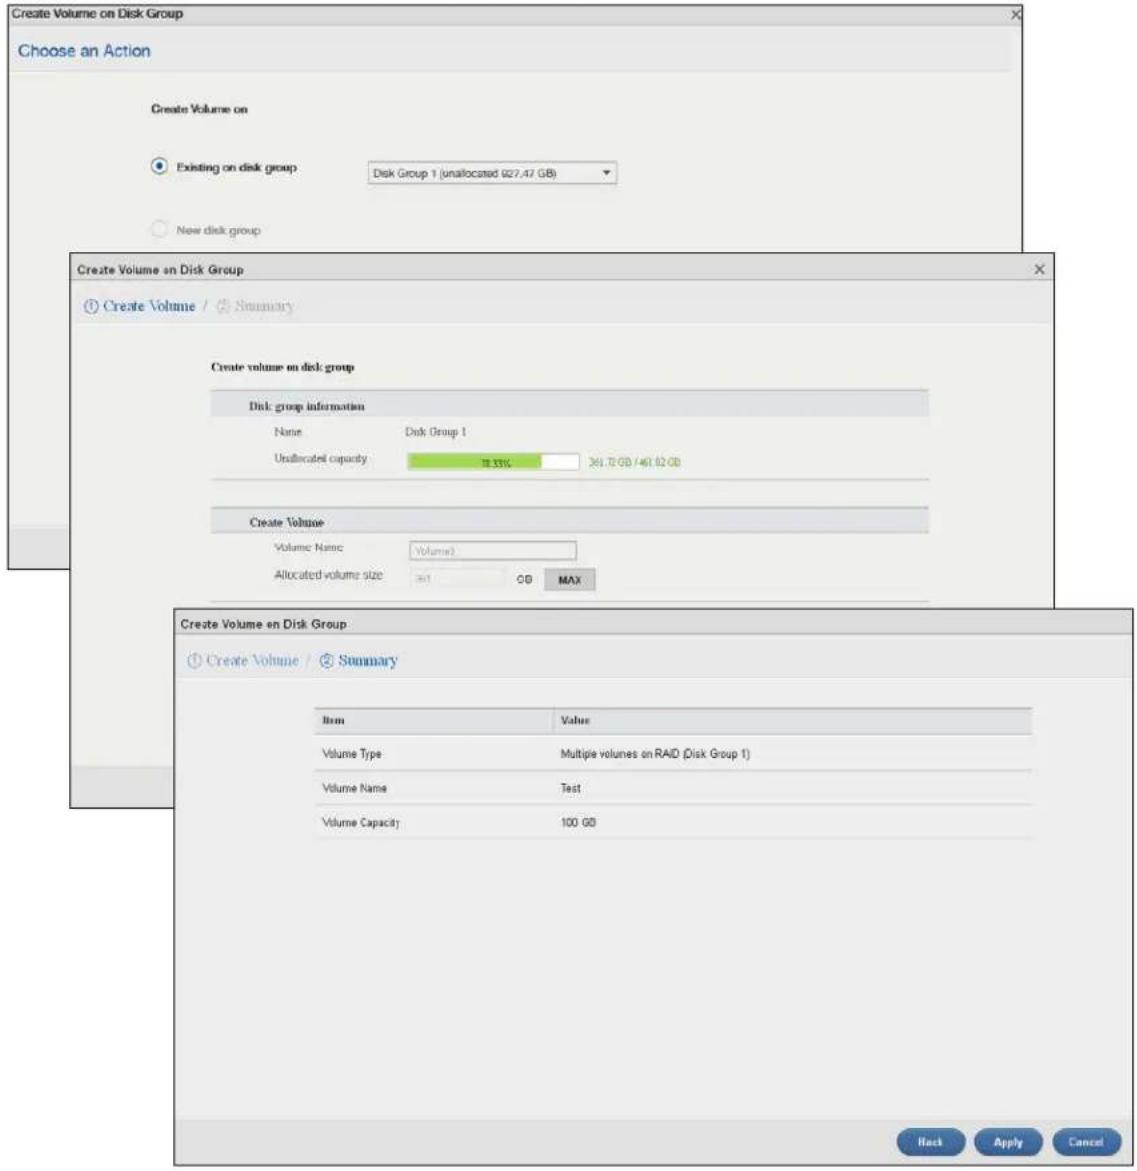
text_image
Create Volume on Disk Group Choose an Action Create Volume on Existing on disk group: Disk Group 1 (unallocated 927.47 GB) New disk group Create Volume on Disk Group Create Volume / Summary Create volume on disk group Disk group information Name Disk Group 1 Unallocated capacity 38.33% 361.72 GB / 401.62 GB Create Volume Volume Name Volume1 Allocated volume size =1 GB MAX Create Volume on Disk Group Create Volume / Summary Item Value Volume Type Multiple volumes on RAID (Disk Group 1) Volume Name Test Volume Capacity 100 GB Hack Apply CancelFigure 41 Create Volume on a New Disk Group
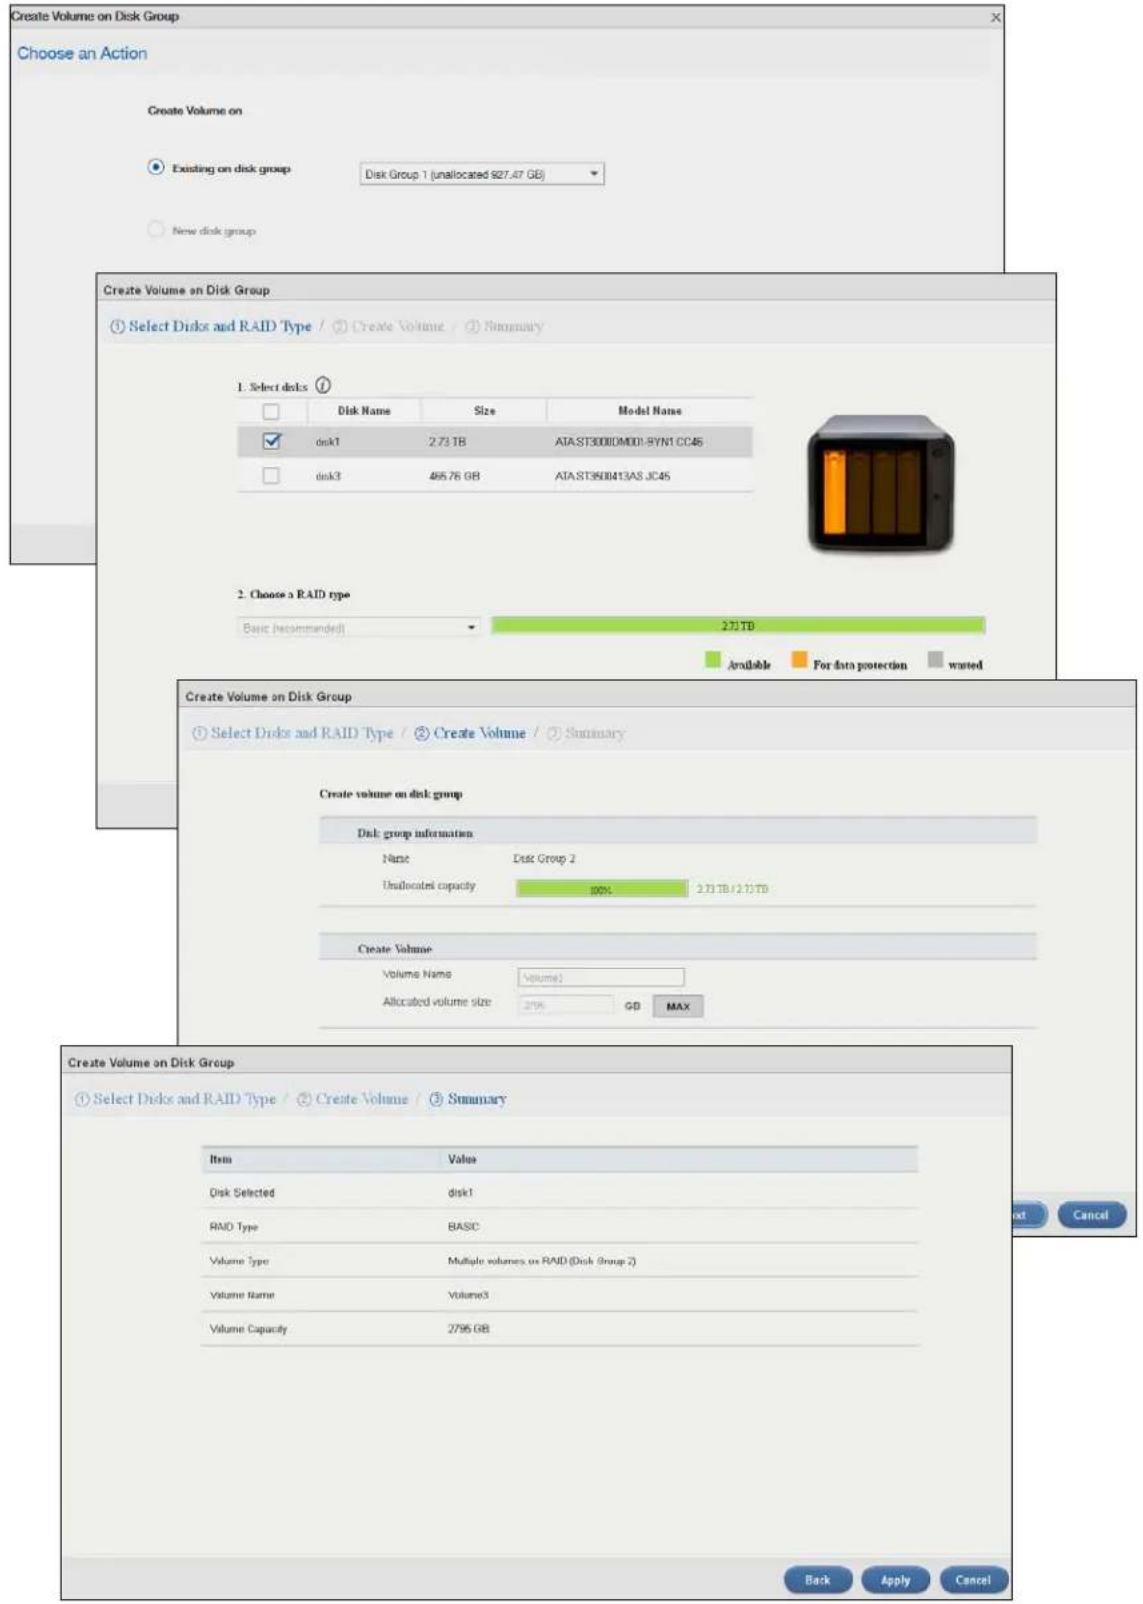
text_image
Create Volume on Disk Group Choose an Action Create Volume on Existing on disk group Disk Group 1 (unallocated 927.47 GB) New disk group Create Volume on Disk Group Select Discs and RAID Type / Create Volume / Summary 1. Select disks Disk Name Size Model Name disk1 2.73 TB ATA.ST3000UM001-BYN1 CC45 disk3 465.76 GB ATA.ST950413AS_JC45 2. Choose a RAID type Basic (recommended) 221TB Available For data protection wasted Create Volume on Disk Group Select Discs and RAID Type / Create Volume / Summary Create volume on disk group Disk group information Name Disk Group 2 Unallocated capacity 100% 2.73 TB/2.73 TB Create Volume Volume Name Volume1 Allocated volume size 2796 GB MAX Create Volume on Disk Group Select Discs and RAID Type / Create Volume / Summary Item Value Disk Selected disk1 RAM Type BASIC Volume Type Multiple volumes on RAM (Disk Group 2) Volume Name Volume3 Volume Capacity 2796 GB Back Apply CancelThe following table describes the labels in this screen.
Table 14 Create Volume on Disk Group
| LABEL DESCRIPTION | |
| Choose an Action | |
| Create Volume on | Select Existing on disk group and a disk group from the drop-down list box to create a volume on the disk group. This option is available only when there is an existing disk group available.Select New disk group to create a disk group and then a volume on the disk group. |
| The following fields describe the labels on the following screens if you select Existing on disk group on the Choose an Action screen. | |
| Step 1. Create Volume | |
| Disk group information | |
| Name This field displays the name of the disk group. | |
| Unallocated capacity | This field displays the percentage of the available size, the size in use, and total size of the disk group. |
| Create Volume | |
| Volume Name This field displays the default name of the volume. You can also type a new name for the volume. | |
| Allocated Volume Size | This field displays the number of Gigabytes available on the volume by default. You can change the size to allocate to this volume. Click MAX to allocate all available size of the disk group to the volume. |
| Back Click Back to go to the previous step. | |
| Next Click Next to go to the next step. | |
| Cancel | Click Cancel to close the screen without saving any settings. |
| Step 2. Summery | |
| Volume Type | This field displays the type of the volume, Multiple volumes on RAID (Disk Group X) where Disk Group X is the disk group's name. |
| Volume Name This field displays the name of the volume. | |
| Volume Capacity This field displays the size of the volume. | |
| Back Click Back to go to the previous screen. | |
| Next Click Next to go to the next step. | |
| Cancel | Click Cancel to close the screen without saving any settings. |
| The following fields describe the labels on the following screens after you select New disk group on the Choose an Action screen. | |
| Step 1. Select Disks and RAID Type | |
| Select disks | This section lists all available hard disks in the table and displays the disk trays they are currently installed on the graphic at the right. |
| Select one or more hard disks where you want to create a volume. Use the check box on the top to select or unselect all entries in this column. | |
| Disk Name This field shows the name of the hard disk. | |
| Size | This field shows the total disk size. |
| Model Name | This field shows the model of the hard disk. |
| Choose a RAID type Select | a RAID type from the drop-down list box. The corresponding space allocations of available size, data protection area, and wasted size display.Use Basic with one disk.Use JBOD with two or more disks for maximum capacity.Use RAID 0 with two or four disks for maximum speed.Use RAID 1 with two or more disks to mirror primary data to another disk(s) with high performance.Use RAID 5 with three or more disks to balance performance, hard disk capacity usage with data protection in case of disk failure.Use RAID 6 with four disks for more data protection in case of disk failure.Use RAID 10 with four disks to get better performance than RAID 6, with slightly less data protection.See Table 8 on page 50 or Section 8.6 on page 98 for more information.Note: Use the same capacity of hard disks for RAID 1, 5, 6, or 10 to avoid wasting space. |
| Back Click Back to go to the previous screen. | |
| Next Click Next to go to the next step. | |
| Cancel | Click Cancel to close the screen without saving any settings. |
| Step 2. Create Volume | |
| Disk group information | |
| Name This field displays the name of the disk group. | |
| Unallocated capacity | This field displays the percentage of the available size, the size in used, and total size of the disk group. |
| Create Volume | |
| Volume Name This field displays the default name of the volume. You can also type a new name for the volume. | |
| Volume Capacity | This field displays the number of Gigabytes available on the volume by default. You can set the size to allocate for this volume. Click MAX to allocate all available capacity of the disk group to the volume. |
| Back Click Back to go to the previous step. | |
| Next Click Next to go to the next step. | |
| Cancel | Click Cancel to close the screen without saving any settings. |
| Step 3. SummaryUse this screen to review the settings you configured in the last step. | |
| Disk Selected This field displays the hard disk(s) on which the RAID array will be built. | |
| RAID Type This field displays the type of RAID on which the volume will be built. | |
| Volume Type | This field displays the type of the volume, Multiple volumes on RAID (Disk Group X) where Disk Group X is the disk group's name. |
| Volume Name This field displays the name of the volume. | |
| Volume Capacity This field displays the size of the volume. | |
| Back Click Back to go to the previous step. | |
| Apply Click Apply to save the settings. | |
| Cancel | Click Cancel to close the screen without saving any settings. |
8.3.4 Editing a Volume on Disk Group
Use the Edit Volume on Disk Group screen to expand a volume's capacity. In the Internal Storage > Volume screen, select a volume and then click Edit in the Volume on Disk Group section to open the screen as shown.
Figure 42 Edit Volume on Disk Group

text_image
Edit Volume on Disk Group Unallocated capacity on Disk Group 1 : 99.96% 2.72 TB / 2.73 TB Current volume size : 1007.90 MB New volume size : 1 GB MAX Apply CancelThe following table describes the labels in this screen.
Table 15 Edit Volume on Disk Group
| LABEL DESCRIPTION | |
| Unallocated capacity on Disk Group X | This field displays the percentage of the disk group size unallocated to other volumes, the size in use, and total size of the disk group. |
| Current volume size | This field displays the total size of the volume, excluding the file system size. |
| New volume size | This field displays the smallest size to which you can expand the volume (this includes the volume's current available size, file system size, and a minimum additional capacity for expansion). You can enter a bigger number or click MAX to allocate all the rest of the space in the disk group to the volume. |
| Apply Click Apply | to save the settings. |
| Cancel | Click Cancel to close the screen without saving any settings. |
8.3.5 Disk Group
Use the Disk Group screen to configure and manage disk groups. From the Internal Storage screen, click Disk Group to open the screen as shown.
Figure 43 Disk Group
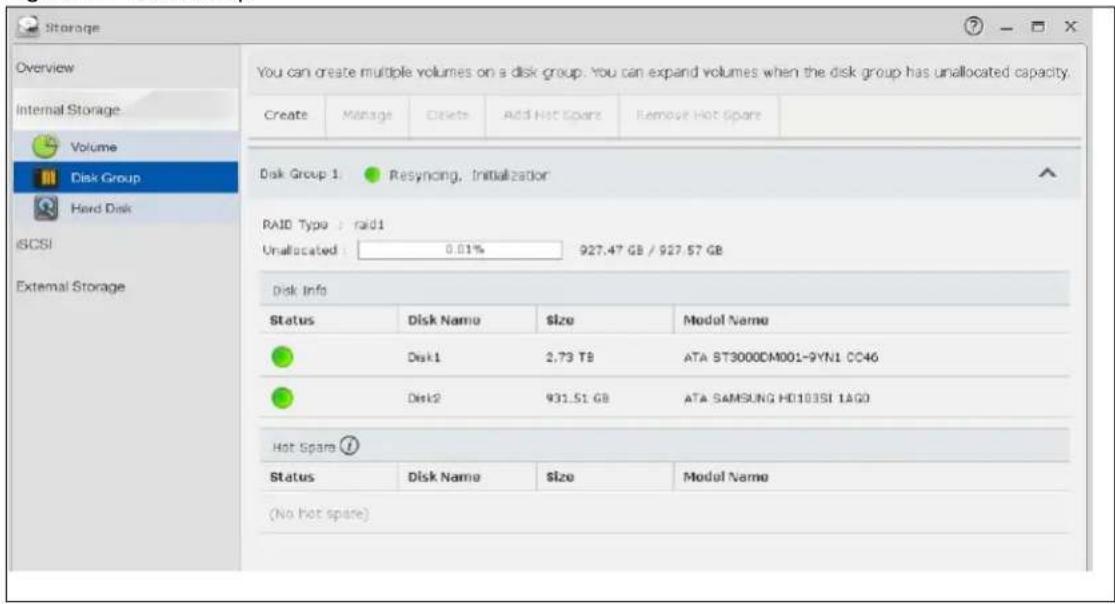
text_image
Storage Overview Internal Storage Volume Disk Group Hard Disk ISCSI External Storage You can create multiple volumes on a disk group: You can expand volumes when the disk group has unallocated capacity. Create Manage Delete Add Hot Spare Remove Hot Spare Disk Group 1 Resyncing, Initialization RAID Type : raid1 Unallocated : 0.01% 927.47 GB / 927.57 GB Disk Info Status Disk Name Size Model Name Disk1 2.73 TB ATA ST3000DM001-9YN1 CC46 Disk2 931.51 GB ATA SAMSUNG HD103SI 1AGD Hot Spare ? Status Disk Name Size Model Name (No hot spare)The following table describes the labels in this screen.
Table 16 Disk Group
| LABEL DESCRIPTION | ||
| Create | Click this to format internal hard disks and create a new disk group. All data on the disk(s) will be lost.Note: This button is not available while the NAS is creating, deleting, or changing the RAID type of any volume or disk group. | |
| Manage | Select a volume and click Manage to edit, repair, or expand the volume.Note: This button is available only when you can repair, expand or change RAID type. | |
| Delete | Select a disk group and click Delete to remove it.Note: If you delete a disk group, all data in the disk group is erased. | |
| Add Hot Spare | Select a RAID 1 or RAID 5 disk group and click Add Hot Spare to add another disk as a hot-spare (standby) to the RAID array. See Section 8.6 on page 98 for more information.Note: The capacity of the disk you are adding must be equal to or greater than the largest disk in the RAID 1 or RAID 5 array.Note: You need four hard disks installed to use RAID 5 with hotspare. | |
| Remove Hot Spare | Select a RAID 1 or RAID 5 disk group and click Remove Hot Spare to remove the standby drive from the RAID array. | |
| Disk Group X | This field shows the name of the disk group and whether it is normal, degraded, crashed, Creating, Deleting, Expanding, Repairing or Changing the RAID type.Normal: A green circle represents a healthy volume.Degraded: An orange circle represents a degraded RAID 1 volume.Crashed: A red circle represents a down volume.The following status also displays the percentage of an action has been completed.Creating: The NAS's percentage progress in creating the volume.Deleting: The NAS's percentage progress in deleting the volume.Expanding: The NAS's percentage progress in expanding the volume. For a RAID 1 volume, this also displays the percentage of resynchronizing the NAS has finished and the evaluated remaining time.Repairing: The NAS's percentage progress in repairing the volume. For a RAID 1 volume, this also displays the percentage of resynchronizing the NAS has finished and the evaluated remaining time.Changing: The NAS's percentage progress in changing the volume's RAID type. For a RAID 1 volume, this also displays the percentage of resynchronizing the NAS has finished and the evaluated remaining time. | |
| RAID Type | This field shows the type of the RAID over which this disk group is running. | |
| Unallocated | This field shows the percentage of the disk group size that is available, the disk group size being used, and the total disk group size. | |
| Disk Info | ||
| Status This field shows the status of the disk. | ||
| Disk Name This field shows the name of the disk. | ||
| Size This field shows the total size of the disk. | ||
| Model Name This field shows the model of the disk. | ||
| Hot Spare | ||
| Status This field shows the status of the hot-spare disk. | ||
| Disk Name This field shows the name of the hot-spare disk. | ||
| Size This field shows the total size of the hot-spare disk. | ||
| Model Name This field shows the model of the hot-spare disk. | ||
8.3.5.1 Creating a Disk Group
Use the Create Disk Group screen to create a disk group. From the Storage > Disk Group screen, click the Create button to open the screen as shown.
Figure 44 Create Disk Group
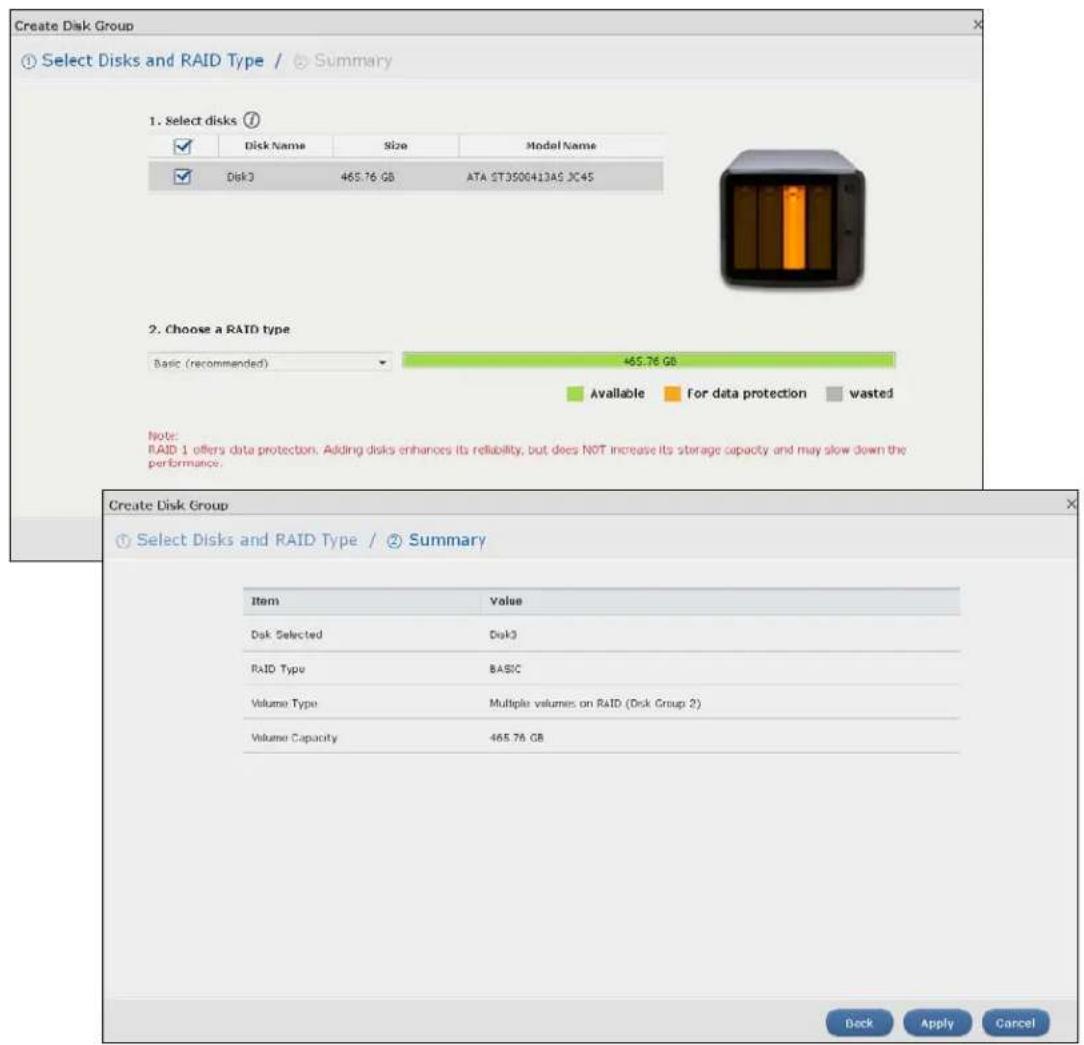
text_image
Create Disk Group Select Disks and RAID Type / Summary 1. Select disks ① Disk Name Size Model Name Disk3 465.76 GB ATA 2T3500413AS 3C4S 2. Choose a RAID type Basic (recommended) 465.76 GB Available For data protection wasted Note: RAID 1 offers data protection. Adding disks enhances its reliability, but does NOT increase its storage capacity and may slow down the performance. Create Disk Group Select Disks and RAID Type / Summary Item Value Disk Selected Disk3 RAID Type BASIC Volume Type Multiple volumes on RAID (Disk Group 2) Volume Capacity 465.76 GB Deck Apply CancelThe following table describes the labels in this screen.
Table 17 Create Disk Group
| LABEL DESCRIPTION | |
| Step 1. Select Disks and RAID Type | |
| Select disks | This section lists all available hard disks in the table and displays the disk trays the hard disks are currently installed in the graphic on the right. |
| Select one or more hard disks where you want to create a disk group. Use the check box on the top to select or unselect all entries in this column. | |
| Disk Name This field | shows the name of the hard disk. |
| Size This field shows | the total disk size. |
| Model Name This field | shows the model of the hard disk. |
| Choose a RAID type | Select a RAID type from the drop-down list box. The corresponding space allocations of available size, data protection area, and wasted size display.UseBasicwith one disk.UseJBODwith two or more disks for maximum capacity.UseRAID 0with two or four disks for maximum speed.UseRAID 1with two or more disks to mirror primary data to another disk(s) with high performance.UseRAID 5with three or more disks to balance performance, hard disk capacity usage with data protection in case of disk failure.UseRAID 6with four disks for more data protection in case of disk failure.UseRAID 10with four disks to get better performance than RAID 6, with slightly less data protection.SeeTable 8 on page 50 or Section 8.6 on page 98for more information.Note: Use the same capacity of hard disks for RAID 1, 5, 6, or 10 to avoid wasting space. |
| Back Click Back to go to the previous screen. | |
| Next Click Next to go to the next step. | |
| Cancel | Click Cancelto close the screen without saving any settings. |
| Step 2. SummaryUse this screen to review the settings you configured in the last step. | |
| Disk Selected This field displays the hard disk(s) on which the RAID array will be built. | |
| RAID Type This field displays the type of RAID on which the volume will be built. | |
| Volume Type | This field displays the type of the volume, Multiple volumes on RAID (Disk Group X) where Disk Group X is the disk group's name. |
| Volume Capacity This field displays the size of the volume. | |
| Back Click Back to go to the previous step. | |
| Apply Click Apply to save the settings. | |
| Cancel | Click Cancelto close the screen without saving any settings. |
8.3.6 Hard Disk
Use the Hard Disk screen to view all disk information. From the Storage screen, click Hard Disk to open the screen as shown.
Figure 45 Hard Disk
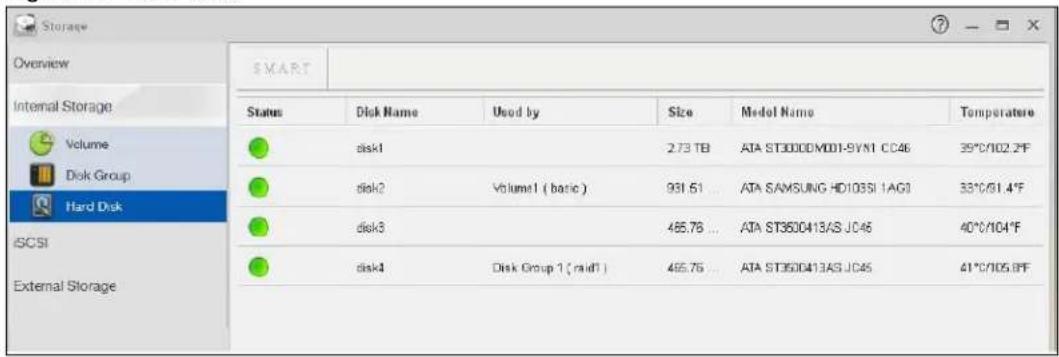
text_image
Storage Overview Internal Storage Volume Disk Group Hard Disk SCSI External Storage SMART Status Disk Name Used by Size Model Name Temperatere Disk1 2.73 TB ATA ST30000M001-SYN1 CC46 39°C/102.2°F Disk2 Volume1 ( basic ) 981.61 ATA SAMSUNG HD103SI 1AG1 33°C/61.4°F Disk3 485.76 ATA ST3500413AS JC46 40°C/104°F Disk4 Disk Group 1 ( midf ) 485.76 ATA ST3500413AS JC46 41°C/105.8°FThe following table describes the labels in this screen.
Table 18 Hard Disk
| LABEL DESCRIPTION | |
| Status This field shows the status of an installed hard disk.Normal: A green circle displays. This represents the volume is functioning normally.Crashed: A red circle displays. This represents the volume is down. | |
| Disk Name This field shows the name of the hard disk. | |
| Used by | This field shows the name of a volume or disk group built on the hard disk if any. This field also displays the RAID type the volume or disk group is using. |
| Size This field shows the total size of the hard disk. | |
| Model Name This field shows the model of the hard disk. | |
| Temperature This field shows the temperature of the hard disk in degrees celsius ( °C) and fahrenheit (°F). | |
8.3.6.1 S.M.A.R.T
Use the S.M.A.R.T screens to view hard disk health indicators. Self Monitoring, Analysis, and Reporting Technology (S.M.A.R.T) detects and reports the reliability of hard disks using standard indicators (called "attributes"), to help you anticipate possible disk failures.
Note: The available S.M.A.R.T information varies from one hard disk vendor to another.
From the Internal Storage > Hard Disk screen, select a disk and click S.M.A.R.T to open the screen as shown.
Figure 46 S.M.A.R.T Overview
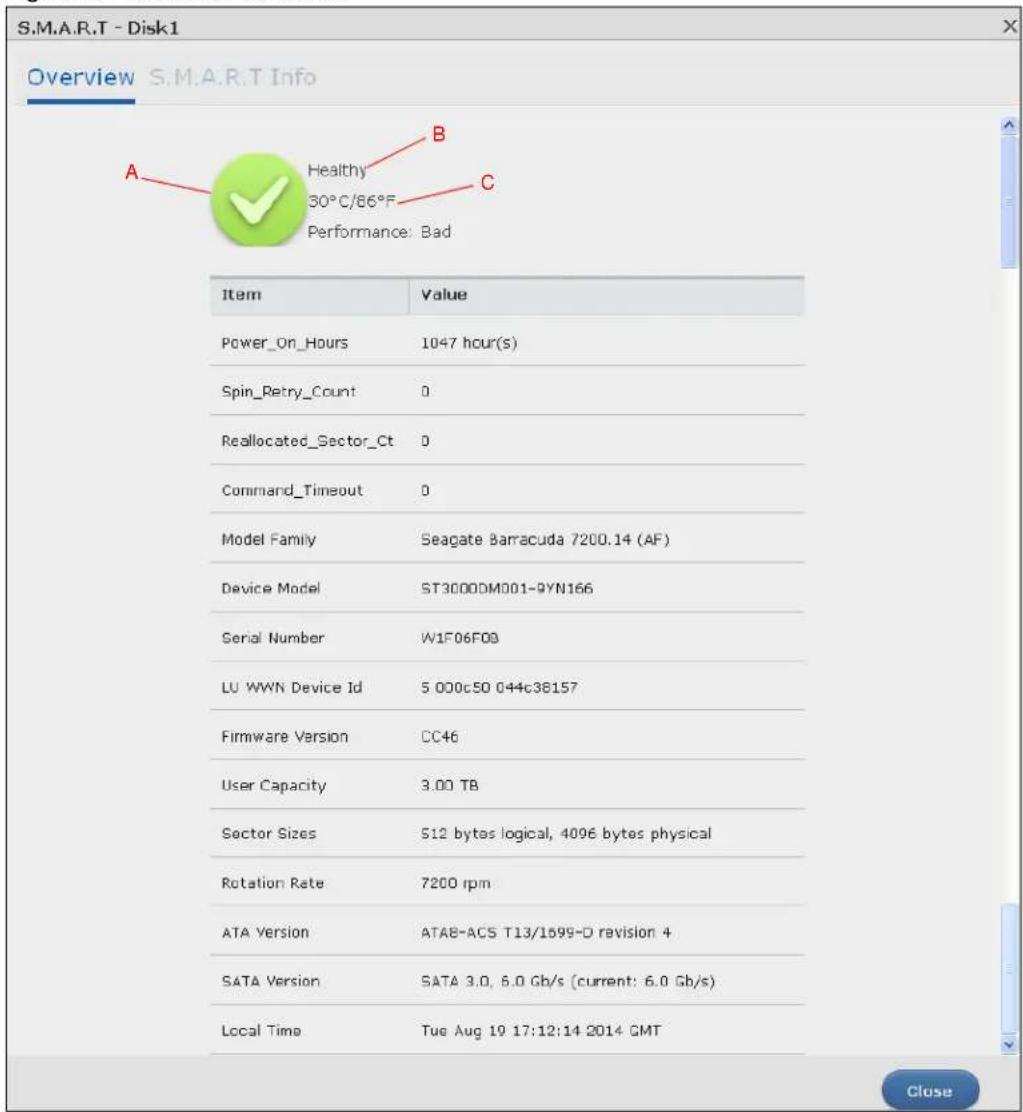
text_image
S.M.A.R.T - Disk1 Overview S.M.A.R.T Info A Healthy B 30°C/86°F C Performance: Bad Item Value Power_On_Hours 1047 hour(s) Spin_Retry_Count 0 Reallocated_Sector_Ct 0 Command_Timeout 0 Model Family Seagate Barracuda 7200.14 (AF) Device Model ST3000DM001-9YN166 Serial Number W1F06F08 LU WWN Device Id 5 000c50 044c38157 Firmware Version CC46 User Capacity 3.00 TB Sector Sizes 512 bytes logical, 4096 bytes physical Rotation Rate 7200 rpm ATA Version ATA8-ACS T13/1699-D revision 4 SATA Version SATA 3.0, 6.0 Gb/s (current: 6.0 Gb/s) Local Time Tue Aug 19 17:12:14 2014 GMT CloseThe following table describes the labels in this screen.
Table 19 S.M.A.R.T Overview
| LABEL DESCRIPTION | |
| A | This shows the current status of the hard disk (a green circle with a check mark indicates healthy). |
| B This shows the overall health of the hard disk based on S.M.A.R.T diagnostics. | |
| C This shows the temperature of the hard disk in degrees celsius ( °C) and fahrenheit (°F). | |
| Performance | This shows your hard disk's performance (Good or Bad). |
| Power_On_Hours | This field shows the number of hours the hard disk has been in power-on state since it was produced. |
| Spin_Retry_Count | This field shows the total number of spin start retry attempts. This is the number of attempts to spin up to fully operational speed the hard drive has made when the first attempt did not succeed. An increase in this value is an indicator of hard disk mechanical subsystem problems. |
| Reallocated_Sector_Ct | This field shows the total number of reallocated sectors on the hard drive. When the hard drive detects a read/write/verification error, it marks the sector as “reallocated” and transfers the data to a specially reserved (spare) area. The process is also known as remapping with “reallocated” sectors known as remaps. The more sectors the hard disk has to reallocate, the slower read and write speeds become. |
| Command_Timeout | This field shows the temperature of the hard disk in degrees celsius (°C) and fahrenheit (°F). |
| Model Family | This field shows the model family of the hard disk. |
| Device Model | This field shows the hard disk model number that uniquely identifies a hard disk. |
| Serial Number | This field shows this individual hard disk’s serial number from the manufacturer. |
| LU WWN Device Id | This field shows the hard disk’s Logical Unit World Wide Name Device Identifier. |
| Firmware Version | This field shows the version number of the hard disk’s internal operating software. |
| User Capacity | This field shows the hard disk’s usable size. |
| Sector Sizes | This field shows the sector size of the hard disk. A sector is the smallest physical storage unit on a hard disk. Normally it is 512 bytes. |
| Rotation Rate | This field shows the rotational speed of the hard disk, measured in revolutions per minute (rpm). |
| ATA Version | This field shows the hard disk’s Advanced Technology Attachment version number. |
| SATA Version | This field shows the hard disk’s Serial ATA (SATA) version number. |
| Local Time This | field shows the local time that the hard disk is using. |
| SMART support | This field shows whether or not the hard disk is SMART-capable. |
| SMART support | This field shows whether or not the hard disk has SMART monitoring turned on. |
| Close Click this | button to close the screen. |
8.3.6.2 SMART Info
Use this screen to display more details information about the volume.
Click S.M.A.R.T Info in the S.M.A.R.T Overview screen to display the following.
Figure 47 S.M.A.R.T Info
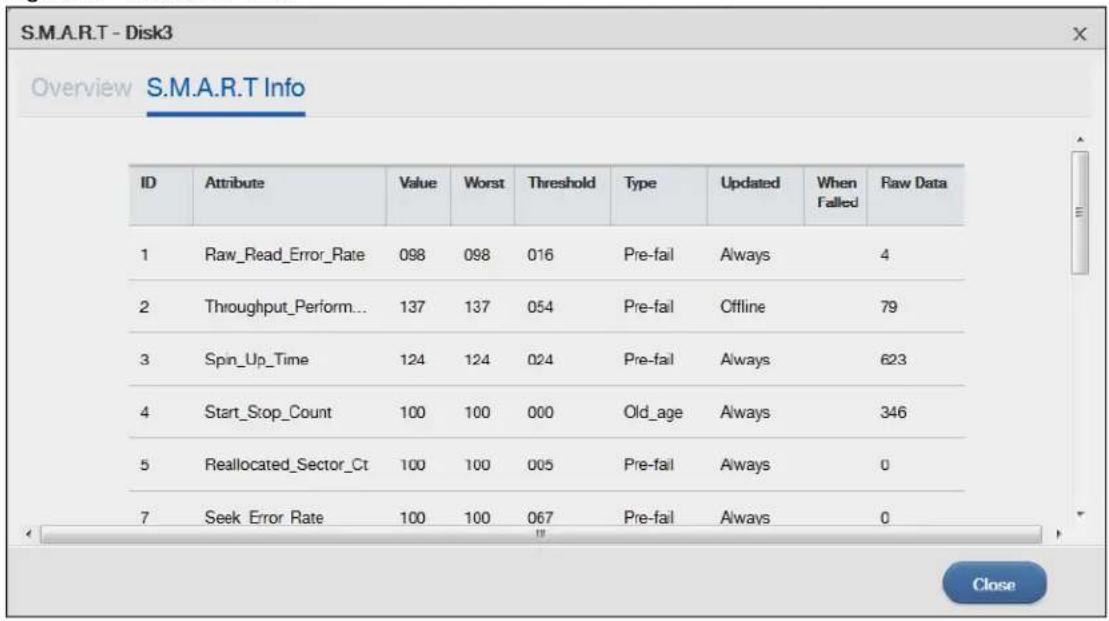
text_image
S.M.A.R.T - Disk3 Overview S.M.A.R.T Info ID Attribute Value Worst Threshold Type Updated When 1 Raw_Read_Error_Rate 098 098 016 Pre-fail Always 4 2 Throughput_Perform... 137 137 054 Pre-fail Offline 79 3 Spin_Up_Time 124 124 024 Pre-fail Always 623 4 Start_Stop_Count 100 100 000 Old_age Always 346 5 Reallocated_Sector_Ct 100 100 005 Pre-fail Always 0 7 Seek Error Rate 100 100 067 Pre-fail Always 0 CloseThe following table describes the labels in this screen.
Table 20 S.M.A.R.T Info
| LABEL DESCRIPTION | |
| ID This is the identification number used to tag a hard disk attribute.This is standard across all S.M.A.R.T-enabled storage devices. However it depends on the storage vendor which attributes it will allow S.M.A.R.T to diagnose. | |
| Attribute | This refers to an attribute of the hard disk that S.M.A.R.T can assess. Attributes describe the hard disk's physical state, performance, wear-and-tear, and so on. |
| Value | This is a value that corresponds to the Raw Data. Compare this with the Threshold.S.M.A.R.T compresses the raw value(s) into a digit from 1 to 253, where 1 indicates the worst scenario while 253 indicates the best scenario.The values 100 or 200 usually represent the mean or normal value. |
| Worst This is the lowest value attained by the hard disk since S.M.A.R.T started its assessment of the hard disk. | |
| Threshold This is the attribute's threshold value. If the attribute's current normalized value is less than or equal to the threshold, the attribute has failed. An attribute value close to or below the threshold indicates the hard drive is no longer reliable. | |
| Type This shows S.M.A.R.T's assessment of the hard disk.Old_age indicates end-of-product life from old-age (normal wearing out) if the attribute value is less than or equal to the threshold.Pre-fail indicate imminent hard drive failure if the attribute value is less than or equal to the threshold.Note that just because an attribute is of the Pre-fail type does not mean your hard drive is ready to fail. It only means this if the current normalized value of the attribute is less than or equal to the threshold. | |
Table 20 S.M.A.R.T Info
| LABEL DESCRIPTION | |
| Updated | This indicates when the hard drive updates the value for this attribute. • Always means the hard drive updates this attribute during normal operation and during offline activities. • Offline means the hard drive only updates this attribute when no one is accessing the hard drive. |
| When Failed This column indicates when (if ever) the attribute failed. An attribute has failed if the normalized value is less than or equal to the threshold. • -: This displays if the attribute is not failing now and has never failed in the past. • FAILING_NOW: This displays if the attribute's current normalized value is less than or equal to the threshold. • In_the_past: This displays if the attribute's current normalized value is greater than the threshold but the worst recorded value is less than or equal to the threshold. | |
| Raw Data | This is the attribute's unprocessed raw data. These values show exact amounts of time or numbers of attempts or errors. The meaning to the raw values is specific to the hard drive manufacturer. Table 42 on page 156 has some information about whether a higher or lower individual raw S.M.A.R.T. attribute value is better. |
| Close Click this button to close the screen. | |
8.3.6.3 S.M.A.R.T Attributes
The following table describes some common S.M.A.R.T. attributes. If a higher or lower raw attribute value is better, it is indicated in the BETTER column. Since S.M.A.R.T. attributes and their definitions vary by manufacturer, refer to the hard drive manufacturer for details about the attributes your hard drive supports.
Table 21 S.M.A.R.T. Attributes
| ID | ATTRIBUTE NAME | BETTER | DESCRIPTION |
| 01 | Read Error Rate | Low | Shows the rate of hardware read errors. If this is not zero, there is a problem with the disk surface or the read/write heads. |
| 02 Throughput Performance | High | This is the hard drive's general (overall) throughput performance. A decreasing value indicates a problem. | |
| 03 Spin-Up Time Low This is the average number of milliseconds the hard drive took for spindle spin up (from zero RPM to fully operational). | |||
| 04 | Start/Stop Count | The total number of spindle start and stop cycles. | |
| 05 Reallocated Sectors Count | Low Total | number of reallocated sectors on the hard drive. When the hard drive detects a read/write/verification error, it marks the sector as “reallocated” and transfers the data to a specially reserved (spare) area. The process is also known as remapping with “reallocated” sectors known as remaps. The more sectors the hard drive has to reallocate, the slower read and write speeds become. | |
| 06 Read Channel Margin | This is the margin of a channel when it reads data. | ||
| 07 | Seek Error Rate | Low | This is the rate of the magnetic heads’ seek errors. A failure in the mechanical positioning system, such as servo damage or a thermal widening of the disk, results in seek errors. An increasing number of seek errors indicate the condition of the disk surface and the mechanical subsystem are worsening. |
| 08 Seek Time Performance | High This is an average performance indicator for the seek operations of the magnetic heads. Mechanical subsystem problems cause this value to decrease. | ||
| 09 | Power-On Hours (POH) | Low This is | how many hours the hard drive has been in a power-on state. The raw value lists the total number of hours (or minutes, or seconds depending on the manufacturer). |
| 10 | Spin Retry Count | Low | This is the total number of spin start retry attempts. This is the number of attempts to spin up to fully operational speed the hard drive has made when the first attempt did not succeed. An increase in this value is an indicator of hard disk mechanical subsystem problems. |
| 11 | Recalibration Retries | High This is | the number of times recalibration was requested when the first attempt did not succeed. A decrease in this value is an indicator of hard disk mechanical subsystem problems. |
| 12 | Device Power Cycle Count | This is the number of times the hard drive has gone through a full power on and power off. | |
| 13 | Soft Read Error Rate | Low This is | the number of uncorrected read errors the hard drive has reported. If this is not zero, back up your data. |
| 190 | Airflow Temperature | Low This indicates the temperature of the airflow measured by a Western Digital hard drive. | |
| 190 | Temperature Difference from 100 | High This indicates the value of 100 - the temperature in degrees Celsius. Manufacturers can set a minimum threshold that corresponds to a maximum temperature. | |
| 191 | G-sense error rate | Low This is the number of mistakes caused by impact loads. | |
| 192 | Power-off Retract Count | Low This is how many times the heads are loaded off the media. | |
| 193 | Load/Unload Cycle | Low This is the number of load and unload cycles into head landing zone position. | |
| 194 | Temperature Low | This is the hard drive's internal temperature. | |
| 195 | Hardware ECC Recovered | High This is the time between ECC (Error Correction Code)-corrected errors. | |
| 196 | Reallocation Event Count | Low This is the total number of reallocation (remap) operations. The raw value is the total attempts to move data from reallocated sectors to a spare area. Successful and unsuccessful attempts are both included. | |
| 197 | Current Pending Sector Count | Low This is the number of unstable sectors awaiting reallocation. If the sector is later successfully written or read, this value decreases and reallocation is not performed. Only failed write attempts cause a reallocation, not read errors. This can be difficult to test since only direct I/O writes to the disk cause reallocations, not cached writes. | |
| 198 | Uncorrectable Sector Count | Low This is the number of errors reading or writing a sector that were not correctable. An increase in this value is an indicator of disk surface defects or mechanical subsystem problems. | |
| 199 | UltraDMA CRC Error Count | Low This is the number of data transfer errors through the interface cable according to the ICRC (Interface Cyclic Redundancy Check). | |
| 200 | Write Error Rate / Multi-Zone Error Rate | Low This is the total number of errors in writing sectors. | |
| 201 | Soft Read Error Rate | Low | This is the number of read/write head off-track errors. If the value is not zero, make a backup. |
| 202 | Data Address Mark Errors | Low This is the number of data address mark errors. This could also be a different, manufacturer-specific attribute. | |
| 203 | Run Out Cancel Low | This is the number of ECC (Error Correction Code) errors. | |
| 204 | Soft ECC Correction | Low This is the number of errors corrected by software ECC (Error Correction Code). | |
| 205 | Thermal Asperity Rate (TAR) | Low This is the number of thermal asperity errors. Thermal asperity is a read signal spike caused by sensor temperature rise due to touching the disk surface or contaminant particles. | |
| 206 | Flying Height | This is the height of the hard drive's read/write heads above the disk surface. | |
| 207 | Spin High Current | This is the quantity of high current used to spin up the drive. | |
| 208 | Spin Buzz This is the number of buzz routines to spin up the drive. When the arm holding the read/write heads is stuck, the motor driving it tries to oscillate the arm to free it. This causes an audible vibration. | ||
| 209 | Offline Seek Performance | This is the hard drive's seek performance during offline operations. Offline operations are tests the drive does itself as opposed to those that an external diagnostic tool has it do. Seek performance is how quickly the drive moves from track to track. | |
| 220 | Disk Shift Low This is how far the disk has moved relative to the spindle (this kind of shift is usually due to shock). | ||
| 221 | G-Sense Error Rate | Low This is the number of errors that have resulted from external vibration and shock. | |
| 222 | Loaded Hours This is how long the hard drive has operated under data load (this requires movement of the magnetic head armature). | ||
| 223 | Load/Unload Retry Count | This is how many time the magnetic head has changed position. | |
| 224 | Load Friction | Low | This is resistance caused by friction in mechanical parts during operation. |
| 225 | Load/Unload Cycle Count | Low This is the total number of load cycles. | |
| 226 | Load 'In'-time | This is the total time that the magnetic heads actuator has had a load (not been in the parking area). | |
| 227 | Torque Amplification Count | Low This is the number of attempts to compensate for variations in platter speed. | |
| 228 | Power-Off Retract Cycle | Low This is how many times the magnetic armature was automatically retracted because the power was cut. | |
| 230 | GMR Head Amplitude | This is the amplitude of thrashing (or the distance of repetitive forward and reverse head motion). | |
| 231 | Temperature Low This is the hard drive's temperature. | ||
| 240 | Head Flying Hours | This is the total time that the head has been positioning. | |
| 250 | Read Error Retry Rate | Low This is the number of errors in reading from the disk. | |
8.4 iSCSI
The NAS supports the iSCSI (Internet Small Computer System Interface) standard and can serve as an iSCSI target. When the iSCSI initiator is successfully connected to an iSCSI target over an IP
network, data transmission and storage management can be processed through the network. In other words, you can access and manage the target the same way as a locally attached drive.
In the following example, a branch office has a NAS named NAS1. You want to expand your data storage capacity by accessing an iSCSI LUN (Logical Unit Number) volume called VOL1 on NAS1 over the Internet. Your computer is the iSCSI initiator and the NAS is the iSCSI target. When the initiator is successfully connected to the target, your computer can use VOL1 on the NAS as its own internal storage.
The configuration steps are as follows:
1 Create an iSCSI LUN Volume for the iSCSI target in NAS1.
2 Configure NAS1 as an iSCSI target.
Figure 48 iSCSI Connection Example
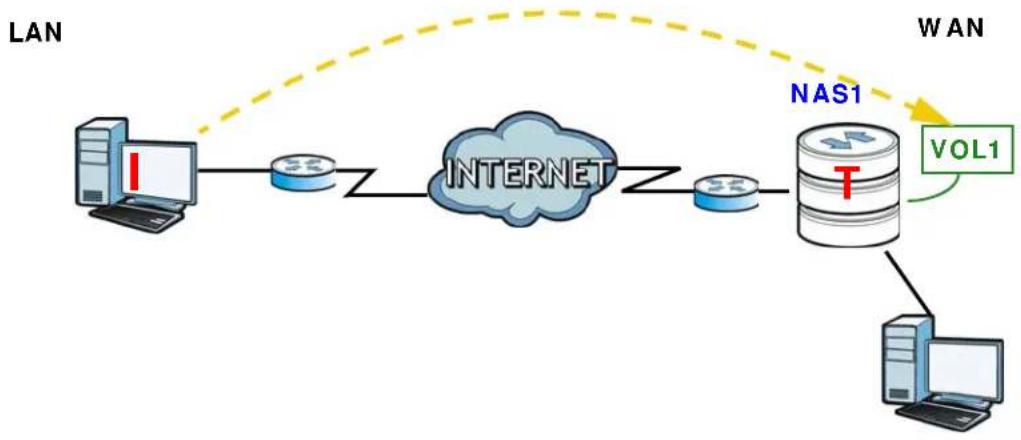
flowchart
graph LR
    A["LAN"] --> B["Internet"]
    B --> C["NAS1"]
    C --> D["VOL1"]
    D --> E["Computer"]
    style A fill:#f9f,stroke:#333
    style B fill:#ccf,stroke:#333
    style C fill:#cfc,stroke:#333
    style D fill:#fcc,stroke:#333
    style E fill:#cff,stroke:#333
8.4.1 iSCSI LUNs Screens
This section enables you to create, up-map, and delete LUN volumes, as well as display the volumes' information. Click Storage Manager > iSCSI > iSCSI LUNs to display the following screen.
Figure 49 Storage Manager > iSCSI > iSCSI LUNs

text_image
Storage Manager Overview Internal Storage iSCSI iSCSI LUNs iSCSI Targets External Storage iSCSI is a storage area network protocol. By mapping an iSCSI LUN (a logical volume) on NAS to an iSCSI target, clients (called initiators, e.g. computers) can connect to the target and access the LUN the same way they access a locally attached drive. LUN on Volume (File Type) Create Un-map Delete Info Volume1: Usage 0.11% 3.95 GB / 3.58 TB Status LUN Name Capacity Allocation Mode Mapped Target LUN-1 1.00 GB Thrin provisioning NoneThe following table describes the labels in this screen.
Table 22 iSCSI > iSCSI LUNs
| LABEL DESCRIPTION | |
| Create Click this to create a new LUN on a volume.See more details on Section 8.4.1.1 on page 84. | |
| Un-map | Click this to open the following screen where you can up-map the LUN from the iSCSI target.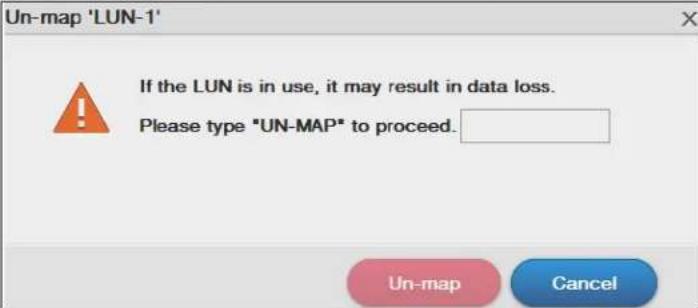 Key in UN-MAP and click Un-map to un-map the LUN from the iSCSI target. Click Cancel to close this screen. Key in UN-MAP and click Un-map to un-map the LUN from the iSCSI target. Click Cancel to close this screen. |
| Delete Click this to open the following screen where you can delete an existing LUN. | |
 Key in DELETE and click Delete to remove an existing LUN. Click Cancel to close this screen. Key in DELETE and click Delete to remove an existing LUN. Click Cancel to close this screen. | |
| Info Click this | tem to check detailed information about the LUN. |
 Name - Displays the name of the LUN.Location - Displays the name of the volume the LUN is located in.Capacity - Displays the size of the LUN.Allocation mode - Displays the allocation method the LUN applies.Write Back - Displays whether the write back feature is enabled or disabled.Mapped iSCSI Target - Displays the iSCSI target name the LUN is mapped to. Name - Displays the name of the LUN.Location - Displays the name of the volume the LUN is located in.Capacity - Displays the size of the LUN.Allocation mode - Displays the allocation method the LUN applies.Write Back - Displays whether the write back feature is enabled or disabled.Mapped iSCSI Target - Displays the iSCSI target name the LUN is mapped to. | |
8.4.1.1 Creating a New LUN
A LUN is a unit of storage shared over iSCSI that can be mapped to an iSCSI target. You must create an iSCSI LUN volume before you configure an iSCSI target for it. Click Create in the iSCSI LUNs section of the Storage Manager > iSCSI screen to open the screens as shown.
Figure 50 Creating a New LUN

text_image
Create a LUN on Volume (File Type) Set up LUN Properties / Summary Name LUN-1 Location Volumet (Available 3859.73 GB) Capacity 1 GB Allocation mode Thin provisioning Instant allocation Enable write back ?
text_image
Create a LUN on Volume (File Type) Set up LUN Properties / Summary Item Value Name LUN-1 Location Volume1 (Available 3609.73 GB) Capacity 1 GB Allocation mode Thin Provisioning Write Back Enabled Back Apply CancelThe following table describes the labels in these screens.
Table 23 Create a New LUN
| LABEL DESCRIPTION | |
| Step 1. Set Up LUN Properties | |
| Name Type a LUN name in this field.Note: Valid characters for the name are 0-9, a-z, and A-Z, and the maximum length is 30 characters. The “-” symbol is allowed as well, but cannot be the first character. | |
| Location Select a volume to create the LUN on. | |
| Capacity Type the size of the LUN in this field. | |
| Allocation Mode Select the method the NAS uses to allocate storage space to the LUN.Thin provisioning - Allocate space only when an initiator writes data to it.Instant allocation - Allocate the specified disk space to the LUN when you create the LUN. | |
| Enable Write Back | Select this option to increase the write performance. Write Back is a feature that collects data in the hard disk's cache memory first and permanently writes data into the hard disk when the system is idle.Note: It also creates a serious data integrity hazard. Data loss may occur if the NAS experiences unexpected power loss before it has time to write the cached data to the hard disk. |
| Next Click Next to go to the next step. | |
| Cancel | Click Cancel to close the screen without saving any settings. |
| Step 2. SummaryUse this screen to review the settings you configured in the last step. | |
| Name Displays the name of the LUN. | |
| Location Displays the name of the volume the LUN is located in. | |
| Capacity Displays the size of the LUN. | |
| Allocation Mode Displays the allocation method the LUN applies. | |
| Write Back Displays whether the Write Back feature is enabled or disabled. | |
| Back Click Back to go to the previous step. | |
| Apply Click Apply to save the settings. | |
| Cancel | Click Cancel to close the screen without saving any settings. |
8.4.2 iSCSI Targets Screens
The iSCSI target refers to the storage resource that is actually attached to the iSCSI storage device. The initiator can manage the assigned disk volume on the iSCSI target over the Internet as if it was the initiator's internal storage volume.
iSCSI Targets allows you to create, edit, and delete an iSCSI target and map a target to an existing LUN. Click Storage Manager > iSCSI > iSCSI Targets to show the following screen.
Figure 51 Storage Manager > iSCSI > iSCSI Targets
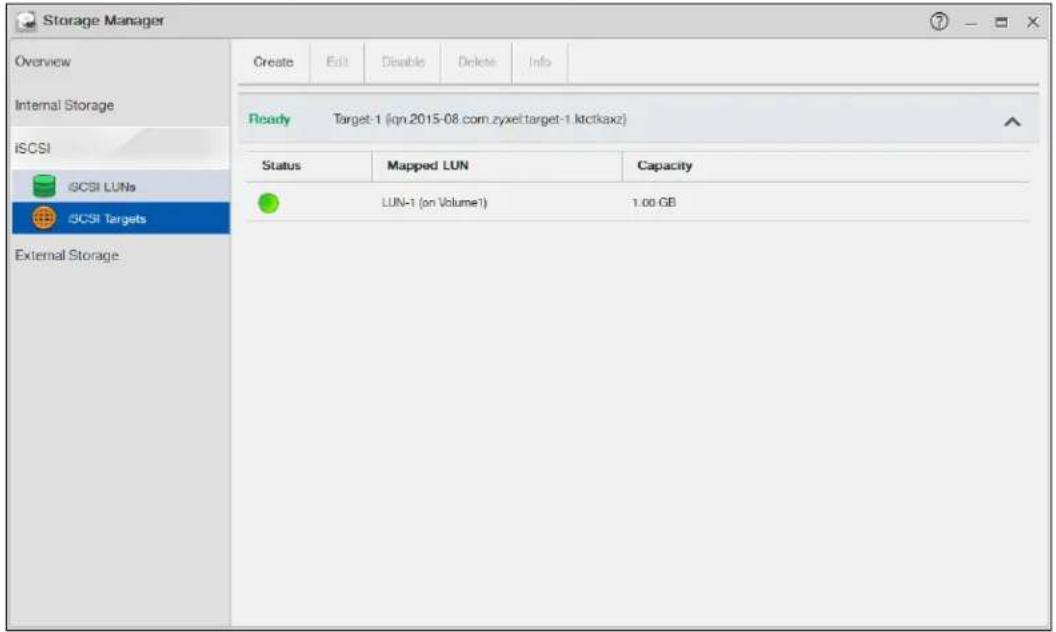
text_image
Storage Manager Overview Internal Storage ISCSI ISCSI LUNs ISCSI Targets External Storage Create Edit Disable Delete Info Ready Target-1 (qrn.2015-08.com.zyxel.target-1.ktctkaxz) Status Mapped LUN Capacity LUN-1 (on Volume1) 1.00 GBThe following table describes the labels in these screens.
Table 24 iSCSI > iSCSI Targets
| LABEL DESCRIPTION | |
| Create Click this to create a new iSCSI target.See more details on Section 8.4.2.1 on page 88. | |
| Edit Click this to modify the configuration of the iSCSI target.See more detailed on Section 8.4.2.2 on page 92. | |
| Disable / Enable | Disable - Click this to open the following screen where you can deactivate an existing target. |
| Disable 'Target-1'If the LUN(s) mapped to the target is in use, to disable the target may result in data loss.Please type "DISABLE" to proceed. | |
| Disable Cancel | |
| Key in DISABLE and click Disable to deactivate the target. Click Cancel to close this screen. Enable - When the iSCSI is disabled, click Enable will activate the target. | |
| Delete Click this to open the following screen where you can delete an existing target. | |
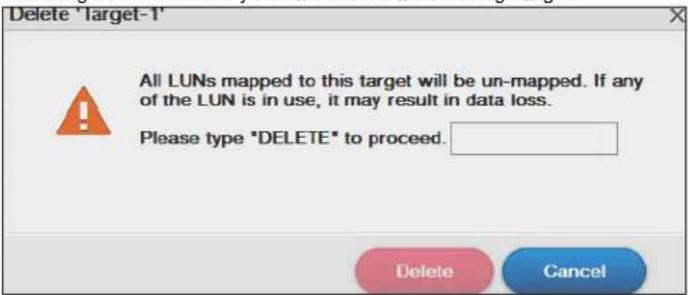 Key in DELETE and click Delete to remove an existing target. Click Cancel to close this screen. Key in DELETE and click Delete to remove an existing target. Click Cancel to close this screen. | |
| Info | Click this item to check detailed information about the target. |
 Name - Displays the created target name.IQN - Displays the target's iCSI Qualified Name (IQN) format.Allowed initiator (IQN) - Displays the allowed initiator's iCSI Qualified Name (IQN) format.Authentication - Displays the authentication method the target applies.CRC Checksum - Displays the data transmission error detecting technique.Maximum receive segment bytes - Displays the maximum data segment length in bytes that the iCSI target can receive.Maximum send segment bytes - Displays the maximum data segment length in bytes that the iCSI target can send. This feature is for the NAS326 only.Mapped iCSI Luns - Displays the LUNs mapped with the target. Name - Displays the created target name.IQN - Displays the target's iCSI Qualified Name (IQN) format.Allowed initiator (IQN) - Displays the allowed initiator's iCSI Qualified Name (IQN) format.Authentication - Displays the authentication method the target applies.CRC Checksum - Displays the data transmission error detecting technique.Maximum receive segment bytes - Displays the maximum data segment length in bytes that the iCSI target can receive.Maximum send segment bytes - Displays the maximum data segment length in bytes that the iCSI target can send. This feature is for the NAS326 only.Mapped iCSI Luns - Displays the LUNs mapped with the target. | |
8.4.2.1 Creating a New Target
Click Create in the iSCSI Targets section of the Storage Manager > iSCSI screen to open the screens as shown.
Note: The NAS can create only 10 targets at maximum.
Figure 52 Creating a new LUN
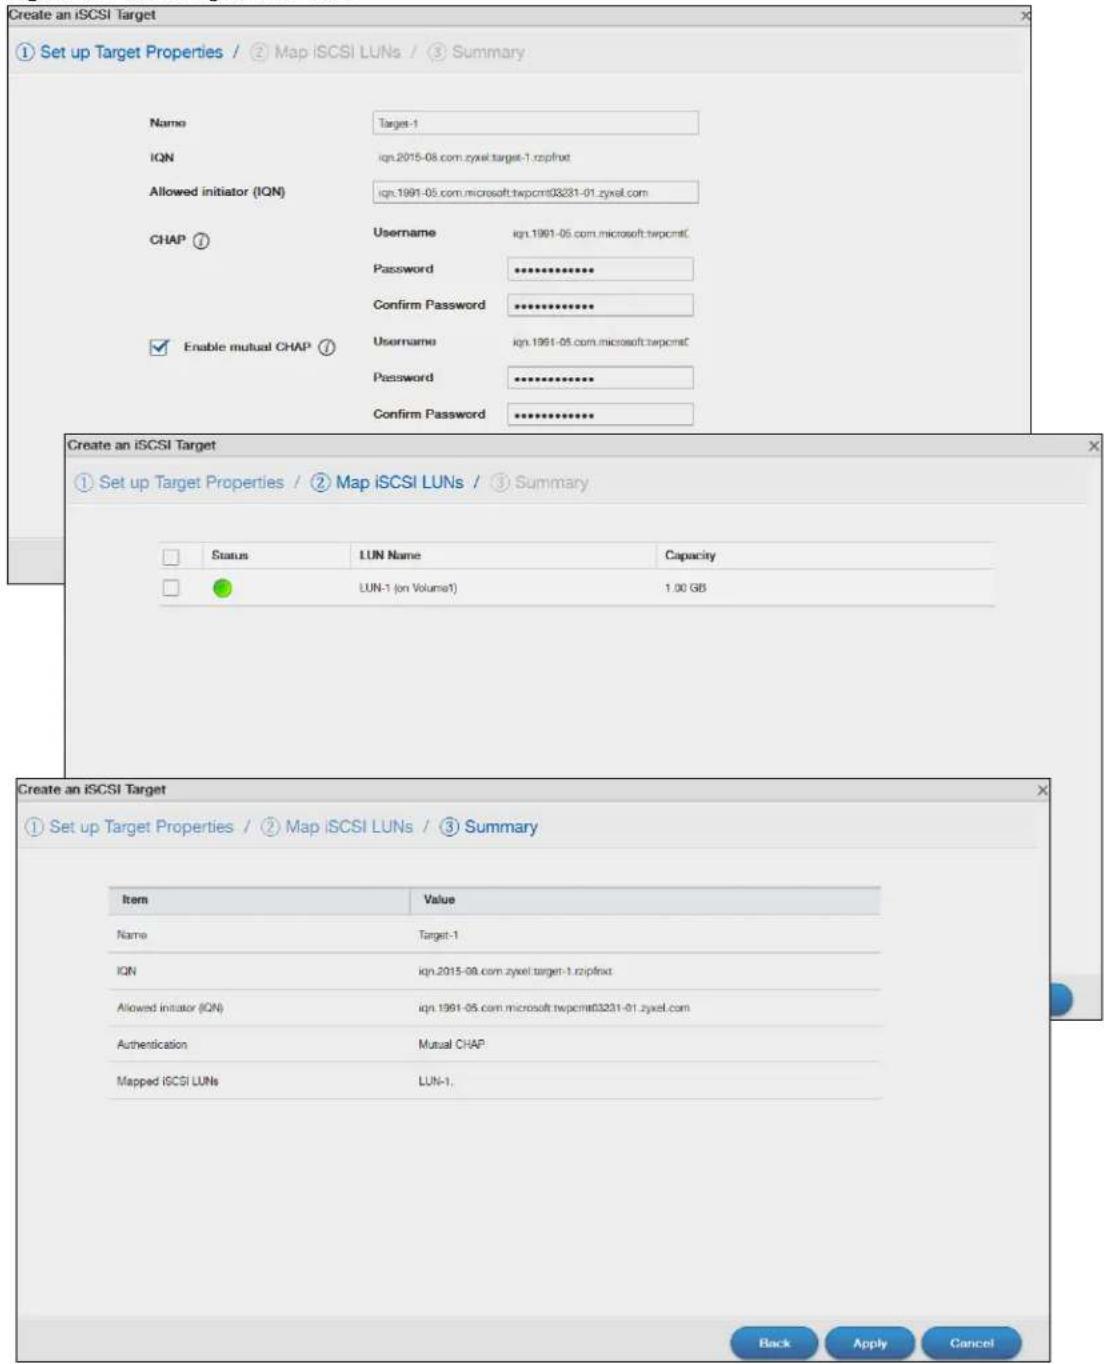
text_image
Create an iSCSI Target ① Set up Target Properties / ② Map iSCSI LUNs / ③ Summary Name Target-1 IQN ign.2015-08.com.zyxel.target-1.rozpfnxt Allowed initiator (IQN) ign.1991-05.com.microsoft.twpcmt03231-01.zyxel.com CHAP ⑦ Username ign.1991-05.com.microsoft.twpcmtC Password ************************** Confirm Password ************************** ✓ Enable mutual CHAP ⑦ Username ign.1991-05.com.microsoft.twpcmtC Password ************************** Confirm Password ************************** Create an iSCSI Target ① Set up Target Properties / ② Map iSCSI LUNs / ③ Summary Status LUN Name Capacity LUN-1 (on Volume1) 1.00 GB Create an iSCSI Target ① Set up Target Properties / ② Map iSCSI LUNs / ③ Summary Item Value Name Target-1 IQN ign.2015-08.com.zyxel.target-1.rozpfnxt Allowed initiator (IQN) ign.1991-05.com.microsoft.twpcmt03231-01.zyxel.com Authentication Mutual CHAP Mapped iSCSI LUNs LUN-1. Back Apply CancelThe following table describes the labels in these screens.
Table 25 Create a New Target
| LABEL DESCRIPTION | |
| Step 1. Set Up Target Properties | |
| Name Enter the name of your iSCSI target.Note: Valid characters for the name are 0-9, a-z, and A-Z, and the maximum length is 30 characters. The “-” symbol is allowed as well, but cannot be the first character. | |
| IQN The iSCSI Qualified Name (IQN) of the target is automatically generated after you enter the target name. | |
| Allowed initiator (IQN) | The allowed initiator name is in the iSCSI Qualified Name (IQN) format.To check the initiator name, open the iSCSI Initiator program on your computer. Select theConfigurationtab and you can see the initiator name as shown in the following screen. Note: If you use your computer as the iSCSI initiator, download and install the iSCSI Initiator first. For example, use Microsoft iSCSI Software Initiator with a Microsoft OS or globalSAN iSCSI Initiator with MAC OS. Note: If you use your computer as the iSCSI initiator, download and install the iSCSI Initiator first. For example, use Microsoft iSCSI Software Initiator with a Microsoft OS or globalSAN iSCSI Initiator with MAC OS. |
| CHAP If the iSCSI target has configured Challenge Handshake Authentication Protocol (CHAP) here, the initiator needs to enter the secret before the initiator connects to the target. The target will authenticate the initiator with the username and password (shared secret). The connection fails if the username and password are not entered correctly.Usage - The user name is for the initiator to authenticate the initiator when attempting connection.Password - The password is for the target to authenticate the initiator when attempting connection.Confirm password - Re-type the password to make sure you entered it correctly.Note: Valid characters for password are 0-9, a-z, and A-Z. | |
| Enable mutual CHAP | Mutual CHAP is a two-way authentication between the iSCSI initiator and the target. If the initiator has configured CHAP authentication, the target must enter the secret that's set up by the initiator when attempting connection.Select this check box to perform mutual CHAP on the target.Usage - The user name is for the initiator to authenticate the initiator when attempting connection.Password - The password is for the target to authenticate the initiator when attempting connection.Confirm password - Re-type the password to make sure you entered it correctly.Note: Valid characters for password are 0-9, a-z, and A-Z. |
| Next Click Next to go to the next step. | |
| Cancel | Click Cancel to close the screen without saving any settings. |
| Step 2. Map iSCSI LUNsUse this screen to map the iSCSI target to an existing LUN.Note: One iSCSI target can map to several LUN, but one LUN can only map to one target. | |
| Status Displays the status of the iSCSI LUN(s). | |
| LUN Name Displays the LUN name. | |
| Capacity Displays the size of the iSCSI LUN(s). | |
| Back Click Back to go to the previous step. | |
| Next Click Next to go to the next step. | |
| Cancel | Click Cancel to close the screen without saving any settings. |
| Step 3. SummaryUse this screen to review the settings you configured in the last step. | |
| Name Displays the iSCSI target name. | |
| IQN Displays the IQN of the target. | |
| Allowed initiator (IQN) | Displays the IQN of the allowed initiator. |
| Authentication Displays the CHAP authentication method the target applies. | |
| Mapped iSCSI LUNs | Displays the iSCSI LUN the target maps to. |
| Back Click Back to go to the previous step. | |
| Apply Click Apply to | save the settings. |
| Cancel | Click Cancel to close the screen without saving any settings. |
8.4.2.2 Editing a Created Target
You can edit iSCSI target settings such as allowed initiator (IQN), CHAP, and CRC checksum after you create a target. Click Storage Manager > iSCSI Targets and select Edit to open the following screens.
Properties
The Properties screen allows you to edit the allowed initiator (IQN), CHAP authentication features as shown in the following screen.
Figure 53 iSCSI Targets > Edit > Properties
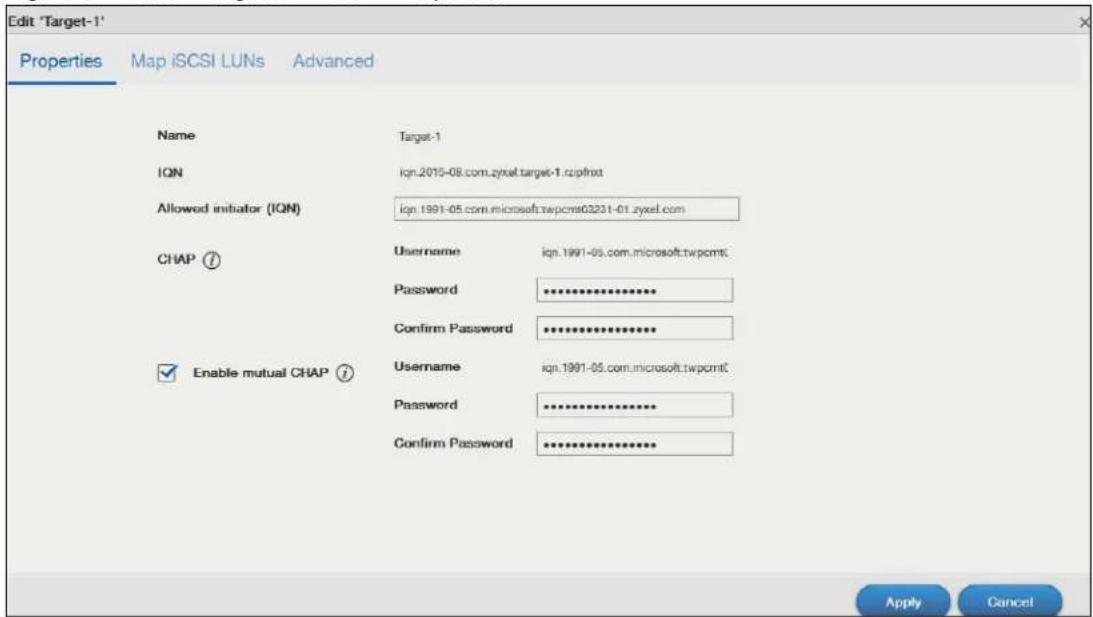
text_image
Edit 'Target-1' Properties Map iSCSI LUNs Advanced Name Target-1 IQN ign.2015-08.com.zyxel.target-1.rzipfroxt Allowed initiator (IQN) ign.1991-05.com.microsoft.twpcmt03231-01.zyxel.com CHAP Ⓡ Username ign.1991-05.com.microsoft.twpcmtc Password ********** Confirm Password ********** Enable mutual CHAP Ⓡ Username ign.1991-05.com.microsoft.twpcmtc Password ********** Confirm Password ********** Apply CancelTable 26 iSCSI Targets > Edit > Properties
| LABEL DESCRIPTION | |
| Name Displays the name of your iSCSI target. | |
| IQN Displays the iSCSI Qualified Name (IQN) of the target. | |
| Allowed initiator (IQN) | The allowed initiator name is in the iSCSI Qualified Name (IQN) format. You can connect with another initiator by changing the allowed initiator IQN.The system will display a prompt if you enter an invalid character or username of unacceptable length in this field. |
| CHAP | Username- The user name is for the initiator to authenticate the initiator when attempting connection.Password- The password is for the target to authenticate the initiator when attempting connection.Confirm password- Re-type the password to make sure you entered it correctly.Note: Valid characters for password are 0-9, a-z, and A-Z, and the valid length is 12-14 characters. |
| Enable mutual CHAP | Select this check box to perform mutual CHAP on the target.Usage- The user name is for the target to authenticate the initiator when attempting connection.Password- The password is for the target to authenticate the initiator when attempting connection.Confirm password- Re-type the password to make sure you entered it correctly.Note: Valid characters for password are 0-9, a-z, and A-Z, and the valid length is 12-14 characters. |
| Apply Click Apply to | save your changes. |
| Cancel | Click Cancel to close the screen without saving any settings. |
Map iSCSI LUNs
If the existing iSCSI target doesn't map to any iSCSI LUN, go to Map iSCSI LUNs to configure the mapping.
Figure 54 iSCSI Targets > Edit > Map iSCSI LUNs

text_image
Edit 'Target-1' Properties Map iSCSI LUNs Advanced Status LUN Name Capacity LUN-1 (on Volume1) 1.00 GB Apply CancelTable 27 iSCSI Targets > Edit > Map iSCSI LUNs
| LABEL DESCRIPTION | |
| Status Displays the status of the iSCSI LUN. | |
| LUN Name Displays the iSCSI LUN name. | |
| Capacity Displays the size of the iSCSI LUN. | |
| Apply | Select the check to choose a LUN, and click Apply to save your changes. |
| Cancel | Click Cancel to close the screen without saving any settings. |
Advanced
Go to Advanced screen for other configurations such as CRC checksum and maximum receive/send segments.
Figure 55 iSCSI Targets > Edit > Advanced
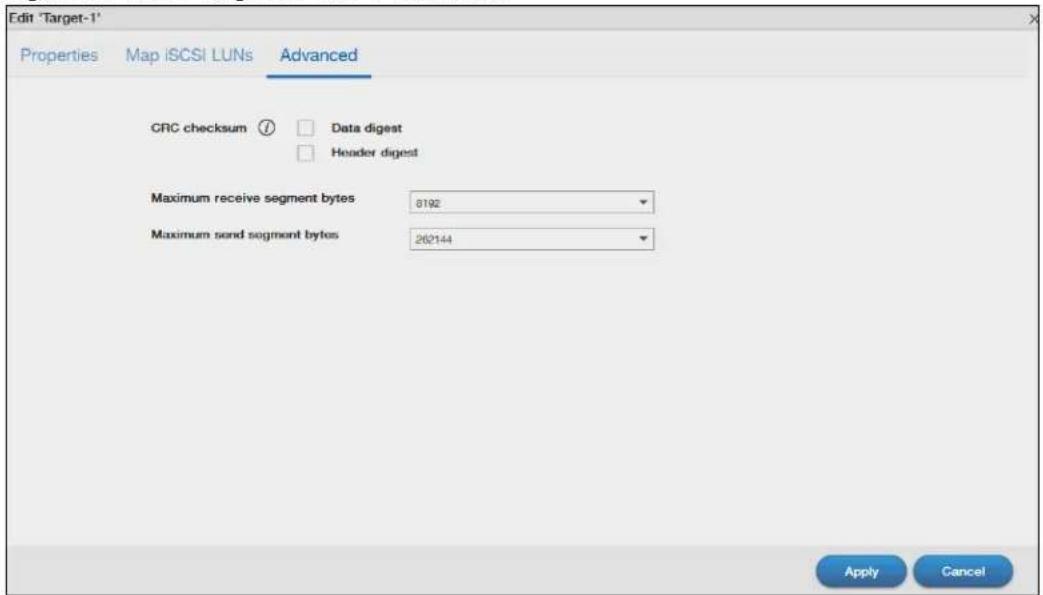
text_image
Edit 'Target-1' Properties Map iSCSI LUNs Advanced CRC checksum ⑦ Data digest Header digest Maximum receive segment bytes 8192 Maximum send segment bytes 262144 Apply CancelTable 28 iSCSI Targets > Edit > Advanced
| LABEL DESCRIPTION | |
| CRC checksum | Cyclic Redundancy Check (CRC) checksum is a technique for detecting data transmission errors. It ensures correct data transmissions between the initiator and the target. If you select the Data/Header Digest, the iSCSI initiator will be verified by these parameters when transmitting data. |
| Data digest | Select the check box to enable data digest. The data digest protects the integrity of the data. |
| Header digest | Select the check box to enable header digest. The header digest protects the integrity of the header. |
| Maximum receive segment bytes | Select the maximum receive segments allowed in bytes.Four options are applied: 262144, 65536, 9182, 4092. |
| Maximum send segment bytes | Select the maximum send segments allowed in bytes. Four options are applied: 262144, 65536, 9182, 4092. Note: This feature is for the NAS326 only. |
| Apply Click Apply to | save your changes. |
| Cancel | Click Cancel to close the screen without saving any settings. |
8.5 External Storage
This chapter covers the management of external volumes and disks.
Use the External Storage screen (Section 8.5.2 on page 95) to display information on all external volumes, configure volumes' name and format volumes.
8.5.1 What You Need to Know About External Storage
Disk
USB-attached storage disks and SD cards are treated as external disks/volumes.
Volume
A volume is a storage area on a disk or disks. You can create volumes on SD cards or external disks attached to the USB ports. You cannot spread a volume across external disks like you can with internal disks.
8.5.2 External Storage Screen
Click Storage Manager > External Storage in the navigation panel to display the following screen. Use this screen to format and edit external volumes on USB-connected storage and SD cards.
Figure 56 Storage Manager > External Storage
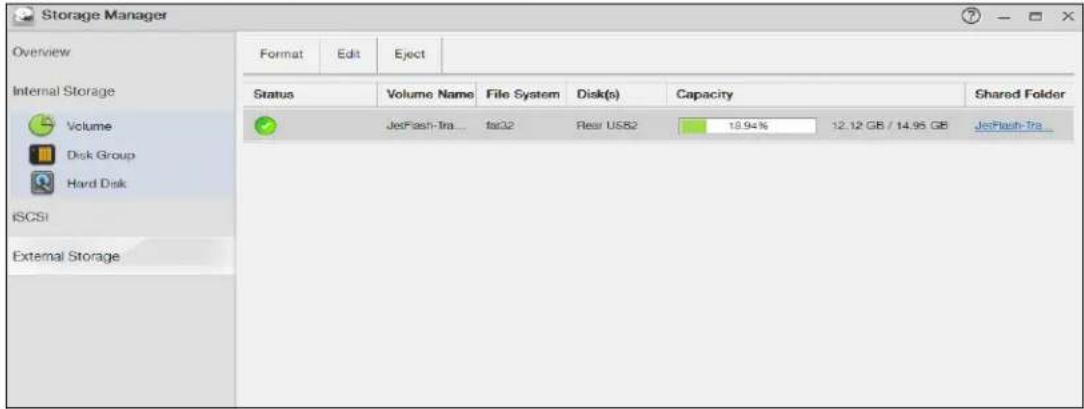
text_image
Storage Manager Overview Format Edit Eject Internal Storage Volume Disk Group Hard Disk iSCSI External Storage Status Volume Name File System Disk(s) Capacity Shared Folder JetFlash-TRA... tac32 Rear USB2 18.94% 12.12 GB / 14.95 GB JetFlash-TRA_The following table describes the labels in this screen.
Table 29 Storage Manager > External Storage
| LABEL DESCRIPTION | |
| Format Click this to | format the connected USB disk.See Section 8.5.3 on page 97 for more information. |
| Edit Click this to modify the volume name. | |
| Volume name -Type a volume name from 1 to 31 characters.Acceptable characters are all alphanumeric characters and " " [spaces], "_" [underscores], and "." [periods].The first character must be alphanumeric (A-Z 0-9).The last character cannot be a space " ".Apply - Click this to save your change and rename the volume.Cancel - Click this to exit this screen without saving changes. | |
| Eject Click this to eject the external volume. | |
 Click Yes to eject the volume or No to exit this screen without saving changes. Click Yes to eject the volume or No to exit this screen without saving changes. | |
| Status | This field shows whether the volume is Normal, Unsupported, or Unformatted.Normal means the USB connected device is functioning properly.Unsupported means the USB connected device uses a file system the NAS does not support.Unformatted means the USB connected device is not formatted with a file system.Note: There is no explicit message from CIFS that tells users their volume is degraded or down. |
| Volume Name | This field displays the volume name. If the status is Unsupported or Unformatted, the volume name displays “--”. |
| File System | This field displays the file system that an external (USB or SD) volume is using. |
| Disk(s) This field shows to which USB port the disk is connected. | |
| Capacity | This field shows total disk size, the percentage of the volume being used and the percentage that is available. If the status is Unsupported, the capacity displays “Unknown”. If the status is Unformatted, the capacity displays “--”. |
| Shared Folder | This field displays the folder that shares files. Roll your mouse over the link and click it to display the files in the File Browser. |
8.5.3 Format the Volume
This allows you to format the connected USB disk. Click External Storage > Format to show the following screen.
Note: Formatting the disk will also delete all your data in the USB drive. If the connected external volume has more than one partition, you can choose which partition you want to format.
Figure 57 External Storage > Format
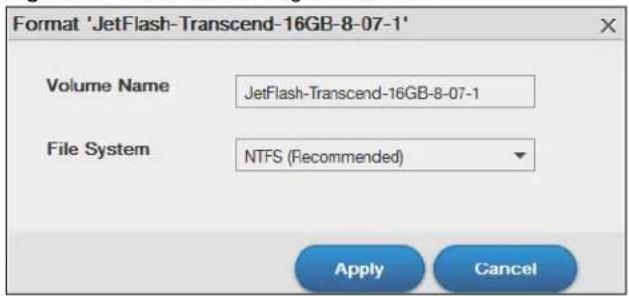
text_image
Format 'JetFlash-Transcend-16GB-8-07-1' Volume Name JetFlash-Transcend-16GB-8-07-1 File System NTFS (Recommended) Apply CancelThe following table describes the labels in this screen.
Table 30 External Storage > Format
| LABEL DESCRIPTION | |
| Volume Name Type | a volume name from 1 to 31 characters.Acceptable characters are all alphanumeric characters and " " [spaces], "_" [underscores], and "." [periods].The first character must be alphanumeric (A-Z 0-9).The last character cannot be a space " ". |
| File System Select | the file system you want the new volume to use.Windows file systemsNTFS: Recommended.FAT32: Newer, and more efficient than FAT16. Supports a volume size of up to 2 TB (Tera Bytes) and individual file sizes of up to 4 GB.exFAT: Designed to bridge the gap between the NTFS file system and the older FAT32 file system. It is a 64-bit file system that can store files over 4 GB.Linux file systemsEXT2: Older file system.EXT3: The same as EXT2, but adds a journaled file system and is more robust.EXT4: Supports larger files and better performance than EXT3. |
| Apply Click this to | save your changes and format the disk. |
| Cancel Click this to | exit this screen without saving changes. |
8.6 Technical Reference
This section contains background on JBOD and the RAID levels used on the NAS.
JBOD
• Minimum number of disks: 1
• Total capacity: Sum of the member disks
- Advantages: Maximum storage capacity, especially for disks of mixed sizes. Flexibility (you can add disks to the JBOD
- Disadvantages: Not as fast or reliable as RAID.
JBOD allows you to combine multiple physical disk drives into a single virtual one, so they appear as a single large disk. JBOD can be used to turn several different-sized drives into one big drive. For
example, JBOD could convert 100 GB, 200 GB, 250 GB, and 500 GB drives into one large logical drive of 1050 GB. Since data isn't striped across disks, if one disk fails, you should just lose the data on that disk (but you may lose data in the whole array depending on the nature of the disk failure). You can add disks to the JBOD array later (using the Add disk to JBOD feature) and even remove them so JBOD offers a lot of flexibility. However JBOD read performance is not as good as RAID as only one disk can be read at a time and they must be read sequentially. The following figure shows three disks in a single JBOD array. Data is not written across disks but written sequentially to each disk until it's full.
Table 31 JBOD
| A1 B1 C1 | ||
| A2 B2 C2 | ||
| A3 B3 C3 | ||
| A4 B4 C4 | ||
| DISK 1 DISK 2 DISK 3 | ||
RAID 0
RAID 0 spreads data across two or more disks (data striping) with no mirroring nor parity for data redundancy, so if one disk fails the entire array will be lost. The major benefit of RAID 0 is performance. The following figure shows two disks in a single RAID 0 array. Data can be written and read across disks simultaneously for faster performance.
Table 32 RAID 0
| A1 A2 | |
| A3 A4 | |
| A5 A6 | |
| A7 A8 | |
| DISK 1 DISK 2 |
RAID 0 capacity is the size of the sum of the capacities of the disks in the RAID 0. For example, if you have four disks of sizes 1 TB, 2 TB, 3 TB and 2 TB respectively in one RAID 0 array, then the maximum capacity is 8 TB.
Typical applications for RAID 0 are non-critical data (or data that changes infrequently and is backed up regularly) requiring high write speed such as audio, video, graphics, games and so on.
RAID 1
RAID 1 creates an exact copy (or mirror) of a set of data on another disk. This is useful when data backup is more important than data capacity. The following figure shows two disks in a single RAID
1 array with mirrored data. Data is duplicated across two disks, so if one disk fails, there is still a copy of the data.
Table 33 RAID 1
| A1 A1 | |
| A2 A2 | |
| A3 A3 | |
| A4 A4 | |
| DISK 1 DISK 2 |
As RAID 1 uses mirroring and duplexing, a RAID 1 array needs an even number of disks (two or four for the NAS).
RAID 1 capacity is limited to the size of the smallest disk in the RAID array. For example, if you have two disks of sizes 150 GB and 200 GB respectively in one RAID 1 array, then the maximum capacity is 150 GB and the remaining space (50 GB) is unused.
Typical applications for RAID 1 are those requiring high fault tolerance without need of large amounts of storage capacity or top performance, for example, accounting and financial data, small database systems, and enterprise servers.
RAID 6
RAID 6 can tolerate two simultaneous drive failures by calculating dual distributed parity data on striped data across disks. Dual parity provides extra data protection, however, it is slower to write than most other RAID levels.
RAID 6 uses parity to store redundant data on space equal to the size of two disks for later data recovery. Therefore, on a RAID 6 array, only 50% of the space is available as usable capacity. If you have four disks of sizes 1TB, 1TB, 2TB, 2TB respectively in one RAID 6 array, then the maximum capacity of the array is the capacity of the smallest drive (1TB, 1TB, 2TB, 2TB) * (Number of disks - 2) = 1TB * (4-2) = 2TB. The remaining space (2 TB) is unused.
Table 34 RAID 6
| RAID 6 | |||
| A1 A2 AP AQ | |||
| B1 BP BQ B2 | |||
| CP CQ C1 C2 | |||
| DQ D1 D2 DP | |||
| DISK 1 DISK 2 DISK 3 DISK 4 | |||
RAID 10
RAID 10 (RAID 1+0) is a nested RAID where two RAID 1 arrays are stored on the physical disks with a RAID 0 array on top. It is a stripe of mirrors. RAID 1 provides redundancy while RAID 0 boosts performance. The following figure shows two disks in two RAID 1 arrays. Data is duplicated across two disks, so if one disk fails, there is still a copy of the data. These two arrays are configured as a single RAID 0 array for faster performance.
Table 35 RAID 10
| RAID 0 | |||
| RAID 1 RAID 1 | |||
| A1 A1 A2 A2 | |||
| A3 A3 A4 A4 | |||
| A5 A5 A6 A6 | |||
| A7 A7 A8 A8 | |||
| DISK 1 DISK 2 DISK 3 DISK 4 | |||
Typical applications for RAID 10 are those requiring both high performance and reliability such as enterprise servers and high-end moderate-sized database systems. RAID 10 is often used in place of RAID 1 or RAID 5 by those requiring higher performance. It may be used instead of RAID 1 for applications requiring more capacity.
RAID 5
RAID 5 provides the best balance of capacity and performance while providing data redundancy. It provides redundancy by striping data across three disks and keeps the parity information (AP) on the fourth disk (in each stripe). In case of disk failure, data can be recovered from the surviving disks using the parity information. When you replace the failed disk, the reconstructed data is written onto the new disk. Re-synchronize the array to have it return to its original state. The following example shows data stripped across three disks (A1 to A3 in the first strip for example) with parity information (AP) on the fourth disk.
Table 36 RAID 5
| A1 A2 A3 AP | |||
| B1 B2 BP B3 | |||
| C1 CP C2 C3 | |||
| DP D1 D2 D3 | |||
| DISK 1 DISK 2 DISK 3 DISK 4 | |||
The capacity of a RAID 5 array is the smallest disk in the RAID set multiplied by one less than the number of disks in the RAID set. For example, if you have four disks of sizes 150 GB, 150 GB, 200
GB and 250 GB respectively in one RAID 5 array, then the maximum capacity is 450 GB (3 * 150 GB, the smallest disk size) and the remaining space (300 GB) is unused.
Typical applications for RAID 10 are transaction processing, relational database applications, enterprise resource planning and other business systems. For write-intensive applications, RAID 1 or RAID 1+0 are probably better choices, as the performance of RAID 5 will begin to substantially decrease in a write-heavy environment.
Hot-spare
A RAID 1 or RAID 5 array with a hot-spare operates as a three-disk RAID 1 or RAID 5 array with the fourth disk on standby. The standby disk automatically comes into play if a disk in the array fails. The advantage of a hot-spare is that if a disk fails, then the array resynchronizes automatically with the standby disk and operates at healthy array speed after the resynchronization.
Note: You need four hard disks installed to use RAID 10, RAID 5 or RAID 5 with hot-spare.
RAID and Data Protection
If a hard disk fails and you're using a RAID 1, RAID 10, or RAID 5 array then your data will still be available (but at degraded speeds until you replace the hard disk that failed and re-synchronize the array). However, RAID cannot protect against file corruption, virus attacks, files incorrectly deleted or modified, or the NAS malfunctioning.
9.1 Overview
Status Center displays the system information or network connection status.
9.1.1 System Information
In the Desktop screen, click Status Center to display System Information for detailed NAS status information.
Figure 58 Status Center > System Information
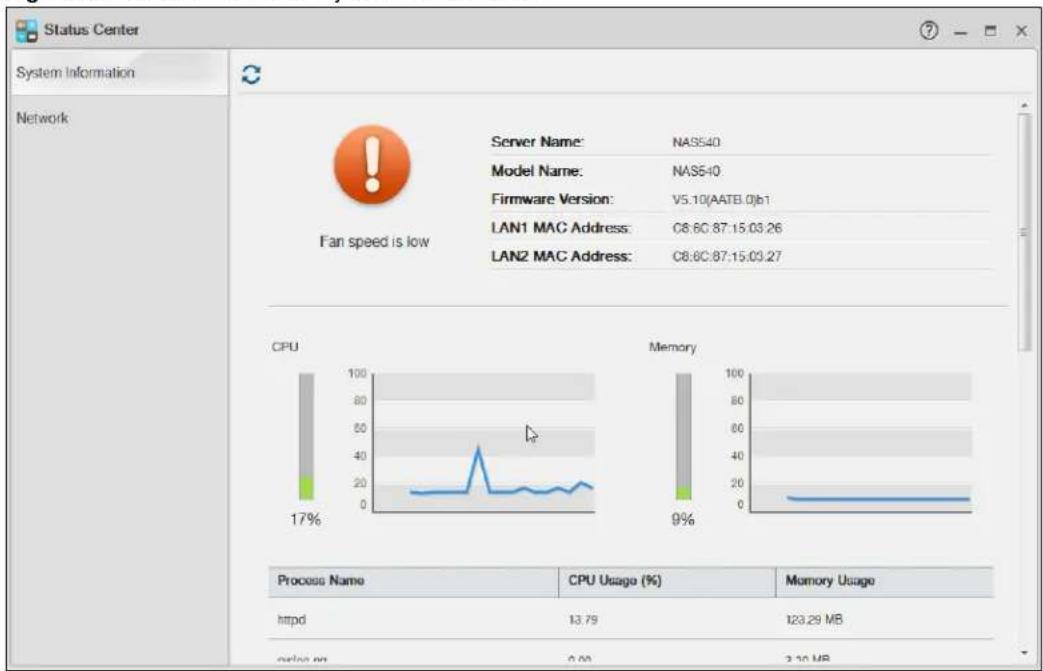
text_image
Status Center System Information Network Fan speed is low Server Name: NAS540 Model Name: NAS540 Firmware Version: V5.10(AATB.0)b1 LAN1 MAC Address: C8.6C:87.15.03.26 LAN2 MAC Address: C8.6C:87.15.03.27 CPU 100 80 50 40 20 10 Process Name CPU Usage (%) Memory Usage httpd 13.79 123.29 MB online '' 0.00 3.10 MBThe following table describes the labels in this screen.
Table 37 Status Center > System Information
| LABEL DESCRIPTION | |
| Refresh Click the Refresh | icon to update this display. |
| Status | The circular icon displays the health state of the NAS. A green circle with a check mark indicates healthy. |
| Server Name This displays | the name which helps you find the NAS on the network. |
| Model Name This displays | which model this NAS device is. |
| Firmware Version This is the | NAS firmware version. |
| LAN1 MAC Address This displays the NAS's unique physical hardware address (MAC) for the LAN1 Ethernet port. You need the MAC address to register the product at myZyXEL.com. Customer support may also request it for troubleshooting purposes. | |
| LAN2 MAC Address This displays the NAS's unique physical hardware address (MAC) for the LAN2 Ethernet port. | |
| CPU This displays a summary of CPU usage by all current processes.Note: If too many users are using the NAS then the NAS may appear sluggish. | |
| Memory This shows how much of the NAS's total memory is being used. | |
| Process Name This displays the top 10 processes that occupy the most CPU usage. | |
| CPU Usage | This displays a summary of CPU usage by all current processes. |
| Memory Usage This shows how much of the NAS's total memory is being used. | |
| CPU Temperature This displays the temperature near the NAS's CPU. The NAS generates an emergency log if the temperature goes out of the normal operating range. If the temperature goes even higher, the NAS shuts down automatically to avoid damage from overheating. If the NAS overheats, make sure the fans are working and it is in a well ventilated place. | |
| Fan Speed This is the RPM (Rotations Per Minute) of the NAS's fans. | |
9.1.2 Network
The Network screen display the NAS connection status. From Status Center screen, click Network to open the screen as shown.
Figure 59 Status Center > System Information
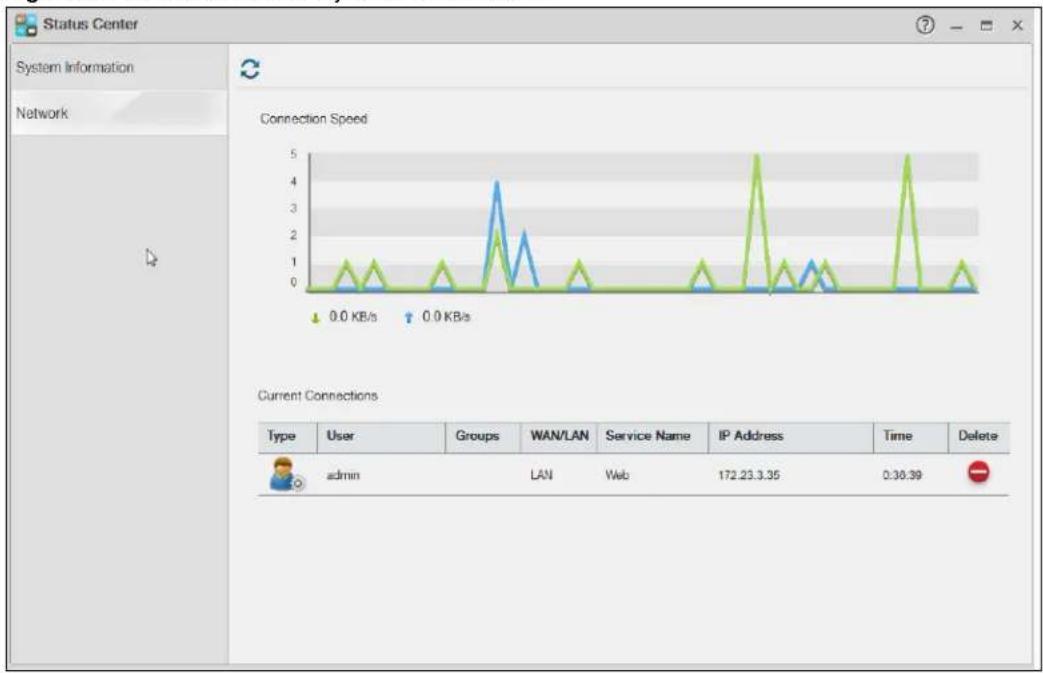
line
| Type | User | Groups | WAN/LAN | Service Name | IP Address | Time | Delete | | ---------- | ----- | ------ | ------- | ------------ | ---------- | ------ | ------ | | admin | | | | | | | | | | | | | | | | | | | | | | | | | | | | | | | | | | | | | | | | | | | | | | | | | | | | | | | | | | | | | |The following table describes the labels in this screen.
Table 38 Status Center > Network
| LABEL DESCRIPTION | |
| Type Displays the type of the user account. | |
| User Displays the user name. | |
| Groups Displays the group the current user belongs to. | |
| WAN/LAN Displays whether the connection is from the WAN or the LAN. | |
| Service Name Displays the service name. | |
| IP Address Displays the IP address of the user. | |
| Time Displays the connection time. | |
| Delete Click this to disconnect the user. | |
10.1 Overview
This chapter discusses the Control Panel screens. Use the Control Panel screens to configure network settings and upload firmware.
10.2 What You Can Do
- Use the TCP/IP screen (Section 10.4 on page 107) to configure the NAS's TCP/IP network connection settings such as the teaming mode and IP addresses.
- Use the PPPoE screen (Section 10.4.2.2 on page 111) to configure PPPoE settings for a direct Internet connection.
- Use the UPnP Port Mapping screen (Section 10.5 on page 113) to automatically configure your Internet gateway's firewall and Network Address Translation (NAT) to allow access to the NAS from the Internet.
- Use the Terminal screen (Section 10.6 on page 119) to enable or disable Telnet and SSH access.
- Use the DyDNS screen (Section 10.7 on page 120) to configure the domain name settings of your NAS.
- Use the FW Upgrade screen (Section 10.8 on page 122) to upload new firmware.
10.3 What You Need to Know
IP Address
The NAS needs an IP address to communicate with other devices on your network. The NAS can get an IP address automatically if you have a device on your network that gives them out. Or you can assign the NAS a static (fixed) IP address.
DNS Server Address
A DNS (Domain Name System) server maps domain names (like www.zyxel.com) to their corresponding numerical IP addresses. This lets you use domain names to access web sites without having to know their IP addresses. The NAS can receive the IP address of a DNS server automatically (along with the NAS's own IP address). You can also manually enter a DNS server IP address in the NAS.
PPPoE
Point-to-Point Protocol over Ethernet (PPPoE) allows the NAS to establish a direct Internet connection if you do not have a router. PPPoE is a dial-up connection. You need a username and password from your Internet Service Provider (ISP) to set up the connection.
10.4 TCP/IP Screens
Use the TCP/IP screens to have the NAS use a dynamic or static IP address, subnet mask, default gateway, PPPoE and DNS servers, and to test the network connection.
10.4.1 Configuring General TCP/IP Settings
Click Control Panel > Network > TCP/IP > General Settings in the navigation panel to open the following screen. This screen allows you to configure the default gateway and DNS server.
Note: If you change the NAS's IP address, you need to log in again after you apply changes.
Figure 60 Control Panel > Network > TCP/IP > General Settings
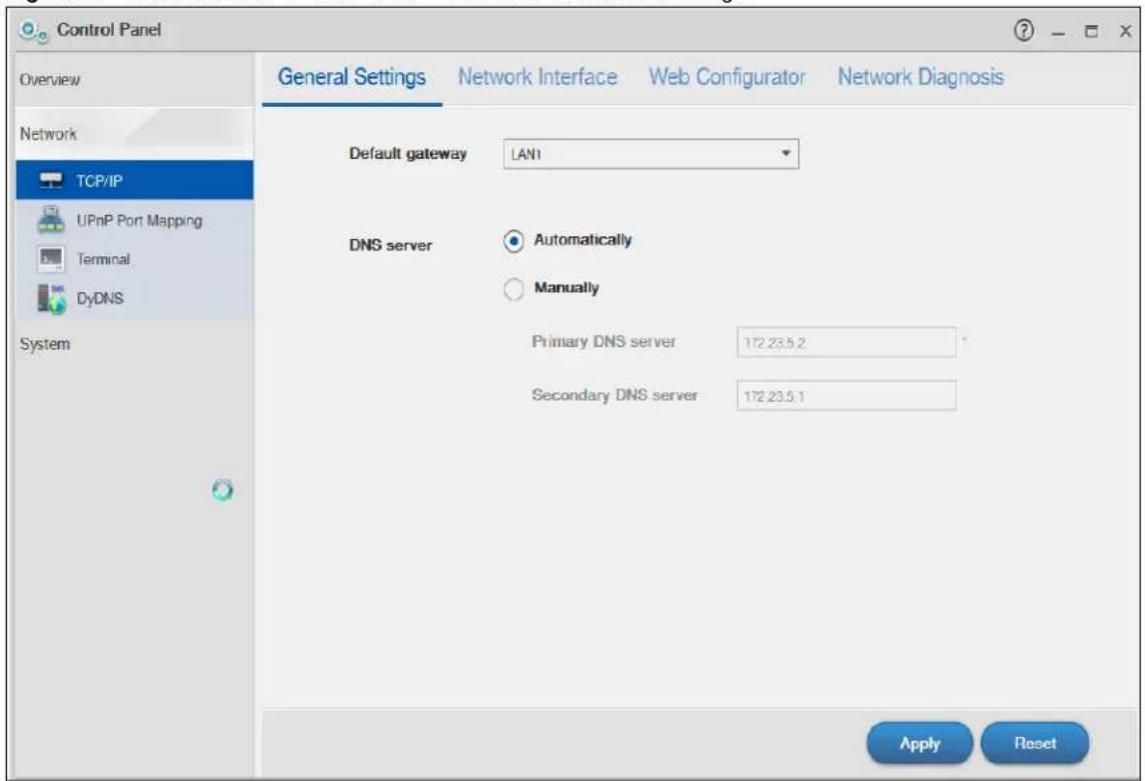
text_image
Control Panel Overview Network TCP/IP UPnP Port Mapping Terminal DyDNS System General Settings Network Interface Web Configurator Network Diagnosis Default gateway LAN1 DNS server Automatically Manually Primary DNS server 172.23.5.2 Secondary DNS server 172.23.5.1 Apply ResetThe following table describes the labels in this screen
Table 39 Control Panel > Network > TCP/IP > General Settings
| LABEL DESCRIPTION | |
| Default Gateway Select the LAN interface to use as the default gateway. | |
| DNS Server | DNS (Domain Name System) is for mapping a domain name to its corresponding IP address and vice versa. If you have the IP address(es) of the DNS server(s), enter them. |
| Automatically Select the option to have the NAS get a DNS server address automatically. | |
| Manually | Select this option to choose a static DNS server address. Type the DNS server IP address(es) into the fields below. |
| Primary DNS Server | Type a primary DNS server IP address. |
| Secondary DNS Server | Type a secondary DNS server IP address. |
| Apply | Click this to save your TCP/IP configurations. After you click Apply, the NAS restarts. Wait until you see the Login screen or until the NAS fully boots and then use the NAS Starter Utility to rediscover it. |
| Reset Click this to restore your previously saved settings. | |
10.4.2 Configuring Network Interface
Use the Network Interface screen to edit the IPv4 or IPv6 settings of LAN 1 and LAN 2, set up port trunking, and configure PPPoE settings. Click Control Panel > Network > TCP/IP > Network Interface in the navigation panel to open the following screen.
Figure 61 Control Panel > Network > TCP/IP > Network Interface

text_image
Control Panel Overview Network + Network Interface Web Configurator Network Diagnosis TCP/IP UPnP Port Mapping Terminal DyDNS System Status Interface IP Settings IP Address Subnet Mask ● LAN 2 Automatically 0.0.0.0 0.0.0.0 ● 100 Mbps, full-duplex LAN 1 Automatically 172.23.3.37 255.255.255.0 ● ppp0 -- 0.0.0.0 0.0.0.0The following table describes the labels in this screen.
Table 40 Control Panel > Network > TCP/IP > Network Interface
| LABEL DESCRIPTION | |
| Status Display data transmission rate and transmission system. | |
| Interface Display the interface name. | |
| IP Settings Display the IP settings (automatically or manually) of an interface. | |
| IP Address Display the IP address of an interface. | |
| Subnet Mask Display the subnet mask of an interface. | |
| Create Click it to open the following screen to set up a port trunking.For adding a port trunking, see Section 10.4.2.1 on page 110. | |
| Automatically Select this option to have the interface get IP address information automatically.If no IP address information is assigned, the NAS uses Auto-IP to assign itself an IP address and subnet mask. For example, you could connect the NAS directly to your computer. If the computer is also set to get an IP address automatically, the computer and the NAS will choose addresses for themselves and be able to communicate. | |
| Manually | Select this option for the interface to use fixed TCP/IP information. You must fill in the following fields.IP Address - Type an IP address in this field.Subnet Mask - Type an IP subnet mask in this field.Default Gateway - Type a default gateway address in this field. |
| Create Click this to save the settings and create a port trunk. | |
| Cancel Click this to return to the previous screen without saving. | |
| Edit | Click this to modify the IPv4 or IPv6 settings of LAN 1 and LAN 2.For editing the PPPoE settings, see Section 10.4.2.2 on page 111. |
| IPv4 Settings | Click this to configure the following IPv4 settings.Automatically - Select this option to have the interface get IP address information automatically.Manually - Select this option for the interface to use fixed TCP/IP information.IP Address - Type an IP address in this field.Subnet Mask - Type an IP subnet mask in this field.Default Gateway - Type a default gateway address in this field. |
| IPv6 Settings | Click this to configure the following IPv6 settings.Mode -Select Auto to have the Device use the IPv6 prefix from the connected router's Router Advertisement (RA) to generate an IPv6 address.Select Manual if you have a fixed IPv6 address assigned by your ISP.Select Disable to not assign any IPv6 address for the NAS.Address - Enter the IPv6 address assigned by your ISP.Subnet prefix length - Enter the address prefix length to specify how many most significant bits in an IPv6 address compose the network address. The range is 0 to 128Default Gateway - Enter the IP address of the next-hop gateway. The gateway is a router or switch on the same segment as your Device's interface(s). The gateway helps forward packets to their destinations. |
| Apply | Click this to save your TCP/IP configurations. After you click Apply, the NAS restarts. Wait until you see the Login screen or until the NAS fully boots and then use the NAS Starter Utility to rediscover it. |
| Cancel | Click this to return to the previous screen without saving. |
| Remove Click this to r | remove the port trunking.Note: This button is available only when the port trunking is created. |
10.4.2.1 Creating a Port Trunking
Link Aggregation: Link aggregation combines LAN1 and LAN2 into a single logical link with greater bandwidth. Both interfaces use the same IP address and MAC address. It also includes fault tolerance and load balancing. Connect LAN1 and LAN2 to the same Ethernet switch.
Figure 62 Link Aggregation

text_image
LAN1 LAN2Use this screen to set up port trunking. Click Control Panel > Network > TCP/IP > Network Interface, and then click Create.
Figure 63 Creating a Port Trunking
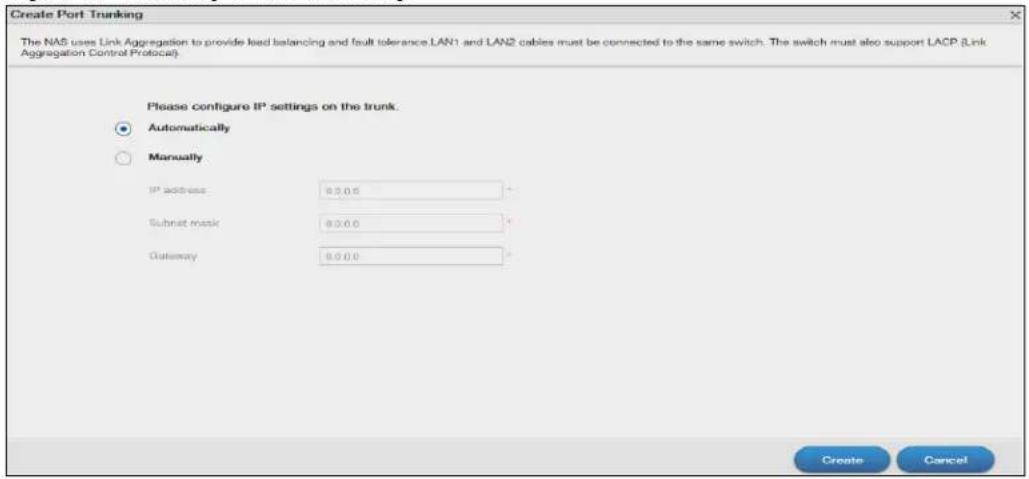
text_image
Create Port Trunking The NAS uses Link Aggregation to provide lead balancing and fault tolerance LAN1 and LAN2 cables must be connected to the same switch. The switch must also support LACP (Link Aggregation Control Protocol). Please configure IP settings on the trunk. Automatically Manually IP address: 0.0.0 Submit mask: 0.0.0 Gateway: 0.0.0 Create CancelThe following table describes the labels in this screen.
Table 41 Control Panel > Network > TCP/IP > Network Interface > Create
| LABEL DESCRIPTION | |
| Automatically Select th | this option to have the interface get IP address information automatically.If no IP address information is assigned, the NAS uses Auto-IP to assign itself an IP address and subnet mask. For example, you could connect the NAS directly to your computer. If the computer is also set to get an IP address automatically, the computer and the NAS will choose addresses for themselves and be able to communicate. |
| Manually | Select this option for the interface to use fixed TCP/IP information. You must fill in the following fields.IP Address - Type an IP address in this field.Subnet Mask - Type an IP subnet mask in this field.Default Gateway - Type a default gateway address in this field. |
| Create Click this to save the settings and create a port trunking. | |
| Cancel Click this to return to the previous screen without saving. | |
10.4.2.2 Configuring PPPoE Settings
Use this screen to configure PPPoE settings for a direct Internet connection. Select the ppp0 interface and then click Edit.
Figure 64 Control Panel > Network > TCP/IP > Network Interface > PPPoE
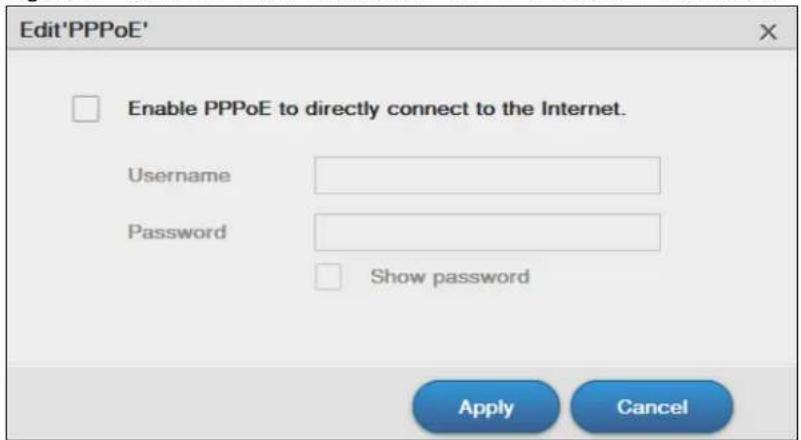
text_image
Edit'PPPoE' Enable PPPoE to directly connect to the Internet. Username Password Show password Apply CancelThe following table describes the labels in this screen.
Table 42 Control Panel > Network > TCP/IP > Network Interface > PPPoE
| LABEL DESCRIPTION | |
| Enable PPPoE to directly connect to the Internet | Select or clear this field to enable or disable PPPoE. |
| Username Enter the | username exactly as your ISP assigned. If assigned a name in the form user@domain where domain identifies a service name, then enter both components exactly as given. |
| Password Enter the | password associated with the username above. |
| Show password | Select this field to reveal the password hidden behind asterisks or clear this field to hide the password. |
| Apply Click this to save your changes. | |
| Cancel Click this to return to the previous screen without saving. | |
10.4.3 Configuring Web Configurator
Click Control Panel > Network > TCP/IP > Web Configurator to configure the port number of HTTP and HTTPS.
Figure 65 Control Panel > Network > TCP/IP > Web Configurator

text_image
Control Panel Overview Network TCP/IP UPnP Port Mapping Terminal DyDNS System General Settings Network Interface Web Configurator Network Diagnosis HTTP connection ? Port Number 80 Enable HTTPS connection Port Number 413 Allow only HTTPS connection ? You can create a certificate, or import a certificate on the SS1 page. Apply ResetThe following table describes the labels in this screen.
Table 43 Control Panel > Network > TCP/IP > Web Configurator
| LABEL DESCRIPTION | |
| Port Number Specify the port number of HTTP connection. | |
| Enable HTTPS connection | Select or clear this field to enable or disable HTTPS connection. |
| Port Number Specify the port number of HTTPS connection. | |
| Allow only HTTPS connection | Select this field to allow connection to the Web Configurator via HTTPS only. Clear this field to allow connection to the Web Configurator via both HTTP and HTTPS. |
| Apply Click this to save your changes. | |
| Cancel Click this to return to the previous screen without saving. | |
10.4.4 Configuring Network Diagnosis
Click Control Panel > Network > TCP/IP > Network Diagnosis to test the network connection to a particular IP address or domain name.
Figure 66 Control Panel > Network > TCP/IP > Network Diagnosis
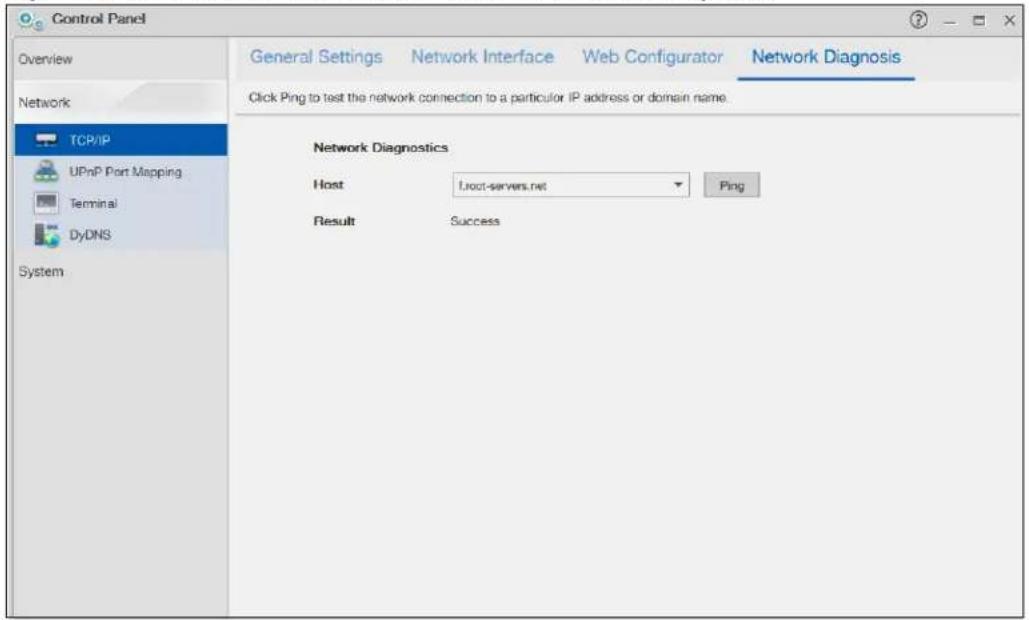
text_image
Control Panel Overview Network TCP/IP UPnP Port Mapping Terminal DyDNS System General Settings Network Interface Web Configurator Network Diagnosis Click Ping to test the network connection to a particular IP address or domain name. Network Diagnostics Host root-servers.net Ping Result SuccessThe following table describes the labels in this screen.
Table 44 Control Panel > Network > TCP/IP > Network Diagnosis
| LABEL DESCRIPTION |
| Host Select a specific host to perform the diagnosis. |
| Ping Click this to test the network connection. |
| Result Displays whether or not the test received a response from the host. |
10.5 UPnP Port Mapping Screen
Use UPnP (Universal Plug and Play) port mapping to allow access from the WAN to services you select on the NAS. It is recommended that you place the NAS behind an Internet gateway firewall device to protect the NAS from attacks from the Internet. Many such Internet gateways use UPnP to simplify peer-to-peer network connectivity between devices. UPnP can automatically configure the Internet gateway's firewall and Network Address Translation (NAT) to allow access to the NAS from the Internet.
Figure 67 UPnP for FTP Access

In the above example, UPnP creates a firewall rule and NAT port forwarding mapping to send FTP traffic (using TCP port number 21) from the public IP address a.b.c.d to the NAS's private IP address of 192.168.1.20.
Use the NAS's UPnP Port Mapping screen to configure the UPnP settings your Internet gateway uses to allow access from the WAN (Internet) to services you select on the NAS. You can also set which port Internet users need to use in order to access a specific service on the NAS.
Note: To use UPnP port mapping, your Internet gateway must have UPnP enabled.
If your Internet gateway supports Port Address Translation (PAT is sometimes included with a port forwarding feature), you can have the Internet users use a different TCP port number from the one the NAS uses for the service.
Figure 68 UPnP Port Address Translation for FTP Example

flowchart
graph LR
    A["Database 192.168.1.20"] -->|TCP: 21| B["Router"]
    B -->|TCP: 2100| C["Internet"]
    C --> D["Computer"]
In the above example, the Internet gateway uses PAT to accept Internet user FTP sessions on port 2100, translate them to port 21, and forward them to the NAS.
10.5.1 UPnP and the NAS's IP Address
It is recommended that the NAS use a static IP address (or a static DHCP IP address) if you will allow access to the NAS from the Internet. The UPnP-created NAT mappings keep the IP address the NAS had when you applied your settings in the UPnP Port Mapping screen. They do not automatically update if the NAS's IP address changes.
Note: WAN access stops working if the NAS's IP address changes.
For example, if the NAS's IP address was 192.168.1.33 when you applied the UPnP Port Mapping screen's settings and the NAS later gets a new IP address of 192.168.1.34 through DHCP, WAN access stops working because the Internet gateway still tries to forward traffic to IP address 192.168.1.33. Since you can no longer access the NAS from the WAN, you would have to access the NAS from the LAN and re-apply your UPnP Port Mapping screen settings to update the Internet gateway's UPnP port mappings.
Figure 69 UPnP Using the Wrong IP Address

flowchart
graph LR
    A["192.168.1.34"] --> B["a.b.c.d"]
    C["192.168.1.33"] --> B
    B <--> D["INTERNET"]
    D --> E["Computer"]
10.5.2 UPnP and Security
UPnP's automated nature makes it easier to use than manually configuring firewall and NAT rules, but it is also less secure. Using UPnP may make your network more susceptible to snooping and hacking attacks.
10.5.3 The NAS's Services and UPnP
This section introduces the NAS's services which an Internet gateway can use UPnP to allow access to and from the Internet.
CIFS (Windows File Sharing)
Common Internet File System (CIFS) is a standard protocol supported by most operating systems in order to share files across the network. Using UPnP port mapping for CIFS allows users to connect from the Internet and use programs like Windows Explorer to access the NAS's shares to copy files from the NAS, delete files on the NAS, or upload files to the NAS from the Internet.
If you configure UPnP port mapping to allow CIFS access from the WAN but cannot get it to work, you may also have to configure the Internet gateway to also allow NetBIOS traffic. See Section 16.3 on page 205 for more on CIFS.
FTP
File Transfer Protocol is a standard file transfer service used on the Internet. Using UPnP port mapping for FTP allows remote users to use FTP from the Internet to access the NAS's shares. A user with read and write access to a share can copy files from the share, delete files from the share, or upload files to the share. See Section 17.4 on page 215 for more on FTP. If you use UPnP to allow FTP access from the WAN, you may want to use a different WAN port number (instead of the default of port 21) to make it more secure. Remember to tell the remote users to use the custom port number when using FTP to access the NAS.
HTTP (Web Configurator)
You can use UPnP port mapping to allow access to the NAS's management screens. If you use UPnP to allow web configurator access from the WAN, you may want to use a different WAN port number (instead of the default of port 80) to make it more secure. Remember to use the custom port number when accessing the NAS's web configurator from the Internet.
HTTP (Web Published Shares)
This is the NAS's web publishing feature that lets people access files using a web browser without having to log into the Web Configurator. Use UPnP port mapping to allow access to these files from the Internet without having to enter a user name or password. See Section 17.8 on page 230 for more on web publishing.
10.5.4 UPnP Router
UPnP allows access to your NAS through a UPnP router. Click Network > UPnP Port Mapping > UPnP Router to check if the NAS has found a UPnP router on the network.
Figure 70 Network > UPnP Port Mapping > UPnP Router

text_image
Control Panel Overview UPnP Router UPnP Port Mapping Network TCP/IP UPnP Port Mapping Terminal DyDNS System Status Found UPnP supported router IP address 172.23.136.86The following table describes the labels in this screen.
Table 45 Network > UPnP Port Mapping > UPnP Router
| LABEL DESCRIPTION | |
| Status Displays wh | ether a UPnP router is found. |
| IP address Displays | the IP address of the UPnP router. |
10.5.5 Configuring UPnP Port Mapping
Click Network > UPnP Port Mapping > UPnP Port Mapping to display the UPnP Port Mapping screen.
Use this screen to set how the Internet gateway's UPnP feature configure's the Internet gateway's NAT IP address mapping and port mapping settings. These settings allow Internet users connected to the Internet gateway's WAN interface to access services on the NAS. You can set which port Internet users need to use to access a specific service on the NAS.
Figure 71 Network > UPnP Port Mapping > UPnP Port Mapping

text_image
Control Panel Overview Network TCP/IP UPnP Port Mapping Terminal DyDNS System UPnP Router UPnP Port Mapping To enable UPnP Port Mapping, please click the toggle below. Enabled/Disabled Status Service LAN Port WAN Port AFP 548 548 CIFS 445 445 FTP 21 2121 HTTP 80 6080 SSH 22 2222 TELNET 23 2323 Apply ResetThe following table describes the labels in this screen.
Table 46 Network > UPnP Port Mapping > UPnP Port Mapping
| LABEL DESCRIPTION | |
| Add | Click this to add a service and create a port mapping rule.See more details on Section 10.5.5.1 on page 118. |
| Remove | Click this to open the following screen where you can remove a port mapping rule. Click Yes to remove the selected port mapping rule or No to close this screen. Click Yes to remove the selected port mapping rule or No to close this screen. |
| Enabled/Disabled | Use this to enable or disable a selected port mapping rule. |
| Status | Displays the status of the port mapping rule. A green circle indicates the port mapping rule is enabled and you can access the service. A grey circle indicates the port mapping rule is disabled. A red circle indicates the router's settings failed to be changed. “-” indicates a new mapping rule. |
| Service | This read-only field identifies a service on the NAS. |
| LAN PortWAN Port | Displays the NAS's internal port number for the service.When you enable one of the NAS's services, specify the port number (1~65,535) Internet uses need to use to connect to the Internet gateway's WAN port in order to access the service on the NAS. Whoever wants to access a service on the NAS from the Internet must use this port number.Make sure there is not another service using TCP protocol with the same port number.If another device is using the same port (the Internet gateway has the same port number mapped to another LAN IP address), the NAS overwrites it when you apply the setting and WAN users can no longer access the other device. |
| Apply | Click Apply to save your changes back to the NAS. |
| Reset | Click Reset to begin configuring this screen afresh. |
10.5.5.1 Adding a Port Mapping Rule
Some Internet gateways will delete all UPnP mappings after reboot. So if the Internet gateway reboots, you may need to re-apply the UPnP port mapping again. Click UPnP Port Mapping > Add to add NAS services and create port mapping rules.

text_image
Add Port Mapping Rule(s) To use port number on the router (WAN) that is different from the one on the NAS (LAN), your router should support Port Address Translation (PAT). Select the service(s) to create port mapping rules Service LAN Port MEDIASERVER 9001 HTTPS 443 WEBDAV_HTTP 5002 WEBDAV_HTTPS 5003 WEBPUBLISHING_HTTP 80 WEBPUBLISHING_HTTPS 443 Apply CancelSelect the services you want to create port mapping rules for, and click Apply to add the services. Click Cancel to close the screen without saving any setting.
Note: The default of the WAN port for the newly created service displays -1. Specify the port number from 1 to 65,535, or you cannot access that service from the Internet.
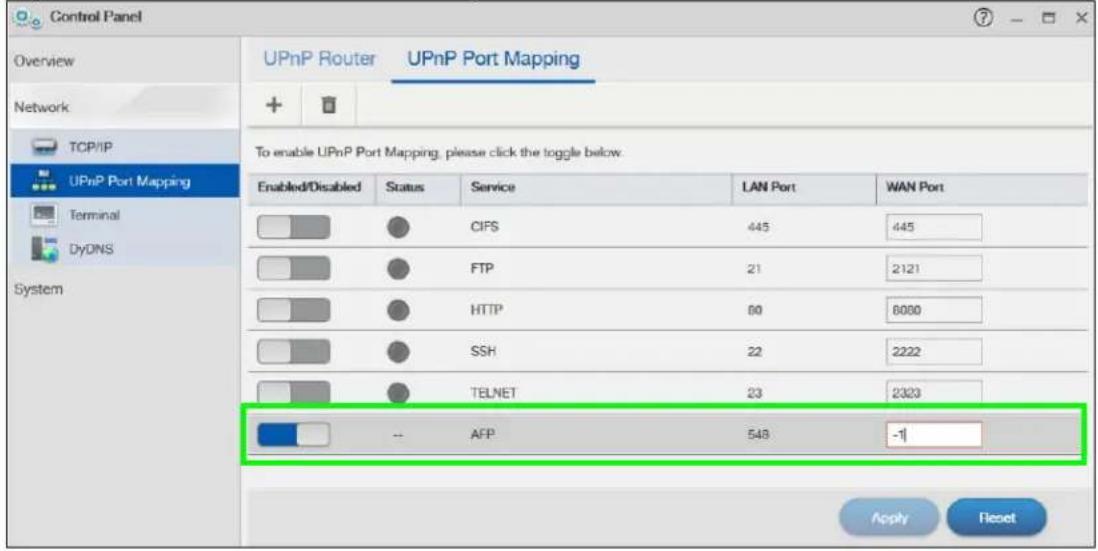
text_image
Control Panel Overview Network TCP/IP UPnP Port Mapping Terminal DyDNS System UPnP Router UPnP Port Mapping To enable UPnP Port Mapping, please click the toggle below. Enabled/Disabled Status Service LAN Port WAN Port CIFS 445 445 FTP 21 2121 HTTP 60 6000 SSH 22 2222 TELNET 23 2323 -- AFP 548 -1 Apply Reset10.6 Terminal Screen
Use this screen to enable or disable Telnet and SSH (Secure SHEll) access to the NAS.
Telnet or SSH access lets you use line commands to configure the NAS. Use these commands at your own risk. The vendor takes no responsibility for any changes you make using the commands.
Click Control Panel > Network > Terminal in the navigation panel to open the following screen.
Figure 72 Control Panel > Network > Terminal
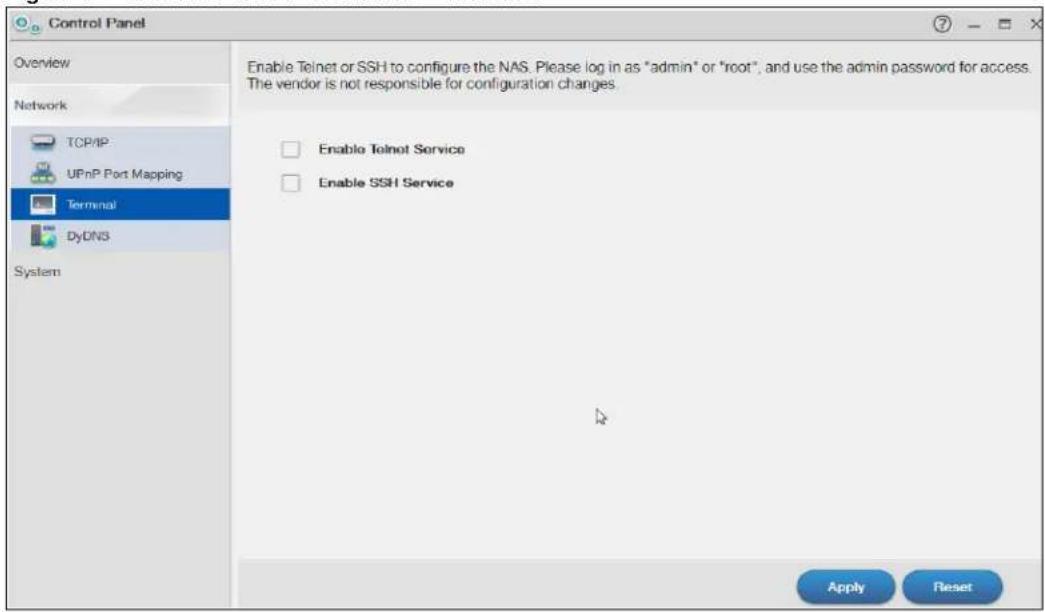
text_image
Control Panel Overview Network TCP/IP UPnP Port Mapping Terminal DyDNS System Enable Telnet or SSH to configure the NAS. Please log in as "admin" or "root", and use the admin password for access. The vendor is not responsible for configuration changes. Enable Telnet Service Enable SSH Service Apply ResetThe following table describes the labels in this screen.
Table 47 Control Panel > Network > Terminal
| LABEL DESCRIPTION | |
| Enable Telnet Service | Select this to enable Telnet access to the NAS. Clear it to not allow Telnet access to the NAS.To use Telnet, log in as “admin” or “root” and use the admin password. |
| Enable SSH Service | Select this to enable SSH access to the NAS. Clear it to not allow SSH access to the NAS.To use SSH, log in as “admin” or “root” and use the admin password. |
| Apply Click this to save your changes. | |
| Reset Click this to restore previously saved settings. | |
10.7 DyDNS Screen
Use this to enable and configure Dynamic DNS.
Dynamic DNS (DyDNS) allows you to update your current dynamic IP address with a dynamic DNS service so that anyone can contact you (such as through NetMeeting or CUSeeMe). You can also access your FTP server or Web site on your own computer using a domain name (for instance myhost.dhs.org, where myhost is a name of your choice) that will never change instead of using an IP address that changes each time you reconnect. Your friends or relatives will always be able to call you even if they don't know your IP address.
Click Control Panel > Network > DyDNS to open the following screen.
Figure 73 Control Panel > Network > DyDNS

text_image
Control Panel Overview Network TCP/IP UPnP Port Mapping Terminal DyDNS System Enable DyDNS to update current dynamic IP address with a dynamic DNS service, so that you can access NAS by a domain name. Enable DyDNS Service provider DynDNS.com Register Now Hostname Username Password Status Disabled Default Gateway LAN1 External Address -- Apply ResetThe following table describes the labels in this screen.
Table 48 Control Panel > Network > DyDNS
| LABEL DESCRIPTION | |
| Enable DyDNS Select | this to use dynamic DNS.You need to have registered a dynamic DNS account with a service provider such as www.dyndns.org. The Dynamic DNS service provider will give you a password or key. |
| Service Provider Select | your Dynamic DNS service provider. |
| Hostname Enter your | host name provided by the Dynamic DNS service. |
| Username Enter your | user name for your DNS account. |
| Password Enter the p | password assigned to your DNS account. |
| Status This shows the | DyDNS update result:Disabled – You have manually disabled the DyDNS feature.Error – An unrecoverable error (such as authentication error) occurred caused the NAS to disable the DyDNS feature automatically.Fail to update – A recoverable error (such as a temporary Internet disconnect) occurred. The NAS will retry later.Updated - The NAS updated the DyDNS server with the NAS's public IP address. |
| Default Gateway | This shows with which public IP of interface the NAS updated the DyDNS server. |
| External Address This | shows the IP address of the NAS that can be accessed in the Wide Area Network (WAN). Note that this is not assigned by the DyDNS server. |
| Apply Click this to save your changes. | |
| Reset Click this to clear the fields. | |
10.8 FW Upgrade Screen
Use this screen to upgrade the NAS firmware. You should first have downloaded the latest firmware files from the ZyXEL website.
Do not turn off the NAS while it is upgrading the firmware or you may render it unusable.
Click Control Panel > System > FW Upgrade to open the following screen. Latest Firmware Check allows you to check the latest firmware version and perform the upgrade.
Figure 74 Control Panel > System > FW Upgrade > Latest Firmware Check

text_image
Latest Firmware Check Manual Firmware Upgrade Before upgrading, please back up all disk data. The system LED will start blinking after you click Upgrade Now. Please do not power off NAS while FW is upgrading. Until the reboot completes, you may need to reconfigure device in some cases. Model Name NAS540 Current firmware version V2015-09-13_22_22_36(AATB.0)b1 Last Check 2015/00/03 19:29:05 Check Now ✓ Periodically check for latest firmware automatically Status V5 04(AATB.0) is ready to upgrade Upgrade Now Release Date 2015/05/14 Release Note 504AATB0C0.pdf Size: 58.15 MB Apply ResetThe following table describes the labels in this screen.
Table 49 Control Panel > System > FW Upgrade > Latest Firmware Check
| LABEL DESCRIPTION | |
| Model Name Displays the model name of you NAS | |
| Current Firmware Version | Displays the current firmware version of your NAS |
| Last Check Displays the last checking time. If no, it is blank. | |
| Check Now Click this to check ZyXEL's server for updated firmware. | |
| Periodically Check for Latest Firmware Automatically | Select this to have the NAS regularly check ZyXEL's server for updated firmware. The NAS notifies you at login if a new firmware is available.ClickApplyto save this field's setting. |
| Status | Displays the firmware checking status or error messages. If there is no previous checking information, it displays --. |
| Upgrade Now | Click this to upload the new firmware. The NAS automatically restarts after you upgrade. Wait until the restart completes before accessing the NAS again. If you interrupt the upgrade, then the NAS may become unusable. See page 354 for your model's LED behavior during firmware upgrade. |
| Reset Click this to refresh the screen. | |
You can also download the firmware from the ZyXEL website and upgrade the firmware manually. Click Control Panel > System > Manual Firmware Upgrade to show the following screen.
Figure 75 Control Panel > System > FW Upgrade > Manual Firmware Upgrade

text_image
Control Panel Overview Network TCP/IP UPnP Port Mapping Terminal DyDNS System FW Upgrade Latest Firmware Check Manual Firmware Upgrade Before upgrading, please back up all disk data. The system LED will start blinking after you click Upgrade Now. Please do not power off NAS while FW is upgrading. Until the reboot completes, you may need to reconfigure device in some cases. Please select the binary (BIN) upgrade file from your local computer. Browse UpgradeThe following table describes the labels in this screen.
Table 50 Control Panel > System > Firmware > Manual Firmware Upgrade
| LABEL DESCRIPTION | |
| Browse Click this to find the file on your computer. | |
| Upgrade Click this to upgrade the firmware after you find the file. | |
Videos, Photos, Music, & File Browser
11.1 Overview
This chapter introduces the File Browser, Photo, Music, Video, Media Server and the iTunes Server for sharing media files.
11.2 File Browser
Click File Browser on the Desktop to open the following screen in a new tab. Use the file browsing screens to play, open, upload, and download files. A share is a set of user access permissions for a specific folder on a volume (gives someone access to a folder). It is equivalent to the Windows concept of a shared folder, but the access rights are independent of the folder (you configure the share and the folder separately). You can map a share to a network drive for easy and familiar file transfer for Windows users.
- A folder icon with a hand indicates a share.
- The administrator owns and manages the public shares.
- Double-click a media file to open it. Double-click other types of files to be able to save them.
- Click to the right of a file or folder name to select it.
- Use the [SHIFT] key to select a range of entries. Hold down the [CTRL] key to select multiple individual entries.
- Drag and drop files to open a screen that lets you choose whether to copy or move them.
- You can upload files of up to 2 GB in size.
- You can download individual files of up to 4 GB in size with Mozilla Firefox and Internet Explorer 7 and later or up to 2 GB in size with Internet Explorer 6.
Figure 76 File Browser
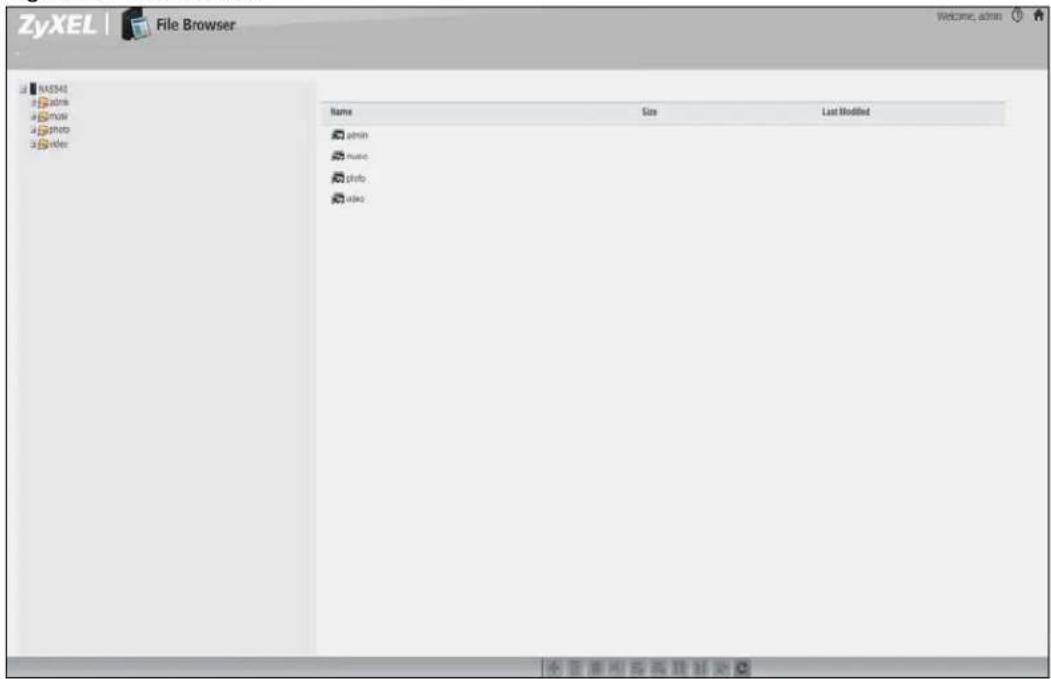
text_image
ZyXEL | File Browser Name Size Last Modified admin music photo videoThe following table describes the labels in this screen.
| LABEL DESCRIPTION | |
| Up | Click this to go to the next higher layer in the share's folder tree. |
| Name | This column identifies the names of folders and files in the share. Click a file's file name to open the file or save it to your computer. Click a folder's name to display the folder's contents. |
| Size This column | n displays a file's size in bytes. |
| Last Modified | This column displays the last time the file or folder was changed (in year-month-day hour:minute:second format). |
| Create New Folder | Click this to open the following screen where you can create a new folder within the share. Specify a name to identify the folder. See Section 11.2.2 on page 128 for more information on folder names. ClickApplyto create a folder or click Cancelto exit this screen. Specify a name to identify the folder. See Section 11.2.2 on page 128 for more information on folder names. ClickApplyto create a folder or click Cancelto exit this screen. |
| Configure Share | Select a share and click this link to open a screen where you can see and configure share management details. |
| Delete Select a | file or folder and click this to delete it from the NAS. |
| Rename Select | a file or folder and click this to change its name. |
| Upload Click th | s to open the following screen where you can add files to the share. |
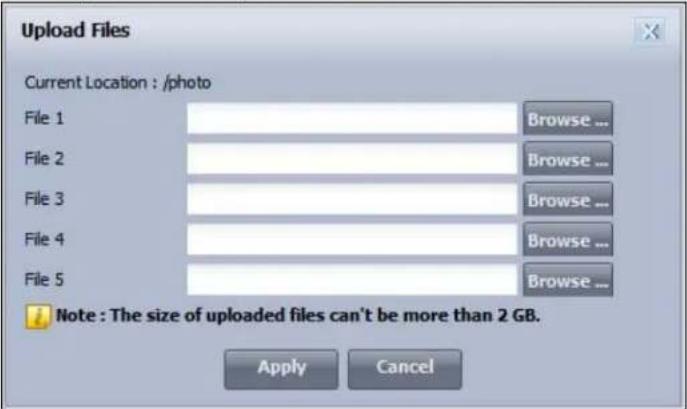 | |
| Use the Browse button to locate your file/s and click Apply to upload the file. Click Cancel to close this screen.Note: Do not refresh the screen while an upload is going on. | |
| Download Select | a file and click this to save the file to your computer.Note: Do not refresh the screen while a download is going on. |
| Compress Select | files or folders and click this to compress them into a zip file. |
| Decompress | Select a zipped file and click this to create a folder named after the zip file and save the decompressed files into the folder. |
| Restore | When you are in a recycle bin folder, select a folder or file and click this to restore it. |
| Refresh | Click this to update the information displayed in the screen.Note: Do not refresh the screen while an upload or download is in progress. |
11.2.1 Configure Share Screen
In the File Browser screen, select a share and click Configure Share to open the following screen where you can see and configure share management details.
Figure 77 File Browser > Configure Share

text_image
Configure Share Share Name photo Volume: caff Make this share owned by admin Enable This Share Enable Recycle Bin Publish this share to Media Server Publish Music Tracks Publish Photos Publish Videos Publish this share to Vets Share Access Advanced Edit Apply CancelThe following table describes the labels in the this screen.
Table 52 File Browser > Configure Share
| LABEL DESCRIPTION | |
| Share Name | Configure a name to identify this share. Type a share name from 1 to 239 single-byte (no Chinese characters allowed for example) ASCII characters. The name cannot be the same as another existing local share. See Section 11.2.2 on page 128 for more information on share names. This is not configurable for the NAS's default admin, music, photo, public, and video shares. |
| Volume This shows | the volume the share is on. It is read-only. |
| Make this share owned by | Select the administrator or user account that is to own (manage) this share. The share owner controls access rights to the share. This is not configurable for the NAS's default admin and public shares. |
| Enable This Share | Select this option to allow users to access this share. When this option is not selected, you cannot see and access this share. |
| Enable Recycle Bin | Select this option to keep deleted items in a recycle bin. When you delete an item, a recycle folder is created within the share, and the deleted item is stored in the recycle bin. Later if you want to retrieve a deleted item, you can select the item from the recycle folder and move/copy the item to another share. |
| Publish this share to Media Server | Select this option to make the share's files available to media clients. When you publish a share, you can also select whether or not to publish music tracks, photos, and videos. |
| Publish this share to Web | Select this option to let people use a web browser to access this share's files without logging into the Web Configurator screens. |
| Share Access | Select who can access the files in the share and how much access they are to be given. If you publish the share to the media server or the web, all users will have at least read-only access to the share, regardless of what you configure here.Select Keep it private to owner to allow only the share owner to read files in the share, delete files in the share and save files to the share.Select Make it public to allow anyone (with or without a user account on the NAS) to read files in the share, delete files in the share and save files to the share.Select Advanced to select which individual users can read the share's files, which users can delete the share's files, and which users are blocked from doing either. |
| Apply Click this to save your changes. | |
| Cancel Click this to return to the previous screen without saving. | |
11.2.2 Share and Folder Names
The name can only contain the following characters:
- Alphanumeric (A-z, 0-9) and Unicode.
The NAS allows FTP access to shares, folders or files with names encoded in the UTF-8 (8-bit UCS/Unicode Transformation Format) format. So your FTP client must support UTF-8 in order to access shares, folders or files on the NAS with Unicode names.
- Spaces
- _ [underscores]
• . [ periods ] - [ d a s h e s ]
Other limitations include:
- All leading and trailing spaces are removed automatically.
- Multiple spaces within names are converted to a single space.
- Share names must be unique (they cannot be the same as other share names).
- The NAS creates automatic volume names for external (USB) disk volumes. These are a type of share, so the share name you configure cannot conflict with the external (USB) disk volume names. "ExtVol1" or "ExtVol2" are examples of external (USB) disk volume names.
- Folder names must be unique (they cannot be the same as other folder names).
- The minimum character length of a name is one character, that is a name cannot be blank.
- The maximum character length of share name is 239 characters.
- Unicode is supported for share names, although your FTP client must support UTF-8. Full support should be available in all Windows versions after Windows 2000.
11.3 Photo
Click the Photo icon on the Desktop to open the photo folder in a new tab. Double-click the photo folder to view photos in the shares that publish photos. The following figures show the files as thumbnail and list views of files.
Figure 78 Photo (Thumbnail)

text_image
ZyXEL | Photo / Folder / photo / Welcome; admin Search... 001ec949H212d 0_4661a757097c 1-1502f11826480 10 1421387_8328515 1792f90668_104 1_160802101333_ 2010070245626 20110722131724 30155 33hde 3466d59f4e54612 62zhe612jw1d4fnt mg_0 mg_2 mg_777 patoo-recite-f... pk_745_5 w6008 w020121185399 CFigure 79 Photo (List)
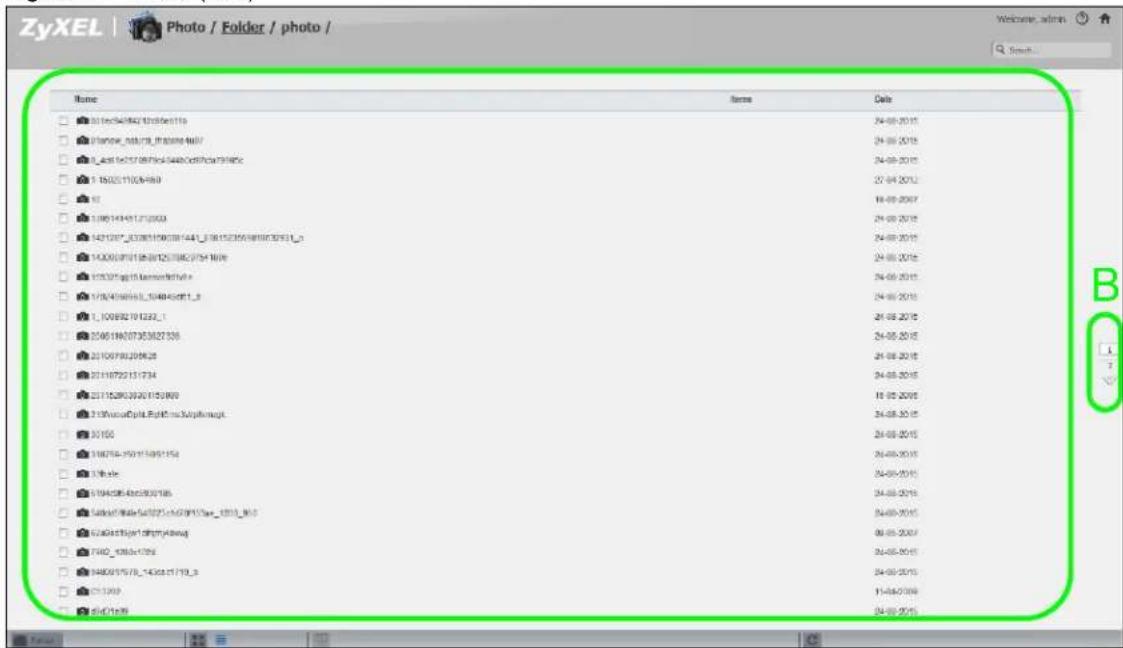
text_image
ZyXEL Photo / Folder / photo / Name Items Date 3016054982/17856e116 24-08-2015 3016054982/17856e116 24-08-2015 3016054982/17856e116 24-08-2015 3016054982/17856e116 24-08-2015 3016054982/17856e116 24-08-2015 3016054982/17856e116 24-08-2015 3016054982/17856e116 24-08-2015 1 15005110054989 27-09-2012 30 18-09-2007 3016054982/17856e116 24-08-2015 3016054982/17856e116 24-08-2015 3016054982/17856e116 24-08-2015- 3016054982/17856e116 24-08-2015 3016054982/17856e116 24-08-2015 3016054982/17856e116 24-08-2015 TJ 30093279 3233_1 24-08-2015 TJ 30093279 3233_1 24-08-2015 TJ 30093279 3233_1 24-08-2015 TJ 30093279 3233_1 24-09-2015 TJ 30093279 3233_1 24-08-2015 TJ 30093279 3233_1 24-08-2015 TJ 30093279 3233_1 24-08-2015 30 30093279 3233_1 24-08-2015 TJ 30093279 3233_1 24-08-2015 TJ 30093279 3233_1 24-08-2015 TJ 30093777777777777777777777777777777777777777777777 TJ 30093777777777777777777777777777 TJ 300937777777777777777777 TJ 300937777777777777 TJ 3009377777777777 TJ 30093777The following table describes the labels in this screen.
Table 53 Photo Screen
| LABEL DESCRIPTION | |
| ZyXEL The path of the current view.Click an underlined link to go to that location in the path.Music, Photo, or Video indicates the category of files. | |
| Search Use this to look for a file by name. | |
| A View files. Double-click an item to play it. You can also select check boxes for multiple items when you display the files as a list. | |
| B | The current page and total number of pages displays when a category has multiple pages of entries. Click an arrow or type a number to go to another page of entries. |
| C Select a view type for displaying folders and files:Date - Sort photos by date.All - Display all of the category's files.Folder - List the folders containing files. | |
| Thumbnail Click this to view the files as thumbnails. | |
| List Click this to view the files as a list. | |
| Slideshow Click this to display files as a slideshow. | |
| Refresh Click this to update the display in the screen. | |
11.3.1 Exif and Google Maps (Photos)
Double-click a photo file to display it. Thumbnails of all photos in the view display across the bottom of the screen. Click a photo's EXIF button to display or hide the photo's Exchangeable image file format (Exif) data.
Figure 80 Exif Information

text_image
ExE Version 2.21 Camera Manufacture Canon Camera Model Canon EOG-1Do Mark II Original Date 2004-10-15 2008-15 Exposure Time 1/50s F Number 11 Exposure Program ISO Speed 100 Exposure Bias 0.0 Light Source Flash Light off Focal Length 50mm Exit Image Width 4892 Exit Image Length 3329 Image Width Image Length Orientation Top-Left Latitude LongitudeIf a photo's Exif data includes GPS location data, click the latitude or longitude link to display the location in Google Maps. Click Clear to delete the markers of other photos and only display the current photo's marker.
Figure 81 Google Maps

In a Photo menu click the SlideShow button to display the menu's files as a slideshow. Move your cursor over the slideshow's screen to display full screen, previous, pause, and next buttons for controlling the slideshow.
Note: Your browser must have the Flash Player plug-in installed to view slideshows.
Figure 82 Slideshow
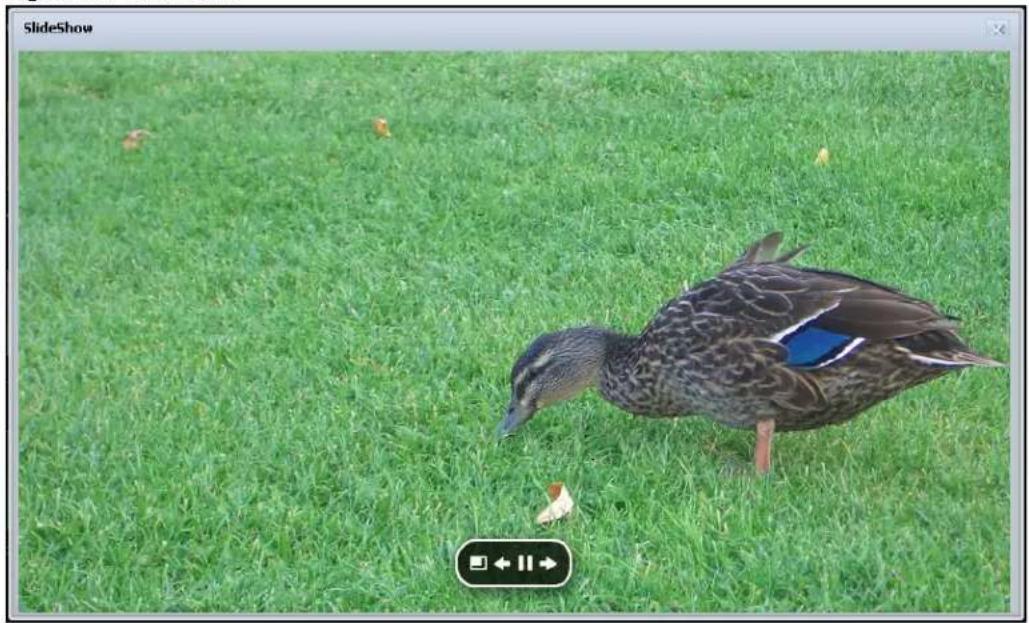
natural_image
Duck standing on a grassy field, no visible text or symbols11.4 Music
Click the Music icon on the Desktop to open the music folder in a new tab. Double-click the music folder to view and play music files in the shares that publish photos. The following figures show thumbnail and list views of files.
Figure 83 Music (Thumbnail)
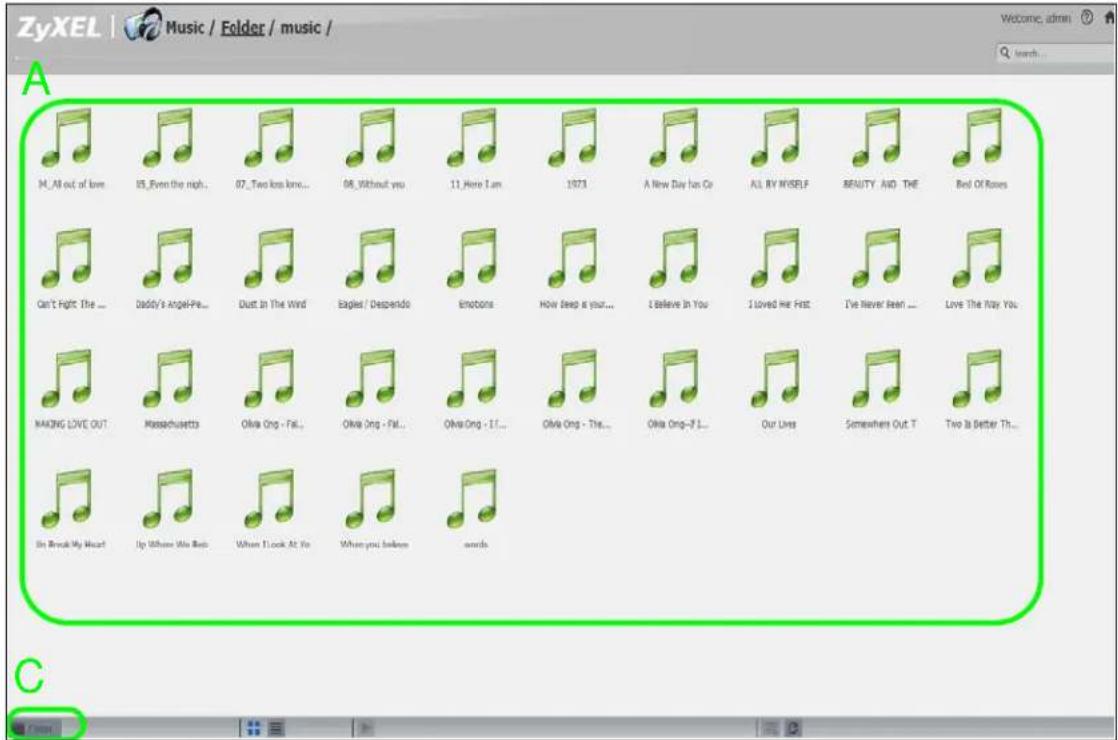
text_image
ZyXEL | Music / Folder / music / A 14_All out of love 25_Even the nigh... 07_Two love love... 08_Without you 11_Have I am 1973 A New Day has Co ALL BY MYSELF BEAUTY AND THE Bed Of Roses Can't Fight The ... Daddy's Angel-Pe... Dust in The Wind Eagles / Despendo Emotions How Deep is your... I Believe In You I Loved Me Fest I've Never Been ... Love The Way You MAKING LOVE OUT Massachusetts Oliva Ong - Fat... Oliva Ong - Fat... Oliva Ong - If... Oliva Ong - The... Oliva Ong-If I... Our Lives Somewhere Out T Two Is Better Th... I'm Break My Heart Up Where We Bea When I Look At Yo When you before words CFigure 84 Music (List)
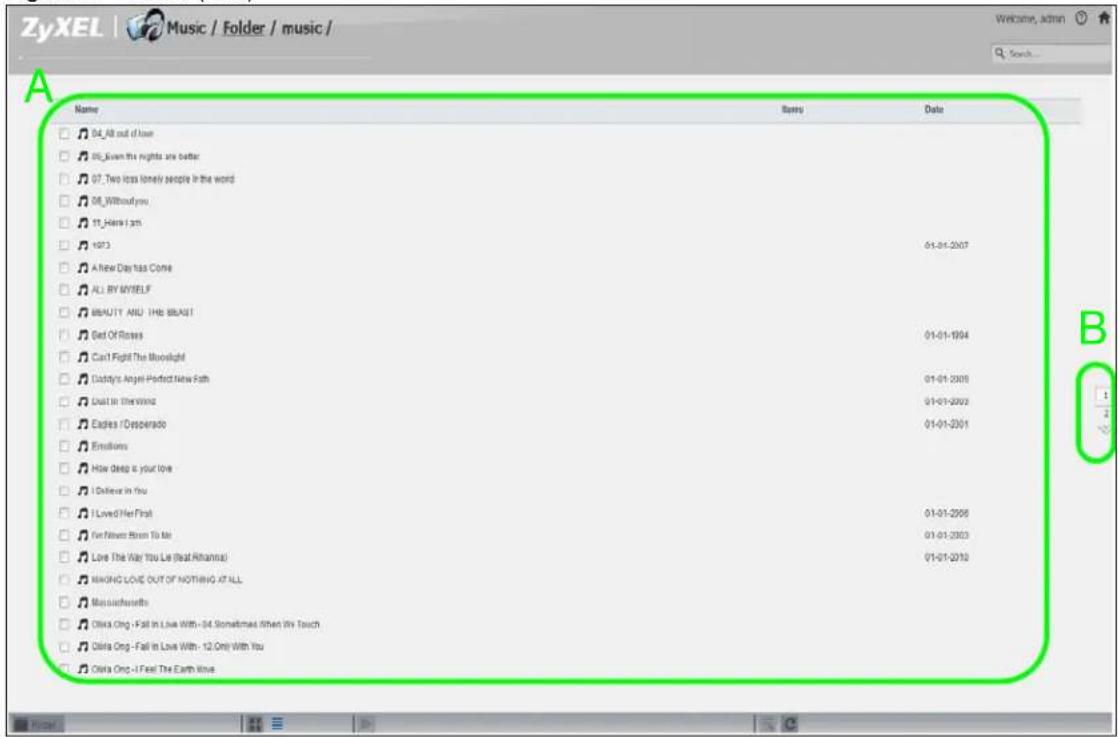
text_image
ZyXEL | Music / Folder / music / Welcome, admin Search... A Name 04_All out of love 05_Given the nights are better 07_ Two kids lonely people in the world 08_ Without you 11_Hare i am 12/13 A New Day has Come ALL BY MYSELF BEAUTY AND THE BRANT Get Of Roses Can't Fight The Moonlight Daddy's Angel Perfect New Path Dead in the wind Eadies / Desperado Emotions How deep is your love I Believe in You I Loved! Her First I'm Never Born To Me Love The Way You Lie (real Rihanna) MIKING LOVE OUT OF NOTHING AT ALL Massachusetts Olivia Cng - Fall In Love With - 04 Sometimes When My Touch Olivia Cng - Fall In Love With - 12 Only With You Olivia Cng - I Feel The Earth LoveThis table describes common labels in the Playzone media server screens. Not every item displays in every screen.
Table 54 Music Screen
| LABEL DESCRIPTION | |
| ZyXEL The path of the current view.Click an underlined link to go to that location in the path.Music, Photo, or Video indicates the category of files. | |
| Search Use this to look for a file by name. | |
| A View files. Double-click an item to play it. You can also select check boxes for multiple items when you display the files as a list. | |
| B | The current page and total number of pages displays when a category has multiple pages of entries. Click an arrow or type a number to go to another page of entries. |
| C Select a view type for displaying folders and files:Artist - Sort music by artist.All - Display all of the category's files.Folder - List the folders containing music files.Current Playlist - Show the playing and queued songs. | |
| Thumbnail Click this to view the files as thumbnails. | |
| List Click this to view the files as a list. | |
| Play | Click this to play the currently selected file. You can also double-click a file to play it. |
| Add to Current Playlist | Click this to add the selected music file to the currently playing playlist. |
| Refresh Click this to update the display in the screen. | |
| Now Playing This link is available when a song is playing. Click it to see details about the song that is currently playing. | |
11.4.1 Now Playing (Music)
A Now Playing link displays when a song is playing. Click it to display a panel like the following. This screen displays the name of the current song and it's play progress and lets you control the playback.
Figure 85 Now Playing

text_image
Eagles - What the World Needs Now Is... Dust In The Wind 1/1 00:56 04:01 Go to Current Playlist>11.5 Video
Click the Video icon on the Desktop to open the video folder in a new tab. Double-click the video folder to view and play video files in the shares that publish videos. The following figures show the thumbnail and list views of files.
Figure 86 Video (Thumbnail)
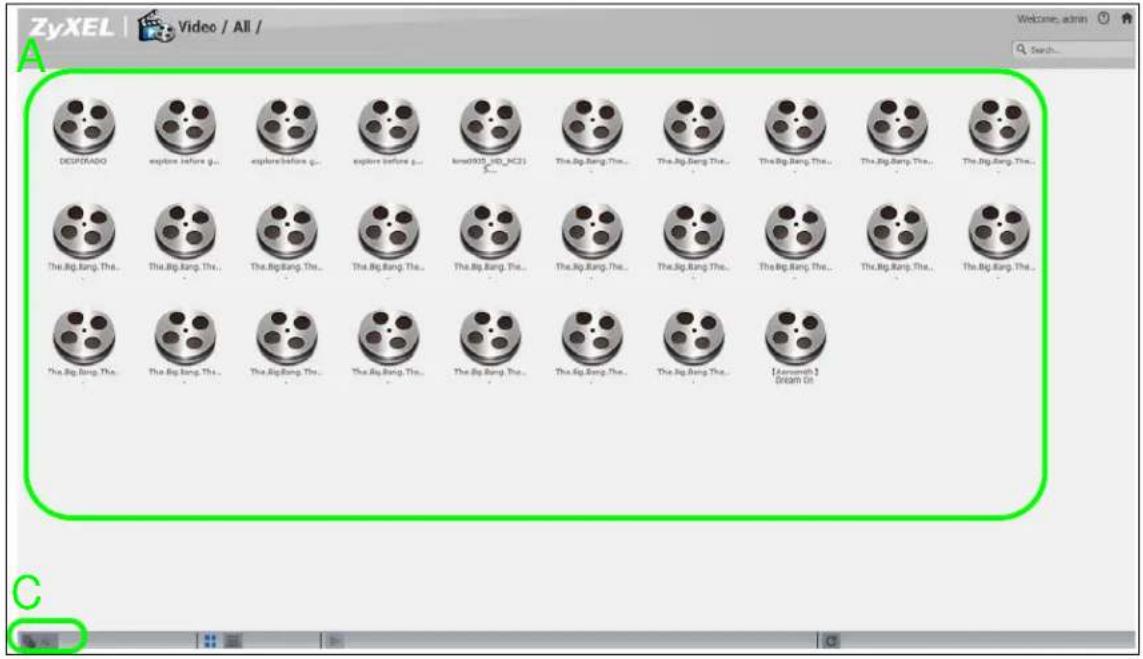
text_image
ZyXEL | Video / All / Welcome: admin Search... DECSPORADO explore before g... explore before g... explore before g... knotDVD_ID_MCS1 The.Big Bang. The... The.Big Bang. The... The.Big Bang. The... The.Big Bang. The... The.Big Bang. The... The.Big Bang. The... The.Big Bang. The... The.Big Bang. The... The.Big Bang. The... The.Big Bang. The... The.Big Bang. The... The.Big Bang. The... The.Big Bang. The... The.Big Bang. The... The.Big Bang. The... TheBumman 2 Dream On CFigure 87 Video (List)

text_image
ZyXEL Video / All / Name Size Date DESPERADO 10.78 MB 26-08-2015 Explore before graduation-01 221.22 MB 26-08-2015 Explore before graduation-02 225.39 MB 26-08-2015 Explore before graduation-03 234.07 MB 26-08-2015 Imma0039_HD_MC216_H26E_10M_1000p 816.13 MB 18.11.2015 The Big Bang Theory Season1.EPO1_S-Files 97.91 MB 26-08-2015 The Big Bang Theory Season1.EPO2_S-Files 90.28 MB 26-08-2015 The Big Bang Theory Season1.EPO1_S-Files 94.36 MB 26-08-2015 The Big Bang Theory Season1.EPO4_S-Files 88.25 MB 26-08-2015 The Big Bang Theory Season1.EPO1_S-Files 89.16 MB 26-08-2015 The Big Bang Theory Season1.EPO4_S-Files 89.84 MB 26-08-2015 The Big Bang Theory Season1.EPO1_S-Files 90.71 MB 26-08-2015 The Big Bang Theory Season1.EPO4_S-Files 88.25 MB 26-08-2015 The Big Bang Theory Season1.EPO4_S-Files 82.66 MB 26-08-2015 The Big Bang Theory Season1.EPO1_S-Files 99.44 MB 26-08-2015 The Big Bang Theory Season2.EPO1_S-Files 92.16 MB 26-08-2015 The Big Bang Theory Season2.EPO4_S-Files 52.92 MB 26-08-2015 The Big Bang Theory Season2.EPO4_S-Files 91.42 MB 26-08-2015 The Big Bang Theory Season2.EPO4_S-Files 91.24 MB 26-08-2015 The Big Bang Theory Season2.EPO4_S-Files 85.37 MB 26-08-2015 The Big Bang Theory Season2.EPO4_S-Files 88.96 MB 26-08-2015 The Big Bang Theory Season2.EPO4_S-Files 99.94 MB 26-08-2015 The Big Bang Theory Season3.EPO4_S-Files 95.57 MB 26-08-2015 The Big Bang Theory Season3.EPO4_S-Files 91.12 MB 26-08-2015 The Big Bang Theory Season3.EPO4_S-Files 88.37 MB 26-08-2015 The Big Bang Theory Season3.EPO4_S-Files 90.51 MB 26-08-2015The following table describes the labels in this screen.
Table 55 Video Screen
| LABEL DESCRIPTION | |
| ZyXEL The path of the current view.Click an underlined link to go to that location in the path.Music, Photo, or Video indicates the category of files. | |
| Search Use this to look for a file by name. | |
| A View files. Double-click an item to play it. You can also select check boxes for multiple items when you display the files as a list. | |
| B | The current page and total number of pages displays when a category has multiple pages of entries. Click an arrow or type a number to go to another page of entries. |
| C Select a view type for displaying folders and files:All - Display all of the category's files.Folder - List the folders containing music files. | |
| Thumbnail Click this to view the files as thumbnails. | |
| List Click this to view the files as a list. | |
| Play | Click this to play the currently selected file. You can also double-click a file to play it. |
| Refresh Click this to update the display in the screen. | |
11.6 Playzone Settings
The Playzone Settings screen is only available with user accounts. Click Playzone Settings to open the following screen. Use this screen to change general Playzone screen settings and account passwords.
Figure 88 Playzone Settings

text_image
ZyXEL | Playzone Settings Player WMP Install WMP Music Setting Double Click Behavior Setting Replace current playlist and start to play Append to current playlist Photo Slideshow Slide Effect: Enable Kan Bums Slide Interval: 3 Second(s) Change Password Video Setting Play Next Video Playback Account Name admin Old Password New Password Password (Confirm) System Language Language English System Administration Go to system administration page. Apply Reset CancelThe following table describes the labels in this screen.
Table 56 Playzone Settings
| LABEL DESCRIPTION | |
| WMP | This field displays “Installed” if you already have Windows Media Player installed or a link for installing it if you do not already have it installed. |
| Double Click Behavior Setting | SelectReplace current playlist and start to playto have double clicking a song cause the NAS to immediately stop any currently playing song and start playing the double-clicked song.SelectAppend to current playlistto have double clicking a song add a song to the end of the current playlist. |
| Slide Effect | Enable the Ken Burns effect to have the NAS automatically pan and zoom photos in slideshows. Disable it to display photos in slideshows normally. |
| Slide Interval | Select how long to display each image in a slideshow before changing to the next. |
| Video Playback | SelectPlay Nextto play the rest of the video files in a folder. So for example, a folder has video files 1~10 and you play video 3. When video 3 finishes the device continues playing the rest of the videos in the folder (4~10). It does not loop back and play videos 1 and 2. |
| Account Name | Type the user name of the account for which you want to change the password. |
| Old Password Type the | user's current password. |
| New Password Create a | new password for the user. You can type from one to 14 single-byte (no Chinese characters allowed for example) ASCII characters. |
| Password (Confirm) | You must type the exact same password that you just typed in the above field. |
| Language Select the web | configurator language from the drop-down list box. |
| Go to system administration page | This link appears when you are logged in as the administrator. Click it to open the advanced administrator screens. The NAS opens the administrator configuration screens in a new browser if you clickGo to system administration pagewhile using the media server to play music. |
| Apply Click this to save | your changes. |
| Reset Click this to refresh | sh the screen. |
| Cancel Click this to exit | the screen without saving your changes. |
11.7 Application Zone
Normal users can click Application Zone to go to the management page of installed, non-built-in packages.
Figure 89 Application Zone
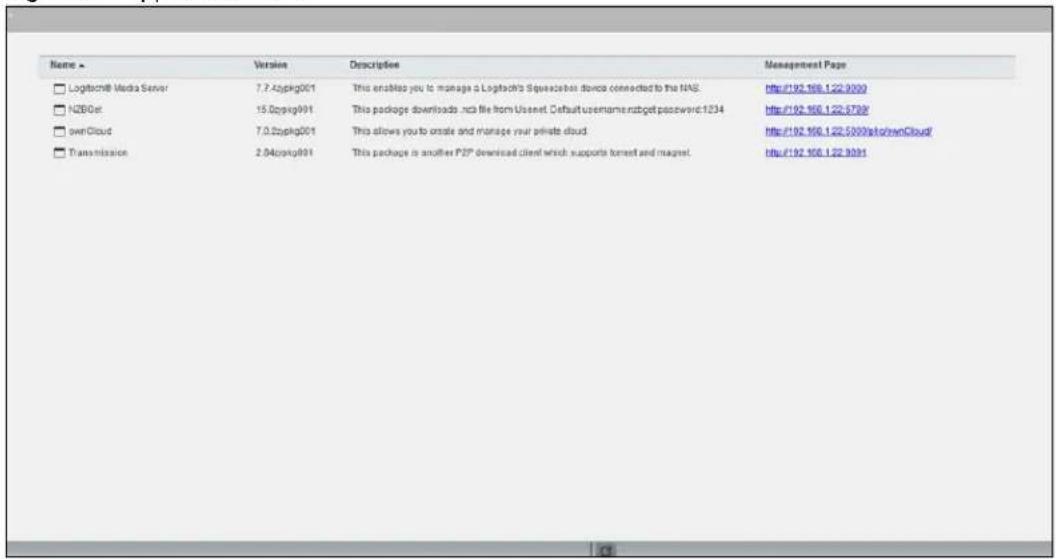
text_image
Name ▶ Logitech Media Server 7.7.42pkg001 This enables you to manage a Logitech's Squaresian devices connected to the NAS. NZBOer 15.02pkg001 This package downloads .ncb file from Usenet. Default username:zsgb password:1234 ownCloud 7.0.22pkg001 This allows you to create and manage your private cloud. Transmission 2.04c0kg001 This package is another P2P downloaded client which supports torrent and magnet. Management Page http://192.166.1.22.9099 http://192.166.1.22.9788/ http://192.166.1.22.5099/slo/ownCloud/ http://192.166.1.22.9091The following table describes the labels in the this screen.
Table 57 Application Zone
| LABEL DESCRIPTION | |
| Name This is the name of the application. | |
| Version This is the version number of the item. | |
| Description This is a brief description of the application. | |
| Management Page | Click this link to go the application's management page where you can configure settings for it. |
| Refresh Update | the list of applications in the screen. |
11.8 Media Server
Use the Media Server screens to enable or disable the sharing of media files with media clients and select which shares to share. See Section 17.5 on page 216 for details.
11.9 iTunes Server
Use the iTunes server to share media files with iTunes users on your network. See Section 17.6 on page 218 for details.
12.1 Overview
This chapter describes how to access the administrator screens and provides an overview of its screens.
12.2 Administrator Screens
The Desktop screen displays an Administrator icon when you log in with an administrator account. Click it to open the administrator configuration screens in a new tab. The Status screen displays first. See Chapter 15 on page 203 for more information about the Status screen.
Figure 90 Status

text_image
1 NASS40 Systems Setting Applications Application Auto-Upload Maintenance Maintenance Protect Status 2 Status 3 System Information Server Name Name 3 Model Name Name 3 Hardware Version Web/Networks Media Server Status Download 3 FTP Server Status Download 3 Web Publishing Status Download 3 UPS Link 3 Active Session Type Share Name Username Connected At IP Address Web admin 2015-09-28 16:47:13 172.23.3.33 Web admin 2015-09-01 14:00:24 172.23.3.3312.2.1 Global Administrator Icons
The icons and language label at the top-right of the screen (1) are visible from most of the administrator screens. The following table describes the 'global' icons and labels.
Table 58 Global Labels and Icons
| LABEL/ICON DESCRIPTION |
| Language Select the web configurator language from the drop-down list box. |
| Help Click this to open Web Help for the current screen. |
| Home Click this to go to the Desktop screen. |
12.2.2 Navigation Panel
The navigation panel on the left of the Web Configurator screen (2) contains screen links. Click a link to display sub-links. There are no sub-links for the Status screen. Certain screens also contain hyper links that allow you to jump to another screen.
The following table describes the navigation panel screens.
Table 59 Screens Summary
| LINK SCREEN FUNCTION | ||
| Status This screen shows system information, the status of the volumes, and the users who are currently using the NAS. | ||
| System Setting | Packages | The NAS can download multiple packages/files at once and automatically goes through all the installation steps. |
| Server Name Sp | Specify the NAS's server name and workgroup name. | |
| Date / Time | Chose a time zone and/or allow the NAS to synchronize with a time server. | |
| LINK | SCREEN | FUNCTION |
| Applications | FTP Server | Enable FTP file transfer to/from the NAS, set the number of FTP connections allowed, an FTP idle timeout, and the character set. |
| Media Server Enable or disable the sharing of media files and select which shares to share. | ||
| iTunes Server | Use the iTunes server to share media files with iTunes users on your network. | |
| Download Service | Have the NAS handle large file downloads. | |
| Web Publishing | Let people use a web browser to access files in shares without logging into the Web Configurator. | |
| Print Server | View and manage the NAS's list of printers and print jobs. | |
| Copy/Sync Button | Copy or synchronize files between a USB device and the NAS. | |
| Auto Upload - Flickr/YouTube | Upload files in selected shares to your Flickr and/or YouTube accounts. | |
| Auto Upload - FTP Uploadr | Upload files in selected shares to FTP servers. | |
| Dropbox Use your Dropbox account to easily move files to your NAS and have the NAS download *.torrent files. | ||
| Time Machine Use Time Machine in OS X to use your NAS as a backup volume. | ||
| Memopal Back up files from the NAS to your Memopal account. | ||
| GoogleDriveClient | Use GoogleDriveClient to synchronize local user folders on the NAS with Google Drive cloud storage accounts. | |
| Syslog Server | Enable the syslog server and select the categories to include in the log report. | |
| TFTP Server Configure the NAS to accept log files from TFTP clients. | ||
| pyLoad Configure the NAS to use pyLoad to manage your downloads, including those from one-click hosting sites. | ||
| Sharing | Users | View, create and edit administrator and user accounts to let people use the NAS. |
| Groups | View, create and edit groups. Groups allow you to organize users into specific groups. You can create shares accessible only by the group members. | |
| Shares | View, create and edit shares. Shares are shared folders to which you can allow specific users read/write access rights. | |
| WebDAV | Allow remote users to use client programs that support WebDAV to edit and manage files stored on the NAS | |
| Maintenance | Power | Configure power saving settings for the NAS and have the NAS turn itself off and on or reboot according to the schedules you configure. |
| Log | View the NAS's logs and configure how you want to receive the log reports. | |
| Configuration | Back up and/or restore the NAS configuration file. | |
| SSL | Configure HTTPS and the NAS's SSL certificate. | |
| Shutdown | Restart the NAS or shut it down. | |
| Unpair myZyXELcloud | Remove the pairing between the NAS and the myZyXELcloud account. | |
| Protect | Backup | Create and customize backup jobs. |
| Restore | Restore previous backups made with the NAS. | |
| Network | NFS | Install the NFS package to display this screen where you can configure NFS (Network File System) file-sharing. |
12.2.3 Main Window
The main window (3) shows the screen you select in the navigation panel. It is discussed in the rest of this document.
12.2.4 Status Messages
The Message text box at the bottom of the screen (4) displays status messages as you configure the NAS.
12.2.5 Common Administrator Screen Icons
The following table explains some icons that appear in several administrator configuration screens.
Table 60 Common Administrator Screen Icons
| ICON DESCRIPTION | |
 | EditClick this to go to a screen where you can change the configuration settings of an entry. |
| [C1WK] | DeleteClick this to delete an entry from the list. |
 | EditClick this to jump to related item's configuration screen. |
| [XHBK] | RefreshClick this to refresh the data for the field or value with which it is associated. |
| [YHB2] | UserSee the chapter on user accounts for detailed information on variants of this icon. |
| [KGYD] | ShareSee the chapter on shares for detailed information on variants of this icon. |
| [5506] | HealthyThis represents a healthy volume. |
| [30SC] | DownThis represents a down volume. |
 | Scan DiskClick this to scan a hard disk for file system errors.Note: It is recommended to scan the volume every three months or 32 reboots. |
| [25KA] | EjectClick this before you remove an external hard drive so that you do not lose data that is being transferred to or from that hard drive. |
12.2.6 Session Example (Windows)
Open Windows Explorer and type two back slashes followed by the NAS name or IP address. Initially you can only read and write to the Public, Video, Music, and Photo folders until you create other shares on the NAS. This session is then displayed as shown in the following figure.
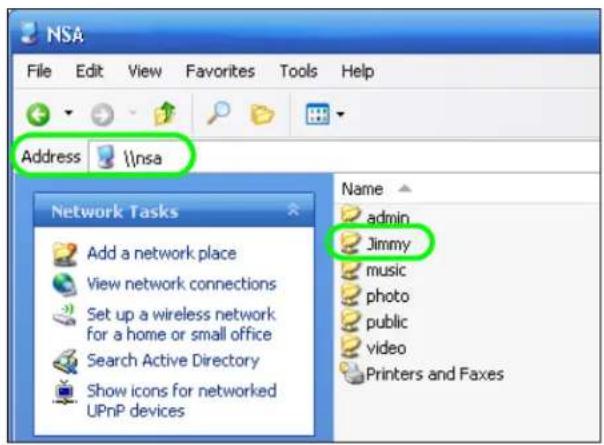
text_image
NSA File Edit View Favorites Tools Help Address \nsa Network Tasks Add a network place View network connections Set up a wireless network for a home or small office Search Active Directory Show icons for networked UPnP devices Name admin Jimmy music photo public video Printers and FaxesManaging Packages
13.1 About Packages
Packages enhance the functions of your NAS. Your NAS supports various packages that let you do more. Your NAS comes with some packages pre-installed. The Packages screen also includes a list of packages to add.
Note: Check what packages do before you install them. Only install packages you actually plan to use.
Note: Get support for each package through its individual vendor.
13.2 Managing Packages
In the administrator screens, click System Setting > Packages to install, remove, or upgrade packages. See Section 16.4 on page 207 for details.
Figure 91 System Setting > Packages
| Status | Package Name | Requires | Verales | Description | Management Page |
| Enabled | Gallery | PHP MySQL shpMyAdmin | 3.0.9zypkg003 | This web-based application allows your NAS to host pictures. Use the NAS administrator credentials to log in. The administrator can then create accounts for other users. | http://172.23.3.100:500/pka/gallery/ https://172.23.3.100:500/pek/gallery/ |
| Built-in | GoogleDriveClient | 0.4.6zypkg002 | This offers server of 2 way synchronization between NAS and Google Drive. | Applications > GoogleDriveClient | |
| Enabled | Logitech@ Media Server | PHP MySQL-shpMyAdmin | 7.7.4zypkg004 | This enables you to manage a Logtech's Squeezebox device connected to the NAS. | http://172.23.3.100:5000 |
| Built-in | Memopal | 2.4.4zypkg004 | Memopal is online-backup and online storage software that archives your files in real-time to a remote server. | Applications > Memopal | |
| Built-in | NFS | 1.3.0zypkg003 | NFS (Network File System) is a file-sharing protocol most commonly implemented on Unix-like systems. | Network > NFS | |
| Enabled | NZDIGet | 15.0zypkg004 | This package downloads .nxb file from usernet, default username.mzget password:1234 | http://172.23.3.100:6789/ | |
| Enabled | PHP MySQL-pkuMyAdmin | 1.0zypkg004 | This tool can be used to manage MySQL through the web, Enter Roof as the username and '1234' as the password to log in. | https://172.23.3.100:500/pka/ownvaldmin/ https://172.23.3.100:500/24k/aonvaldmin/ | |
| Built-in | Tfpo | 0.7nypkg003 | Trivial File Transfer Protocol (FTP) is an Internet file transfer protocol that uses port number 69. It is similar to FTP but uses UDP User Datagram Protocol rather than TCP (Transmission Control Protocol). It cannot let directories nor authenticate users. | Applications > TITP Server | |
| Enabled | Transmission | 2.84zypkg004 | This package is another P2P download client which supports torrent and magnet. | http://172.23.3.100:9091 | |
| Enabled | WordPress | PHP-MiSQL-shpMyAdmin | 3.9.1zypkg003 | This allows you to create and manage a Blog. Use the NAS administrator credentials to log in. The administrator can then create accounts for other users. | http://172.23.3.100:500/pka/WordPress/ https://172.23.3.100:500/pka/WordPress/ |
| Enabled | myZyXELcloud-Agent | 1.0.0zypkg0821 | myZyXELcloud, your solution for remote application management and securely access to your ZyXEL network devices accessory from anywhere that has an internet connection. | https://mycloud.zyxel.com | |
| Enabled | ownCloud | PHP-MiSQL-shpMyAdmin | 7.0.zzypkg003 | This allows you to create and manage your private cloud. | http://172.23.3.100:500/pka/ownCloud/ https://172.23.3.100:500/pka/ownCloud/ |
| Built-in | pyLoad | 0.4.9zypkg005 | Have the NAS manage your downloads including those from one-click-hosting sites. | Applications > pyLoad |
13.3 Available Packages
Use packages to add the following applications to the NAS.
- Use the NFS screen (Section 18.3 on page 247) to configure the Network File System (NFS) settings of your NAS.
- Use the TFTP Server screen (Section 18.4 on page 250) to configure the NAS to accept log files from TFTP clients.
- Use theillus screen (Section 18.5 on page 251) to useillus manage your downloads including those from one-click hosting sites.
- Use ownCloud (Section 18.6 on page 251) to store, synchronize, and share files, photos, calendars, and more with computers and mobile devices using an ownCloud client.
- Use Memorial (Section 18.3 on page 247) to back up files on the NAS to your Memorial online backup and storage account.
- Use the GoogleDriveClient screens (Section 18.8 on page 256) to synchronize local NAS shares or folders and Google Drive accounts.
Access the following applications' configuration screens through the Package Management screen. Refer to the applications' own documentation for further information.
- Gallery - This web-based application allows your NAS to host pictures. You can upload images in your local computer or shares to this application. Use the Gallery administrator account (default username admin, password 1234) to log into the Gallery console. There you can create accounts for other users.
- Use Logitech® Media Server (Section 17.5.2 on page 218) to manage a Logitech Squeezebox device connected to the NAS.
- The NZBGet news grabber helps download files from UseNet.
- PHP-MySQL-phpMyAdmin can be used to manage MySQL through the web. Enter 'root' as the username and '1234' as the password to log in. This includes MySQL, PHP, and phpMyAdmin.
- Transmission - This Bit Torrent client supports adding tasks through torrent files and magnet links.
- WordPress - This allows you to create and manage a blog. Use the WordPress administrator account (default username admin, password 1234) to log in. You can then create accounts for other users.
- myZyXELcloud-Agent - Use this to go to mycloud.zyxel.com to set up a free DDNS hostname for the NAS so you can connect to it easily from the Internet.
14.1 Overview
This chapter provides tutorials that show how to use the NAS.
• Windows 7 Network, see page 146
• Windows 7 Network Map, see page 150
- Playing Media Files in Windows 7, see page 152
- Windows 7 Devices and Printers, see page 152
• File Sharing Tutorials, see page 155
- Download Service Tutorial, see page 162
• Copy and Flickr Auto Upload Tutorial, see page 173
• FTP Uploadr Tutorial, see page 174
- Web Configurator's Security Sessions, see page 177
• Using FTPES to Connect to the NAS, see page 188
• Using a Mac to Access the NAS, see page 189
• How to Use the BackupPlanner, see page 191
14.2 Windows 7 Network
To see your NAS in a Windows 7 home or work network:
1 Click Start > Control Panel. Set View by to Category and click Network and Internet.
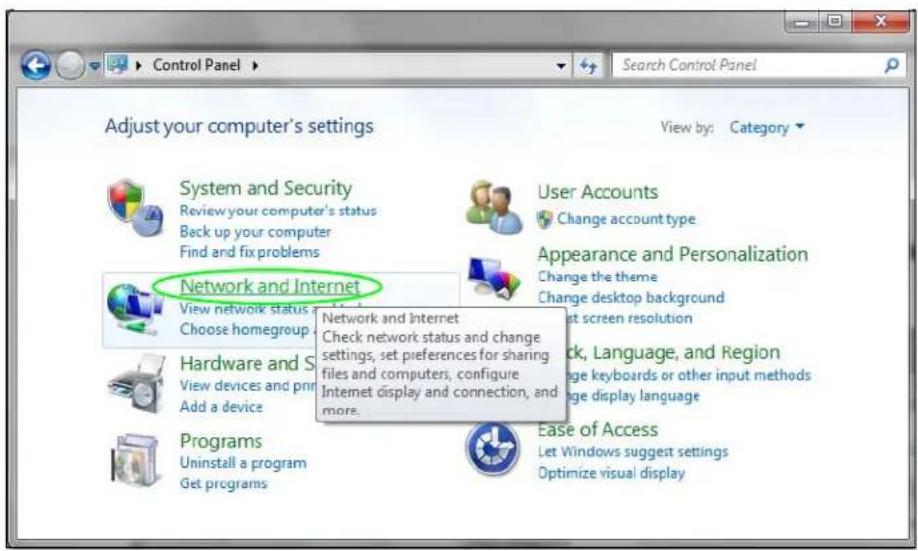
text_image
Adjust your computer's settings View by: Category System and Security Review your computer's status Back up your computer Find and fix problems User Accounts Change account type Appearance and Personalization Change the theme Change desktop background Start screen resolution Network and Internet Check network status and change settings, set preferences for sharing files and computers, configure Internet display and connection, and more. Hardware and S View devices and print Add a device Programs Uninstall a program Get programs Ease of Access Let Windows suggest settings Optimize visual display2 Click View network computers and devices.

text_image
Control Panel Home System and Security • Network and Internet Hardware and Sound Programs User Accounts Appearance and Personalization Clock, Language, and Region Ease of Access Network and Sharing Center View network status and tasks | Connect to a network | View network computers and devices | Add a wireless device to the network HomeGroup Choose homegroup and sharing options Internet Options Change your homepage | Manage browser add-ons Delete browsing history and cookies3 The NAS icon displays twice because the NAS is both a media server and a storage device. Double-click either NAS icon to open the Web Configurator login screen.

text_image
Network Organize Install Network and Sharing Center Add a printer Add a wireless device Favorites Desktop Downloads Recent Places Libraries Documents Music Pictures Videos Computer Local Disk (C:) BD-ROM Drive (D:) Network Computer (1) KONCA.NB Media Devices (16) JOHNNY: Johnny: NSA-220PLUS.msa220plus TWPC12550.12550 TWPC13027.13027: GaryVM NSA221.msa221 NSA320.mancy320 NSA320.msa820 Other Devices (11) GaryVM NSA221.msa221 NSA320.mancy320 NSA320.msa820 NSA320.msa820 Categorize: Other Devices; Media Devices Network location: ZyEL.com14.2.1 If the NAS Icon Does Not Display
The network containing the NAS must be set as a home or work network in order for the NAS icons to display. If the network containing the NAS displays as "Public":
1 Click Network and Sharing Center and then the network's link (circled in the figure).

text_image
All Control Panel Items ▶ Network and Sharing Center Search Control Panel Control Panel Home Change adapter settings Change advanced sharing settings View your basic network information and set up connections PC1 (This computer) Network 4 View your active networks Connect or disconnect Access type: No Internet access Connections: Local Area Connection Network 4 Home network2 Use the Set Network Location screen to set the network's location to home or work.
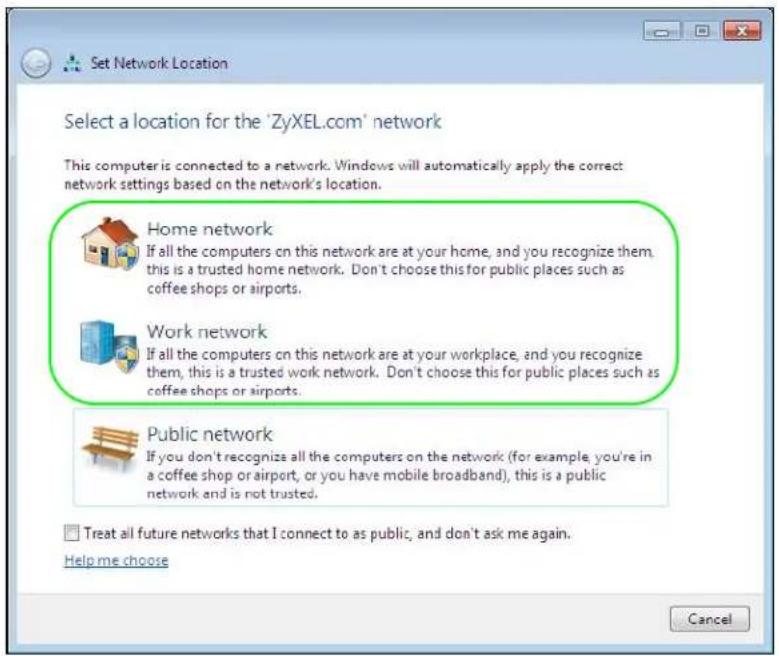
text_image
Set Network Location Select a location for the 'ZyXEL.com' network This computer is connected to a network. Windows will automatically apply the correct network settings based on the network's location. Home network If all the computers on this network are at your home, and you recognize them, this is a trusted home network. Don't choose this for public places such as coffee shops or airports. Work network If all the computers on this network are at your workplace, and you recognize them, this is a trusted work network. Don't choose this for public places such as coffee shops or airports. Public network If you don't recognize all the computers on the network (for example, you're in a coffee shop or airport, or you have mobile broadband), this is a public network and is not trusted. Treat all future networks that I connect to as public, and don't ask me again. Help me choose Cancel14.2.2 NAS Icon Right-click Options
Right-click the NAS's icon to see these options:
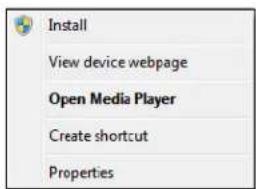
text_image
Install View device webpage Open Media Player Create shortcut Properties- Install/ Uninstall: Click Install to add the NAS as a device in your computer. After you install the NAS you can see it in the computer's list of devices (see Section 14.5 on page 152. Click Uninstall to remove the NAS from the list of devices installed in your computer.
• View device web page opens the Web Configurator login screen. - Open Media Player opens the computer's default media player.
- Create shortcut adds a desktop shortcut to the Web Configurator login screen.
- Properties opens a window of NAS details and troubleshooting information.
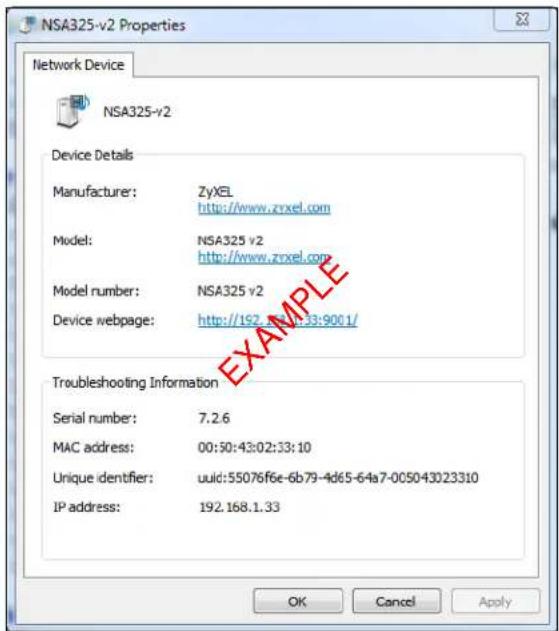
text_image
NSA325-v2 Properties Network Device NSA325-v2 Device Details Manufacturer: ZyXEL http://www.zrxel.com Model: NSA325 v2 http://www.zrxel.com Model number: NSA325 v2 Device webpage: http://192.861-13:9001/ Troubleshooting Information Serial number: 7.2.6 MAC address: 00:50:43:02:33:10 Unique identifier: uuid:55076f6e-6b79-4d65-64a7-005043023310 IP address: 192.168.1.33 OK Cancel Apply- Manufacturer identifies the company that produced the NAS.
- Model identifies the NAS model.
- Model number identifies the NAS model number.
- Device webpage shows the IP address for accessing the Web Configurator.
- Serial number is unavailable because the NAS does not have one.
- MAC address is the NAS's unique physical hardware address (MAC). You need the MAC address to register the product at myZyXEL.com. Customer support may also request it for troubleshooting purposes.
- Unique identifier is a unique UPnP ID that the NAS generated.
- IP address is the NAS's IP address. It is also the IP address for accessing the Web Configurator.
14.3 Windows 7 Network Map
To see your NAS in a Windows 7 home or work network map:
1 Click Start > Control Panel > View network status and tasks (or Network and Sharing Center if you view the Control Panel by icons).
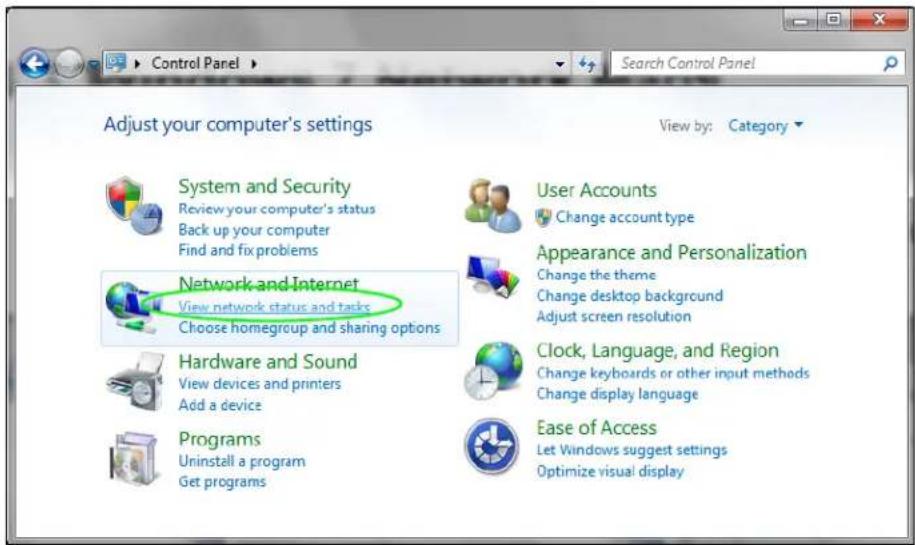
text_image
Control Panel Search Control Panel Adjust your computer's settings View by: Category System and Security Review your computer's status Back up your computer Find and fix problems Network and Internet View network status and tasks Choose homegroup and sharing options Hardware and Sound View devices and printers Add a device Programs Uninstall a program Get programs User Accounts Change account type Appearance and Personalization Change the theme Change desktop background Adjust screen resolution Clock, Language, and Region Change keyboards or other input methods Change display language Ease of Access Let Windows suggest settings Optimize visual display2 Click See full map (1 in the figure).
The network containing the NAS must be set as a home or work network in order to use the full map feature. If the network containing the NAS displays as "Public", click the network's link (2 in the figure, although it is already set to home here) and use the Set Network Location screen to set the network's location to home or work (see page 148).
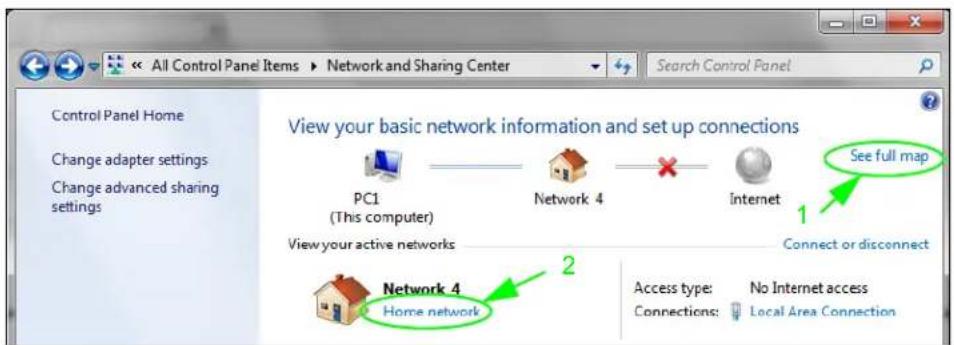
text_image
All Control Panel Items ▶ Network and Sharing Center Search Control Panel Control Panel Home Change adapter settings Change advanced sharing settings View your basic network information and set up connections PC1 (This computer) Network 4 View your active networks Internet See full map 1 Connect or disconnect Network 4 Home network 2 Access type: No Internet access Connections: Local Area Connection3 Double-click the NAS's icon to open the Web Configurator login screen. See Section 14.2.2 on page 149 for the NAS icon's right-click options.

flowchart
graph LR
    A["PC1"] --> B["Switch"]
    C["NSA325-v2"] --> B
    B --> D["Gateway"]
    D --> E["X"]
    E --> F["Sphere"]
14.4 Playing Media Files in Windows 7
In Windows 7, the NAS automatically displays as a library in Windows Media Player.
Figure 92 NAS in Windows Media Player
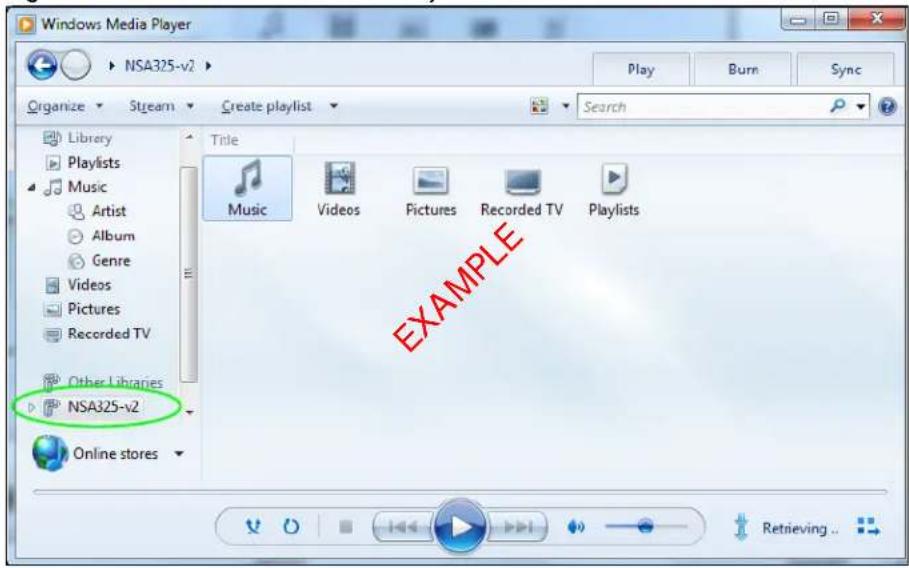
text_image
Windows Media Player NSA325-v2 Play Burn Sync Organize Stream Create playlist Search Library Playlists Music Artist Album Genre Videos Pictures Recorded TV Other Libraries NSA325-v2 Online stores Title Music Videos Pictures Recorded TV Playlists EXAMPLE14.5 Windows 7 Devices and Printers
After you use the NAS's network icon's install option you can manage the NAS from the Windows 7 Devices and Printers folder.
Click Start > Control Panel > Hardware and Sound > Devices and Printers. Select the NAS icon to display information about the NAS. Double-click the NAS icon to open a properties window (see page 149). Right-click the icon to display these options:
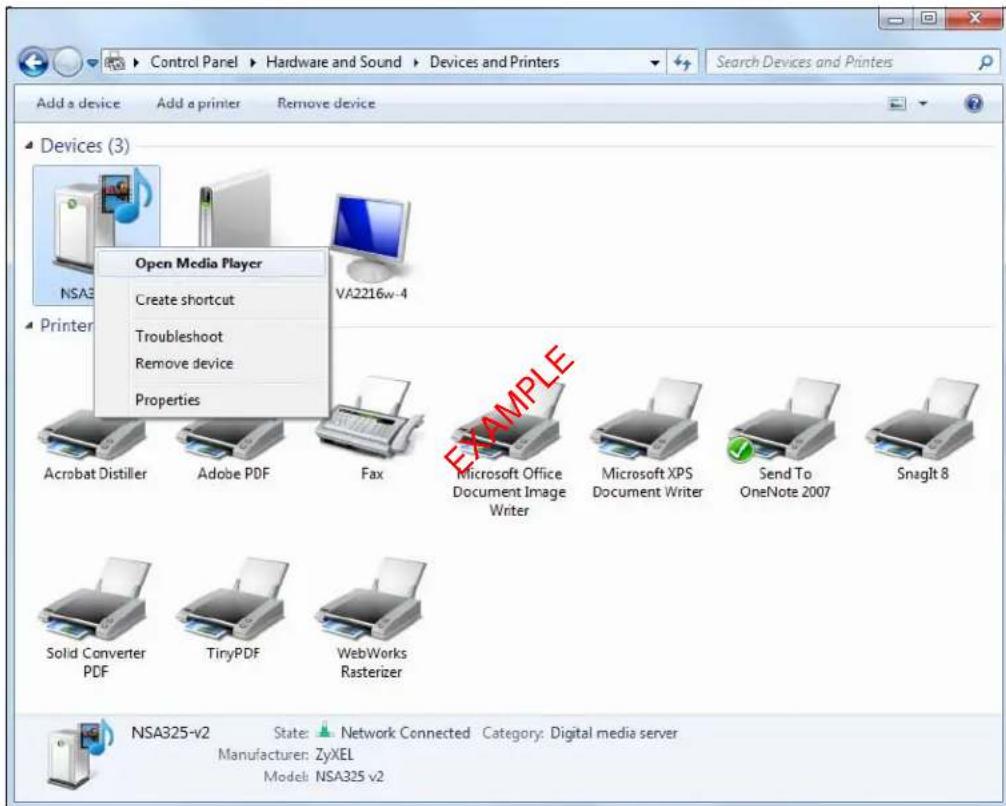
text_image
Control Panel > Hardware and Sound > Devices and Printers Add a device Add a printer Remove device Devices (3) Open Media Player Create shortcut Troubleshoot Remove device Properties NSA216w-4 Acrobat Distiller Adobe PDF Fax Microsoft Office Document Image Writer Microsoft XPS Document Writer Send To OneNote 2007 SnagIt 8 Solid Converter PDF TinyPDF WebWorks Rasterizer NSA325-v2 State: Network Connected Category: Digital media server Manufacturer: ZyXEL Model: NSA325 v2- Open Media Player opens the computer's default media player.
- Create shortcut has Windows make a desktop shortcut to this screen.
- Troubleshoot opens Windows' device troubleshooting wizard.
- Remove device removes the NAS from the Windows 7 Devices and Printers folder.
- Properties opens a window of NAS details and troubleshooting information (see page 149).
14.5.1 Windows 7 Desktop Shortcut
This is the NAS's desktop shortcut. Double-click it to open a properties window (see page 149).

text_image
NSA325-v2- Shoecut EXAMPLE1 Right-click the NAS's desktop shortcut icon to see these options:
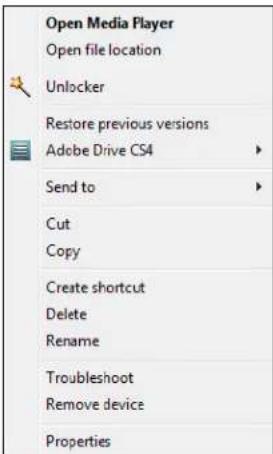
text_image
Open Media Player Open file location Unlocker Restore previous versions Adobe Drive CS4 Send to Cut Copy Create shortcut Delete Rename Troubleshoot Remove device Properties- Open Media Player opens the computer's default media player.
- Open file location takes you to the Windows 7 Devices and Printers folder.
- Download NAS Starter Utility downloads the NAS's Starter Utility. It lets you find, set up, and manage the NAS as well as copy files to it and access the files on it. See Chapter 2 on page 19 for details.
- Restore previous versions is the Windows 7 option for restoring a file or folder. It does not apply to this shortcut.
- Send to give you options for copying the shortcut to another location.
- Cut removes this shortcut so you can paste it somewhere else.
- Copy copies the shortcut so you can paste it somewhere else.
- Create shortcut has Windows make a desktop shortcut to this icon.
- Delete sends the shortcut to the recycle bin.
-
Rename lets you change the name of the shortcut.
-
Troubleshoot opens Windows' device troubleshooting wizard.
- Remove device removes the NAS from the Windows 7 Devices and Printers folder.
- Properties opens a window of details about the shortcut.
14.6 File Sharing Tutorials
The following sections cover using the NAS for file sharing. This chapter assumes you have already followed the Quick Start Guide instructions to perform initial setup and configuration (so you have a working volume). See the rest of this User's Guide for details on configuring the NAS's various screens.
14.6.1 Creating a User Account
Jimmy wants to create accounts for his sons Bob and Kevin. This is how he would do it.
1 Go to the advanced administration screens.
2 Click Sharing > Users to open the Users screen. Then click Add User.
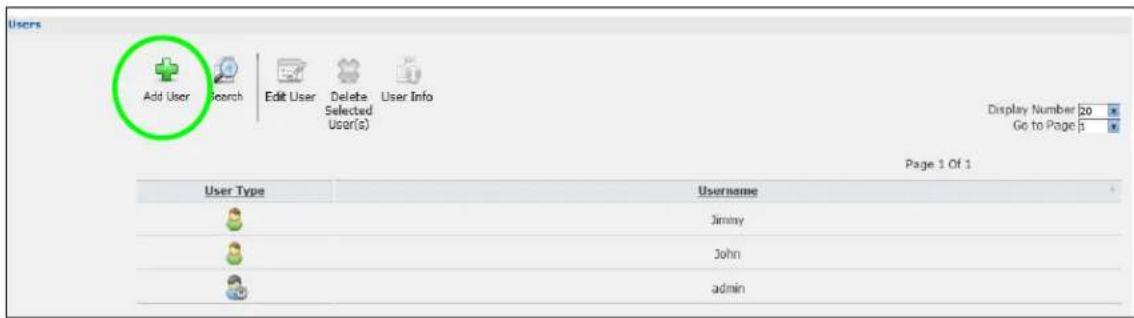
text_image
Users Add User Search Edit User Delete User Info Selected User(s) Display Number 20 Go to Page 3 Page 1 Of 1 User Type Username Jimmy John admin3 Configure the screen as follows and write down the username and password to give to Bob. If the username and password are the same as Bob's Windows login, Bob will not need to enter a username and password when he logs into his share from his computer. Set the Account Type to User so Bob doesn't get to configure the whole NAS. Click Apply to create the account.

text_image
Add User General Settings Quota (per volume) Group Membership Username Bob New Password Password (Confirm) Account Type Administrator User Apply Cancel4 The account now displays in the Users screen.
| Page 1 Of 1 | |
| User Type | Username |
| Bob | |
| Jimmy | |
| John | |
| admin | |
Now that Jimmy has created Bob's account, he can go through the steps again to create another account for Kevin. After both accounts are created, he can go to Section 14.6.2 on page 156 to create shares for Bob and Kevin.
14.6.2 Creating a Share
Suppose Jimmy has already created separate accounts for his sons Bob and Kevin. Now Jimmy wants to create a share for each son. He also wants to make sure that each son can only access his own share (to keep them from deleting each other's files). This is how he would do it.
1 In the NAS's administration web configurator screens, click Shares > Add Share. Click Add Share to create a new share.
| Status | Share Type | Share Name | Share Path | Share Owner | Permission Type |
| Auto | JetFlash-Transcend-16GB-8-07-1 | JetFlash-Transcend-16GB-8-07-... | admin | Public | |
| Predefined | video | Volume1/video | admin | Public | |
| Predefined | photo | Volume1/photo | admin | Public | |
| Predefined | music | Volume1/music | admin | Public | |
| Built-in | admin | Volume1/admin | admin | Private |
2 Specify a name for the share and select which volume it should be on. Configure the screen as follows. Then click Edit.

text_image
Add Share Share Name Bob Volume Volume1 ( 3.58 TB ) Make this share owned by admin Enable This Share Enable Recycle Bin Publish this share to Media Server Publish this share to Web Share Access Advanced Edit Apply Cancel3 Configure the screen as follows to give Bob full access right to the share. Then click Apply to create the share.

text_image
Share Access Configuration Available User(s)/Group(s)Now that Jimmy has created Bob's share, he can go through the steps again to create another share for Kevin.
14.6.3 Creating a Group
After creating user accounts for Bob and Kevin, Jimmy wants to create a group for his sons and another one for the parents. Jimmy can assign access rights to his sons' group for certain shares such as a cartoons share and allow only the parents' group to access the scary movie share. This is how he would create the group.
1 In the NAS's administration web configurator screen, click Groups > Add Group.

text_image
Groups Add Group Search Edit Group Delete Selected Group(s) Status Group Name2 Specify a name for the group. Select the user(s) you want to add to the group from the Available User(s) list and click Add Selected User(s). Configure the screen as follows. Then click Apply to create the group.

text_image
Add Group Group Name children Available User(s) Bob admin Group Membership Add Selected User(s) → ← Remove Selected User(s) Apply CancelNow that Jimmy has created a group for Bob and Kevin, he can go through the steps again to create another group for the parents. Then he can see the rest of the tutorials for how to use the groups in assigning access rights to shares.
14.6.4 Accessing a Share From Windows Explorer
If you map a NAS share (where data is stored) to a Windows network drive, you can use Windows Explorer to transfer files to and from the NAS as if it was another folder on your computer. Here he maps Jimmy's share to Jimmy's computer.
1 Start Windows Explorer and go to the NAS's server name. The default is 'nas' followed by the number of your model ('nas540' for example).
2 Click Tools > Map Network Drive.
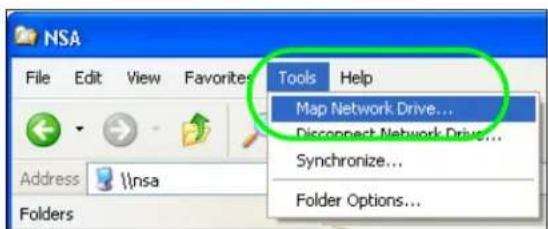
text_image
NSA File Edit View Favorites Tools Help Address \nsa Folders Map Network Drive... Disconnect Network Drive... Synchronize... Folder Options...3 Select the network drive that you want to map the NAS to from the Drive list box. This example uses I. Then browse to and select the share on the NAS. Click Finish.
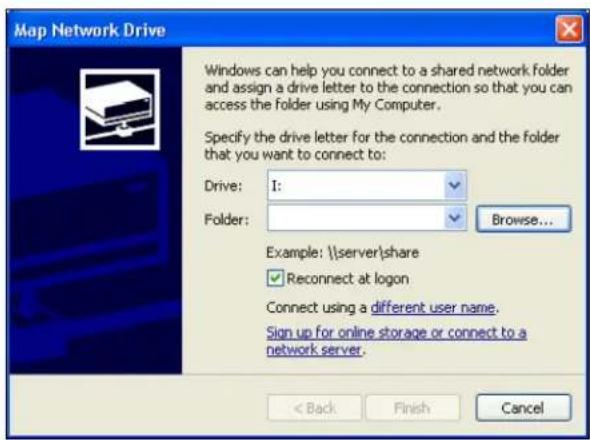
text_image
Map Network Drive Windows can help you connect to a shared network folder and assign a drive letter to the connection so that you can access the folder using My Computer. Specify the drive letter for the connection and the folder that you want to connect to: Drive: I: Folder: Browse... Example: \\server\share ✓ Reconnect at logon Connect using a different user name. Sign up for online storage or connect to a network server. < Back Finish Cancel
text_image
Browse For Folder Select a shared network folder Nsa Nsa Nsa admin Jimmy music photo public video Printers and Faxes Make New Folder OK Cancel4 Enter the username and password for Jimmy's account and click OK. You do not need to do this if the username and password are the same as Jimmy's Windows login.

text_image
Connect to nsa localdomain Connecting to nsa User name: Password: Remember my password OK Cancel5 After the mapping is done, you can then simply copy and paste or drag and drop files from/to your local computer's drives to or from this network folder. Just like the NAS's share was another folder on your computer.

text_image
File Edit View Favorites Tools Help Address I:\ Folders Desktop My Computer ZyXEL_XP (C:) ZyDATA (D:) ZyXEL_Wise (E:) DVD Drive (F:) jasmine (G:) Jimmy on 'NSA (Nsa)' (I:) zytw on 'zyxel.com' (L:) temp on 'zyxel.com\zytw' (T:) TW-archive on 'tw1477-testpc' (Y:) TWBackup on 'tw1477-testpc' (Z:) Control PanelNow that Bob has mapped Jimmy's share to Jimmy's computer, he can go through the steps again to map Kevin's share to Kevin's computer.
14.6.5 Accessing a Share Using FTP
You can also use FTP to access the NAS. Suppose Jimmy is temporarily using a different computer and wants to access his share without mapping it to the computer. This is how he would do it.
1 Open the FTP client (Windows Explorer is used here) and type "ftp://username@server" where "username" is the account's username and "server" is the NAS's IP address or server name.
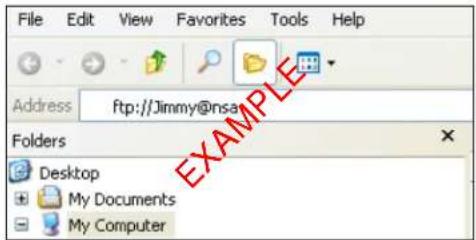
text_image
File Edit View Favorites Tools Help Address Ftp://Jimmy@nsa Folders Desktop My Documents My Computer2 Enter your password and click Login.

text_image
Log On As Could not login to the FTP server with the user name and password specified. FTP server: nsa User name: Jimmy Password: ••••• After you log on, you can add this server to your Favorites and return to it easily. FTP does not encrypt or encode passwords or data before sending them to the server. To protect the security of your passwords and data, use Web Folders (WebDAV) instead. Learn more about using Web Folders. Log on anonymously Save password Log On Cancel3 Now you can access files and copy files from/to your local computer's drives to or from this network folder.

text_image
ftp://nsa/ File Edit View Favorites Tools Help Address ftp://nsa/ Name Size Type Modified music File Folder 9/14/2008 12:33 PM photo File Folder 9/19/2008 10:17 AM public File Folder 8/30/2008 1:57 PM video File Folder 10/9/2008 9:05 AM Other Places Internet Explorer My Documents My Network Places14.6.6 Accessing a Share Through the Web Configurator
You can browse and access files through the web configurator.
1 Log into the NAS web configurator (see Section 7.2 on page 38) using the appropriate user name and password (this example uses Jimmy's) and click File Browser. Click a share (the admin share in this example) to see the top level of the share's contents.

text_image
ZyXEL | File Browser admin Name Size Last Modified download 30-07-2014 23.34 dropbox 28-06-2015 16.55 firmware 31-07-2014 02.382 Click a folder's file name to browse the folder. You can open files or copy them to your computer. You can also create new folders and upload additional files to the share.
3 Click the logout icon when your are done.
14.7 Download Service Tutorial
This tutorial covers using the NAS to download a file from the Internet. Use this same procedure for P2P downloads as well as regular HTTP (web) and FTP downloads. See Section 17.11.2 on page 235 for more on the download service.
14.7.1 Copying/Pasting a Download Link
1 Open your Internet browser (this example uses Internet Explorer).
2 Find a download link for the file you want. In this example, www.zyxel.com has a Server 1 link for downloading a datasheet for ZyXEL's NSA325 v2.
Download Library


Search Results for "Keyword : NSA325 v2"
Displaying documents 1 - 10 of total 12 found.
Search Again
| Material Type | Product Model | Version | Release Date | Download |
| Firmware | NSA325 v2 | V4.71(AALS.0)C0 | Sep 10, 2014 | Server 1Server 2 |
| Datasheet | NSA325 v2 | 2 | Aug 14, 2014 | Server 1Server 2 |
| Software | NSA325 v2 | 2.10_MAC_ENG | Jul 01, 2014 | Server 1Server 2 |
Note: Make sure the link opens either the file you want or a pop-up window about how to handle the file.
Note: It is also OK for the link to open a .torrent file. If you are redirected to a screen that says the download should start in a few seconds, there may be a link to click if the download does not start automatically. See if that link opens the file or the pop-up window.
3 Right-click the download link and select Copy Shortcut in Internet Explorer (or Copy Link Location in Firefox).

text_image
Description: error correction Download New Open Open in New Tab Open in New Window Save Target As... Print Target Cut Copy Copy Shortcut Paste4 Log into the NAS web configurator (see Section 7.2 on page 38) using the administrator account and click Application Zone and the Application Zone > Download Service link.
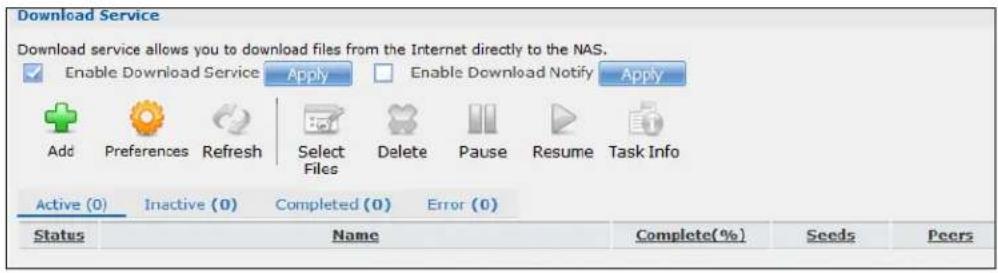
text_image
Download Service Download service allows you to download files from the Internet directly to the NAS. Enable Download Service Apply Enable Download Notify Apply Add Preferences Refresh Select Files Delete Pause Resume Task Info Active (0) Inactive (0) Completed (0) Error (0) Status Name Complete(%) Seeds Peers5 Click Add.
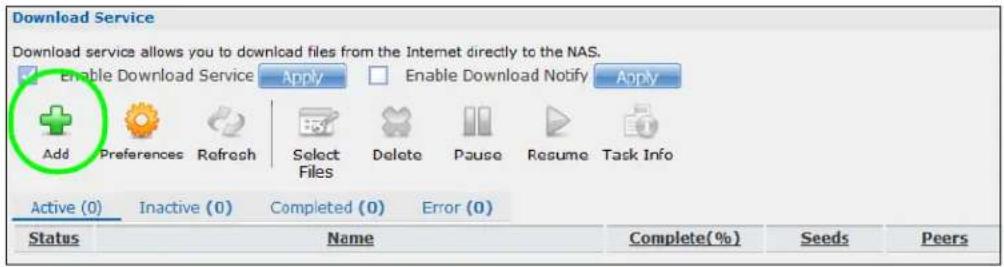
text_image
Download Service Download service allows you to download files from the Internet directly to the NAS. Enable Download Service Apply Enable Download Notify Apply Add Preferences Refresh Select Files Delete Pause Resume Task Info Active (0) Inactive (0) Completed (0) Error (0) Status Name Complete(%) Seeds Peers6 Right-click the URL field and select Paste.
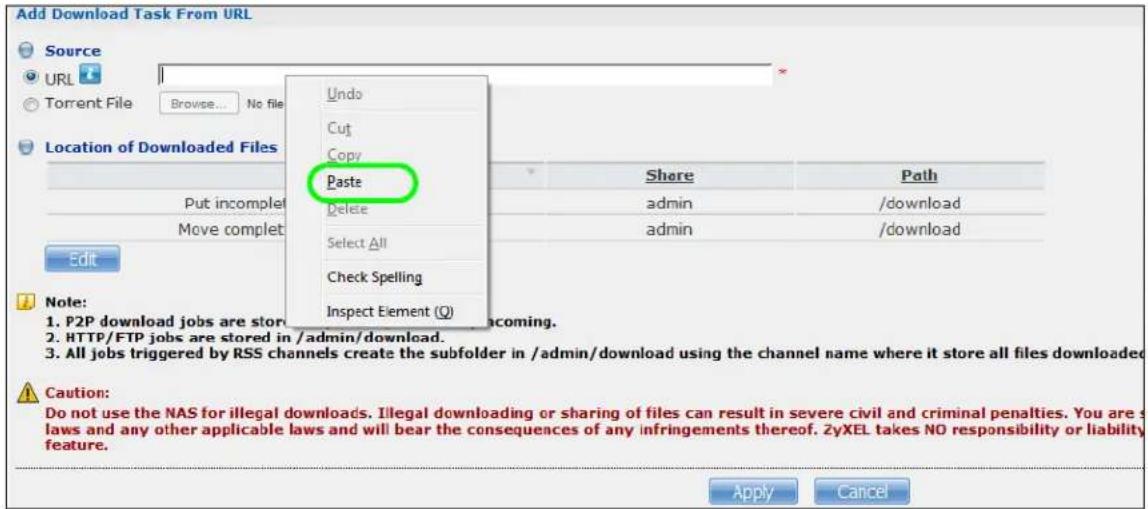
text_image
Add Download Task From URL Source URL Torrent File Browse... No file Location of Downloaded Files Undo Cut Copy Paste Delete Select All Check Spelling Inspect Element (Q) Share Path admin /download admin /download Edit Note: 1. P2P download jobs are store 2. HTTP/FTP jobs are stored in /admin/download. 3. All jobs triggered by RSS channels create the subfolder in /admin/download using the channel name where it store all files downloaded Caution: Do not use the NAS for illegal downloads. Illegal downloading or sharing of files can result in severe civil and criminal penalties. You are s laws and any other applicable laws and will bear the consequences of any infringements thereof. 2yXEL takes NO responsibility or liability feature. Apply Cancel7 The URL displays in the URL field. Click Apply.
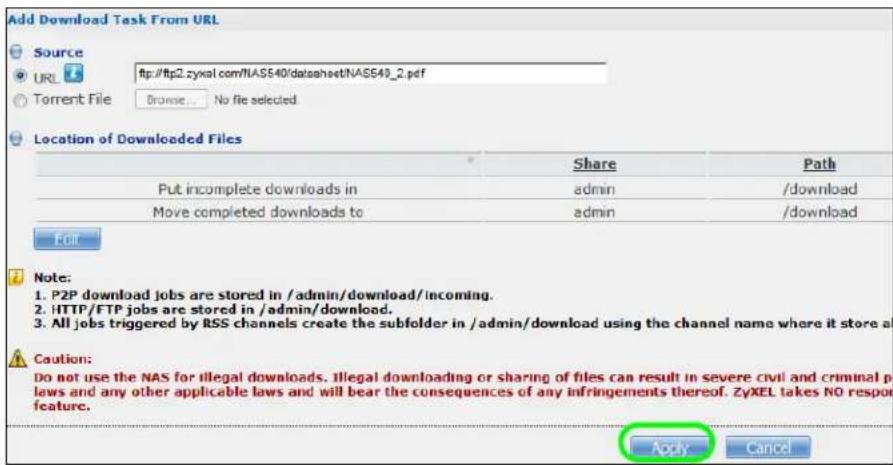
text_image
Add Download Task From URL Source URL http://ftp2.zyxal.com/NASS40/datasheet/NASS40_2.pdf Torrent File Browse... No file selected Location of Downloaded Files Share Path Put incomplete downloads in admin /download Move completed downloads to admin /download Edit Note: 1. P2P download jobs are stored in /admin/download/incoming. 2. HTTP/FTP jobs are stored in /admin/download. 3. All jobs triggered by RSS channels create the subfolder in /admin/download using the channel name where it store a Caution: Do not use the NAS for illegal downloads. Illegal downloading or sharing of files can result in severe civil and criminal p laws and any other applicable laws and will bear the consequences of any infringements thereof. ZyXEL takes NO respon feature. Apply Cancel8 After a few moments, the download task appears in the Download Service screen's Active tab.
The download appears in the Completed tab when it is done. By default the NAS stores all downloads in the admin share's download folder. See Section 14.6.4 on page 158, Section 14.6.5 on page 160, or Section 14.6.6 on page 161 for how to access a share.
14.7.2 Configuring the Download Service Preferences
Once you added a list of download tasks to the NAS (see Section 14.7.1 on page 162), you can have the NAS download files during a specific time period of the day. You can also configure the P2P download settings to control bandwidth and optimize download efficiency.
Say you have the NAS turned on all the time, but you only want the NAS download files at night. Here is how you use the download period control feature to set the time range.
1 Click Applications > Download Service > Preferences to open the General Settings screen.
2 Select Enable Download Period Control and use the arrows to adjust the time period from 23:30 to 09:00. Click Apply to save your changes. The NAS only downloads files within this 9.5-hour period every day.
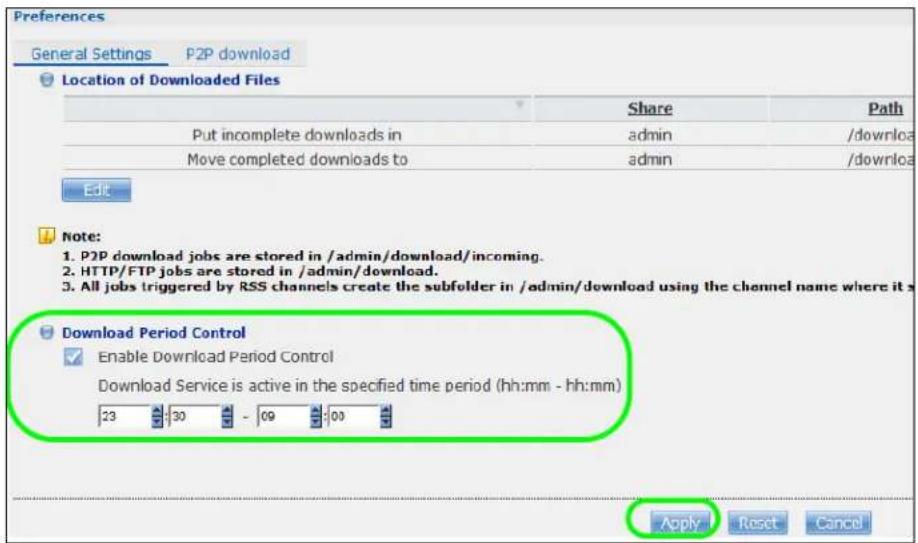
text_image
Preferences General Settings P2P download Location of Downloaded Files Share Path Put incomplete downloads in admin /download Move completed downloads to admin /download Edit Note: 1. P2P download jobs are stored in /admin/download/incoming. 2. HTTP/FTP jobs are stored in /admin/download. 3. All jobs triggered by RSS channels create the subfolder in /admin/download using the channel name where it is Download Period Control Enable Download Period Control Download Service is active in the specified time period (hh:mm - hh:mm) 23 30 - 69 00 Apply Reset CancelNote: If you configure the Power On/ Off Schedule feature in the Power Management screen, make sure your active download period does not conflict with the power-off period.
Note: If power failure occurs during the active download period, the NAS will verify whether the downloaded files were damaged. If a file is corrupted, the NAS will download the file again. If the file is intact but not completely downloaded, the NAS will resume the download task after it restarts.
3 When it is not the download time, you see a message in the Download Service screen, indicating the active download period.
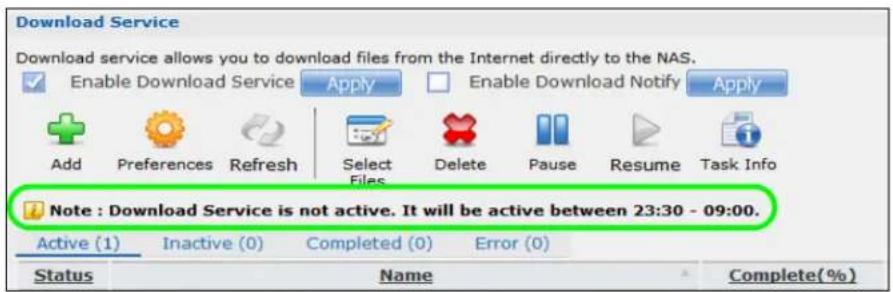
text_image
Download Service Download service allows you to download files from the Internet directly to the NAS. Enable Download Service Apply Enable Download Notify Apply Add Preferences Refresh Select Files Delete Pause Resume Task Info Note : Download Service is not active. It will be active between 23:30 - 09:00. Active (1) Inactive (0) Completed (0) Error (0) Status Name Complete(%)Click Applications > Download Service > Preferences > P2P download to open the following screen. Enter the information below and then click Apply.
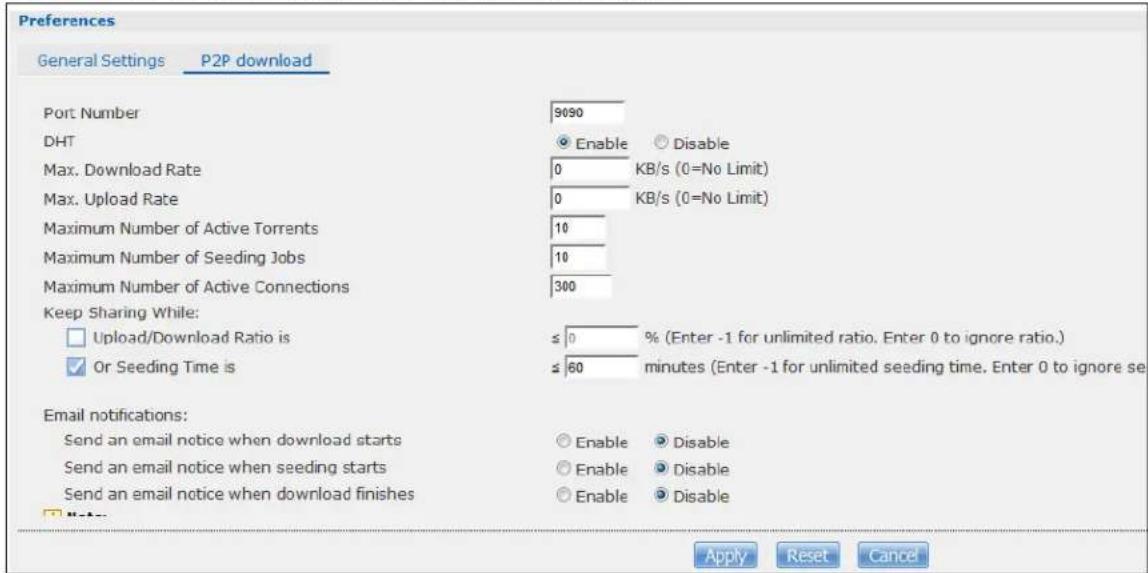
text_image
Preferences General Settings P2P download Port Number 9090 DHT Enable Disable Max. Download Rate 0 KB/s (0=No Limit) Max. Upload Rate 0 KB/s (0=No Limit) Maximum Number of Active Torrents 10 Maximum Number of Seeding Jobs 10 Maximum Number of Active Connections 300 Keep Sharing While: □ Upload/Download Ratio is ≤ 0 % (Enter -1 for unlimited ratio, Enter 0 to ignore ratio.) ✓ Or Seeding Time is ≤ 60 minutes (Enter -1 for unlimited seeding time, Enter 0 to ignore se Email notifications: Send an email notice when download starts Enable Disable Send an email notice when seeding starts Enable Disable Send an email notice when download finishes Enable Disable Apply Reset CancelHere is a list of P2P download settings you want to configure for your NAS:
- Limit the maximum upload rate to 20 KB/s.
Enter this value in the Max. upload rate field.
- Actively download three torrent files but only upload one at a time.
Enter 3 in the Maximum Number of Active Torrents field and enter 1 in the Maximum Number of Seeding Jobs field.
- Keep sharing until the NAS has shared equal or greater amount of the downloaded files.
Select the check box and enter 100 in the Upload/ Download Ratio field.
- Scroll down and click Edit IP Filter. Use an online IP filter table from http://www.bluetack.co.uk/config/level1.gz for example to protect P2P downloads.
Enter the URL in the Update IP Filter from the Internet Every Week field.
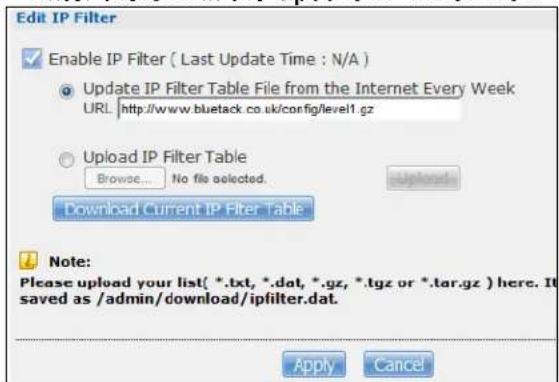
text_image
Edit IP Filter Enable IP Filter ( Last Update Time : N/A ) Update IP Filter Table File from the Internet Every Week URL http://www.bluetack.co.uk/config/level1.gz Upload IP Filter Table Browse... No file selected. Download Current IP Filter Table Note: Please upload your list( *.txt, *.dat, *.gz, *.tgz or *.tar.gz ) here. It saved as /admin/download/ipfilter.dat. Apply Cancel14.7.3 Using Download Service Notification
Use an RSS feed reader on your computer to keep track of files the NAS has downloaded. The following examples show how to subscribe to the NAS's download service notifications. See Section 17.11.3 on page 236 for more on download service notifications.
Some RSS readers may not support the NAS's download service notifications. For example, Google Reader cannot support this feature if the NAS has a private IP address.
Note: It is recommended to subscribe to the download service notifications using the built-in reader in Internet Explorer 7 or higher, or Firefox.
You have to activate this feature in the Download Service screen. Click Applications > Download Service to open the following screen. Select Enable Download Notify and click Apply.

text_image
Download Service Download service allows you to download files from the Internet directly to the NAS. Enable Download Service Apply Enable Download Notify Apply Add Preferences Refresh Select Files Delete Pause Resume Task Info Note : Download Service is not active. It will be active between 23:30 - 09:00.Internet Explorer 7 Example
1 After you activate download service notification, click the RSS feed icon.
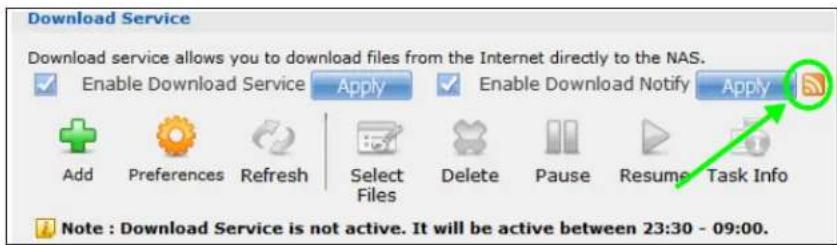
text_image
Download Service Download service allows you to download files from the Internet directly to the NAS. Enable Download Service Apply Enable Download Notify Apply Add Preferences Refresh Select Files Delete Pause Resume Task Info Note : Download Service is not active. It will be active between 23:30 - 09:00.2 The following screen displays. Select Subscribe to this feed.

text_image
Download Notify - Windows Internet Explorer http:// 45/zyxel/cgi-bin/dlnotify File Edit View Favorites Tools Help Download Notify Download Notify You are viewing a feed that contains frequently updated content. When you subscribe to a feed, it is added to the Common Feed List. Updated information from the feed is automatically downloaded to your computer and can be viewed in Internet Explorer and other programs. Learn more about feeds. Subscribe to this feed3 The following screen displays. Click Subscribe.

text_image
Internet Explorer Subscribe to this Feed When you subscribe to a feed, it is automatically added to the Favorites Center and kept up to date. Name: Download Notify Create in: Feeds New folder Subscribe Cancel Your computer will periodically check online for updates to subscribed feeds, even when Internet Explorer is not running. What's a feed?4 Click the Favorite icon on your browser and select the Feeds tab to check the updates of your NAS's download list.
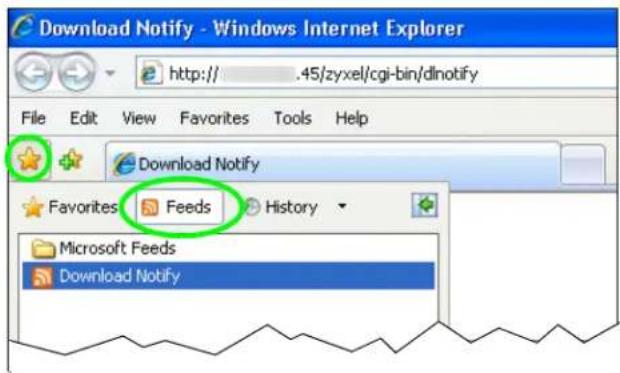
text_image
Download Notify - Windows Internet Explorer http:// .45/zyxel/cgi-bin/dlnotify File Edit View Favorites Tools Help Download Notify Favorites Feeds History Microsoft Feeds Download NotifyFirefox Example
1 After you activate download service notification, click the RSS feed icon.

text_image
Download Service Download service allows you to download files from the Internet directly to the NAS. Enable Download Service Apply Enable Download Notify Apply Add Preferences Refresh Select Files Delete Pause Resume Task Info Note : Download Service is not active. It will be active between 23:30 - 09:00.2 The following screen displays. Select Live Bookmarks from the drop-down list and click Subscribe Now.
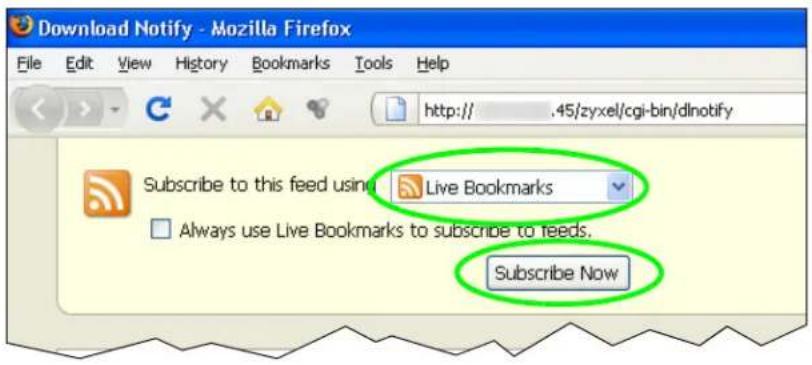
text_image
Download Notify - Mozilla Firefox File Edit View History Bookmarks Tools Help http:// .45/zyxel/cgi-bin/dlnotify Subscribe to this feed using Live Bookmarks Always use Live Bookmarks to subscribe to feeds. Subscribe Now3 The following screen displays. Select Bookmarks Menu and click Add.

text_image
Add Live Bookmark Name: Download Notify Create in: Bookmarks Menu Add Cancel4 From the Firefox's Bookmarks Menu, select Download Notify to check the updates of your NAS's download list.
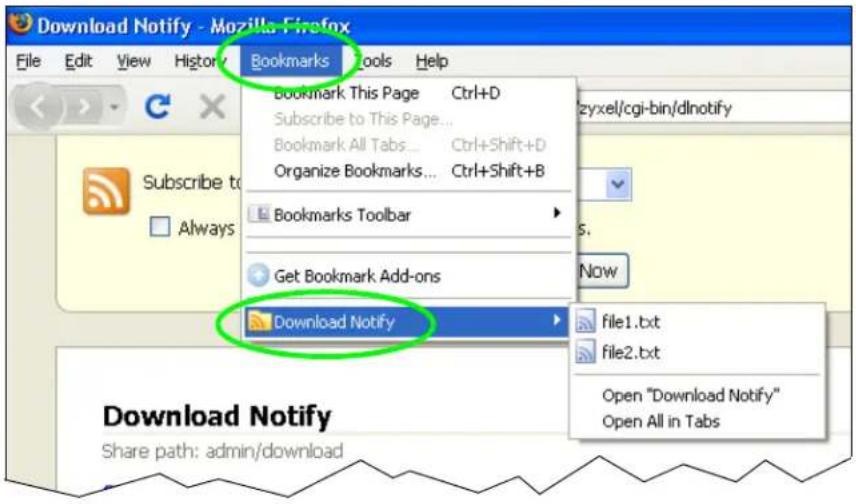
text_image
Download Notify - Mozilla Firefox File Edit View History Bookmarks Tools Help Bookmark This Page Ctrl+D Subscribe to This Page... Bookmark All Tabs... Ctrl+Shift+D Organize Bookmarks... Ctrl+Shift+B Bookmarks Toolbar Get Bookmark Add-ons Download Notify file1.txt file2.txt Open "Download Notify" Open All in Tabs Download Notify Share path: admin/download14.8 Printer Server Tutorial
Do the following to have the NAS let computers on your network share a printer. See www.zyxel.com for a list of compatible printers.
1 Make sure the NAS is on and the SYS light is on steady (not blinking).
2 Use a USB cable to connect the printer's USB port to one of the NAS's USB ports. Make sure the printer is also connected to an appropriate power source.

flowchart
graph TD
    A["Desktop Computer"] --> B["Network Switch"]
    C["Desktop Computer"] --> B
    D["NAS"] --> E["USB PRINTER"]
    E --> F["Printer"]
3 Turn on the printer.
4 The NAS detects the printer after a few moments.
5 On your computer, open your CIFS file sharing program (Windows Explorer for example) and browse to the NAS. Double-click the printer's icon.
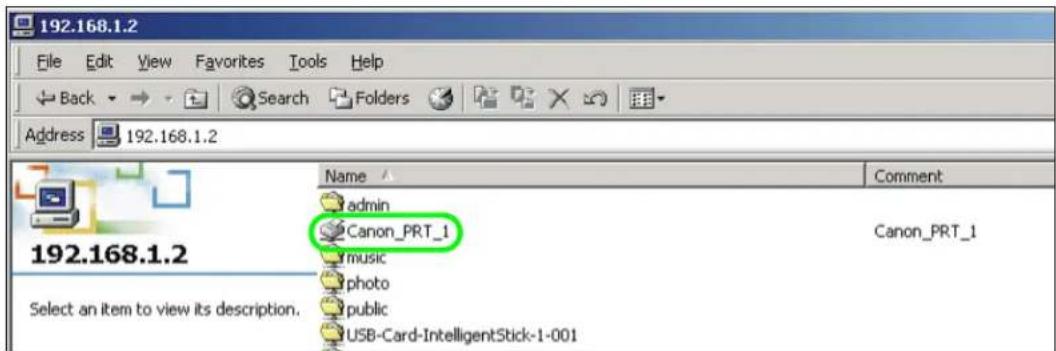
text_image
192.168.1.2 File Edit View Favorites Tools Help Back Search Folders Address 192.168.1.2 192.168.1.2 Select an item to view its description. Name Comment admin Canon_PRT_1 music photo public USB-Card-IntelligentStick-1-001 Canon_PRT_16 If you get a warning screen, click the option that lets you continue (Yes in this example).

text_image
Printers Before you can use the printer "192.168.1.2"Canon_PRT_1," it must be set up on your computer. Do you want Windows to set up the printer and continue this operation? Yes No7 If your computer does not already have the printer's driver installed, you will need to install it. In this example, click OK.

text_image
Connect to Printer The server on which the printer resides does not have the correct printer driver installed. If you want to install the driver on your local computer, click OK. OK Cancel8 Use the wizard screens to install the printer driver on the computer. You may need to get the file from the printer's CD or the printer manufacturer's website (the driver is not installed on the NAS).
Note: You must install the printer driver on each computer that will use the printer.

text_image
Add Printer Wizard Select the manufacturer and model of your printer. If your printer came with an installation disk, click Have Disk. If your printer is not listed, consult your printer documentation for a compatible printer. Manufactures: Agfa Alps Apollo Apple APS-PS AST AT&T Printers: AGFA:AccuSet v52.3 AGFA:AccuSetSF v52.3 AGFA:AccuSet 800 AGFA:AccuSet 800SF v52.3 AGFA:AccuSet 800SF v2013.108 AGFA:AccuSet 1000 AGFA:AccuSet 1000SF v52.3 Have Disk... OK CancelAfter the driver installation finishes, the computer is ready to use the printer. Select the printer in an application to use it to print. Browse to the NAS using a CIFS program (like Windows Explorer) and double-click the printer's icon to open the printer's queue of print jobs.

text_image
Canon_PRT_1 on 192.168.1.2 Printer Document View Help Document Name Status Owner Pages Size SubmNote: Repeat steps 5 to 8 on your other computers so they can also use the printer.
14.9 Copy and Flickr Auto Upload Tutorial
Amy received some photos taken during her best friend's wedding and saved the files on a USB disk. She wants to save a copy of the photos in the NAS and upload the photos to her Flickr account.
Amy has to activate the NAS's auto upload feature. See Section 19.4 on page 262 for more details on setting up a Flickr account for auto upload. In this example Amy select the NAS's photo share for auto upload.
This is how Amy would transfer the files from her USB disk to the NAS.
1 Click Applications > Copy/ Sync Button in the navigation panel to open the screen.
2 Configure the copy settings as shown and click Apply.
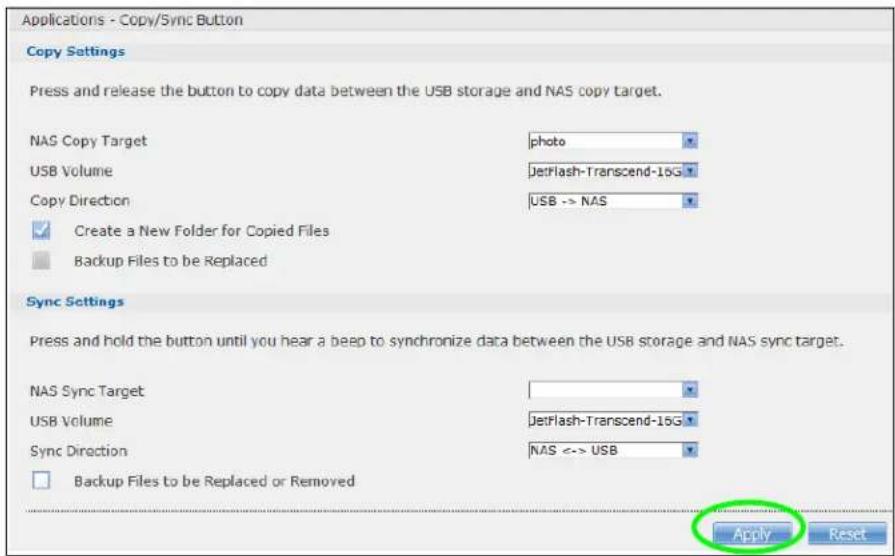
text_image
Applications - Copy/Sync Button Copy Settings Press and release the button to copy data between the USB storage and NAS copy target. NAS Copy Target photo USB Volume/JetFlash-Transcend-16G Copy Direction USB -> NAS ✓ Create a New Folder for Copied Files ■ Backup Files to be Replaced Sync Settings Press and hold the button until you hear a beep to synchronize data between the USB storage and NAS sync target. NAS Sync Target USB Volume/JetFlash-Transcend-16G Sync Direction NAS <-> USB □ Backup Files to be Replaced or Removed Apply Reset3 Press and release the COPY/ SYNC button on the NAS's front panel to start copying files.
4 The copied files can be found in a new folder in the photo share. The name of this folder is the date (yyyy-mm-dd) and time (hh-mm-ss) when the folder is created.
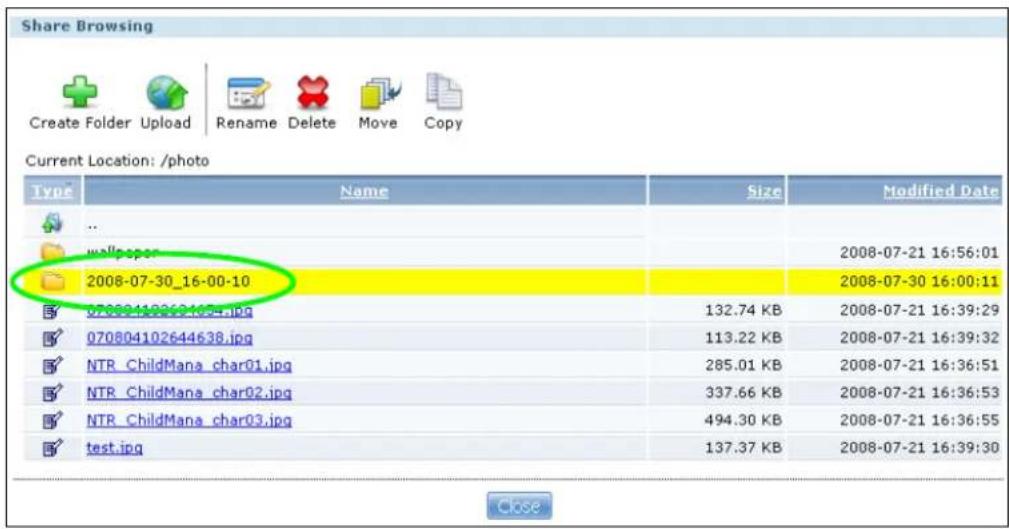
text_image
Share Browsing Create Folder Upload Rename Delete Move Copy Current Location: /photo Type Name Size Modified Date .. wallpaper 2008-07-30_16-00-10 070804102644638.jpg 132.74 KB 2008-07-21 16:39:29 070804102644638.jpg 113.22 KB 2008-07-21 16:39:32 NTR_ChildMana_char01.jpg 285.01 KB 2008-07-21 16:36:51 NTR_ChildMana_char02.jpg 337.66 KB 2008-07-21 16:36:53 NTR_ChildMana_char03.jpg 494.30 KB 2008-07-21 16:36:55 test.jpg 137.37 KB 2008-07-21 16:39:30 Close5 The NAS also automatically uploads the copied files to Flickr.

text_image
Applications - Auto Upload - Flickr/YouTube Flickr/YouTube Disable Pause Config Status Service Name Account Information Username ckbc_jiwen Photo Space Usage 0% (0.00 Bytes) Used 102.40 MB Total 100.00% Free Uploaded 0 Video Files Usage Remain 2 Enabled YouTube Username ckbcjiwen14.10 FTP Uploadr Tutorial
FTP Uploadr can automatically upload files saved on the NAS to a remote FTP server. Amy wants to share files on her NAS with Susan. They each have an NAS at home, so Susan has to set her NAS as an FTP server for Amy to automatically send files using FTP Uploadr.

flowchart
graph LR
    A["Amy's NAS"] --> B["Document 1"]
    A --> C["Document 2"]
    B --> D["→"]
    C --> D
    D --> E["Susan's NAS"]
To set the NAS as an FTP server, click Applications > FTP to open the FTP screen. Select Enable FTP and click Apply.

text_image
FTP Enable FTP Connection Limit 10 Idle Timeout 15 minutes Port Number 21 Enable Anonymous FTP Access Customize the port range for data transfer. Download/Upload Rate For All Users (include admin) Max. Download Rate 0 KB/s (0=No Limit) Max. Upload Rate 0 KB/s (0=No Limit) Note: To configure a share to allow anonymous FTP access go to the configure shares page and modify a share's access rights to allow the user. Character Set (UTF-8) Note: The NAS uses UTF-8 format for FTP by default. If the NAS's folders or file names do not display correctly in your FTP client, select the appropriate character set here. Apply ResetSusan also has to create a user account and share on her NAS for Amy to upload files. The share is used for files uploaded from Amy's NAS. Amy will then use the following information to configure FTP Uploadr on her NAS.
Table 61 FTP Uploadr Tutorial: FTP Server Information
| FTP Domain Name or IP Address example2.com | |
| FTP User Name Amy | |
| FTP Password xxxxx | |
| Share (Remote Path) Amy | |
This is how Amy would set up the NAS's FTP Uploadr.
1 Click Applications > Auto Upload > FTP Uploadr to open the FTP Uploadr screen. Select Enable FTP Uploadr and click Apply to turn on FTP Uploadr.
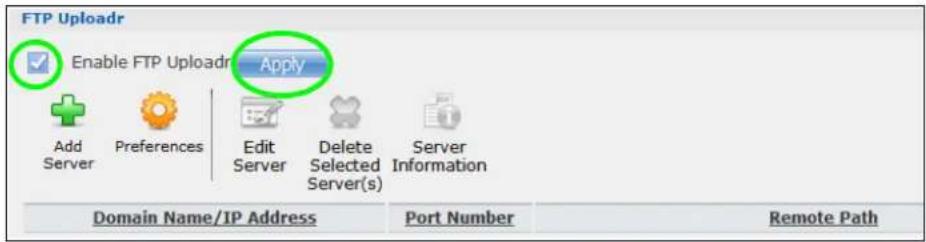
text_image
FTP Uploadr Enable FTP Uploadr Apply Add Server Preferences Edit Server Delete Selected Server(s) Server Information Domain Name/IP Address Port Number Remote Path2 Click Add Server.
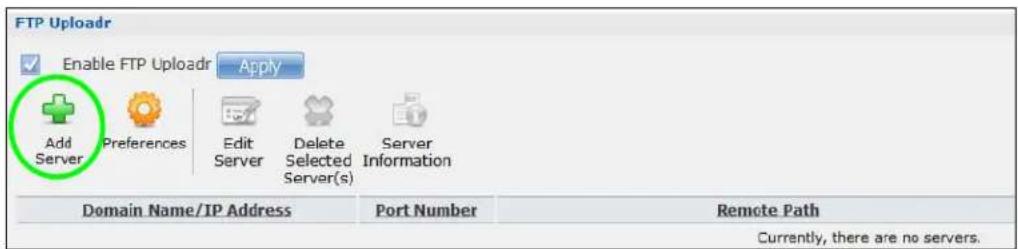
text_image
FTP Uploadr Enable FTP Uploadr Apply Add Server Preferences Edit Server Delete Selected Server(s) Server Information Domain Name/IP Address Port Number Remote Path Currently, there are no servers.3 Enter the information as describe in Table 61 on page 175. Click Apply to add the server.

text_image
Add Server Domain Name/IP Address example2.com Account Name Amy Password •••• Port Number 21 Remote Path /Amy Description Send to Susan Test Connection Apply Cancel4 In the FTP Uploadr screen, click Preferences to configure the auto upload settings.

text_image
FTP Uploadr Enable FTP Uploadr Apply Add Server Preferences Edit Server Delete Selected Server(s) Server Information Domain Name/IP Address Port Number Remote Path Account Name example2.com 21 /Amy Amy5 Amy wants to share video files with Susan. In the Preferences screen, click the Add button and select video from the Shares drop-down list box, enter a forward slash in the Path field and click Apply to add the share to the Folder Watch List.

text_image
Folder Watch List Status Share Name Way Action There are currently no folders on the watch list. Add Settings Add Watch Folder share video Path Browse ... Apply Cancel Grace Period The time the system will wait before a newly added file is saved in a watched folder. Grace Period 15 minutes Bandwidth Limit Max. Upload Rate 0 KB/s (0=No Limit) Apply Reset Close6 Amy also set the Bandwidth Limit to 20 KB/s so that the upload doesn't slow down her Internet connection.

text_image
Folder Watch List Status Share Name Path Action video / Add Settings Grace Period The time the system will wait before a newly added file is saved in a watched folder. Grace Period 15 minutes Bandwidth Limit Max. Upload Rate 20 KB/s (0=No Limit) Apply Reset CloseNow Amy has set up FTP Uploadr to send files to Susan's NAS. Every time Amy adds new files or renames files in the video share, these new or modified files will be uploaded automatically to the Amy share on Susan's NAS.
Similarly, Susan can go through the steps described above to configure FTP Uploadr on her NAS. Once Susan completes the setup, Amy can also receive files from Susan's NAS.

flowchart
graph TD
    A["Amy's NAS"] --> B["Document"]
    B --> C["Susan's NAS"]
    C --> A
    A --> D["Document"]
    D --> E["Susan's NAS"]
    E --> C
14.11 Web Configurator's Security Sessions
These tutorials show you how to configure security for the NAS's Web Configurator sessions. You will customize the NAS's self-signed SSL certificate and distribute it to your users.
14.11.1 Customizing the NAS's Certificate
1 Click Maintenance > SSL and then select Edit a self-signed CA certificate and click Edit.

text_image
Maintenance - SSL Install System CA This action will install the system CA in your browser's trusted CA list. Step1 Download the CA file Download Step2 Double click on the CA file to install it into your browser Modify the Existing Certificate Edit a self-signed CA certificate Step1 Edit the Self-signed Certificate Edit Step2 Download the self-signed CA file Download Step3 Double click on the CA file to install it into your browser Create a Certificate To Be Authorized By My Own Certificate Authority Caution: Modifications of TLS/SSL certificate settings will restart network services.2 Next, let's modify the certificate by changing the Common Name to this NAS's host name of "nsa", the Organization to "ZyXEL" and the Key Length to 2048.

text_image
Edit the Self-signed Certificate Common Name Host IP Address Host Domain Name nsa Organizational Unit(Optional) Max length: 64 characters Organization(Optional) ZyXEL Max length: 64 characters Country(Optional) Country code only, such as TW, US, JP, etc... Key Type RSA Key Length 2048 Note: If you choose a large key length, it may take a while to make the certificate file. Apply Cancel3 The NAS restarts its network services and returns you to the login screen.
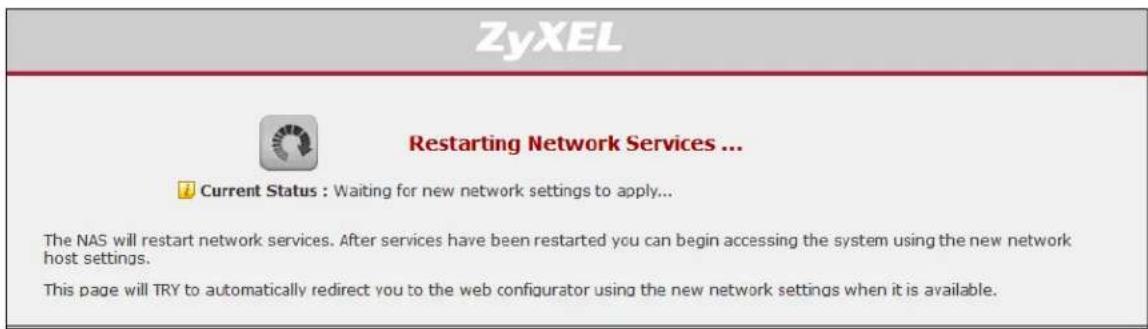
text_image
ZyXEL Restarting Network Services ... Current Status : Waiting for new network settings to apply... The NAS will restart network services. After services have been restarted you can begin accessing the system using the new network host settings. This page will TRY to automatically redirect you to the web configurator using the new network settings when it is available.14.11.2 Downloading and Installing Customized Certificate
1 Log in and return to Maintenance > SSL. Under Modify the Existing Certificate, click Download.

text_image
Maintenance - SSL Install System CA This action will install the system CA in your browser's trusted CA list. Step1 Download the CA file Download Step2 Double click on the CA file to install it into your browser Modify the Existing Certificate Edit a self-signed CA certificate Step1 Edit the Self-signed Certificate Edit Step2 Download the self-signed CA file Download Step3 Double click on the CA file to install it into your browser Create a Certificate To Be Authorized By My Own Certificate Authority Caution: Modifications of TLS/SSL certificate settings will restart network services.2 Save the file to your computer.
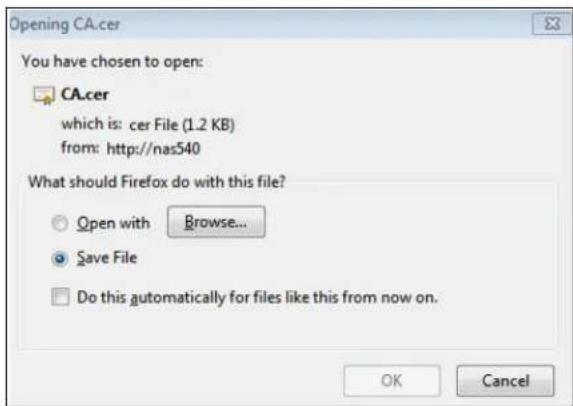
text_image
Opening CA.cer You have chosen to open: CA.cer which is: cer File (1.2 KB) from: http://nas540 What should Firefox do with this file? Open with Browse... Save File Do this automatically for files like this from now on. OK Cancel3 Find the certificate file on your computer and double-click it.
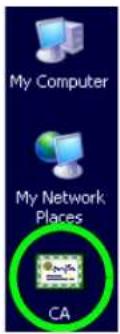
text_image
My Computer My Network Places CA4 Install the certificate. The rest of the steps in this section are an example of installing a certificate in Windows. In the Certificate dialog box, click Install Certificate.

text_image
Certificate General Details Certification Path Certificate Information This CA Root certificate is not trusted. To enable trust, install this certificate in the Trusted Root Certification Authorities store. Issued to: nsa Issued by: nsa Valid from 12/15/2008 to 12/15/2011 Install Certificate... Issuer Statement OK5 In the Certificate Import Wizard, click Next.
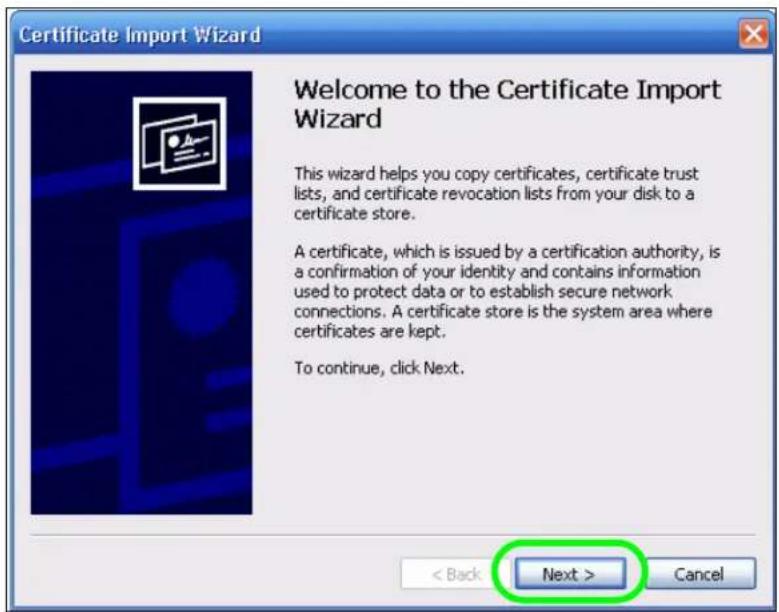
text_image
Certificate Import Wizard Welcome to the Certificate Import Wizard This wizard helps you copy certificates, certificate trust lists, and certificate revocation lists from your disk to a certificate store. A certificate, which is issued by a certification authority, is a confirmation of your identity and contains information used to protect data or to establish secure network connections. A certificate store is the system area where certificates are kept. To continue, click Next. < Back Next > Cancel6 Leave Automatically select certificate store based on the type of certificate selected and click Next.
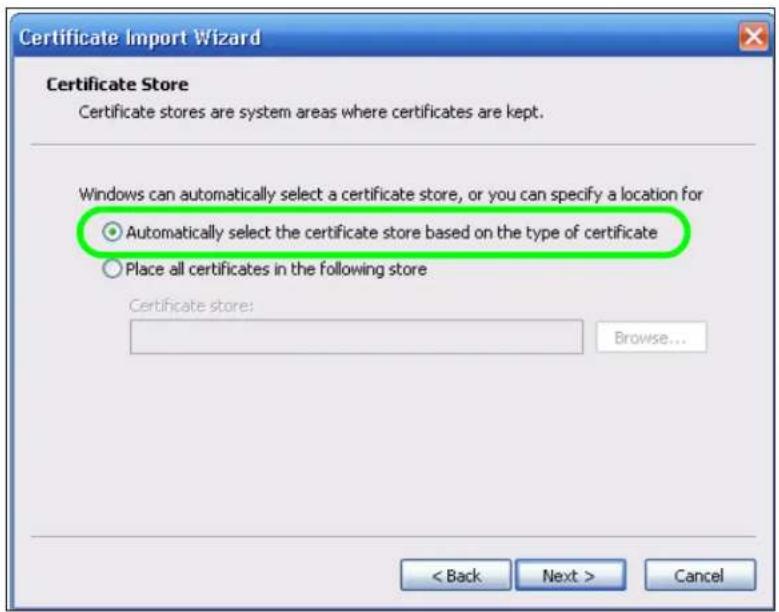
text_image
Certificate Import Wizard Certificate Store Certificate stores are system areas where certificates are kept. Windows can automatically select a certificate store, or you can specify a location for Automatically select the certificate store based on the type of certificate Place all certificates in the following store Certificate store: Browse... < Back Next > Cancel7 In the Completing the Certificate Import Wizard screen, click Finish.
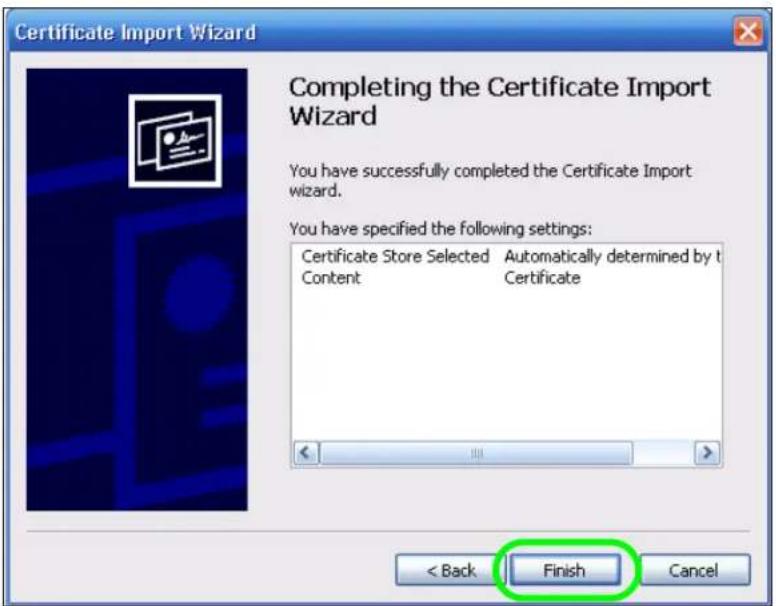
text_image
Certificate Import Wizard Completing the Certificate Import Wizard You have successfully completed the Certificate Import wizard. You have specified the following settings: Certificate Store Selected Automatically determined by t Content Certificate < Back Finish Cancel8 If you are presented with another Security Warning, click Yes.
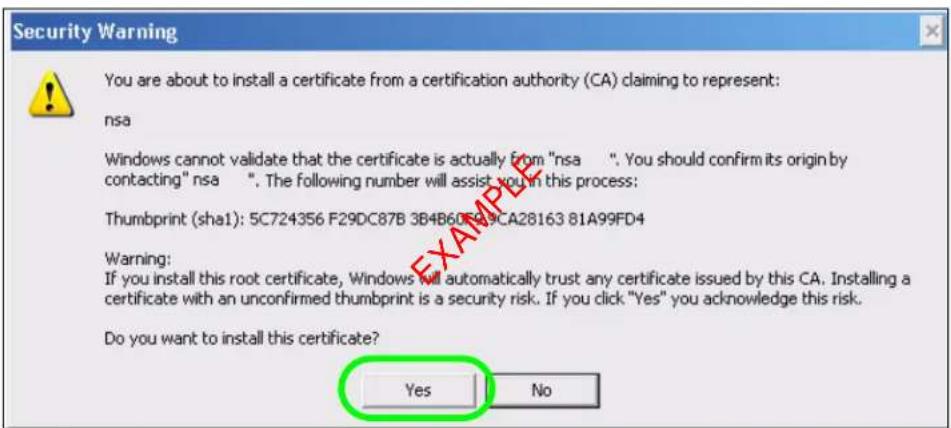
text_image
Security Warning You are about to install a certificate from a certification authority (CA) claiming to represent: nsa Windows cannot validate that the certificate is actually from "nsa .". You should confirm its origin by contacting" nsa ". The following number will assist you in this process: Thumbprint (sha1): 5C724356 F29DC87B 3B4B60F59CA28163 81A99FD4 Warning: If you install this root certificate, Windows will automatically trust any certificate issued by this CA. Installing a certificate with an unconfirmed thumbprint is a security risk. If you click "Yes" you acknowledge this risk. Do you want to install this certificate? Yes No9 Finally, click OK when presented with the successful certificate installation message.

text_image
Certificate Import Wizard The import was successful. OK14.11.3 Turn on the NAS's Web Security
Now that you have customized the NAS's certificate and installed it in your computer, you can turn on security for your Web Configurator sessions. This example uses Firefox 3.0.
1 Close your web browser and open it again to reset its session with the NAS. Log in and click Control Panel > TCP/IP > Web Configurator. Select Enable HTTPS connection and click Apply.
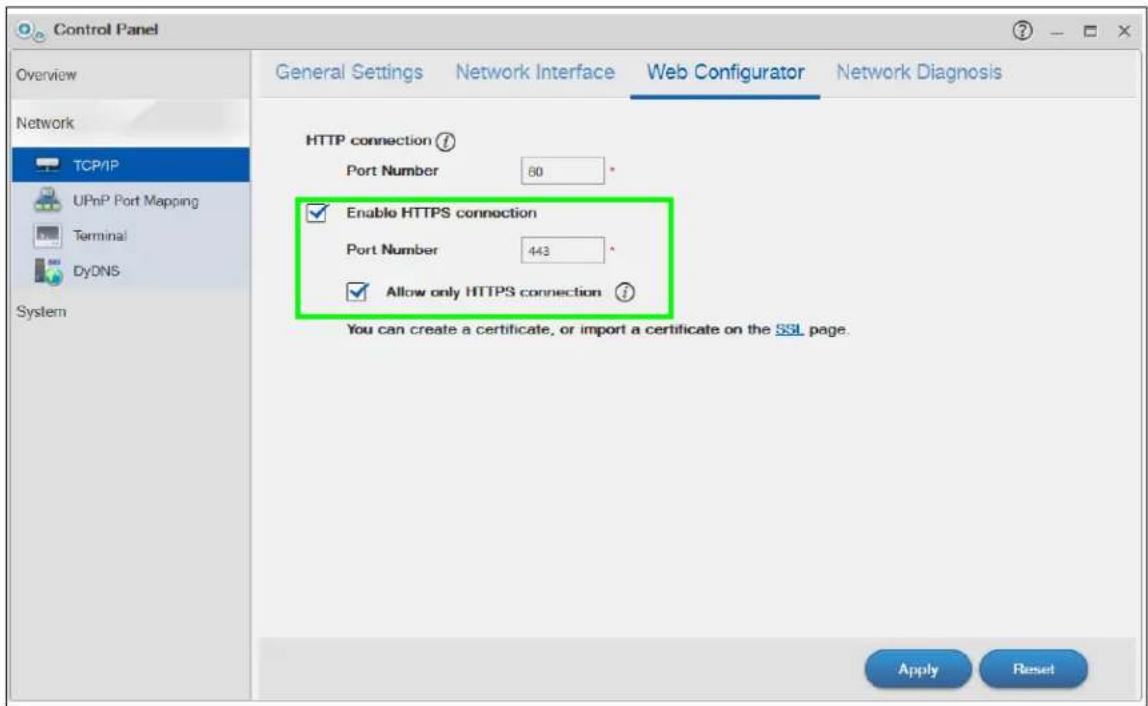
text_image
Control Panel Overview Network TCP/IP UPnP Port Mapping Terminal DyDNS System General Settings Network Interface Web Configurator Network Diagnosis HTTP connection ? Port Number 80 * Enable HTTPS connection Port Number 443 * Allow only HTTPS connection i You can create a certificate, or import a certificate on the SSL page. Apply Reset2 A warning screen pops up if applying your change may disconnect some users. Click Yes to continue.
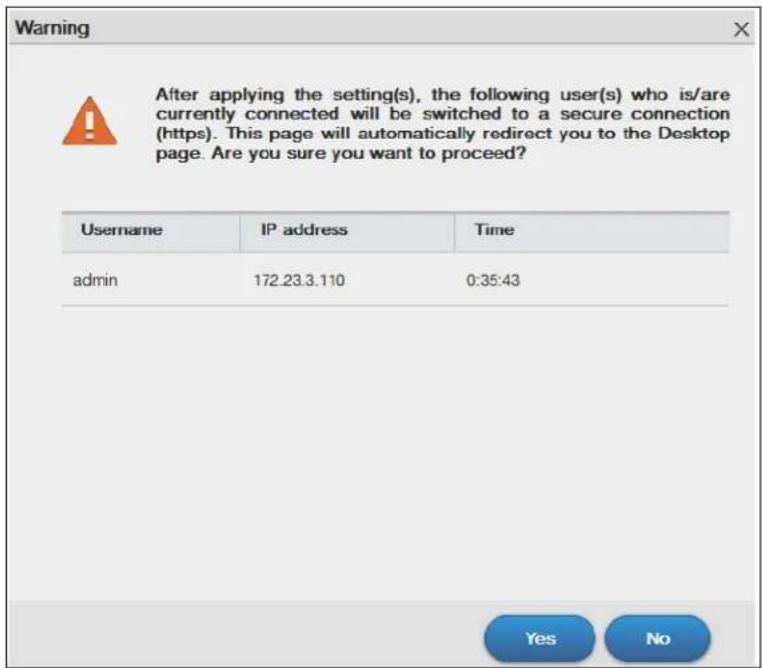
text_image
Warning After applying the setting(s), the following user(s) who is/are currently connected will be switched to a secure connection (https). This page will automatically redirect you to the Desktop page. Are you sure you want to proceed? Username IP address Time admin 172.23.3.110 0:35:43 Yes No3 The NAS logs you out and automatically redirects your formerly non-secure (HTTP) connection to a secure (HTTPS) connection. Your browser may give you a warning about the device's public key certificate. Add an exception to allow your browser to bypass the warning.

Secure Connection Failed
- uses an invalid security certificate.
The certificate is not trusted because it is self signed. The certificate is only valid for nsa.
(Error code: sec_error_untrusted_issuer)
- This could be a problem with the server's configuration, or it could be someone trying to impersonate the server.
- If you have connected to this server successfully in the past, the error may be temporary, and you can try again later.
Or you can add an exception...
4 Click Add Exception.

Secure Connection Failed
- uses an invalid security certificate.
The certificate is not trusted because it is self signed. The certificate is only valid for nsa
(Error code: sec_error_untrusted, issuer)
- This could be a problem with the server's configuration, or it could be someone trying to impersonate the server.
- If you have connected to this server successfully in the past, the error may be temporary, and you can try again later.
You should not add an exception if you are using an internet connection that you do not trust completely or if you are not used to seeing a warning for this server.
Get me out of here!
Add Exception.
5 Click Get Certificate.

text_image
Add Security Exception You are about to override how Firefox identifies this site. Legitimate banks, stores, and other public sites will not ask you to do this. Server Location: https:// .52/ Get Certificate Certificate Status View... Permanently store this exception Confirm Security Exception Cancel6 Before you add an exception, verify that the device to which you are trying to connect is providing the correct certificate. Click View.
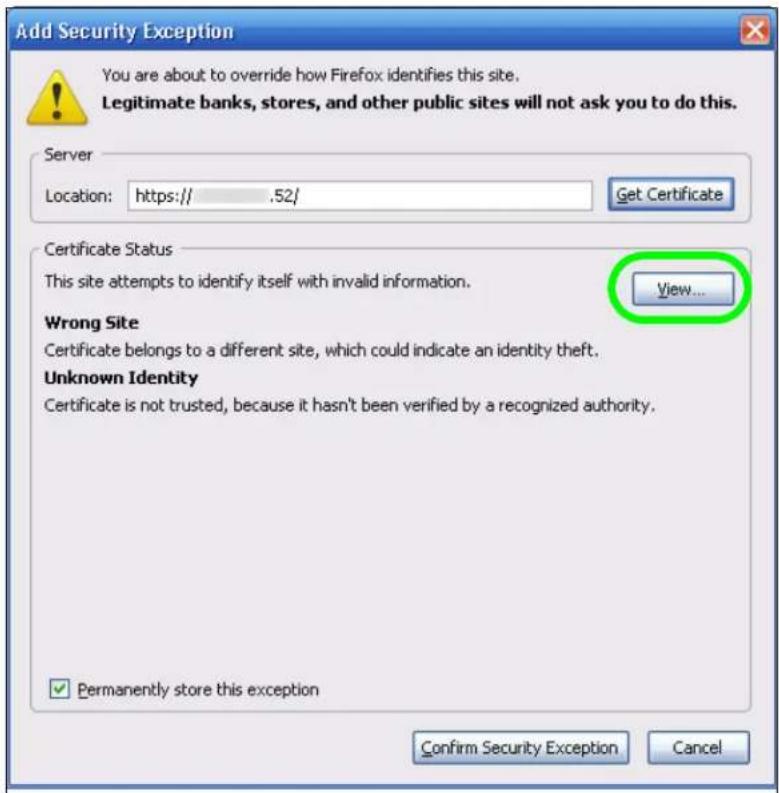
text_image
Add Security Exception You are about to override how Firefox identifies this site. Legitimate banks, stores, and other public sites will not ask you to do this. Server Location: https:// .52/ Get Certificate Certificate Status This site attempts to identify itself with invalid information. View... Wrong Site Certificate belongs to a different site, which could indicate an identity theft. Unknown Identity Certificate is not trusted, because it hasn't been verified by a recognized authority. ✓ Permanently store this exception Confirm Security Exception Cancel7 The SHA1 fingerprint must match the NAS's certificate you downloaded from the NAS to your computer. (Double-click the NAS's certificate file and then click Details and look at the Thumbprint). Click Close.

text_image
Certificate Viewer:"nsa" General Details Could not verify this certificate because the issuer is not trusted. Issued To Common Name (CN) nsa Organization (O) Test Organizational Unit (OU)
text_image
Certificate General Details Certification Path Show:8 If the certificate fingerprints match, click Confirm Security Exception, otherwise click Cancel.

text_image
Add Security Exception You are about to override how Firefox identifies this site. Legitimate banks, stores, and other public sites will not ask you to do this. Server Location: https:// .52/ Get Certificate Certificate Status This site attempts to identify itself with invalid information. View... Wrong Site Certificate belongs to a different site, which could indicate an identity theft. Unknown Identity Certificate is not trusted, because it hasn't been verified by a recognized authority. ✓ Permanently store this exception Confirm Security Exception Cancel9 The login screen displays.
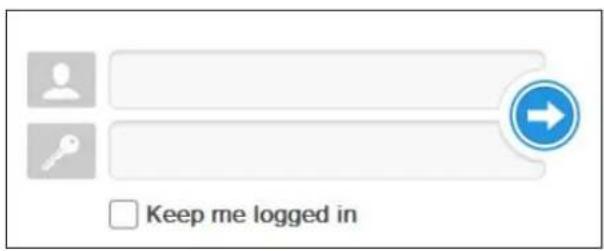
text_image
Keep me logged inNow, anyone who connects to the NAS's Web Configurator screens will automatically do so by HTTPS. Use a secure method to let your users know the correct fingerprint for the NAS's certificate so they can check it before adding a security exception (as in steps 6 to 7 on pages 185 to 186). See the next section for how to use FTPES with the NAS for secure FTP transfers.
14.12 Using FTPES to Connect to the NAS
This section covers how to use FTP over Explicit TLS/SSL with the NAS for secure FTP transfers. Before you go through this section, read Section 14.11 on page 177 to configure HTTPS. This example uses FileZilla.
1 Open FileZilla and click File > Site Manager > New Site.
- Configure the Host field with the NAS's address.
- Set the Servertype to FTPES - FTP over explicit TLS/ SSL.
- Configure the account name and password.
- Click Connect.

text_image
Site Manager Select Entry: My Sites New site General Advanced Transfer settings Charset Host: 192.168.1.35 Port: 21 Servertype: FTPES - FTP over explicit TLS/SSL Logontype: Normal User: Gonzo Password: Account: Comments: New Site New Folder Rename Delete Copy Connect OK Discard2 A security warning screen displays. The SHA1 fingerprint must match the NAS's certificate you downloaded from the NAS to your computer. (Double-click the NAS's certificate file and then click Details and look at the Thumbprint). If they match, click OK.
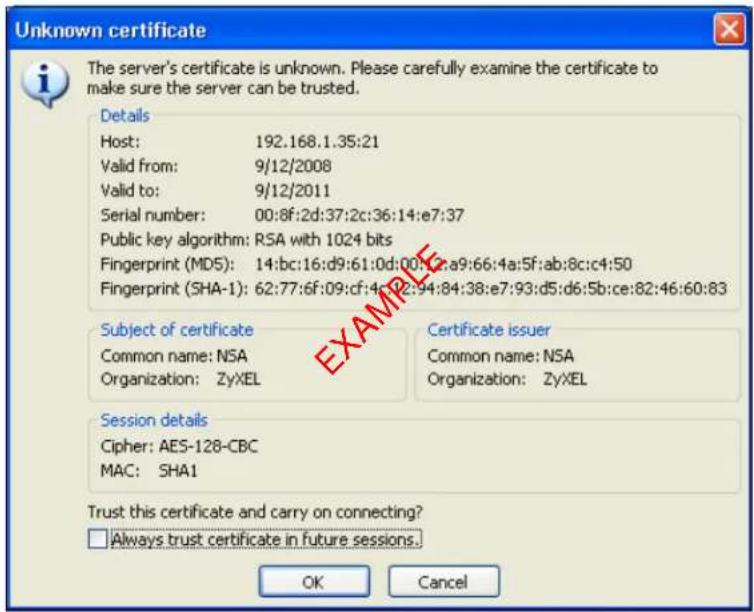
text_image
Unknown certificate The server's certificate is unknown. Please carefully examine the certificate to make sure the server can be trusted. Details Host: 192.168.1.35:21 Valid from: 9/12/2008 Valid to: 9/12/2011 Serial number: 00:8f:2d:37:2c:36:14:e7:37 Public key algorithm: RSA with 1024 bits Fingerprint (MD5): 14:bc:16:d9:61:0d:00:12:a9:66:4a:5f:ab:8c:c4:50 Fingerprint (SHA-1): 62:77:6f:09:cf:4c:12:94:84:38:e7:93:d5:d6:5b:ce:82:46:60:83 Subject of certificate Common name: NSA Organization: ZyXEL Certificate issuer Common name: NSA Organization: ZyXEL Session details Cipher: AES-128-CBC MAC: SHA1 Trust this certificate and carry on connecting? Always trust certificate in future sessions. OK CancelThe shares and folders to which Gonzo has access display. Now you can use FTP to securely transfer files to or from the NAS. Use a secure method to let your users know the correct fingerprint for the NAS's certificate so they can check it before adding a security exception.
14.13 Using a Mac to Access the NAS
This tutorial shows you how to find the NAS on Mac OS X 10.5 (Leopard).
You can access the NAS in two ways:
• Use the Finder to browse for the NAS, or
- Use the Finder > Go option to connect to the NAS.
14.13.1 Finder
1 Open a new Finder window.

text_image
Finder2 Select All under the SHARED sidebar. Look for the NAS from the Network list.

text_image
Network DEVICES Macintosh HD iDisk SHARED All... PLACES Desktop Downloads zyxel Applications Documents SEARCH FOR Today Yesterday Past Week All Images Name Date Modified mshome ---- mygroup ---- nancyz ---- nsa22nancy ---- nsa220 ---- nsa ---- nsa220plus1 ---- nsa2401 ---- nsatest ---- ont ---- pqa ---- pqasw1 ---- sec_sw_3 ---- security2003 ---- server ---- shin ---- smt ---- storage ---- 1 of 91 selected3 Expand the NAS to display the shares you may access.

text_image
Network Name Date Modified mshome ---- mygroup ---- nancyz ---- nsa22nancy ---- nsa ---- nsa210 ---- nsa210-tw ---- admin ---- music ---- photo ---- public ---- video ---- spbu_nas ---- nsa220plus ---- nsa220plus1 ---- All... PLACES Desktop ---- Downloads ---- zyxel ---- Applications ---- Documents ---- SEARCH FOR ---- Today ---- Yesterday ----14.13.2 Go Menu
4 In the Finder, click Go > Connect to Server.

text_image
Finder File Edit View Go Window Help Back ⌘[ Forward ⌘] Enclosing Folder ⌘↑ Computer ⌘C Home ⌘H Desktop ⌘D Network ⌘K iDisk Applications ⌘A Utilities ⌘U Recent Folders Go to Folder... ⌘C Connect to Server... ⌘K5 When the Connect to Server dialog box opens, enter smb:// and the NAS's IP address in the Server Address field. You may also click Browse to have the Mac search for the NAS. Click Connect.
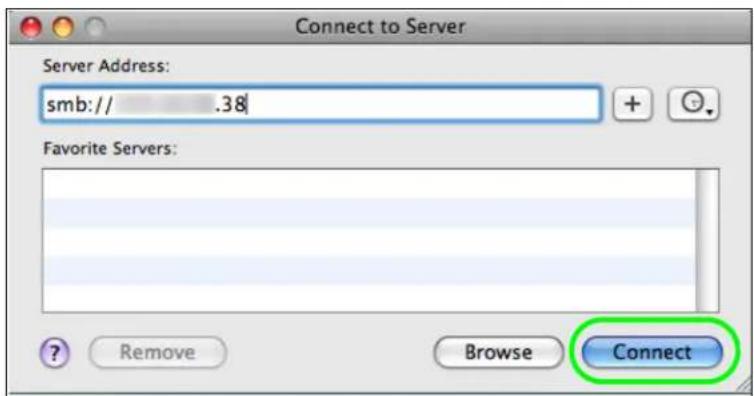
text_image
Connect to Server Server Address: smb:// .38 Favorite Servers: ? Remove Browse Connect6 Once you establish the connection, you can access the NAS from the Finder or directly from the desktop.
14.14 How to Use the BackupPlanner
Note: The screens and links in this section appear only after you have installed and enabled BackupPlanner. BackupPlanner is an application that you can install using Package Management (see Chapter 18 on page 246.)
Use the NAS's BackupPlanner to have a backup of your files and folders.
Schedule backups for times when the network is not busy (like at night or on weekends). For example, you might do daily backups of important individual files or folders and a weekly general archive. You can save backups to another location so your files can survive even if the original RAID or NAS fails.
14.14.1 Creating an Archive Backup
To backup the NAS every week to a remote NAS:
1 Click Protect > Backup > Add Job.
Figure 93 Protect > Backup

text_image
Status NASS40 System Setting Packages Server Name Date/Time Applications FTP Server Media Server iTunes Server Download Service Web Publishing Print Server Copy/Sync Button Auto Upload Flickr/YouTube FTP Uploadr Dropbox Time Machine Syslog Server Sharing Users Groups Shares WebDAV Maintenance Power Log Configuration SSL Shutdown repair by XELcloud Protect Backup Restore Add Job Edit Job Delete Selected Job(s) Execute Job Now Restore Archive Abort Job Activate Job Inactivate Job Status Job Name Job Description Backup Info Currently, there are no jobs. Backup Info2 Identify the backup job and select Archive.
New files are often added to the shares that you need to back up and existing files are not frequently changed so select Incremental. The NAS does a full backup first and later only copies source files that are new and/or modified since the last backup. This example sets the NAS to do another full backup after every four incremental backups.
Figure 94 Protect > Backup > Add Job: Step 1
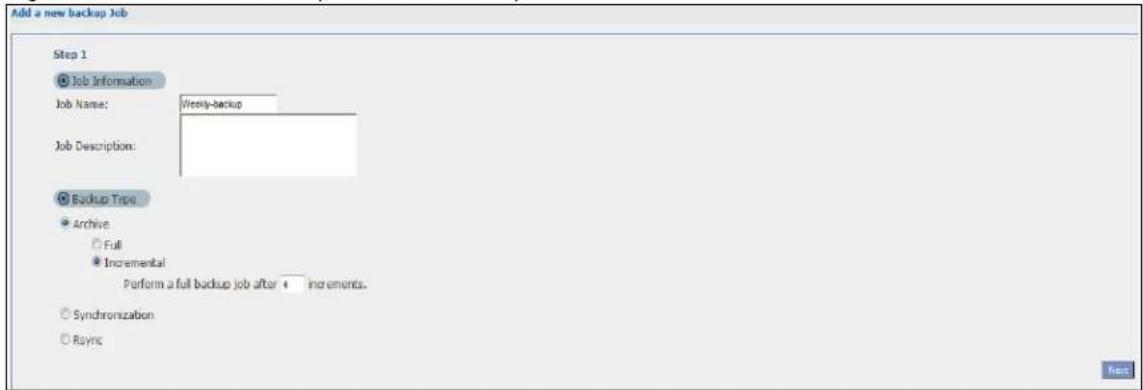
text_image
Add a new backup Job Step 1 Job Information Job Name: Weekly-backup Job Description: Backup Type Archive Full Incremental Perform a full backup job after 4 increments. Synchronization Syncs3 Select the volume1 check box to select all the folders and files.
Select Remote and enter the other NAS's address, username, password, and share name.
If you want to make sure the remote NAS is reachable, click Test Connection.
Figure 95 Protect > Backup > Add Job: Step 2
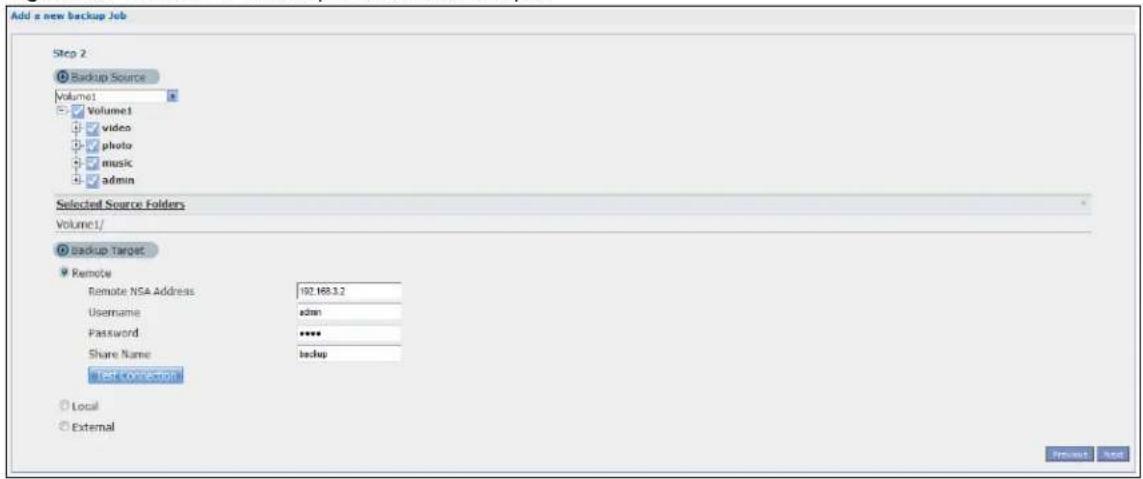
text_image
Add a new backup Job Step 2 Backup Source Volume1 Volume1 video photo music admin Selected Source Folders Volume1/ Backup Target Remote Remote NSA Address 192.168.3.2 Username adults Password ****** Share Name backup TEST CONNECTOR Local External Preview Help4 In this example, the target NAS is on the LAN so leave the compression off.
Security is already configured on the target NAS so you can leave the encryption off, too.
Have the NAS keep 3 backups.
Figure 96 Protect > Backup > Add Job: Step 3
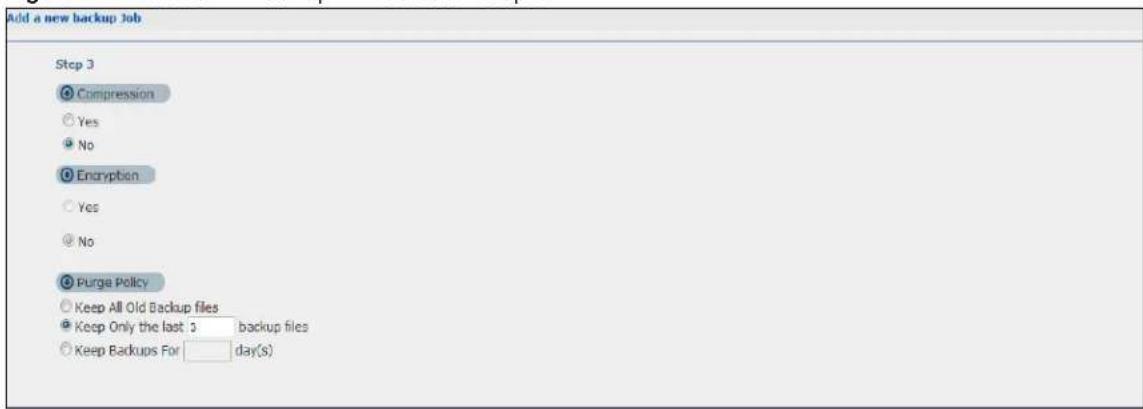
text_image
Add a new backup Job Step 3 Compression Yes No Encryption Yes No Purge Policy Keep All Old Backup files Keep Only the last 3 backup files Keep Backups For day(s)5 Set the frequency to Weekly. Schedule the backup for 5:00 every Saturday morning.
Protect > Backup > Add Job: Step 4

text_image
Add a now backup Job Step 4 Scheduler Backup Frequency: Weekly Start Time (hh:mm): 5 9 Every how many weeks? 1 (1-57) on every Sunday Monday Tuesday Wednesday Thursday Friday Saturday Preview Date14.14.2 Creating a Synchronization Backup
To create a synchronization backup:
1 Click Protect > Backup > Add Job.
Figure 97 Protect > Backup
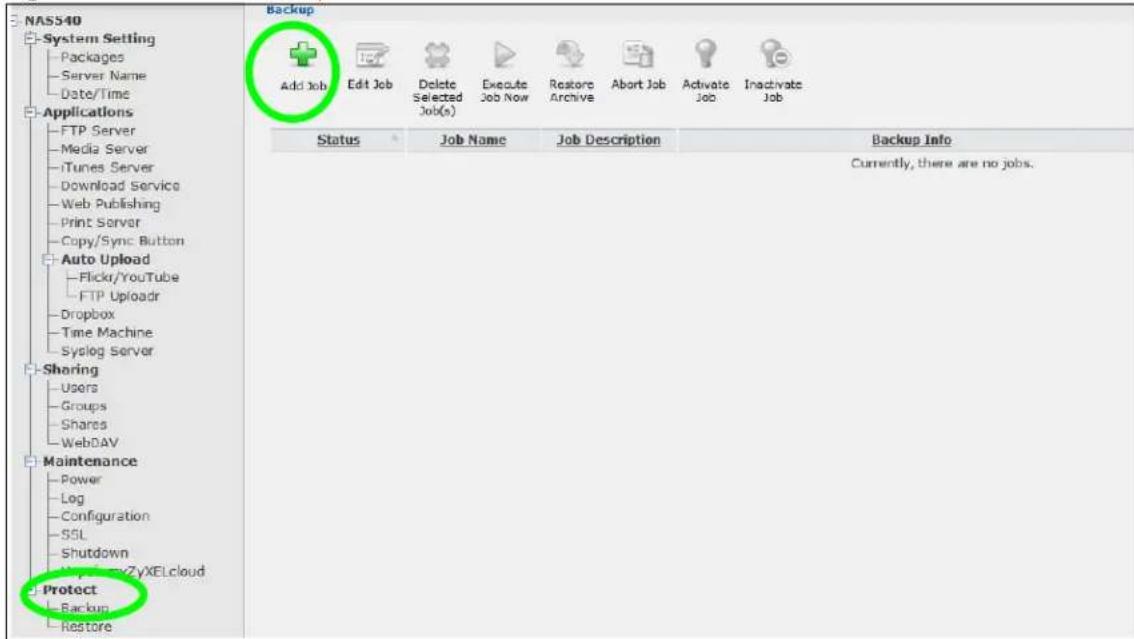
text_image
NASS40 System Setting Packages Server Name Date/Time Applications FTP Server Media Server iTunes Server Download Service Web Publishing Print Server Copy/Sync Button Auto Upload Flickr/YouTube FTP Uploadr Dropbox Time Machine Syslog Server Sharing Users Groups Shares WebDAV Maintenance Power Leg Configuration SSL Shutdown MySpaceZyXELcloud Protect Backup Restore Backup Add Job Edit Job Delete Selected Job(s) Execute Job Now Restore Archive Abort Job Activate Job Inactivate Job Status Job Name Job Description Backup Info Currently, there are no jobs.Name the backup job and select Synchronization.
You want only your current set of files in the Backup Photo folder of your External storage, so you select Mirror to make the target folder identical to the source folder. The NAS deletes any other files in the target folder.
Figure 98 Protect > Backup > Add Job: Step 1

text_image
Add a new backup Job Step 1 Job Information Job Name: Backup_Sync Job Description: Backup Type Archive Synchronization Publish Mirror Caution: Please make sure that your backup target directory is empty, otherwise all files will be deleted during the first run of the backup job. Rsync2 Select the folder that needs to be mirrored (your Photo folder in this example) and External.
- Select the destination on the External (Backup Photo in this example).
- Click Next.
Figure 99 Protect > Backup > Add Job: Step 2
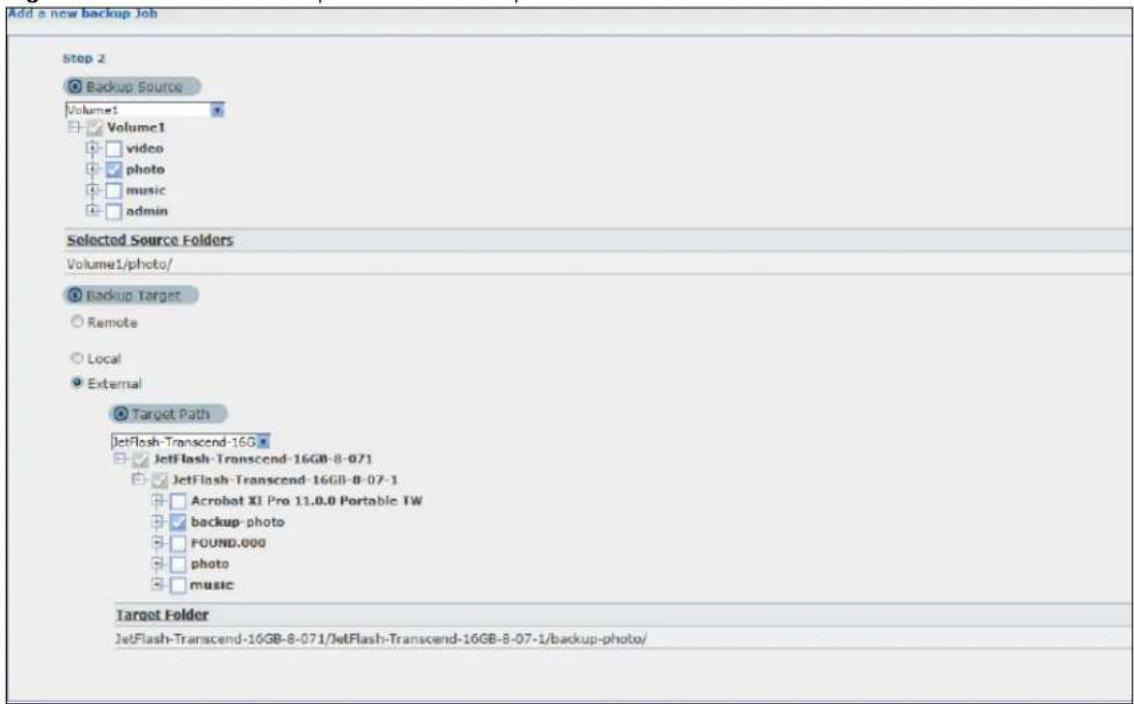
text_image
Add a new backup Job Step 2 Backup Source Volumet Volume1 video photo music admin Selected Source Folders Volume1/photo/ Backup Target Remote Local External Target Path JetFlash-Transcend-160 JetFlash-Transcend-16GB-8-071 JetFlash-Transcend-16GB-8-07-1 Acrobat XI Pro 11.0.0 Portable TW backup-photo FOUND.000 photo music Target Folder JetFlash-Transcend-16GB-8-071/JetFlash-Transcend-16GB-8-07-1/backup-photo/3 Click OK in the warning dialog box.
Figure 100 Protect > Backup > Add Job: Step 3

text_image
You are creating a mirror job. When you run this job, all the file/folders in the target that are different from the source content will be DELETED! Are you sure the target is empty?4 For this example, assume not many files need to be backed up so leave the compression off.
- Turn on the encryption to protect these sensitive files during the transfer. The final files stored on the remote NAS will be unencrypted (usable).
- Restrict the bandwidth usage to 256 KB/s to stop the archives from using all of your network connection's available bandwidth.
- You don't have to configure a purge policy for a synchronization backup.
- Click Next.
Figure 101 Protect > Backup > Add Job: Step 3

text_image
Step 3 Compression Yes No Encryption Use Encrypted Connection Yes No Bandwidth 256 KB/s (0 : No Limit) Purge Policy Keep All Old Backup files Keep Only the last backup tiles(1-30) Keep Backups For day(s)(1-3650) Previous Next5 Schedule the backup to occur every morning at 3:00 and click Done.
Figure 102 Protect > Backup > Add Job: Step 4

text_image
Step 4 Scheduler Backup Frequency: Daily Start Time (hh:mm): 3 0 Every how many days? 1 Previous DoneYou do not need to use a special restore process to use the files a synchronization backup creates. The copy of files that the NAS creates on the other NAS's Backups share can be used directly by anyone with access to that share.
14.14.3 Restoring Archived Files by Backup Job
If you have backup jobs for which the NAS has already performed backups, you can restore the files based on the backup job. Do the following:
1 Click Protect > Backup screen, select a backup job and click Restore Archive.
Figure 103 Protect > Backup

text_image
Backup Add Job Edit Job Delete Selected Job(s) Execute Job Now Restore Archive Abort Job Activate Job Inactivate Job Status Job Name Job Description Backup Info WAITING Weekly_backup Backup Type: Incremental Backup Source: /Volume1/ Backup Target: 192.168.3.2:Backups/2 Select which backup to use and click Next.
Figure 104 Protect > Backup > Restore Archive: Step 1
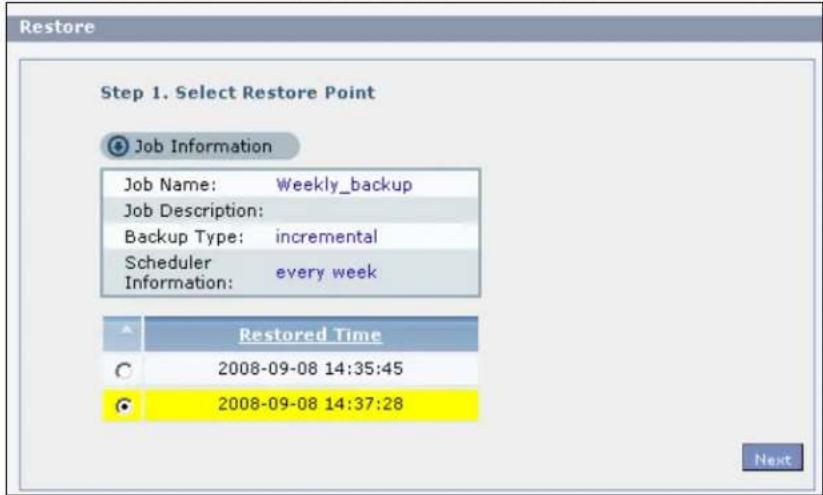
text_image
Restore Step 1. Select Restore Point Job Information Job Name: Weekly_backup Job Description: Backup Type: incremental Scheduler every week Information: Restored Time 2008-09-08 14:35:45 2008-09-08 14:37:28 Next3 Select the files and folders you want to restore and click Next.
Figure 105 Protect > Backup > Restore Archive: Step 2
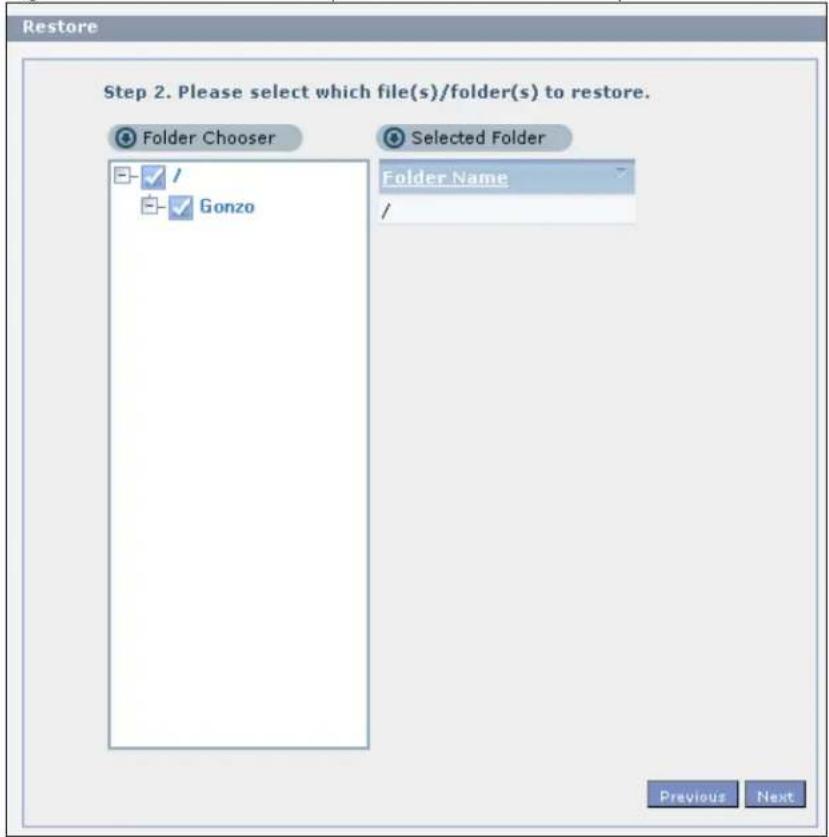
text_image
Restore Step 2. Please select which file(s)/folder(s) to restore. Folder Chooser Selected Folder Folder Name / Previous Next4 Select the original location and click Done.
Figure 106 Protect > Backup > Restore Archive: Step 3

text_image
Restore Step 3. Set a restore target and start restoring ● Original Location ○ Other Location Browse... Previous Done5 The NAS restores the files into the share. When it finishes you can access the files.
Figure 107 Protect > Backup > Restore Archive: Progress
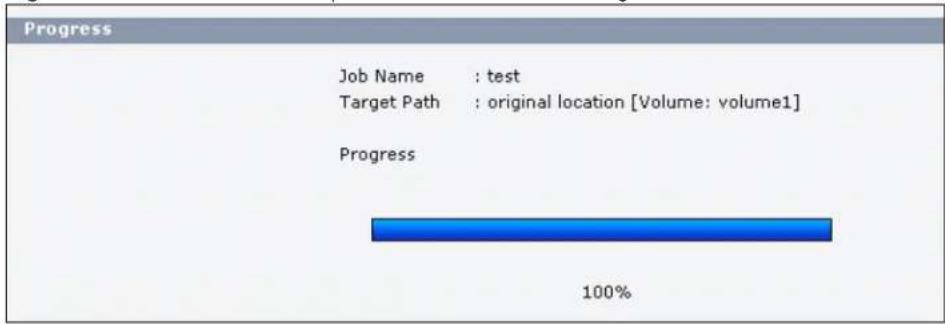
14.14.4 Restoring by Backup Files
If you deleted an archive backup job or the NAS or the RAID array containing the backup job failed you cannot restore archived files by the backup job. In this example, the NAS's RAID array failed. You've replaced the hard drives and re-configured the RAID. To restore by backup files:
1 Click Protect > Restore. Specify where the archive files are located. In this example, enter "192.168.3.2" as the IP address, "admin" as the account name, "1234" as the password, and "Backups" as the share name. Click Test Connection. Click Next.
Figure 108 Protect > Restore: Step 1
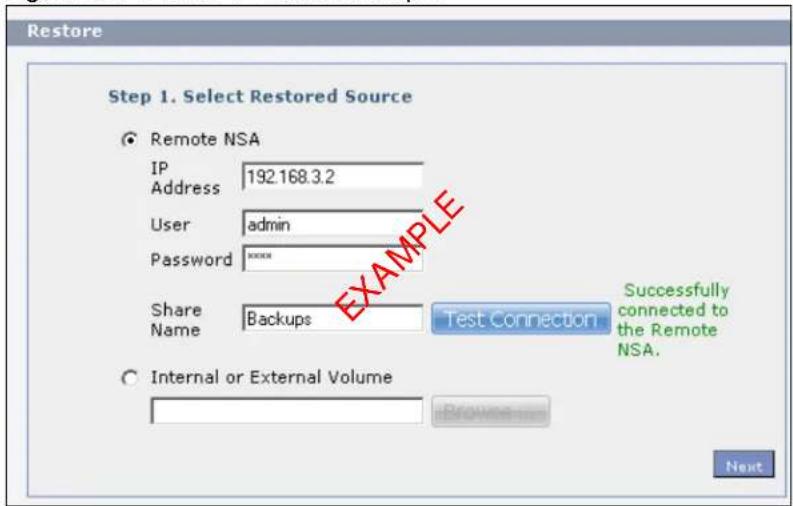
text_image
Restore Step 1. Select Restored Source Remote NSA IP Address 192.168.3.2 User admin Password ****** Share Name Backups Test Connection Successfully connected to the Remote NSA. Internal or External Volume Browse... Next2 Select the backup job and backup time and click Next.
Figure 109 Protect > Restore: Step 2

text_image
Restore Step 2. Select Restore Point Job Name Weekly_backup recycle Restored Time 2008-09-08 14:35:45 2008-09-08 14:37:28 2008-09-08 15:01:30 Previous Next3 Select everything in the share except the recycle folder. Click Next.
Figure 110 Protect > Restore: Step 3

text_image
Restore Step 3. Please select which file(s)/folder(s) to restore. Folder Chooser Selected Folder Folder Name /Gonzo/Planning/ /Gonzo/Strategy/ ✓ / ✓ Gonzo recycle ✓ Planning 2010-2014-Plans.doc ✓ 2009-Plan.doc ✓ Strategy Previous Next4 Browse to the folder where you want to put the files. Click Done.
Figure 111 Protect > Restore: Step 4

text_image
Restore Step 4. Set a restore target and start restoring Path for restoring Browse ... Please input encryption password if you have set to this backup job Previous Done5 The NAS restores the files and you can use them again.
PART II
Technical Reference
15.1 Overview
This chapter describes the Status screen, which is the first advanced administration screen that displays.
15.2 Status Screen
Click the Administration button in the Desktop screen (Chapter 12 on page 139) to open the Web Configurator. From within the Web Configurator screens, you can also click Status on the top-left of the navigation panel to display the status screen.
Figure 112 Status

text_image
Status System Information Server Name NA3540 Model Name NA3540 Firmware Version V2015-10-01_05_12_08(AATB.0)kt Media Server Status Enabled FTP Server Status Enabled Web Publishing Status Disabled UPS N/A Active Sessions Type Share Name Username Connected AI IP Address Web admin 2015-10-02 17:15:41 172-23.3.33The following table describes the labels in this screen.
Table 62 Status
| LABEL DESCRIPTION | |
| Status | Click Status in the navigation panel to refresh the status screen statistics. |
| System Information | |
| Server Name | This displays the name which helps you find the NAS on the network. Click the Edit icon to go to the screen where you can configure this. |
| Model Name This displays which model this NAS device is. | |
| Firmware Version | This is the NAS firmware version. Click the Edit icon to go to the Maintenance > FW Upgrade screen from which you can upload/upgrade new firmware. |
| Media Server Status | This shows whether the media server function is enabled or disabled. It must be enabled for media clients to play content files stored on the NAS. Click the Edit icon to go to the screen where you can configure this. |
| FTP Server Status | This shows whether the FTP server function is enabled or disabled. It must be enabled to use FTP file transfer to/from the NAS. Click the edit icon to go to the screen where you can configure this. |
| Web Publishing Status | This shows whether the Web server function is enabled or disabled. It must be enabled to use HTTP to access shares on the NAS. Click the Edit icon to go to the screen where you can configure this. |
| UPS | This shows the Uninterruptible Power Supply (UPS) capacity. Click the Edit icon to go to the screen where you can configure this. |
| Active Sessions | This shows how many users are currently connected to the NAS. |
| Type This shows whether it's a Windows/CIFS, web (web configurator), or FTP connection to the NAS. | |
| Share Name | This displays the shared folder name on the NAS that the user is connected to for CIFS sessions and is blank for FTP and web sessions. |
| Username This displays | the name of the user connected to the NAS if one is defined.ANONYMOUS FTP displays if a username is not defined for the user's connection. |
| Connected At | This displays the date and time the user last connected to the NAS in year, month, day, hour, minute, second format. |
| IP Address | This displays the IP address of the computer connected to the NAS. |
16.1 Overview
This chapter gives an overview of the various features included in the system setting screens. Upgrade the NAS firmware. Use package management to add more useful applications in your NAS. Identify your NAS on the network and set the time that the NAS follows for its scheduled tasks/logs.
16.2 What You Can Do
- Use the Packages screens (Section 16.4 on page 207) to upload new firmware and download and install applications from the web.
- Use the Server Name screen (Section 16.5 on page 209) to specify the NAS's server and workgroup names.
- Use the Date/ Time screen (Section 16.6 on page 210) to set up date/time and choose a time zone for the NAS.
16.3 What You Need to Know
Package Management
This feature enables you to install and use the following applications.
- Gallery - This web-based application allows your NAS to host pictures. You can upload images in your local computer or shares to this application. Use the Gallery administrator account (default username admin, password 1234) to log into the Gallery console. There you can create accounts for other users.
- NFS - NFS (Network File System) is a file-sharing protocol most commonly implemented on Unix-like systems.
- NZBGet - This news grabber helps download files from UseNet.
- PHP-MySQL-phpMyAdmin - This tool can be used to manage MySQL through the web. Enter 'root' as the username and '1234' as the password to log in. This includes MySQL, PHP, and phpMyAdmin.
- Logitech® Media Server - This enables you to manage a Logitech's Squeezebox device connected to the NAS.
- TFTP - Use this to configure the NAS to accept log files from TFTP clients.
-
Transmission - This Bit Torrent client supports adding tasks through torrent files and magnet links.
-
WordPress - This allows you to create and manage a blog. Use the WordPress administrator account (default username admin, password 1234) to log in. You can then create accounts for other users.
- carbohydrate - Use this to have the NAS manage your downloads including those from one-click hosting sites. One-click hosting sites allow Internet users to easily upload files to the one-click host's server so others can download them.
- Memopal - Use this to back up files on the NAS to your Memopal online backup and storage account.
- ownCloud - Use this to store, synchronize, and share files, photos, calendars, and more with computers and mobile devices.
- myZyXELcloud-Agent - Use this to go to mycloud.zyxel.com to set up a free DDNS hostname for the NAS so you can connect to it easily from the Internet.
The following applications come with their own configuration screens and documentation:
- Gallery
• NZBGet - PHP-MySQL-phpMyAdmin
• Logitech® Media Server - Transmission
- WordPress
- m y Z y X E L c l o u d - A g e n t
- own Could
Windows/CIFS
Common Internet File System (CIFS) is a standard protocol supported by most operating systems in order to share files across the network.
- CIFS is included by default in Windows operating systems.
- You can use Samba with Linux to use CIFS.
• CIFS transfers use security.
Time Lag
Time lag occurs when the time on the NAS falls behind the time on the time server. This may happen if:
- the time server is no longer reachable
- if the NAS is shut down often (the NAS internal battery keeps time when the NAS is shut down and this may cause possible variance)
• power surges occur.
The NAS gives no warning if time lag occurs. You should resynchronize the time after a power surge or after you have shut down the NAS several times.
16.4 Package Management Screen
Use this screen to download and install applications from the web. See Chapter 18 on page 246 for more about the features you can add to the NAS by installing packages.
Click System Setting > Packages to open the following screen.
Figure 113 System Setting > Packages
| Status | Package Name | Requires | Verklos | Description | Management Page |
| Enabled | Gallery | PHP MySQL phpMyAdmin | 3.0.5zypkg003 | This web-based application allows your NAS to host pictures. Use the NAS administrator credentials to log in. The administrator can then create accounts for other users. | http://172.23.3.100:5000/pxq/galery/ https://172.23.3.100:5001/pxq/galery/ |
| Built-in | GoogleDriveClient | 0.4.6zypkg002 | This offers server of 2-way synchronization between NAS and Google Drive. | Applications > GoogleDriveClient | |
| Enabled | Logitech® Media Server | PHP MySQL-shpMyAdmin | 7.7.4zypkg004 | The enables you to manage a Logtech's Squeezebox device connected to the NAS. | http://172.23.3.100:9550 |
| Built-in | Memopal | 2.4.4zypkg004 | Memopal is online backup and order storage software that archives your file in real-time to a remote server. | Applications > Memopal | |
| Built-in | NFS | 1.3.0zypkg003 | NFS (Network File System) is a file-sharing protocol most commonly implemented on UIo-like systems. | Network > NFS | |
| Enabled | NZGet | 15.0zypkg004 | This package downloads .nab file from usernet, default username.nzbget password:1234 | http://172.23.3.100:6789/ | |
| Enabled | PHP MySQL-phpMyAdmin | 1.0zypkg004 | This tool can be used to manage MySQL through the web, enter 'root' as the username and '1234' as the password to log in. | http://172.23.3.100:5000/pxq/gamysadmin/ https://172.23.3.100:5001/pxq/gamysadmin | |
| Built-in | Tftp | 0.7zypkg003 | Trivial File Transfer Protocol (TFIP) is an Internet file transfer protocol that uses port number 69. It is similar to FTP but uses UDP (User Datagran Protocol) rather than TCP (Transmission Control Protocol). It cannot let directories nor authenticate users. | Applications > HTTP Server | |
| Enabled | Transmission | 2.84zypkg004 | This package is another P2P download client which supports torrent and magnet. | http://172.23.3.100:951 | |
| Enabled | WordPress | PHP-M/SQL-shpMyAdmin | 3.9.1zypkg003 | This allows you to create and manage a blog. Use the NAS administrator credentials to log in. The administrator can then create accounts for other users. | http://172.23.3.100:5000/pxq/WordPress/ https://172.23.3.100:501/pxq/WordPress/ |
| Enabled | myZyXELcloud-Agent | 1.0.0zypkg8821 | myzYXELcloud, your solution for remote application management and securely access to your ZYXELnetwork devices accessory free anywhere that has an internet connection | https://mycloud.zxcel.com | |
| Enabled | ownCloud | PHP-M/SQL-shpMyAdmin | 7.0.2zypkg003 | This allows you to create and manage your private cloud. | http://172.23.3.100:501/pxq/ownCloud/ https://172.23.3.100:501/pxq/ownCloud |
| Built-in | prLoad | 0.4.5zypkg005 | Have the IAS manage your downloads including those from one-click hosting sites. | Applications > app.net |
The following table describes the labels in this screen.
Table 63 System Setting > Packages
| LABEL DESCRIPTION | |
| Package Management | |
| Retrieve List From Internet | Click this to retrieve a list of available packages from the ZyXEL website. |
| Install/Upgrade | Choose the item(s) on the list and click this to install the selected application(s) on your system or upgrade to the latest version if you have previously installed the application. |
| Uninstall/Cancel Installation | Choose the item(s) on the list and click this to uninstall the selected application(s) from your system or cancel their active download(s) or install process/es.This is only available if you have previously installed the package. |
| Enable This option is | only for non built-in packages.Choose the item(s) on the list and click this to enable the application(s) on your system.This is only available if you have previously installed the package. |
| Disable This option is | only for non built-in packages.Choose the item(s) on the list and click this to disable the application on your system.You have to enable the application again in order to use it.This is only available if you have previously installed the package. |
| Package Info | Select an item on the list and click this to display information about the package. See Section 16.4.1 on page 208 for more details. |
Table 63 System Setting > Packages
| LABEL DESCRIPTION | |
| Status | This is the current status of the application. It shows:Not Installed- This displays for applications that have not been installed by the NAS.Installing (%) - This displays when the application is being installed. It also shows the percent of the package already installed.Built-in- This displays for applications installed by the NAS that you can configure in the NAS Web Configurator.Enabled- This displays for applications installed and enabled by the NAS that have their own web configurators.Disabled- This displays for applications installed and disabled by the NAS that have their own web configurators.Unknown- It is possible to get this status if the web location for the application is unavailable. |
| Package Name This is the name of the application. | |
| Requires | This shows the other packages required in order to run this application.Note: A package would be disabled/enabled simultaneously if its prerequisite package(s) has been disabled/enabled. For example, when you enable WordPress, this also enables PHP-MySQL-phpMyAdmin automatically. However when you enable PHP-MySQL-phpMyAdmin, this does not automatically enable WordPress. |
| Version This is the | version number of the item.The icon indicates that the application has a newer version available. Move your mouse over this icon to see the latest version number. Choose this item and click Install/ Upgrade. |
| Description | This shows a brief description of the application. |
| Management Page | This shows the location of the screens or web configurator where you can manage the application (after the package has been installed on the system). |
Note: Once you install an application and enable it, additional links show up in the navigation panel. This applies to NFS, TFTP Server, pyLoad, and Memopal. Access the Gallery, NZBGet, PHP-MySQL-phpMyAdmin, Logitech® Media Server, Transmission, WordPress, OwnCloud, and myZyXELcloud-Agent applications' web configurators through the Package Management screen.
16.4.1 Displaying the Package Information
Select an item on the list and click Package Info. Use this screen to check detailed information about the application.
Figure 114 System Setting > Packages > Package Info

text_image
Package Info Detailed Information Status Enabled Name Gallery Size 7.88 MB Needed Space 20.24 MB Version 3.0.9zypkg003 Requires PHP-MySQL-phpMyAdmin Required By Source NAS "This web-based application allows your NAS to host pictures. Use the NAS administrator credentials to. CloseThe following table describes the labels in this screen.
Table 64 System Setting > Packages > Package Info
| LABEL DESCRIPTION | |
| Status This is the current status of the application. It shows:Not Installed - This displays for applications that have not been installed by the NAS.Installing (%) - This displays when the application is being installed. It also shows the percent of the package already installed.Built-in - This displays for applications installed by the NAS that you can configure in the NAS Web Configurator.Enabled - This displays for applications installed and enabled by the NAS that have their own web configurators.Disabled - This displays for applications installed and disabled by the NAS that have their own web configurators. | |
| Name This is the name of the application. | |
| Size This is the size of the application at initial download. | |
| Needed Space This is the needed space to complete the installation of the application. | |
| Version This is the version number of the application. | |
| Requires This shows other package/s required to run this application. | |
| Required By | This shows which other packages require this application in order to be usable. |
| Management Page | This shows the location of the screens, console or web configurator where you can manage the application (after the package has been installed on the system). |
| Source This shows the location of the installed files of the application. | |
| Description This shows a brief description of the item. | |
| Close | Click this to close the screen. |
16.5 Server Name Screen
Click System Setting > Server Name to open the following screen. Use this screen to configure your CIFS settings. In this screen you can set your server name and specify if your NAS is a part of a workgroup.
Note: CIFS cannot be disabled on the NAS.
Figure 115 System Setting > Server Name
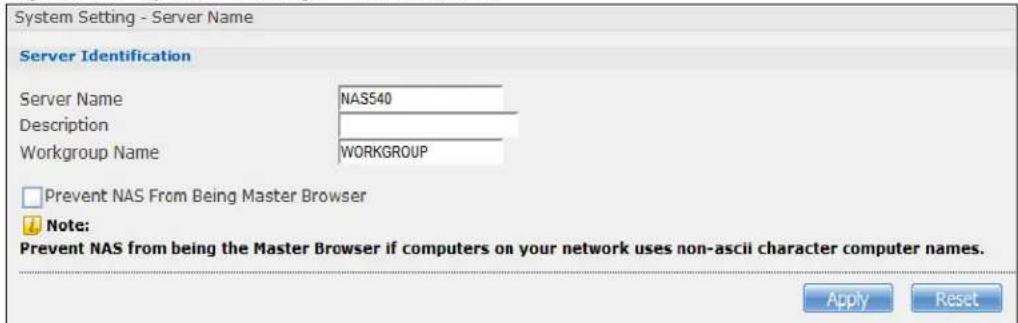
text_image
System Setting - Server Name Server Identification Server Name NAS540 Description Workgroup Name WORKGROUP □ Prevent NAS From Being Master Browser ↓ Note: Prevent NAS from being the Master Browser if computers on your network uses non-ascii character computer names. Apply ResetThe following table describes the labels in these screens.
Table 65 System Setting > Server Name
| LABEL DESCRIPTION | |
| Server Name Enter | a name to identify your NAS on the network in this field.You can enter up to 15 alphanumeric characters with minus signs allowed but not as the last character. The name must begin with an alphabet (a-z) and is NOT case sensitive. |
| Description | Add text here to describe the NAS if the Server Name field is not enough. Use up to 61 characters. You can use all characters except the following: /\:|[]<>+;,?=*~. |
| Workgroup Name | Type your workgroup name in this field. A workgroup is a group of computers on a network that can share files. These user accounts are maintained on the NAS.You can enter up to 15 alphanumeric characters with minus signs allowed but not as the last character. The name must begin with an alphabet (a-z) and is NOT case sensitive. |
| Prevent NAS From Being Master Browser | Select this option if computers in your workgroup are named with non-English characters (such as Chinese and Russian). When you perform a search in the workgroup, this option allows you to locate computers named with non-English characters. |
| Apply Click this to | save your changes. |
| Reset Click this to | restore previously saved settings. |
16.6 Date/Time Screen
Use this screen to select a time zone and a time server from which your NAS can get the time and date. This time is then used in NAS logs and alerts.
Click the System Setting link in the navigation panel and then click the Date/ Time link to access the Date/ Time screen.
Figure 116 System Setting > Date/Time
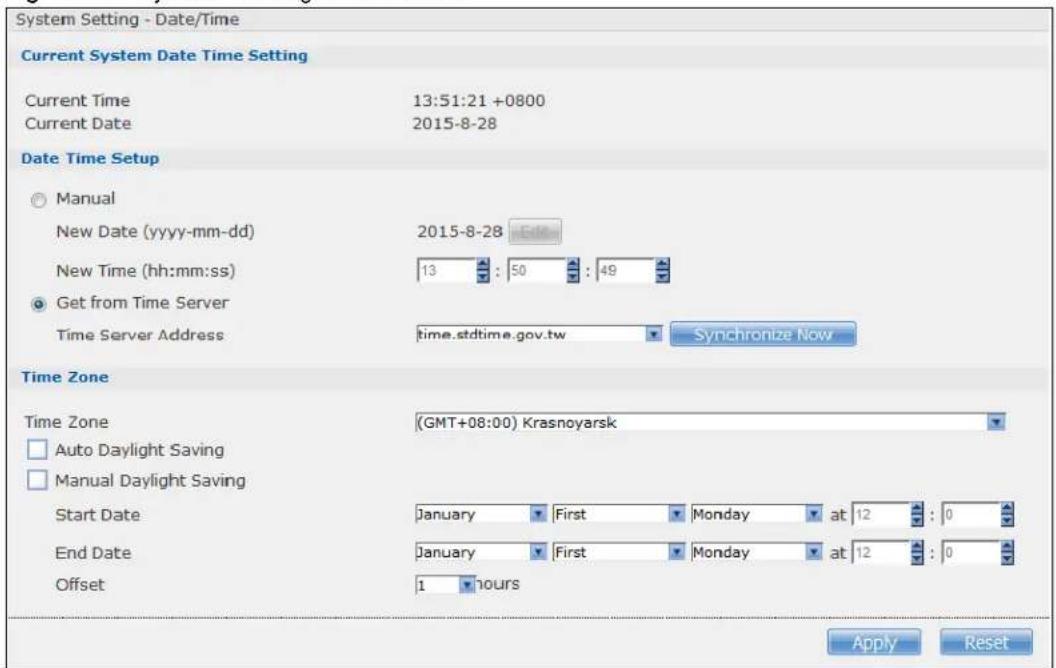
text_image
System Setting - Date/Time Current System Date Time Setting Current Time 13:51:21 +0800 Current Date 2015-8-28 Date Time Setup ○ Manual New Date (yyyy-mm-dd) 2015-8-28 Edit New Time (hh:mm:ss) 13 : 50 : 49 ● Get from Time Server Time Server Address time.stdtime.gov.tw Synchronize Now Time Zone Time Zone (GMT+08:00) Krasnoyarsk □ Auto Daylight Saving □ Manual Daylight Saving Start Date January First Monday at 12 : 0 End Date January First Monday at 12 : 0 Offset 1 hours Apply ResetThe following table describes the labels in this screen.
Table 66 System Setting > Date/Time
| LABEL DESCRIPTION | |
| Current System Date Time Setting | |
| Current Time This field displays the time used by your NAS for its logs and alerts. | |
| Current Date This field displays the date used by your NAS for its logs and alerts. | |
| Date Time Setup | |
| Manual Select this radio button to enter the time and date manually.When you enter the time settings manually, the NAS uses the new setting once you click Apply.Note: If you enter time settings manually, they revert to their defaults when power is lost. | |
| New Date (yyyy-mm-dd) | This field displays the last updated date from the time server or the last date configured manually.When you set Time and Date Setup to Manual, enter the new date in this field and then click Apply. |
| New Time (hh:mm:ss) | This field displays the last updated time from the time server or the last time configured manually.When you set Time and Date Setup to Manual, enter the new time in this field and then click Apply. |
| Get from Time Server | Select this check box to have the NAS get the time and date from the time server you select in the Time Server Address field. |
| Time Server Address | Select a time server from the drop-down list box or select Specify my own time server and enter the time server you wish to use in the field below. Check with your ISP/network administrator if you are unsure of this information. |
| Synchronize Now | Click this for the NAS to retrieve the correct time from the configured time server right away. |
| Time Zone | |
| Time Zone | Choose the time zone of your location. This will set the time difference between your time zone and Greenwich Mean Time (GMT). |
| Manual Daylight Saving | Daylight saving is a period from late spring to fall when many countries set their clocks ahead of normal local time by one hour to give more daytime light in the evening.Select this option to manually enter Daylight Saving Time settings. Clear this option to have the NAS automatically retrieve Daylight Saving Time settings from the Internet. The NAS will download a new daylight saving resource file from the Internet every month. |
| Start Date | Configure the day and time when Daylight Saving Time starts if you selected Enable Daylight Saving. The hour field uses the 24 hour format. Here are a couple of examples:Daylight Saving Time starts in most parts of the United States on the second Sunday of March. Each time zone in the United States starts using Daylight Saving Time at 2 A.M. local time. So in the United States you would use March, Second, Sunday, at 2:00.Daylight Saving Time starts in the European Union on the last Sunday of March. All of the time zones in the European Union start using Daylight Saving Time at the same moment (1 A.M. GMT or UTC). So in the European Union you would select March, Last, Sunday. The time you specify depends on your time zone. In Germany for instance, you would type 2 because Germany's time zone is one hour ahead of GMT or UTC (GMT+1). |
| End Date | Configure the day and time when Daylight Saving Time ends if you selected Enable Daylight Saving. The o'clock field uses the 24 hour format. Here are a couple of examples:Daylight Saving Time ends in the United States on the first Sunday of November. Each time zone in the United States stops using Daylight Saving Time at 2 A.M. local time. So in the United States you would select November, First, Sunday, at 2:00.Daylight Saving Time ends in the European Union on the last Sunday of October. All of the time zones in the European Union stop using Daylight Saving Time at the same moment (1 A.M. GMT or UTC). So in the European Union you would select October, Last, Sunday. The time you specify depends on your time zone. In Germany for instance, you would type 2 because Germany's time zone is one hour ahead of GMT or UTC (GMT+1). |
| Offset | Specify by how many hours to change the time for Daylight Saving Time. |
| Apply | Click this to save your changes. If you configured a new time and date, Time Zone and Daylight Saving at the same time, all of the settings take affect. |
| Cancel | Click this to restore your previously saved settings. |
17.1 Overview
This chapter discusses the features in the Application screens. The NAS contains various applications for file sharing and downloading.
17.2 What You Can Do
- Use the FTP Server screen (Section 17.4 on page 215) to configure settings for FTP file transfers to/from the NAS.
- Use the Media Server screens (Section 17.5 on page 216) to share files with media clients.
- Use the iTunes Server screens (Section 17.6 on page 218) to share files with iTunes users on your network.
- Use the Download Service screen (Section 17.7 on page 219) to download files from the Internet.
- Use the Web Publishing screen (Section 17.8 on page 230) to publish shares for people to access files using a web browser.
- Use the Print Server screen (Section 17.9 on page 231) to share a printer.
- Use the Copy/ Sync Button screen (Section 17.10 on page 232) to transfer files between a USB device and the NAS.
- Use the Auto Upload screens (Chapter 19 on page 262) to upload files in selected shares to your Flickr and/or YouTube accounts.
- Use the Syslog Server screen (Section 17.12 on page 243) to configure the NAS to accept syslog logs from syslog clients.
- Use the Dropbox screen (Chapter 20 on page 274) to log the NAS into your Dropbox account.
- Use the Time Machine screen (Chapter 21 on page 278) to turn Time Machine support on or off, and designate the share for Time Machine backups.
17.3 What You Need to Know
FTP
File Transfer Protocol (FTP) is a file transfer service that operates on the Internet. A system running the FTP server accepts commands from a system running an FTP client. FTP is not a secure protocol. Your file transfers could be subject to snooping.
FTPES (File Transfer Protocol over Explicit TLS/SSL)
File Transfer Protocol over Explicit TLS/SSL (FTPES) is a file transfer service that uses either TLS (Transport Layer Security) or SSL (Secure Sockets Layer) for secure transfers across the Internet. It requests for a mutual method of encryption from the FTP server for its file transfer sessions. Your FTP client must be set to use FTPES as in the following example.
Figure 117 FTP Client Example

text_image
Site Manager Select Entry: My Sites Now site General Advanced Transfer settings Charset Host: Port: Servertype: FTP - File Transfer Protocol FTP - File Transfer Protocol SFTP - SSH File Transfer Protocol ETPS - FTP over implicit TLS/SSL Logontype: FTPES - FTP over explicit TLS/SSL User: Password: ********** Account: Comments: New Site New Folder Rename Delete Copy Connect OK DiscardMedia Server
The media server feature lets anyone on your network play video, music, and photos from the NAS (without having to copy them to another computer). The NAS can function as a DLNA-compliant media server and/or an iTunes server. The NAS streams files to DLNA-compliant media clients or computers using iTunes. The Digital Living Network Alliance (DLNA) is a group of personal computer and electronics companies that works to make products compatible in a home network.
iTunes Server
The NAS iTunes server feature lets you use Apple's iTunes software on a computer to play music and video files stored on the NAS. You can download iTunes from www.apple.com.
Download Service
The NAS's download service downloads files from the Internet directly to the NAS. You do not have to download to your computer and then copy to the NAS. This can free up your computer's system resources.
The NAS can download using these protocols.
- HTTP: The standard protocol for web pages.
- FTP: A standard Internet file transfer service.
- P2P download: Peer-to-peer files sharing protocol.
Web Publishing
Web publishing lets you "publish" shares (containing folders and files) on the NAS so people can access the files using a web browser without having to log into the Web Configurator. This way you can share files with others without them having to know and enter a username and password.
For example, if you want to share photos in a FamilyPhotos share, you could "web publish" it and others could use a web browser to access the photos at http://my-NAS's-IP-Address/MyWeb/FamilyPhotos.
RSS
RSS (Really Simple Syndication) is a format for delivering frequently updated digital content. A channel uses a feed to deliver its contents (items). Subscribe the NAS to a feed to be able to download the contents.
17.4 FTP Server Screen
Use FTP or FTPES (FTP over Explicit TTL/SSL) to upload files to the NAS and download files from the NAS. Click Applications > FTP Server to open the following screen.
Figure 118 Applications > FTP Server
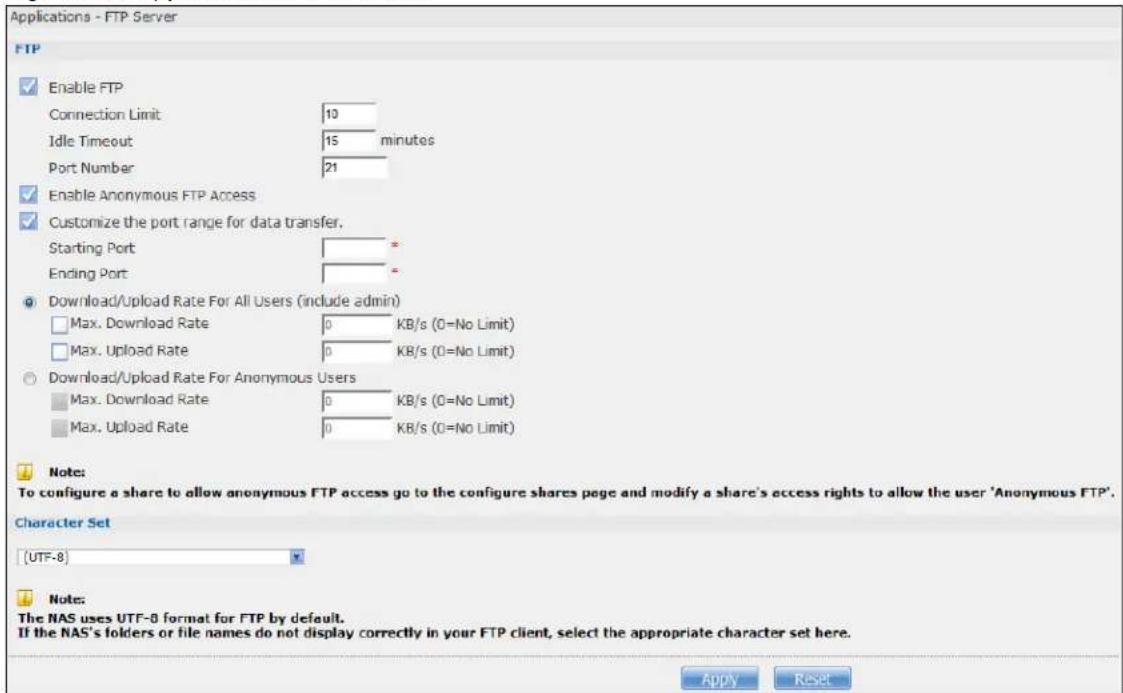
text_image
Applications - FTP Server FTP Enable FTP Connection Limit 10 Idle Timeout 15 minutes Port Number 21 Enable Anonymous FTP Access Customize the port range for data transfer. Starting Port * Ending Port * Download/Upload Rate For All Users (include admin) Max. Download Rate 0 KB/s (0=No Limit) Max. Upload Rate 0 KB/s (0=No Limit) Download/Upload Rate For Anonymous Users Max. Download Rate 0 KB/s (0=No Limit) Max. Upload Rate 0 KB/s (0=No Limit) Note: To configure a share to allow anonymous FTP access go to the configure shares page and modify a share's access rights to allow the user 'Anonymous FTP'. Character Set (UTF-8) Note: The NAS uses UTF-8 format for FTP by default. If the NAS's folders or file names do not display correctly in your FTP client, select the appropriate character set here. Apply ResetThe following table describes the labels in this screen.
Table 67 Applications > FTP Server
| LABEL DESCRIPTION | |
| FTP | |
| Enable FTP | You can use FTP to send files to the NAS or get files from the NAS. Select this check box to allow users to connect to the NAS via FTP; otherwise clear the check box. |
| Connection Limit | Enter the maximum number of concurrent FTP connections allowed on the NAS in this field. See your screen for your model's connection limit. |
| Idle Timeout | Enter the length of time that an FTP connection can be idle before timing out. The timeout limit is 300 minutes. |
| Port Number This | is the port number used by the NAS for FTP traffic. |
| Enable Anonymous FTP Access | Select this check box to allow any user to log into the NAS using 'FTP' or 'anonymous' as a username and no password. Any other name is considered a username, so must be valid and have a corresponding correct password. |
| Customize the port range for data transfer | Select this check box to assign a port range for FTP clients to use when downloading files from the NAS using passive mode.The connection limit is restricted to half of the port numbers within the range if this value is smaller than the one configured in theConnection Limitfield. For example, you specified a port range from 1024 to 1029 and configured 10 in theConnection Limitfield. The FTP connection limit will only be 3 (6 ports in the range divided by 2) because it is the smaller value. |
| Starting Port Enter | the first port number in the range. Choose from 1024 to 65535. |
| Ending Port Enter | the last port number in the range. Choose from 1024 to 65535. |
| Download/Upload Rate For All Users (include admin) | Select this if you want to limit the download/upload bandwidth for all users who are logged into the NAS, including the administrator.Max. Download Rate- Enter the download speed (in kilobytes/s) that the NAS allows for users who are logged into the NAS.Max. Upload Rate- Enter the upload speed (in kilobytes/s) that the NAS allows for users who are logged into the NAS. |
| Download/Upload Rate For Anonymous Users | Select this if you want to limit the download/upload bandwidth for users who log into the NAS using 'FTP' or 'anonymous' as a username and no password.Max. Download Rate- Enter the download speed (in kilobytes/s) that the NAS allows for users who are logged into the NAS.Max. Upload Rate- Enter the upload speed (in kilobytes/s) that the NAS allows for users who are logged into the NAS. |
| Character Set | The NAS uses UTF-8 (8-bit UCS/Unicode Transformation Format) format for FTP by default. If the NAS's folders, or file names do not display correctly in your FTP client, select the appropriate language encoding here.This setting applies to all FTP client connections to the NAS. It does not affect your Windows/CIFS connections (it will not correct the character display in Windows Explorer). |
| Apply Click this to save your changes. | |
| Reset | Click this to restore your previously saved settings. |
17.5 Media Server Screens
The media server application allows you to share media files with media clients.
Click Applications > Media Server to open the following screen. Use this screen to view the media server's status and rebuild the media server database.
Figure 119 Applications > Media Server > Media Server
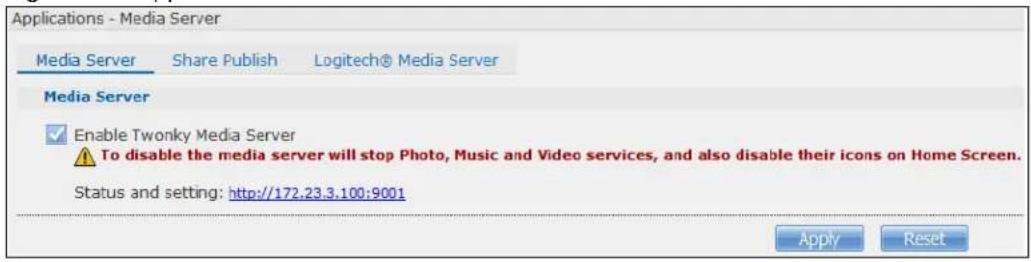
text_image
Applications - Media Server Media Server Share Publish Logitech® Media Server Media Server ✓ Enable Twonky Media Server ⚠️ To disable the media server will stop Photo, Music and Video services, and also disable their icons on Home Screen. Status and setting: http://172.23.3.100:9001 Apply ResetThe following table describes the labels in this screen.
Table 68 Applications > Media Server > Media Server
| LABEL DESCRIPTION | |
| Enable Twonky Media Server | Select this to have the NAS share the media files in the shares selected in the Share Publish tab. Clear it to stop the NAS from sharing media files through the Playzone screens or media players.Click the hyper link to open the Twonky media server configuration screens to check media server status or modify media server settings. See the help center in the Twonky screens for details. |
| Apply Click this to save your changes. | |
| Reset Click this to restore your previously saved settings. | |
17.5.1 Media Server Share Publish Screen
Click Applications > Media Server > Share Publish to open the following screen. Use this screen to select shares to publish (share with media clients like a media player or iTunes).
Figure 120 Applications > Media Server > Share Publish
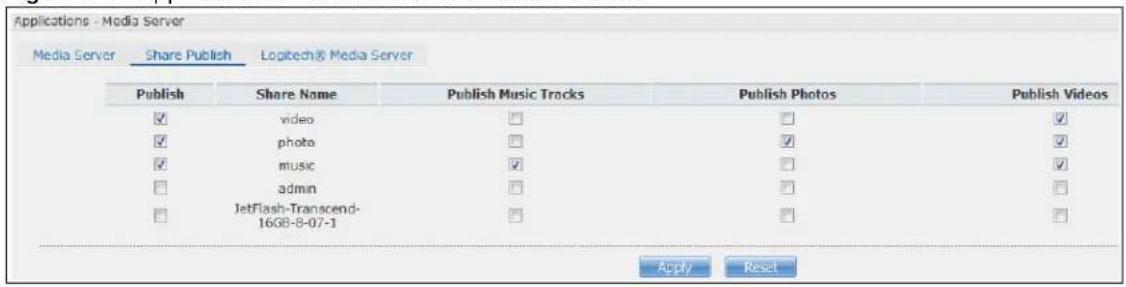
text_image
Applications - Media Server Media Server Share Publish Logitech® Media Server Publish Share Name Publish Music Tracks Publish Photos Publish Videos ✓ video ✓ ✓ ✓ photo ✓ ✓ ✓ ✓ music ✓ ✓ ✓ □ admin ✓ ✓ □ JetFlash-Transcend- 16GB-8-07-1 ✓ ✓ Apply ResetThe following table describes the labels in this screen.
Table 69 Applications > Media Server > Share Publish
| LABEL DESCRIPTION | |
| Publish | Select this to have the media server share a share's media files with media clients. |
| Share Name This column lists names of shares on the NAS. | |
| Publish Music Tracks Select this to give media clients access to the share's music files. | |
| Publish Photos Select this to give media clients access to the share's photo files. | |
| Publish Videos Select this to give media clients access to the share's video files. | |
Table 69 Applications > Media Server > Share Publish
| LABEL DESCRIPTION | |
| Apply Click this to save your changes. | |
| Reset Click this to restore your previously saved settings. |
17.5.2 Media Server Logitech® Media Server Screen
Logitech® Media Server enables you to manage a Logitech Squeezebox device connected to the NAS.
Click Applications > Media Server > Logitech® Media Server to open the following screen. This screen is available when the Logitech® Media Server application is installed using Package Management (see Section 17.5.2 on page 218). Use this screen to turn the Logitech® Media Server application on or off.
Figure 121 Applications > Media Server > Logitech® Media Server

text_image
Applications - Media Server Media Server Share Publish Logtech® Media Server Enable Logtech® Media Server Management Page http:// 9000 Apply ResetThe following table describes the labels in this screen.
Table 70 Applications > Media Server > Logitech® Media Server
| LABEL DESCRIPTION | |
| Enable Logitech®Media Server | Check this to enable Logitech® Media Server.Click the hyper link to open the Logitech media server screens where you can play files and change settings See the help center in the Logitech media server screens for details. |
| Apply Click this to save your changes. | |
| Reset Click this to restore your previously saved settings. | |
17.6 iTunes Server Screen
Click Applications > iTunes Server to open the following screen. Use this screen to turn the iTunes server on or off.
Figure 122 Applications > iTunes Server

text_image
Applications - iTunes Server iTunes Server Enable iTunes Server Apply ResetThe following table describes the labels in this screen.
Table 71 Applications > iTunes Server
| LABEL DESCRIPTION | |
| Enable iTunes Server | Check this to let anyone on your network use iTunes to play music files in the published shares. |
| Apply Click this | to save your changes. |
| Reset Click this | to restore your previously saved settings. |
17.7 Download Service Screen
The Download Service screen allows you to download files from the Internet.
Click Applications > Download Service to open the following screen. Use this screen to manage the NAS's file downloads.
Note: By default, the NAS saves downloads in the admin share's download folder.
Figure 123 Applications > Download Service
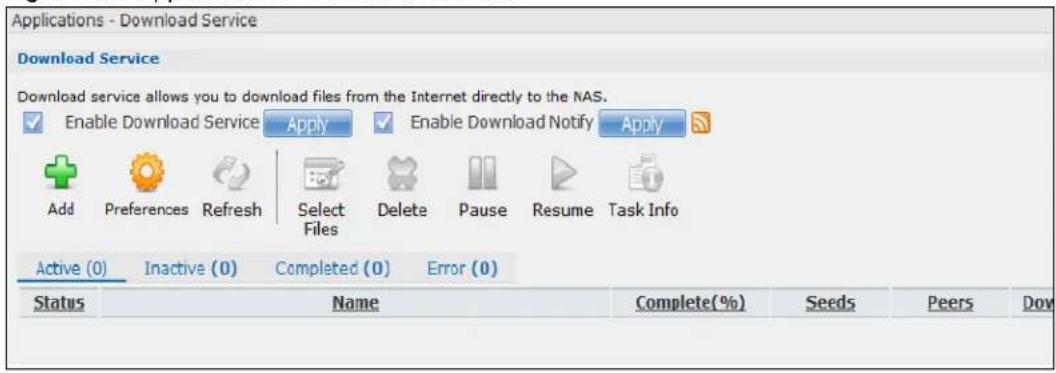
text_image
Applications - Download Service Download Service Download service allows you to download files from the Internet directly to the NAS. Enable Download Service Apply Enable Download Notify Apply Add Preferences Refresh Select Files Delete Pause Resume Task Info Active (0) Inactive (0) Completed (0) Error (0) Status Name Complete(%) Seeds Peers DowThe following table describes the labels in this screen.
Table 72 Applications > Download Service
| LABEL DESCRIPTION | |
| Enable Download Service | Use this option (and click theApplybutton) to turn the download service off or on. If you turn off the service, all downloads are paused. Files currently downloading are queued.Turning on the download service resumes downloads (or restarts them if they are not able to resume). |
| Enable Download Notify | Use this option (and click theApplybutton) to turn the download service notification off or on. SeeSection 17.11.3 on page 236for more details about this feature. |
| At the time of writing, the NAS supports RSS 2.0 feeds.Click this to get and subscribe to the NAS channel feed. This enables you to keep track and download the NAS's new contents (items). | |
| Add After you find | a file to download, copy the file's URL. Then log into the NAS web configurator and go to theApplications > Download Serverscreen and click this button. A screen opens where you create a new download task. You can paste the file's URL or use a P2P download file. |
| LABEL DESCRIPTION | |
| Preferences | Click this to open a screen where you can set the default location for saving downloads and configure your P2P download settings. |
| Refresh Click this to update the information displayed on the screen. | |
| Select Files | A single P2P download torrent file is often for multiple files. If you do not need all of the files the torrent file specifies, click this to select which files to download. |
| Delete To delete download tasks (or manually clear out completed download tasks), select a download task and click this to remove it from the list. A pop-up screen asks you to confirm. Click Apply to delete or Cancel to quit. When you delete a download task, you are given the option to delete the associated files. Selecting this option deletes a downloaded file and in the case of a P2P download task, also deletes the related .torrent file.Use your keyboard's [SHIFT] key to select a range of download tasks. Use the [CTRL] key and click individual download tasks to select multiple individual download tasks. | |
| Pause | Select a downloading item and click this to temporarily stop the download. Paused downloads appear in the Download Service screen's Inactive tab.Use your keyboard's [SHIFT] key to select a range of download tasks. Use the [CTRL] key and click individual download tasks to select multiple individual download tasks. |
| Resume | Select a paused item and click this to continue downloading the file.Select a completed item and click this to re-seed a P2P file or download a file again. If you want to re-seed a P2P task, keep the P2P file and the completed file in their original locations. |
| Task Info | Select an item on the list and click this to display information about the download task.See Section 17.7.6 on page 229 for more details. |
| The table lists your downloads. Click a column's heading to sort the entries by that criteria. | |
| Active Click this to see the list of files the NAS is currently downloading or sharing with other P2P users. The NAS handles a maximum of 10 active tasks at a time (or fewer depending on how much of the NAS's system memory is available). If you add more, they appear in the Inactive tab.P2P downloads may appear in the Inactive tab for a while before showing in the Downloading tab. The NAS automatically moves completed tasks to the Completed tab. | |
| Inactive Click this to see the list of files that are queued (waiting in line) for the NAS to download or the downloads that have been manually paused. | |
| Completed Click this to see the list of files that the NAS has finished downloading.The Location column shows where a downloaded file is saved on the NAS. Click on the location link to open the share browser and access the file. | |
| Error Click this to see the list of files that the NAS was not able to download. The NAS automatically retries unsuccessful download attempts. The download displays in the error tab when the re-attempts are also unsuccessful and the NAS stops trying to download the file. To try the download again, use the Add button to create a new download task. | |
| Status The following icons show the download's status.☑:Completed ☑:Seeding ☑:Downloading☐:Queued ☐:Paused ☑:Error ☑:Missing File☒:Start downloading ☑:Delete ItemCompleted: The NAS has downloaded the whole file.Seeding: The download is finished and the NAS is allowing other P2P users to download it.Downloading: The NAS is getting the file.Queued: The download is waiting in line for the NAS to download it.Pause: The download has been manually stopped. Select it and clickResumeto continue it.Error: The NAS was not able to complete the download. Select it and clickResumeto reattempt the download. | |
| Name | This identifies the download file. A “...” indicates an abbreviated name. Hold your cursor over the name to display the full name. |
| Complete(%) | This is the percentage of the file that the NAS has downloaded. |
| Location | This appears in theCompletedtab.It displays the path for where the file is saved. Click on the location link to open the share browser and access the file. |
| Seeds | Seeds apply to P2P downloads. This is the number of computers that are sharing the complete file that you are downloading.This value is in the format “Leeches(Seeds)” where Leeches refer to peers that do not have a complete copy of the file yet and are still downloading; Seeds refer to peers that have the complete file. |
| Peers Peers apply to P2P downloads. This is the number of other computers that are also downloading (and sharing) the file you are downloading.This value is in the format “ConnectedPeers(AllPeers)[Health]” where Connected Peers is the number of computers to which the NAS is connected in order to download the file; AllPeers refer to the total number of computers to which the NAS can connect in order to download the file; Health indicates the availability of the file. | |
| DownloadSpeed | This is how fast the NAS is getting the file.It is normal for a P2P download to start out with a slow download speed since it has to set up numerous connections. The speed should increase as the download progresses and decrease near the end of the download. |
| Upload Speed | This is how fast the NAS is sending the file to other P2P users. |
| Time Left | This is how much longer (in hours, minutes, and seconds) it should take to finish the download at the current download speed. |
| Priority | This is the download's priority on the NAS. You can set a currently downloading or queued download to high or automatic priority. You can set a download to high priority to have the NAS try to download it before the other files. However the actual download speed depends more on factors like the speed of you Internet connection, the speed of the download source's Internet connection, how many others are trying to download at the same time, the peers and seeds available and general network conditions. |
| Error Code | This appears in theErrortab.This shows the tag for the error that occurred. |
| ErrorMessage | This appears in theErrortab.This message states what went wrong with the download. |
17.7.1 Adding a Download Task
Click Applications > Download Service > Add to open the following screen. Use this screen to specify a file for the NAS to download. Section 14.7 on page 162 provides a tutorial on adding a download task.
Figure 124 Applications > Download Service > Add

text_image
Add Download Task From URL Source URL Torrent File Browse... No file selected Location of Downloaded Files Share Path Put incomplete downloads in admin /download Move completed downloads to admin /download Edit Note: 1. P2P download jobs are stored in /admin/download/incoming. 2. HTTP/FTP jobs are stored in /admin/download. 3. All jobs triggered by RSS channels create the subfolder in /admin/download using the channel name where it store all files downloaded from that Caution: Do not use the NAS for illegal downloads. Illegal downloading or sharing of files can result in severe civil and criminal penalties. You are subject to laws and any other applicable laws and will bear the consequences of any infringements thereof. 2vXEL takes NO responsibility or liability for your u feature. Apply CancelThe following table describes the labels in this screen.
Table 73 Applications > Download Service > Add
| LABEL DESCRIPTION | |
| Source | |
| URL Paste the URL or magnet link of the file you want to download into this field. The URL can be for an HTTP, FTP, or P2P download. A magnet link is for a P2P download.For a P2P download using a magnet link the NAS automatically downloads the file related to the magnet link.For a P2P download using a .torrent file, you can copy and paste the URL of the .torrent file. The NAS will automatically download the .torrent file and use it. You do not have to manually download the .torrent file or save it to your computer.Note: Make sure the link opens either the file you want or a pop-up window about how to handle the file.It is also OK for the link to open a .torrent file. If you are redirected to a screen that says the download should start in a few seconds, there may be a link to click if the download does not start automatically. See if that link opens the file or the pop-up window. | |
| Torrent File | A “torrent” file has information the NAS uses to do a P2P download. A torrent file uses a .torrent extension. If you already have a torrent file saved on your computer, select the Torrent File option and specify its path or click Browse and look for its location. |
| Location of Downloaded Files | This shows where the NAS stores new downloads (Put incomplete downloads in) and where the NAS moves completed downloads (Move completed downloads to).The Share column shows the name of the share where the file is downloaded.The Path column points to the location in the share where the NAS will save the downloaded files.P2P download jobs are stored in */incoming (where “*” is a folder that you have set.)HTTP/FTP jobs are stored in /* (where “*” is a folder that you have set.)All jobs triggered by RSS channels create the subfolder in /* using the channel name where it store all files downloaded from that channel (where “*” is a folder that you have set.) |
| Edit | Click this to open the following screen where you can set the default folder location where you “Put incomplete downloads in” and “Move complete downloads to”: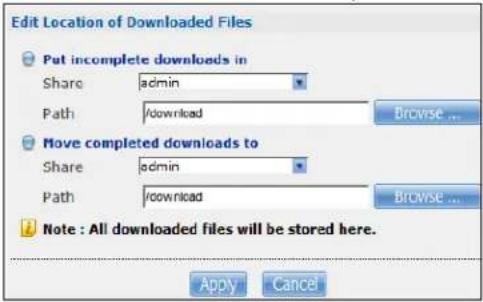 Share - Select the share from the list.Path - Type the folder location in the share directly or click Browse to open the following screen and navigate to the file’s location. Share - Select the share from the list.Path - Type the folder location in the share directly or click Browse to open the following screen and navigate to the file’s location.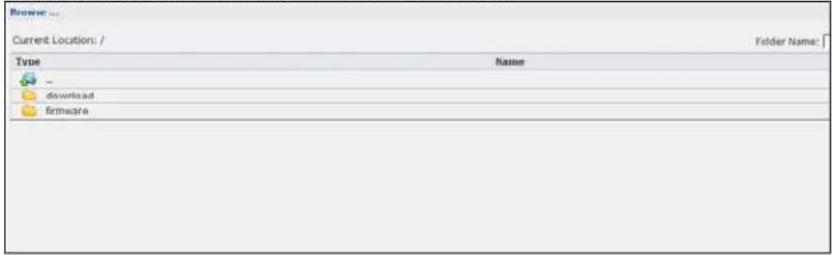 Current Location - This is the location of the selected folder.Folder Name - Enter a new folder name and click 📄 to create it.Type - This identifies the item as a folder or file.Name - This is the name of the folder/file.Select a folder. If you don’t select a folder, a forward slash (/) displays in the Path field. All contents within the specified share are automatically selected.Click Apply to save your settings and Cancel to close the screen. Current Location - This is the location of the selected folder.Folder Name - Enter a new folder name and click 📄 to create it.Type - This identifies the item as a folder or file.Name - This is the name of the folder/file.Select a folder. If you don’t select a folder, a forward slash (/) displays in the Path field. All contents within the specified share are automatically selected.Click Apply to save your settings and Cancel to close the screen. |
| Apply Click this to save your changes. | |
| Cancel | Click this to return to the previous screen without saving. |
17.7.2 Configuring General Download Settings
Click Applications > Download Service > Preferences to open the following screen. Use this screen to set the default location for saving downloads and configure the download period.
Figure 125 Applications > Download Service > Preferences > General Settings
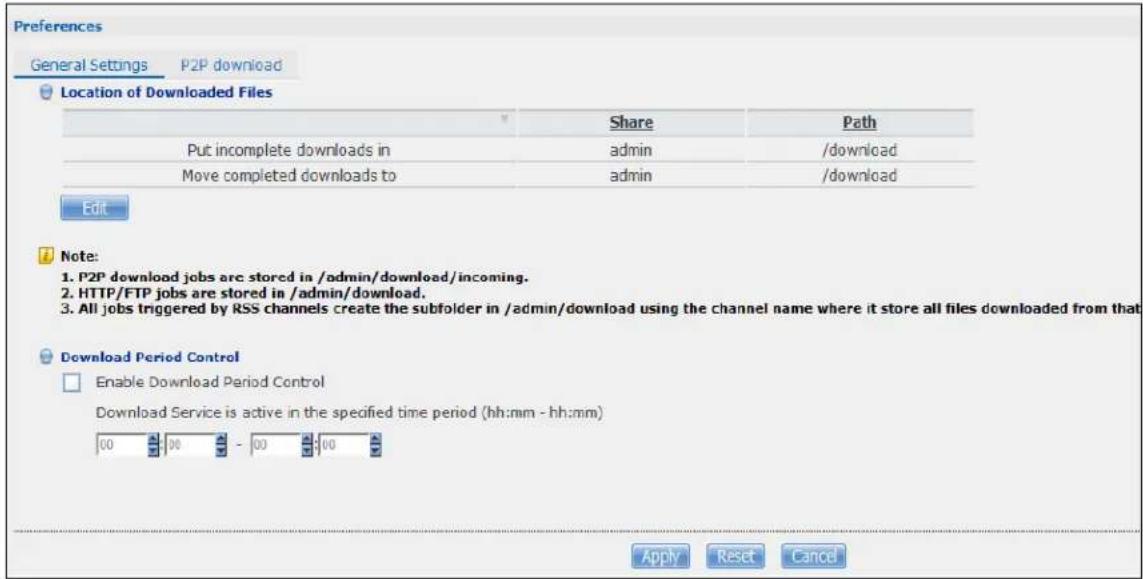
text_image
Preferences General Settings P2P download Location of Downloaded Files Share Path Put incomplete downloads in admin /download Move completed downloads to admin /download Edit Note: 1. P2P download jobs are stored in /admin/download/incoming. 2. HTTP/FTP jobs are stored in /admin/download. 3. All jobs triggered by RSS channels create the subfolder in /admin/download using the channel name where it store all files downloaded from that Download Period Control Enable Download Period Control Download Service is active in the specified time period (hh:mm - hh:mm) 00 00 - 00 00 Apply Reset CancelThe following table describes the labels in this screen.
Table 74 Applications > Download Service > Preferences > General Settings
| LABEL DESCRIPTION | |
| Location of Downloaded Files | This shows where the NAS stores new downloads (Put incomplete downloads in) and where the NAS moves completed downloads (Move completed downloads to).TheSharecolumn shows the name of the share where the file is downloaded.ThePathcolumn points to the location in the share where the NAS will save the downloaded files.P2P download jobs are stored in */incoming (where **' is a folder that you have set.)HTTP/FTP jobs are stored in */* (where **' is a folder that you have set.)All jobs triggered by RSS channels create the subfolder in /* using the channel name where it store all files downloaded from that channel (where **' is a folder that you have set.) |
Edit Click this to open the following screen where you can set the default folder location where you “Put incomplete downloads in” and “Move complete downloads to”: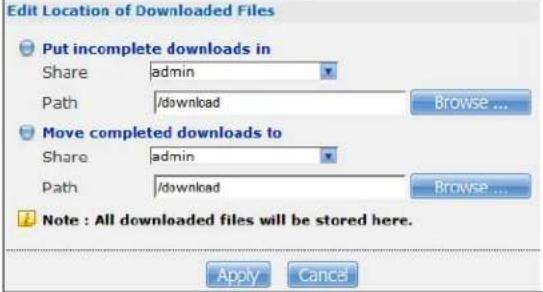 Share - Select the share from the list.Path - Type the folder location in the share directly or clickBrowse to open the following screen and navigate to the file's location. Share - Select the share from the list.Path - Type the folder location in the share directly or clickBrowse to open the following screen and navigate to the file's location. | |
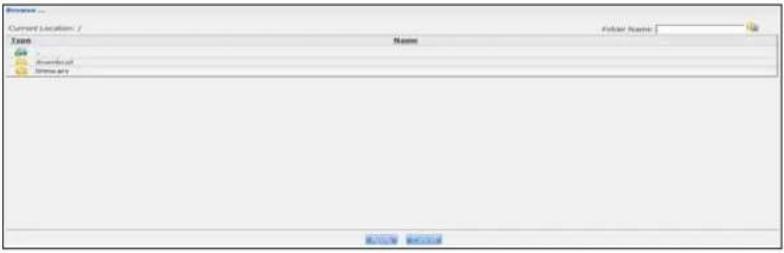 Current Location - This is the location of the selected folder.Folder Name - Enter a new folder name and click [icon] to create it.Type - This identifies the item as a file or folder.Name - This is the name of the folder/file.Select a folder. If you don't select a folder, a forward slash (/) displays in the Path field.All contents within the specified share are automatically selected.Click Apply to save your settings and Cancel to close the screen. Current Location - This is the location of the selected folder.Folder Name - Enter a new folder name and click [icon] to create it.Type - This identifies the item as a file or folder.Name - This is the name of the folder/file.Select a folder. If you don't select a folder, a forward slash (/) displays in the Path field.All contents within the specified share are automatically selected.Click Apply to save your settings and Cancel to close the screen. | |
| Download Period Control | This feature sets the NAS to download files only within a specified time period. |
| Enable Download Period Control | Use the check box to turn the download period control on or off. |
| Download Service is active in the time period (hh:mm - hh:mm) | Specify the time period for the NAS to download files.Note: If you also configured the Power On/Off Schedule feature in the Power Management screen, make sure your active download period does not conflict with the power-off period. |
| Apply Click this to save your changes. | |
| Reset Click this to restore your previously saved settings. | |
| Cancel Click this to return to the previous screen without saving. | |
17.7.3 Configuring the P2P Download Settings
Click Applications > Download Service > Preferences > P2P download to open the following screen. Use this screen to configure P2P download settings.
Figure 126 Applications > Download Service > Preferences > P2P download
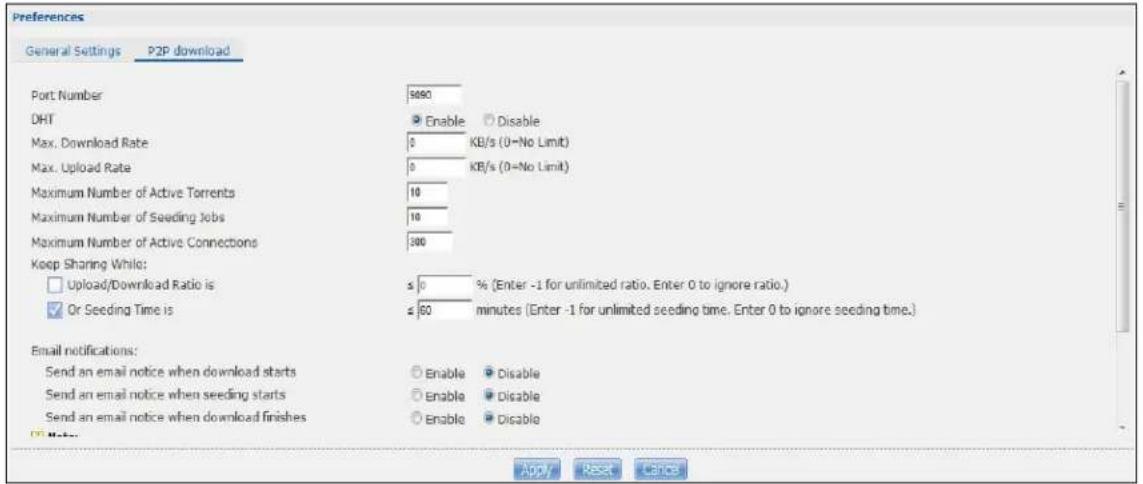
text_image
Preferences General Settings P2P download Port Number 5090 DHT Enable Disable Max. Download Rate 0 KB/s (0=No Limit) Max. Upload Rate 0 KB/s (0=No Limit) Maximum Number of Active Torrents 10 Maximum Number of Seeding Jobs 10 Maximum Number of Active Connections 300 Keep Sharing While: □ Upload/Download Ratio is ≤ 0 % (Enter -1 for unlimited ratio. Enter 0 to ignore ratio.) ✓ Or Seeding Time is ≤ 60 minutes (Enter -1 for unlimited seeding time. Enter 0 to ignore seeding time.) Email notifications: Send an email notice when download starts Enable Disable Send an email notice when seeding starts Enable Disable Send an email notice when download finishes Enable Disable Apply Reset CancelThe following table describes the labels in this screen.
Table 75 Applications > Download Service > Preferences > P2P download
| LABEL DESCRIPTION | |
| Port Number | Assign a port number for P2P downloads. You can select a number from 2 to 65536. It is recommended to use a port number greater than 1025. |
| DHT | Select Enable or Disable to use Distributed Hash Table (DHT) or not.Note: When you use DHT, the NAS will also attempt to open a UDP port one number smaller than the P2P download port number. So if the P2P download port number is 9090, the NAS uses UDP port 9089. |
| Max. download rate | You may need to limit the bandwidth the NAS uses for P2P downloads if your network's other Internet applications are not getting enough downstream bandwidth. 0 has the NAS impose no restriction. |
| Max. upload rate | may need to limit the bandwidth the NAS uses to share files through P2P download if your network's other Internet applications are not getting enough upstream bandwidth. 0 has the NAS impose no restriction.If you do not allow any uploads, (for example, you set a limit of 1 KB/s) you will not have a good standing in the P2P download community.Note: The settings for maximum download/upload rates would not affect peers accessing the NAS from the same LAN. |
| Maximum Number of Active Torrents | Specify how many simultaneous P2P downloads are allowed on the NAS. You can enter a number from 1 to 10. |
| Maximum Number of Seeding Jobs | Specify how many simultaneous seeds are allowed on the NAS. Enter a number from 1 to 10. This value cannot exceed the one you configured in the Maximum Number of Active Torrents field. |
| Maximum Number of Active Connections | Specify how many active connections are allowed on the NAS. Enter a number from 1 to 500. This specifies the number of computers that can connect to the NAS to download files being shared by the NAS. |
| Keep Sharing While | With P2P download, the NAS starts sharing a file while you are downloading it. Set how long to continue sharing a file after the NAS finishes the download.SelectUpload/Download Ratioto keep sharing a file until the NAS has uploaded a specific percent compared to the download.SelectSeeding Timeto keep sharing a file for a specific number of minutes after the download finishes.Continuing to share a file helps other P2P download users finish downloading it. Sharing out at least as much as you download helps keep you in good standing in the P2P download community.Enter -1 to share a file indefinitely. Leave both check boxes blank to have the NAS stop sharing the file as soon as the download finishes.If you select both options, the NAS keeps sharing a file until both conditions exceed the values you configure. For example, you entered 150% in theUpload/Download Ratiofield and 120 minutes in theSeeding Timefield. The NAS keeps sharing a file until it has shared 1.5 times the size of the file and has passed 120 minutes. |
| Email notifications | Select whether or not to send emails to the email address configured for emailing log reports (seeSection 26.4.2 on page 308) when the NAS starts downloading the file, seeding the file, and/or finishes downloading the file. |
| Edit IP Filter Click this | to enable or disable IP filtering for P2P downloads.Refer toSection 17.7.4 on page 227for information about the fields in this screen. |
| Apply Click this to save your changes. | |
| Reset Click this to restore your previously saved settings. | |
| Cancel | Click this to return to the previous screen without saving. |
17.7.4 Edit IP Filter
Use this screen to enable or disable IP filtering for P2P downloads. IP filtering blocks IP addresses known to share fake files. You can either get an IP filter table from a website or use your own table.
Click Edit IP Filter in the Applications > Download Service > Preferences > P2P download screen.
Figure 127 Applications > Download Service > Preferences > P2P download > Edit IP Filter
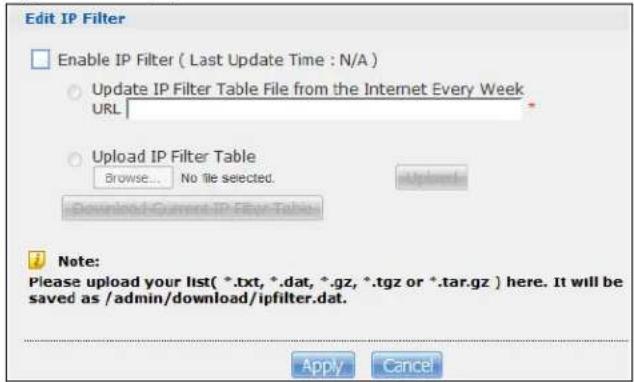
text_image
Edit IP Filter Enable IP Filter ( Last Update Time : N/A ) Update IP Filter Table File from the Internet Every Week URL Upload IP Filter Table Browse... No file selected. Download Current IP Filter Table Note: Please upload your list( *.txt, *.dat, *.gz, *.tgz or *.tar.gz ) here. It will be saved as /admin/download/ipfilter.dat. Apply CancelThe following table describes the labels in this screen.
Table 76 Applications > Download Service > Preferences > P2P download > Edit IP Filter
| LABEL DESCRIPTION | |
| Enable IP Filter | Click this to enable or disable IP filtering for P2P downloads. |
| Update IP Filter Table File from the Internet Every Week | Select this option and enter a URL to use an online IP filter table. You can find an online IP filter table in websites such as http://www.bluetack.co.uk/config/level1.gz.When you change the URL of the online IP filter table, the NAS also performs an update after you clickApply. |
| Upload IP Filter Table | Select this option to upload your own IP filter table. Use theBrowsebutton to locate the file and clickUploadto save it on the NAS.The NAS supports .txt, .dat, .gz, .tgz, and .tar.gz file extensions. The NAS saves the IP filter table as /admin/ download/ ipfilter.dat. |
| Download Current IP Filter Table | Click this to save a copy of the IP filter table on your computer. |
| Apply | ClickApplyto update the IP filter table from the specified URL. |
| Cancel | Click this to return to the previous screen without saving. |
17.7.5 Selecting Files to Download
Select an item in the Applications > Download Service screen's list and click Select Files to open the following screen. Use this screen to select which of the torrent's files to download. Section 14.7 on page 162 provides a tutorial on adding a download task.
Figure 128 Applications > Download Service > Select Files
| ✓ | File Name | Size |
| ✓ | Cowboys and Aliens (2011) DVDRip XviD-MAXSPEED/Cowboys and Aliens (2011) DVDRip XviD-MAXSPEED www.torentz.3xforum.ro.avi | 1.15 GB |
| ✓ | Cowboys and Aliens (2011) DVDRip XviD-MAXSPEED/sample.avi | 9.23 MB |
| ✓ | Cowboys and Aliens (2011) DVDRip XviD-MAXSPEED/screencaps.jpeg | 534.67 KB |
| ✓ | Cowboys and Aliens (2011) DVDRip XviD-MAXSPEED/Cowboys and Aliens (2011) DVDRip XviD-MAXSPEED.info | 2.75 KB |
| ✓ | Cowboys and Aliens (2011) DVDRip XviD-MAXSPEED/Torrent downloaded from Demonoid.me.txt | 46.00 Bytes |
| ✓ | Cowboys and Aliens (2011) DVDRip XviD-MAXSPEED/Torrent downloaded from Extratorrent.com.txt | 40.00 Bytes |
| ✓ | Cowboys and Aliens (2011) DVDRip XviD-MAXSPEED/Torrent downloaded from Rarbg.com.txt | 33.00 Bytes |
| ✓ | Cowboys and Aliens (2011) DVDRip XviD-MAXSPEED/Torrent downloaded from h33t.com.txt | 32.00 Bytes |
The following table describes the labels in this screen.
Table 77 Applications > Download Service > Select Files
| LABEL DESCRIPTION | |
| Select Files | |
| File Name | This is the name of a file specified in the torrent file. Select the check boxes of the files you want to download. |
| Size This is the size of the file to be downloaded. | |
| Apply Click this to save your changes. | |
| Cancel Click this to return to the previous screen without saving. | |
17.7.6 Displaying the Task Information
Select an item on the list and click Task Info. Use this screen to check detailed information about the task.
Figure 129 Applications > Download Service > Task Info
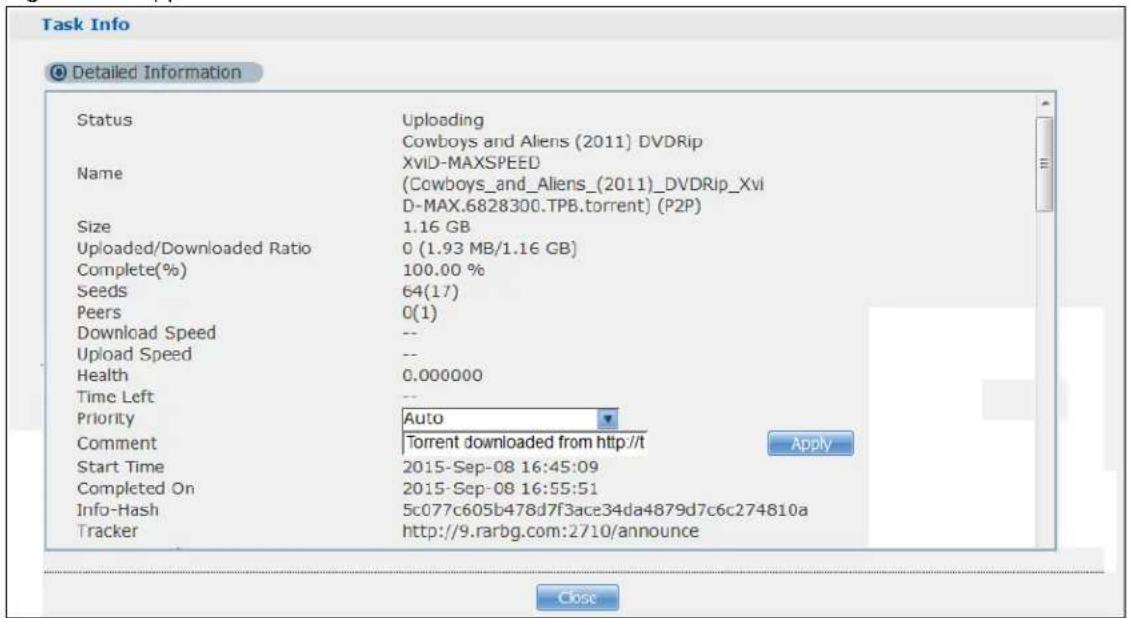
text_image
Task Info Detailed Information Status Uploading Cowboys and Aliens (2011) DVDRip XviD-MAXSPEED (Cowboys_and_Aliens_(2011)_DVDRip_Xvi D-MAX.6828300.TPB.torrent) (P2P) Name Size 1.16 GB Uploaded/Downloaded Ratio 0 (1.93 MB/1.16 GB) Complete(%) 100.00 % Seeds 64(17) Peers 0(1) Download Speed -- Upload Speed -- Health 0.000000 Time Left -- Priority Auto Comment Torrent downloaded from http://t Start Time 2015-Sep-08 16:45:09 Completed On 2015-Sep-08 16:55:51 Info-Hash 5c077c605b478d7f3ace34da4879d7c6c274810a Tracker http://9.rarbg.com:2710/announce CloseThe following table describes the labels in this screen.
Table 78 Applications > Download Service > Task Info
| LABEL DESCRIPTION | |
| Status This is the current status of the task. | |
| Name This is the name of the task. | |
| Size This is the size of the file to be downloaded. | |
| Uploaded/Downloaded Ratio | This is the ratio of total uploaded data to downloaded data. |
| Complete(%) This field displays how much has been downloaded to the NAS. | |
| Seeds This is the number of computers that are sharing the complete file that you are downloading. | |
| Peers | This is the number of other computers that are also downloading (and sharing) the file you are downloading. |
| Download Speed This field displays how fast the NAS downloads the file. | |
| Upload Speed This field displays how fast the NAS uploads the file. | |
| Health This field displays how many full copies of the file are available for this task. The NAS can download a file with a higher health value more efficiently. If the health value is less than 1 (0.65 for example), there is no full copy of the file, and the NAS may not be able to complete downloading the file. | |
| Time Left This is the time remaining to complete the task. | |
| Priority Use this field to set the priority for downloading the task.Select Auto to have the NAS automatically determine the task's priority.Select High to have the NAS download this file before the other files. | |
| Comment | Enter a description for this task. Click Apply to save the description. |
| Start Time This field displays when the NAS started to download files. | |
| Completed on | This field displays when the file was successfully downloaded to the NAS. |
| Info-Hash This information is used to verify the torrent file. | |
| Tracker | This field displays the tracker that NAS is currently connected to. A tracker is a server used for finding peers sharing the file. |
| Close Click this to close the screen. | |
17.8 Web Publishing Screen
Use this screen to turn web publishing on or off and select shares to publish. Click Applications > Web Publishing to open the following screen.
Figure 130 Applications > Web Publishing
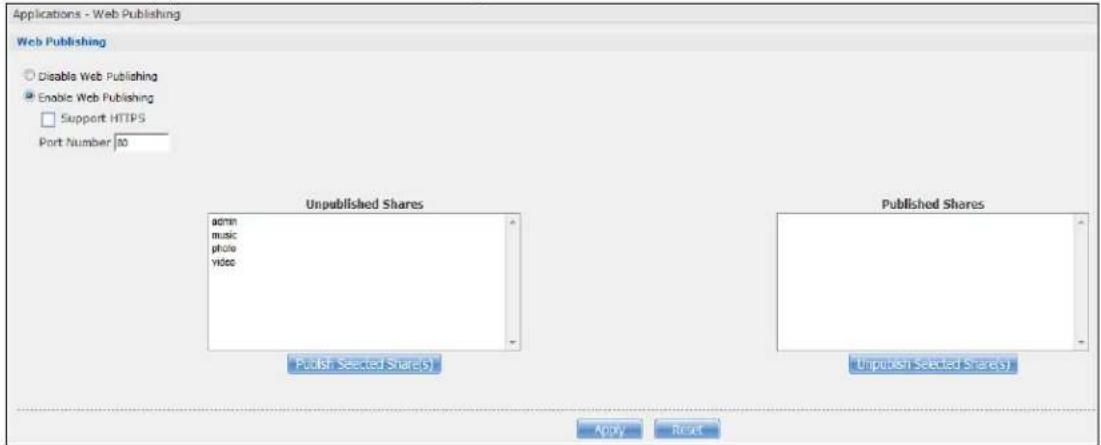
text_image
Applications - Web Publishing Web Publishing Disable Web Publishing Enable Web Publishing Support HTTPS Port Number: 50 Unpublished Shares admin music photo video Published Selected Share(s) Published Shares Unpublished Selected Share(s) ADDY ROUTThe following table describes the labels in this screen.
Table 79 Applications > Web Publishing
| LABEL DESCRIPTION | |
| Web Publishing | |
| Disable / Enable Web Publishing | Turn on web publishing to let people access files in the published shares using a web browser, without having to log into the Web Configurator. |
| Support HTTPS | Select this to allow users to use web browser security for connections to the web-published shares. In order to use secured connections users must use "https://" in the NAS's web address and install the NAS's public key certificate. |
| Port Number | Specify a port number for accessing the published share websites hosted on the NAS. If you enter a number other than 80, make sure you include it when telling others how to access the web-published share. For example, say you specified port 8080, the NAS's IP address is 192.168.1.23, and the name of the web-published share is FamilyPhotos. You would have to enter "http://192.168.1.23:8080/MyWeb/FamilyPhotos/" in your browser's address bar to access the share's web page. |
| Unpublished Shares | This list box displays the shares that the NAS does not publish for web browser access. |
| Publish Selected Share(s) | Select shares in the Unpublished Shares box and click this to let people access files in the published shares using a web browser, without logging into the Web Configurator. Use the [SHIFT] key to select a range of entries. Hold down the [CTRL] key to select multiple individual entries. |
| Published Shares | This list box displays the shares people can access using a web browser, without logging into the Web Configurator. |
| Unpublish Selected Share(s) | Select shares in the Published Shares box and click this to not let people access using a web browser without logging into the Web Configurator. Use the [SHIFT] key to select a range of entries. Hold down the [CTRL] key to select multiple individual entries. |
| Apply Click this to save your changes. | |
| Reset | Click this to restore your previously saved settings. |
Note: If you installed php-MySQL-phpMyAdmin through the Package Management screen (Section 18.6 on page 251) and enable it, you can use PHP and MySQL in your published web page.
17.9 Print Server Screen
Use the Print Server screen to view and manage the NAS's list of printers and print jobs.
Click Applications > Print Server to open the following screen.
Figure 131 Applications > Print Server

text_image
Applications - Print Server Print Server Refresh Status Name Actions on-line Canon_PRT_1 8 8 8 8 8 8The following table describes the labels in this screen.
Table 80 Applications > Print Server
| LABEL DESCRIPTION | |
| Refresh Click | this to update the list of printers and print jobs. |
| The table lists printers and their queued print jobs. Click a column's heading to sort the entries by that criteria. | |
| Status | This fields shows whether the printer is connected and turned on (on-line) or not (off-line). |
| Name | This identifies the printer. Each printer connected to the NAS must use a unique name. |
| Actions | Rename: Click this to change the name the NAS uses for the printer.Cancel Job: Click this to remove all print jobs from the NAS queue for a particular printer. However, since the NAS sends print jobs to the printer as soon as it can, this button may only have an effect if there are very large or many print jobs in the queue. To stop a print job that has already started, you may have to turn off the printer.Delete: Click this to remove a printer from the NAS's printer list. To add the printer back into the list, disconnect the printer from the NAS's USB port and reconnect it. If that does not work, disconnect the USB port and turn off the printer's power. Then reconnect the printer and turn it back on. |
17.9.1 Print Server Rename
Click Applications > Print Server and a printer's Rename icon to open the following screen. Use this screen to change the name the NAS uses for the printer.
Figure 132 Applications > Print Server > Rename
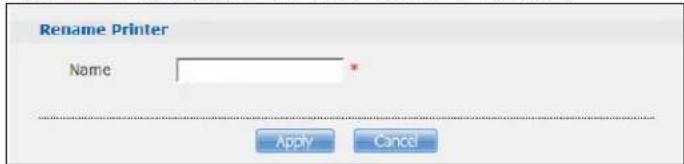
text_image
Rename Printer Name Apply CancelThe following table describes the labels in this screen.
Table 81 Applications > Print Server > Rename
| LABEL DESCRIPTION | |
| Name | Type a new name to identify the printer. The name must be unique from all the other names of printers connected to the NAS. |
| Apply Click | this to save your changes. |
| Cancel | Click this to return to the previous screen without saving. |
17.10 Copy/Sync Button Screen
The Copy/ Sync button on the front panel allows you to copy or synchronize files between a connected USB or SD device and the NAS.
Click Applications > Copy/ Sync Button to open the following screen.
Figure 133 Applications > Copy/Sync Button
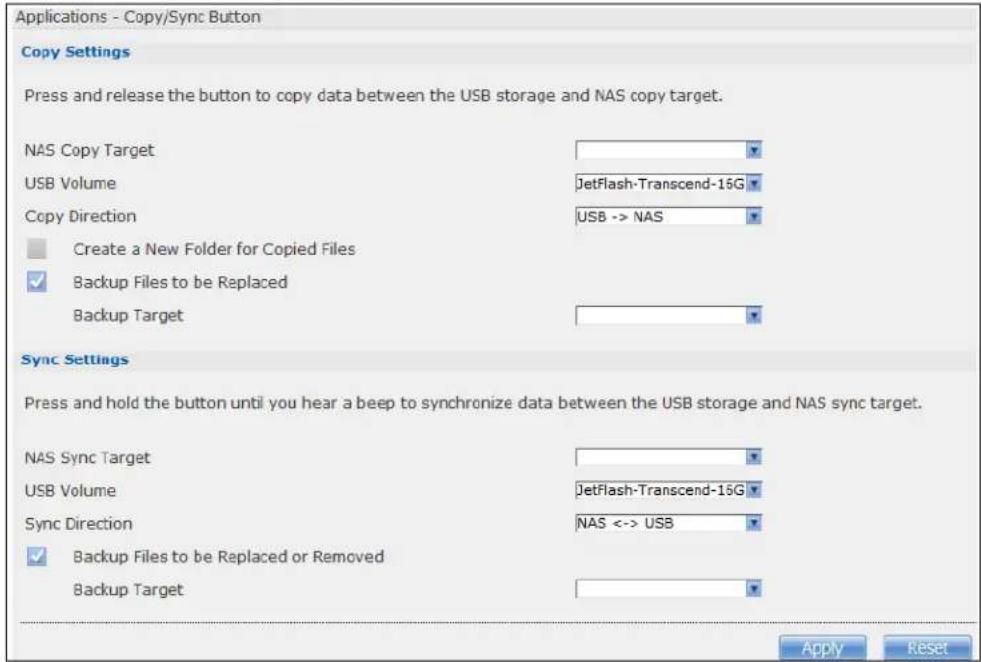
text_image
Applications - Copy/Sync Button Copy Settings Press and release the button to copy data between the USB storage and NAS copy target. NAS Copy Target USB Volume JetFlash-Transcend-15G Copy Direction USB -> NAS Create a New Folder for Copied Files Backup Files to be Replaced Backup Target Sync Settings Press and hold the button until you hear a beep to synchronize data between the USB storage and NAS sync target. NAS Sync Target USB Volume JetFlash-Transcend-15G Sync Direction NAS <-> USB Backup Files to be Replaced or Removed Backup Target Apply ResetThe following table describes the labels in this screen.
Table 82 Applications > Copy/Sync Button
| LABEL DESCRIPTION | |
| Copy Settings | |
| NAS Copy Target Select the NAS share to use with the copy function. | |
| USB Volume | If your USB or SD device has multiple partitions, select which partition to use with the copy function. |
| Copy Direction | Select USB -> NAS to copy files from your USB or SD device to the NAS.Select NAS -> USB to copy files from the NAS to your USB or SD device. |
| Create a New Folder for Copied Files | Select this option to place the copied files in a new folder.The name of the folder created for the copied files consists of the date and time of the copy in year_month_day_hour_minute_second format. |
| Backup Files to be Replaced | This option is only available if you do not select Create a New Folder for Copied Files. Select this option to save the files that will be replaced by the source files. |
| Backup Target Select a share in which to save the backup files.Note: The NAS will not create a new folder to store the backup files. It is recommended to create a specific share (such as “backup”) for backup purposes. | |
| Sync Settings | |
| NAS Sync Target Select the NAS share to use with the synchronization function. | |
| USB Volume | If your USB device has multiple partitions, select which partition to use with the synchronization function. |
| Sync Direction | Select USB -> NAS to synchronize files from your USB or SD device to the NAS.Select NAS -> USB to synchronize files from the NAS to your USB or SD device.Select NAS < -> USB to synchronize files in both directions simultaneously. |
| Backup Files to be Replaced or Removed | Select this option to save the files that will be replaced by the source files. |
| Backup Target Select a share in which to save the backup files.Note: The NAS will not create a new folder to store the backup files. It is recommended to create a specific share (such as “backup”) for backup purposes. | |
| Apply Click this to save your changes.The configuration file is saved on the USB device. | |
| Reset | Click this to restore your previously saved settings. |
17.11 Technical Reference
This section provides technical background information on the topics discussed in this chapter.
17.11.1 Sharing Media Files on Your Network
The media server feature lets anyone on your network play video, music, and photos from the NAS (without having to copy them to another computer). The NAS can function as a DLNA-compliant media server and/or an iTunes server. The NAS streams files to DLNA-compliant media clients or computers using iTunes. The Digital Living Network Alliance (DLNA) is a group of personal computer and electronics companies that works to make products compatible in a home network.
- Publish shares to let others play the contained media files.
- The media server is a convenient way to share files you download.
- Hardware-based media players can also play the files. See page 354 for the supported multimedia file formats.
Note: Anyone on your network can play the media files in the published shares. No user name and password or other form of security is used. The media server is enabled by default with the video, photo, and music shares published.
Songs from the iTunes Store
After using iTunes on your computer to download songs from Apple's iTunes Store, you can copy them to the NAS. Many of these songs have DRM (Digital Rights Management). At the time of writing, you can use your Apple account ID and password to authorize up to a total of five computers to play the files. To authorize a computer, open iTunes and click Store > Authorize Computer.
A link for the NAS in iTunes under SHARED. Click it to display the NAS's published media files as shown next.
Figure 134 NAS link in iTunes
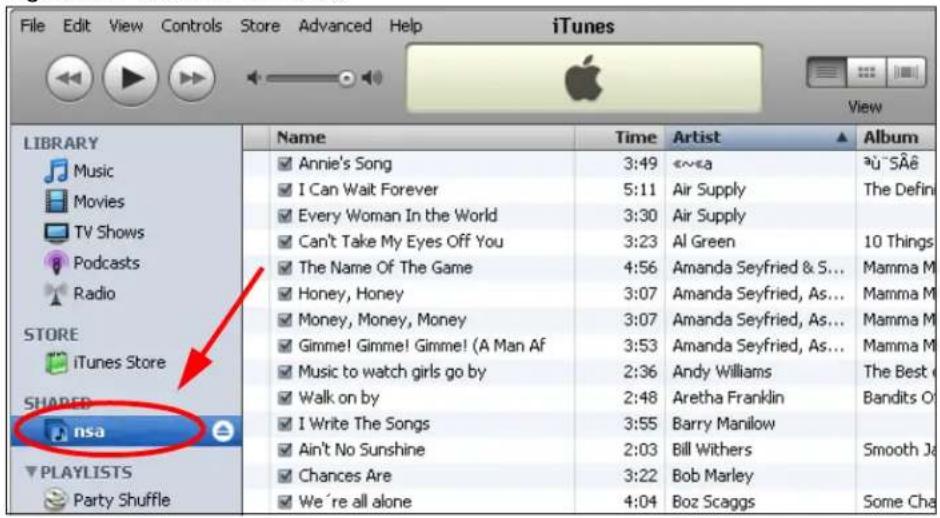
text_image
File Edit View Controls Store Advanced Help iTunes View LIBRARY Music Movies TV Shows Podcasts Radio STORE iTunes Store SHARED nsa PLAYLISTS Party Shuffle Name Time Artist Album Annie's Song 3:49 «»a äü "SÄê I Can Wait Forever 5:11 Air Supply The Defin Every Woman In the World 3:30 Air Supply Can't Take My Eyes Off You 3:23 Al Green 10 Things The Name Of The Game 4:56 Amanda Seyfried & S... Mamma M Honey, Honey 3:07 Amanda Seyfried, As... Mamma M Money, Money, Money 3:07 Amanda Seyfried, As... Mamma M Gimme! Gimme! Gimme! (A Man Af 3:53 Amanda Seyfried, As... Mamma M Music to watch girls go by 2:36 Andy Williams The Best ( Walk on by 2:48 Aretha Franklin Bandits O I Write The Songs 3:55 Barry Manilow Ain't No Sunshine 2:03 Bill Withers Smooth Ja Chances Are 3:22 Bob Marley We're all alone 4:04 Boz Scaggs Some Cha17.11.2 Download Service
The NAS's download service downloads files from the Internet directly to the NAS. You do not have to download to your computer and then copy to the NAS. This can free up your computer's system resources.
The NAS can download using these protocols.
- HTTP: The standard protocol for web pages.
- FTP: A standard Internet file transfer service.
- P2P download: Peer-to-peer files sharing protocol.
Note: Do not use the NAS for illegal purposes. Illegal downloading or sharing of files can result in severe civil and criminal penalties. You are subject to the restrictions of copyright laws and any other applicable laws and will bear the consequences of any infringements thereof. ZyXEL bears NO responsibility or liability for your use of the download service feature.
Torrent Files
The NAS needs a “.torrent” file for P2P download to download a file. The torrent file gives the NAS information about the file to be downloaded (and shared) and the tracker(s) (computers) that coordinates the distribution of the file.
When you add a P2P download task in the NAS's web configurator screens, you can copy and paste the URL of the torrent file. The NAS automatically downloads the torrent file and saves it in a torrent folder within the folder where the NAS stores downloaded files (the admin share's download folder by default).
If you already have the torrent file saved on your computer, you can just specify its location when adding a download task through the web configurator. Another method is to use FTP or a CIFS program (Windows Explorer for example) to copy the torrent file into the torrent folder. The NAS automatically uses the torrent file.
After your P2P download and sharing are finished, you can go to the incoming folder within the destination share or folder and delete the .torrent file if you need to free up hard disk space.
17.11.3 Download Service Notification
Use the download service notification to keep track of downloaded files on the NAS. You can subscribe to the NAS's download list on your computer. When the NAS finishes downloading new files, your RSS reader displays the information and links for the files. You can also download the files from the RSS reader to your computer.
See Section 14.7.3 on page 168 for a tutorial about using the download service notification.
In the Download Service screen, select Enable Download Notify and click Apply. An RSS feed icon appears. Click the icon to subscribe to the NAS's download list.
Note: The download service notification only keeps track of files downloaded via P2P download.
Figure 135 Download Service Notification
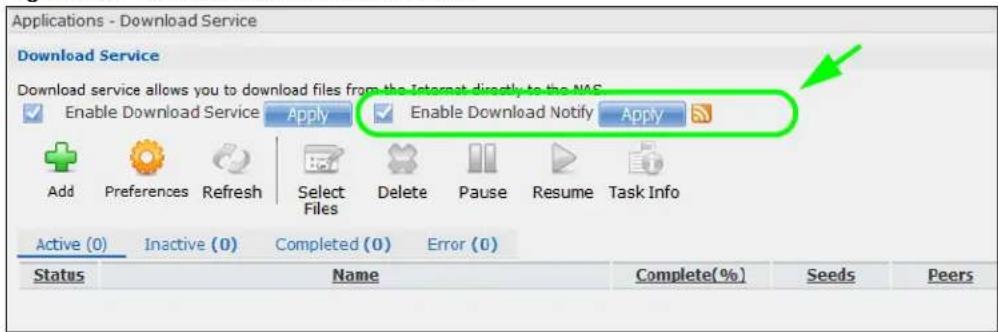
text_image
Applications - Download Service Download Service Download service allows you to download files from the Internet directly to the NAS Enable Download Service Apply Enable Download Notify Apply Add Preferences Refresh Select Files Delete Pause Resume Task Info Active (0) Inactive (0) Completed (0) Error (0) Status Name Complete(%) Seeds Peers17.11.4 P2P Download Security
When you download using P2P, you reveal your IP address. This increases the risk of hacking attacks, which can be protected against by a good firewall.
Use a Hardware-based Firewall
Place a hardware-based firewall between your network and the Internet (a software-based firewall on your computer would just protect the computer itself, not the NAS since your computer is not between your NAS and the Internet).
Figure 136 Firewall
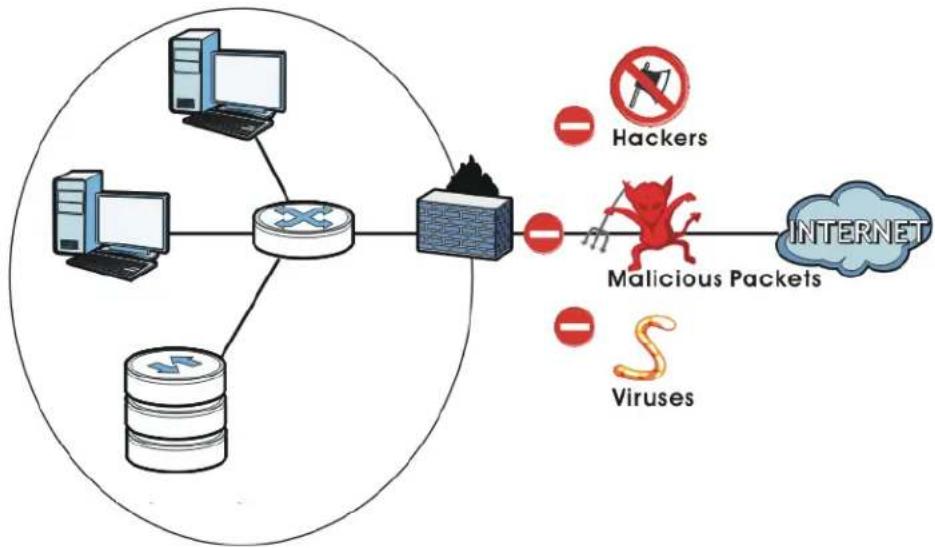
flowchart
graph LR
    A["Router"] --> B["Switch"]
    B --> C["Cloud"]
    D["Hackers"] --> E["Malicious Packets"]
    F["Viruses"] --> E
    E --> G["INTERNET"]
Ideally your firewall should have the following:
- Stateful packet inspection to control access between the Internet and your network and protect your NAS (and computers) from hacking attacks.
- IDP (Intrusion Detection and Prevention) to detect malicious packets within normal network traffic and take immediate action against them.
- Anti-virus to check files you download for computer viruses.
P2P Download and Your Firewall
The anti-virus feature on a firewall probably cannot check P2P downloads for viruses, so use anti-virus software on your computer to scan the NAS for viruses.
When you download using P2P download, many other P2P download users are also trying to download the file from you. The firewall slows this down because by default, it only allows traffic from the Internet in response to a request that originated on the LAN (it lets you get files from the Internet and blocks those on the Internet from getting files from you).
Figure 137 Firewall Blocking Incoming P2P Download Requests
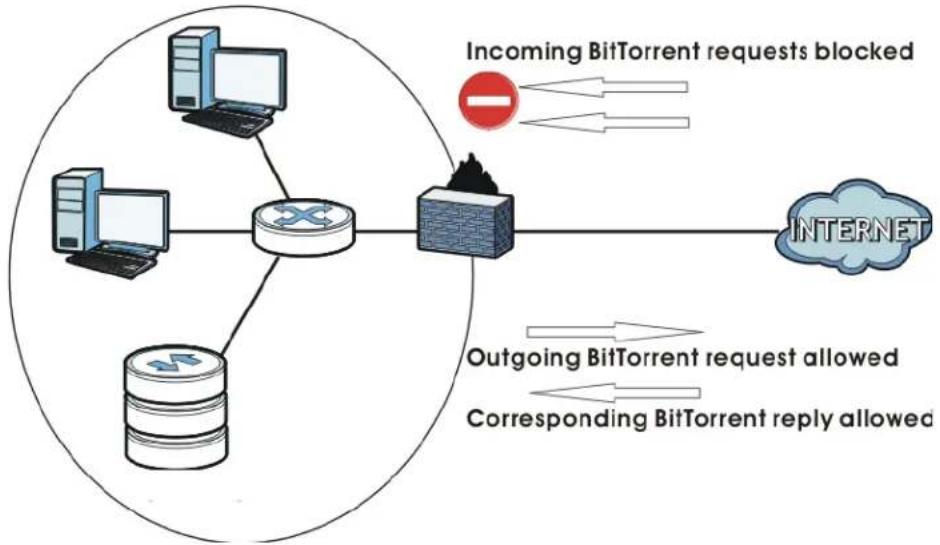
flowchart
graph TD
    A["Incoming BitTorrent requests blocked"] --> B["Router"]
    C["Outgoing BitTorrent request allowed"] --> B
    D["Corresponding BitTorrent reply allowed"] --> B
    B --> E["INTERNET"]
    style A fill:#f9f,stroke:#333
    style C fill:#f9f,stroke:#333
    style D fill:#f9f,stroke:#333
    style E fill:#ccf,stroke:#333
To speed up P2P download file transfers, configure your firewall's port forwarding to send incoming TCP port 9090 and UDP port 9089 connections to the NAS. You probably need to use your firewall's HTML (web-based) configuration interface to set this up (see the firewall's manual for details). You may also have to configure a corresponding firewall rule.
Figure 138 Firewall Configured to Allow Incoming P2P Download Requests
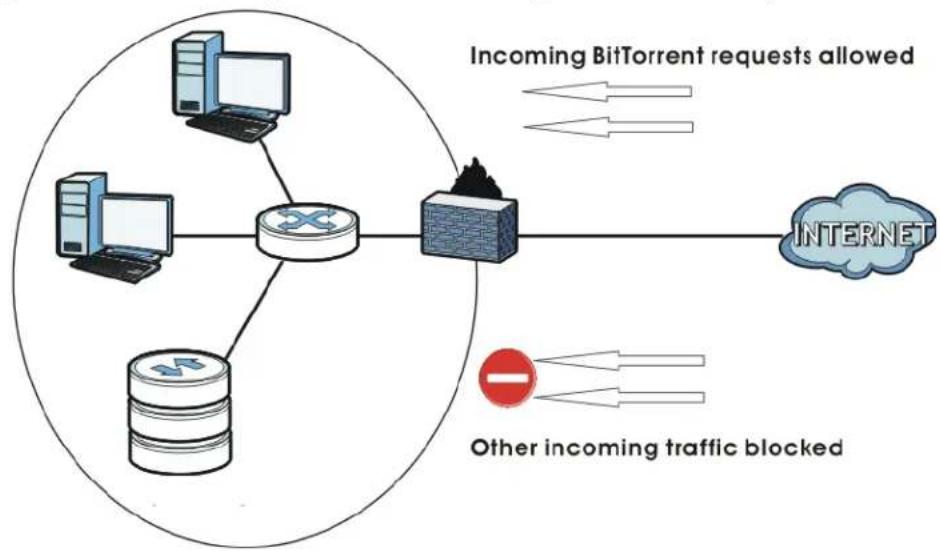
flowchart
graph TD
    A["Incoming BitTorrent requests allowed"] --> B["Internet"]
    C["Other incoming traffic blocked"] --> D["Router"]
    E["Computer"] --> F["Switch"]
    G["Server"] --> F
    F --> H["Cloud"]
    style A fill:#f9f,stroke:#333
    style B fill:#ccf,stroke:#333
    style C fill:#cfc,stroke:#333
    style D fill:#fcc,stroke:#333
    style E fill:#cff,stroke:#333
    style F fill:#ffc,stroke:#333
    style G fill:#fcc,stroke:#333
    style H fill:#fff,stroke:#333
17.11.5 Web Publishing Example
This example covers how to configure the Web Publishing screen to let people use a web browser to access a share named FamilyPhotos without logging into the Web Configurator and shows how to access the share through the Internet.
1 Click Applications > Web Publishing and configure the screen as shown (enable the web publishing and move FamilyPhotos over to Published Shares) and click Apply.
Figure 139 Applications > Web Publishing (Example)
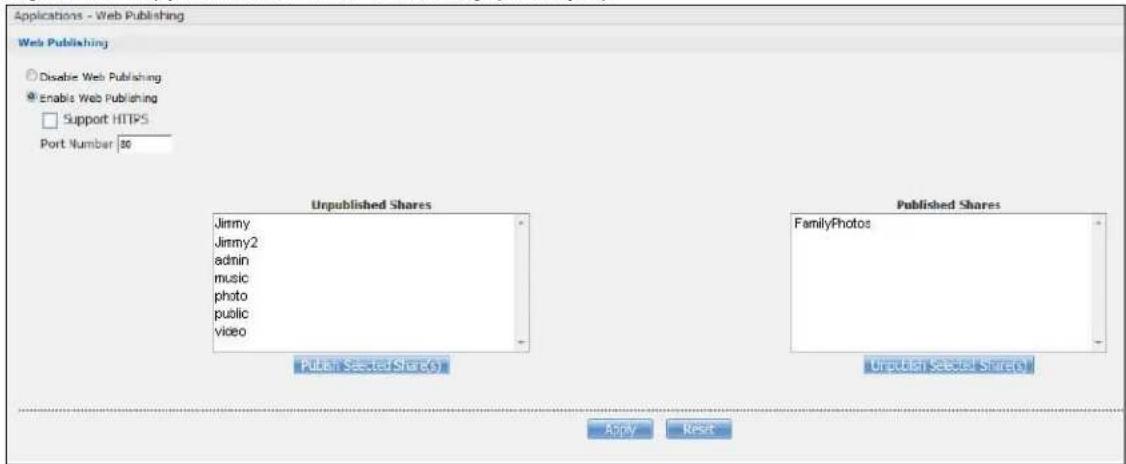
text_image
Applications - Web Publishing Web Publishing Disable Web Publishing Enable Web Publishing Support HTTPS Port Number: 30 Unpublished Shares Jimmy Jimmy2 admin music photo public video Published Shares FamilyPhotos Publish Selected Share(s) Unpublished Selected Share(s) Apply Reset2 Now open your web browser and type in the address of the NAS's FamilyPhotos web page. In this example, the NAS's IP address is 192.168.1.33, and the name of the web-published share is FamilyPhotos. So you would enter "http://192.168.1.33/MyWeb/FamilyPhotos/" in your browser's address bar. Then press [ENTER] or click Go. A screen displays listing the share's files.
Figure 140 Browsing to an NAS Share Example
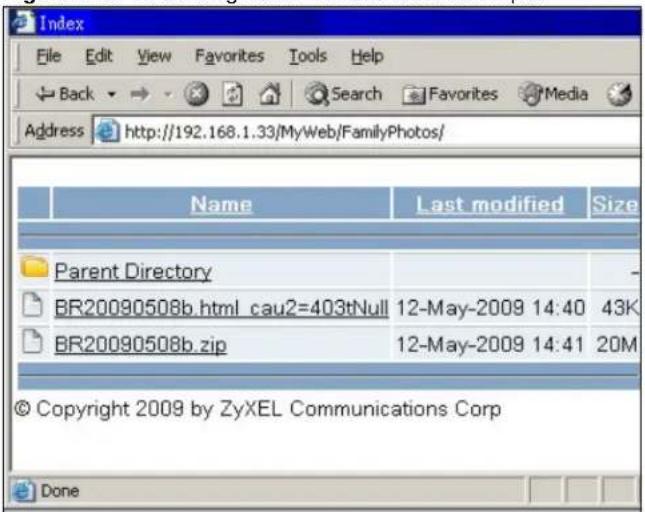
text_image
Index File Edit View Favorites Tools Help Back Search Favorites Media Address http://192.168.1.33/MyWeb/FamilyPhotos/ Name Last modified Size Parent Directory BR20090508b.html cau2=403tNull 12-May-2009 14:40 43K BR20090508b.zip 12-May-2009 14:41 20M © Copyright 2009 by ZyXEL Communications Corp Done- Click a file's link to open the file.
- Right-click a file's link and select Save Target As.. (in Internet Explorer) to save a copy of the file.
- Click a label in the heading row to sort the files by that criteria.
- To customize how the page looks and works, create an index.html or index.htm file and store it in the share.
17.11.6 Web Publishing
Web publishing lets you "publish" shares (containing folders and files) on the NAS so people can access the files using a web browser without having to log into the Web Configurator. This way you can share files with others without them having to know and enter a user name and password.
For example, if you want to share photos in a FamilyPhotos share, you could "web publish" it and others could use a web browser to access the photos at http://my-NAS's-IP-Address/MyWeb/FamilyPhotos.
Note: The NAS does not use any security for the files in the published folders. It is not recommended to publish shares if you do not have the NAS behind a good hardware-based firewall. See page 236 for more on firewalls.
Additionally, you can use HTML editing software (not included) to create an index.html or index.htm file to define and customize how your website works and looks.
Accessing Web-published Shares from the Internet
You need to use a public address to access the NAS's web-published shares from the Internet. If your NAS uses a private IP address, you may need to use the public IP address of your Internet gateway and configure NAT or port forwarding on your Internet gateway and possibly firewall rules in order to let people access the NAS's web-published shares from the Internet.
Web Publishing Port Number
If the web-published shares use a port number other than 80 (the normal port for web traffic), users must include it after the NAS's IP address in order to access the NAS's web-published shares. For example, say you specified port 8080, the NAS's IP address is 192.168.1.23, and the name of the web-published share is FamilyPhotos. You would have to enter "http://192.168.1.23:8080/MyWeb/FamilyPhotos/" in your browser's address bar to access the share's web page.
The NAS's web configurator uses port 80. To make the web configurator more secure, you can have the web-published shares use another port number. Then you can configure one set of firewall rules and NAT or port forwarding settings on your Internet gateway specifically for allowing access to the web-published shares and another separate set of rules for accessing the NAS's web configurator.
17.11.7 Printer Sharing
The NAS can act as a print server. A print server lets multiple computers share a printer. Connect a printer to the NAS's USB port to let multiple computers on your network use it. See www.zyxel.com for a list of compatible printers.
Figure 141 Printer Sharing

You can copy files from a USB device to the NAS or from the NAS to a USB device. Simply press and release the COPY/SYNC button to start copying files. See Section 17.10 on page 232 for details about configuring the copy settings.
The following figure illustrates how copying files works when you copy files from a USB device to the NAS. The same concept applies when you copy files from the NAS to a USB device.
Figure 142 Copying Files Example
Before Copy

flowchart
graph LR
    A["USB"] --> B["After Copy"]
    C["NAS"] --> D["After Copy"]
    E["USB"] --> F["After Copy"]
    G["NAS"] --> H["After Copy"]
Both storage devices contain file A.
- A copy of files A and B from the USB device is transferred to the NAS.
- File A from the USB device replaces file A on the NAS.
17.11.9 Synchronizing Files
Synchronization makes the contents on the target device identical to the ones on the source device. You can synchronize files from a USB device to the NAS or from the NAS to a USB device. In addition, you may also synchronize files in both directions simultaneously.
Press and hold the COPY/ SYNC button until you hear a beep to synchronize files. See Section 17.10 on page 232 for details about configuring the synchronization settings.
USB -> NAS or USB <- NAS
When you synchronize files in one direction, contents on the source device replace the files on the target device.
The following figure illustrates how synchronization works when you synchronize files from a USB device to the NAS. The same concept applies when you synchronize files from the NAS to a USB device.
Figure 143 Synchronizing Files Example 1
Before Sync
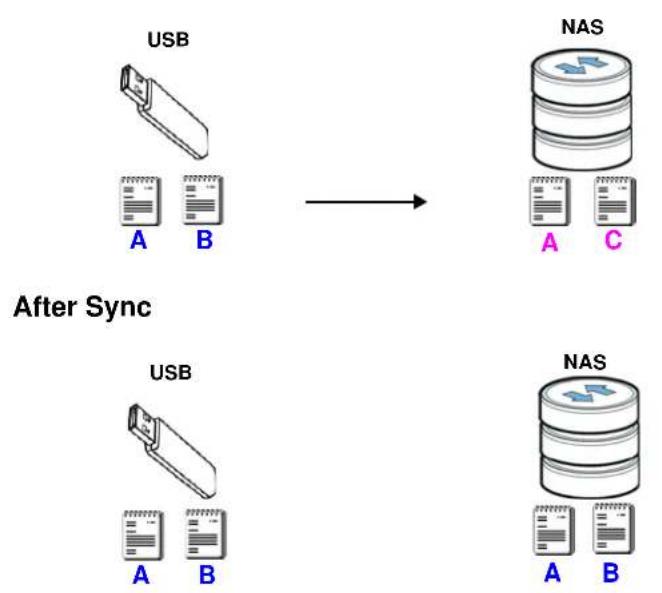
Both storage devices contain A.
- A copy of files A and B from the USB device is transferred to the NAS.
- File A from the USB device replaces file A on the NAS.
- File C on the NAS is deleted.
USB <-> NAS
When you synchronize files in both directions simultaneously, both storage devices transfer unique files to one another. Files with the same file name are synchronized according to their modification date/time. The difference in modification time between the two files has to be greater than five minutes. More recently modified files overwrite the older ones during synchronization.
The following figure illustrates how synchronization works when you synchronize files in both directions simultaneously.
Figure 144 Synchronizing Files Example 2
Before Sync

flowchart
graph LR
    USB["USB"] -->|new| NAS["NAS"]
    style USB fill:#f9f,stroke:#333
    style NAS fill:#bbf,stroke:#333
After Sync

text_image
USB A B (new) (new) C D NAS A B (new) (new) C DA on the USB device and B on the NAS are modified more recently.
- File A from the USB device replaces file A on the NAS.
- File B from the NAS replaces file B on the USB device.
- A copy of file C from the USB device is transferred to the NAS.
• A copy of file D from the NAS is transferred to the USB device.
17.12 Syslog Server Screen
Use this screen to configure the NAS to accept syslog logs from syslog clients such as ZyXEL's G-4100 v2.
Note: You may need to configure any firewalls between the NAS and the syslog clients in order to let the syslog traffic go to the NAS.
Click Applications > Syslog Server to open the following screen.
Figure 145 Applications > Syslog Server
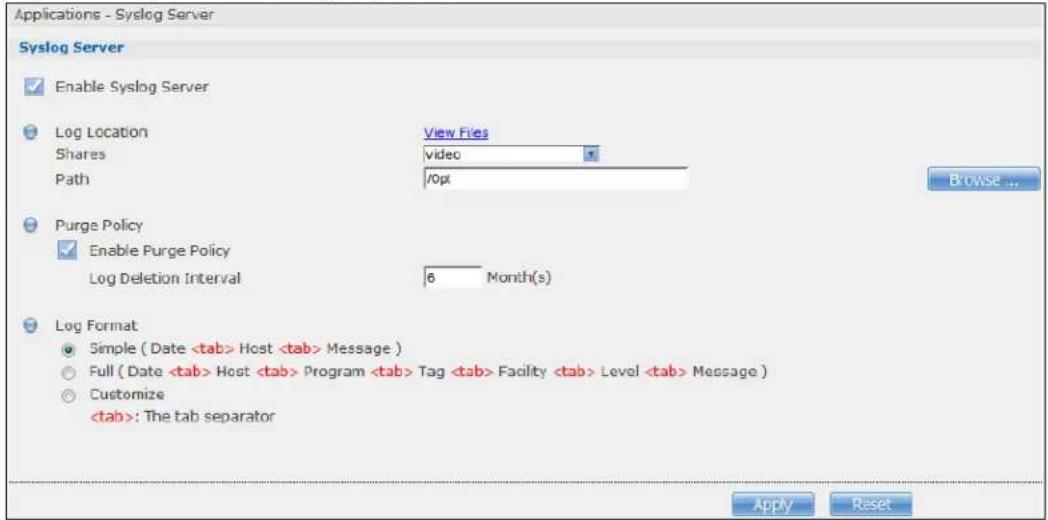
text_image
Applications - Syslog Server Syslog Server Enable Syslog Server Log Location View Files Shares video Path /opt Purge Policy Enable Purge Policy Log Deletion Interval 6 Month(s) Log Format Simple ( DateThe following table describes the labels in this screen.
Table 83 Applications > Syslog Server
| LABEL DESCRIPTION | |
| Enable Syslog Server | Select this to have the NAS accept syslog logs from syslog clients. Clear it to stop the NAS from accepting syslog logs from syslog clients. |
| Log Location | ClickView Filesto browse to where you want to store the syslog logs on the NAS. |
| Shares Select the share in which to store the syslog logs. | |
Path Use this if you want to further specify a folder within the share. This field displays the share folder's path. Type the location of the folder using forward slashes as branch separators or useBrowseto find or create a folder on the NAS. After you clickApplyin theSyslog Serverscreen the NAS creates a folder for the current month's logs. The folder's name uses the year and month in YYYYMM format. After you clickApplyin theSyslog Serverscreen the NAS creates a folder for the current month's logs. The folder's name uses the year and month in YYYYMM format. | |
| Purge Policy | SelectEnable Purge Policyand set a number of months in theLog Deletion Intervalfield that displays to have the NAS delete the syslog messages after keeping them for the specified period of time.Regardless of how you set the purge policy, to save hard disk space the NAS archives the syslog logs in a .tgz file on the second day of each month and deletes the original folder and syslog files. The NAS creates a new folder for the syslog logs it receives after that. You can use a zip program such as 7-zipto open the archives. |
| Log Format Select the | format you want to use for recording the received logs. |
| The Example item below the drop-down list boxes displays how the selected custom format looks. For example, if you select Full Date, the individual log entries would display with something like 2009 May 13 17:15:51 in front of them. | |
| Apply Click this to save your changes. | |
| Reset | Click this to restore the screen's last-saved settings. |
18.1 Overview
This chapter describes screens for features you can add to the NAS by installing packages. See Section 16.4 on page 207 for how to manage packages.
18.2 What You Can Do
- Use the NFS screen (Section 18.3 on page 247) to configure the Network File System (NFS) settings of your NAS.
- Use the TFTP Server screen (Section 18.4 on page 250) to configure the NAS to accept log files from TFTP clients.
- Use theillus screen (Section 18.5 on page 251) to configure the NAS so you can have it manage your downloads including those from one-click hosting sites.
- Use ownCloud (Section 18.6 on page 251) to store, synchronize, and share files, photos, calendars, and more with computers and mobile devices using an ownCloud client.
- Use Memopal (Section 18.7 on page 254) to back up files on the NAS to your Memorial online backup and storage account.
- Use the GoogleDriveClient screens (Section 18.8 on page 256) to synchronize local NAS shares or folders and Google Drive accounts.
Access the following applications' configuration screens through the Package Management screen. Refer to the applications' own documentation for further information.
- Gallery - This web-based application allows your NAS to host pictures. You can upload images in your local computer or shares to this application. Use the Gallery administrator account (default username admin, password 1234) to log into the Gallery console. There you can create accounts for other users.
- Use Logitech® Media Server (Section 17.5.2 on page 218) to manage a Logitech Squeezebox device connected to the NAS.
- The NZBGet news grabber helps download files from UseNet.
- PHP-MySQL-phpMyAdmin can be used to manage MySQL through the web. Enter 'root' as the username and '1234' as the password to log in. This includes MySQL, PHP, and phpMyAdmin.
- Transmission - This Bit Torrent client supports adding tasks through torrent files and magnet links.
- WordPress - This allows you to create and manage a blog. Use the WordPress administrator account (default username admin, password 1234) to log in. You can then create accounts for other users.
- myZyXELcloud-Agent - Use this to go to mycloud.zyxel.com to set up a free DDNS hostname for the NAS so you can connect to it easily from the Internet.
18.3 NFS Screen
Use this screen to enable and configure Network File System (NFS) settings on your NAS.
NFS is a client/server distributed file service that provides transparent file sharing for network environments. This allows shared folders in your NAS to be accessible like a local folder in a user's computer.
Click Network > NFS to open the following screen.
Figure 146 Network > NFS

text_image
Network - NFS NFS Service Enable NFS Server Disable NFS Server Add NFS Share NFS Session Edit NFS Share Delete NFS Share(s) Status NFS Share Path Volume Name DN/IP Filter Comment A data/sysvolnfs Volume1 * (Read Write)The following table describes the labels in this screen.
Table 84 Network > NFS
| LABEL DESCRIPTION | |
| NFS Service | |
| Enable NFS Server Click this to employ NFS in your NAS. | |
| Disable NFS Server Click this to stop using NFS.This makes all NFS shares unavailable. | |
| Add NFS Share Click this to add an NFS share.Refer to Section 18.3.1 on page 248 for the Add NFS Share screen. | |
| NFS Session Click this to view active NFS sessions. You can see the list of users who have access to the NFS shares.Refer to Section 18.3.2 on page 249 for the NFS Session screen. | |
| Edit NFS Share Select an NFS share from the list and click this to edit it.Refer to Section 18.3.1 on page 248 for the Edit NFS Share screen. | |
| Delete NFS Share (s) | Select an NFS share from the list and click this to delete it. |
| The table lists your NFS shares. Click a column's heading to sort the entries by that criteria. | |
| Status This shows wh | ether the share is active or not. |
| NFS Share Path This shows the location of the share in the NAS. | |
| Volume Name This shows the volume where the NFS share is located. | |
| DN/IP Filter This shows which domain name(s) or IP address(es) have read/write access to the NFS shares.Refer to Section 18.3.1 on page 248 for the screen where you can configure this. | |
| Comment This shows a short description of the share. | |
You see a warning screen before you delete a volume.
Figure 147 Delete an NFS Share

text_image
Delete NFS Share(s) Are you sure you want to delete the following NFS Share(s)? Delete NFS Share(s): sample1 Delete all content associated with this share? Do you wish to proceed? Yes No18.3.1 Add/Edit NFS Share
Use this screen to add or edit an NFS share.
Note: Some attributes of the NFS share cannot be edited.
Click Add or Edit in the Network > NFS screen to open the following:
Figure 148 Network > NFS: Add/Edit
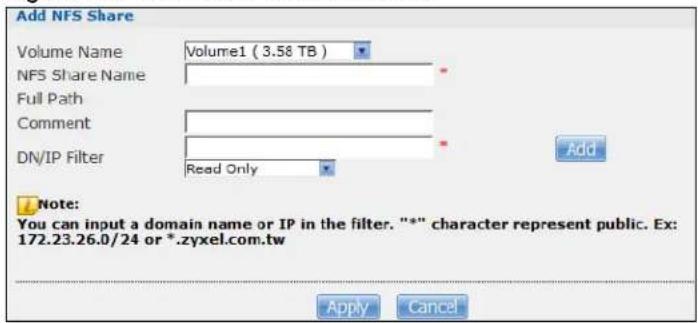
text_image
Add NFS Share Volume Name Volume1 ( 3.58 TB ) NFS Share Name Full Path Comment DN/IP Filter Read Only Add Note: You can input a domain name or IP in the filter. "*" character represent public. Ex: 172.23.26.0/24 or *.zyxel.com.tw Apply CancelThe following table describes the labels in this screen.
Table 85 Network > NFS: Add/Edit
| LABEL DESCRIPTION | |
| Volume Name Select | the volume where the folder you want to add as an NFS share is located. |
| NFS Share Name Enter | the name you want to give to the NFS share. |
| Full Path This shows | the location of the NFS share in the NAS.The NFS server assigns this path to the share folder you input. |
| Comment Enter a short description for the share. | |
| DN/IP Filter Enter the | domain name(s) or IP address(es) that can have access to the NFS share.Enter “*” to make the share available to all users in the network. You can also enter a wildcard, such as “*.domain.com’ to indicate that all users within that network have access to the share.Select the access rights you want to grant to each domain name or IP address you enter and click Add.Read Only- Users with this access right can only view and copy files in the NFS share but cannot modify or delete them.Read/Write- Users with this access right can view, edit or delete files in the NFS share.Note: NFS v4 supports Read/Write only, and NFS v3 supports both Read Only and Read/Write. |
| Apply Click this to save your changes. | |
| Cancel Click this to return to the previous screen without saving. | |
18.3.2 NFS Session
Use this screen to view a list of active NFS sessions. You can see which users are connected the NFS shares.
Click NFS Session in the Network > NFS screen to open the following.
Figure 149 Network > NFS: NFS Session
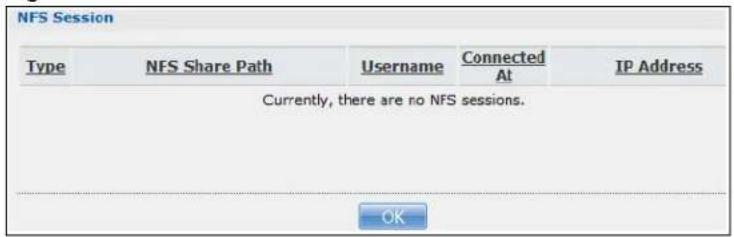
text_image
NFS Session Type NFS Share Path Username Connected IP Address Currently, there are no NFS sessions. OKThe following table describes the labels in this screen.
Table 86 Network > NFS: NFS Session
| LABEL DESCRIPTION | |
| Type This shows if the NFS share is active or not. | |
| NFS Share Path This shows the location of the share in the NAS. | |
| Username This shows the username of the active user connected to the NFS share. | |
| Connected At | This displays the date and time the user last connected to the NAS in year, month, day, hour, minute, second format. |
| IP Address This shows the IP address of the user accessing the NFS share. | |
| OK Click this to close the window. | |
18.4 TFTP Server Screen
Trivial File Transfer Protocol (TFTP) is an Internet file transfer protocol similar to FTP and often used for transmitting large numbers of small files. Use this screen to configure the NAS to accept log files from TFTP clients such as ZyXEL's G-4100 v2.
Note: You may need to configure any firewalls between the NAS and the TFTP clients in order to let the log files go to the NAS.
Click Applications > TFTP Server to open the following screen.
Figure 150 Applications > TFTP Server

text_image
TFTP Server Enable TFTP Server Upload / Download Directory Setting Shares View files admin Path Browse ... Apply ResetThe following table describes the labels in this screen.
Table 87 Applications > TFTP Server
| LABEL DESCRIPTION | |
| Enable TFTP Server | Select this to have the NAS accept log files from TFTP clients. Clear it to stop the NAS from accepting log files from TFTP clients. |
| Upload / Download Directory Setting | ClickView Filesto browse to where you want to store the log files on the NAS. |
| Shares Select the share in which to store the log files. | |
| Path | Use this if you want to further specify a folder within the share This field displays the share folder's path. Type the location of the folder using forward slashes as branch separators or useBrowseto find or create a folder on the NAS.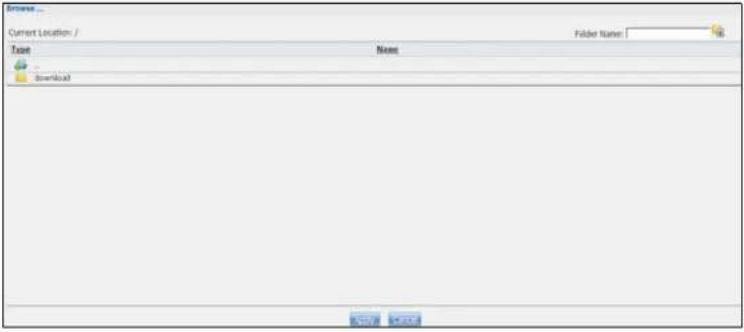 |
| Apply Click this to save your changes. | |
| Reset | Click this to restore the screen's last-saved settings. |
18.5illus p yLoad Screen
Use this screen to configure the NAS so you can use pointer to manage your downloads, including those from one-click hosting sites.
Click Applications >illus to open the following screen.
Figure 151 Applications >pyLoad

text_image
Applications - pyLoad Settings Enable pyLoad Management Page Username admin Password ********** Password (Confirm) ********** Port Number 7272 Note: Default password:1234. Apply ResetThe following table describes the labels in this screen.
Table 88 Applications >pyLoad
| LABEL DESCRIPTION | |
| Enable pyLoad | Select this to have the NAS manage your downloads. Clear it to turn the feature off. |
| Management Page | This is the IP address and port number of the NAS's pyLoad management login screen. The pyLoad management login screen uses the NAS's IPv4 address and the port number you configure. Click this link to go to it. |
| Username | Only the admin account can log into the pyLoad management screen. |
| Password | You can configure a separate password for using the admin account to access the NAS's pyLoad management screen. |
| Password (Confirm) | Type the same password again to make sure you entered it correctly. |
| Port Number | Set the pyLoad management page's port number. The range of valid port numbers is 1024~65536. Include this port number after the IP address when manually entering the pyLoad management login page's address in your browser's address bar. For example, 192.168.1.2:7272. |
| Apply Click this to save your changes. | |
| Reset | Click this to restore the screen's last-saved settings. |
18.6 ownCloud Setup
Use the Package Management screen to install the ownCloud package. Use ownCloud to store, synchronize, and share files, photos, calendars, and more with computers and mobile devices. Use the following procedure to install the ownCloud package.
1 Click Packages > Package and select ownCloud. Then click the Install/ Upgrade icon.
Note: If ownCloud does not appear, click the Retrieve List from Internet icon to update the list.

text_image
ZyXEL Language: English Status NAS540 System Setting Packages Server Name Date/Time Applications FTP Server Media Server iTunes Server Download Service Web Publishing Print Server Copy/Sync Button Auto Upload Pickr/YouTube FTP Uploadr Dropbox Time Machine Syslog Server GoogleDriveClient Sharing Users Groups Shares WebDAV Maintenance Power Log Configuration SSL Shutdown Unpair myZyXELcloud Protect System Setting - Packages Package Management Retrieve List From Internet Install/Upgrade Uninstall/Cancel Enable Disable Package Info Not Installed Tiltp 0.7zypkg002 69. It is similar to FTP but uses UDP (User Datagram Protocol) rather than TCP (Transmission Control Protocol). It cannot list directories nor authenticate users. Not Installed Transmission 2.83zypkg003 This package is another P2P download client which supports torrent and magnet. Not Installed WordPress PHP-MySQL- phpMyAdmin 3.9.1zypkg002 This allows you to create and manage a blog. Use the NAS administrator credentials to log in. The administrator can then create accounts for other users. Not Installed myZyXELcloud-Agent 0.0.14zypkg0014 myZyXELcloud, your solution for remote application management and securely access to your ZyXEL network devices accessory from anywhere that has an internet connection! Not Installed ownCloud PHP-MySQL- phpMyAdmin 7.0.2zypkg002 This allows you to create and manage your private cloud. Not Installed pyLoad 0.4.9zypkg004 Have the NAS manage your downloads including those from one-click-hosting sites. Message Ready2 The following confirmation screen appears. Select the volume in which to install ownCloud and store ownCloud data and click Apply. The NAS must have a connection to the Internet to download the package.
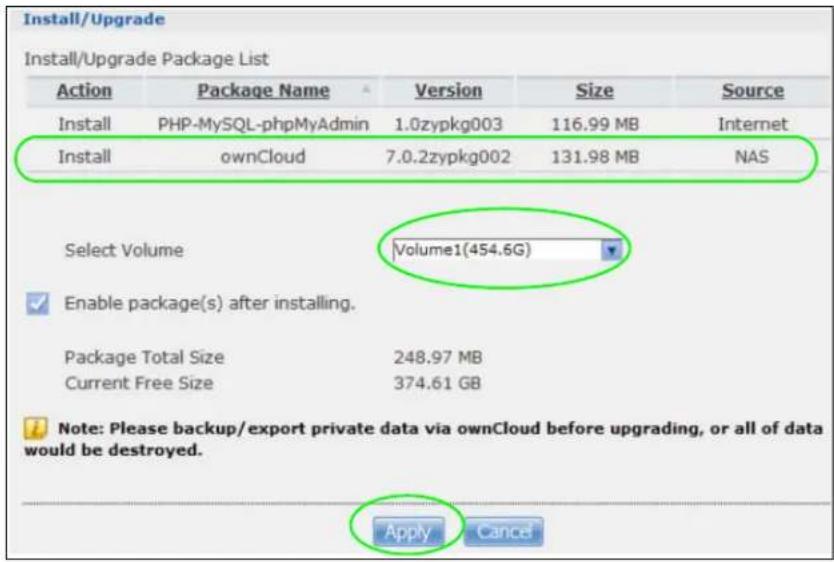
text_image
Install/Upgrade Install/Upgrade Package List Action Package Name Version Size Source Install PHP-MySQL-phpMyAdmin 1.0zypkg003 116.99 MB Internet Install ownCloud 7.0.2zypkg002 131.98 MB NAS Select Volume Volume1(454.6G) Enable package(s) after installing. Package Total Size 248.97 MB Current Free Size 374.61 GB Note: Please backup/export private data via ownCloud before upgrading, or all of data would be destroyed. Apply Cancel3 The installation progress appears in the ownCloud row.
| Installing 48% | ownCloud | PHP-MySQL- phpMyAdmin | 7.0.2zypkg002 | This allows you to create and manage your private cloud. |
4 A link appears in the Management Page column after installation finishes. Click this link.

text_image
Enabled ownCloud PHP-MySQL-phpMyAdmin 7.0.2zypkg003 This allows you to create and manage your private cloud. http://172.23.3.100:500/cks/ownCloud https://172.23.3.100:500/cks/ownCloud5 The ownCloud login screen appears. Create an administrator user name and password and click Finish Setup.
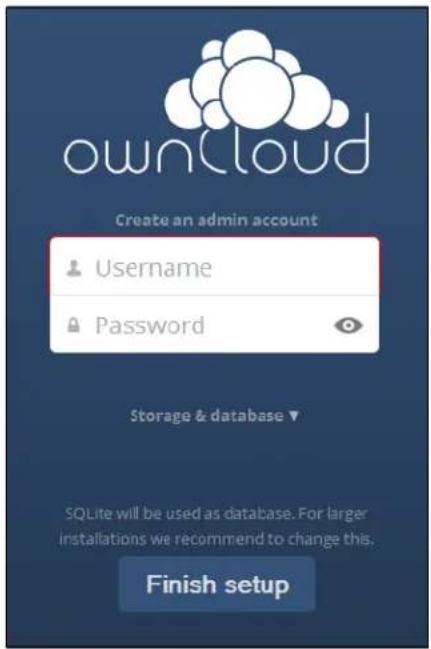
text_image
ownCloud Create an admin account Username Password Storage & database ▼ SQLite will be used as database. For larger installations we recommend to change this. Finish setup6 The main ownCloud screen displays. Use this web interface to manage files on the NAS ownCloud server. Click your user name in the upper-right corner to see the help for more information on using ownCloud.
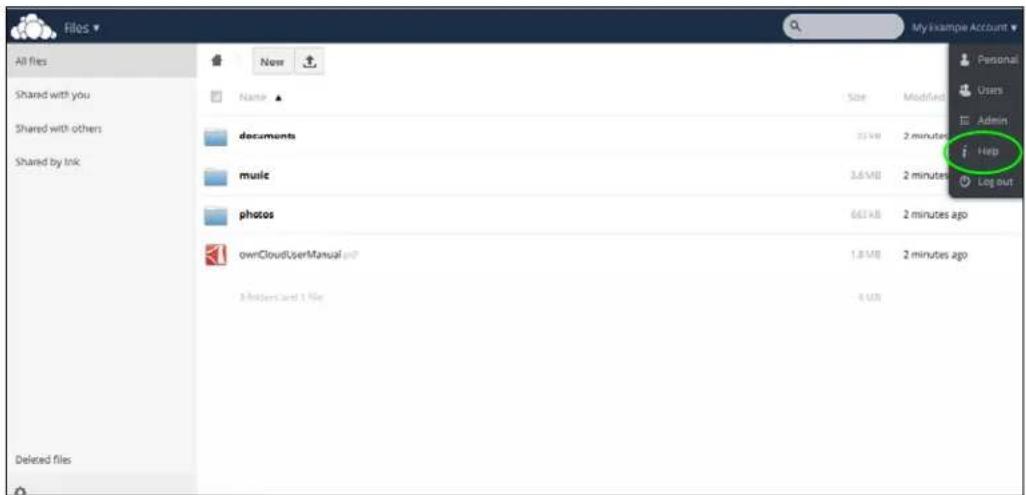
text_image
Files All files Shared with you Shared with others Shared by link Deleted files Name documents music photos ownCloudUserManual.psd 3.000x3.000 x 1 file Size Modified 2 minutes 2 minutes ago 2 minutes ago 4 KB My Example Account Personal Users Admin Help Log outNote: Get ownCloud desktop clients from owncloud.org and ownCloud mobile apps from Google Play or the Apple App Store.
18.7 Memorial
Install the Memopal package to back up folders of files on the NAS to your Memopal online backup and storage account.
Note: Deleting files from your Memorial account's online backup set does not delete the files from the NAS, just as deleting a file from the NAS does not delete a backup copy in your Memorial account's online backup set.
Deleting a file or a folder from your Memopal account's online backup set deletes all versions of that file from the online backup set.
Click Applications > Memorial to open the following screen.
Figure 152 Applications > Memopal

text_image
Applications - Memorial Status Status Disabled To Backup -- Backed up -- Failures -- Upload Speed -- Progress -- Note: Size limitation of single file is 1GB. Settings Enable Memorial General Setting Email * Password * Limit File Size MB Schedule Setting Enable Schedule Weekly Daily hours Hourly minutes Backup Folder Setting Share Name Way Path Actions Share: video Path: / Browse... Add Note: You must click "Apply" button to finish Backup Folder Setting. Apply ResetThe following table describes the labels in this screen.
Table 89 Applications > Memorial
| LABEL DESCRIPTION | |
| Status This shows the | status of the Memopal application's interaction with the Memopal server. |
| Disabled: The NAS Memopal application is turned off. | |
| Starting: The backup job is initializing and the NAS is getting ready to back up. | |
| Running: The backup job is executing. | |
| Stopped: The backup job is stopped. This may be due to a network error, remote server error, or other issue. | |
| Completed: The backup job finished. | |
| To Backup The number | of files remaining to back up. |
| Backed up The number | of files backed up already. |
| Failures The number | of files the NAS failed to back up to the Memopal server. |
| Upload Speed | This is how fast in Bytes per second the NAS is backing up to the Memopal server. |
| Progress | This shows the percentage of the files already backed up from the total files to be backed up. |
| Restart Backup Re-scan | an all files and perform a backup. |
| Retry Failures Only re-scan and back up files the NAS failed to back up. | |
| Backup Report Display | back up record details. |
| Enable Memopal | Select this to back up files to your Memopal account. The rest of the configuration fields display. |
| Enter the email address you use for your Memopal account. | |
| Password | Enter the password for your Memopal account. |
| Limit File Size | Select this and enter a number of MegaBytes if you want to restrict the size of files the NAS uploads to the Memopal account. You have to enter your password again if you select this. |
| Enable Schedule | Select this to set when the Memopal backups occur. You have to enter your password again if you select this. Clear this to have the NAS back up files in the selected folders to your Memopal account in real-time whenever you add or modify the files. |
| Weekly | Select this to perform a Memopal backup on a weekly basis. The NAS performs the backup job every Sunday at 2:00 AM and continues until the job finishes. |
| Daily Select this to perform a Memopal backup every day. The NAS performs the backup job every day at 2:00 AM. Use hours to specify for up to how many hours the NAS can perform a Memopal backup. Enter 0 in hours to have the NAS continue the backup job until it finishes (no time limit). | |
| Hourly | Select this to perform a Memopal backup every hour. Use minutes to specify for up to how many minutes the NAS can perform a Memopal backup. Enter 0 in minutes to have the NAS continue the backup job until it finishes (no time limit). |
| Share Name | This is the name of the share containing a folder the NAS Memopal application backs up to the Memopal server. |
| Path | This field displays the share folder's path. |
| Actions | Click the Delete icon to remove the folder from the list of folders the NAS Memopal application backs up to the Memopal server. |
| Share | Select the share containing the folder to back up to the Memopal server. |
| Path Identify the folder | to back up to the Memopal server.UseBrowse to find or create a folder on the NAS or type the location of the folder using forward slashes as branch separators.ClickAddto add the folder to the list of folders the NAS Memopal application backs up to the Memopal server. |
| Apply Click this to save your changes. | |
| Reset | Click this to restore the screen’s last-saved settings. |
18.8 GoogleDriveClient
Use GoogleDriveClient to synchronize local NAS user folders and Google Drive cloud storage accounts. This two-way synchronization means changes in the Google Drive account appear in the local sync folder and changes in the local sync folder appear in the Google Drive account.
Note: Do not store your only copy of a document in Google Drive or the local sync folder.
- Modifying or deleting a file or folder at either end modifies or deletes it at the other end.
- Moving a file out of the local sync folder or Google Drive deletes it at the other end.
- Use the Protect screens instead of Google Drive for backups (see Chapter 27 on page 321).
- You can link multiple NAS user accounts to Google accounts.
- You can link an individual NAS user account to multiple Google accounts.
- You can only link each individual Google account to one NAS user account.
- This feature does not currently download Google Documents.
18.8.1 Account Setting Screen
Use the Account Setting screen to synchronize local NAS shares or folders and Google Drive accounts.
Click Applications > GoogleDriveClient to open the following screen.
Figure 153 Applications > GoogleDriveClient > Account Setting
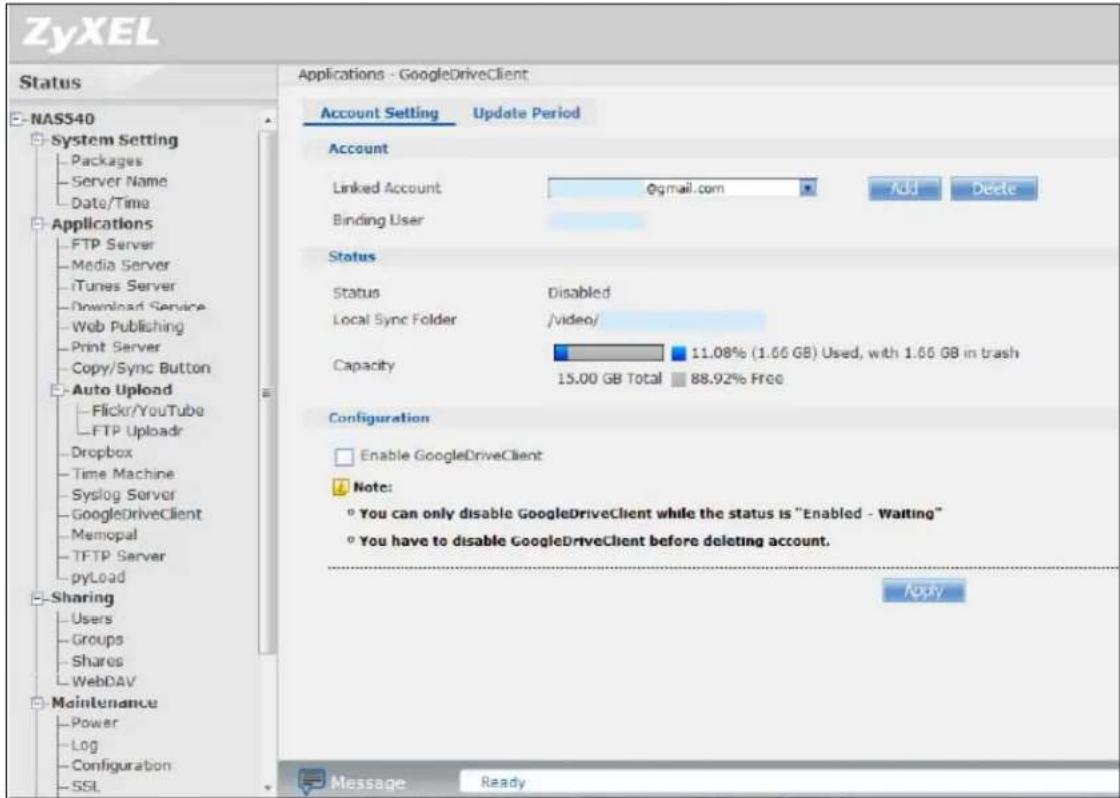
text_image
ZyXEL Status NAS540 System Setting Packages Server Name Date/Time Applications FTP Server Media Server iTunes Server Download Service Web Publishing Print Server Copy/Sync Button Auto Upload Flickr/YouTube FTP Uploaddr Dropbox Time Machine Syslog Server GoogleDriveClient Memopal TFTP Server pyLoad Sharing Users Groups Shares WebDAV Maintenance Power Log Configuration SSL Applications - GoogleDriveClient Account Setting Update Period Account Linked Account @gmail.com Add Delete Binding User Status Status Disabled Local Sync Folder /video/ Capacity 11.08% (1.66 GB) Used, with 1.66 GB in trash 15.00 GB Total 88.92% Free Configuration Enable GoogleDriveClient Note: ° You can only disable GoogleDriveClient while the status is "Enabled - Waiting" ° You have to disable GoogleDriveClient before deleting account. Apply Message ReadyThe following table describes the labels in this screen.
Table 90 Applications > GoogleDriveClient > Account Setting
| LABEL DESCRIPTION | |
| Linked Account Select | a Google account linked to an NAS user account.ClickAddto open a screen where you can link an NAS user account and a Google account.ClickDeleteto remove the NAS's link to the selected Google account. You must disable the Google Drive feature for the account before you can do this. A screen pops up to let you decide what to do with the data in the NAS's linked local sync folder.Do you want to delete data in "/public/###"?YesNoCancelClickYesto delete all data in the local sync folder. ClickNoto remove the link to the selected Google account but keep the data in the local sync folder. ClickCancelto do nothing (keep the account link and data). |
| Binding User The NAS | user account linked to the selected Google account. |
| Status The current status of the GoogleDrive feature for the selected Google account.·Disabled- The GoogleDrive feature is turned off. During this state you can use the other sections of this screen to add or delete linked accounts or enable Google Drive.·Enabled - Waiting- The GoogleDrive feature is configured, enabled, and waiting to perform the next Google Drive update. During this state you can use the other sections of this screen to add or delete linked accounts or disable Google Drive.·Enabled - Synchronizing- The GoogleDrive feature is synchronizing the local sync folder and the Google account. During this state you can use the other sections of this screen to add linked accounts during this state. | |
| Local Sync Folder | The NAS folder or share the NAS synchronizes with the linked Google account. |
| Capacity The Google account's used, available, and total online Google Drive storage space. | |
| Enable GoogleDrive | Select this to have the NAS periodically synchronize the selected linked account's local sync folder and Google Drive storage. You can enable synchronizing with Google Drive for individual accounts and disable it for other accounts.Clear this option to disable synchronizing the selected linked account's local sync folder and Google Drive storage. |
| Apply Click this to save your changes. | |
18.8.2 Account Setting Add Screen
Use the Account Setting Add screen to link an NAS user account and a Google account. Click Applications > GoogleDriveClient > Add to open the following screen.
Note: The user has to log into the Google account on the same computer to allow the NAS to link to it.
Figure 154 Applications > GoogleDriveClient > Account Setting > Add
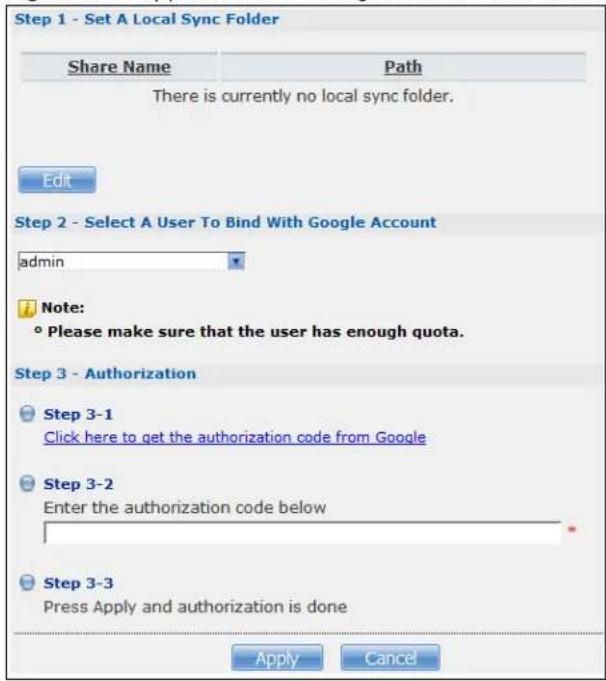
text_image
Step 1 - Set A Local Sync Folder Share Name Path There is currently no local sync folder. Edit Step 2 - Select A User To Bind With Google Account admin Note: ° Please make sure that the user has enough quota. Step 3 - Authorization Step 3-1 Click here to get the authorization code from Google Step 3-2 Enter the authorization code below Step 3-3 Press Apply and authorization is done Apply CancelThe following table describes the labels in this screen.
Table 91 Applications > GoogleDriveClient > Account Setting > Add
| LABEL DESCRIPTION | |
| Step 1 Specify the folder on the NAS to synchronize with Google Drive for the local user. | |
| Share Name The name of a share on the NAS containing the folder the NAS synchronizes with Google Drive. | |
| Path The location of the folder the NAS synchronizes with Google Drive. | |
Edit Click this to open the following screen where you can specify the share or folder to synchronize with Google Drive. The NAS's sharing configuration must allow the user access. The user must also have a large enough quota on both the NAS and Google Drive to hold whatever files go in the local sync folder and in the Google Drive account (since they both end up containing everything you put in either). Share - Select the share from the list.Path - Type the folder location in the share or clickBrowseto navigate to the folder. Use a “/” to synchronize the entire share. Share - Select the share from the list.Path - Type the folder location in the share or clickBrowseto navigate to the folder. Use a “/” to synchronize the entire share. | |
| Step 2 Select the local NAS user account to link with Google Drive. | |
| LABEL DESCRIPTION | |
| Step 3 | Click the link to get the authorization code from Google. The user must sign into the Google account. You may need to sign out of Google's services first if another user account is already signed in.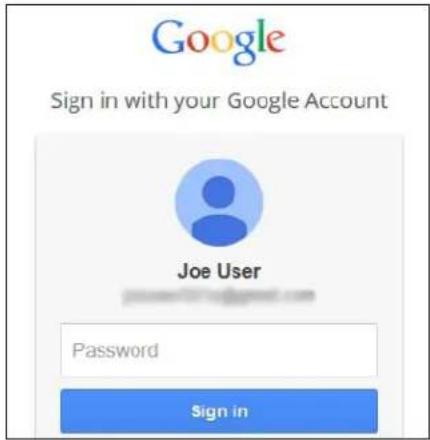 The NAS GoogleDriveClient feature uses the Grive app. Review what the Grive app wants to use and click Accept if you agree. The NAS GoogleDriveClient feature uses the Grive app. Review what the Grive app wants to use and click Accept if you agree.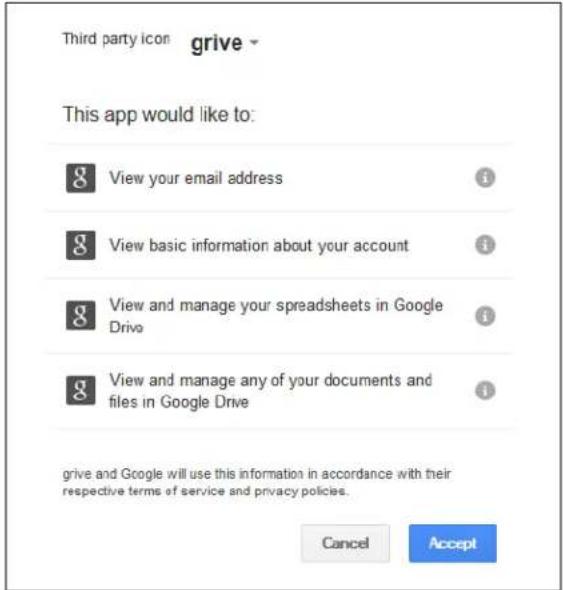 Copy the code and paste it into the field in the Web Configurator screen.Please copy this code, switch to your application and paste it there:4/PWA18R6gGcil4V54G7c_2UqaMB8.0jWhoTq2LiClick Apply to have the NAS connect to Google and complete the authorization.In the Account Setting screen, select the Enable Google Drive option and click Apply to start synchronizing your files with Google Drive. Copy the code and paste it into the field in the Web Configurator screen.Please copy this code, switch to your application and paste it there:4/PWA18R6gGcil4V54G7c_2UqaMB8.0jWhoTq2LiClick Apply to have the NAS connect to Google and complete the authorization.In the Account Setting screen, select the Enable Google Drive option and click Apply to start synchronizing your files with Google Drive. |
| LABEL DESCRIPTION | |
| Apply | Click this to save your changes and complete the authorization. |
| Cancel | Click this to return to the previous screen without saving. |
18.8.3 Update Period Screen
Use the Update Period screen to set how often the NAS synchronizes with Google Drive. The NAS initiates the connections, thus you do not have to configure rules on a firewall located in front of the NAS to allow access.
Click Applications > GoogleDriveClient > Update Period to open the following screen.
Figure 155 Applications > GoogleDriveClient > Update Period

text_image
Applications - GoogleDriveClient Account Setting Update Period Update Period The time the system will query remote server for the next update. Update Period 15 minutes ApplyThe following table describes the labels in this screen.
Table 92 Applications > GoogleDriveClient > Update Period
| LABEL DESCRIPTION | |
| Update Period | Specify how frequently the NAS synchronizes the local sync folders and the linked Google Drive accounts. The range is 1 to 4320 minutes (3 days). |
| Apply Click this to save your changes. | |
19.1 Overview
This chapter discusses the features in the Auto Upload screens.
The auto upload feature uploads media files stored in the NAS to the Flickr and/or YouTube sharing websites. Besides web publishing and media server, auto upload is another convenient way to share media files with your friends and family. You can link the NAS to your Flickr and/or YouTube account and select shares for the NAS to upload. The NAS uploads the media files stored in the specified shares to your Flickr and/or YouTube account. When you add new files to the specified shares, the NAS also automatically uploads the new files to your Flickr and/or YouTube account.
19.2 What You Can Do
- Use the Flickr/ YouTube screen (Section 19.4 on page 262) to upload photos and videos to your Flickr and YouTube accounts.
- Use the FTP Uploadr screen (Section 19.5 on page 270) to upload files to FTP servers.
19.3 What You Need to Know
FTP
File Transfer Protocol (FTP) is a file transfer service that operates on the Internet. A system running the FTP server accepts commands from a system running an FTP client. FTP is not a secure protocol. Your file transfers could be subject to snooping.
FTPES (File Transfer Protocol over Explicit TLS/SSL)
File Transfer Protocol over Explicit TLS/SSL (FTPES) is a file transfer service that uses TLS (Transport Layer Security) or Secure Socket Layer (SSL) for secure transfers across the Internet.
19.4 Flickr/YouTube Screen
Use this screen to upload photos and videos to your Flickr and YouTube accounts.
Click Applications > Auto Upload > Flickr/ YouTube to open the following screen.
Figure 156 Applications > Auto Upload > Flickr/YouTube
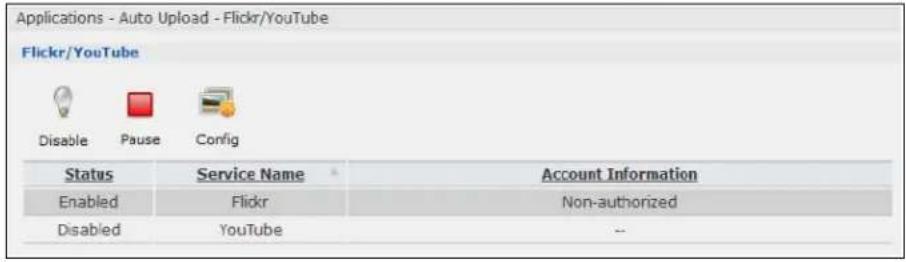
text_image
Applications - Auto Upload - Flickr/YouTube Flickr/YouTube Disable Pause Config Status Service Name Account Information Enabled Flickr Non-authorized Disabled YouTube --The following table describes the labels in this screen.
Table 93 Applications > Auto Upload > Flickr/YouTube
| LABEL DESCRIPTION | |
| Flickr/YouTube | |
| Disable/Enable | Select a service from the list and click this to turn the service on or off.If you disable the service and add more files to the watch folder(s), the NAS will not auto upload these files. However, the NAS still uploads any files added before you turned off the service. |
| Pause/Resume | Select a service from the list and click this to pause or resume the auto upload feature. |
| Config | Select a service from the list and click this to manage the service's settings. |
| Status This field disp | ays the service's status.The service may be Enabled, Disabled, Uploading or Paused. |
| Service Name | This field displays the name of a sharing website to which the NAS can automatically upload files. |
| Account Information | This field displays the username and related information of the account to use with the auto upload feature. |
19.4.1 Configuring the Flickr Settings
In the Applications > Auto Upload > Flickr/ YouTube screen, select Flickr from the list and then click the Config button.
The following screen displays if you have not authorized the NAS to use a Flickr account. Click OK to continue the authorization process.
Figure 157 Linking NAS to Flickr

text_image
Note: The service requires permission to connect to your Flickr account. That permission is granted on the Flickr website, so click OK to get started. OK CancelThe web browser opens the Yahoo! Flickr login page. Enter your Yahoo account's information and click Sign In.
Figure 158 Yahoo! Flickr Login Page
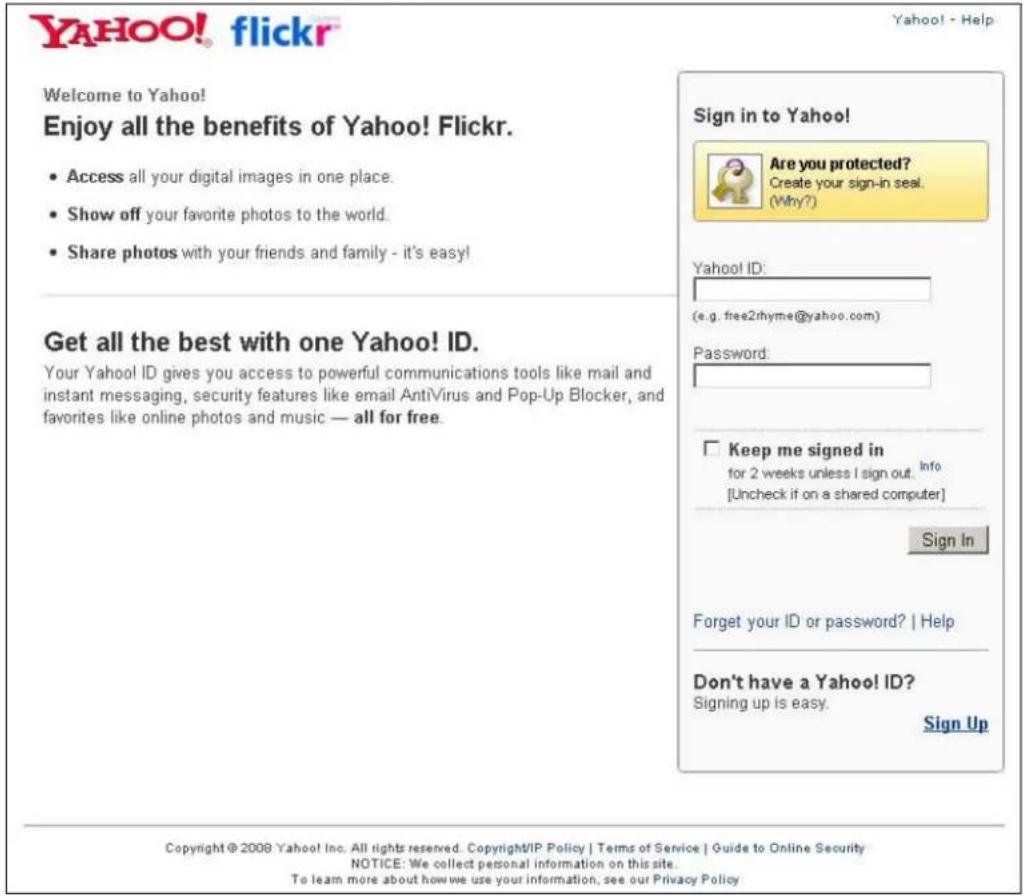
text_image
YAHOO! flickr Welcome to Yahoo! Enjoy all the benefits of Yahoo! Flickr. • Access all your digital images in one place. • Show off your favorite photos to the world. • Share photos with your friends and family - it's easy! Get all the best with one Yahoo! ID. Your Yahoo! ID gives you access to powerful communications tools like mail and instant messaging, security features like email AntiVirus and Pop-Up Blocker, and favorites like online photos and music — all for free. Sign in to Yahoo! Are you protected? Create your sign-in seal. (Why?) Yahoo! ID: (e.g. free2zhyme@yahoo.com) Password: □ Keep me signed in for 2 weeks unless I sign out. Info [Uncheck if on a shared computer] Sign In Forget your ID or password? | Help Don't have a Yahoo! ID? Signing up is easy. Sign Up Copyright © 2008 Yahoo! Inc. All rights reserved. Copyright/IP Policy | Terms of Service | Guide to Online Security NOTICE: We collect personal information on this site. To learn more about how we use your information, see our Privacy PolicyThe following page displays asking for your authorization. Click OK, I'LL ALLOW IT to establish a link between the NAS and your Flickr account.
Figure 159 Flickr Authorization

text_image
flickr Home You Organize Contacts Groups Explore Hi pink ZyxEL NSA wants to link to your Flickr account. You should not authorize ZyxEL NSA unless you trust them with access to your account. By authorizing this link, you'll allow the ZyxEL NSA service to provide: • Access to your photostream (including private stuff) • Editing of your photo or video information via ZyxEL NSA • Uploads to your Flickr account via ZyxEL NSA What's going on here? Flickr encourages other developers to build cool tools for you to play with, but you must authorize these third parties to access your account. Want to know more? A wealth of information lies within the Flickr Services page. OK, I'LL ALLOW ITA confirmation page displays indicating successful authorization. Return to the NAS web configurator. Click Get Ready in the following screen to complete the authorization process.
Figure 160 Confirming Flickr Authorization

text_image
Note: When you've given the NAS permission to connect to your account on the Flickr website, click the "Get Ready" button. Get ReadyOnce the NAS is associated with your Flickr account, you can configure auto upload settings in the following screen.
Figure 161 Applications > Auto Upload > Flickr/YouTube > Config (Flickr)

text_image
Applications - Auto Upload - Flickr/YouTube Flickr Account Configuration Username yvnnnetal2001 Photo Space Usage 204.80 GB Total 0% (3.00 Bytes) Used 100.80% Free Video Files Usage Uploaded 0 Remain Unlimited Folder Selection Folder Watch List Status Share Name Path Action There are currently no folders on the watch list Add Note: Only the following file formats will be automatically uploaded: bmp, gif, jpeg, jpg, pag, tif, tiff, 3gp, 3p2, evi, mov, mpeg, mpg, wmv, mp4 Grace Period The time the system will wait before a newly added media file is saved in a watched folder. Grace Period 5 minutes Default Privacy Who can see your media files on Flickr? Only You Your friends Your family Anyone Hide from public site area? Default Safety Level Safe Moderate Restricted Note: Video on Flickr may only include "Safe" or "Moderate" content. "Restricted" video content is not allowed on Flickr and will be removed. Default Content Type Photos / Videos Screenshots / Screencasts Illustration / Art / Animation / CGI APP NETThe following table describes the labels in this screen.
Table 94 Applications > Auto Upload > Flickr/YouTube > Config (Flickr)
| LABEL DESCRIPTION | |
| Flickr Account Configuration | |
| Username | This field displays the Flickr account authorized for the auto upload feature. |
| Photo Space Usage This shows how much storage space for photos (in size and percentage) you have used and how much space is still available on your Flickr account. | |
| Video Files Usage | This shows how many videos you have uploaded and how many videos you can still upload to your Flickr account. |
| Switch User Click this to use a different Flickr account for the auto upload feature. | |
| Folder Selection | |
| Folder Watch List | This table displays a list of shares and folders selected for auto upload. Files stored in these locations are uploaded to your Flickr account. |
| Status This indicates whether the folder or share is available.represents a valid folder. The folder is available for auto upload.represents a missing folder. The share may be deleted from the NAS, or the hard disk was removed from the NAS. | |
| Share Name This is the share selected for auto upload. | |
| Path | This is the path of a folder selected for auto upload. The NAS only uploads files stored in the specified share or folder to your Flickr account. |
| Action | Use the Remove icon to remove a folder from the Folder Watch List. |
| Add | Click this to open the following screen where you can set a folder that contains files you want the NAS to automatically upload.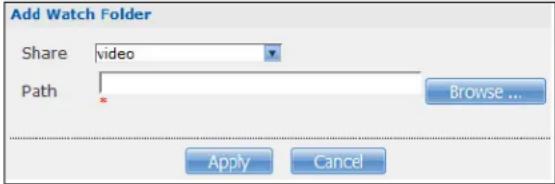 Share - Select the share from the list.Path - Type the folder location in the share directly or click Browse to open the following screen and navigate to the folder's location. Share - Select the share from the list.Path - Type the folder location in the share directly or click Browse to open the following screen and navigate to the folder's location. Current Location - This is the location of the selected folder.Folder Name - Enter a new folder name and click 📋 to create it.Type - This is the type of the folder/file.Name - This is the name of the folder/file.Select a folder. If you don't select a folder, a forward slash (/) displays in the Path field. All contents within the specified share are automatically selected.Click Apply to save your settings and Cancel to close the screen. Current Location - This is the location of the selected folder.Folder Name - Enter a new folder name and click 📋 to create it.Type - This is the type of the folder/file.Name - This is the name of the folder/file.Select a folder. If you don't select a folder, a forward slash (/) displays in the Path field. All contents within the specified share are automatically selected.Click Apply to save your settings and Cancel to close the screen. |
| Grace Period | |
| Grace Period N minutes | Specify how long the NAS should wait when you add a new file for auto upload. For example, if you set the grace period to 5 minutes, the NAS uploads a new file after it has been in a watched folder for 5 minutes. You can choose from a range of 1 to 10080 minutes (up to one week). |
| Default Privacy | |
| Who can see your media files on Flickr? | Determine who has the right to see files uploaded to your Flickr account.SelectOnly Youif you do not want anyone else to see your files. You may also restrict the access toYour friendsand/orYour family. You can set up a friend/family list in your Flickr account.SelectAnyoneto allow everyone to see your files. |
| Hide from public site area | Check this option to prevent others from finding your files when they perform a search in the Flickr website. |
| Default Safety Level | Assign a safety level to your files.SelectSafeif the contents of your files are suitable for the general public.SelectModerateif the contents of your files may be offensive to some people.SelectRestrictedif the contents of your files are not suitable for certain people, such as children or your colleagues. |
| Default Content Type | Select a content type for your files. You can choosePhoto/ Video, Screenshots/Screencasts, or Illustration/ Art/ Animation/ CGI. |
| Apply Click this to save your changes. | |
| Reset Click this to restore previously saved settings. | |
19.4.2 Configuring the YouTube Settings
In the Applications > Auto Upload > Flickr/ YouTube screen, select YouTube from the list and then click the Config button.
Note: Your YouTube account must be associated with a Google account.
Get a Google account and use it to log into YouTube. You can then merge the existing YouTube account to your Google account.
If you have not authorized a YouTube account on the NAS, the following screen displays. Enter your Google account's e-mail address and password in the fields and click OK to authorize the service.
Figure 162 YouTube Account Settings

text_image
YouTube Account Settings Email Password Note: To use this feature you must use a Google account that is linked to your YouTube account. Please create a Google account if you do not have one. Log into YouTube using your Google account and then link your existing YouTube account or create a new YouTube account.Once the NAS is associated with your YouTube account, you can configure auto upload settings in the following screen.
Figure 163 Applications > Auto Upload > Flickr/YouTube > Config (YouTube)

text_image
Applications - Auto Upload - Flickr/Youtube YouTube Account Configuration Account Search Account Folder Selection Folder Watch List Status Share Name Path Action There are currently no folders on the watch list. Add Note: Only the following file formats will be automatically uploaded: 3gp, asf, asx, avi, cif, dl, dv, flv, gl, mkv, mov, movie, m4v, mp4, mpe, mpeg, mpg, qgv, ql, wmv, wmx, wvx YouTube limits the file size allowed for an uploaded video. Files exceeding the file size limit may not be uploaded successfully. Grace Period The time the system will wait before a newly added media file is saved in a watched folder. Grace Period 15 minutes Video Category Please select a category. Film & Animation Autos & Vehicles Music Pets & Animals Sports Travel & Events Comedy People & Blogs News & Politics Entertainment Education.Howto & Style Nonprofits & Activism Science & Technology Default Privacy Who can see your media files on YouTube? Only You Anyone Apply ResetThe following table describes the labels in this screen.
Table 95 Applications > Auto Upload > Config (YouTube)
| LABEL DESCRIPTION | |
| YouTube Account Configuration | |
| Username This field displays the Youtube account authorized for the auto upload feature. | |
| Switch User | Click this to use a different YouTube account for the auto upload feature. |
| Folder Selection | |
| Folder Watch List | This table displays a list of shares and folders selected for auto upload. Files stored in these locations are uploaded to your YouTube account. |
| Status | This field indicates whether the share or folder is available.represents a valid folder. The folder is available for auto upload.represents a missing folder. The share may be deleted from the NAS, or the hard disk was removed from the NAS. |
| Share Name | This field displays the share selected for auto upload. |
| Path | This field displays the path of a folder selected for auto upload. The NAS only uploads the files stored in the specified share or folder to your YouTube account. |
| Action | Use theRemoveicon to delete a folder from theFolder Watch List. |
| Add Click this to open | the following screen where you can set a folder that contains files you want the NAS to automatically upload.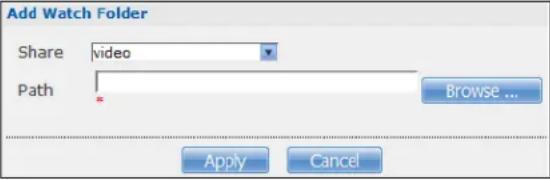 Share- Select the share from the list.Path-Type the folder location in the share directly or clickBrowseto open the following screen and navigate to the folder's location. Share- Select the share from the list.Path-Type the folder location in the share directly or clickBrowseto open the following screen and navigate to the folder's location. Current Location- This is the location of the selected folder.Folder Name- Enter a new folder name and clickto create it.Type- This is the type of the folder/file.Name- This is the name of the folder/file.Select a folder. If you don't select a folder, a forward slash (/) displays in thePathfield. All contents within the specified share are automatically selected.ClickApplyto save your settings andCancelto close the screen. Current Location- This is the location of the selected folder.Folder Name- Enter a new folder name and clickto create it.Type- This is the type of the folder/file.Name- This is the name of the folder/file.Select a folder. If you don't select a folder, a forward slash (/) displays in thePathfield. All contents within the specified share are automatically selected.ClickApplyto save your settings andCancelto close the screen. |
| Grace Period | |
| Grace Period N minutes | Specify how long the NAS should wait when you add a new file for auto upload. For example, if you set the grace period to 5 minutes, the NAS uploads a new file after it has been in a watched folder for 5 minutes. You can choose from a range of 1 to 10080 minutes (up to one week). |
| Video Category | Select the category that best describes the media files you want to upload. |
| Default Privacy | |
| Who can see your media files on YouTube? | Determine who has the right to see files uploaded to your YouTube account.SelectOnly Youif you do not want anyone else to see your files.SelectAnyoneto allow everyone to see your files. |
| Apply Click this to save your changes. | |
| Reset | Click this to restore your previously stored settings. |
19.5 FTP Uploadr Screen
The FTP Uploadr feature uploads files stored in the NAS to FTP servers. Besides web publishing and media server, auto upload is another convenient way to share media files with your friends and family. You can link the NAS to the FTP server or the FTP server on another NAS and select shares or folders for the NAS to upload. The NAS uploads the files stored in the specified shares to the FTP server. When you add new files to the specified shares, the NAS also automatically uploads the new files to the FTP server.
Use this screen to configure the FTP Uploadr.
Click Applications > Auto Upload > FTP Uploadr to open the screen shown next.
Figure 164 Applications > Auto Upload > FTP Uploadr

text_image
Applications - Auto Upload - FTP Uploadr FTP Uploadr Enable FTP Uploadr Add Server Preferences Edit Server Delete Selected Server(s) Server Information Domain Name/IP Address Port Number Remote Path Account Name Description example2.com 21 /Any Any Send to SusanThe following table describes the labels in this screen.
Table 96 Applications > Auto Upload > FTP Uploadr
| LABEL DESCRIPTION | |
| Enable FTP Uploadr | Use the check box to enable or disable the FTP Uploadr. ClickApplyto save your changes.When you disable the FTP Uploadr, a screen opens requesting confirmation. Select the check box to stop any current or queued uploads. If you do not select the check box, the FTP Uploadr will finish uploading the files that are already in the queue list. ClickingYeswill disable the FTP Uploadr.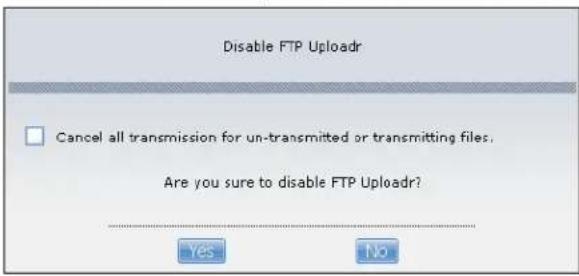 |
| Add Server | Click this to add a target FTP server entry. SeeSection 19.5.1 on page 271for more details. |
| Preferences Click this | to manage the settings of the FTP Uploadr. |
| Edit Server Select a s | server from the list and click this to edit the FTP server entry. |
| Delete Selected Server(s) | Select a server from the list and click this to remove the FTP server entry. |
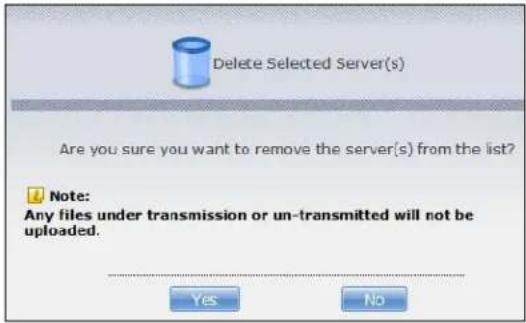 | |
| Server Information | Select a server from the list and click this to display the status and settings about the FTP server. |
| Domain Name/IP Address | This is the domain name or IP address of the FTP server. |
| Port Number This is the port number used by the FTP server. | |
| Remote Path The NAS | automatically uploads files to this location of the FTP server. |
| Account Name This is the login account for the FTP server. | |
| Description This is the information related to the FTP server. | |
19.5.1 Adding or Editing an FTP Server Entry
Use this screen to add or edit an FTP server entry for auto upload.
In the FTP Uploadr screen, click the Add Server or Edit Server button to open the following screen.
Figure 165 Applications > Auto Upload > FTP Uploadr > Add or Edit a Server

text_image
Add Server Domain Name/IP Address Account Name Password Port Number 21 Remote Path Description Test Connection Apply CancelThe following table describes the labels in this screen.
Table 97 Applications > Auto Upload > FTP Uploadr > Add or Edit a Server
| LABEL DESCRIPTION | |
| Domain Name/IP Address | Enter the domain name or IP address of the FTP server. |
| Account Name Enter the account name used to access the FTP server. | |
| Password Enter the | password associated with the account name. |
| Port Number Enter | the port number for the FTP server. |
| Remote Path Enter | the path of the FTP server where the NAS automatically uploads files. |
| Description Enter | additional information about this FTP server. |
| Test Connection Click | this to test your settings and check whether you can use the settings to connect to the FTP server. |
| Apply Click this to | save your changes. |
| Cancel Click this to | return to the previous screen without saving. |
19.5.2 FTP Uploadr Preferences Screen
Use this screen to configure the general settings for the FTP Uploadr.
In the FTP Uploadr screen, click the Preferences icon to open the following screen.
Figure 166 Applications > Auto Upload > FTP Uploadr > Preferences

text_image
Folder Watch List Status Share Name Path Action Unknown Add Settings Grace Period The time the system will wait before a newly added file is saved in a watched folder. Grace Period 15 minutes Bandwidth Limit Max. Upload Rate 0 KB/s (0=No Limit) Apply Reset CloseThe following table describes the labels in this screen.
Table 98 Applications > Auto Upload > FTP Uploadr > Preferences
| LABEL DESCRIPTION | |
| Folder Watch List | |
| Status | This field indicates whether the share or folder is available.represents a valid folder. The folder is available for auto upload.represents a missing folder. The share may be deleted from the NAS, or the hard disk was removed from the NAS. |
| Share Name This is the share selected for auto upload. | |
| Path | This is the path of a folder selected for auto upload. The NAS only uploads files stored in the specified share or folder to your FTP server. |
| Action | Use the Remove icon to delete a folder from the Folder Watch List. |
| Add Click this to open | the following screen where you can set a folder that contains files you want the NAS to automatically upload.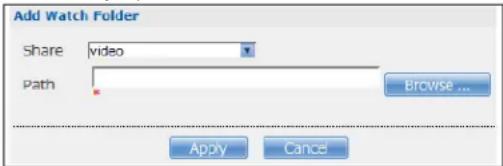 Share - Select the share from the list.Path - Type the folder location in the share directly or clickBrowse to open the following screen and navigate to the folder's location. Share - Select the share from the list.Path - Type the folder location in the share directly or clickBrowse to open the following screen and navigate to the folder's location. |
| Browse ...Current Location: /Type Namedownloadfirmware | |
| Current Location - This is the location of the selected folder.Folder Name - Enter a new folder name and clickto create it.Type - This is the type of the folder/file.Name - This is the name of the folder/file.Select a folder. If you don't select a folder, a forward slash (/) displays in thePath field.All contents within the specified share are automatically selected.ClickApplyto save your settings andCancelto close the screen. | |
| Settings | |
| Grace Period | Specify how long the NAS should wait when you add a new file for auto upload. For example, if you set the grace period to 5 minutes, the NAS uploads a new file after it has been in a watched folder for 5 minutes. You can choose from a range of 1 to 10080 minutes (up to one week). |
| Bandwidth Limit | Enter the maximum upload rate for auto upload. You can choose from a range of 0 to 100,000 KB/s. Enter 0 if you do not want to set any limit.Use this to leave bandwidth on your network connection for other traffic, especially if your Internet connection has restricted upload speed. |
| Apply Click this to | save your changes in this section. |
| Reset Click this to restore previously saved settings. | |
| Close Click this to return to the previous screen without saving. | |
20.1 Overview
The Dropbox Web-based file hosting service uses cloud computing to let you use file synchronization to store and share files and folders with others across the Internet. Use your Dropbox account to easily move files to your NAS and have the NAS download *.torrent files.
20.2 Dropbox Screen
Use the Dropbox screen to log the NAS into your Dropbox account. This creates Drop2NAS and zDownload folders in your Dropbox account. See Section 20.3 on page 276 for how to use the folders to move files to your NAS and have the NAS download *.torrent files. The NAS checks the Dropbox account's Drop2NAS and zDownload folders every three minutes.
Click Applications > Dropbox to open the following screen.
Figure 167 Applications > Dropbox
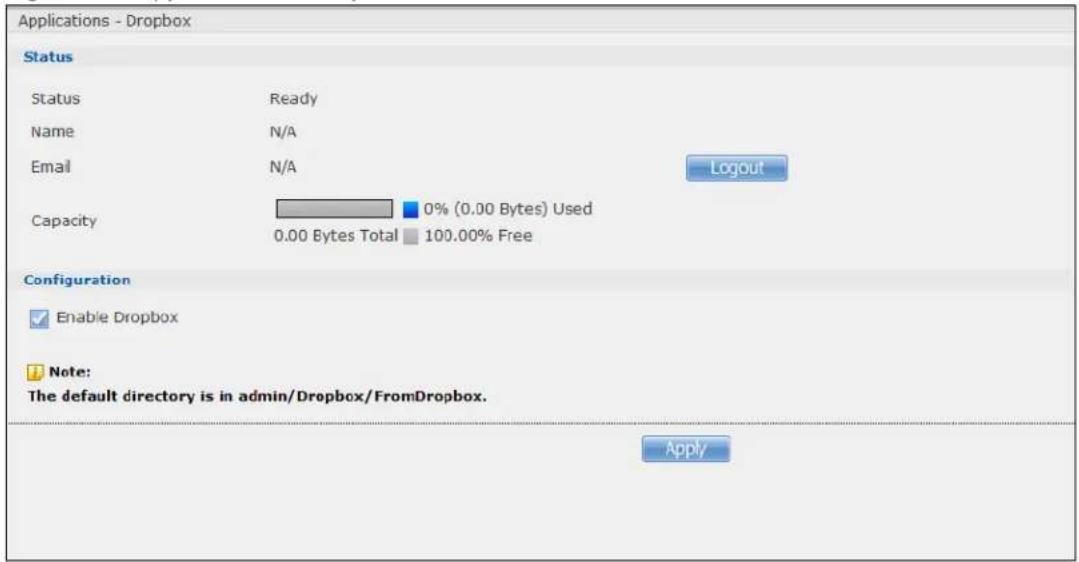
text_image
Applications - Dropbox Status Status Ready Name N/A Email N/A Capacity 0% (0.00 Bytes) Used 0.00 Bytes Total 100.00% Free Configuration Enable Dropbox Note: The default directory is in admin/Dropbox/FromDropbox. ApplyThe following table describes the labels in this screen.
Table 99 Applications > Dropbox
| LABEL DESCRIPTION | |
| Status This shows the | status of the NAS Dropbox application's interaction with the Dropbox server. |
| Disable: The NAS Dropbox application is turned off. | |
| Ready: The NAS Dropbox application has authenticated with the Dropbox server and is ready to use. | |
| Authenticating with Dropbox. Please wait.: The NAS Dropbox application is logging into the Dropbox server. | |
| Failed to negotiate link with Dropbox. Please contact your vendor.: The NAS cannot find the Dropbox server at the normal address. | |
| Receiving file/ folder from Dropbox tunnel.: The NAS is getting a file from your Dropbox account. | |
| Dropbox account has been already used on other NAS.: One Dropbox account can only work with one NAS at a time. Log the other NAS out of your Dropbox account to be able to use the account with this NAS. | |
| Name This is the owner of the Dropbox account the NAS is configured to use. | |
| This is the e-mail address of the owner of the Dropbox account the NAS is configured to use. | |
| Logout | This displays after the NAS connects to Dropbox. Click Logout to stop syncing your files with Dropbox and have the NAS log out from your Dropbox account. Use this to be able to use the NAS with another Dropbox account. If you only want to stop syncing your files with Dropbox, you can just clear the Enable Dropbox option and click Apply. |
| Capacity This shows how much total storage space is available on the NAS to use for Dropbox as well as the amounts already in use and still available. | |
| Enable Dropbox | Select this to synchronize and back up your Dropbox account. The first time you do this a Dropbox screen prompts you to log into your Dropbox account.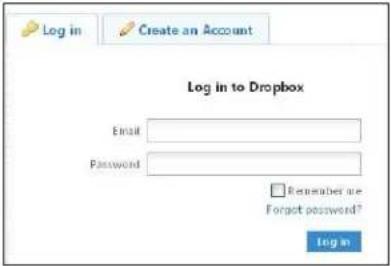 Then a NAS pop-up opens. Click Get Ready. Then a NAS pop-up opens. Click Get Ready. Click Allow when the Dropbox screen notifies you of the NAS's DropNAS application trying to connect to your Dropbox account. Click Allow when the Dropbox screen notifies you of the NAS's DropNAS application trying to connect to your Dropbox account. After the NAS connects to Dropbox, clear the Enable Dropbox option and click Apply to stop syncing your files with Dropbox without logging out from your Dropbox account. Click Logout instead to be able to use the NAS with another Dropbox account. After the NAS connects to Dropbox, clear the Enable Dropbox option and click Apply to stop syncing your files with Dropbox without logging out from your Dropbox account. Click Logout instead to be able to use the NAS with another Dropbox account. |
| Apply Click this to save your changes. | |
20.3 How to Use Dropbox with the NAS
Here is how to use the Drop2NAS and zDownload folders the NAS creates in your Dropbox account.
Using the Drop2NAS Folder
The NAS connects to Dropbox and copies files in the Drop2NAS folder to the NAS's admin\Dropbox\FromDropbox folder and empties the Drop2NAS folder. The NAS initiates connections to the Dropbox server so you do not need to configure rules on a firewall in front of the NAS to allow access to the NAS. Dropbox is not connecting to the NAS. When you upload files of the same name to the Drop2NAS folder, the NAS adds a number to the names of the files in the NAS's
admin\Dropbox\FromDropbox folder in the format of "filename(n).extension". Here is an example of the Drop2NAS folder.
Note: Do not delete the NAStoken file as it is needed for your NAS to work with the Dropbox account.
Figure 168 Dropbox\Drop2NAS
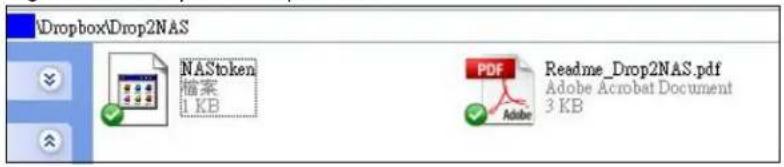
text_image
Dropbox\Drop2NAS NASDAQ 档案 1 KB PDF Adobe Readme_Drop2NAS.pdf Adobe Acrobat Document 3 KBUsing the zDownload Folder
The NAS copies *.torrent files in the zDownload folder to the NAS's admin\download\torrents folder and automatically starts downloading them. The NAS adds a suffix to the name of each torrent file in the Dropbox account's zDownload folder and keeps updating it to show the job's state (downloading, queued, paused, canceled, uploading, finished, error, or retrying). The NAS does not take any action for folders nor other types of files in the zDownload folder. Here is an example of torrent files in the zDownload folder.
Figure 169 Dropbox\zDownload
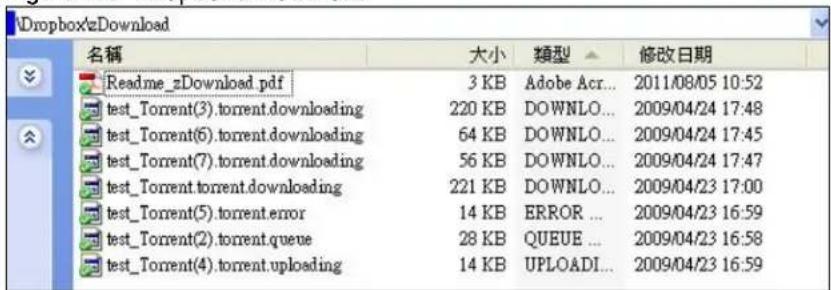
text_image
Dropbox/zDownload 名称 大小 類型 修改日期 Readme_zDownload.pdf 3 KB Adobe Acr... 2011/08/05 10:52 test_Torrent(3).torrent.downloading 220 KB DOWNLO... 2009/04/24 17:48 test_Torrent(6).torrent.downloading 64 KB DOWNLO... 2009/04/24 17:45 test_Torrent(7).torrent.downloading 56 KB DOWNLO... 2009/04/24 17:47 test_Torrent.torrent.downloading 221 KB DOWNLO... 2009/04/23 17:00 test_Torrent(5).torrent.error 14 KB ERROR ... 2009/04/23 16:59 test_Torrent(2).torrent.queue 28 KB QUEUE ... 2009/04/23 16:58 test_Torrent(4).torrent.uploading 14 KB UPLOADI... 2009/04/23 16:59Using Time Machine with the NAS
21.1 Overview
Time Machine is a backup system provided by Mac OS X. It automatically backs up everything on your Mac, including pictures, music, videos, documents, applications, and settings. This chapter helps you to enable Time Machine in OS X to use your NAS as a backup volume.
21.2 Time Machine Screen
Use the Time Machine screen to turn Time Machine support on or off, and designate the share for Time Machine backups.
Click Applications > Time Machine to open the following screen.
Figure 170 Applications > Time Machine
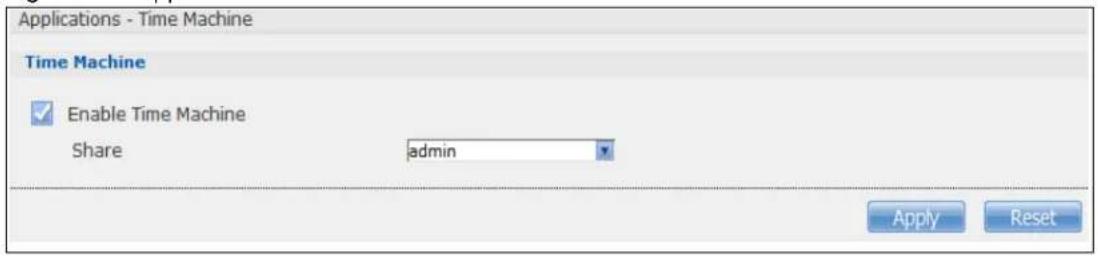
text_image
Applications - Time Machine Time Machine Enable Time Machine Share admin Apply ResetThe following table describes the labels in this screen.
Table 100 Applications > Time Machine
| LABEL DESCRIPTION | |
| Enable Time Machine | Select this to allow Macs to use Time Machine to back up to the NAS. Clear it to turn off Time Machine support. |
| Share Select the share | the NAS uses to store Time Machine backups. |
| Apply Click this to save your changes. | |
| Reset | Click this to restore the screen's last-saved settings. |
21.3 Using Time Machine
After enabling Time Machine on the NSA, follow the steps below to set up Time Machine on your Mac to use your NAS for backup.
1 Click Apple > System Preferences. Then go to System and select Time Machine.

text_image
System Preferences Show All Personal Appearance Desktop & Screen Saver Dock Expose & Spaces International Security Spotlight Hardware Bluetooth CDs & DVDs Displays Energy Saver Keyboard & Mouse Trackpad Print & Fax Sound Internet & Network MobileMe Network QuickTime Sharing System Accounts Date & Time Parental Controls Software Update Speech Startup Dial Time Machine Universal Access2 Turn Time Machine ON. Then click Change Disk.

text_image
Time Machine Show All Name: share1-1 Available: -- Oldest Backup: -- Latest Backup: -- Options... Next Backup: Today, 11:21 AM Change Disk... Time Machine keeps • Hourly backups for the past 24 hours • Daily backups for the past month • Weekly backups until your backup disk is full Show Time Machine status in the menu bar OFF ON Click the lock to prevent further changes.3 Select share01 as the backup disk. Then click Use for Backup.
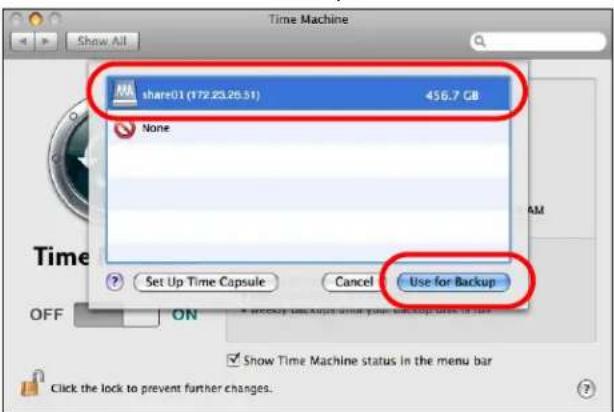
text_image
Time Machine Share01 (172.25.26.51) 456.7 GB None Set Up Time Capsule Cancel Use for Backup OFF ON Show Time Machine status in the menu bar Click the lock to prevent further changes.4 When prompted for the username and password of share01, enter the login information for an existing user account with write access permission on share01 (for information on configuring user accounts and shares see Section 14.6 on page 155). In this example user1/12345 is used. Then click Connect.
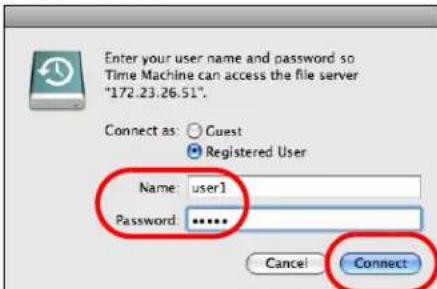
text_image
Enter your user name and password so Time Machine can access the file server "172.23.26.51". Connect as: Guest Registered User Name: user1 Password: ****** Cancel Connect5 Time Machine starts backing up files to share01 after 120 seconds. If you want to backup immediately, click Time Machine icon and select Back Up Now.
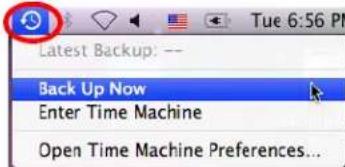
text_image
Latest Backup: -- Back Up Now Enter Time Machine Open Time Machine Preferences...6 The screen shows the status of the backup once the process begins.

text_image
Time Machine Show All Name: share01 Available: 456.5 GB of 458.0 GB Oldest Backup: -- Latest Backup: -- Options... Backing up: 218.9 MB of 18.2 GB Time Machine Backup Backing up 725,691 Items 218.9 MB of 18.21 GB Show Time Machine status in the menu bar Click the lock to prevent further changes.7 To stop the backup process, click the Time Machine icon and select Stop Backing Up. Then turn Time Machine OFF.

text_image
Preparing Backup... Stop Backing Up Enter Time Machine Open Time Machine Preferences...22.1 Overview
This chapter introduces the Users screens of the NAS. Use the Users screens to create and manage administrator and user accounts.
Administrators can:
- Configure and manage the NAS.
- Create volumes, shares, and user accounts.
- Assign individual users specific access rights for specific shares.
Users are people who have access rights to the NAS and can store files there for later retrieval. A user can:
- Manage shares that he owns.
- Change his own password.
- Access the contents of other shares to which he is given access rights.
22.2 What You Can Do
- Use the main Users screen (Section 22.3 on page 281) to display a list of user accounts created on the NAS.
- Use the Add User screen (Section 22.3.2 on page 283) to create new user accounts.
- Use the Edit User screen (Section 22.3.2 on page 283) to edit the properties of an existing account.
- Use the User Info screen (Section 22.4 on page 285) to display the amount of volume space used by a selected account and the account's membership in any groups.
22.3 Users Screen
Click Sharing > Users to display the screen shown next.
Use this screen to create and manage accounts for users who can store files on the NAS.
Figure 171 Sharing > Users
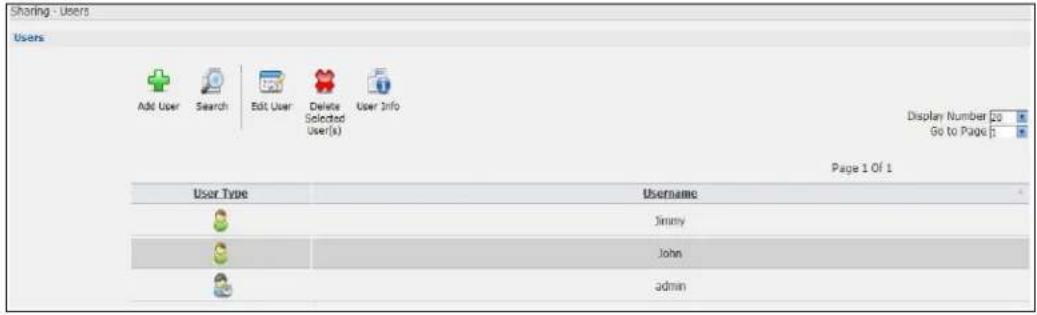
text_image
Sharing - Users Users Add User Search Edit User Delete User Info User Type Username Jimmy John admin Display Number 20 Go to Page 1 Page 1 Of 1The following table describes the labels in this screen.
Table 101 Sharing > Users
| LABEL DESCRIPTION | |
| Add User Click this to | open a screen where you can configure a new user account.Refer to Section 22.3.2 on page 283 to see the screen. |
| Search Click this to | display a search field. Type in the name of an account and then clickSearch to look up the account you specified. Click Clear to close the search function.    Add User Search Edit User Delete User Info[STWS] [STWS] Add User Search Edit User Delete User Info[STWS] [STWS] |
| Edit User Select an account and click this to open a screen where you can edit the properties of the account.Refer to Section 22.3.2 on page 283 to see the screen. | |
| Delete Selected Users | Select an account and click this to open a screen where you can delete the user account. |
| User Info | Select an account and click this to open a screen displaying the amount of storage space used by the account. You can also check the account's membership in any groups.Refer to Section 22.4 on page 285 to see the screen. |
| Display Number Click | the drop-down menu to set how many accounts you want to display in one screen. |
| Go to Page Click the | drop-down menu to display and access more user accounts. |
| User Type | This field displays whether the account is an administrator account or a user account. |
| Username This field displays the username of each account. | |
22.3.1 User Icons
The following table describes the user icons.
Table 102 User Icons
| ICON DESCRIPTION | |
 | The blue icon is for an administrator account. |
 | The green icon is for a user account. |
22.3.2 Adding or Editing an Account
Use this screen to create or edit a NAS user account with NAS access password.
Click the Add User button in the Users screen to open the following screens. Click the Edit User button in the screen shown previously to edit an existing account.
Figure 172 Sharing > Users > Add or Edit a User: General Settings
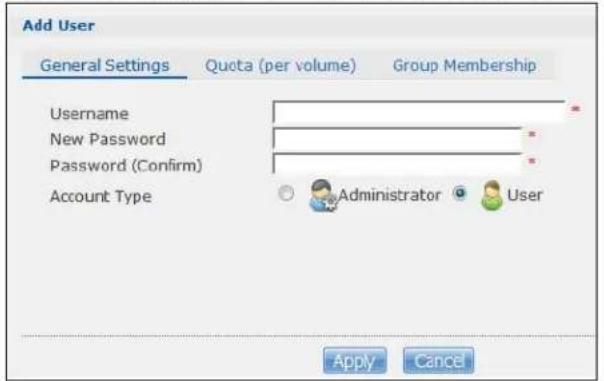
text_image
Add User General Settings Quota (per volume) Galou Membership Username New Password Password (Confirm) Account Type Administrator User Apply CancelFigure 173 Sharing > Users > Add or Edit a User: Quota (per volume)

text_image
Add User General Settings Quota (per volume) Group Membership Volume Name Quota (per volume) Volume1 ( 3.58 TB ) 0 MB (0 means unlimited) Apply CancelFigure 174 Sharing > Users > Add or Edit a User: General Settings
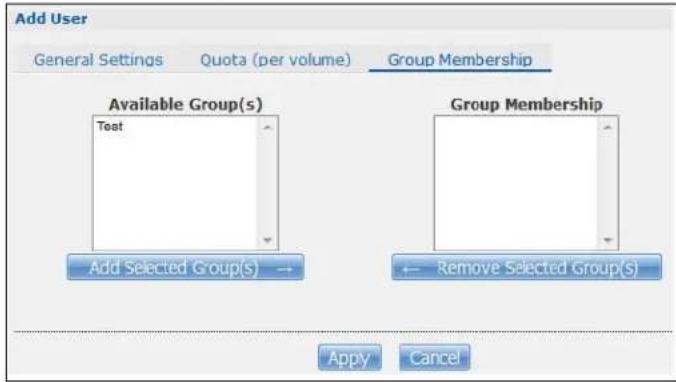
text_image
Add User General Settings Quota (per volume) Group Membership Available Group(s) Text Add Selected Group(s) → Group Membership ← Remove Selected Group(s) Apply CancelThe following table describes the labels in these screens.
Table 103 Users > Add or Edit a User
| LABEL DESCRIPTION | |
| General Settings Click this to configure the user's user name and password. | |
| Username | Type a name from 1 to 32 single-byte (no Chinese characters allowed for example) ASCII characters. See Section 22.3.3 on page 284 for more details on usernames. |
| New Password | Create a password associated with this user. You can type from one to 14 single-byte (no Chinese characters allowed for example) ASCII characters. |
| Password (Confirm) | You must type the exact same password that you just typed in the above field. |
| Account Type | Select Administrator to give the account full configuration and management access to the NAS.Select User to give the account basic access rights to the NAS and allow the user to manage his own shares, change his own password, and access the contents of other shares to which he is given access rights. |
| Quota (per volume) | Click this to configure which volume the user can use and the allowed storage space. |
| Volume Name Select | the volume in which you want the user's files to be stored. |
| Quota (per volume) | Enter how much space (in megabytes) you want to allow for the user to store files. |
| Group Membership Click | this to configure to which groups on the NAS the user belongs. |
| Available Group(s) | This field lists the groups created on the NAS to which the selected account does not belong. |
| Group Membership | This field lists the groups that the selected account belongs to. |
| Add Selected Group(s) | Select a group from the Available Groups list and click this to add the account to that group. |
| Remove Selected Group(s) | Select a group from the Group Membership list and click this to remove the account from that group. |
| Apply | Click this to save your changes. |
| Cancel | Click this to return to the previous screen without saving. |
22.3.3 Usernames
Enter a username from one to 32 characters. The first character must be alphabetical (case insensitive, [A-Z a-z]); numeric characters are not allowed as the first character.
The username can only contain the following characters:
- Alphanumeric A-z 0-9. Unicode usernames are supported with CIFS logins, but not FTP or web configurator logins.
- Spaces
- _ [underscores]
• . [ periods ] - [ d a s h e s ]
Other limitations on usernames are:
- All leading and trailing spaces are removed automatically.
- Multiple spaces within names are converted to a single space.
- Usernames are case insensitive. The username cannot be the same (no matter the letter case) as an existing user. For example, if a user exists with the name 'BOB', you cannot create a user named 'bob'. If you enter a user 'bob' but use 'BOB' when connecting via CIFS or FTP, it will use the account settings used for 'bob'.
-
The username cannot be the same as a system username such as ANONYMOUS-FTP nor be the same as an existing user. Other reserved usernames that are not allowed are:
-
bin
- daemon
- ftp
- anonymous-ftp
- anonymous
- nobody
- root
- p c - g u e s t
- admin
- password
22.4 Displaying User Info
Use this screen to display a user's information.
In the Users screen, select an account and click User Info to open the following screen.
Figure 175 Sharing > Users > User Info
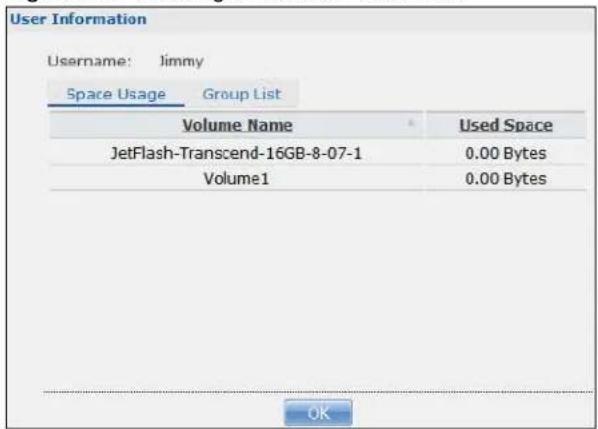
text_image
User Information Username: Jimmy Space Usage Group List Volume Name Used Space JetFlash-Transcend-16GB-8-07-1 0.00 Bytes Volume1 0.00 Bytes OKThe following table describes the labels in this screen.
Table 104 Sharing > Users > User Info
| LABEL DESCRIPTION | |
| Username This field displays the selected username. | |
| Space Usage Click this to display the amount of volume space used by the selected account. | |
| Group List Click this to display the selected user's group membership. | |
| Volume Name This field displays the volume(s) created on the NAS. | |
| Used Space This field displays how much storage space the selected account is currently using. This only applies for files that the user saved onto the NAS while logged in with that username. | |
| Group Name | This shows when you click the Group List tab.This displays the list of groups to which the selected user belongs. |
| OK Click this to close the current screen. | |
23.1 Overview
This chapter introduces the Groups screens. Use the Groups screens to create and manage groups. You can assign users to groups and grant individual groups access rights to specific shares.
23.2 What You Can Do
- Use the main Groups screen (Section 23.3 on page 287) to display and manage a list of groups created on the NAS.
- Use the Add Group screen (Section 23.3.1 on page 288) to create new groups.
- Use the Edit Group screen (Section 23.3.1 on page 288) to edit the properties of an existing group.
23.3 Groups Screen
Use this screen to create and manage groups.
Click Sharing > Groups to display the screen shown next.
Figure 176 Sharing > Groups
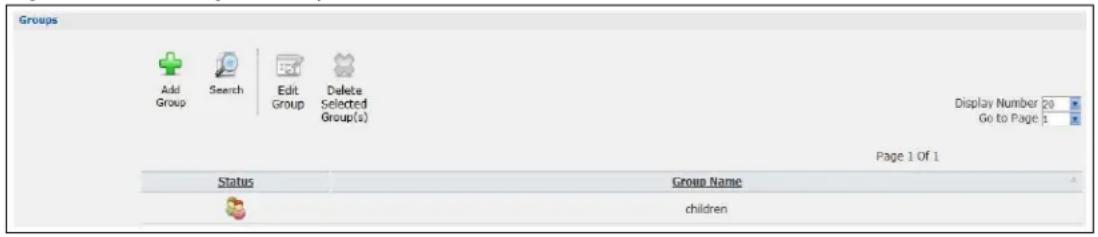
text_image
Groups Add Group Search Edit Group Delete Selected Group(s) Display Number 20 Go to Page 1 Page 1 Of 1 Status Group Name childrenThe following table describes the labels in this screen.
Table 105 Sharing > Groups
| LABEL DESCRIPTION | |
| Add Group Click this to open a screen where you can configure a new group. | |
| Search | Click this to display a search field. Type the name of a group and then click function. Click Clear to close the search 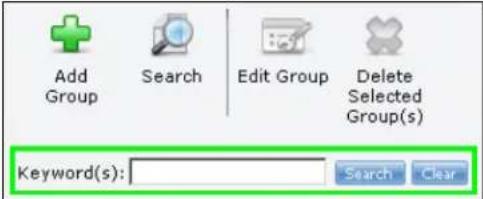 |
| Edit Group Select a group and click this to open a screen where you can edit the properties of the selected group. | |
| Delete Selected Group(s) | Select a group and click this to open a screen where you can delete the group. 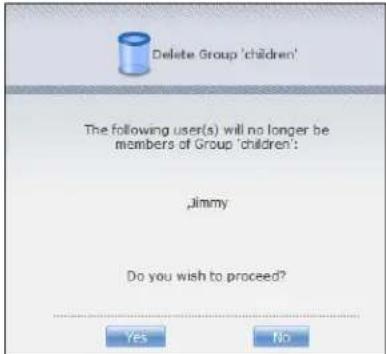 |
| Display Number Click the drop-down menu to set how many groups you want to display in one screen. | |
| Go to Page Click the drop-down menu to select a page number. Jump to a different page to display and access more groups. | |
| Status This field displays the group icon. | |
| Group Name This field displays the group names created on the NAS. | |
23.3.1 Adding or Editing a Group
Use this screen to create or edit a NAS group.
Click the Add Group button in the Groups screen to open the following screen. Click the Edit Group button in the screen shown previously to edit an existing group.
Figure 177 Sharing > Groups > Add or Edit a Group

text_image
Add Group Group Name Available User(s) Jimmy John admin Group Membership Add Selected User(s) → ← Remove Selected User(s) Apply CancelThe following table describes the labels in this screen.
Table 106 Sharing > Groups > Add or Edit a Group
| LABEL DESCRIPTION | |
| Group Name | Type a name from 1 to 32 single-byte (no Chinese characters allowed for example) ASCII characters. See Section 23.3.2 on page 289 for more details on group names. |
| Group Membership | Use this field to assign group membership to individual users. |
| Available User(s) This field lists the user accounts created on the NAS that are not members of the current group. | |
| Group Membership This field lists the user accounts added to the group. | |
| Add Selected User(s) | Select a user account from the Available Users list and click this to add the account to the group. |
| Remove Selected User(s) | Select a user account from the Group Membership list and click this to remove the account from the group. |
| Apply Click this to save your changes. | |
| Cancel Click this to return to the previous screen without saving. | |
23.3.2 Group Names
Enter a group name from 1 to 32 characters. The first character must be alphabetical (case insensitive, [A-Z a-z]); numeric characters are not allowed as the first character.
The group name can only contain the following characters:
- Alphanumeric A-z 0-9. Unicode usernames are supported with CIFS logins, but not FTP or web configurator logins.
- Spaces
- _ [underscores]
• . [ periods ] - [dashes]
Other limitations on group names are:
- All leading and trailing spaces are removed automatically.
-
Multiple spaces within names are converted to a single space.
-
Group names are case insensitive. The group name cannot be the same (no matter the letter case) as an existing group. For example, if a group exists with the name 'FAMILY', you cannot create a group named 'family'.
- The group name cannot be the same as a system group name such as EVERYONE nor be the same as an existing group. Other reserved groups names that are not allowed are:
- nobody
- root
- everyone
24.1 Overview
A share is a set of access permissions mapped to a specific folder on a volume. It is equivalent to the Windows concept of a shared folder. You can map a share to a network drive for easy and familiar file transfer for Windows users.
24.2 What You Can Do
- Use the Shares screen (Section 24.3 on page 291) to navigate a list of shares created on the NAS.
- Use the Add Shares screen (Section 24.3.1 on page 293) to create additional shares on the NAS.
- Use the Recycle Bin screen (Section 24.4 on page 295) to configure and clean up the recycle bins.
- Use the Edit Share screen (Section 24.3.1 on page 293) to edit a share's properties.
- Use the Share Browser screen (Section 24.5 on page 296) to navigate, add and edit the contents in a share.
24.3 Shares Screen
Click Sharing > Shares in the navigation panel to open the following screen. This screen lists all shares created on the NAS.
Figure 178 Sharing > Shares

text_image
Sharing - Shares shares Add Share Recycle Bin Edit Share Delete Share Share Browser Status Share Type Share Name Share Path Share Owner Permission Type Auto JetFlash-Transcend-16GB-8-07-1 JetFlash-Transcend-16GB-8-07-... admin Public Predefined video Volume1/video admin Public Predefined photo Volume1/photo admin Public Predefined music Volume1/music admin Public Built-in admin Volume1/admin admin PrivateThe following table describes the labels in this screen.
Table 107 Sharing > Shares
| LABEL DESCRIPTION | |
| Add Share Click this to create a new share. | |
| Recycle Bin Click this to configure recycle bins. | |
| Edit Share Select a share and click this to edit the share. | |
| Delete Share | Select a share and click this to remove or restrict access to the share. |
| Share Browser Select a share and click this to browse the share's contents. | |
| Status This field displays the share icons. | represents aBuilt-inshare on a volume on the internal hard drives.represents aPredefinedorUser-Createdshare on a volume on the internal hard drives.represents anAutoorUser-Createdshare on a volume on the external (USB) devices.represents a disabled share that no user can access.represents a missing share. The NAS cannot find the hard disk associated with the share (the disk may be removed from the NAS for example). You may install the disk back to the NAS to recover the share, or you may delete the share from the NAS. |
| Share Type | This field displaysBuilt-infor the admin share. If you delete the volume containing this share, the NAS automatically creates an admin share in the next volume by alphabetical order.This field displaysPredefinedfor default shares. Default shares, including music, video, and photo, always exist as long as there is a volume. If you delete the volume containing these default shares, the NAS automatically creates these shares in the next volume by alphabetical order.This field displaysUser-createdfor shares that an administrator has created. You can delete these shares.This field displaysAutofor shares that are automatically created on an external (USB) device when a user plugs in the device. |
| Share Name This field displays the share's names. | |
| Share Path | This field displays the share's file path, for example, volume1/music. |
| Share Owner This is the name of the user account to which this share belongs. | |
| Permission Type This field displays the access permission of a share. | |
24.3.1 Adding or Editing Share
Click Add Share to create a new share. In the Shares screen, select a share and click Edit Share to open the following screen. Use this screen to create or edit a share.
Figure 179 Shares > Add Share (or Edit Share)
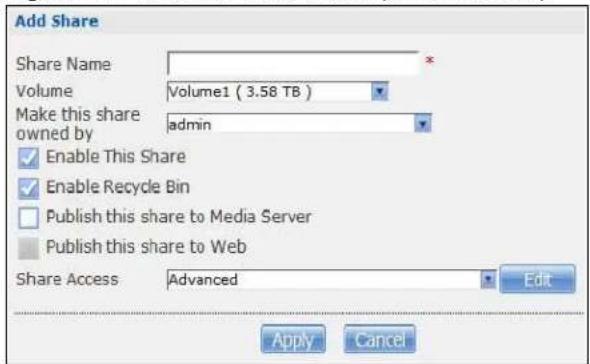
text_image
Add Share Share Name Volume Volume1 ( 3.58 TB ) Make this share owned by admin Enable This Share Enable Recycle Bin Publish this share to Media Server Publish this share to Web Share Access Advanced Edit Apply CancelThe following table describes the labels in this screen.
Table 108 Shares > Add Share (or Edit Share)
| LABEL DESCRIPTION | |
| Share Name | Type a share name from 1 to 239 single-byte (no Chinese characters allowed for example) ASCII characters. The name cannot be the same as another existing share. See Section 11.2.2 on page 128 for more information on share names. |
| Volume | You should have already created volumes (a single accessible storage area with a single file system) on the NAS. Select the one that contains the folder that you want to share out.You cannot modify this when editing a share. |
| Make this share owned by | Select the administrator or user account that can own (manage) this share. The share owner controls access rights to the share. |
| Enable this share | Click this to allow access to this share. |
| Enable Recycle Bin | Click this to activate the recycle bin. When you delete a file from this share, a recycle folder is created to store the deleted item. |
| Publish this share to Media Server | This option is available only when you enable the Media Server (Section 17.5 on page 216).Select this option to have the NAS make media files in this share available to media clients and through the Playzone screens. When you publish a share, you can also select whether or not to publish music tracks, photos, and videos. The media clients do not have to use a password to play the shares you publish. |
| Publish this share to Web | This option is available when you enable theWeb Publish(Section 17.8 on page 230).Select this option to let people use a web browser to access this share's files without logging into the Web Configurator. |
| Share Access | Assign access rights (full, read only or deny) to users or groups. If you publish the share to the media server or the web, all users will have at least read-only access to the share, regardless of what you configure here.Keep it private to ownermeans only the share owner (selected above) can access the share.Make it Publicmeans every user (including people who do not have accounts on the NAS) can access the share.Advancedallows you to assign specific access rights (full, read only or deny) to individual users/groups. |
| Edit | This button is available only when you selectAdvancedshare access. Click this to configure advanced share access rights. |
| Apply Click this to | save your changes. |
| Cancel Click this to | return to the previous screen without saving. |
24.3.2 Configuring Advanced Share Access
In the Sharing > Shares > Add Share or Edit Share screen, select Advanced from the Share Access drop-down list. Click Edit to open the following screen. Use this screen to configure share access rights for individual users and groups.
Figure 180 Sharing > Shares > Add Share (or Edit Share) > Advanced

text_image
Share Access Configuration Available User(s)/Group(s)The following table describes the labels in this screen.
Table 109 Sharing > Shares > Add Share (or Edit Share) > Advanced
| LABEL DESCRIPTION | |
| Available Users/Groups | This field lists the users/groups to which you can assign access rights. |
| Authority Use this field to assign access rights to users/groups.Full Control gives users/groups full access (read, write and execute) to all files contained within this share.Read-Only gives users/groups read-only access (they cannot modify nor execute) to all files contained within this share.Deny blocks access (users/groups cannot read, modify, nor execute) to all files contained within this share.Among all access rights, Deny has the highest priority. For example, User A belongs to Group 1. You assign User A full access rights to the Music share but deny access rights to Group 1. Then User A cannot access the Music share.Note: If you deny access to all users, no-one can use the share, not even the administrator. | |
  | Click an arrow button to move users/groups between the left and right fields. Use the arrow buttons to assign access rights to users/groups. |
| Apply Click this to save your changes. | |
| Cancel Click this to return to the previous screen without saving. | |
24.3.3 Public and ANONYMOUS Share Access Rights
If you make a share public, users do not need to log in.
With ANONYMOUS FTP, you must enter either 'anonymous' or 'ftp' as the username. Any other name is considered a username, so must be valid and have a corresponding correct password.
24.4 Recycle Bin Configuration Screen
Use this screen to periodically clean up items in all recycle bins.
24.4.1 Recycle Bins
Recycle bins in the NAS help users recover accidentally deleted files or folders in the shares. When you delete an item, a recycle folder is created within the share to hold the deleted item.
Every share can have its own recycle folder. You must enable the recycle-bin function to recycle deleted items. You can configure this setting when you add or edit a share. See Section 24.4.2 on page 296 for details on activating the recycle bin in a share.
Later if you want to retrieve a deleted item, you can locate the item in the recycle folder. You may move or copy the deleted item to another share.
24.4.2 Configuring Recycle Bins
In the Sharing > Shares screen, click Recycle Bin to open the following screen.
Figure 181 Sharing > Shares > Recycle Bin
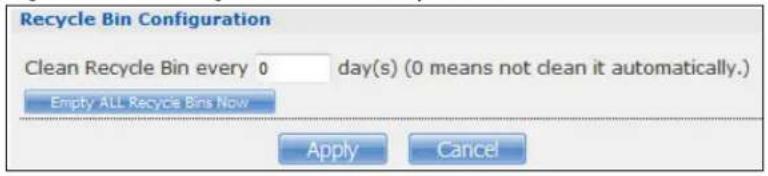
text_image
Recycle Bin Configuration Clean Recycle Bin every 0 day(s) (0 means not clean it automatically.) Empty ALL Recycle Bins Now Apply CancelThe following table describes the labels in this screen.
Table 110 Sharing > Shares > Recycle Bin
| LABEL DESCRIPTION | |
| Clean Recycle Bin every N days | Specify how often you want to clear the contents in all recycle bins. The specified days correspond to how long a file has been stored in a recycle bin. For example, if you set the interval to be 3 days, recycle bins will clean up items deleted or not accessed for 3 days.Note: Cleaning up recycle bins permanently removes the files from the NAS. |
| Empty All Recycle Bins Now | Click this to immediately remove contents from all recycle bins. |
| Apply Click this to save your changes. | |
| Cancel Click this to return to the previous screen without saving. | |
24.5 Share Browser Screen
Use this screen to create folders, upload files, and edit files within the share.
Figure 182 Sharing > Shares > Share Browser

text_image
Share Browsing Create Folder Upload Rename Delete Move Copy Current Location: /music Type Name Size Modified Date Bon Jovi When you believe.mp3 4.18 MB 2015-08-26 10:03:06 Up Where We Belong.mp3 3.53 MB 2015-08-26 09:05:48 The Calling - Our Lives.mp3 5.30 MB 2015-08-26 09:05:43 Somewhere Out There.mp3 3.63 MB 2015-08-26 09:05:57 Olivia Ong - If I Ain't Got You.mp3 5.24 MB 2015-08-26 09:04:36 Olivia Ong - The Rose.mp3 8.79 MB 2015-08-26 09:04:31 Olivia Ong - I Feel The Earth Move.MP3 3.59 MB 2015-08-26 09:04:26 Olivia Ong - Fall In Love With - 12.Only With You.mp3 8.35 MB 2015-08-26 09:04:22 Olivia Ong - Fall In Love With - 04.Sometimes when We Touch.mp3 9.43 MB 2015-08-26 09:04:17 Miley Cyrus - When I Look At You.mp3 5.73 MB 2015-08-26 08:59:14 MAKING LOVE OUT OF NOTHING AT ALL.mp3 5.25 MB 2015-08-26 09:09:04The following table describes the labels in this screen.
Table 111 Sharing > Shares > Share Browser
| LABEL DESCRIPTION | |
| Create Folder | Type a folder name and clickApplyto make a new folder. The name can be 1 to 239 single-byte (no Chinese characters allowed for example) ASCII characters. The name cannot be the same as another existing folder in the same path. SeeSection 11.2.2 on page 128for more information on folder names. |
| Upload | Click this to add files to the share. UseBrowse to locate a file and clickApplyto upload the file. Note that the size of each file should be less than 2 GB. |
| Rename | Select a folder or file and click this to open a screen. Enter the name you want and click OK to make the changes.Note: When you change a file name, make sure you keep the file extension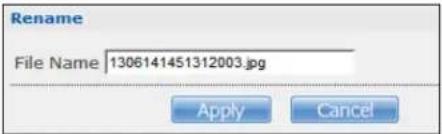 |
| Delete | Select a file/folder from the list and click this to open a warning screen. ClickYesto delete the file/folder, or clickNoto close the screen. |
| Move | Select a file/folder from the list and click this to relocate the file/folder to another share. |
| Copy | Select a file/folder from the list and click this to make a duplicate of the file/folder to another share. |
| Current location | This is the name of the share and folder path that you are in. |
| Type | The icon in this column identifies the entry as a folder or a file. Click a music or video file's play icon to play the file.The folder with an arrow pointing up is for the link that takes you to the next higher layer in the share's folder tree. |
| Name This section | lists the share's existing folders or files. Click to the right of the file/folder name to select the file/folder. You can also click the folder's name to navigate to a sub-folder within the folder. |
| Size This field displays size of the file. | |
| Modified Date This field displays a file's latest modification date. | |
| Close Click this to close the screen. | |
24.5.1 Moving or Copying Files
Use this screen to move or copy files to another share.
In the Share Browser screen, select a file or folder and click Move or Copy to open the following screen.
Figure 183 Sharing > Shares > Share Browser > Move (or Copy)

text_image
Select a folder Shares video Path Browse ... Note: Files with same filename will be overwritten Apply CancelThe following table describes the labels in this screen.
Table 112 Sharing > Shares > Share Browser > Move (or Copy)
| LABEL DESCRIPTION | |
| Shares Select the destination share from the drop-down list. | |
| Path | This field displays the share folder's path. You can useBrowse to find or create a folder on the NAS or type the location of the folder using forward slashes as branch separators. |
Browse Click this to open the following screen and navigate to the location of the file/folder. Current Location- This is the location of the selected folder.Folder Name - Enter a new folder name and clickto create it.Type- This identifies the item as a folder or file.Name- This is the name of the folder/file.Select a folder. If you don't select a folder, a forward slash (/) displays in thePathfield. All contents within the specified share are automatically selected.ClickApplyto save your settings andCancelto close the screen. Current Location- This is the location of the selected folder.Folder Name - Enter a new folder name and clickto create it.Type- This identifies the item as a folder or file.Name- This is the name of the folder/file.Select a folder. If you don't select a folder, a forward slash (/) displays in thePathfield. All contents within the specified share are automatically selected.ClickApplyto save your settings andCancelto close the screen. | |
| Yes | Click this to move or copy the file/folder to the designated share. |
| Close Click this | to return to the Share Browser screen. |
25.1 Overview
The WebDAV HTTP extension lets users edit and manage files stored on remote servers. The NAS's WebDAV service allows client programs that support WebDAV, such as NetDrive and BitKinex on Windows, Mac OS Finder, and Linux file browsers remotely edit and manage files stored on the NAS.
25.2 WebDAV Screen
Use the WebDAV screen to allow remote users to use client programs that support WebDAV to edit and manage files stored on the NAS.
Click Sharing > WebDAV to open the following screen.
Figure 184 Sharing > WebDAV

text_image
Sharing - WebDAV WebDAV Enable WebDAV to allow users to access the shared folders remotely. To edit the access privileges, please go to the "Sharing" > "Shares" page. Enable WebDAV (Http/Https) Turn off WebDAV could cause mobile app, Zyxel Drive, functions failed. Enable anonymous WebDAV Note: ° You must click on the "Apply" button for applying WebDAV settings. Apply ResetThe following table describes the labels in this screen.
Table 113 Sharing > WebDAV
| LABEL DESCRIPTION | |
| Enable WebDAV (http/Https) | Select this to allow remote users to work with files stored on the NAS. Edit the access privileges in Sharing > Shares. Https is for secure WebDAV connections to the NAS. |
| Example When you enable WebDAV the screen displays an example of the URL users would use to use WebDAV to connect to the NAS where “sharename” represents a share that the user can access. Use HTTPS for secure WebDAV connections to the NAS. | |
| Enable anonymous WebDAV | Select this to allow remote users to use WebDAV to access all shares on the NAS without a login name or password. |
| Apply Click this to save your changes. | |
| Reset Click this to discard any unsaved changes and restore previously saved settings. | |
25.3 How to Use NetDrive with the NAS
Here is an example of how to use the NetDrive WebDAV client with the NAS.
1 Download and install NetDrive.
2 Click Add Drive and use the URL for WebDAV connections to the NAS to add a drive entry for accessing the NAS.
Figure 185 NetDrive Example

text_image
NetDrive Add Drive Delete Drive Drives Options ? About Net drive 2 days 015 Purchase License Charles_test (S:) http://192.168.1.10/webdav/admin Connect Box.net https://dav.box.com/dav Connect Google Drive Connect OneDrive Connect Amazon S3 Connect Openstack Swift Connect FTP Connect3 Name the drive and specify the URL of the share to access. Select SSL if the NAS forces HTTPS use. Specify your user name and password for accessing the share on the NAS.
Figure 186 NetDrive Add Drive
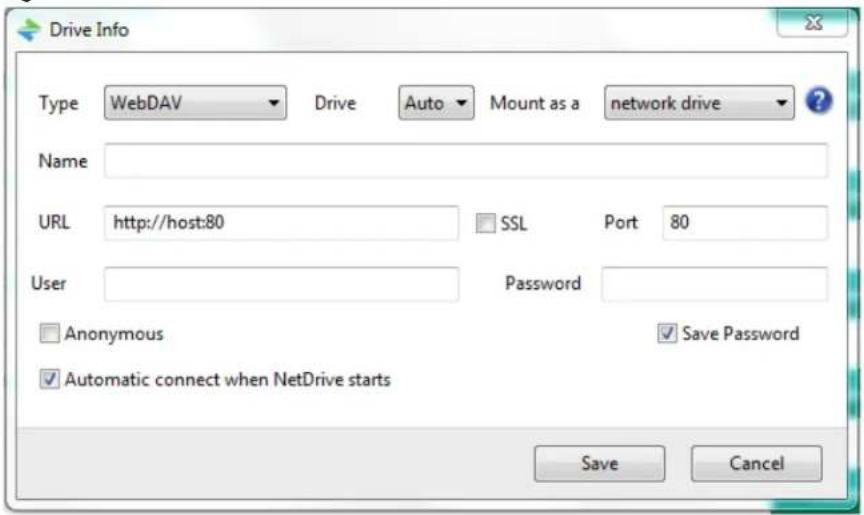
text_image
Drive Info Type WebDAV Drive Auto Mount as a network drive ? Name URL http://host:80 SSL Port 80 User Password Anonymous Save Password Automatic connect when NetDrive starts Save CancelMaintenance Screens
26.1 Overview
This chapter discusses the Maintenance screens. The Maintenance screens allow you to manage system configurations.
26.2 What You Can Do
- Use the Power screen (Section 26.3 on page 302) to configure power settings for the NAS, including power saving, UPS, power on/off after power failure, power on/off schedule, and Wake on LAN.
- Use the Log screen (Section 26.4 on page 306) to check the system's logs.
- Use the Configuration screen (Section 26.5 on page 310) to backup or restore the NAS configuration file.
- Use the SSL screen (Section 26.6 on page 311) to configure HTTPS and the NAS's SSL certificate.
- Use the Shutdown screen (Section 26.7 on page 313) to restart or shut down your NAS.
- Use the Unpair myZyXELcloud screen (Section 26.8 on page 314) to remove the pairing between the NAS and the myZyXELcloud account.
26.3 Power Screen
Use this screen to manage power settings for the NAS.
Click Maintenance > Power to display the following screen.
Figure 187 Maintenance > Power
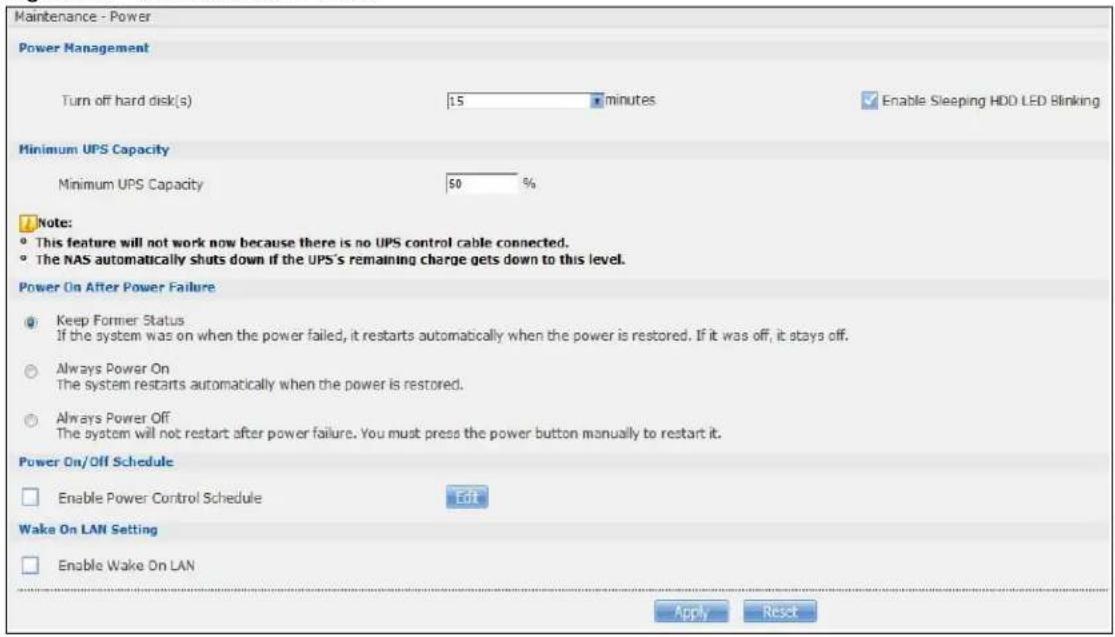
text_image
Maintenance - Power Power Management Turn off hard disk(s) 15 minutes Enable Sleeping HDD LED Blinking Minimum UPS Capacity Minimum UPS Capacity 50 % Note: • This feature will not work now because there is no UPS control cable connected. • The NAS automatically shuts down if the UPS's remaining charge gets down to this level. Power On After Power Failure • Keep Former Status If the system was on when the power failed, it restarts automatically when the power is restored. If it was off, it stays off. • Always Power On The system restarts automatically when the power is restored. • Always Power Off The system will not restart after power failure. You must press the power button manually to restart it. Power On/Off Schedule • Enable Power Control Schedule Edit Wake On LAN Setting • Enable Wake On LAN Apply ResetThe following table describes the labels in this screen.
Table 114 Maintenance > Power
| LABEL DESCRIPTION | |
| Power Management | |
| Turn off hard disk(s) | Enter the number of minutes to wait when the NAS is idle before spinning the hard disks down to sleep (hibernation). The default time is 15 minutes. |
| Enable Sleeping HDD LED Blinking | Select this to have the HDD LED blink slowly when the hard disk is sleeping (hibernating). Clear this to have the HDD LED stay on when the hard disk is sleeping. |
| Minimum UPS Capacity | |
| Minimum UPS Capacity | When you use an APC Uninterruptible Power Supply (UPS) with a USB connection to the NAS, the NAS shuts itself down if the APC UPS's battery charge gets down to the percentage you specify in this field. This allows the NAS to shut down properly and avoid data loss caused by a power failure when the UPS stops supplying power.A setting around 50% is recommended. A setting close to 100% is not recommended since it would cause the NAS to shut down whenever the UPS is charging. A setting close to 0 is also not recommended since the UPS would not have enough power to allow the NAS to shutdown properly. |
| Power On After Power Failure | Select an option to set whether or not the NAS restarts when the power is restored after a power failure.Note: |
| Keep Former Status | Select this option to have the NAS automatically restart only if it was operating when the power failed. The NAS remains off if it was already off when the power failed. |
| Always Power On | Select this option to keep the NAS operating as much of the time as possible. The NAS restarts automatically even if it was turned off when the power failed. |
| Always Power Off | Select this option to keep the NAS from automatically restarting when the power is restored after a power failure. This is a computer's “traditional” behavior. Select this if you have other servers such as a domain controller or DNS server that you want to start or check after a power failure before the NAS turns on. |
| Power On/Off Schedule | |
| Enable Power Control Schedule | Select this option to have the NAS turn itself off and on or reboot according to the schedules you configured.Click Edit to go to the screen where you can configure the power control schedules.Refer to Section 26.3.1 on page 304 for this screen.Note: |
| Enable Wake On LAN | Enable Wake On LAN to be able to turn on the NAS through its wired Ethernet connection.You must have a computer or router on your LAN that supports sending Wake On LAN “magic packets” to turn on the NAS.To use Wake On LAN from a computer on your LAN, install a program such as Wake On LAN EX or another Wake On LAN program that supports sending magic packets.You can use Wake On LAN from a remote location if the router in front of the NAS supports sending magic packets.Use the NAS's power button or the Web Configurator's Maintenance > Shutdown menu to turn off the NAS. |
| Apply Click this to | save your changes. |
| Reset Click this to | restore previously saved settings. |
26.3.1 Editing the Power Control Schedule Screen
Click Maintenance > Power Management > Edit to open this screen. Use this screen to configure power control schedules to have the NAS turn on, turn off, or reboot at specified times.
Figure 188 Maintenance > Power Management > Edit
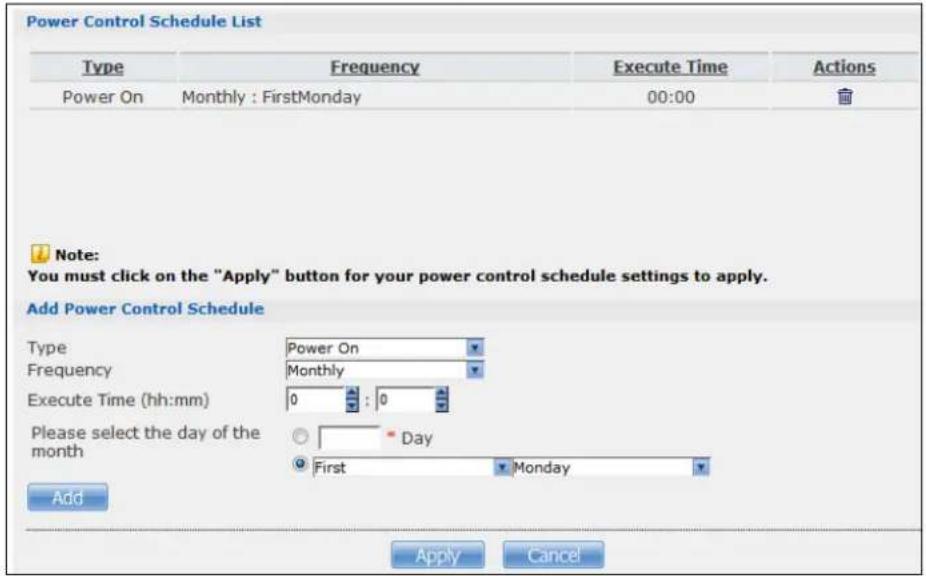
text_image
Power Control Schedule List Type Frequency Execute Time Actions Power On Monthly : FirstMonday 00:00 Note: You must click on the "Apply" button for your power control schedule settings to apply. Add Power Control Schedule Type Power On Frequency Monthly Execute Time (hh:mm) 0 : 0 Please select the day of the month Day First Monday Add Apply CancelThe following table describes the labels in this screen.
Table 115 Maintenance > Power Management > Edit
| LABEL DESCRIPTION | |
| Power Control Schedule List | This table lists the power on, power off, and reboot schedules. For example, you could have one schedule to turn the NAS on every morning, at 8:00, another schedule to turn it off every evening at 18:00, and a third schedule to have it reboot every Friday at 14:00.Click a column's heading cell to sort the schedules by that column's criteria. Click the heading cell again to reverse the sort order. |
| Type | This field displays whether the power control schedule has the NAS turn on, turn off, or reboot. |
| Frequency This field | ld shows how often (monthly, weekly, or daily) the NAS is to apply this power control schedule. |
| Execute Time This | field shows when the NAS is to use this power control schedule (when the NAS is to turn on, turn off, or reboot). |
| Actions | Click the Delete icon to remove a power control schedule from the list. |
| Add Power Control Schedule | Use this part of the screen to configure power on, power off, and reboot times. |
| Type Select whether this power control schedule has the NAS turn on, turn off, or reboot. | |
| Frequency Select | whether the NAS is to apply this power control schedule entry on a monthly, weekly, or daily basis. |
| Execute Time (hh:mm) | Enter the time, day, and/or day of the month as appropriate for this power control schedule entry. Leave more than 10 minutes between the execution times of the entries.If the NAS turns off or restarts while a user is transferring files to or from the NAS, the transfer fails. The user will need to restart the transfer.The NAS skips a scheduled restart or power off if the execution time comes while the NAS is doing any of the following:Resynchronizing a RAIDUpgrading firmwareReplacing the configuration fileIf the NAS is turned off at the time when a restart or power off is scheduled, the NAS does not perform the restart or power off.If the NAS is turned on at the time when a power on is scheduled, the NAS does not perform the power on. |
| Use this part of the screen to configure power on, power off, and reboot times. | |
| Please select the day of the month | This is only available if you set the Frequency to Monthly.Choose the day of each month for the power control schedule entry. |
| Every how many weeks? | This is only available if you set the Frequency to Weekly.Enter the interval between weeks and choose the day of the week for the power control schedule entry. |
| Every how many days? | This is only available if you set the Frequency to Daily.Enter the interval between days for the power control schedule entry. |
| Add Click this to add the power control schedule to the list. | |
| Apply Click this to save your changes. | |
| Cancel Click this to return to the previous screen without saving. | |
26.4 Log Screen
Click Maintenance > Log to open the following screen.
Use this screen to display all NAS logs. There are at most 512 entries in the log. Older logs are removed by the system. You cannot download the log file via FTP or CIFS.
Figure 189 Maintenance > Log
| # | Time | Class | Severity | Message |
| 1 | 2015-08-31 08:50:40 | user | notice | Add new group family. |
| 2 | 2015-08-31 08:50:31 | user | notice | Add new group children, |
| 3 | 2015-08-31 08:50:14 | user | notice | Delete group Test. |
| 4 | 2015-08-31 08:44:46 | user | info | User admin has logged in from WebI |
| 5 | 2015-08-31 04:47:16 | system | info | NTP fails to update from bme.stdtime.gov.tw |
| 6 | 2015-08-31 04:47:02 | built-in-service | info | Auto daylight saving setting: SUCCESS |
| 7 | 2015-08-30 16:47:17 | system | info | NTP fails to update from bme.stdtime.gov.tw |
| 8 | 2015-08-30 16:47:03 | built-in-service | info | Auto daylight saving setting: SUCCESS |
| 9 | 2015-08-30 04:47:16 | system | info | NTP fails to update from time.stdtime.gov.tw |
| 10 | 2015-08-30 04:47:02 | built-in-service | info | Auto daylight saving setting: SUCCESS |
| 11 | 2015-08-29 16:47:17 | system | info | NTP fails to update from bme.stdtime.gov.tw |
| 12 | 2015-08-29 16:47:03 | built-in-service | info | Auto daylight saving setting: SUCCESS |
| 13 | 2015-08-29 04:47:16 | system | info | NTP fails to update from time.stdtime.gov.tw |
The following table describes the labels in this screen.
Table 116 Maintenance > Log
| LABEL DESCRIPTION | |
| Refresh Click this to update the log display. | |
| Purge all Logs Click this to erase all logs from the NAS. | |
| Report Config | Click this to open a screen where you can configure email alerts for logs. Refer to Section 26.4.1 on page 307 to see the screens for this. |
| Display | The screen always shows all logs by default. Choose a specific log category to view logs for just that category. |
| # This is the log | entry's number in the list according to the currently selected sort order. |
| Time | This shows the date and time the log was created. Click the top of the column to sort by oldest or newest. |
| Class | This displays the log category; see Table 124 on page 314for details. |
| Severity | This displays how serious the log is rated by the NAS. See Table 125 on page 315for more information. |
| Message | This displays a description of the log. Click the top of the column to sort by alphabetical or reverse alphabetical order. |
26.4.1 Report Config Screen
In the Log screen, click Report Config to do the following:
- Use the Email Setting screen (Section 26.4.2 on page 308) to enable and configure e-mail alerts from the NAS.
- Use the Report Setting screen (Section 26.4.3 on page 308) to select the type of alerts you want to receive through e-mail and schedule when the NAS e-mails the alerts.
- Use the Syslog Server Setting screen (Section 26.4.4 on page 309) to enable the syslog server and select the categories to include in the log report.
26.4.2 Email Setting
You can enable and configure e-mail alerts from the NAS. In the Report Config screen, click the Email Setting tab to open the following screen.
Figure 190 Maintenance > Log > Report Config: Email Setting
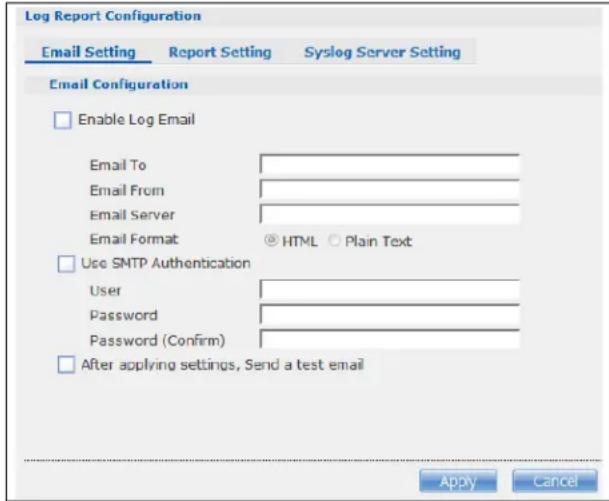
text_image
Log Report Configuration Email Setting Report Setting Syslog Server Setting Email Configuration Enable Log Email Email To Email From Email Server Email Format HTML Plain Text Use SMTP Authentication User Password Password (Confirm) After applying settings, Send a test email Apply CancelThe following table describes the labels in this screen.
Table 117 Maintenance > Log > Report Config: Email Setting
| LABEL DESCRIPTION | |
| Enable Log Email Click this to have the NAS e-mail log alerts to your e-mail account. | |
| Email To Enter the e-mail address where you want to receive the log alerts. | |
| Email From Enter the e-mail address the NAS uses in the From field of the e-mail header for its log alerts. | |
| Email Server Enter the e-mail server address the NAS uses to send e-mail alerts, | |
| Email Format Select the e-mail format you want the NAS to use in its e-mail alerts. | |
| Use SMTP Authentication | Click this if the e-mail server you want the NAS to use for its e-mail alerts requires a username and password. |
| User Enter the username for the e-mail server. | |
| Password Enter the password for the e-mail server. | |
| Password (Confirm) | Re-enter the password to confirm it. |
| After apply settings, send a test email | Click this to have the NAS send a test e-mail to the settings you have entered. |
| Apply Click this to save your changes. | |
| Cancel Click this to return to the previous screen without saving. | |
26.4.3 Report Setting
You can have the NAS email you alerts and reports. In the Report Config screen, click the Report Setting tab to open the following screen.
Figure 191 Maintenance > Log > Report Config: Report Setting
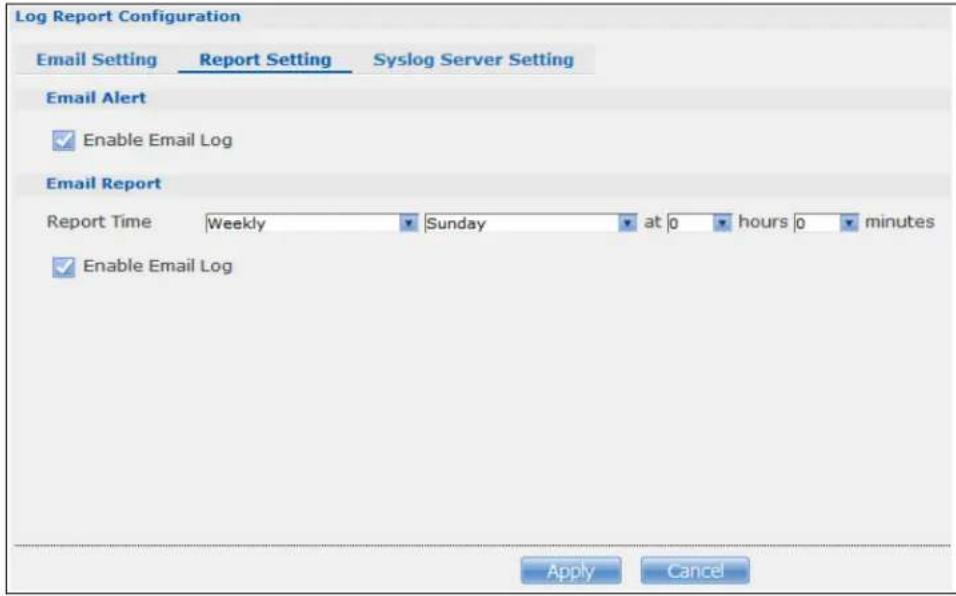
text_image
Log Report Configuration Email Setting Report Setting Syslog Server Setting Email Alert Enable Email Log Email Report Report Time Weekly Sunday at 0 hours 0 minutes Enable Email Log Apply CancelThe following table describes the labels in this screen.
Table 118 Maintenance > Log > Report Config: Report Setting
| LABEL DESCRIPTION | |
| Email Alert | Select the Enable Email Log check box to have the NAS send an alert email to the configured email address whenever the NAS generates a critical severity log. |
| Report Time | Select how often (Weekly, Daily or Hourly), the day of the week (for weekly reports), and the time (hour:minutes) the NAS sends a report email. |
| Enable Email Log | Select the check box to have the NAS email reports of all logs the NAS generates to the configured email address. |
| Apply Click this | to save your changes. |
| Cancel Click this | to return to the previous screen without saving. |
26.4.4 Syslog Server Setting
You can enable the syslog server and select the categories to include in the log report. In the Report Config screen, click the Syslog Server Setting tab to open the following screen.
Figure 192 Maintenance > Log > Report Config: Syslog Server Setting
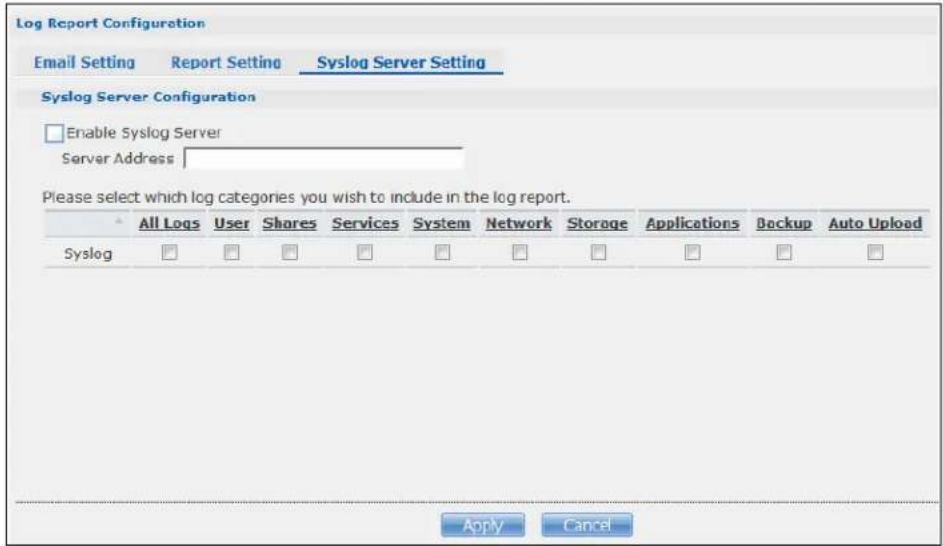
text_image
Log Report Configuration Email Setting Report Setting Syslog Server Setting Syslog Server Configuration Enable Syslog Server Server Address Please select which log categories you wish to include in the log report. All Logs User Shares Services System Network Storage Applications Backup Auto Upload Syslog Apply CancelThe following table describes the labels in this screen.
Table 119 Maintenance > Log > Report Config: Syslog Server Setting
| LABEL DESCRIPTION | |
| Enable Syslog Server | Check this to enable syslog server. |
| Server Address Enter the syslog server address you want the NAS to use for its log alerts. | |
| In the table below, check the type of log alerts you want to receive in your e-mail. Select All Log to include all types of log alerts. | |
| Apply Click this to | save your changes. |
| Cancel Click this to | return to the previous screen without saving. |
26.5 Configuration Screen
Click Maintenance > Configuration to open the following screen. Use this screen to backup or restore the NAS configuration settings.
Figure 193 Maintenance > Configuration
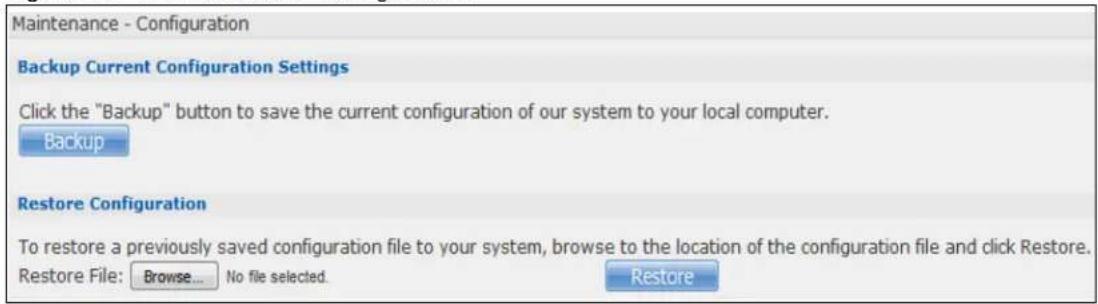
text_image
Maintenance - Configuration Backup Current Configuration Settings Click the "Backup" button to save the current configuration of our system to your local computer. Backup Restore Configuration To restore a previously saved configuration file to your system, browse to the location of the configuration file and click Restore. Restore File: Browse... No file selected. RestoreThe following table describes the labels in this screen.
Table 120 Maintenance > Configuration
| LABEL DESCRIPTION | |
| Backup Current Configuration Settings | |
| Backup Click this to save the current configuration of the NAS to your computer. A pop-up screen appears asking you to confirm. Click OK to continue or Cancel to quit. | |
| Restore Configuration When you restore a file configuration, the NAS checks the volumes/share paths on the NAS and the configuration file.If the volume exists but the share path is missing in the NAS, the NAS automatically creates this share path.If the volume does not exist on the NAS, the Status of the share will show “missing share icon” in Shares screen (see Table 107 on page 292). | |
| Browse Click this to locate a previously-saved configuration file. | |
| Restore | Click this to load the previously-saved configuration file to the NAS. This replaces your current NAS configuration settings with the settings in the previously-saved configuration file.A pop-up screen appears asking you to confirm. Click OK to continue or Cancel to quit. |
26.6 SSL Certification
Click Maintenance > SSL to open this screen, where you can turn on HTTPS, create a public key certificate, or upload a public key certificate that was issued by a known certificate authority.
Figure 194 Maintenance > SSL
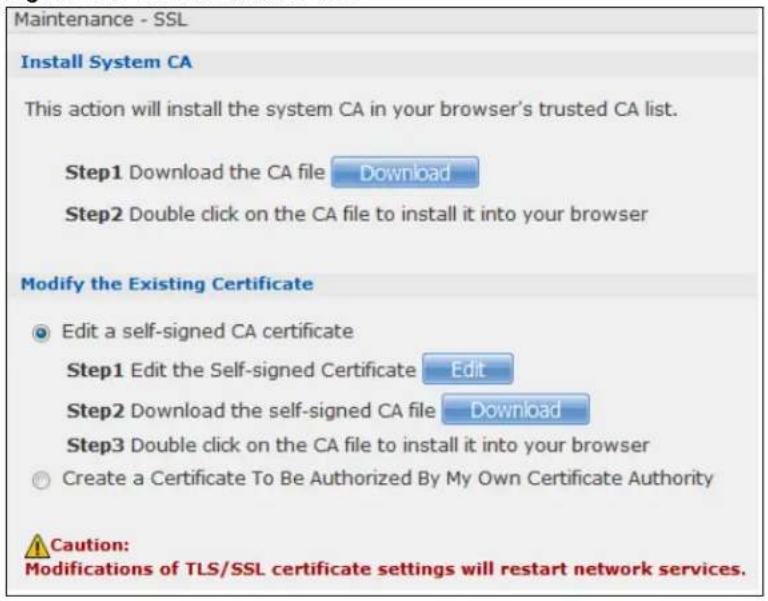
text_image
Maintenance - SSL Install System CA This action will install the system CA in your browser's trusted CA list. Step1 Download the CA file Download Step2 Double click on the CA file to install it into your browser Modify the Existing Certificate Edit a self-signed CA certificate Step1 Edit the Self-signed Certificate Edit Step2 Download the self-signed CA file Download Step3 Double click on the CA file to install it into your browser Create a Certificate To Be Authorized By My Own Certificate Authority Caution: Modifications of TLS/SSL certificate settings will restart network services.The following table describes the labels in this screen.
Table 121 Maintenance > SSL
| LABEL DESCRIPTION | |
| Install System Default CA | Click Download button to save a copy of the NAS's public key certificate to your local computer. This is useful for installing the certificate without having to connect to the NAS, or for sending by email to other users for them to install prior to logging into the NAS for the first time. After saving the certificate to your computer, double-click it to install it.Note: Each web browser handles certificate installation differently. |
| Modify the Existing Certificate | Select Edit a self-signed CA certificate, then follow the on-screen instructions for creating a public key certificate signed by the NAS as the local certificate authority.Note: Use certificates created and signed by the NAS if the device is not open to external access.Select Create a certificate authorized by other CA, then follow the on-screen instructions to install a certificate that has been authorized by a third-party certificate authority.Note: Use this method if the device is open to external access, such as allowing users to connect through the Internet using FTP over TLS or HTTPS. |
26.6.1 Modifying or Creating a Certificate
When you select the Edit a self-signed CA certificate option, then click the Edit button, a screen opens to allow you to make adjustments to the NAS's public key certificate.
The screen is also the same for the Create a certificate authorized by other CA option.
Figure 195 Maintenance > SSL > Create or Edit a Certificate
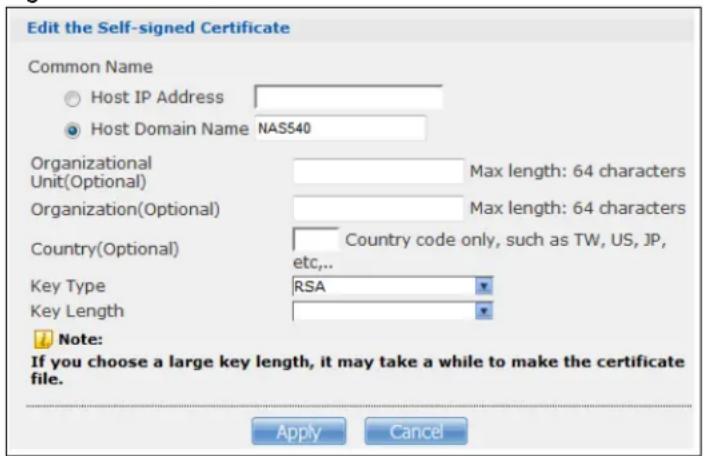
text_image
Edit the Self-signed Certificate Common Name Host IP Address Host Domain Name NAS540 Organizational Unit(Optional) Max length: 64 characters Organization(Optional) Max length: 64 characters Country(Optional) Country code only, such as TW, US, JP, etc,... Key Type RSA Key Length Note: If you choose a large key length, it may take a while to make the certificate file. Apply CancelThe following table describes the labels in this screen.
Table 122 Maintenance > SSL > Create or Edit a Certificate
| LABEL DESCRIPTION | |
| Common Name | This name describes the certificate's origin, either in the form of an IP address or a domain name. |
| Host IP Address | Select this option and enter the NAS's IP address if you want to use this for the common name. |
| Host Domain Name | Select this option and enter the NAS's domain name if you want to use this for the common name |
| Organizational Unit (Optional) | Enter this name of the organizational unit which owns or maintains the NAS. This is an optional field. |
| Organization (Optional) | Enter this name of the organization or company which owns or maintains the NAS. This is an optional field. |
| Country (Optional) | Enter this name of the country in which the NAS is located. This is an optional field. |
| Key Type | Select the certificate's key type, either RSA or DSA. RSA is a public-key encryption and digital signature algorithm, while DSA is only a digital signature algorithm. |
| Key Length Select the encryption key length. The longer the key, the better the encryption security. The only drawback to having a long key is that the file encrypted with it swells in size as well. | |
| Apply Click this to save your changes. | |
| Cancel Click this to discard changes and close the window. | |
26.7 Shutdown Screen
Use this screen to turn off the NAS or perform a software restart. A software restart is faster than turning the NAS off and then turning it on again. Before shutting down or restarting, check the System Status > Active Sessions screen to make sure that no one is logged into the NAS or transferring files to or from the NAS.
Click Maintenance > Shutdown to open the following screen.
Figure 196 Maintenance > Shutdown

text_image
Maintenance - Shutdown System Shutdown Click Restart to have the device perform a software restart. The SYS LED blinks as the device restarts and then stays steady on if the restart is successful. Wait a minute before logging into the device again. Restart ShutdownThe following table describes the labels in this screen.
Table 123 Maintenance > Shutdown
| LABEL DESCRIPTION | |
| Restart | Click this to have the device perform a software restart. |
| Shutdown Click this to | shut down the system and restart it again later. |
When you click the Restart button a pop-up screen will appear asking you to confirm. Click OK to continue or Cancel to quit the restart.
Figure 197 Maintenance > Shutdown > Confirm Restart

text_image
Restart system now? Yes NoWhen you click the Shutdown button a pop-up screen will appear asking you to confirm. Click OK to continue or Cancel to quit the shutdown.
Figure 198 Maintenance > Shutdown > Confirm Shutdown

text_image
Shutdown system now? Yes No26.8 Unpair myZyXELcloud Screen
Figure 199 Use this screen to remove the pairing between the NAS and the myZyXELcloud account if you want to pair the NAS with a different myZyXELcloud account. You have to pair the NAS and your myZyXELcloud account before performing the unpair. Click Maintenance > Unpair myZyXELcloud to open the following screen, and click Unpair.
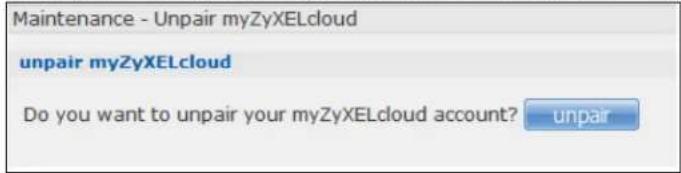
text_image
Maintenance - Unpair myZyXELcloud unpair myZyXELcloud Do you want to unpair your myZyXELcloud account? unpair26.9 Technical Reference
This section provides technical background information on the topics discussed in this chapter.
26.9.1 Log Classes
The following table shows information on log classes.
Table 124 Log Classes
| LOG CATEGORY | DESCRIPTION |
| Users This log class shows information on user access to the NAS. | |
| Shares This log class shows information on shares being created or deleted. | |
| Services This log class shows information on the operation of the NAS's built-in services. | |
| System This log class shows all other system related messages. | |
| Network This log class shows information on network configuration, setting changes and so on. | |
| Storage | This log class shows information on the NAS's internal and external storage activities. |
| Backup This log class shows information on all backup-related activities. | |
| Auto Upload This log class shows information on automatic uploads done by the NAS. | |
26.9.2 Log Severity Levels
The following table shows information on log severity levels. Levels range from 0 to 6 with 0 being the most severe level log and 6 being an informational log only. Log levels are not displayed in the logs and are for your reference only.
Table 125 Log Severity Levels
| LEVEL DESCRIPTION | |||||||||
| 0 | E | m | e | r | g | e | n | c | y |
| 1 | A | l | e | r | t | ||||
| 2 | C | r | i | t | i | c | a | l | |
| 3 Error | |||||||||
| 4 Warning | |||||||||
| 5 | N | o | t | i | c | e | |||
| 6 | l | n | f | o | |||||
26.9.3 Log Messages
Here are some example log messages.
Table 126 Log Messages
| CLASS SEVERITY | MESSAGE | |
| Auto upload INFO %s is queued. | ||
| Auto upload INFO %s uploaded (Flickr or YouTube Upload). | ||
| Auto upload WARNING error uploading "%s" (%s): %s | ||
| Auto upload INFO %s will not be uploaded to %s for there is already a duplicate file. | ||
| Auto upload INFO Failed to upload %s to %s (FTP Upload) : %s | ||
| Auto upload INFO Successfully upload %s to %s (FTP Upload) | ||
| Copy/Sync Button ERROR [USB %s] Backup Folder Does Not Exist. | ||
| Copy/Sync Button ERROR [USB %s] Target Folder Does Not Exist. | ||
| Copy/Sync Button | ERROR | [USB Sync] Failed at %s: It is a Folder in Internal Volume. But It is not a Folder in USB. |
| Copy/Sync Button ERROR [USB Sync] Failed at %s: It is a Folder in USB. But It is not a Folder in Internal Volume. | ||
| Copy/Sync Button ERROR [USB Sync] Failed at File %s. | ||
| Copy/Sync Button ERROR [USB Sync] Sync Failed at Folder %s. | ||
| Copy/Sync Button ERROR Modify COPY/SYNC Button Configuration: %s | ||
| Copy/Sync Button ERROR Please Change Your Folder Name. Invalid Path: %s | ||
| Copy/Sync Button INFO [USB Sync] Copying %s from Internal Volume to Backup Folder. | ||
| Copy/Sync Button INFO [USB Sync] Copying %s from Internal Volume to USB. | ||
| Copy/Sync Button INFO [USB Sync] Copying %s from USB to Backup Folder. | ||
| Copy/Sync Button INFO [USB Sync] Copying %s from USB to Internal Volume. | ||
| Copy/Sync Button INFO [USB Sync] Deleting %s from Internal Volume. | ||
| Copy/Sync Button INFO [USB Sync] Deleting %s from USB. | ||
| Copy/Sync Button INFO [USB Sync] Deleting %s from USB Recursively. | ||
| Copy/Sync Button INFO [USB Sync] Finished. Elapsed Time %s Seconds. | ||
| Copy/Sync Button INFO [USB Sync] Moving %s from Internal Volume to Backup Folder. | ||
| Copy/Sync Button INFO [USB Sync] Moving %s from USB to Backup Folder | ||
| Copy/Sync Button INFO [USB Sync] Skip %s: File not Exist | ||
| Copy/Sync Button INFO [USB Sync] Skip %s: Not a Regular File. | ||
| Copy/Sync Button INFO [USB Sync] Start Pre-Processing: Generating File Lists. | ||
| Copy/Sync Button NOTICE [USB Sync] Start Copying Files. | ||
| Download Service ERROR Download service cannot find a volume | ||
| Download Service ERROR Download service failed to find ipfilter.dat | ||
| Download Service INFO Download service add a URL download job %s | ||
| Download Service INFO Download service delete %s by user | ||
| Download Service INFO Download service download %s error (0x%08x) | ||
| Download Service INFO Download service download %s finished in %s | ||
| Download Service INFO Download service found a new torrent file %s | ||
| Download Service INFO Download service initialized | ||
| Download Service INFO Download service pause %s by user | ||
| Download Service INFO Download service set %s to %s priority by user | ||
| Download Service INFO Download service set default download location to %s | ||
| Download Service INFO Download service set max P2P download rate to %d KB/s by user | ||
| Download Service INFO Download service set max P2P upload rate to %d KB/s by user | ||
| Download Service INFO Download service set max download slot to %d | ||
| Download Service INFO Download service set seeding time to %d minutes | ||
| Download Service INFO Download service set TCP port to %d and UDP port to %d | ||
| Download Service INFO Download service set torrent monitor location to %s | ||
| Download Service INFO Download service start to download %s | ||
| Download Service INFO Download service stopped | ||
| Download Service INFO Download download service suspend %s because of no data income detected or to limit max download slot | ||
| Download Service INFO Download service add comment %s to %s by user | ||
| Download Service INFO Download service set min upload/download ratio to %d% | ||
| Download Service INFO Download service set max seed slot to %d | ||
| Download Service INFO Download service start loading ipfilter.dat | ||
| Download Service INFO Download service clear all ipfilter rules | ||
| Download Service INFO Download service blocked peer removed from peer list | ||
| Download Service INFO Download download service disconnected blocked peer | ||
| Download Service INFO Download service incoming connection blocked by IP filter | ||
| Download Service INFO Download service peer from tracker blocked by IP filter | ||
| Download Service INFO Download service abort loading ipfilter.dat | ||
| Download Service INFO Download service will update ipfilter.dat from %s after %d day(s) | ||
| Download Service INFO Download service added %d rules from ipfilter.dat | ||
| Download Service INFO Download service detected invalid ip range %s in ipfilter.dat | ||
| Download Service WARNING | Download service default location does not exist. Load default | |
| Download Service | WARNING | Download service default torrent location does not exist. Load default |
| Groups NOTICE Add | new group %s. | |
| Groups NOTICE Delete group %s. | ||
| Network INFO DyDNS: Start Success | ||
| Network INFO DyDNS: Stop Success | ||
| Network | NOTICE | %s is active because of changing Port Group. Enable DHCP client. |
| Network NOTICE %s | is inactive because of changing Port Group. Disable DHCP client. | |
| Network NOTICE %s | MTU > (%s MTU - 8), %s may not work correctly. | |
| Network NOTICE (% s MTU - 8) < | %s MTU, %s may not work correctly. | |
| Network NOTICE Add | interface %s. | |
| Network NOTICE Because %s link | down. Default route will not apply until %s link up. | |
| Network NOTICE Because base interface %s will be disabled. Interface %s is disabled now.,base_ud_iface | ||
| Network NOTICE Network Config setting is changed | ||
| Network NOTICE Interface %s was disabled. | ||
| Network NOTICE Interface %s was enabled. | ||
| Network NOTICE Port Group on %s is changed. Renew DHCP client. | ||
| Network NOTICE Account pppoe was changed | ||
| Network NOTICE Add account pppoe | ||
| Network NOTICE ADD interface ppp0 | ||
| Network | NOTICE | Interface ppp0 will reapply because Device-Ha become active status. |
| Network NOTICE Interface ppp0 will reapply because Device-Ha is not running. | ||
| Network NOTICE Network port is disabled | ||
| Network NOTICE Network port is enabled | ||
| Network ERROR DyDNS: Start Error | ||
| Network ERROR DyDNS: Stop Error | ||
| Services INFO HTTP management port has changed to %s | ||
| Services INFO Clock timezone is set to GMT%s | ||
| Services INFO Clock timezone is set to default | ||
| Services INFO Clock daylight saving is enabled | ||
| Services INFO Clock daylight saving is disabled | ||
| Services INFO Clock has disable daylight saving | ||
| Services INFO MyClock has enable daylight saving | ||
| Services INFO MyClock has set timezone to %s | ||
| Services INFO MyClock has set timezone to default | ||
| Services INFO The date and time are updated from NTP server. | ||
| Services INFO The date and time are updated manually. | ||
| Services INFO The time is updated manually. | ||
| Services NOTICE FTP server stops | ||
| Services NOTICE FTP server starts | ||
| CLASS | SEVERITY | MESSAGE |
| Services NOTICE My | Clock has changed daylight saving interval | |
| Services NOTICE My | Clock has disabled daylight saving interval | |
| Services NOTICE NTP | server has set to '%s' | |
| Services NOTICE NTP | server has set to null | |
| Services NOTICE The | NTP service is disabled. | |
| Services NOTICE The | NTP service is enabled. | |
| Services WARNING | Reaching Maximum Allowed Rules | |
| Services WARNING | Rule is empty | |
| Services WARNING | The Rule Does Not Exist | |
| Shares INFO Expire | recycle-bin finish for share %s, process time: %s seconds, remove %s file (%s bytes) | |
| Shares NOTICE Add | new disabled share %s for unshared folder: %s in volume: %s. | |
| Shares NOTICE Add | new share %s. | |
| Shares NOTICE Delete | share %s. | |
| Shares NOTICE Purge | all files in recycle-bin folder in share: %s. | |
| Shares NOTICE Recycle-bin disabled. Remove recycle-bin folder in share: %s. | ||
| Storage ERROR Eject External Disk (%s): FAILED | ||
| Storage INFO Eject External Disk (%s): SUCCESS | ||
| Storage ERROR Cancel External Volume Scan: FAILED | ||
| Storage ERROR Can hot Unmount | Volume and RAID. System Busy Using Volume and RAID: Please Reboot and Try Again | |
| Storage ERROR Create External | Normal Volume [%s] (%s): FAILED | |
| Storage ERROR Rename External | Volume to [%s]: FAILED | |
| Storage ERROR Scan External Volume: FAILED | ||
| Storage INFO Cancel External Volume Scan: SUCCESS | ||
| Storage | INFO Create External Normal Volume [%s] (%s): SUCCESS | |
| Storage INFO Rename External Volume to [%s]: SUCCESS | ||
| Storage INFO Scan External Volume: SUCCESS | ||
| storage Info Create raidType [Volume1]: SUCCESS | ||
| storage error | Create raidType [Volume1]: FAILED | |
| storage Info Create raidType [Disk group 1]: SUCCESS | ||
| storage error | Create raidType [Disk group 1]: FAILED | |
| storage Info Create Internal Volume [Volume1] (Size=512MB): SUCCESS | ||
| storage error | Create Internal Volume [Volume1] (Size=512MB): FAILED | |
| storage Info Delete Volume [Volume1] SUCCESS | ||
| storage error | Delete Volume [Volume1] FAILED | |
| storage Info Delete Disk Group [Disk Group 1] SUCCESS | ||
| storage error | Delete Disk Group [Disk Group 1] FAILED | |
| storage Info initialize Repair Degraded Raid [Volume1]: SUCCESS | ||
| storage error | initialize Repair Degraded Raid [Volume1]: FAILED | |
| storage Info initialize Repair Degraded Raid [Disk Group 1]: SUCCESS | ||
| storage error | initialize Repair Degraded Raid [Disk Group 1]: FAILED | |
| CLASS SEVERITY | MESSAGE | |
| storage Info Add disk1 to Volume1: SUCCESS | ||
| storage error Add disk1 to Volume1: FAILED | ||
| storage Info Add disk1 to Disk Group 1: SUCCESS | ||
| storage error Add disk1 to Disk Group 1: FAILED | ||
| storage Info Change | Volume1 Raid type to raid5: SUCCESS | |
| storage error Change | Volume1 Raid type to raid5: FAILED | |
| storage Info Change | Disk Group 1 | Raid type to raid5: SUCCESS |
| storage error Change | Disk Group 1 | Raid type to raid5: FAILED |
| storage Info Add Hot-Spare disk1 | to Raid [Volume1]: SUCCESS | |
| storage error Add Hot-Spare disk1 | to Raid [Volume1]: FAILED | |
| storage Info Add Hot-Spare disk1 | to Raid [Disk Group 1]: SUCCESS | |
| storage error Add Hot-Spare disk1 | to Raid [Disk Group 1]: FAILED | |
| storage Info Remove | Hot-Spare disk1 from Raid [Volume1]: FAILED | |
| storage error Remove | Hot-Spare disk1 from Raid [Volume1]: SUCCESS | |
| storage Info Remove | Hot-Spare disk1 from Raid [Disk Group1]: FAILED | |
| storage error Remove | Hot-Spare disk1 from Raid [Disk Group1]: SUCCESS | |
| storage Info Expand | Volume [Volume1] : SUCCESS | |
| storage error Expand | Volume [Volume1] : FAILED | |
| storage Info Expand | Disk Group [Disk Group 1] SUCCESS | |
| storage error Expand | Disk Group [Disk Group 1] FAILED | |
| System INFO NTP update failed | ||
| System INFO NTP updates successfully from %s | ||
| System INFO NTP fails to update from %s | ||
| System INFO Device is rebooted by administrator! | ||
| System INFO Device is shutdown by administrator! | ||
| System NOTICE DNS server is changed. | ||
| System NOTICE Hostname is cleared. | ||
| System NOTICE Hostname is set to '%s'. | ||
| System NOTICE System description is changed. | ||
| System NOTICE System description is empty now. | ||
| System NOTICE DNS server setting is changed | ||
| System NOTICE DNS server address is changed to be given from DHCP server | ||
| System NOTICE DNS server address is changed to be assigned by user | ||
| System NOTICE Name server is changed. | ||
| USB NOTICE An external APC UPS device is plugged/unplugged. | ||
| USB | NOTICE | An external Mass Storage device is plugged/unplugged. |
| USB NOTICE An external Printer device is plugged/unplugged. | ||
| USB NOTICE An external USB hub device is plugged/unplugged. | ||
| Users | ALERT | Failed %s login attempt (incorrect password or inexistent username) |
| Users | ALERT | Failed %s login attempt (incorrect password or inexistent username) |
| Users INFO User %s has logged in from %s! | ||
| Users INFO User %s | has logged out from %s! | |
| Users INFO User %s | from %s has been logged out (re-auth timeout)! | |
| Users INFO User %s | from %s has been logged out (lease timeout)! | |
| Users NOTICE Add new user %s by %s from %s. | ||
| Users NOTICE User %s password has been changed. | ||
| Users NOTICE Delete user %s by %s from %s. | ||
| Users | NOTICE | The user %s from %s has attempted to change the user %s password but old password verification fail. |
| Users NOTICE User %s on %u.%u.%u %u %u has been denied access from %s | ||
| Users NOTICE User %s password has been changed by %s from %s. | ||
| Backup/Restore ERROR When query remote target [%s]: %s | ||
| Backup/Restore INFO Backup job [%s] successfully | ||
| Backup/Restore ERROR When backup [%s]: %s | ||
| Backup/Restore ERROR When backup [%s], error happens: %s | ||
| Backup/Restore INFO Start to restore backup job [%s]. | ||
| Backup/Restore INFO Restore backup job [%s] successfully. | ||
| Backup/Restore ERROR Restore backup job [%s] failed: %s | ||
| Backup/Restore INFO Start to restore backup job [%s] from [%s]. | ||
| Backup/Restore INFO Restore from [%s] successfully. | ||
| Backup/Restore ERROR Restore from [%s] failed: %s | ||
| Backup/Restore ERROR When restore [%s]: %s | ||
| Backup/Restore ERROR When restore job [%s], error happens: %s | ||
| Power Management | NFO Job [%] is triggered by schedule | |
| Power Management | NFO Job [%] is triggered by user | |
| Power Management | ERROR Job [%s] is resulted as failed | |
| Power Management | NFO Job [%s] is finished successfully | |
| Power Management | NFO Job [%] is pending because other job is running | |
| Power Management | NFO Job [%] is canceled by user | |
| Power Management | NFO Restore job [%s] is triggered by user | |
| Power Management | NFO [Power On] schedule is triggered. | |
| Power Management | NFO [Power Off] schedule is triggered. | |
| Power Management | NFO [Reboot] schedule is triggered. | |
27.1 Overview
This chapter introduces different ways of protecting data on the NAS and covers the Protect screens.
Table 127 Overview of Protection Methods
| SITUATION ACTION | |
| Unexpected NAS behavior after configuration changes | Back up the NAS configuration file before you make major configuration changes. See Section 27.5 on page 336. |
| Need to transfer data from your computer to the NAS after volume(s) have been created | Backup your data to a computer or other storage devices. |
| Data infected by virus Use anti-virus software on your computer to scan files before saving them onto the NAS. Although this may be slow so you may want to schedule it to occur while no one is using the NAS.Use a firewall with anti-virus capability on your network. | |
| Hard drive malfunction. | Use RAID. See Section 8.6 on page 98 for more information on RAID. |
| NAS malfunctionNetwork downNatural disaster such as a fire or earthquake occurs where your NAS is located | Back up data to another NAS or external USB hard drive. See Section 14.14 on page 191 for an example of how to back up the NAS to another NAS. |
27.2 What You Can Do
- Use the Backup screens (Section 27.3 on page 321) to create and customize backup jobs.
- Use the Restore screens (Section 27.4 on page 332) to restore previous backups made with the NAS.
27.3 Backup Screens
Use this screen to create and customize scheduled backup jobs for your files.
You can have several backup jobs for specific folders and time periods.
Click Protect > Backup to open the following screen.
Figure 200 Protect > Backup

text_image
Protect - Backup Backup Add Job Edit Job Delete Selected Job(s) Execute Job Now Restore Archive Abort Job Activate Job Inactivate Job Status Job Name Job Description Backup Info Scheduler Info Currently, there are no jobs.The following table describes the labels in this screen.
Table 128 Protect > Backup
| LABEL DESCRIPTION | |
| Backup | |
| Add Job Click this to create and customize a backup job. | |
| Edit Job Select a backup job in the list and click this to make some changes to it. | |
| Delete Selected Job(s) | Select a backup job in the list and click this to delete it. |
| Execute Job Now Select a backup job in the list and click this to run the backup job immediately. | |
| Restore Archive Select a backup job in the list and click this to restore the file(s) included in that backup job to the NAS.This applies to Archive backups only. Refer to Section 27.3.8 on page 330 to see the screens. | |
| Abort Job Select a backup job in the list and click this to stop the process if the backup job is currently active. | |
| Activate Job Enable the selected backup job. | |
| Inactivate Job Disable the selected backup job. | |
| Status This shows the current state of the backup job.Waiting means the backup job is not active but is scheduled to run at some time.Running indicates that the NAS is currently doing the backup job. When the backup job is running, you can also see a progress bar. | |
| Job Name This identifies the backup job. | |
| Job Description This is a short description of the backup job. | |
| Backup Info | This lists down the backup job details: type, source and target. Refer to Section 27.3.1 on page 322 and Section 27.3.2 on page 323. |
| Scheduler Info | This shows the backup schedule, including the frequency, the time it was last run in (and whether or not it succeeded), and when it is scheduled to run again. The times use yyyy-mm-dd hh:mm:ss format.Refer to Section 27.3.4 on page 326. |
27.3.1 Backup: Step 1
Use this screen to specify the job information and back up type.
Click Add Job in the Protect > Backup screen to open the following:
Figure 201 Protect > Backup: Step 1
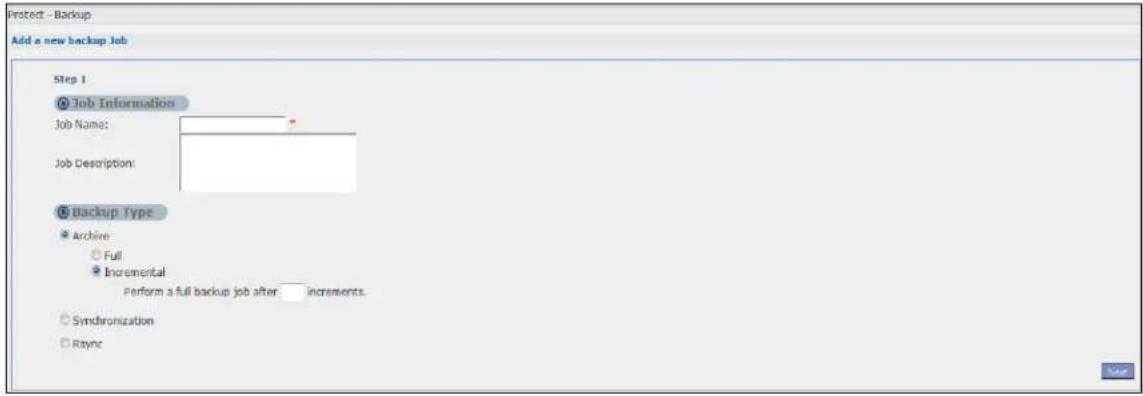
text_image
Protect - Backup Add a new backup Job Step 1 Job Information Job Name: Job Description: Backup Type Archive Full Incremental Perform a full backup job after increments. Synchronization RyyncThe following table describes the labels in this screen.
Table 129 Protect > Backup: Step 1
| LABEL DESCRIPTION | |
| Job Information | |
| Job Name Enter a | name to identify the backup job. |
| Job Description | Enter a short description (up to 100 keyboard characters) for the backup job. |
| Backup Type Choose the backup type the NAS implements for the backup job. | |
| Archive- This is a backup of the source folder in an archive format. Once you backup your files in the target folder, you cannot access the files individually unless you have the extracting tool used by the NAS. If there are existing files in the target folder prior to the NAS's backup job, the files remain undisturbed. You can also choose between the following types of archive:Full- The NAS does a fresh backup each time. This provides the most protection but also requires the most storage space.Incremental- The NAS backs up new or modified files from the source folder since the last backup. The first backup is a full backup. You can also do a full backup after several incremental backups. Enter how many incremental backups the NAS runs before it performs a full backup of the source folder. You must keep the latest full backup to be able to restore the files later.Synchronization- This does a backup of individual files. If you use this type, you cannot use theRestorefeature of the NAS. You can also choose between the following types of synchronization:Mirror- The NAS deletes all data in the target folder before running the backup. It makes the target folder identical to the source folder.Publish- The NAS does a backup of individual files to the target folder without overwriting existing files in that folder. It makes a copy of the source files.Rsync- This synchronizes individual files to another device that supports rsync. Rsync is open source and provides incremental file transfers. It only sends the differences in the files through the connection so it brings the remote files into sync very quickly.The NAS deletes all data in the target folder before running the backup. It makes the target folder identical to the source folder.If you use this type, you cannot use theRestorefeature of the NAS. | |
| Next Click this to go to the next step. | |
27.3.2 Backup: Step 2
Use this screen to specify where the files you want to backup are located and set where you want the backup to be stored.
Figure 202 Protect > Backup: Step 2

text_image
Protect - Backup Add a new backup Job Step 2 Backup Source Volume1 Volume1 video photo music admin Selected Source Folders Backup Target Remote Local Target Path Volume1 volume1 video photo music admin Target Folder ExternalThe following table describes the labels in this screen.
Table 130 Protect > Backup: Step 2
| LABEL DESCRIPTION | |
| Backup Source | Select an (internal) volume and the folders and files to back up using this tree interface.Clickto browse through folders, sub-folders and files.Click- to close a folder in the tree. This is useful if there are many folders or files that you wish to hide from view.Click to select a folder or file to back up. This also selects all sub-folders and files.Click to deselect the folder or file. This also deselects all sub-folders and files.More ... ▲ and M appear when there are too many folders/files to display. Click the arrows to scroll up or down through the folders/files.for a folder means all sub-folders and files and new folders/files added later will be backed up.for a file means the file will be backed up.(a grayed out check box) for a folder means that only some sub-folders and files under the folder will be backed up. Newly added folders/files will NOT be backed up.means the file structure is still loading. Please wait for the folders/files to display.Note: If you select to back up an entire folder and then de-select a sub-folder or file within that folder, the main folder icon will turn and any new sub-folders and files added to this main folder after the initial backup configuration willNOTbe backed up.A list of your select folders and files displays below the selection fields. |
| Selected Source Folders | This shows the path of the backup source folder you selected. |
| Backup Target Select the target folder where you want to place your backup. | |
| Remote Select this | to back up to another device.For Archives:The remote device can be another NAS in the network. Fill in the following fields in order to be able to access it.Remote NAS AddressUser namePasswordShare NameClick Test Connection to see if your NAS can communicate with the remote device.For Synchronization:The remote device must be another NAS compatible with the NAS's synchronization feature. Fill in the following fields in order to be able to access it.Remote NAS AddressUsername (always “admin”)Remote Admin's PasswordClick Show target content to connect to the remote NAS so you can select the target share for the backup.For Rsync:The remote device must be a NAS that supports rsync or a computer running the rsync utility. Fill in the following fields in order to be able to access it.Remote NAS AddressUsername (always “admin”)Remote Admin's PasswordClick Show target content to connect to the remote NAS or computer so you can select the target folder for the backup. |
| Local | Select this if you want to place your backup in another volume in the NAS. Select the folder where you want to place the backup. |
| External | Select this if you have a USB hard disk connected to the NAS that you want to use for your backup. Select the folder where you want to place the backup. |
| Previous Click this | to go back to the previous screen. |
| Next Click this to go to the next screen. | |
27.3.3 Backup: Step 3
Use this screen to specify compression, encryption and purge policies for the backup job. This step is only available if you are doing an archive backup or a synchronization backup to a remote target.
Figure 203 Protect > Backup: Step 3

text_image
Protect - Backup Add a new backup Job Step 3 Compression Yes No Encryption Encrypt Archive File: Yes Password: No Purge Policy Keep All Old Backup files Keep Only the last backup files Keep Backups For day(s)The following table describes the labels in this screen.
Table 131 Protect > Backup: Step 3
| LABEL DESCRIPTION | |
| Compression | Select Yes if you want NAS to compress the files for your backup. Otherwise, choose No.In an Archive backup, compression is a method of packing computing files in a way that saves hard disk space.For a Synchronization backup (to a remote target), the source data will be compressed before the transmission to reduce the transmission time. It is used in slow networks only. |
| Encryption | Select Yes if you want NAS to encrypt the files for your backup. Otherwise, choose No.In an Archive backup, this means using a password to secure files.For a Synchronization backup (to a remote target), this means securing the file transfer session. However the final file stored on the remote NAS is unencrypted. This takes a long time. Make sure you really need this feature before enabling it. |
| Bandwidth | Restrict the bandwidth of synchronization backups to help stop them from using all of your network connection's available bandwidth. This is more important when backing up to a remote NAS or computer through the Internet. |
| Purge Policy | The NAS maintains the files that have been included in your backups. However to save hard disk space, you can choose to delete files that have been included in previous backups.Select Keep All Old Backup files to store all files that have been included in previous backups.If you want to store a certain number of backup files, select Keep Only the last n backup files (1-30). Enter a value (n) from 1 to 30 to specify how many backups the NAS stores. All backup files older than the last one are deleted. You will not be able to recover files that existed (only) in those previous backups. Select this if backup space is limited and recovery of old files is not important.If you want to store all backups for a certain time period, select Keep Backups for n day(s)(1-3650). Enter a value (n) from 1 to 3650 to specify how many days the NAS stores all backup files. After this day has expired, all backup files will be deleted. |
| Previous Click | this to go back to the previous screen. |
| Next Click this | to go to the next screen. |
27.3.4 Backup: Step 4
Click this to specify the schedule for the backup job. The backup job automatically runs according to the schedule that you set in this screen.
Figure 204 Protect > Backup: Step 4
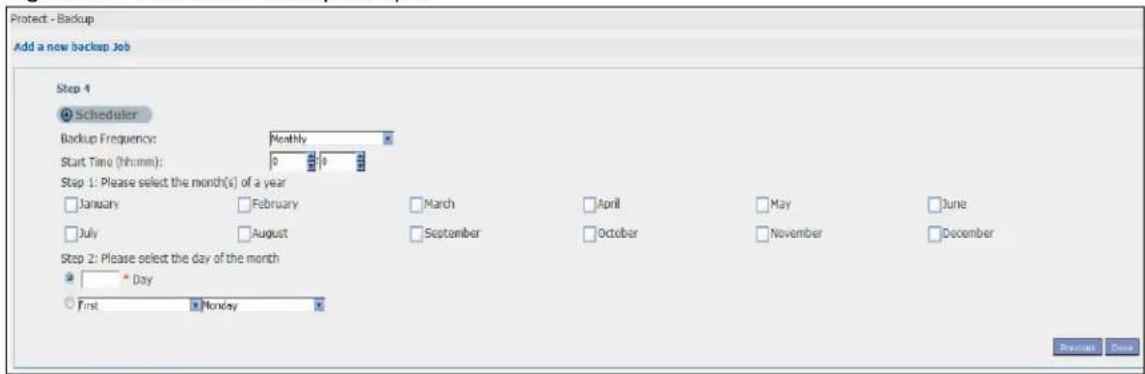
text_image
Protect - Backup Add a new backup Job Step 4 Scheduler Backup Frequency: Monthly Start Time (hh:mm): 0 0 Step 1: Please select the month(s) of a year January February March April May June July August September October November December Step 2: Please select the day of the month Day First Monday Browse DoneThe following table describes the labels in this screen.
Table 132 Protect > Backup: Step 4
| LABEL DESCRIPTION | |
| Scheduler | |
| Backup Frequency | Select from Hourly, Daily, Weekly and Monthly backup intervals. The screen changes depending on the item you select. |
| Every how many hours? | This is only available if you selected Hourly as your backup frequency.Select every how many hours the NAS performs the backup job. |
| On which minute of the hour? | This is only available if you selected Hourly as your backup frequency.Select the minute (from 0 to 59) in an hour when the NAS performs the backup job. |
| Start Time (hh:mm) | This is available if you selected Daily, Weekly or Monthly as your backup frequency.Select the time in hour:minute format when you want the NAS to perform the backup job. |
| Every how many days? | This is only available if you selected Daily as your backup frequency.Enter the interval between days when the NAS performs the backup job. |
| Every how many weeks? | This is only available if you selected Weekly as your backup frequency.Enter the interval between weeks when NAS performs the backup job. |
| Step 1: Please select the month(s) of a year | This is only available if you selected Monthly as your backup frequency.Select the month(s) when you want the NAS to perform the backup job. |
| Step 2: Please select the day of the month | This is only available if you selected Monthly as your backup frequency.Select the day in a month when you want the NAS to perform the backup job. |
| Previous Click this to close the screen. | |
| Done Click this to close the screen. | |
27.3.5 Edit Job Screen
Use this screen to edit an existing backup job. Some attributes of the backup job cannot be changed, such as the name, backup type, source folder and so on.
27.3.6 Edit Job: Step 1
Click Protect > Backup. Select a backup job from the list and click Edit Job to open the Edit Job screen.
Figure 205 Protect > Backup > Edit: Step 1

text_image
Protect - Backup Edit Step 1 Job Settings Job Name : backup Job Description Backup Type : Full Source folder(s)/file(s) Volume1/photo/ Volume1/video/ Backup Target : External Volume Target Path : JetFlash-Transcend-16GE-8-071/ Compression : No Encryption : No Bandwidth : N/A KB/s (0 for no limitation) Purge Policy: Keep All Old Backup Mes Keep Only the last backup files Keep Backups For day(s)The following table describes the labels in this screen.
Table 133 Protect > Backup > Edit: Step 1
| LABEL DESCRIPTION | |
| Job Settings | |
| Job Name This field is | read-only and shows the name of the backup job. |
| Job Description Enter | a short description for the backup job. |
| Backup Type This field | d is read-only and shows the backup type. |
| Source folder(s)/file(s) | This is read-only and shows the path of the source folder for backup. |
| Backup Target | This field is read-only and shows on which volume (whether internal or external) the backup files are stored. If the target location is a remote NAS, this shows the remote IP address. |
| Target Path This field | is read-only and shows the target folder for the backup files. |
| Compression This field | d is read-only and shows whether the backup employs compression.Compression reduces the size of the file that you want to back up. Backup is then faster, but restoring may be slower, so if backup space is not a concern and recovery speed is, then turn off compression. |
| Encryption | This field is read-only and shows whether the backup employs encryption.You can have the NAS use a password to encrypt the backup files. |
| Bandwidth | For backups to a remote NAS, you can restrict the bandwidth to help prevent the backups from using all of your network connection's available bandwidth. This is more important when backing up to a remote NAS or computer through the Internet. |
| Purge Policy | The NAS maintains the files that have been included in your backups. However to save hard disk space, you can choose to delete files that have been included in previous backups.Select Keep All Old Backup files to store all files that have been included in previous backups.If you want to store a certain number of backup files, select Keep Only the last n backup files (1-30). Enter a value (n) from 1 to 30 to specify how many backups the NAS stores. All backup files older than the last one are deleted. You will not be able to recover files that existed (only) in those previous backups. Select this if backup space is limited and recovery of old files is not important.If you want to store all backups for a certain time period, select Keep Backups for n day(s)(1-3650). Enter a value (n) from 1 to 3650 to specify how many days the NAS stores all backup files. After this day has expired, all backup files will be deleted. |
| Next Click this to go | to the next screen. |
27.3.7 Edit Job: Step 2
Use this screen to edit the schedule for the backup job.
Figure 206 Protect > Backup > Edit: Step 2

text_image
Protect - Backup Edit Step 2 Scheduler Settings Backup Frequency: Monthly Start Time (hh:mm) 0 0 Step 1: Please select the month(s) of a year January February March April May June July August September October November December Step 2: Please select the day of the month Day First Monday Previous DateThe following table describes the labels in this screen.
Table 134 Protect > Backup > Edit: Step 2
| LABEL DESCRIPTION | |
| Scheduler Settings | |
| Backup Frequency | Edit this by selecting from Hourly, Daily, Weekly and Monthly backup intervals. The screen changes depending on the item you select. |
| Every how many hours? | This is only available if you selected Hourly as your backup frequency.Select every how many hours the NAS performs the backup job. |
| On which minute of the hour? | This is only available if you selected Hourly as your backup frequency.Select the minute (from 0 to 59) in an hour when the NAS performs the backup job. |
| Start Time (hh:mm) | This is available if you selected Daily, Weekly or Monthly as your backup frequency.Select the time in hour:minute format when you want the NAS to perform the backup job. |
| Every how many days? | This is only available if you selected Daily as your backup frequency.Enter the interval between days when the NAS performs the backup job. |
| Every how many weeks? | This is only available if you selected Weekly as your backup frequency.Enter the interval between weeks when NAS performs the backup job. |
| Step 1: Please select the month(s) of a year | This is only available if you selected Monthly as your backup frequency.Select the month(s) when you want the NAS to perform the backup job. |
| Step 2: Please select the day of the month | This is only available if you selected Monthly as your backup frequency.Select the day in a month when you want the NAS to perform the backup job. |
| Previous Click this to | go back to the previous screen. |
| Done Click this to close | the screen. |
27.3.8 Restore Archive Screen
Use this screen to restore previous backups made with the NAS.
27.3.9 Restore Archive: Step 1
Click Protect > Backup screen (Section 27.3 on page 321). You can restore a previous backup job by selecting a backup job from the list and clicking Restore Archive.
Figure 207 Protect > Backup > Restore Archive: Step 1

text_image
Project - Backup Restore Step 1. Select Restore Point Job Information Job Name: backup-photo Job Description: Backup Type: full Scheduler Information: Restored Time 2015-08-31 14:44:41The following table describes the labels in this screen.
Table 135 Protect > Backup > Restore Archive: Step 1
| LABEL DESCRIPTION | |
| Step 1. Select Restore Source | Select a previous archive backup that you want to restore to the NAS. |
| Job Information | |
| Job Name This is the | name to identify the backup job. |
| Job Description | This is a short description (up to 100 keyboard characters) for the backup job. |
| Backup Type This is the | the type of backup implemented for the backup job. |
| Scheduler Information | This field displays the backup's frequency. |
| Restored Time Select | a previous backup in the list that you want to restore to your NAS. |
| Next Click this to go | to the next screen. |
27.3.10 Restore Archive: Step 2
Use this screen to select the folder where the archive you want to restore is located.
Figure 208 Protect > Backup > Restore Archive: Step 2
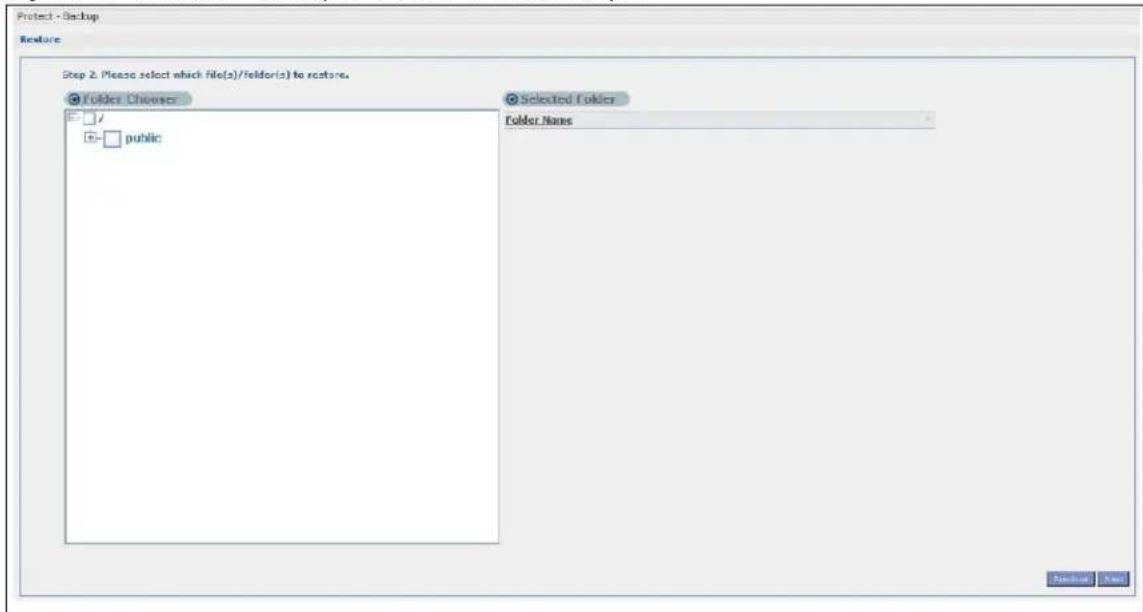
text_image
Protect - Backup Feature Step 2. Please select which File(s)/Feldor(s) to restore. Folder Chewser Selected Folder Folder Name publicThe following table describes the labels in this screen.
Table 136 Protect > Backup > Restore Archive: Step 2
| LABEL DESCRIPTION | |
| Step 2. Please select which file(s)/folder(s) to restore. | |
| Folder Chooser Select | the folder where the backup you want to restore is located. |
| Selected Folder This shows the path of the folder you selected. | |
| Previous Click this to go back to the previous screen. | |
| Next Click this to go to the next screen. | |
27.3.11 Restore Archive: Step 3
Use this screen to select the location in the NAS where you want to restore your backup.
Figure 209 Protect > Backup > Restore Archive: Step 3

text_image
Protect - Backup Restore Step 3. Set a restore target and start restoring Original Location Other Location Options DeleteThe following table describes the labels in this screen.
Table 137 Protect > Backup > Restore Archive: Step 3
| LABEL DESCRIPTION | |
| Step 3. Set a restore target and start restoring | |
| Original Location Select this to restore the files to their original location in the NAS. | |
| Other Location | Click this to select a folder where you want to place the restored files. ClickBrowseto open the following screen. Volume- Select a volume from the list.Current Location- This is the location of the selected folder.Type- This identifies the item as a file or folder.Name- This is the name of the folder/file.ClickApplyto save your settings andCancelto close the screen. Volume- Select a volume from the list.Current Location- This is the location of the selected folder.Type- This identifies the item as a file or folder.Name- This is the name of the folder/file.ClickApplyto save your settings andCancelto close the screen. |
| Previous Click this to | go back to the previous screen. |
| Done | Click this to run the restore process and go back to theBackupscreen. |
27.4 Restore Screen
Use this screen to restore previous backups made with the NAS, including archives and folders from internal, external or remote NASs to the NAS.
You can access this screen by clicking Protect > Restore.
Figure 210 Protect > Restore: Step 1

text_image
Protect - Restore Restore Step 1. Select Restore Source Remote NSA IP Address User Password Share Name Internal or External Volume VideoOpt Browse... NextThe following table describes the labels in this screen.
Table 138 Protect > Restore: Step 1
| LABEL DESCRIPTION | |
| Step 1. Select Restore Source | Select a previous archive backup that you want to restore to the NAS.Select Remote NAS if the file is in another NAS in the network that you used for your backup. Fill in the fields below when you choose this option.Select Internal or External Volume if you want to use another volume in the NAS or an attached USB hard disk for your backup. Click Browse to select the backup file. |
| IP Address Enter the address of the NAS you want to use. | |
| User Enter the user name you use to access the NAS. | |
| Password Enter the password of your NAS account. | |
| Share Name Enter the name of the share you want to use. | |
| Test Connection | Click this to test your connection to the remote NAS that you have specified in the fields above. |
| Browse | Click this to select where the previous backup that you want to restore is located. Volume - Select a volume from the list.Current Location - This is the location of the selected folder.Type - This identifies the item as a file or folder.Name - This is the name of the folder/file.Click Apply to save your settings and Cancel to close the screen. Volume - Select a volume from the list.Current Location - This is the location of the selected folder.Type - This identifies the item as a file or folder.Name - This is the name of the folder/file.Click Apply to save your settings and Cancel to close the screen. |
| Next Click this to go to the next screen. | |
Select a previous archive backup that you want to restore to the NAS.
Figure 211 Protect > Restore: Step 2
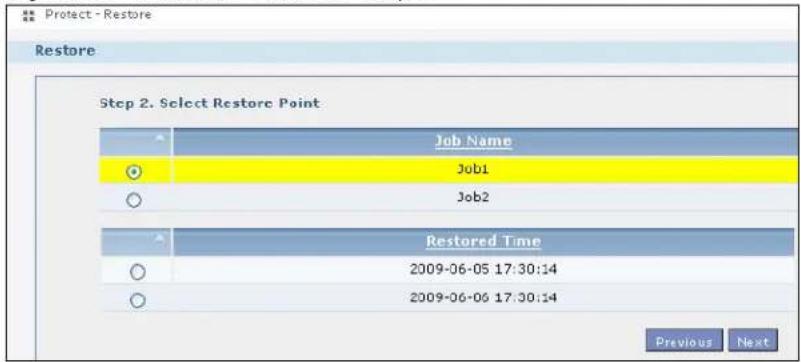
text_image
Protect - Restore Restore Step 2. Select Restore Point Job Name Job1 Job2 Restored Time 2009-06-05 17:30:14 2009-06-06 17:30:14 Previous NextThe following table describes the labels in this screen.
| LABEL DESCRIPTION | |
| Step 2. Select Restore Point | If you selected Remote NAS for the backup you want to restore, you can see a list of all the backups you performed in the Job Name table.If you selected Internal or External Volume for the backup you want to restore, you can see a list of restore times for the backups you performed in the Restored Time table. |
| Job Name | Select a previous backup job in the list that you want to restore to your NAS. Once you choose a job name, all available restore times for that backup job shows in the Restored Time table. |
| Restored Time | Select a previous backup job in the list that you want to restore to your NAS. |
| Previous Click this to go back to the previous screen. | |
| Next Click this to go to the next screen. | |
Use this screen to select the folder where the archive you want to restore is located.
Figure 212 Protect > Restore: Step 3
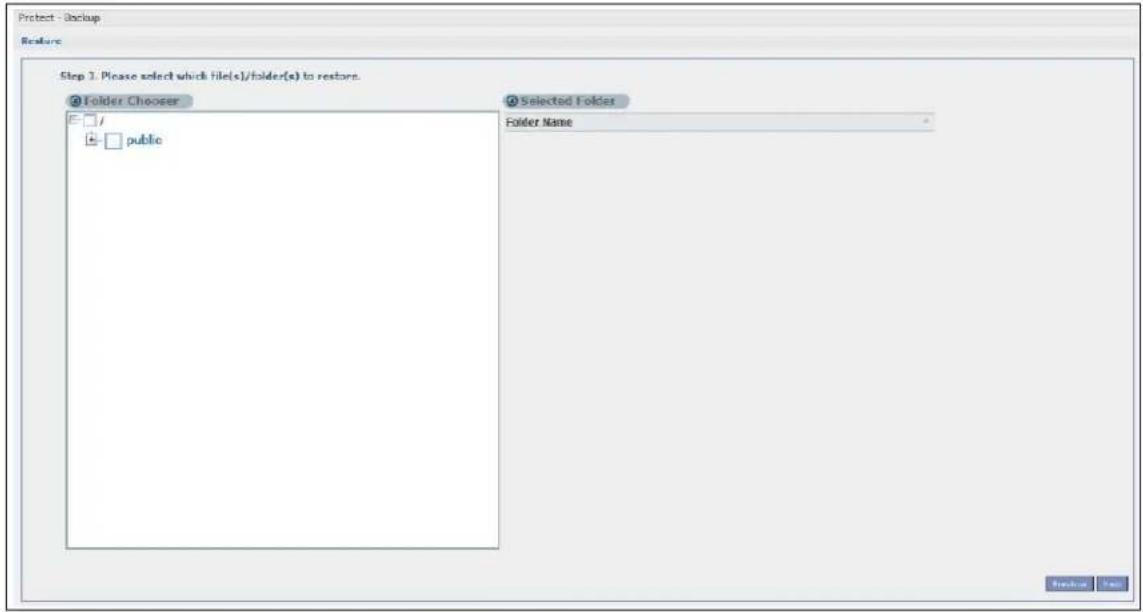
text_image
Protect - Backup Features Step 1. Please select which file(s)/folder(s) to restore. Folder Choozer Selected Folder Folder Name publicThe following table describes the labels in this screen.
Table 140 Protect > Restore: Step 3
| LABEL DESCRIPTION | |
| Step 3. Please select which file(s)/folder(s) to restore. | |
| Folder Chooser Select | the folder where the backup you want to restore is located. |
| Selected Folder This shows the path of the folder you selected. | |
| Previous Click this to go back to the previous screen. | |
| Next Click this to go to the next screen. | |
Use this screen to select the location in the NAS where you want to restore your backup.
Figure 213 Protect > Restore: Step 4

text_image
Restore Step 4. Set a restore target and start restoring Path for restoring Browse ... Please input encryption password if you have set to this backup job Previous DateThe following table describes the labels in this screen.
Table 141 Protect > Restore: Step 4
| LABEL DESCRIPTION | |
| Step 3. Set a restore target and start restoring | |
| Browse | Click this to select a folder where you want to place the restored files.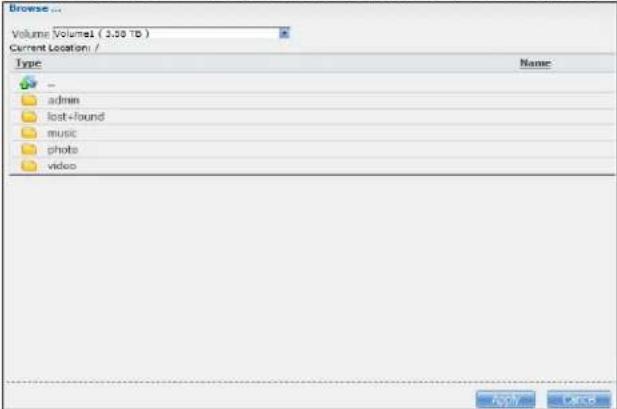 Volume - Select a volume from the list.Current Location - This is the location of the selected folder.Type - This identifies the item as a file or folder.Name - This is the name of the folder/file.ClickApplyto save your settings and Cancelto close the screen. Volume - Select a volume from the list.Current Location - This is the location of the selected folder.Type - This identifies the item as a file or folder.Name - This is the name of the folder/file.ClickApplyto save your settings and Cancelto close the screen. |
| Previous Click | this to go back to the previous screen. |
| Done | Click this to run the restore process and go back to the Backupscreen. |
27.5 Configuration File Backup and Restoration
Use the Maintenance > Configuration menus to create a file of your NAS configurations such as passwords, shares and volumes created, network settings and so on. If you're going to do some major configuration changes, then it is advisable to create a configuration backup file. If things go wrong after you make the configuration changes, you can always go back to the previous configuration by restoring an earlier configuration file.
If you forgot the NAS password, then use the RESET button (see Section 1.7 on page 17) to return the NAS to the factory default configuration.
Note: Configuration File Backup and Restoration does not affect data (your files and folders), volumes on the NAS.
28.1 Troubleshooting Overview
This chapter offers some suggestions to solve problems you might encounter. The potential problems are divided into the following categories.
• Power, Hardware, Connections, and LEDs
• NAS Starter Utility
• NAS Login and Access
• I Cannot Access The NAS
- Users Cannot Access the NAS
- External USB Drives
- Storage
- Firmware
- File Transfer
- Networking
- Some Features' Screens Do Not Display
• Media Server Functions
- Download Service Functions
- Web Publishing
- Auto Upload
• Package Management
- Backups
- Google Drive
28.2 Power, Hardware, Connections, and LEDs
The NAS PWR LED does not turn on (no LEDs are on).
- Make sure the NAS is turned on.
- Make sure you are using the power adaptor or cord included with the NAS.
-
Make sure the power adaptor or cord is connected to the NAS and plugged in to an appropriate power source. Make sure the power source is turned on.
-
Turn the NAS off and on.
- If the problem continues, contact the vendor.
An HDD LED is off.
The HDD LED is off when the NAS cannot detect a hard drive in the drive bay. Replace or install a hard drive. See Installing or replacing a hard disk.
An HDD LED is red.
Red means that the NAS detected an error on the hard drive (like a bad sector for example). The NAS automatically tries to recover a bad sector, but the LED stays red until the NAS restarts. Even if the hard drive still functions, it is recommended that you replace it since errors are a sign that the hard drive may fail soon. See Installing or replacing a hard disk.
Installing or replacing a hard disk.
Do not remove or install a hard disk while the NAS is turned on. The NAS must be turned off before you remove or install the hard disk.
1 Turn the NAS off, remove the front panel and make sure:
- there is a SATA I or SATA II (3.0 Gbit/s) compatible hard disk installed.
- the hard disk is installed correctly in the disk bay. Push the disk back into the NAS disk bay until the hard disk is fitted snugly inside the NAS (see the NAS Quick Start Guide).
- the hard disk could be faulty. Try a different hard drive or test the original hard disk in a different NAS or computer.
2 If you had to replace the drive, turn on the NAS and go to the Storage screen.
- If you have a RAID I volume click the Repair icon next to the new drive.
- If you are using RAID 0 you will need to recreate the whole volume. All of your data is lost.
- If you are using a single-disk JBOD volume, you need to create a new volume on the new drive.
- If you are using a two-disk JBOD volume, you need to create a whole new volume on both drives.
The LAN LED (by the LAN port) is off.
- Make sure the Ethernet cable is connected properly to the NAS and connected to another (Ethernet) device. Make sure the other device is turned on. If it's connected directly to a computer, make sure that the computer network card is working (ping 127.0.0.1 on the computer).
- Use another Ethernet cable. If you're connecting to a Gigabit Ethernet, make sure you're using an 8-wire Ethernet cable.
- If the problem continues, contact the vendor.
See Table 1 on page 15 for a description of NAS LEDs.
The NAS turns off or reboots by itself.
Check the Power Management screen. This is where you configure power settings for the NAS, including power saving, UPS, power on/off during power failure and power on/off schedule. The NAS may be set to turn off under certain conditions.
A power failure occurred while the NAS was downloading files.
- If power failure occurs during the active download period, the NAS will verify whether the downloaded files were damaged.
- If a file is corrupted, the NAS will download the file again.
- If the file is intact but not completely downloaded, the NAS will resume the download task after it restarts.
28.3 NAS Starter Utility
The NAS Starter Utility cannot discover my NAS.
- Close the NAS Starter Utility and reopen it.
- Check your hardware connections and make sure they are set up correctly.
- Only one instance of the NAS Starter Utility can run on your computer. Make sure you close any duplicate windows for this application.
- Wait for the SYS LED to stop blinking before clicking Discover.
- Confirm that the computer running the NAS Starter Utility has a network connection. See the section on the NAS's LAN connection for related information.
- The computer running the NAS Starter Utility can only discover NASs in the same subnet. NASs connected to the same switch or router as your NAS Starter Utility computer are usually in the same subnet unless the router is doing subnetting or the switch is implementing VLAN.
The NAS Starter Utility discovered my NAS but the status is always unreachable, even though I can access it.
You may need to add the NAS Starter Utility to your software firewall's allow list or lower your software firewall or anti-virus scanner's security level. Alternatively you may have to configure your software firewall or other security software to allow UDP port 50127 traffic from the NAS. If there is a hardware firewall between you and the NAS, configure it to allow UDP port 50127 traffic from the NAS.
I have at least two NASs in my network, how do I identify which one I want to configure in the NAS Starter Utility screens.
If you have several NASs connected to your computer/network, give each a unique name. You may have to disconnect all but one and use the NAS Starter Utility to rename it. Then connect another NAS and rename it and continue to connect and rename the NASs one-by-one until they are all connected and each has a unique name.
Alternatively, if you have a DHCP server on your network and you can access it's list of assigned IP addresses, you could see which IP address belongs to which NAS. You can check the MAC address of your NAS by checking the attached sticker in the device housing.
28.4 NAS Login and Access
I forgot the server name of the NAS.
- The default server name is 'NAS' followed by the number of your model ('NAS540' for example).
- Use the NAS Starter Utility to discover your NAS. If you have admin privileges, you can directly change the IP address of the NAS using the NAS Starter Utility.
- If the server name has changed and you don't have the NAS Starter Utility, see Section 1.7 on page 17 to use the RESET button to return to the default setting.
I cannot get to the NAS login screen.
- Use the NAS Starter Utility to discover your NAS. If you have admin privileges, you can directly change the IP address of the NAS using the NAS Starter Utility.
- Make sure you have used the NAS Starter Utility to initialize your NAS.
- If you used the RESET button, the NAS may have a new IP address. Close and reopen the NAS Starter Utility to discover the NAS.
-
Make sure the NAS is turned on.
-
If you are trying to login directly by typing the server name into your web browser's address field, make sure you are using the correct server name as the web site address.
- The default server name is 'NAS' followed by the number of your model ('NAS540' for example). If you have changed the server name, use the new one.
- If the server name has been changed and you do not know the new server name, see the troubleshooting suggestions for I forgot the server name of the NAS.
- If it still doesn't work, try using the NAS Starter Utility.
- Check the hardware connections, and make sure the LEDs are behaving as expected. See the Quick Start Guide and Table 1 on page 15.
- By default, the NAS gets an IP address automatically. The NAS assigns itself an IP address if no device assigns one. If your computer is also set to get an IP address automatically, the computer and the NAS can both assign themselves IP addresses and communicate. See Section 10.4 on page 107 if you need to configure the NAS with a static IP address.
- If you are connecting to the NAS by its IP address, make sure you use the correct one. If the NAS has a wired Ethernet connection and a wireless connection through an attached USB wireless dongle, the NAS has a different IP address for each connection. To connect through the wired Ethernet connection, use the wired Ethernet connection's IP address. To connect through the wireless connection, use the wireless connection's IP address.
- Make sure your computer's IP address is in the same subnet as the NAS's IP address. You can use the NAS Starter Utility to find the NAS's IP address. Skip this if you know that there are routers between your computer and the NAS.
- Ping the NAS from your computer. Make sure your computer's Ethernet adapter is installed and functioning properly. In a (Windows) computer, click Start, (All) Programs, Accessories and then Command Prompt. In the Command Prompt window, type "ping" followed by the NAS's IP address (use the NAS Starter Utility to find the NAS's IP address if you don't know it) and then press [ENTER].
- Make sure you are using Internet Explorer 6.0 (and later) or Firefox 1.07 (and later).
- Make sure your Internet browser does not block pop-up windows and has JavaScript and Java enabled. With Internet Explorer 6, you may also have to enable scripting of safe ActiveX controls. See Section 28.4.1 on page 341.
I forgot the password.
• The default password is 1234.
- If you have changed the password and forgotten it, you will have to reset the NAS.
28.4.1 Enabling Scripting of Safe ActiveX Controls
If pages of the web configurator do not display properly in Internet Explorer, check that scripting of safe ActiveX controls is enabled.
1 In Internet Explorer, click Tools, Internet Options and then the Security tab.
Figure 214 Internet Options: Security

text_image
Internet Options General Security Privacy Content Connections Programs Advanced Select a Web content zone to specify its security settings. Internet Local intranet Trusted sites Restricted sites Internet This zone contains all Web sites you haven't placed in other zones Sites... Security level for this zone Move the slider to set the security level for this zone. Medium - Safe browsing and still functional - Prompts before downloading potentially unsafe content - Unsigned ActiveX controls will not be downloaded - Appropriate for most Internet sites Custom Level... Default Level OK Cancel Apply2 Click the Custom Level... button.
3 Under Script ActiveX controls marked safe for scripting, make sure that Enable is selected (the default).
4 Click OK to close the window.
Figure 215 Security Settings - Script Safe ActiveX Controls
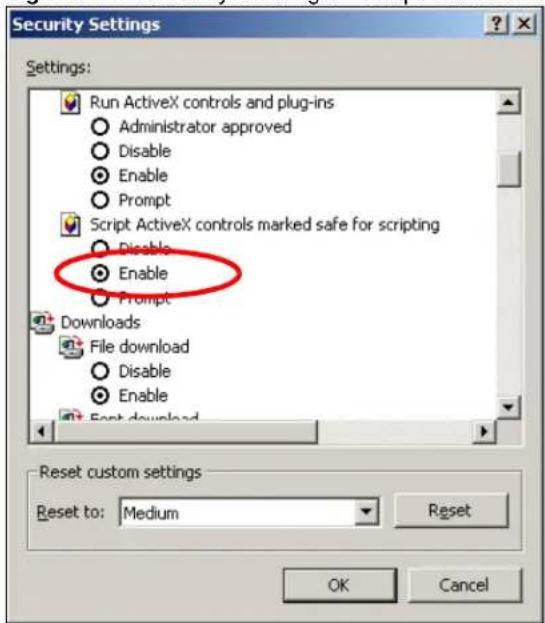
text_image
Security Settings Settings: Run ActiveX controls and plug-ins Administrator approved Disable Enable Prompt Script ActiveX controls marked safe for scripting Disable Enable Prompt Downloads File download Disable Enable Back download Reset custom settings Reset to: Medium Reset OK CancelI can see the login screen, but I cannot log in to the NAS.
- Make sure you have entered the username and password correctly. The default username is admin, and the default password is 1234. These fields are case-sensitive, so make sure [Caps Lock] is not on.
- Turn the NAS off and on.
- If this does not work, see Section 1.7 on page 17 to reset the device.
I cannot see the multi-language web configurator screens while using Internet Explorer.
Use Section 28.4.1 on page 341 to enable the scripting of safe ActiveX controls.
The Web Configurator logs out by itself.
The web configurator management session automatically times out if it is left idle for 15 minutes. Simply log back into the NAS if this happens to you.
28.5 I Cannot Access The NAS
I cannot access a share.
- Check that the NAS is turned on and connected to the network. Try to ping the NAS or use the NAS Starter Utility to discover it.
- Make sure you have used the NAS Starter Utility to initialize your NAS. See Chapter 2 on page 19 for more information.
- Check that you entered your login name and password correctly.
- Check that the share exists and check its access settings.
- Check if the shared folder is a subfolder of another (parent) share. Check that the parent share's access rights do not conflict with the subfolder share. It is recommended that you do not create subfolder shares.
- Check if there are any existing mapped network drives to the NAS. You may need to disconnect existing mapped network drives as a new mapped network drive connection may use (different) previously-saved login information. To do this, open Windows Explorer and click Tools > Disconnect Mapped Network Drives.
- Check that the volume in which the share resides, exists and is not down or degraded. If it is down or degraded, see Section 28.2 on page 337.
- Make sure you have the client for Microsoft networks installed and enabled in your network connection's properties.
- In Windows XP or 2000, click Start > Settings > Control Panel > Network Connections (Network and Dial-up Connections in Windows 2000/NT) > Local Area Connection > Properties.
- Check that Client for Microsoft Networks is in the list of components and has its check box selected.
28.6 Users Cannot Access the NAS
A local user cannot access a share
- Check that the NAS is turned on and connected to the network. The local user should try to ping the NAS or use the NAS Starter Utility to discover it.
- The local user should check that he entered his login name and password correctly.
- Check if the share exists and has the correct access settings for this user.
- Check the Access Control List (ACL) of read/write permissions associated with specific files and/or folders. Account names added to the list are linked to the files and folders that they are allowed to access, along with what kinds of actions they are allowed to perform with those files and folders (delete, move, rename, and so on).
- The user's computer may already be connected to another of the NAS's shares using a different user name and/or password. This can happen without the user realizing it if the user's computer automatically connects to a share at logon. Right-click any other connected shares and click Disconnect. Then re-attempt to connect to the desired share.
- Check if the share has an ANONYMOUS or EVERYONE access right. If the user is already logged into a share using her username and password, she will NOT be able to access a share that has ANONYMOUS FTP only access rights (as these require 'no login'). In this case she should log out and try to access the share again without logging in. See Section 17.4 on page 215 for more details.
- Check if the shared folder is a subfolder of another (parent) share. Check that the parent share's access rights do not conflict with the subfolder share. It is recommended that you do not create subfolder shares.
- Check if the user belongs to a group with conflicting access rights. DENY always takes precedence. If you allow a user FULL access to a share but set his group to DENY, then he will NOT be able to access the share.
- The local user should check if there are any existing mapped network drives to the NAS. He may need to disconnect existing CIFS connections as new CIFS connection may use previously-saved login information that may be different to NAS login.
- Check that the array in which the share resides, exists and is not down or degraded. If the array is down or degraded, see Section 28.2 on page 337.
- If the user is using DFS links, then he can only access the NAS using CIFS and not FTP.
- Check that the share has not been disabled.
I cannot import domain user or user group information even though testing of the connection to the domain controller is OK.
- Check the NAS's DNS setting. The DNS server the NAS is using must be able to resolve the domain controller's address. If the domain controller uses a private IP address, the NAS needs to use a private DNS server. If the domain controller uses a public IP address, the NAS needs to use a public DNS server.
- Leave the domain and re-join it.
A domain user can't access a share.
In addition to the checks listed previously for local users, check that the domain controller is turned on and connected to the network.
A user can access a share but cannot access individual folders or files within the share.
- Check the Access Control List (ACL) of read/write permissions associated with the share's specific files and/or folders. Account names added to the list are linked to the files and folders that they are allowed to access, along with what kinds of actions they are allowed to perform with those files and folders (delete, move, rename, and so on).
28.7 External USB Drives
The COPY LED is red.
Copying files to or from a USB device or SD card failed. The USB device or SD card may not be compatible with the NAS. Try to save the files onto a computer and then from the computer to the NAS (through the network connection).
28.8 Storage
Migrating from RAID 1 to RAID 5 did not expand the storage capacity.
The NAS normally expands the storage capacity by itself after rebuilding the RAID but may not if the NAS rebooted during the RAID re-build.
After the re-build finishes, go to the Storage screens and select the volume or disk group and click Manage and use Expand the volume with unallocated disk space.
Replacing smaller disks in a RAID 1, RAID 5, or RAID 6 with larger capacity hard disks did not expand the storage capacity.
The NAS normally expands the storage capacity by itself after rebuilding the RAID but may not if the NAS rebooted during the RAID re-build.
After the re-build finishes, go to the Storage screens and select the volume or disk group and click Manage and use Expand the volume with unallocated disk space.
28.9 Firmware
I want to know the firmware version on the NAS.
Go to the Status screen. The Firmware field shows you the current firmware version running.
28.10 File Transfer
I want to transfer my file(s) from my local computer or storage device to the NAS.
- After you initialize your hard disk, you can directly access the folders in your NAS and transfer files in the same way you transfer files in your local computer:
1 On your Windows computer, click Start > Run or open a web browser.
2 Enter \ nas followed by the number of your model (540 for example) or the Server Name you assigned the NAS. This shows you the folders in the NAS.
3 Use drag-and-drop or copy-and-paste to transfer files over to your NAS.
- Use the COPY/ SYNC button to transfer files from an external (USB) storage device to the NAS.
I want to transfer my file(s) from the NAS to my local computer or storage device.
- After you initialize your hard disk, you can directly access the folders in your NAS and transfer files in the same way you transfer files in your local computer:
1 On your Windows computer, click Start > Run or open a web browser.
2 Enter \ nas followed by the number of your model (540 for example) or the Server Name you assigned the NAS. This shows you the folders in the NAS.
3 Use drag-and-drop or copy-and-paste to transfer files from your NAS to your local computer's folder or your storage device.
- You can download the files from your NAS. Just click on the file(s) in the Share Browsing screen (Section 11.2 on page 124). Your computer will prompt you for the location where you want to save the file.
28.11 Networking
I want to control who can access my folder(s)/file(s).
- If you are an administrator, you can configure a user's access rights. Use the Shares screen (Section 24.3 on page 291) to do this.
- If you enabled Web Publishing for a folder, anyone on your network can play the media files in the published shares. No user name and password or other form of security is used. The media server is enabled by default with the video, photo, and music shares published.
One of the computers in my network cannot use the printer I connected to the NAS.
- You must install the printer driver on each computer that will use the printer.
- Check Section 28.4 on page 340 and check for related connectivity issues.
28.12 Some Features' Screens Do Not Display
Many NAS features require a valid internal volume.
Features like the print server, download service, FTP and Windows/CIFS access will not work without a valid internal volume. Make sure you have a volume on an internal disk and that the volume is in the healthy state.
- Install an internal disk if one is not installed yet or has failed. See the Quick Start Guide for how to install an internal disk.
- Create a new volume if you do not have one on the internal disk yet.
- Make sure the volume on the installed internal disk is in a healthy state.
I cannot use some applications in the Web Configurator.
- The firmware installed in your NAS includes the features mentioned in Section 10.8 on page 122. This does not include the applications you can install using the Package Management screen.
- You can use the Package Management screen (Chapter 18 on page 246) to install more applications from a web location (specified in the firmware) to your NAS.
- If you have installed the application and can see the application's configuration screen but still cannot use it, check that you have Enabled the application.
28.13 Media Server Functions
I set the media server function to publish a folder, but some of the files in the folder do not display in the list on the media client.
Files with formats that are not supported on the media server may not display in the list. See page 354 for the file formats that the media server supports.
I published a folder with the media server function, but the media client does not play some of the files (or does not play them properly).
1 Files with formats that are not supported on the media server may not display in the list. See page 354 for the file formats that the media server supports.
2 If you are using media client software, you may need to install codecs on your computer. Since the media client software uses your computer's installed codecs, files do not play if the required codec is not installed on your computer.
3 The media client may not support the file's format.
iTunes does not display the names of all the music files I just put on the NAS.
1 Make sure the files are a format supported by iTunes. See page 354.
2 Go to Applications > Media Server. Make sure the share containing the music files is published and the iTunes server option is enabled.
3 If an iTunes client is connected, the NAS's iTunes server function scans the published media server folders for files every three minutes. Leave iTunes connected to the NAS for three minutes. Then use the NAS's eject button (as shown next) to disconnect.
Figure 216 iTunes Eject Button

text_image
File Edit View Controls Store Advanced Help iTunes View LIBRARY Music Movies TV Shows Podcasts Radio STORE iTunes Store SHARED nsa PLAYLISTS Party Shuffle Name Time Artist Album Annie's Song 3:49 «~ea aù ~SAê I Can Wait Forever 5:11 Air Supply The Defini Every Woman In the World 3:30 Air Supply Can't Take My Eyes Off You 3:23 Al Green 10 Things The Name Of The Game 4:56 Amanda Seyfried & S... Mamma M Honey, Honey 3:07 Amanda Seyfried, As... Mamma M Money, Money, Money 3:07 Amanda Seyfried, As... Mamma M Gimme! Gimme! Gimme! (A Man Af 3:53 Amanda Seyfried, As... Mamma M Music to watch girls go by 2:36 Andy Williams The Best o Walk on by 2:48 Aretha Franklin Bandits O! I Write The Songs 3:55 Barry Manilow Ain't No Sunshine 2:03 Bill Withers Smooth Ja Chances Are 3:22 Bob Marley We're all alone 4:04 Boz Scaggs Some Cha4 Then click the NAS's link to reconnect.
Figure 217 iTunes Reconnected

text_image
File Edit View Controls Store Advanced Help iTunes View LIBRARY Music Movies TV Shows Podcasts Radio STORE iTunes Store SHARED nsa PLAYLISTS Party Shuffle Albums Artists Genres Composers5 Another way to get the NAS's iTunes server function to scan the published media server folders for files is to go to Applications > Media Server and disable and re-enable the iTunes server option. If you uploaded many files, it may take awhile for the NAS to find and list all of them. Then try reconnecting your iTunes client.
I cannot use iTunes to play files located on my NAS.
1 Make sure the files are a format supported by iTunes. See page 354.
2 If you have files from the iTunes Store that use DRM, you need to use your Apple account ID and password to authorize other computers to play the files. Apple permits you to authorize up to five computers at a time. To authorize a computer, open iTunes and click Store > Authorize Computer.
3 If you are connecting through a NAT router, make sure that TCP port 3689 and UDP port 5353 are open for traffic on both the server and the client and all points in between (especially the NAT router). If your router includes a firewall, make sure it also allows TCP port 3689 and UDP port 5353 traffic.
28.14 Download Service Functions
The download list items are missing after I removed a hard drive.
The NAS's download list is stored on the system volume. If you have two JBOD volumes, it is possible to remove one and still use the other. However if you remove the system volume, you may lose the download list. With two JBOD volumes, the hard disk that was installed first is usually the system volume.
I cannot find the download files.
By default, the Download Service feature stores downloaded files as follows:
- P2P download jobs are stored in /*/incoming (where ‘*’ is a folder that you have set.)
- HTTP/FTP jobs are stored in /* (where '*' is a folder that you have set.)
- All jobs triggered by RSS channels create the subfolder in /* using the channel name where it store all files downloaded from that channel (where ‘*’ is a folder that you have set.)
Check your Preferences in the Download Service (Section 17.7 on page 219) screens to know or configure where downloaded files are stored.
28.15 Web Publishing
A web-published share cannot be accessed by web browser from the Internet.
- Make sure the person trying to access the share is using the correct web address (and port number if the NAS's web publishing feature is not using port 80). See page 240 for details.
- Make sure the publishing feature is turned on and the share is in the list of published shares.
- Make sure the person trying to access the share is using Internet Explorer 6.0 (and later) or Firefox 1.07 (and later).
-
You need to use a public address to access the NAS's web-published shares from the Internet. If your NAS uses a private IP address, use the public IP address of your Internet gateway (firewall) and configure NAT or port forwarding on your Internet gateway and possibly firewall rules in order to let people access the NAS's web-published shares from the Internet.
-
Make sure the firewall's public IP address is static or that the firewall uses a Dynamic Domain Name (DDNS).
- Web publishing uses TCP protocol and the port number you specify. Make sure there is not another service using TCP protocol with the same port number.
- If Firefox access to the share does not work, check that you did not set the Web publishing feature to use one of the following ports. (Firefox blocks these ports by default.)
Table 142 Ports Blocked By Default in Firefox
| PORT SERVICE PORT SERVICE PORT SERVICE | ||||||
| 1 tcpmux | 95 supdup 513 login | |||||
| 7 echo | 101 | hostriame | 514 shell | |||
| 9 discard | 102 | iso-tsap | 515 printer | |||
| 11 | systat | 103 | gppitnp | 526 | tempo | |
| 13 | daytime | 104 | acr-nema 530 courier | |||
| 15 | netstat | 109 | POP2 | 531 | chat | |
| 17 | qotd | 110 | POP3 | 532 | netnews | |
| 19 | chargen | 111 | sunrpc | 540 | uucp | |
| 20 | ftp data | 113 | auth | 556 | remotefs | |
| 21 | ftp control | 115 | sftp | 563 | NNTP+ SSL | |
| 22 | ssh | 117 | uucp-path | 587 | submission | |
| 23 | telnet | 119 | NNTP | 601 | syslog | |
| 25 | smtp | 123 | NTP | 636 | LDAP+ SSL | |
| 37 | time | 135 | loc-srv epmap | 993 | IMAP+ SSL | |
| 42 | name | 139 | netbios 995 POP3+ SSL | |||
| 43 | nicname | 143 | IMAP2 | 2049 | nfs | |
| 53 | domain | 179 | BGP | 4045 | lockd | |
| 77 | priv-rjs | 389 | LDAP | 6000 | X11 | |
| 79 | finger | 465 | SMTP+ SSL | |||
| 87 | ttylink | 512 | print exec | |||
- Make sure your ISP allows you to run a server and is not blocking the port number of the NAS's web publishing feature.
28.16 Auto Upload
The NAS does not automatically upload files to Flickr or YouTube.
1 Make sure the NAS is connected to the Internet. See Section 10.4 on page 107 for details about testing network connections.
2 Click Maintenance > Log to check the NAS's log for a message about the file.
2a If the log message displays "no such file or directory", the file may have been removed from the NAS. Make sure the file still exists in the watch folder.
2b If the log message displays "filename is queued", the file may still be waiting for auto upload. Check the grace period setting in the service's Configuration screen. You can set a smaller grace period to shorten the queue time.
2c If you cannot find any log messages about the file:
- Make sure the Folder Watch List includes the folder containing the file. You can upload the file to the watch folder again.
- Make sure the file's format is supported by Flickr or YouTube. You can find the supported file extensions in the Folder Watch List.
2d If the log message displays "not authorized yet", check if you can enter the NAS's Configuration screen for the service. If you changed the password of your Flickr or YouTube account, you cannot access the service's Configuration screen, and the NAS cannot auto upload files. Make sure you also update the account information in the NAS.
3 Make sure the file size does not exceed the limit imposed by the service. At the time of writing, Flickr restricts the file size to 10 MB, and YouTube restricts the file size to 100 MB.
4 Make sure you did not exceed the service's upload quota. Flickr and YouTube have different policies about how much you can upload within a certain period, for example, 100 MB/week.
5 The NAS may have temporarily failed to connect to the service. You can upload the file to the watch folder again.
28.17 Package Management
The NAS won't install the package(s) I selected in the Package Management screen.
- The web location of the package may be undergoing maintenance. Try again at a later time. Upgrade the firmware of the NAS.
- If a new firmware is available, do an upgrade and try installing the package(s) again.
I want to know how my hard disk is performing.
Use S.M.A.R.T. (Self Monitoring, Analysis, and Reporting Technology) to monitor hard disks. It detects and reports the reliability of hard disks using standard indicators, enabling administrators to anticipate possible disk failures.
28.18 Backups
I cannot make a backup.
- Check that enough space is available on the external disk. If there isn't you may need to purge older backups or delete other files on the backup USB disk or NAS.
- If you are using the Backup screen (Section 27.3 on page 321):
- You can look at the Backup screen's Last Run Result display.
- If you're backing up to another NAS or a computer, check that it allows the NAS to write files to it. For a synchronization backup, the target must be another NAS or another compatible model.
- Check that the NAS is not performing another backup job. Scheduler queues backups when a different backup is already going on at the time a backup is scheduled.
The backup does not run at the time configured.
- Check that the correct time is configured on the NAS.
- Check that the NAS is able to access the time server from which it gets the time; see Section 16.6 on page 210.
28.19 Google Drive
Google Drive stopped syncing.
1 Make sure the NAS is connected to the Internet. See Section 10.4 on page 107 for details about testing network connections.
2 Check if you have exceeded the Google Drive account's storage quota. You may need to:
- Delete unneeded files.
- Empty the Google Drive trash bin. Note, this permanently deletes everything in the bin, even if Google moved it there without telling you (because you moved a file out of the local sync folder for example).
- Upgrade the account's capacity
3 Click Maintenance > Log to check the NAS's log messages. If a log message says you have exceeded your storage quota on the NAS:
- Delete unneeded files.
- Clean out the recycle bin (see Section 24.4.2 on page 296).
- Increase the user's quota on the volume containing the local sync folder (see Section 22.3.2 on page 283).
4 Check for any logs about removal of the user account. When you remove a user's NAS account, the NAS also removes the link to the user's Google account. However the NAS keeps the data in the local sync folder. Reconfigure a user account and link it to the Google account to let the user use Google Drive again.
Product Specifications
See also Chapter 1 on page 14 for a general overview of the key features.
Supported Media Server Content Formats
The following describes the details about the files that the NAS media server can publish.
- Audio: LPCM (not supported as a file format), MP3, WMA, M4A, M4B, MP4, 3GP, WAV, OGG, FLAC, AAC, MP2, AC3, MPA, MP1, AIF, ASF, FLV, DSD
- Images: JPEG, PNG, TIF, TIFF, BMP, GIF
- Video: WMV, MPEG2, MP1, MPG, SPTS, MP4, AVI, VOB, DivX, 3GP, VDR, MPE, DVR-MS, Xvid, M1V, M4V, MOV, MPV, MKV, OGG, FLV, MTS
Note: Not all published file types can be viewed by all client applications.
Supported iTunes Server Content Formats
At the time of writing, the NAS supports iTunes publishing audio files of the following formats: mp3, m4a, m4p, wav, and mp4.
Customer Support
In the event of problems that cannot be solved by using this manual, you should contact your vendor. If you cannot contact your vendor, then contact a ZyXEL office for the region in which you bought the device.
See http://www.zyxel.com/homepage.shtml and also
http://www.zyxel.com/about_zyxel/zyxel_worldwide.shtml for the latest information.
Please have the following information ready when you contact an office.
Required Information
• Product model and serial number.
- Warranty Information.
- Date that you received your device.
- Brief description of the problem and the steps you took to solve it.
Corporate Headquarters (Worldwide)
Taiwan
• ZyXEL Communications Corporation
- http://www.zyxel.com
Asia
China
• ZyXEL Communications (Shanghai) Corp.
ZyXEL Communications (Beijing) Corp.
ZyXEL Communications (Tianjin) Corp.
- http://www.zyxel.cn
India
• ZyXEL Technology India Pvt Ltd
- http://www.zyxel.in
Kazakhstan
• Z y X E L K a z a k h s t a n
- http://www.zyxel.kz
Korea
• ZyXEL Korea Corp.
- http://www.zyxel.kr
Malaysia
• ZyXEL Malaysia Sdn Bhd.
- http://www.zyxel.com.my
Pakistan
• ZyXEL Pakistan (Pvt.) Ltd.
- http://www.zyxel.com.pk
Philippines
• ZyXEL Philippines
- http://www.zyxel.com.ph
Singapore
• ZyXEL Singapore Pte Ltd.
- http://www.zyxel.com.sg
Taiwan
• ZyXEL Communications Corporation
- http://www.zyxel.com/tw/zh/
Thailand
• ZyXEL Thailand Co., Ltd
- http://www.zyxel.co.th
Vietnam
• ZyXEL Communications Corporation-Vietnam Office
- http://www.zyxel.com/vn/vi
Europe
Austria
• ZyXEL Communications Italy
- http://www.zyxel.it/
Latvia
• Z y X E L L a t v i a
- http://www.zyxel.com/lv/lv/homepage.shtml
Lithuania
- ZyXEL Lithuania
- http://www.zyxel.com/lt/lt/homepage.shtml
Netherlands
• Z y X E L Ben e l u x
- http://www.zyxel.nl
Norway
• ZyXEL Communications
- http://www.zyxel.no
Poland
• ZyXEL Communications Poland
- http://www.zyxel.pl
Romania
• Z y X E L R o m a n i a
- http://www.zyxel.com/ro/ro
Russia
- ZyXEL Russia
- http://www.zyxel.ru
Slovakia
• ZyXEL Communications Czech s.r.o. organizacna zlozka
- http://www.zyxel.sk
Spain
• ZyXEL Communications ES Ltd
- http://www.zyxel.es
Sweden
• ZyXEL Communications
- http://www.zyxel.se
Switzerland
• Studerus AG
- http://www.zyxel.ch/
Turkey
• Z y X E L T u r k e y A . S .
- http://www.zyxel.com.tr
UK
• ZyXEL Communications UK Ltd.
- http://www.zyxel.co.uk
Ukraine
• Z y X E L U k r a i n e
- http://www.ua.zyxel.com
Latin America
Argentina
• ZyXEL Communication Corporation
- http://www.zyxel.com/ec/es/
Brazil
• ZyXEL Communications Brasil Ltda.
- https://www.zyxel.com/br/pt/
Ecuador
• ZyXEL Communication Corporation
- http://www.zyxel.com/ec/es/
Middle East
Israel
• ZyXEL Communication Corporation
- http://il.zyxel.com/homepage.shtml
Middle East
• ZyXEL Communication Corporation
- http://www.zyxel.com/me/en/
North America
USA
• ZyXEL Communications, Inc. - North America Headquarters
- http://www.zyxel.com/us/en/
Oceania
Australia
• ZyXEL Communications Corporation
- http://www.zyxel.com/au/en/
Africa
South Africa
• Nology (Pty) Ltd.
- http://www.zyxel.co.za
Legal Information
Copyright
Copyright © 2016 by ZyXEL Communications Corporation.
The contents of this publication may not be reproduced in any part or as a whole, transcribed, stored in a retrieval system, translated into any language, or transmitted in any form or by any means, electronic, mechanical, magnetic, optical, chemical, photocopying, manual, or otherwise, without the prior written permission of ZyXEL Communications Corporation.
Published by ZyXEL Communications Corporation. All rights reserved.
Disclaimer
ZyXEL does not assume any liability arising out of the application or use of any products, or software described herein. Neither does it convey any license under its patent rights nor the patent rights of others. ZyXEL further reserves the right to make changes in any products described herein without notice. This publication is subject to change without notice.
Regulatory Notice and Statement
UNITED STATES of AMERICA

The following information applies if you use the product within USA area.
FCC EMC Statement
- The device complies with Part 15 of FCC rules. Operation is subject to the following two conditions:
(1) This device may not cause harmful interference, and
(2) this device must accept any interference received, including interference that may cause undesired operation. - Changes or modifications not expressly approved by the party responsible for compliance could void the user's authority to operate the equipment.
- This product has been tested and complies with the specifications for a Class B digital device, pursuant to Part 15 of the FCC Rules. These limits are designed to provide reasonable protection against harmful interference in a residential installation. This equipment generates, uses, and can radiate radio frequency energy and, if not installed and used according to the instructions, may cause harmful interference to radio communications. However, there is no guarantee that interference will not occur in a particular installation.
- If this equipment does cause harmful interference to radio or television reception, which is found by turning the equipment off and on, the user is encouraged to try to correct the interference by one or more of the following measures:
• Reorient or relocate the receiving antenna
- Increase the separation between the equipment or devices
- Connect the equipment to an outlet other than the receiver's
- Consult a dealer or an experienced radio/TV technician for assistance
CANADA
The following information applies if you use the product within Canada area
Industry Canada ICES statement
CAN ICES-3 (B)/NMB-3(B)
EUROPEAN UNION
CE
The following information applies if you use the product within the European Union.
List of national codes
| COUNTRY | ISO 3166 2 LETTER CODE | COUNTRY | ISO 3166 2 LETTER CODE |
| Austria AT Liechtenstein LI | |||
| Belgium BE Lithuania LT | |||
| Bulgaria BG Luxembourg LU | |||
| Croatia | HR Malta | MT | |
| Cyprus CY Netherlands | NL | ||
| Czech Republic | CZ | Norway | NO |
| Denmark DK Poland | PL | ||
| Estonia | EE | Portugal PT | |
| Finland | FI | Romania | RO |
| France | FR | Serbia | RS |
| Germany DE | Slovakia | SK | |
| Greece | GR Slovenia | SI | |
| Hungary | HU Spain | ES | |
| Iceland | IS | Switzerland | CH |
| Ireland | IE | Sweden | SE |
| Italy | IT | Turkey | TR |
| Latvia | LV | United Kingdom | GB |
Safety Warnings
- DO NOT use this product near water, for example, in a wet basement or near a swimming pool.
- DO NOT expose your device to dampness, dust or corrosive liquids.
• DO NOT store things on the device.
• DO NOT install, use, or service this device during a thunderstorm. There is a remote risk of electric shock from lightning. - Connect ONLY suitable accessories to the device.
- DO NOT open the device or unit. Opening or removing covers can expose you to dangerous high voltage points or other risks. ONLY qualified service personnel should service or disassemble this device. Please contact your vendor for further information.
- Make sure to connect the cables to the correct ports.
- Place connecting cables carefully so that no one will step on them or stumble over them.
• Always disconnect all cables from this device before servicing or disassembling.
- DO NOT remove the plug and connect it to a power outlet by itself; always attach the plug to the power adaptor first before connecting it to a power outlet.
- DO NOT allow anything to rest on the power adaptor or cord and do NOT place the product where anyone can walk on the power adaptor or cord.
- Please use the provided or designated connection cables/power cables/ adaptors. Connect it to the right supply voltage (for example, 110V AC in North America or 230V AC in Europe). If the power adaptor or cord is damaged, it might cause electrocution. Remove it from the device and the power source, repairing the power adapter or cord is prohibited. Contact your local vendor to order a new one.
• DO NOT use the device outside, and make sure all the connections are indoors. There is a remote risk of electric shock from lightning.
- CAUTION: Risk of explosion if battery is replaced by an incorrect type, dispose of used batteries according to the instruction. Dispose them at the applicable collection point for the recycling of electrical and electronic devices. For detailed information about recycling of this product, please contact your local city office, your household waste disposal service or the store where you purchased the product.
• DO NOT obstruct the device ventilation slots, as insufficient airflow may harm your device.
The following warning statements apply, where the disconnect device is not incorporated in the device or where the plug on the power supply cord is intended to serve as the disconnect device,
• For permanently connected devices, a readily accessible disconnect device shall be incorporated external to the device;
- For pluggable devices, the socket-outlet shall be installed near the device and shall be easily accessible.
Environment Statement
ErP (Energy-related Products)
ZyXEL products put on the EU market in compliance with the requirement of the European Parliament and the Council published Directive 2009/125/EC establishing a framework for the setting of ecodesign requirements for energy-related products (recast), so called as "ErP Directive (Energy-related Products directive) as well as ecodesign requirement laid down in applicable implementing measures, power consumption has satisfied regulation requirements which are:
Network standby power consumption < 12W, and/or
Off mode power consumption < 0.5W, and/or
Standby mode power consumption < 0.5W.
Wireless setting, please refer to "Wireless" chapter for more detail.
European Union - Disposal and Recycling Information
The symbol below means that according to local regulations your product and/or its battery shall be disposed of separately from domestic waste. If this product is end of life, take it to a recycling station designated by local authorities. At the time of disposal, the separate collection of your product and/or its battery will help save natural resources and ensure that the environment is sustainable development.
Environmental Product Declaration
| Български (Bulgarian) | Čestina (Czech) | Dansk (Danish) | Deutsch (Garman) | ||||||||||||
| Екоплина продуктова декарация | Environmentăni protiăleni o produktu | Mijevaredeklaration | Produkt-Umweltieklaration | ||||||||||||
| RoHS Direcțiva 2011/65/ECEWEE Direcțiva 2012/19/ECPPR Direcțiva 94/82/EOPE/DAIRUT (EC) No 1907/2008ErP Direcțiva 2009/125/EO | RoHS Smelroca 2011/65/EUWEEE Smelroca 2012/19/EUPPW Syndria 94/82/EREACH Nefanara 35/1. 1907/2008Sp Smelroca 2009/125/E | RoHS Direcțiva 2011/65/EUWEEE Direcțiva 2012/19/EUPPW Syndria 94/82/EREACH Polorning (E) Nr. 1907/2008ErP Direcțiva 2009/125/EF | RoHS Direcțiva 2011/65/EUWEEE Direcțiva 2012/19/EUPPW Syndria 94/82/EREACH VUKURUNU (EU) Nr. 1907/2008ErP Direcțiva 2009/125/EG | ||||||||||||
Имет тіла: Richard Hu / Quality Management Division Senior ManagerПроток : Dana (ajvihem):01/10/2014[CKH4]  | Jinlroti tsi : Richard Hu / Quality Management Division Senior ManagerПроток : Datum (ažimminimo):31/10/2014  | Navr tsi : Richard Hu / Quality Management Division Senior ManagerUnskredit : Data (ažimminimo):01/10/2014 | Navr tsi : Richard Hu / Quality Management Division Senior ManagerUnskredit : Data (ažimminimo):01/10/2014 | ||||||||||||
| Eesti keel (Estonian) | English | Español (Spanish) | Français (French) | ||||||||||||
| Toote keskkonnadeklaratsiooni | Environmental product declaration | Declaraciones Ambientales de Producto | Profil environnemental de produit | ||||||||||||
| RoHS Direcțiva 2011/65/ELEWEE Direcțiva 2012/19/EUPPW Syndria 94/82/EREACH MARUS (E) Nr 1907/2008ErP Direcțiva 2009/125/EO | RoHS Direcțiva 2011/65/EUWEEE Direcțiva 2012/19/EUPPW Syndria 94/82/EREACH Regulation (EC) No 1907/2008ErP Direcțiva 2009/125/EC | RoHS Direcțiva 2011/65/EUEWEEE Direcțiva 2012/19/EUPPW Syndria 94/82/EREACH REGLAMENTI (CE) nr 1907/2008ErP Direcțiva 2009/125/E | RoHS Direcțiva 2011/65/EUEWEEE Direcțiva 2012/19/EUPPW Syndria 94/82/EREACH RESLEMENT (CE) Nr 1907/2008ErP Direcțiva 2009/125/E | ||||||||||||
Nami : Richard Hu / Quality Management Division Senior ManagerAluka : Kupiplen (p/p/klassas):01/10/2014  | Name/ title : Richard Hu / Quality Management Division Senior ManagerSignature : Date (ažimminimo):31/10/2014[CTX4]  | Nombre/ Richard Hu / Quality Management Division Senior ManagerFirma : Fecha (ažasimmimo):2014/10/01  | Nombre / Richard Hu / Quality Management Division Senior ManagerSignature : Data (ažasimmimo):2014/10/01 | ||||||||||||
| Hrvatski (Croatian) | Italiano (Italian) | Latvieiu valoda (Latvian) | Lietuviu kalba (Lithuanian) | ||||||||||||
| Deklaraciju o zbirinjavanju proizvoda | Dichiarazione ambientale di prodotto | Produkta vites letekmjuna deklaracija | Aplinkasaugine gamino deklaracija | ||||||||||||
| RoHS Direcțiva 2011/65/EUEWEE Direcțiva 2012/19/EUPPW Syndria 94/82/EREACH Divertir (E) Nr 1907/2008ErP Direcțiva 2009/125/EZ | RoHS Direcțiva 2011/65/EUEWEE Direcțiva 2012/19/EUPPW Syndria 94/82/EREACH REGLAMENTI (CE) Nr 1907/2008ErP Direcțiva 2009/125/EZ | RoHS Direcțiva 2011/65/EUEWEEE Direcțiva 2012/19/EUPPW Syndria 94/82/EREACH Repan (E) Nr 1907/2008ErP Direcțiva 2009/125/EK | RoHS Direcțiva 2011/65/EUEWEEE Direcțiva 2012/19/EUPPW Syndria 94/82/EREACH REGLAMENTI (CE) Nr 1907/2008ErP Direcțiva 2009/125/EK | ||||||||||||
Ime našivn : Richard Hu / Quality Management Division Senior ManagerProtok : Datum (ažimminimo):01/10/2014  | Nome/ stating : Richard Hu / Quality Management Division Senior ManagerFirma : Data (ažasimmimo):2014/10/01  | Nosakuma/ Richard Hu / Quality Management Division Senior ManagerParoska : Daturn (ažimmimo):01/10/2014    | Varav Richard Hu / Quality Management Division Senior ManagerParoska : Data (ažisimmimo):31/10/2014 | ||||||||||||
| Magyar (Hungarian) | Malti (Maltese) | Nederlands (Dutch) | Polski (Polish) | ||||||||||||
| Könyezstvédelmi terméknyllakozatist | Dikjarazzioni Ambientali dwar il-Prodott | Mileproductverklaring | Deklaracja środowiskową produktu | ||||||||||||
| RoHS 2011/65/EUEWEE Direcțiva 2012/19/EUPPW Syndria 94/82/EREACH 1907/2008/SK RendelsleErP 2009/125/EK | RoHS Direcțiva 2011/65/EUEWEEE Direcțiva 2012/19/EUPPW Syndria 94/82/EREACH REGLAMENTI (CE) NRU 1907/2008ErP Direcțiva 2009/125/EZ | RoHS Rizrjena 2011/65/EUEWEEE Rizrjena 2012/19/EUPPW Syndria 94/82/EREACH Verkörung (E) Nr. 1907/2008ErP Rizrjena 2009/125/EK | RoHS Direktywa 2011/65/EUEWEEE Direktywa 2012/19/EUPPW Syndria 94/82/EREACH Ruprizdama (E) Nr 1907/2008ErP Direktywa 2009/125/EK | ||||||||||||
Névicim : Richard Hu / Quality Management Division Senior ManagerAluka : Datum (ažimminimo):2014/10/01  | Semi/ bics : Richard Hu / Quality Management Division Senior ManagerFirma : Data (ažasimmimo):2014/10/01  | Nami/ list : Richard Hu / Quality Management Division Senior ManagerHandsteering : Datum (ažimmimo):01/10/2014  | Nazwski/ Richard Hu / Quality Management Division Senior ManagerPrata : Data (ažimminimo):2014/10/01  | ||||||||||||
| Português (Portuguese) | Română (Romanian) | Slovenčina (Slovak) | Slovenščina (Slovene) | ||||||||||||
| Declaração ambiental do produto | Declaratie de medu privinc produsse | Vyhlasenie e environmentálnom výrobku | Očoljsko deklaracijo izdelka | ||||||||||||
| RoHS Direcțiva 2011/65/EUEWEEE Direcțiva 2012/19/EUPPW Syndria 94/82/EREACH Requamton (CE) Nr 1907/2008ErP Direcțiva 2009/125/EZ | RoHS Direcțiva 2011/65/EUEWEEE Direcțiva 2012/19/EUPPW Syndria 94/82/EREACH REGLAMENTI (CE) NR, 1907/2008ErP Direcțiva 2009/125/EZ | RoHS Smerica 2011/65/EUEWEEE Smerica 2012/19/EUPPW Syndria 94/82/EREACH Nanostma (E) Nr. 1907/2008ErP Smerica 2009/125/EZ | RoHS Direktywa 2011/65/EUEWEEE Direktywa 2012/19/EUPPW Syndria 94/82/EREACH Repunizdama (E) Nr. 1907/2008ErP Direktywa 2009/125/EK | ||||||||||||
Name (hate : Richard Hu / Quality Management Division Senior ManagerAsainatura : Data (ažimminimo):01/10/2014  | Numstar : Richard Hu / Quality Management Division Senior ManagerSemidura : Data (ažinminimo):31/10/2014  | Manul itai : Richard Hu / Quality Management Division Senior ManagerPrata : Datum (ažimmimo):01/10/2014    [6HyG] [6hyG] [6hyG] [6hyG] [6hyG] [6hyG] [6hyG] [6hyG] [6hyG] [6hyG] [6hyG] [6hyG] [6hyG] [6hyG] [6hyG] [6hyG] [6hyG] [6hyG] [6hyG] [6hyG] [6hyG] [6 hyG] [6hyG] [6hyG] [6hyG] [6hyG] [6hyG] [6hyG] [6hyG] [6hyG] [6hyG] [6hyG] [6hyG] [6hyG] [6hyG] [6hyG] [6hyG] [6hyG] [6hyG] [6hyG] [6hyG] [6 HYG] [6 HyG] [6 hyG] [6 hyG] [6 hyG] [6 hyG] [6 hyG] [6 hyG] [6 hyG] [6 hyG] [6 hyG] [6 hyG] [6 hyG] [6 hyG] [6 hyG] [6 hyG] [6 hyG] [6 hyG] [6 hyG] [6 hyG] [6 hyG] [6 hyG] [6 HyG] [6 hyG] [6 hyG] [6 hyG] [6 hyG] [6 hyG] [6 hyG] [6 hyG] [6 hyG] [6 hyG] [6 hyG] [6 hyG] [6 hyG] [6 hyG] [6 hyG] [6 hyG] [6 hyG] [6 hyG] [6 hyG] [6 hyG] [6hyG] [6 hyG] [6 hyG] [6 hyG] [6 hyG] [6 hyG] [6 hyG] [6 hyG] [6 hyG] [6 hyG] [6 hyG] [6 hyG] [6 hyG] [6 hyG] [6 hyG] [6 hyG] [6 hyG] [6 hyG] [6 hyG] [6 hyG] [6 hcyg] [6 hyg] [6 hyg] [6 hyg] [6 hyg] [6 hyg] [6 hyg] [6 hyg] [6 hyg] [6 hyg] [6 hyg] [6 hyg] [6 hyg] [6 hyg] [6 hyg] [6 hyg] [6 hyg] [6 hyg] [6 hyg] [6 hyg] [6 hyg] [6 hcyg] [6 hyg] [6 hyg] [6 hyg] [6 hyg] [6 hyg] [6 hyg] [6 hyg] [6 hyg] [6 hyg] [6 hyg] [6 hyg] [6 hyg] [6 hyg] [6 hyg] [6 hyg] [6 hyg] [6 hyg] [6 hyg] [6 hcyg] [8 Hxg] [8 Hxg] [8 Hxg] [8 Hxg] [8 Hxg] [8 Hxg] [8 Hxg] [8 Hxg] [8 Hxg] [8 Hxg] [8 Hxg] [8 Hxg] [8 Hxg] [8 Hxg] [8 Hxg] [8 Hxg] [8 Hxg] [ [6HyG] [6hyG] [6hyG] [6hyG] [6hyG] [6hyG] [6hyG] [6hyG] [6hyG] [6hyG] [6hyG] [6hyG] [6hyG] [6hyG] [6hyG] [6hyG] [6hyG] [6hyG] [6hyG] [6hyG] [6hyG] [6 hyG] [6hyG] [6hyG] [6hyG] [6hyG] [6hyG] [6hyG] [6hyG] [6hyG] [6hyG] [6hyG] [6hyG] [6hyG] [6hyG] [6hyG] [6hyG] [6hyG] [6hyG] [6hyG] [6hyG] [6 HYG] [6 HyG] [6 hyG] [6 hyG] [6 hyG] [6 hyG] [6 hyG] [6 hyG] [6 hyG] [6 hyG] [6 hyG] [6 hyG] [6 hyG] [6 hyG] [6 hyG] [6 hyG] [6 hyG] [6 hyG] [6 hyG] [6 hyG] [6 hyG] [6 hyG] [6 HyG] [6 hyG] [6 hyG] [6 hyG] [6 hyG] [6 hyG] [6 hyG] [6 hyG] [6 hyG] [6 hyG] [6 hyG] [6 hyG] [6 hyG] [6 hyG] [6 hyG] [6 hyG] [6 hyG] [6 hyG] [6 hyG] [6 hyG] [6hyG] [6 hyG] [6 hyG] [6 hyG] [6 hyG] [6 hyG] [6 hyG] [6 hyG] [6 hyG] [6 hyG] [6 hyG] [6 hyG] [6 hyG] [6 hyG] [6 hyG] [6 hyG] [6 hyG] [6 hyG] [6 hyG] [6 hyG] [6 hcyg] [6 hyg] [6 hyg] [6 hyg] [6 hyg] [6 hyg] [6 hyg] [6 hyg] [6 hyg] [6 hyg] [6 hyg] [6 hyg] [6 hyg] [6 hyg] [6 hyg] [6 hyg] [6 hyg] [6 hyg] [6 hyg] [6 hyg] [6 hyg] [6 hcyg] [6 hyg] [6 hyg] [6 hyg] [6 hyg] [6 hyg] [6 hyg] [6 hyg] [6 hyg] [6 hyg] [6 hyg] [6 hyg] [6 hyg] [6 hyg] [6 hyg] [6 hyg] [6 hyg] [6 hyg] [6 hyg] [6 hcyg] [8 Hxg] [8 Hxg] [8 Hxg] [8 Hxg] [8 Hxg] [8 Hxg] [8 Hxg] [8 Hxg] [8 Hxg] [8 Hxg] [8 Hxg] [8 Hxg] [8 Hxg] [8 Hxg] [8 Hxg] [8 Hxg] [8 Hxg] [ | |||||||||||||
台灣

安全警告
為了您的安全,請先閱讀以下警告及指示:
Viewing Certifications
Go to http://www.zyxel.com to view this product's documentation and certifications.
ZyXEL Limited Warranty
ZyXEL warrants to the original end user (purchaser) that this product is free from any defects in material or workmanship for a specific period (the Warranty Period) from the date of purchase. The Warranty Period varies by region. Check with your vendor and/or the authorized ZyXEL local distributor for details about the Warranty Period of this product. During the warranty period, and upon proof of purchase, should the product have indications of failure due to faulty workmanship and/or materials, ZyXEL will, at its discretion, repair or replace the defective products or components without charge for either parts or labor, and to whatever extent it shall deem necessary to restore the product or components to proper operating condition. Any replacement will consist of a new or re-manufactured functionally equivalent product of equal or higher value, and will be solely at the discretion of ZyXEL. This warranty shall not apply if the product has been modified, misused, tampered with, damaged by an act of God, or subjected to abnormal working conditions.
Note
Repair or replacement, as provided under this warranty, is the exclusive remedy of the purchaser. This warranty is in lieu of all other warranties, express or implied, including any implied warranty of merchantability or fitness for a particular use or purpose. ZyXEL shall in no event be held liable for indirect or consequential damages of any kind to the purchaser.
To obtain the services of this warranty, contact your vendor. You may also refer to the warranty policy for the region in which you bought the device at http://www.zyxel.com/web/support_warranty_info.php.
Registration
Register your product online to receive e-mail notices of firmware upgrades and information at www.zyxel.com for global products, or at www.us.zyxel.com for North American products.
Open Source Licenses
This product contains in part some free software distributed under GPL license terms and/or GPL like licenses. Open source licenses are provided with the firmware package. You can download the latest firmware at www.zyxel.com. To obtain the source code covered under those Licenses, please contact support@zyxel.com.tw to get it.
Index
A
access rights 127
Flickr 267
shares 294, 295
YouTube 269
activation
download service 219
Flickr/YouTube 263
FTP 216
FTP Uploadr 270
recycle bins 127, 293
web publishing 230
adding channels 219
Amazon Fire TV 30
ANONYMOUS FTP 344
anonymous FTP access 216
Apple TV 30
applications 213, 262
adding channels 219
auto upload
Flickr/YouTube 262
FTP Uploadr 270
COPY/SYNC button 232
configuration 232
example 241
synchronization 242
download service 214, 235
activation 219
adding a task 222, 228
configuration 219
notifications 236
P2P download 222, 235
preferences 223
protection 236, 237
status 221
URL 222
FTP 213, 215, 262
activation 216
anonymous access 216
passive mode transfer 216
media server 214, 216
configuration 217
iTunes server 214, 234
print server 240
configuration 231
name 232
web publishing 215, 230, 240
activation 230
example 238
port number 240
archive 192
authorization
Flickr 263, 264
YouTube 267
auto upload
Flickr/YouTube 262
activation 263
authorization 263, 267
configuration 266, 267
FTP Uploadr 270
activation 270
bandwidth limit 273
configuration 272
server entry 271
grace period 267, 269, 273
B
backup 191, 192, 254, 256
archive 192
synchronization tutorial 194
tutorial 194
backup files
restoring files by 34, 198
backup job
restoring files by 196
backup settings 310
bandwidth limit 273
C
certificate 312
editing 312
tutorial 177
verifying 186
certifications 362
viewing 365
Chromecast 30
CIFS 206
cloud 251
cloud storage 254, 256
collaboration 256
configuration
COPY/SYNC button 232
download service 219
Flickr 266
FTP Uploadr 272
print server 231
recycle bins 296
YouTube 267, 268
contact information 355
control panel 106
COPY/SYNC button 17, 232
configuration 232
example 241
synchronization 242
copying contents 298
copyright 361
CPU
temperature 104
usage 104
creating
groups 288, 289
shares 292, 293
users 282, 283
customer support 355
S.M.A.R.T. attributes 79
displaying user information 285
DLNA 214, 234
DNS 106, 108
documentation
related 2
Domain Name System, see DNS
domain user
troubleshooting 345
troubleshooting share access 345
download period control 225
download service 214, 235
activation 219
adding a task 222, 228
configuration 219
download period control 225
notifications 236
activation 219
P2P download
IP filtering 227
protection 236, 237
re-seeding 220
settings 225
torrent files 222, 235
preferences 223
status 221
URL, download service 222
downloading files 126
Dropbox 274
duplexing 98
E
Exchangeable image file format, see Exif
Exif 130
explicit TLS/SSL 188
D
date 210
desktop 41
disclaimer 361
discovery 20
disk
F
fan speed 104
file
troubleshooting access 345
file browser
configure share 126
file synchronization 256
File Transfer Protocol over Explicit TLS, see FTPES
File Transfer Protocol over TLS, see FTPS
files
downloading 126
uploading 126
FileZilla 188
FindMe 19
fingerprint 186
firmware, upgrading 122
Flickr 262
access rights 267
activation 263
authorization 263, 264
grace period 267
safety level 267
folder
troubleshooting access 345
folder creation 125
FTP 188, 213, 215, 262
activation 216
anonymous access 216
over TLS 188
passive mode transfer 216
FTP Uploadr 270
activation 270
bandwidth limit 273
configuration 272
grace period 273
server entry 271
FTPES 214
FTPES - FTP over explicit TLS/SSL 188
FTPS 188, 262
adding 288, 289
editing 289
membership 284, 289
names 289
searching 288
Guide
Quick Start 2
H
hot spare 102
HTTPS 182, 300, 311
|
icons 140, 142
global 140
users 283
IP address 106
IP filtering 227
iSCSI 81
iSCSI target 86
iTunes server 214, 218, 234
J
JBOD 98
K
Ken Burns 137
L
lag, time 206
language 137
latitude 131
login 38
Logitech® Media Server 218
G
global icons 140
GMT 24, 211
Google Chromecast 30
Google Drive 256
Google Maps 131
GPS 131
grace period 267, 269, 273
groups 287
logs 306
longitude 131
LUN 82
M
maintenance 302
backup settings 310
logs 306
power management 302
failure 303
resume 303
schedule 304
UPS 303
reset 310
restoring settings 310
shutdown 313
upgrading firmware 122
master browser 210
media server 214, 216
configuration 217
iTunes server 214, 218, 234
Logitech® Media Server 218
rebuild database 216
share publish 217
status 216
membership 284
groups 284, 289
Memopal 254
mirroring 98
moving contents 298
myZyXELCloud 26
N
naming
server 209
shares 128
workgroup 210
NAS Starter Utility 19
navigation panel 140
network 106
DNS 106, 108
IP address 106
PPPoE 107, 111, 119
TCP/IP 107
notifications
download service
activation 219
notifications, download service 236
0
one-way incremental backup 254
online backup 254
online support information 2
other documentation 2
ownCloud 251
P
P2P download
IP filtering 227
protection 236, 237
re-seeding 220
settings 225
torrent files 222, 235
health 230
info-hash 230
trackers 230
parity 98
passive mode transfer 216
personal cloud 251
Play Next 137
port mapping 113
power button 16
power management 302
failure 303
resume 303
schedule 304
UPS 303
PPPoE 107, 111, 119
preferences, download service 223
print server 240
configuration 231
name 232
private cloud 251
protect 192
backup 191
backup tutorial 194
protection, download service 236, 237
public key certificate 312
editing 312
publishing shares 217
Q
Quick Start Guide 2
R
RAID
background information 98
data protection 102
RAID 0 99
RAID 10 101
RAID 5 101
RAID 5 spare 102
rebuild media server database 216
recycle bins 295
activation 127, 293
configuration 292, 296
related documentation 2
remote access 26
reset 17, 310
restoring
by backup files tutorial 34, 198
by backup job tutorial 196
files 196
restoring settings 310
Roku 3 30
RSS 215
download service notifications 236
S
S.M.A.R.T.
attributes 79
safety level, Flickr 267
schedule, power management 304
scheduling, download service 225
secure connections 182
server
Syslog 243
TFTP 250
server entry, FTP Uploadr 271
server name 209
setup
COPY/SYNC button 232
download service 219
Flickr 266
FTP Uploadr 272
media server 217
P2P download 225
print server 231
YouTube 267, 268
share
configuration 126
troubleshooting local user access 344
share publishing 217
shares 124, 291
access rights 127, 294, 295
adding 292, 293
copying contents 298
downloading files 126
editing 293
folder creation 125
moving contents 298
names 128
recycle bins 292, 295
activation 293
configuration 296
share browser 292, 296
status 292
types 292
uploading files 126, 297
shutdown 313
smart TVs 30
SSL 188, 311
certificate 312
editing 312
tutorial 177
status 139, 203
download service 221
shares 292
volume 97
status center 103
storage 47
status 97
volumes 95
streaming 30
striping 98
support information 2
synchronization 232, 242, 256
configuration 232
directions 233
single direction 242
tutorial 194
two directions 243
Syslog server 243
system
date/time 210
login 38
master browser 210
reset 17
server name 209
settings 205
status 203
time lag 206
workgroup name 210
T
target 86
TCP/IP 107
temperature
CPU 104
TFTP server 250
thumbprint 186
time 210
lag 206
server 211
zone 24, 211
Time Machine 278
TLS 188, 214, 262
torrent files 222, 235
health 230
info-hash 230
trackers 230
Transport Layer Security, see TLS
troubleshooting
domain user 345
domain user share access 345
file access 345
folder access 345
forgot password 340, 341
LED indicators 337
LAN 339
local user share access 344
login 343
media files 348
NAS Starter Utility 339
overview 337
user share access 343
web configurator access 341
two-way synchronization 256
U
Universal Plug and Play. See UPnP.
upgrading firmware 122
uploading files 126, 297
UPnP 113
port mapping 113
UPS 303
URL 222
User Name 121
usernames 284
users 281
adding an account 282, 283
displaying information 282, 285
editing an account 283
group membership 284, 289
icons 283
search 282
usernames 284
V
video category, YouTube 269
video playback 137
volume
RAID 1 99
volumes 95
status 97
W
warranty 365
note 365
web configurator 38
login 38
navigation panel 140
status 139
web publishing 215, 230, 240
activation 230
example 238
port number 240
troubleshooting 350
web security 182
workgroup name 210
Y
YouTube 262
access rights 269
activation 263
authorization 267
configuration 267, 268
grace period 269
video category 269
Z
zCloud 30
ZyXEL Drive 26