
Cuisinemaster CS100C510 - Herd LEISURE - Kostenlose Bedienungsanleitung
Finden Sie kostenlos die Bedienungsanleitung des Geräts Cuisinemaster CS100C510 LEISURE als PDF.


| Produkttyp | Elektroherd (Electric Range Cooker) |
| Marke | Leisure |
| Modell | Cuisinemaster CS100C510 |
| Abmessungen (H/B/T) | 900 mm / 1000 mm / 600 mm |
| Spannung/Frequenz | 220-240 V ~ 50 Hz |
| Gesamtleistungsaufnahme | 15,2 kW |
| Absicherung | min. 40 A |
| Kabeltyp | H05W-FG 3x6 mm² (max. 2 m) |
| Kochzonen | 6: 1x Zweikreis (210/120 mm, 2200/750 W), 2x Einzel 180 mm (1700 W), 2x Einzel 140 mm (1200 W), 1x Warmhaltezone (80 W) |
| Backöfen | 4: Hauptofen links (Umluft, A), Grill links oben (1,6 kW), Rechts oben (Slow Cooker, A), Rechts unten (Konventionell, A) |
| Energieeffizienzklasse Backöfen | A |
| Innenbeleuchtung | 15-25 W (je Ofen) |
| Timer-Funktionen | Kochzeit, Endzeit, Alarm, Tastensperre |
| Sicherheit | Kindersicherung, Sicherheitsketten, Heißwarnanzeige, automatische Abschaltung |
| Reinigung | Katalytische Wände (selbstreinigend), herausnehmbare Türscheibe |
| Zubehör | Drahtgitter, kleine Drahtablage, Backblech, Teleskopauszüge |
| Gewicht | ca. 80 kg (geschätzt) |
Häufig gestellte Fragen - Cuisinemaster CS100C510 LEISURE
Benutzerfragen zu Cuisinemaster CS100C510 LEISURE
0 Frage zu diesem Gerät. Beantworten Sie die, die Sie kennen, oder stellen Sie Ihre eigene.
Eine neue Frage zu diesem Gerät stellen
Laden Sie die Anleitung für Ihr Herd kostenlos im PDF-Format! Finden Sie Ihr Handbuch Cuisinemaster CS100C510 - LEISURE und nehmen Sie Ihr elektronisches Gerät wieder in die Hand. Auf dieser Seite sind alle Dokumente veröffentlicht, die für die Verwendung Ihres Geräts notwendig sind. Cuisinemaster CS100C510 von der Marke LEISURE.
BEDIENUNGSANLEITUNG Cuisinemaster CS100C510 LEISURE
Electric Range Cooker
CUISINEMASTER
CS100C510X
Please read this user manual first!
Dear Customer,
Thank you for purchasing this Leisure product. We hope that you get the best results from your product which has been manufactured with high quality and state-of-the-art technology. Therefore, please read this entire user manual and all other accompanying documents carefully before using the product and keep it as a reference for future use. If you handover the product to someone else, give the user manual as well. Follow all warnings and information in the user manual.
Remember that this user manual is also applicable for several other models. Differences between models will be identified in the manual.
Explanation of symbols
Throughout this user manual the following symbols are used:

Important information or useful hints about usage.
Warning of hazardous situations with regard to life and property.

Warning of electric shock.

Warning of risk of fire.
Warning of hot surfaces.
CE
1 Important instructions and warnings for safety and environment 4
General safety....4
Electrical safety....4
Product safety....5
Intended use....6
Safety for children....7
Disposing of the old product 7
Package information....7
2 General information 8
Overview 8
Technical specifications....9
Package contents....10
3 Installation 11
Before installation ....11
Installation and connection .....12
Future Transportation....14
Future Transportation....14
4 Preparation 15
Tips for saving energy 15
Initial use....15
Time setting....15
First cleaning of the appliance....16
Initial heating 16
5 How to use the hob 17
General information about cooking .....17
Using the hobs....17
6 How to operate the oven 19
General information on baking, roasting and grilling 19
How to operate the main electric oven (LHS) . 19
Using the oven clock 20
Using the keylock 21
Using the clock as an alarm 21
Cooking times table for LHS -main oven ..... 22
How to operate the grill (LHS).... 23
Cooking times table for grilling (LHS) 23
How to operate the RHS bottom oven ..... 24
Cooking times table....24
How to operate the RHS top oven 25
Cooking times table 25
7 Maintenance and care 26
General information....26
Cleaning the hob....26
Cleaning the control panel 26
Cleaning the oven/grill cavities 26
Removing the oven door 27
Removing the door inner glass 27
Replacing the oven lamp.... 27
8 Troubleshooting 29
9 GUARANTEE and SERVICE 30
1 Important instructions and warnings for safety and environment
This section contains safety instructions that will help protect from risk of personal injury or property damage. Failure to follow these instructions shall void any warranty.
General safety
- This appliance can be used by children aged from 8 years and above and persons with reduced physical, sensory or mental capabilities or lack of experience and knowledge if they have been given supervision or instruction concerning use of the appliance in a safe way and understand the hazards involved.
Children shall not play with the appliance. Cleaning and user maintenance shall not be made by children without supervision.
- Never place the product on a carpet-covered floor. Otherwise, lack of airflow beneath the product will cause electrical parts to overheat. This will cause problems with your product.
- Installation and repair procedures must always be performed by Authorized Service Agents. The manufacturer shall not be held responsible for damages arising from procedures carried out by unauthorized persons which may also void the warranty. Before
installation, read the instructions carefully.
- Do not operate the product if it is defective or has any visible damage.
- Ensure that the product function knobs are switched off after every use.
Electrical safety
- If the product has a failure, it should not be operated unless it is repaired by the Authorized Service Agent. There is the risk of electric shock!
-
Only connect the product to a grounded outlet/line with the voltage and protection as specified in the “Technical specifications”. Have the grounding installation made by a qualified electrician while using the product with or without a transformer. Our company shall not be liable for any problems arising due to the product not being earthed in accordance with the local regulations.
-
Never wash the product by spreading or pouring water onto it! There is the risk of electric shock!
- Never wash the product by spreading or pouring water onto it! There is the risk of electric shock!
- The product must be disconnected during installation, maintenance, cleaning and repairing procedures.
- If the power connection cable for the product is damaged, it must be replaced by the manufacturer, its service agent or similar qualified persons in order to avoid a hazard.
- The appliance must be installed so that it can be completely disconnected from the mains supply. The separation must be provided by a switch built into the fixed electrical installation, according to construction regulations.
- Rear surface of the oven gets hot when it is in use. Make sure that the electrical connection does not contact the rear surface; otherwise, connections can get damaged.
- Do not trap the mains cable between the oven door and frame and do not route it over hot surfaces. Otherwise, cable insulation may melt and cause fire as a result of short circuit.
- Any work on electrical equipment and systems should only be carried out by authorized and qualified persons.
- In case of any damage, switch off the product and disconnect it from the mains. To do this, turn off appropriate switch in the consumer unit in your home.
• Make sure that fuse rating is compatible with the product.
Product safety
- The appliance and its accessible parts become hot during use. Care should be taken to avoid touching heating elements. Children less than 8 years of age shall be kept away unless continuously supervised.
- Never use the product when your judgment or coordination is impaired by the use of alcohol and/or drugs.
- Be careful when using alcoholic drinks in your dishes. Alcohol evaporates at high temperatures and may cause fire since it can ignite when it comes into contact with hot surfaces.
- Do not place any flammable materials close to the product as the sides may become hot during use.
- During use the appliance becomes hot. Care should be taken to avoid touching heating elements inside the oven.
- Keep all ventilation slots clear of obstructions.
- Do not heat closed tins and glass jars in the oven. The pressure that would build-up in the tin/jar may cause it to burst.
- Do not place baking trays, dishes or aluminium foil directly onto the
bottom of the oven. The heat accumulation might damage the bottom of the oven.
- Don't line the grill pan with aluminium foil, as this could result in an increase risk of fire or damage to your cooker.
- Do not use harsh abrasive cleaners or sharp metal scrapers to clean the oven door glass since they can scratch the surface, which may result in shattering of the glass.
- Do not use steam cleaners to clean the appliance as this may cause an electric shock.
- Use the shelves as described in "How to operate the electric oven".
- Do not use the product if the front door glass removed or cracked.
- Oven handle is not towel dryer. Do not hang up towel, gloves, or similar textile products when the grill function is at open door.
- Always use heat resistant oven gloves when putting in or removing dishes into/from the hot oven.
- Ensure that the appliance is switched off before replacing the lamp to avoid the possibility of electric shock.
-
Do not close the top cover before the hotplates or burners cool down.
-
Danger of fire: Do not store items on the cooking surfaces.
- If the surface is cracked, switch off the appliance to avoid the possibility of electric shock.
- The appliance is not intended to be operated by means of an external timer or separate remote-control system.
- Unattended cooking on a hob with fat or oil can be dangerous and may result in fire. NEVER try to extinguish a fire with water, but switch off the appliance and then cover flame e.g. with a lid or a fire blanket.
- Danger of fire: Do not store items on the cooking surfaces.
Prevention against possible fire risk!
- Ensure all electrical connections are secure and tight to prevent risk of arcing.
- Do not use damaged cables or extension cables.
- Ensure liquid or moisture is not accessible to the electrical connection point.
Intended use
- This product is designed for domestic use. Commercial use will void the guarantee.
-
This appliance is for cooking purposes only. It must not be used for other purposes, for example room heating.
-
This product should not be used for warming the plates under the grill, drying towels, dish cloths etc. by hanging them on the oven door handles. This product should also not be used for room heating purposes.
- The manufacturer shall not be liable for any damage caused by improper use or handling errors.
- The oven can be used for defrosting, baking, roasting and grilling food.
Safety for children
- Accessible parts may become hot during use. Young children should be kept away.
- The packaging materials will be dangerous for children. Keep the packaging materials away from children. Please dispose of all parts of the packaging according to environmental standards.
- Electrical and/or gas products are dangerous to children. Keep children away from the product when it is operating and do not allow them to play with the product.
- Do not place any items above the appliance that children may reach for.
- When the door is open, do not load any heavy object on it and do not allow children to sit on it. It may overturn or door hinges may get damaged.
Disposing of the old product
Dispose of the old product in an environmentally friendly manner. This equipment bears the selective sorting symbol for waste electrical and electronic equipment (WEEE). This means that this equipment must be handled pursuant to European Directive 2002/96/EC in order to be recycled or dismantled to minimize its impact on the environment. For further information, please contact local or regional authorities.
Refer to your local dealer or solid waste collection centre in your area to learn how to dispose of your product.
Before disposing of the product, cut off the power cable plug and make the door lock (if any) unusable to avoid dangerous conditions to children.
Package information
- Packaging materials of the product are manufactured from recyclable materials in accordance with our National Environment Regulations. Do not dispose of the packaging materials together with the domestic or other wastes. Take them to the packaging material collection points designated by the local authorities.
2 General information
Overview
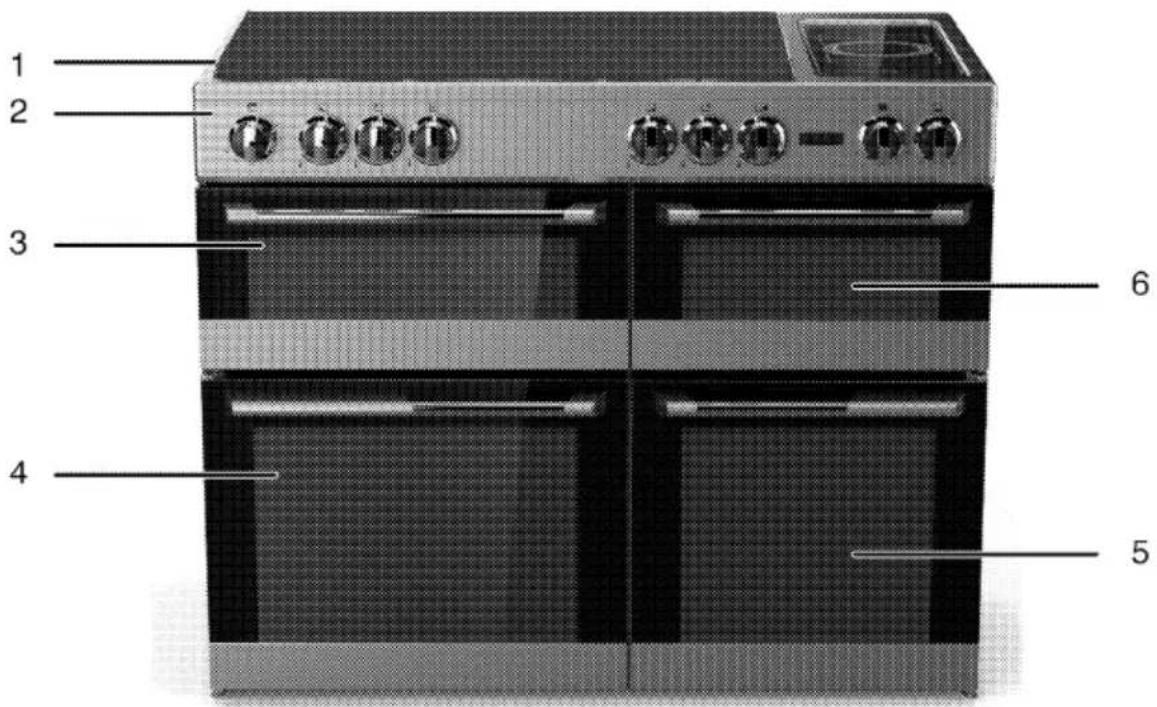
1 Burner plate
2 Control panel
3 LHS Top oven - Grill
4 LHS Main oven
5 RHS bottom oven
6 RHS top oven

1 Warming lamp
2 Single-circuit cooking plate Rear left
3 Single-circuit cooking plate Front left
4 Dual-circuit cooking plate Middle
5 Thermostat lamp for LHS top oven
6 Oven knob for LHS top oven
7 Thermostat lamp for LHS main oven
8 Oven knob for LHS bottom oven
9 Digital timer
10 Single-circuit cooking plate Middle-front
11 Single-circuit cooking plate Middle-rear
12 Warming lamp for Warming zone
13 Warming zone knob Right
14 Thermostat lamp for RHS top oven
15 Oven knob for RHS top oven
16 Thermostat lamp for RHS bottom oven
17 Oven knob for RHS bottom oven
Technical specifications
| GENERAL | |
| External dimensions (height / width / depth) | 900 mm/1000 mm/600 mm |
| Voltage / frequency | 220-240 V ~ 50 Hz |
| Total power consumption | 15.2 kW |
| Fuse | min. 40 A |
| Cable type / section | H05W-FG 3 x 6 mm^2 or equivalent |
| Cable length | max. 2 m |
| HOB | |
| Burners | |
| Rear left | Single-circuit cooking plate |
| Dimension | 140 mm |
| Power | 1200 W |
| Front left | Single-circuit cooking plate |
| Dimension | 180 mm |
| Power | 1700 W |
| Middle | Dual-circuit cooking plate |
| Dimension | 210/120 mm |
| Power | 2200/750 W |
| Middle- rear | Single-circuit cooking plate |
| Dimension | 180 mm |
| Power | 1700 W |
| Middle front | Single-circuit cooking plate |
| Dimension | 140 mm |
| Power | 1200 W |
| Right | Warming zone |
| Power | 80 W |
| OVEN/GRILL | |
| Main oven-LHS | Fan oven |
| Energy efficiency class# | A |
| Inner lamp | 15-25 W |
| Top oven-LHS | Grill |
| Grill power consumption | 1.6 kW |
| RHS Top oven | Slower cooker |
| Energy efficiency class# | A |
| Inner lamp | 15-25 W |
| RHS oven | Conventional oven |
| Energy efficiency class# | A |
| Inner lamp | 15-25 W |
Basics: Information on the energy label of electrical ovens is given in accordance with the EN 50304 standard. Those values are determined under standard load with bottom-top heater or fan assisted heating (if any) functions.

Technical specifications may be changed without prior notice to improve the quality of the product.

Figures in this manual are schematic and may not exactly match your product.
Package contents

Accessories supplied can vary depending on the product model. Not every accessory described in the user manual may exist on your product.
- User manual
- Wire Shelf
Used for roasting and for placing the food to be baked, roasted or cooked in casserole dishes to the desired rack.

natural_image
Simple line drawing of a rectangular metal grate or drain with horizontal slats (no text or symbols)- Small wire shelf
It is placed into the tray (if supplied) in order to collect the dripping fat while grilling so that the oven is kept clean.
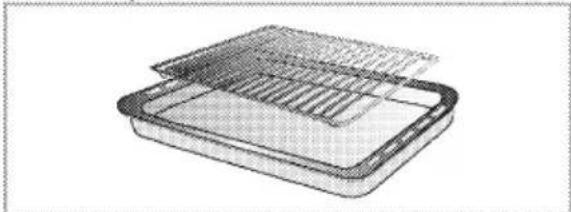
natural_image
3D rendering of a rectangular electronic device with a grid-patterned lid and internal structure (no text or symbols visible)- Placing the wire shelf and tray onto the telescopic racks properly
Telescopic racks allow you to install and remove the trays and wire shelf easily.

Values stated on the product labels or in the documentation accompanying it are obtained in laboratory conditions in accordance with relevant standards. Depending on operational and environmental conditions of the product, these values may vary.
When using the tray and wire shelf with telescopic racks, make sure that the pins at the rear section of the telescopic rack stands against the edges of the wire shelf and tray.

natural_image
Close-up of a mechanical component with internal channels and a central shaft (no visible text or symbols)
natural_image
Close-up of a metal structure with a magnified inset showing a detailed detail (no text or symbols visible)3 Installation
Refer to the nearest Authorised Service Agent for installation of the product. Make sure that the electric and gas installations are in place before calling the Authorised Service Agent to have the product ready for operation. If not, call a qualified electrician and fitter to have the required arrangements made. The manufacturer shall not be held responsible for damages arising from procedures carried out by unauthorized persons which may also void the warranty.
Product must be installed by a qualified person in accordance with the regulations in force. The manufacturer shall not be held responsible for damages arising from procedures carried out by unauthorized persons which may also void the warranty.

Preparation of location and electrical and gas installation for the product is under customer's responsibility.

DANGER:
The product must be installed in accordance with all local gas and/or electrical regulations.

DANGER:
Prior to installation, visually check if the product has any defects on it. If so, do not have it installed.
Damaged products cause risks for your safety.
Before installation
To ensure that critical air gaps are maintained under the appliance, we recommend that this appliance is mounted on a solid base and that the feet do not sink into any carpet or soft flooring.
The kitchen floor must be able to carry the weight of the appliance plus the additional weight of cookware and bakeware and food.

- It can be used with cabinets on either side but in order to have a minimum distance of 400mm above hotplate level allow a side clearance of 65mm between the appliance and any wall, partition or tall cupboard.
- It can also be used in a free standing position. Allow a minimum distance of 650 mm above the hob surface.
- (*) If a cooker hood is to be installed above the cooker, refer to cooker hood manufacturer' instructions regarding installation height (min 650 mm).
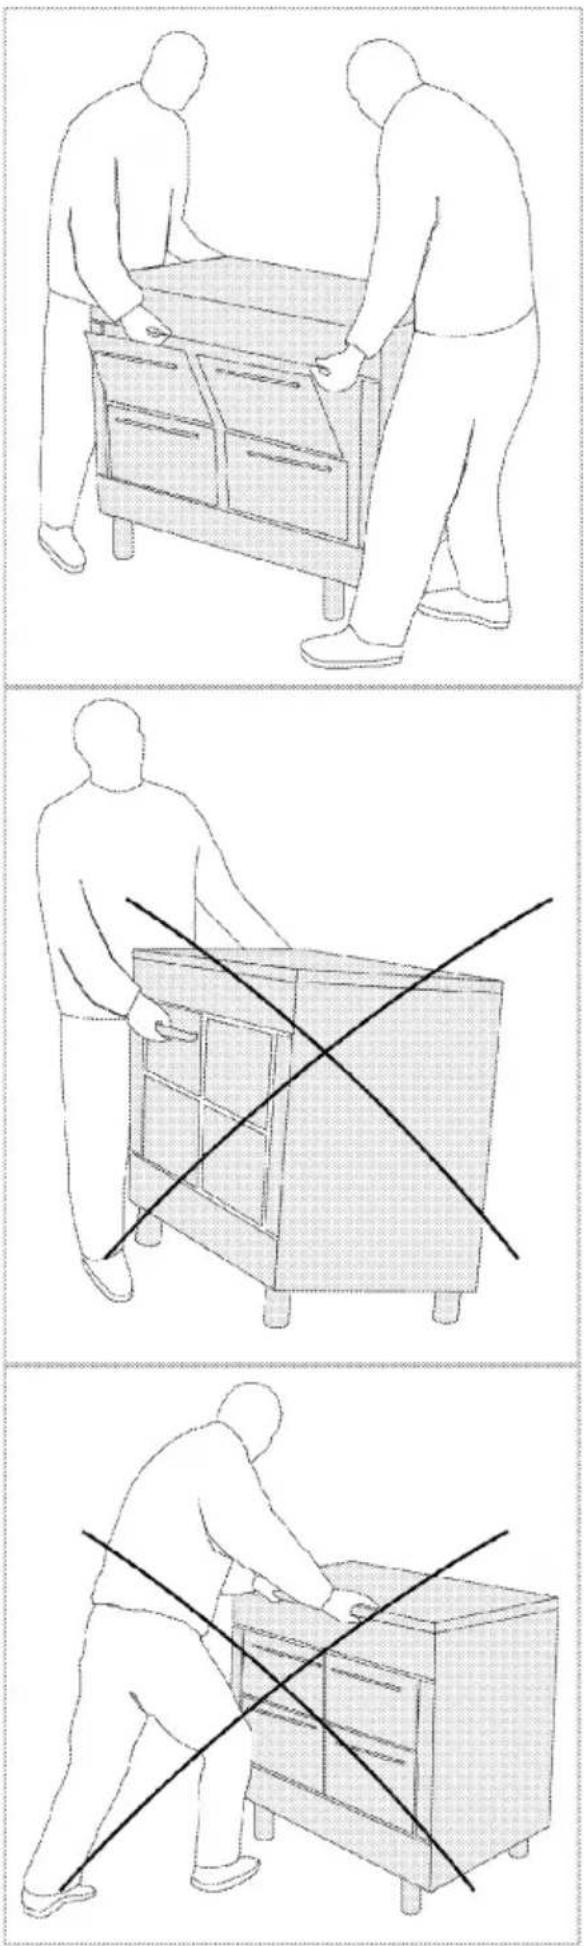
- Movement of your appliance is most easily achieved by lifting the front as indicated in the drawing. Open the oven door sufficiently to allow a comfortable and safe grip on the underside of the oven roof avoid causing any damage to the grill element or any internal parts of the oven. Do not move by pulling on the door handle or knobs. Move the appliance a bit at a time until placed in the position required.
- The appliance corresponds to device class 1, i.e. it may be placed with the rear and one side to kitchen walls, kitchen furniture or equipment of any size. The kitchen furniture or equipment on the other side may only be of the same size or smaller.
- Any kitchen furniture next to the appliance must be heat-resistant (100 °C min.).
Safety chain
The appliance must be secured against overbalancing by using the supplied two safety chains on your oven.
Fasten hook (1) by using a proper peg to the kitchen wall (6) and connect safety chain (3) to the hook via the locking mechanism (2).
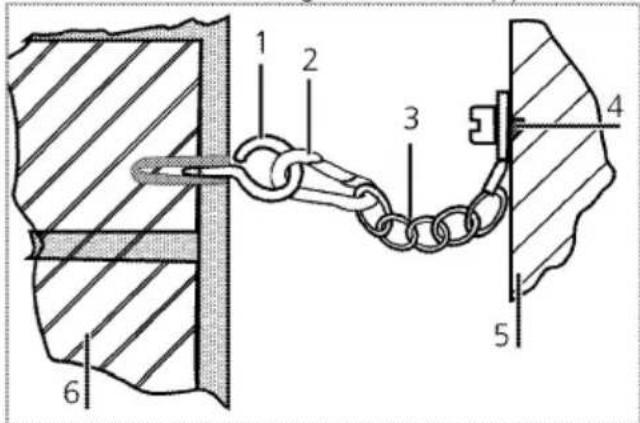
1 Stability hook
2 Locking mechanism
3 Safety chain (supplied and mounted to oven)
4 Firmliy fix chain to cooker rear
5 Rear of cooker
6 Kitchen wall

Stability chain to be as short as practicable to avoid oven tilting forward and diagonal to avoid oven side tilting.
Cooker stability chain for cookers not designed with bracket engagement slot.
Installation and connection
Product can only be installed and connected in accordance with the statutory installation rules.

Do not install the product next to refrigerators or freezers. The heat emitted by the product will increase the energy consumption of cooling appliances.
- Carry the product with at least two persons.
- Product must be placed directly on the floor. It must not be placed onto a base or a pedestal.

Do not use the door and/or handle to carry or move the product. The door, handle or hinges get damaged.
Electrical connection
Connect the product to a grounded outlet/line protected by a fuse of suitable capacity as stated in the "Technical specifications" table. Have the grounding installation made by a qualified electrician while using the product with or without a transformer. Our company shall not be liable for any damages that will arise due to using the product without a grounding installation in accordance with the local regulations.

DANGER:
The product must be connected to the mains supply only by an authorised and qualified person. The product's warranty period starts only after correct installation.
Manufacturer shall not be held responsible for damages arising from procedures carried out by unauthorised persons.

DANGER:
The power cable must not be clamped, bent or trapped or come into contact with hot parts of the product.
A damaged power cable must be replaced by a qualified electrician. Otherwise, there is risk of electric shock, short circuit or fire!
The mains supply data must correspond to the data specified on the type label of the product. The rating plate is either seen when the door or the lower cover is opened or it is located at the rear wall of the unit depending on the unit type. Power cable of your product must comply with the values in "Technical specifications" table.

Power cable plug must be within easy reach after installation (do not route it above the hob).

DANGER:
Before starting any work on the electrical installation, disconnect the product from the mains supply. There is the risk of electric shock!
Connecting the power cable
- Open the terminal block cover with a screwdriver.
- Insert the power cable through the cable clamp below the terminal and secure it to the main body with the integrated screw on cable clamping component.
- Connect the cables according to the supplied diagram.

-
After completing the wire connections, close the terminal block cover.
-
Route the power cable so that it will not contact the product and get squeezed between the product and the wall.

Power cable must not be longer than 2 m because of safety reasons.
Adjusting the feet of oven
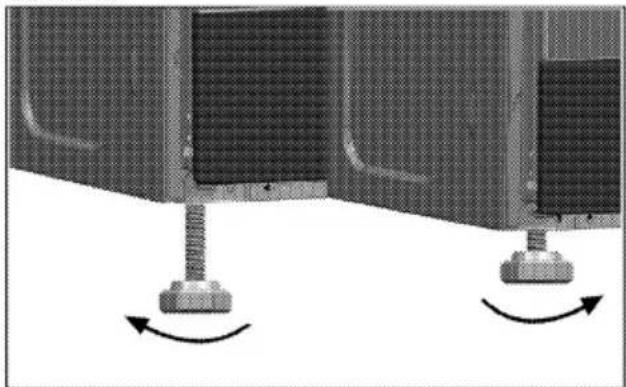
The appliance should be located on a level surface. The front and rear feet can be adjusted as required to raise or lower the appliance by turning the feet clockwise or anti clockwise. The height of the appliance should not exceed 930mm.
natural_image
Close-up of a mechanical component with two bolts and rotational arrows indicating motion (no text or symbols)For equipment with a cooling fan
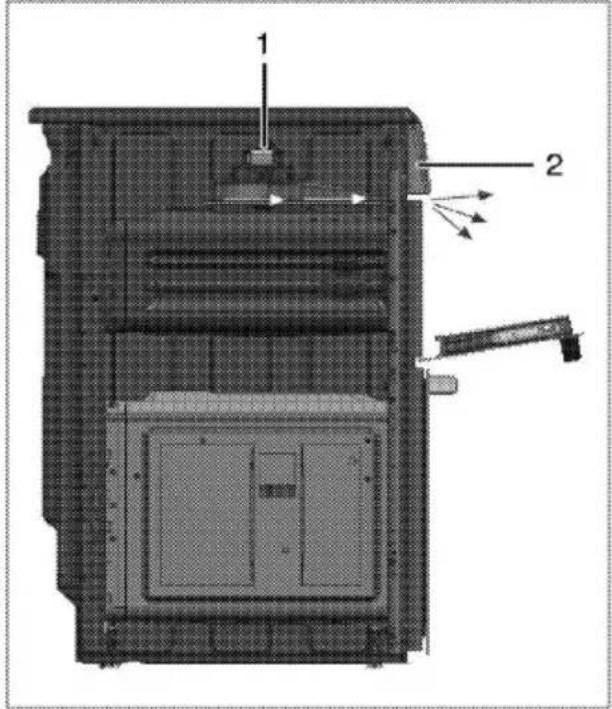
1 Fan
2 Control panel
While open door grilling, in order to protect control panel, knobs and related oven parts; a fan automatically starts working.

Fan continues working until the product cools down.
Final check
- Check electrical functions.
Future Transportation
- Keep the product's original carton and transport the product in it. Follow the instructions on the carton. If you do not have the original carton, pack the product in bubble wrap or thick cardboard and tape it securely.
-
To prevent the wire grill and tray inside the oven from damaging the oven door, place a strip of cardboard onto the inside of the oven door that lines up with the position of the trays. Tape the oven door to the side walls.
-
Secure the caps and pan supports with adhesive tape.
- Do not use the door or handle to lift or move the product.

Do not place any objects onto the product and move it in upright position.

Check the general appearance of your product for any damages that might have occurred during transportation.
Future Transportation
- Keep the product's original carton and transport the product in it. Follow the instructions on the carton. If you do not have the original carton, pack the product in bubble wrap or thick cardboard and tape it securely.
- To prevent the wire grill and tray inside the oven from damaging the oven door, place a strip of cardboard onto the inside of the oven door that lines up with the position of the trays. Tape the oven door to the side walls.
- Secure the caps and pan supports with adhesive tape.
- Do not use the door or handle to lift or move the product.

Do not place any objects onto the product and move it in upright position.

Check the general appearance of your product for any damages that might have occurred during transportation.
4 Preparation
Tips for saving energy
The following information will help you to use your appliance in an ecological way, and to save energy:
- Use dark coloured or enamel coated cookware in the oven since the heat transmission will be better.
- While cooking your dishes, perform a preheating operation if it is advised in the user manual or cooking instructions.
- Do not open the door of the oven frequently during cooking.
- Try to cook more than one dish in the oven at the same time whenever possible. You can cook by placing two cooking vessels onto the wire shelf.
- Cook more than one dish one after another. The oven will already be hot.
- You can save energy by switching off your oven a few minutes before the end of the cooking time. Do not open the oven door.
• Defrost frozen dishes before cooking them. - Use pots/pans with cover for cooking. If there is no cover, energy consumption may increase 4 times.
- Select the burner which is suitable for the bottom size of the pot to be used. Always select the correct pot size for your dishes. Larger pots require more energy.
Initial use
Time setting

Before you can use the oven, the time must be set. If the time is not set, oven will not operate.

While making any adjustment, related symbols on the clock will flash.
Press „−“ or „+“ (5/6) keys to set the time after the oven in energized for the first time.
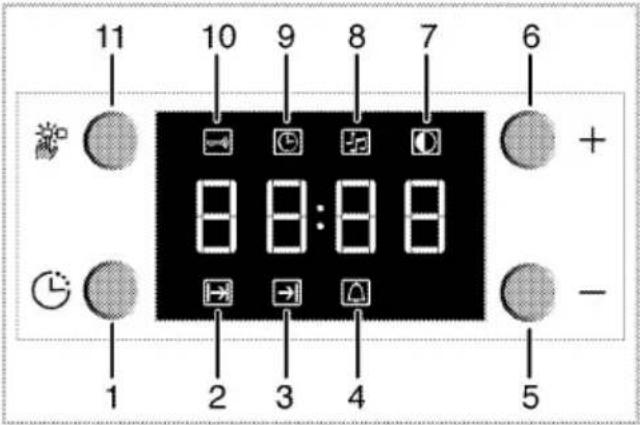
1 Program key
2 Cooking time
3 End of cooking time
4 Alarm
5 Minus key
6 Plus key
7 Screen brightness setting
8 Alarm volume
9 Current time
10 Keylock
11 Adjustment key
After setting the time, you can start and end the cooking by selecting the desired position with temperature button and function button.

If the current time is not set, time setting will start increasing/moving up from 12:00. Clock symbol '9' will be displayed to indicate that the current time has not been set. This symbol will disappear once the time is set.

Current time settings are cancelled in case of power failure. It needs to be readjusted.
To change the time of the day you have previously set:
- Press (11) key to activate current time symbol '9'.
- Press „−“ or „+“ (5/6) keys to set the current time.
Changing screen brightness adjustment
- Press (11) key to activate screen brightness symbol '7' for screen brightness adjustment.
- Press '-' or '+' (5/6) keys to set the desired brightness.
» Selected brightness level will appear as d-01, d-02 or d-03 on the display.
First cleaning of the appliance

The surface might get damaged by some detergents or cleaning materials. Do not use aggressive detergents, cleaning powders/creams or any sharp objects during cleaning. Do not use harsh abrasive cleaners or sharp metal scrapers to clean the oven door glass since they can scratch the surface, which may result in shattering of the glass.
- Remove all packaging materials.
- Wipe the surfaces of the appliance with a damp cloth or sponge and dry with a cloth.
Initial heating
Heat up the product for about 30 minutes and then switch it off. Thus, any production residues or layers will be burnt off and removed.

WARNING
Hot surfaces cause burns!
Product may be hot when it is in use. Never touch the hot burners, inner sections of the oven, heaters and etc. Keep children away. Always use heat resistant oven gloves when putting in or removing dishes into/from the hot oven.

Smoke and smell may emit for a couple of hours during the initial operation. This is quite normal. Ensure that the room is well ventilated to remove the smoke and smell. Avoid directly inhaling the smoke and the smell that emits.
5 How to use the hob
General information about cooking

Never fill the pan with oil more than one third of it. Do not leave the hob unattended when heating oil. Overheated oils bring risk of fire. Never attempt to extinguish a possible fire with water! When oil catches fire, cover it with a fire blanket or damp cloth. Turn off the hob if it is safe to do so and call the fire department.
- Before frying foods, always dry them well and gently place into the hot oil. Ensure complete thawing of frozen foods before frying.
- Do not cover the vessel you use when heating oil.
- Place the pans and saucepans in a manner so that their handles are not over the hob to prevent heating of the handles. Do not place unbalanced and easily tilting vessels on the hob.
- Do not place empty vessels and saucepans on cooking zones that are switched on. They might get damaged.
- Operating a cooking zone without a vessel or saucepan on it will cause damage to the product. Turn off the cooking zones after the cooking is complete.
- As the surface of the product can be hot, do not put plastic and aluminum vessels on it. Clean any melted such materials on the surface immediately.
Such vessels should not be used to keep foods either.
• Use flat bottomed saucepans or vessels only. - Put appropriate amount of food in saucepans and pans. Thus, you will not have to make any unnecessary cleaning by preventing the dishes from overflowing. Do not put covers of saucepans or pans on cooking zones.
Place the saucepans in a manner so that they are centered on the cooking zone.
When you want to move the saucepan onto another cooking zone, lift and place it onto
the cooking zone you want instead of sliding it.
Tips about glass ceramic hobs
- Glass ceramic surface is heatproof and is not affected by big temperature differences.
- Do not use the glass ceramic surface as a place of storage or as a cutting board.
- Use only the saucepans and pans with machined bottoms. Sharp edges create scratches on the surface.
- Do not use aluminum vessels and saucepans. Aluminum damages the glass ceramic surface.

natural_image
Diagram showing a fire with smoke rising above a building and crossed out by a diagonal line (no text or symbols)Spills may damage the glass ceramic surface and cause fire.

Do not use vessels with concave or convex bottoms.
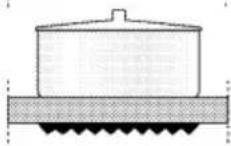
Use only the saucepans and pans with flat bottoms. They ensure easier heat transfer.

If the diameter of the saucepan is too small, energy will be wasted.
Using the hobs

list of advised diameter of pots to be used on related burners.
1 Single-circuit cooking plate 12-14 cm
2 Single-circuit cooking plate 18-20 cm
3 Dual-circuit cooking 12-14/21-23 cm
4 Single-circuit cooking plate 18-20 cm
5 Single-circuit cooking plate 12-14 cm
6 Warming zone
DANGER:
Do not allow any object to drop on the hob. Even small objects such as a saltshaker may damage the hob.
Do not use cracked hobs. Water may leak through these cracks and cause short circuit.
In case of any kind of damage on the surface (eg., visible cracks), switch off the product immediately to minimize the risk of electric shock.
Glass ceramic hob is equipped with an operation light and a hot zone warning indicator.
Hot zone warning indicator indicates the status of the active zone and it remains lit after the plate is turned off. When the temperature of the plate cools down to a level that it can be touched by hand, warning indicator turns off. Flickering of the hot zone warning indicator is not a failure.
Turning on the ceramic plates
The hob control knobs are used for operating the plates. To obtain the desired cooking power, turn the hob control knobs to the corresponding level.
| Cooking level | 1 | 2—3 | 4—6 |
| warming | stewing, simmering | boiling |
| Cooking level | 1 | 2 | 3 |
| warming | stewing, simmering | boiling |
Turning off the ceramic plates
Turn the plate knob to OFF (upper) position.
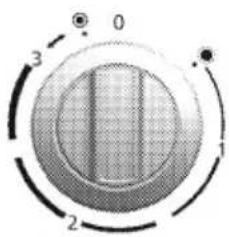
Using multi-segmented cooking zones
Multi-segmented cooking zones allows to cook with different size of saucepans on the same cooking zone. When these cooking zones are activated, first the inward cooking zone turns on.
- To change the active cooking zone diameter, turn the control knob clockwise.
- A "click" will be heard as soon as the hotplate radius changes.
natural_image
Circular diagram with numbered segments and a central shaded region, no readable text or symbolsTurning off multi-segment cooking zones
- Turn the knob counter clockwise to OFF (upper) position to turn off the oven. All segments of the cooking zone are turned off.
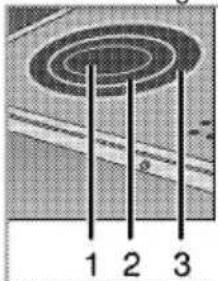
1 Position 1
2 Position 2
3 Position 3

natural_image
Diagram showing two oval shapes labeled 1 and 2, with no text or symbols beyond labels
Position 2 and 3 of the multi-segment cooking zones do not operate independently.
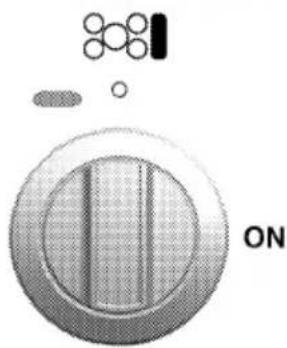
Turning on the keep warm zone
natural_image
Diagram of a device with a circular component and an inset showing a molecular structure (no text or symbols)Keep warm zone is used to keep the food warm.
- Turn the cooking zone control knob to ON position.
Keep warm zone heats up and operation lamp turns on.
Turning off the keep warm zone
Turn the keep warm zone knob to off (upper) position.
Keep warm zone and the operation lamp turns off.
6 How to operate the oven
General information on baking, roasting and grilling
WARNING
Hot surfaces cause burns!
Product may be hot when it is in use. Never touch the hot burners, inner sections of the oven, heaters and etc. Keep children away. Always use heat resistant oven gloves when putting in or removing dishes into/from the hot oven.

DANGER:
Be careful when opening the oven door as steam may escape. Exiting steam can scald your hands, face and/or eyes.
Tips for baking
- Use non-sticky coated appropriate metal plates or aluminum vessels or heat-resistant silicone moulds.
• Make best use of the space on the rack. - Place the baking mould in the middle of the shelf.
- Select the correct rack position before turning the oven or grill on. Do not change the rack position when the oven is hot.
- Keep the oven door closed.
Tips for roasting
- Treating whole chicken, turkey and large piece of meat with dressings such as lemon juice and black pepper before cooking will increase the cooking performance.
- It takes about 15 to 30 minutes longer to roast meat with bones when compared to roasting the same size of meat without bones.
- Each centimeter of meat thickness requires approximately 4 to 5 minutes of cooking time.
- Let meat rest in the oven for about 10 minutes after the cooking time is over. The juice is better distributed all over the roast and does not run out when the meat is cut.
- Fish should be placed on the middle or lower rack in a heat-resistant plate.
How to operate the main electric oven (LHS)

Before you can use the oven, the time must be set. If the time is not set, oven will not operate.
Product is equipped with several ovens. Overview section indicates the relevant knobs for each oven.
Select temperature and operating mode

- Set the Temperature knob to the desired temperature.
» Oven heats up to the adjusted temperature and maintains it. During heating, temperature lamp stays on.
Switching off the electric oven
Turn the ovenknob to off (upper) position.
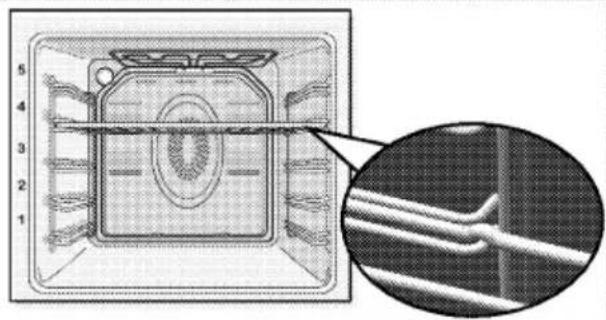
natural_image
Cross-sectional diagram of a mechanical or electrical component with numbered parts and an inset magnified view (no text or symbols)Rack positions (For models with wire shelf)
It is important to place the wire shelf onto the side rack correctly. Wire shelf must be inserted between the side racks as illustrated in the figure. Do not let the wire shelf stand against the rear wall of the oven. Slide your wire shelf to the front section of the rack and settle it with the help of the door in order to obtain a good grill performance.
Using the oven clock

1 Program key
2 Cooking time
3 End of cooking time
4 Alarm
5 Minus key
6 Plus key
7 Screen brightness setting
8 Alarm volume
9 Current time
10 Keylock
11 Adjustment key
| i | Maximum time that can be set for end of cooking is 5 hours 59 minutes. Program will be cancelled in case of power failure. You must reprogram the oven. |
| i | While making any adjustments, related symbols will flash on the display. You must wait for a short time for the settings to take effect. |
| i | If no cooking setting is made, time of the day cannot be set. |
| i | Cooking time will be displayed once the cooking starts. |
Cooking by specifying the cooking time:
You can set the oven so that it will stop at the end of the specified time by setting the cooking time on the clock.
-
To adjust the cooking time, Press Program key (1) and activate the Cooking Time symbol (2).
-
Press '-' / '+' (5/6) keys to set the cooking time.
» Once the Cooking Time is set, Cooking symbol will be displayed continuously.
If you want to set the end of cooking time to a later time:
After setting the cooking time on the clock, you can set the end of cooking time to a later time.
-
To adjust the cooking time, press Program key (1) and activate the Cooking Time symbol (2).
-
Adjust the cooking time with Minus (5) and Plus (6) keys.
» Cooking Time symbol remains lit (displayed continuously) after setting the cooking time.
-
To set the End of Cooking Time, Press Program key (1) and activate the Cooking Time symbol (3).
-
Press - (5) and + (6) keys to set the end of cooking time.
» Once the End of Cooking Time is set, End of Cooking symbol and Cooking symbol will be displayed continuously. The End of Cooking Time symbol (3) will disappear as soon as the cooking starts.
-
Put your dish into the oven.
-
Select operation mode and temperature.
» Oven timer automatically calculates the startup time for cooking by using the end of cooking time and the cooking period you have set. Selected operation mode is activated when the startup time of cooking has come and the oven is heated up to the set temperature. It maintains this temperature until the end of cooking time.
-
After the cooking process is completed, "End" appears on the displayed and the alarm will sound.
-
Alarm signal will sound for 2 minutes. To stop the alarm signal, just press any key. Alarm will be silenced and current time will be displayed.

If you mute the alarm by pressing any key, the oven will restart operating. If you press any button at the end of the alarm period, the oven will restart operating.
- Turn off the oven with the Temperature knob and Function knob.
Using the keylock
Activating the keylock
You can prevent oven from being used by activating the Keylock function.

1 Program key
2 Cooking time
3 End of cooking time
4 Alarm
5 Minus key
6 Plus key
7 Screen brightness setting
8 Alarm volume
9 Current time
10 Keylock
11 Adjustment key
- Press the key (11) to activate Keylock symbol (10).
» "OFF" will appear on the display.
- Press '+' key (6) to activate the keylock.
» Once the keylock is activated, "On" appears on the display and the Keylock symbol (10) remains lit.

When the Keylock function is activated, control panel buttons except for the key (11) cannot be used.
Deactivating the keylock
- Press Adjustment key (11) to activate Keylock symbol (10).
» "On" will appear on the display. - Press '-' (5) to deactivate the keylock.
» "OFF" will be displayed once the keylock is deactivated.
Using the clock as an alarm
You can use the clock of the product for any warning or reminder apart from the cooking programme.
The alarm clock has no influence on the functions of the oven. It is only used as a warning. For example, this is useful when you want to turn food in the oven at a certain point of time. Alarm clock will give a signal once the time you set is over.
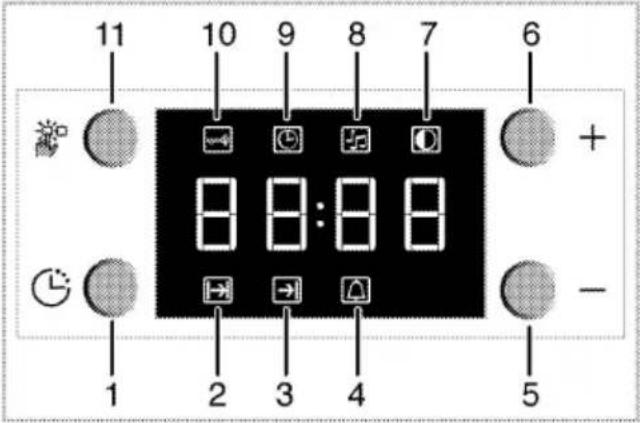
1 Program key
2 Cooking time
3 End of cooking time
4 Alarm
5 Minus key
6 Plus key
7 Screen brightness setting
8 Alarm volume
9 Current time
10 Keylock
11 Adjustment key
Setting the alarm clock
- Press Program key (1) to activate the alarm time symbol (4).

Maximum alarm time can be 23 hours and 59 minutes.
- Adjust the alarm time using „+“ /„-” (5/6) keys.
» Alarm symbol will remain lit and the alarm time will appear on the display once the alarm time is set.
- At the end of the alarm time, Alarm Time symbol (4) will start flashing and the alarm signal is heard.
Turning off the alarm
- To stop the alarm, just press any key.
» Alarm will be silenced and current time will be displayed.
If you want to cancel the alarm:
- To reset the alarm time, press Program key (1) to activate the alarm time symbol (4).
- Press and hold the '-' (5) key until "00:00" is displayed.

Alarm time will be displayed. If the alarm time and cooking time are set concurrently, shortest time will be displayed.
Changing alarm tone
-
Press Setting key (11) to activate the Alarm Tone symbol (8).
-
Adjust the desired tone using „+“ /„-” (5/6) keys.
» Selected alarm tone will appear as "b-01", "b-02" or "b-03" on the display.
Cooking times table for LHS -main oven

The timings in this chart are meant as a guide. Timings may vary due to temperature of food, thickness, type and your own preference of cooking.
Baking and roasting

1st rack of the oven is the bottom rack.
| Dish | Cooking level number | Rack position | Temperature (°C) | Cooking time (approx. in min.) |
| Cakes in tray* | One level | 3 | 175 | 30 ... 45 |
| Cakes in mould* | One level | 2 | 175 | 30 ... 50 |
| Cakes in cooking paper* | One level | 3 | 160 ... 170 | 20 ... 30 |
| Sponge cake* | One level | 3 | 180 ... 200 | 10 ... 20 |
| Cookies* | One level | 3 | 160 ... 170 | 20 ... 30 |
| Dough pastry* | One level | 3 | 200 | 20 ... 30 |
| Rich pastry* | One level | 3 | 190 | 20 ... 35 |
| Leaven* | One level | 3 | 190 | 20 ... 40 |
| Lasagna* | One level | 3 | 180 | 25 ... 45 |
| Beef steak (whole) / Roast | One level | 2 | 25 min. 220, then 180 ... 190 | 80 ... 120 |
| Leg of Lamb (casserole) | One level | 2 | 25 min. 220 then 180 ... 190 | 70 ... 100 |
| Roasted chicken | One level | 2 | 15 min. 220, then 190 | 55 ... 75 |
| Turkey (Sliced) | One level | 3 | 25 min. 220, then 190 | 70 ... 120 |
| Fish | One level | 3 | 200 | 20 ... 30 |
| When cooking with 2 trays at the same time, place the deeper tray on the upper rack and the other one on the lower rack.* It is suggested to perform preheating for all foods. | ||||
Tips for baking cake
- If the cake is too dry, increase the temperature by 10°C and decrease the cooking time.
- If the cake is wet, use less liquid or lower the temperature by 10^ C.
- If the cake is too dark on top, place it on a lower rack, lower the temperature and increase the cooking time.
- If cooked well on the inside but sticky on the outside use less liquid, lower the temperature and increase the cooking time.
Tips for baking pastry
- If the pastry is too dry, increase the temperature by 10°C and decrease the cooking time. Dampen the layers of dough
with a sauce composed of milk, oil, egg and yoghurt.
- If the pastry takes too long to bake, pay care that the thickness of the pastry you have prepared does not exceed the depth of the tray.
- If the upper side of the pastry gets browned, but the lower part is not cooked, make sure that the amount of sauce you have used for the pastry is not too much at the bottom of the pastry. Try to scatter the sauce equally between the dough layers and on the top of pastry for an even browning.

Cook the pastry in accordance with the mode and temperature given in the cooking table. If the bottom part is still not browned enough, place it on one lower rack next time.
Tips for cooking vegetables
- If the vegetable dish runs out of juice and gets too dry, cook it in a pan with a lid instead of a tray. Closed vessels will preserve the juice of the dish.
- If a vegetable dish does not get cooked, boil the vegetables beforehand or prepare them like canned food and put in the oven.
How to operate the grill (LHS)

WARNING
Hot surfaces may cause burns! Keep children away from the product.
Oven door remains slightly inclined when opened full and thus, possible splashes to not reach you.

Switching on the grill
Turning the Grill control knob clockwise allows you grill in various temperature levels.
- Open the grill door.
Cooking times table for grilling (LHS) Grilling with electric grill

Level 1 is the bottom level in the oven.
- If required, perform a preheating of about 5 minutes by switching the grill to position 4.
- Then, select the desired grilling temperature. » Temperature light turns on.
Switching off the grill
-
Turn the Grill control knob to Off (upper) position.
-
Put big or medium-sized portions in correct rack position under the grill heater for grilling.
- For food only whose top is required to be roasted, grill the food either by placing onto the wire grill in the tray or by placing the tray onto the floor of grilling compartment.
- Food and plates placed onto the floor of grill compartment will get heated when the main oven is in use. Do not switch on the grill compartment when using it for storing food.
Grill performance will decrease if the wire grill stands against rear part of the oven. Slide your wire grill to the front section of the rack and settle it with the help of the door in order to obtain the best grill performance.

Foods that are not suitable for grilling carry the risk of fire. Only grill food which is suitable for intensive grilling heat.
Do not place the food too far in the back of the grill. This is the hottest area and fatty food may catch fire.
| Food | Insertion level | Grilling time (approx.) |
| Fish | 1 | 20...25 min.# |
| Sliced chicken | 1 | 25...35 min. |
| Lamb chops | 1 | 20...25 min. |
| Roast beef | 1 | 25...30 min.# |
| Veal chops | 1 | 25...30 min.# |
| Toast bread | 2 | 1...2 min. |
| *depending on thickness | ||
How to operate the RHS bottom oven
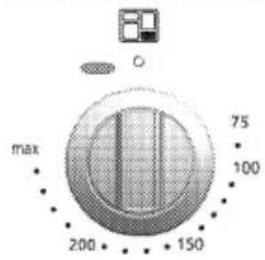
Select temperature and operating mode
- Set the Function knob to the desired temperature.
» Oven heats up to the adjusted temperature and maintains it. During heating and cooling, thermostat light turns on.

natural_image
Cross-sectional diagram of a microwave oven with internal components and a magnified inset showing internal structure (no text or symbols)Rack positions (For models with wire shelf) It is important to place the wire shelf onto the side rack correctly. Wire shelf must be inserted between the side racks as illustrated in the figure. Do not let the wire shelf stand against the rear wall of the oven. Slide your wire shelf to the front section of the rack and settle it with the help of the door in order to obtain a good grill performance.
Switching off the electric oven
Turn the Function knob to Off (top) position.
Cooking times table

The values indicated in the table below are data indicative. They may vary according to the type of food as well as your preferences of cooking.
Baking and roasting

Level 1 is the bottom level in the oven.
| Dish | Cooking level number | Rack position | Temperature (°C) | Cooking time (approx. in min.) |
| **Cakes in tray | One level | 3 | 175 | 30 ... 45 |
| **Cakes in mould | One level | 3 | 175 | 30 ... 50 |
| **Cakes in cooking paper | One level | 3 | 160 ... 170 | 20 ... 30 |
| **Sponge cake | One level | 3 | 180 ... 200 | 10 ... 20 |
| **Cookies | One level | 3 | 160 ... 170 | 20 ... 30 |
| **Dough pastry | One level | 3 | 200 | 20 ... 30 |
| **Rich pastry | One level | 3 | 190 | 25 ... 35 |
| **Leaven | One level | 3 | 190 | 20 ... 40 |
| **Lasagna | One level | 2 | 180 | 25 ... 45 |
| **Pizza | One level | 2 | 200 | 15 ... 25 |
| Beef steak (whole) / Roast | One level | 2 | 25 min. 220, then 180 ... 190 | 80 ... 120 |
| Leg of Lamb (casserole) | One level | 2 | 25 min. 220, then 180 ... 190 | 70 ... 100 |
| Roasted chicken | One level | 2 | 15 min. 220, then 190 | 55 ... 75 |
| Turkey (Sliced) | One level | 2 | 25 min. 220, then 190 | 70 ... 120 |
| Fish | One level | 3 | 200 | 20 ... 30 |
How to operate the RHS top oven

Select temperature and operating mode
- Set the Function knob to the desired temperature.
» Oven heats up to the adjusted temperature and maintains it. During heating and cooling, thermostat light turns on.
Switching off the electric oven
Turn the Function knob to Off (top) position.
Cooking times table

The values indicated in the table below are data indicative. They may vary according to the type of food as well as your preferences of cooking.
Baking and roasting

Level 1 is the bottom level in the oven.
| Food | Shelf level | Rack position | Temperature (°C) | Cooking time (min.) (approx.) |
| Fruit pies/pastries | One level | 1 | 175 | 25 ... 30 |
| Pizza | One level | 1 | 190 | 12-25 mins depending on thickness |
| Small cakes | One level | 2 | 160 | 25 ... 35 |
| Victoria sandwich | One level | 1 | 175 | 25 ... 30 |
| Biscuits | One level | 2 | 175 | 15 ... 20 |
| Scones | One level | 1 | 180 | 20 ... 25 |
| Casseroles | One level | 1 | 150 | 2-3 hours |
| Whole fish | One level | 1 | 190 | 20 ... 30 |
| Pasta bake | One level | 1 | 200 | 25 ... 30 |

Maintenance and care
General information
Service life of the product will extend and the possibility of problems will decrease if the product is cleaned at regular intervals.

DANGER:
Disconnect the product from mains supply before starting maintenance and cleaning works. There is the risk of electric shock!

DANGER:
Allow the product to cool down before you clean it. Hot surfaces may cause burns!
- Clean the product thoroughly after each use. In this way it will be possible to remove cooking residues more easily, thus avoiding these from burning the next time the appliance is used.
- No special cleaning agents are required for cleaning the product. Use warm water with washing liquid, a soft cloth or sponge to clean the product and wipe it with a dry cloth.
• Always ensure any excess liquid is thoroughly wiped off after cleaning and any spillage is immediately wiped dry. - Do not use cleaning agents that contain acid or chloride to clean the stainless or inox surfaces and the handle. Use a soft cloth with a liquid detergent (not abrasive) to wipe those parts clean, paying attention to sweep in one direction.

The surface might get damaged by some detergents or cleaning materials. Do not use aggressive detergents, cleaning powders/creams or any sharp objects during cleaning. Do not use harsh abrasive cleaners or sharp metal scrapers to clean the oven door glass since they can scratch the surface, which may result in shattering of the glass.

Do not use steam cleaners to clean the appliance as this may cause an electric shock.
Cleaning the hob
Gas hobs
- Remove and clean the saucepan carriers and burner caps.
- Clean the hob.
- Install the burner caps and make sure that they are seated correctly.
- When installing the upper grills, pay attention to place the saucepan carriers so that the burners are centered.
Cleaning the control panel
Clean the control panel and knobs with a damp cloth and wipe them dry.

Do not remove the control buttons/knobs to clean the control panel. Control panel may get damaged!
Cleaning the oven/grill cavities
To clean the side wall
- Remove the front section of the side rack by pulling it in the opposite direction of the side wall.
- Remove the side rack completely by pulling it towards you.

Catalytic walls
Side walls or just back wall of oven interior may be covered with catalytic enamel.
The catalytic walls of the oven must not be cleaned. The porous surface of the walls is self-cleaning by absorbing and converting spitting fat (steam and carbon dioxide).
Clean oven door
To clean the oven door, use warm water with washing liquid, a soft cloth or sponge to clean the product and wipe it with a dry cloth.

Don't use any harsh abrasive cleaners or sharp metal scrapers for cleaning the oven door. They could scratch the surface and destroy the glass.
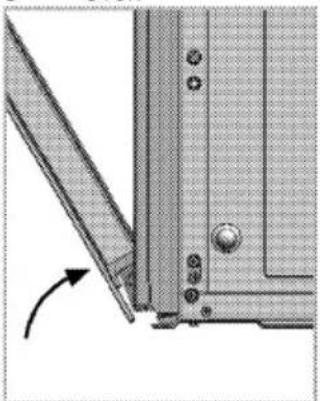
Removing the oven door
- Open the front door (1).
- Open the clips at the hinge housing (2) on the right and left hand sides of the front door by pressing them down as illustrated in the figure.
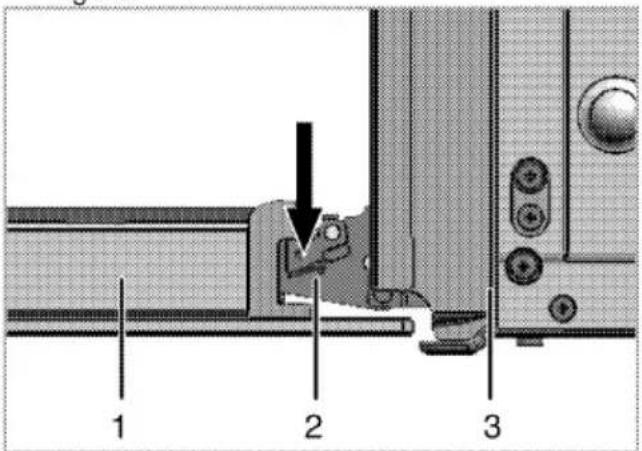
1 Front door
2 Hinge
3 Oven
natural_image
Close-up of a mechanical component with a curved arrow indicating rotation (no text or symbols visible)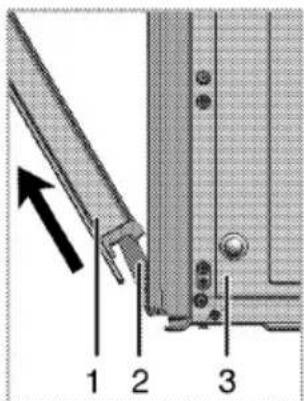
- Move the front door to half-way.
- Remove the front door by pulling it upwards to release it from the right and left hinges.

Steps carried out during removing process should be performed in reverse order to install the door. Do not forget to close the clips at the hinge housing when reinstalling the door.
Removing the door inner glass
The inner glass panel of the oven door can be removed for cleaning.
- Open the oven door.

1 Screw
2 Plastic profile
3 Inner glass pane
4 Plastic slot
2. Take out the screw(1) with a screwdriver
3. Take out the profile (2) than hold up to inner glass (3).
4. Then group the door again, put the glass pane (3) to the plastic slots (4) and group the profile.
Replacing the oven lamp

DANGER:
Before replacing the oven lamp, make sure that the product is disconnected from mains and cooled down in order to avoid the risk of an electrical shock. Hot surfaces may cause burns!

The oven lamp is a special electric light bulb that can resist up to 300 °C. See Technical specifications, page 9 for details. Oven lamps can be obtained from Authorised Service Agents.

Position of lamp might vary from the figure.
If your oven is equipped with a round lamp:
- Disconnect the product from mains.
- Turn the glass cover counter clockwise to remove it.

natural_image
Close-up of a mechanical component with no visible text or symbols- Remove the oven lamp by turning it counter clockwise and replace it with the new one.
- Install the glass cover.
8 Troubleshooting
Oven emits steam when it is in use.
- It is normal that steam escapes during operation. >>> This is not a fault.
Product emits metal noises while heating and cooling.
- When the metal parts are heated, they may expand and cause noise. >>> This is not a fault.
Product does not operate.
- The mains fuse is defective or has tripped. >>> Check fuses in the fuse box. If necessary, replace or reset them.
• Product is not plugged into the (grounded) socket. >>> Check the plug connection. - Buttons/knobs/keys on the control panel do not function. >>> Keylock may be enabled. Please disable it. (See. Using the keylock, page 21)
Oven light does not work.
- Oven lamp is defective. >>> Replace oven lamp.
- Power is cut. >>> Check if there is power. Check the fuses in the fuse box. If necessary, replace or reset the fuses.
Oven does not heat.
- Function and/or Temperature are not set. >>> Set the function and the temperature with the Function and/or Temperature knob/key.
- In models equipped with a timer, the timer is not adjusted. >>> Adjust the time. (In products with microwave oven, timer controls only microwave oven.)
- Power is cut. >>> Check if there is power. Check the fuses in the fuse box. If necessary, replace or reset the fuses.
There is no ignition spark.
• No current. >>> Check fuses in the fuse box.
• Time is not set. >>> Set the time.
There is no gas.
• Main gas valve is closed. >>> Open gas valve.
• Gas pipe is bent. >>> Install gas pipe properly.
Burners are not burning properly or at all.
- Burners are dirty. >>> Clean burner components.
- Burners are wet. >>> Dry the burner components.
- Burner cap is not mounted safely. >>> Mount the burner cap properly.
• Gas valve is closed. >>> Open gas valve.
• Gas cylinder is empty (when using LPG). >>> Replace gas cylinder.
(In models with timer) Clock display is blinking or clock symbol is on.
- A previous power outage has occurred. >>> Adjust the time / Switch of the product and switch it on again.

Consult the Authorised Service Agent or the dealer where you have purchased the product if you can not remedy the trouble although you have implemented the instructions in this section. Never attempt to repair a defective product yourself.
9 GUARANTEE and SERVICE
Your Cooker is guaranteed against the cost of breakdown repairs for twelve months from the date of the original purchase.
What is covered?
• Repairs necessary as a result of faulty materials, defective components or manufacturing defects.
- The cost of functional replacement parts, but excluding consumable items.
- The labour cost of a Leisure Consumer Products approved repairer to carry out the repair.
What is not covered?
- Transit, delivery or accidental damage or misuse and abuse.
- Cabinet or appearance parts, including knobs, saps, handles or container lids.
- Accessories or consumable items including but not limited to filters and light bulbs.
- Repairs required as a result of unauthorized repair or inexpert installation that fails to meet the requirements contained in the user instruction book.
• Repairs to products used on commercial or non-residential household premises.
Important notes
- Your Leisure Consumer Product is designed and built for domestic household use only.
- The guarantee will be void if the product is installed or used in commercial or non-residential domestic household premises.
- The product must be correctly installed, located and operated in accordance with the instructions contained in the User Instruction Booklet provided.
• Professional installation by a qualified Electrical Domestic Appliance installer is recommended for all Washing Machines, Dishwashers, Electric Cookers and Cooker Hoods. - Gas Cookers must only be installed by a Gas Safe (or BORD GAIS) registered Gas Installer.
- The guarantee is given only within the boundaries of the United Kingdom and the Republic of Ireland.
- The guarantee is applicable only to new products and is not transferable if the product is resold.
- Leisure Consumer Products disclaims any liability for incidental or consequential damages.
- The guarantee does not diminish your statutory or legal rights.
Please keep your purchase receipt or other proof of purchase in a safe place; you will need to have it should the product require attention under guarantee.
You should also complete the details below; it will help us assist you when requesting service. (The model is printed on the Instruction Booklet and Serial Number is printed on the Rating Label affixed to the appliance)
Model No:
Serial No:
Retailer:
Date of purchase:
For service under guarantee simply telephone the appropriate number below
UK Mainland & Northern Ireland
| Fridges & Freezers | 0845 600 4903 |
| Electric Cookers | 0845 600 4921 |
| Gas & Dual Fuel Cookers | 0845 600 4921 |
| Washing Machines & Dishwashers | 0845 600 4906 |
Republic of Ireland
| All Refrigeration, All Cookers, Washing Machines & Dishwashers | 01862 34 11 |
Before requesting service please check the trouble-shooting guide in the Operating Instructions as a charge may be levied where no fault is found even though your product may still be under guarantee.
Service once the manufacturer's guarantee has expired
If you have purchased an extended guarantee please refer to the instructions contained within the extended guarantee agreement document. Otherwise please call the appropriate number above where service can be obtained at a charge.
Should you experience any difficulty in obtaining service please contact the Leisure Consumer Products Customer Help-Line.
Tel: 0845 600 4918 e-mail: service@leisurecp.co.uk
Leisure Consumer Products
36-38 Caxton Way
Watford
Herts WD18 8UF
Tel: 0845 6004916
Facsimile: 0845 6004922
www.Leisurecp.co.uk


- Electric Range Cooker
- Please read this user manual first!
- Explanation of symbols
- Important instructions and warnings for safety and environment 4
- General information 8
- Installation 11
- Preparation 15
- How to use the hob 17
- How to operate the oven 19
- Maintenance and care 26
- Troubleshooting 29
- GUARANTEE and SERVICE 30
- Important instructions and warnings for safety and environment
- General safety
- Electrical safety
- Product safety
- Intended use
- Safety for children
- Disposing of the old product
- Package information
- General information
- Overview
- Basics: Information on the energy label of electrical ovens is given in accordance with the EN 50304 standard. Those values are determined under standard load with bottom-top heater or fan assisted heating (if any) functions.
- Package contents
- Installation
- DANGER:
- Before installation
- Safety chain
- Installation and connection
- Electrical connection
- Connecting the power cable
- Adjusting the feet of oven
- Final check
- Future Transportation
- Preparation
- Tips for saving energy
- Initial use
- Time setting
- Changing screen brightness adjustment
- First cleaning of the appliance
- Initial heating
- WARNING
- How to use the hob
- General information about cooking
- Tips about glass ceramic hobs
- Turning on the ceramic plates
- Turning off the ceramic plates
- Using multi-segmented cooking zones
- Turning off multi-segment cooking zones
- Turning on the keep warm zone
- Turning off the keep warm zone
- How to operate the oven
- General information on baking, roasting and grilling
- Tips for baking
- Tips for roasting
- How to operate the main electric oven (LHS)
- Select temperature and operating mode
- Switching off the electric oven
- Rack positions (For models with wire shelf)
- Cooking by specifying the cooking time:
- If you want to set the end of cooking time to a later time:
- Using the keylock
- Activating the keylock
- Deactivating the keylock
- Using the clock as an alarm
- Setting the alarm clock
- Turning off the alarm
- If you want to cancel the alarm:
- Changing alarm tone
- Cooking times table for LHS -main oven
- Baking and roasting
- Tips for baking cake
- Tips for baking pastry
- Tips for cooking vegetables
- How to operate the grill (LHS)
- Switching on the grill
- Cooking times table for grilling (LHS) Grilling with electric grill
- Switching off the grill
- How to operate the RHS bottom oven
- Cooking times table
- How to operate the RHS top oven
- Maintenance and care
- General information
- Cleaning the hob
- Gas hobs
- Cleaning the control panel
- Cleaning the oven/grill cavities
- To clean the side wall
- Catalytic walls
- Clean oven door
- Removing the oven door
- Removing the door inner glass
- Replacing the oven lamp
- If your oven is equipped with a round lamp:
- Troubleshooting
- Oven emits steam when it is in use.
- Product emits metal noises while heating and cooling.
- Product does not operate.
- Oven light does not work.
- Oven does not heat.
- There is no ignition spark.
- There is no gas.
- Burners are not burning properly or at all.
- (In models with timer) Clock display is blinking or clock symbol is on.
- GUARANTEE and SERVICE
- What is covered?
- What is not covered?
- Important notes
- Before requesting service please check the trouble-shooting guide in the Operating Instructions as a charge may be levied where no fault is found even though your product may still be under guarantee.
- Service once the manufacturer's guarantee has expired
Marke : LEISURE
Modell : Cuisinemaster CS100C510
Kategorie : Herd