
Aud 3 - Lautsprecher ILUV - Kostenlose Bedienungsanleitung
Finden Sie kostenlos die Bedienungsanleitung des Geräts Aud 3 ILUV als PDF.


| Produkttyp | Lightning Dock Stereo Lautsprecher für iPhone und iPod |
| Modell | AUD3ABLK |
| Abmessungen (B x H x T) | 234 x 140 x 125 mm |
| Gewicht | 907 g |
| Stromversorgung | DC 7,5 V, 2,5 A (Netzadapter im Lieferumfang) |
| Ausgangsleistung | 3 W x 2 (bei 1 % Klirrfaktor) |
| Audio-Anschlüsse | Apple Lightning Connector, AUX-IN (3,5 mm Klinke) |
| Kompatible Geräte | iPhone 5 oder neuer, iPod Touch (5. Generation), iPod Nano (7. Generation) |
| Steuerung | Play/Pause, Lautstärke +/-, Ein/Aus, LED-Anzeige |
| Lieferumfang | Haupteinheit, AC-Adapter |
| Hersteller | iLuv Creative Technology, 2 Harbor Park Drive, Port Washington, NY 11050, USA |
| Garantie | 1 Jahr (EU: 2 Jahre) |
| Entsorgung | Nicht im Hausmüll entsorgen, gemäß WEEE-Richtlinie |
| Zertifizierung | Konform mit EU-Richtlinien |
| Besonderheiten | Lädt angeschlossene Geräte auf; „Made for iPod/iPhone" zertifiziert |
Häufig gestellte Fragen - Aud 3 ILUV
Benutzerfragen zu Aud 3 ILUV
0 Frage zu diesem Gerät. Beantworten Sie die, die Sie kennen, oder stellen Sie Ihre eigene.
Eine neue Frage zu diesem Gerät stellen
Laden Sie die Anleitung für Ihr Lautsprecher kostenlos im PDF-Format! Finden Sie Ihr Handbuch Aud 3 - ILUV und nehmen Sie Ihr elektronisches Gerät wieder in die Hand. Auf dieser Seite sind alle Dokumente veröffentlicht, die für die Verwendung Ihres Geräts notwendig sind. Aud 3 von der Marke ILUV.
BEDIENUNGSANLEITUNG Aud 3 ILUV
iLuv®
Aud 3
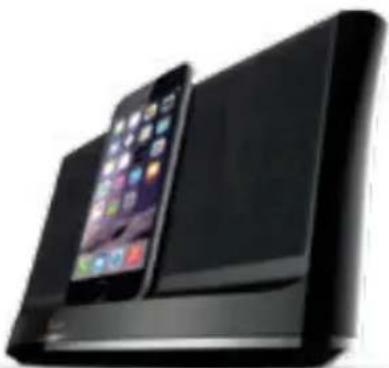
Lightning Dock Stereo Speaker for iPhone and iPod
Model No: AUD3ABLK
natural_image
Black foldable smartphone with a smartphone displaying app icons (no visible text or symbols)Quick Start Guide
Welcome.
Thank you for your purchase. Visit our website at www.iLuv.com or support.iLuv.com for more information.
iLuv®
CONTENTS
Lightning Dock Stereo Speaker for iPhone and iPod | Model No: AUD3ABLK

WHAT'S INCLUDED 3,4

POWERING UP 5,6

CHARGING/PLAYING 7,8

CONTROLS 9,10

CONNECTING OTHER DEVICES 11, 12

SPECIFICATIONS 13
WARRANTY 14

WHAT'S INCLUDED
1 Aud 3 Main Unit

natural_image
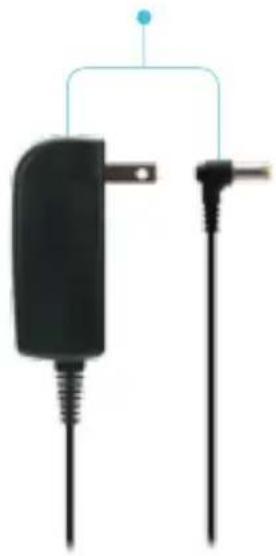
Black rectangular electronic device with a small indicator light and 'iLUV' label on the front panel (no other text or symbols visible)2 AC Adapter
natural_image
Two black electrical connectors with wires, one connected to a terminal and the other to a terminal (no text or symbols visible)| FR | CE QUI EST INCLUS1 Unité principale2 Adaptateur secteur | FN | TOIMITUKSEEN KUULUU1 Päälaite2 AC-adapteri |
| ES | QUÉ SE INCLUYE1 Unidad principal2 Adaptador Corriente | SE | VAD INKLUDERAS1 Huvudenhet2 AC-adapter |
| IT | COSA È INCLUSO1 Unità principale2 Adattatore AC | PT | O QUE ESTÁ INCLUÍDO1 Unidade principal2 Adaptador AC |
| DE | WAS IST ENTHALTEN1 Haupteinheit2 AC-Adapter | CH | 包装内有1 主機2 電源 |
| RU | KOMПЛЕКТ ПОСТАВКИ1 Основное устройство2 Адаптер питания | KR | 구성품1 본체2 AC 이 dép터4 |

POWERING UP
Connect AC adapter to an outlet.1 2

natural_image
Close-up of a black electrical plug connected to a white wall socket, with a blue arrow pointing to the plug (no text or symbols visible)Connect other end of the adapter to the port behind the main unit.

natural_image
Close-up of a black USB cable inserted into a port socket, with a blue arrow pointing to the cable (no text or symbols visible)| FR | METTEZ EN MARCHE1 Branchez l'adaptateur secteur dans la prise.2 Connectez l'autre extrémité de l'adaptateur au port derrière l'unité principale. | FN | KÄYNNISTETÄÄN1 Liitä AC-adapteri pistorasiaan.2 Liitä adapterin toinen pää päälaitteen takana olevaan porttiin. |
| ES | ENCENDERLO1 Conecte el adaptador AC a la toma de corriente.2 Conecte el otro extremo del adaptador al puerto posterior de la unidad principal. | SE | STARTA1 Anslut AC-adaptern till uttaget.2 Anslut den andra änden av adaptern till porten bakom huvudenheten. |
| IT | ACCENSIONE1 Connetti l'adattatore AC alla presa elettrica.2 Connetti l'altra uscita dell'adattatore alla porta situata dietro l'unità principale. | PT | A LIGAR1 Ligue o adaptador AC a uma tomada.2 Ligue a outra extremidade do adaptador à porta por trás da unidade principal. |
| DE | EINSCHALTEN1 Verbinden Sie den AC-Adapter mit der Steckdose.2 Verbinden Sie das andere Ende des Adapters mit dem Anschluss an der Rückseite der Haupteinheit. | CH | 電源連接1 將電源插進交流電源插座裡。2 將電源的另一端插人主機後背的 DC 插座裡。 |
| RU | ПОДКЛЮЧЕНИЕ ПИТАНИЯ1 Включите адаптер питания в розетку.2 Подключите другой конец адаптера к разъему позади основного устройства. | KR | 전원 켜기1 AC 어댑터를 콘센트에 연결합니다.2 어댑터의 다른 끝을 본세 뒤의 포트에 연결합니다. |

CHARGING/PLAYING
1 Align your iPhone, iPod touch (5th generation), or iPod nano (7th generation) with the Lightning connector and connect.

natural_image
Black electronic device with a smartphone displaying its home screen, connected to a power adapter (no text or symbols visible)| FR | CHARGEMENT / LECTURE1 Alignez votre iPhone, votre iPod touch (5ème génération) ou votre iPod nano (7ème génération) avec le connecteur Lightning et connectez-le. | FN | LADATAAN/TOISTETAAN1 Kohdista iPhone, iPod touch (5. sukupolvi) tai iPod nano (7. sukupolvi) Lightning-liittimeen ja yhdistä. |
| ES | CARGAR/REPRODUCIR1 Alinee el iPhone, el iPod touch (5.a generación), o el iPod nano (7.a generación) con el conector Lightning y conéctelos. | SE | LADDA / SPELA1 Lägg din iPhone, iPod touch (5:e generationen), eller iPod nano (7:e generationen), i linje med anslutningen för Lightning och anslut. |
| IT | CARICAMENTO/RIPRODUZIONE1 Metti accanto il tuo iPhone, iPod touch (5a generazione), oppure l'iPod nano (7a generazione) con il connettore Lightning e connettili. | PT | A CARREGAR / EXECUTAR1 Sintonize o seu iPhone, iPod (5.a geração), ou iPod nano (7.a geração) com o conector Lightning e ligue-se. |
| DE | AUFLADEN/ABSPIELEN1 Stecken Sie das Lightning-Kabel in Ihr iPhone, Ihren iPod Touch (fünfte Generation) oder Ihren iPod Nano (siebte Generation) und stellen Sie die Verbindung her. | CH | 充電/播放1 將你的 iphone · ipod touch5 或者 ipod nano7 對齊 lightning插座並插入。 |
| RU | ЗАРЯДКА/ВОСПРОИЗВЕДЕНИЕ1 Расположите ваш iPhone, iPod touch (5-e поколение) или iPod nano (7-e поколение) рядом с соединителем Lightning и соедините. | KR | 충전/재생1 라이트닝 커넥터로 iPhone, il'od touch (5th gen.) 이나 iPod nano (7th gen.)를 인절합니다.8 |

CONTROLS

| FR | COMMANDES1 Lecture / Pause2 Volume + Volume -3 Marche4 DEL Indicateur d'alimentation | FN | OHJAIMET1 Toista/tauko2 Äänenvoimakkuus + Äänenvoimakkuus -3 Virta4 LED Virtaosoitin |
| ES | CONTROLES1 Reproducir/pausar2 Volumen + Volumen -3 Energía4 Indicador LED de energía | SE | KONTROLLER1 Spela / Pausa2 Volym + Volym -3 Ström4 LED-strömindikator |
| IT | CONTROLLI1 Riproduzione/Pausa2 Volume + Volume -3 Accensione4 Indicatore LED accensione | PT | CONTROLOS1 Reproduzir/Pausa2 Volume + Volume -3 Energia4 LED do energia |
| DE | STEUERUNGEN1 Abspielen/Pause2 Lautstärke + Lautstärke -3 Leistung4 LED-Stromanzeige | CH | 控制器1 播放/暫停2 音量 + 音量 -3 電源4 LED電源指示器 |
| RU | СРЕДСТВА УПРАВЛЕНИЯ1 Воспроизведение/Пауза2 Громкость + Громкость -3 Питание4 LED-индикатор питания | KR | 컨트롤1 재생/일시중지2 음량 + 음량 -3 전원4 LED 전원 표시등10 |

CONNECTING OTHER DEVICES
1 Plug AUX-IN cable into the back of the main unit (cable not included).

2 Connect the other end of cable to your audio device.
Smartphones Tablets

MP3 Players

| FR | CONNEXION D'AUTRES APPAREILS1 Branchez câble AUX-IN à l'arrière de l'unité principale (câble non fourni).2 Branchez l'autre extrémité du câble à votre périphérique audio. | FN | LIITETÄÄN MUITA LAITTEITA1 Liitä AUX-IN -kaapeli päälaitteen taakse (kaapeli ei kuulu toimitukseen).2 Liitä kaapelin toinen pää audiolaitteeseesi. |
| ES | CONECTAR OTROS DISPOSITIVOS1 Conecte el cable AUX-IN en la parte posterior de la unidad principal (cable no incluido).2 Conecte el otro extremo del cable a su dispositivo de audio. | SE | ANSLUT ANDRA ENHETER1 Sätt i AUX-IN-kabeln på baksidan av huvudenheten (kabel inkluderas inte).2 Anslut den andra änden av kabeln till din ljudenhet. |
| IT | CONNESSIONE ALTRI DISPOSITIVI1 Inserisci il cavo AUX-IN nel retro dell'unità principale. (cavo non incluso).2 Connetti l'altra uscita del cavo al tuo dispositivo audio. | PT | A LIGAR OUTROS DISPOSITIVOSI1 Ligue o cabo AUX-IN à porta AUX-IN da unidade principal.2 Ligue a outra extremidade do cabo à porta AUX-IN no seu dispositivo de áudio. |
| DE | ANDERE GERÄTE ANSCHLIEßEN1 Stecken Sie das Kabel „AUX-IN" in die Rückseite der Haupteinheit ein (Kabel nicht im Lieferumfang enthalten).2 Verbinden Sie das andere Kabelende mit Ihrem Audiogerät. | CH | 連接其它設備1 將外接音頻線插入主機的後背AUX插座(包裝內不含該音頻線)。2 將音頻線的另一端插入你的音頻設備的相應接口。 |
| RU | ПОДКЛЮЧЕНИЕ ДРУГИХ УСТРОЙСТВ1 Подсоедините кабель AUX-IN к основному устройству сзади.2 Подключите другой конец кабеля к своему аудио-устройству. | KR | 기타 기기 연결1 AUX-IN 케이문을 본체 뒤에 연결합니다.2 케이문의 다른 끝을 오디오 기기에 연결합니다. |

SPECIFICATIONS
| 1 Weight | 907g / 2lbs / 32oz |
| 2 Dimensions(W x H x D) | 234mm x140mm x 125mm9.2in x 5.5in x 4.9in |
| 3 Compatibility | iPhone 5 or LateriPod Touch (5th generation),iPod Nano (7th generation) |
| 4 Connectors | AUX-IN,Apple Lightning Connector |
| 5 Input Power | DC 7.5V 2.5A |
| Output Power6 | 3W×2@1%THD |
WARRANTY
ONE YEAR LIMITED WARRANTY | UNE GARANTIE LIMITEE D'AN GARANTIA LIMITADA DE UM ANO | GARANTÍA LIMITADA DE UN AÑO EINEM JAHR EINGESCHRÄNKTE GARANTIE | GARANZIA LIMITATA UN ANNO 1년 제한 보증 | 壹年有限保証 | 一年有限保证 1年 制限保証 | 1 JAARVOOR BEPERKTE GARANTIE
EUROPEAN UNION
TWO YEAR LIMITED WARRANTY | GARANTIE LIMITEE DE DEUX ANS GARANTIA LIMITADA DE DOIS | GARANTÍA LIMITADA 2 AÑOS ZWEI JAHREN EINGESCHRÄNKTE GARANTIE | GARANZIA LIMITATA DUE ANNI 2년 제한 보증 | 两年有限保证 2年 制限保證 | 2 JAAR VOOR BEPERKTE GARANTIE
Please register your product at www.iLuv.com/reg
iLuv ^® , myMusic ^® and GreeNology ^® trademarks are the exclusive properties of jWIN Electronics Corp. and are registered with the U.S. Patent and Trademark Office, and may be registered or pending registration in other countries.
All other iLuv ^® trademarks, service marks, and logos may be registered or pending registration in the U.S. or in other countries.
All other trademarks or registered trademarks are the property of their respective owners. iPhone, iPod and iTunes are trademarks of Apple Inc. registered in the US and other countries.
"Made for iPod" and "Made for iPhone" mean that an electronic accessory has been designed to connect specifically to iPod or iPhone respectively, and has been certified by the developer to meet Apple performance standards. Apple is not responsible for the operation of this device or its compliance with safety and regulatory standards. Lightning is a trademark of Apple Inc.
Please note that the use of this accessory with iPod or iPhone may affect wireless performance.
© 2015 iLuv Creative Technology. Printed in China.
iLuv Creative Technology
2 Harbor Park Drive
Port Washington, NY 11050
MEMO
MEMO

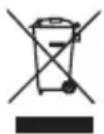
This product conforms to all applicable EU Directive requirements.
When this crossed-out wheeled bin symbol is attached to a product it means that the product is covered by the European Directive 2002/96/EC (WEEE).
Please inform yourself about the local separate collection system for electrical and electronic products.
Please act according to your local rules and do not dispose of your old products with your normal household waste. Correct disposal of your old product helps to prevent potential negative consequences for the environment and human health.

natural_image
Completely dark image with no visible content, text, or symbols.

Marke : ILUV
Modell : Aud 3
Kategorie : Lautsprecher