
SWP1 - Schalter YAMAHA - Kostenlose Bedienungsanleitung
Finden Sie kostenlos die Bedienungsanleitung des Geräts SWP1 YAMAHA als PDF.


| Produkttyp | Netzwerkschalter mit PoE+ |
| Anzahl der Ports | 8 Gigabit-Ethernet-Ports (10/100/1000 Mbps), 4 PoE+ |
| PoE-Budget | 130 W |
| Netzstandard | IEEE 802.3af/at (PoE/PoE+) |
| Schaltkapazität | 16 Gbit/s |
| MAC-Adresstabelle | 8K Einträge |
| Abmessungen (B x T x H) | 440 x 200 x 44 mm (19 Zoll, 1 HE) |
| Gewicht | 2,5 kg |
| Stromversorgung | Externes Netzteil, 100-240 V AC, 50/60 Hz |
| Leistungsaufnahme | Max. 150 W (mit PoE-Last) |
| Betriebstemperatur | 0 °C bis 40 °C |
| Lagertemperatur | -20 °C bis 70 °C |
| Luftfeuchtigkeit | 10 % bis 90 % (nicht kondensierend) |
| Lüfter | Ja, temperaturgesteuert |
| Gehäuse | Metallgehäuse, Rackmontage möglich |
| LED-Anzeigen | Status, Link/Act, PoE, Geschwindigkeit |
| Management | Webinterface, SNMP, CLI (Telnet/SSH) |
| VLAN-Unterstützung | Ja, 802.1Q VLAN |
| QoS | Ja, 802.1p Priorisierung |
| Spanning Tree | Ja, STP/RSTP/MSTP |
| Sicherheit | Port-Sicherheit, MAC-Filter, ACL |
| Zertifizierungen | CE, FCC, RoHS |
| Lieferumfang | Switch, Netzteil, Rackmontagewinkel, Gummifüße, Kurzanleitung |
| Garantie | 2 Jahre |
| Reinigung | Mit einem trockenen, fusselfreien Tuch reinigen. Keine Flüssigkeiten verwenden. |
| Entsorgung | Elektroaltgeräte nicht im Hausmüll entsorgen. Gemäß lokalen Vorschriften recyceln. |
Häufig gestellte Fragen - SWP1 YAMAHA
Benutzerfragen zu SWP1 YAMAHA
0 Frage zu diesem Gerät. Beantworten Sie die, die Sie kennen, oder stellen Sie Ihre eigene.
Eine neue Frage zu diesem Gerät stellen
Laden Sie die Anleitung für Ihr Schalter kostenlos im PDF-Format! Finden Sie Ihr Handbuch SWP1 - YAMAHA und nehmen Sie Ihr elektronisches Gerät wieder in die Hand. Auf dieser Seite sind alle Dokumente veröffentlicht, die für die Verwendung Ihres Geräts notwendig sind. SWP1 von der Marke YAMAHA.
BEDIENUNGSANLEITUNG SWP1 YAMAHA

YAMAHA


ZR15950
MMF-SWP1 Installation Guide MMF-SWP1 取付説明書
Thank you for choosing the Yamaha MMF-SWP1 (optical option unit) for Yamaha SWP1.
Ask an authorized Yamaha service engineer to install the unit. Do not install the unit yourself.
この度はヤマハ SWP1 用光端子拡張ユニット MMF-SWP1 をお買上げいただき、ありがとうございます。
ユニット取り付けは、必ずヤマハサービスエンジニアにご依頼ください。お客様ご自身では行なわないでください。
Information
お知らせ
This is a class A product. In a domestic environment this product may cause radio interference in which case the user may be required to take adequate measures. (CISPR22)
この装置は、クラスA情報技術装置です。この装置を家庭環境で使用すると電波妨害を引き起こすことがあります。この場合には使用者が適切な対策を講ずるよう要求されることがあります。(VCCI-A)
Using the Screwdrivers
使用するドライバー
When you install the unit, you use the screwdrivers following:
• Phillips screwdrivers (#1 and #2)
• Star screwdriver (T10)
• Laser label (Use only SMF1-8.)
ユニットの取り付けのために、以下のドライバーを使用します。
・プラスドライバー (#1と#2)
・ヘクスローブドライバー (T10)
・レーザーラベル(SMF1-8で使用)
Installing the unit (For only authorized Yamaha service engineers)
ユニット装着手順(ヤマハサービスエンジニア用)
The power cord and external power supply must be disconnected before installing the unit.
ユニットの装着作業は、電源コードおよび外部電源を必ず抜いてから作業してください。

Remove 17 screws (rear ×3, both sides ×10, top ×4).
Use a #1 screwdriver to remove the four top screws, and a #2 screwdriver to remove the remaining screws.
17箇所(リア×3、両サイド×10、トップ×4)のネジを外す。
トップの4つのネジを外すときは#1、それ以外は#2のドライバーを使用してください。
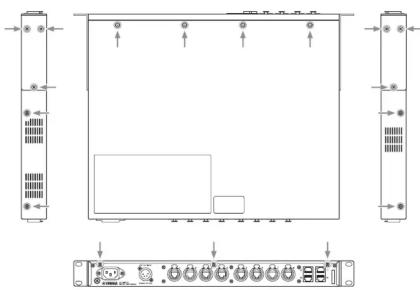

Remove the chassis cover.
筐体のカバーを外す。
flowchart
graph TD
    A["Start"] --> B{Decision}
    B -->|Yes| C["Process Step"]
    B -->|No| D["End"]

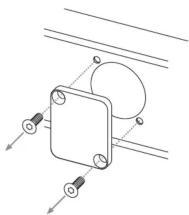
Remove the front MMF cover. Use a Star screwdriver.
フロントのMMFカバーを外す。ヘクスローブドライバーを使用してください。
natural_image
Pure mechanical diagram showing a pulley system with mounting holes and connecting rods (no text or symbols)
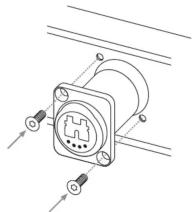
Remove the protective cap from the opticalCON connector, and attach it using the screws that were attached to the MMF cover.
opticalCON端子の保護キャップを外し、opticalCON端子をMMFカバーについていたネジを使って取り付ける。
natural_image
Technical line drawing of a mechanical component with mounting holes and wiring (no text or symbols)
Remove the protective cap from the MMF unit, and insert it until the MMF unit clicks into place. Set the lever to the upward position. If it is in the downward position, it will not be locked, possibly allowing the MMF unit to become detached by an impact.
MMFユニットの保護キャップを外し、MMFユニットをカチッと鳴るまで差し込む。レバーは上を向いた状態にしてください。下にするとロックされていない状態なので、衝撃によってMMFユニットが外れるおそれがあります。
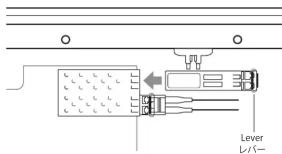
6
Remove the protective cap from the optical fiber, pass the optical fiber below the existing optical fiber, and insert it into the MMF unit until it clicks into place. 光ファイバーの保護キャップを外し、光ファイバーを既存の光ファイバーの下を通して。MMFユニットにカチッと鳴るまで差し込む。
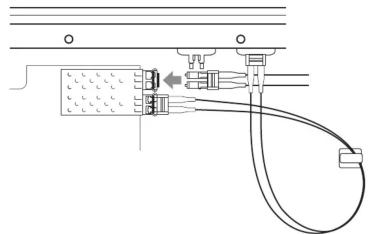
natural_image
Pure electrical circuit lines without any symbols7
Open the lid, pass the optical fiber through the hook, and close the lid. NOTE If installing in the SWP1-8, connect the wiring so that front panel port numbers 9 and 10 match the printed numbers 9 and 10 of the bottom chassis.
フックを開け、光ファイバーをフックにかけて、フックを閉じる。
NOTE SWP1-8に取り付ける場合、フロントパネルのポート番号9、10とボトムシャーシの印刷9、10の数字が合うように結線してください。
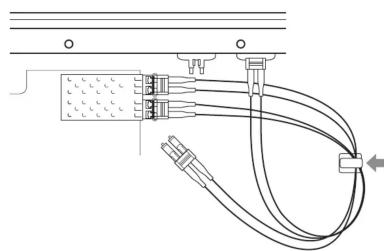
natural_image
Pure electrical circuit lines without any symbols8
Insert the optical fiber into the opticalCON port until it clicks into place. 光ファイバーをopticalCON端子にカチッと鳴るまで差し込む。
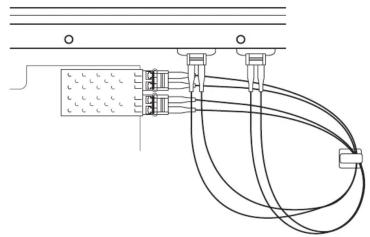
natural_image
Pure electrical circuit lines without any symbols9
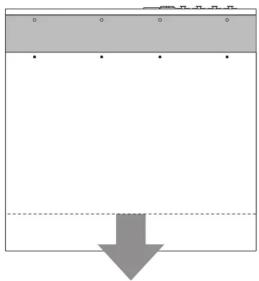
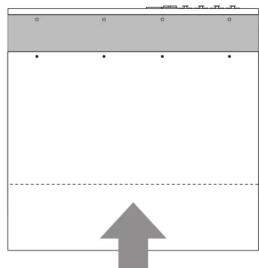
Replace the cover on the chassis, and attach the rackmount hardware and screws that you removed in step 2. Attach the screws in numerical order. Screws with the same number may be attached in any order within that number.
筐体にカバーをかけ、手順2で外したラックマウント金具とネジを取り付ける。 ネジは数字の順番に取り付けてください。同じ数字の場合は、その数字の示す範囲内での順番はありません。
natural_image
Simple diagram with a gray rectangle, dotted lines, and a large upward arrow inside a dashed line (no text or symbols)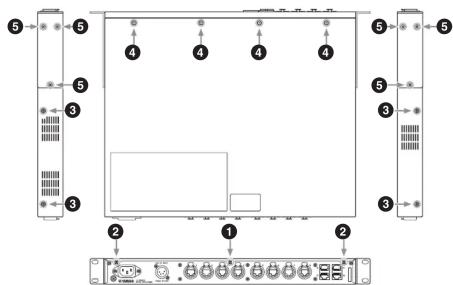
10
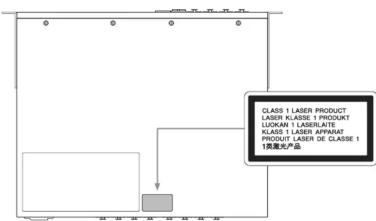
In the case of the SWP1-8, affix the laser label in the location shown by the shading. SWP1-8の場合、レーザーラベルを網掛けの場所に貼る。
flowchart
graph TD
    A["CLASS 1 LASER PRODUCT\nLASER KLASSE 1 PRODUKT\nLUXCAN 1 LASERATE\nKLASSE 1 LASER APPARAT\nPRODUIT LASER DE CLASSE 1\n1黄度光产品"] --> B["Product"]
    B --> C["Product"]
Важное примечание: Информация об условиях Гарантии для Клиентов в Российской Федерации [Русский] Для получения подробной информации об условиях Гарантии на продукцию Yamaha в России, условиях гарантийного обслуживания, пожайustrа, посетите веб-сайт по адресу ниже (на сайте доступен файл с условиями для скачивания и печати) или обратитесь в офис представительства Yamaha в России. http://ru.yamaha.com/ru/support/
产品中有害物质的名称及含量
| 部件名称 | 有害物质 | |||||
| 铅(Pb) | 汞(Hg) | 镉(Cd) | 六价铬(Cr(VI)) | 多溴联苯(PBB) | 多溴二苯醚(PBDE) | |
| 电缆类 | × | ○ | ○ | ○ | ○ | ○ |
本表格依据 SJ/T 11364 的规定编制。
○:表示该有害物质在该部件所有均质材料中的含量均在 GB/T 26572 规定的限量要求以下。 ×:表示该有害物质至少在该部件的某一均质材料中的含量超出 GB/T 26572 规定的限量要求。

此标识适用于在中华人民共和国销售的电子信息产品。标识中间的数字为环保使用期限的年数。
保护环境
如果需要废弃设备时,请与本地相关机构联系,获取正确的废弃方法。请勿将设备随意丢弃或作为生活垃圾处理。
Information for Users on Collection and Disposal of Old Equipment

This symbol on the products, packaging, and/or accompanying documents means that used electrical and electronic products should not be mixed with general household waste. For proper treatment, recovery and recycling of old products, please take them to applicable collection points, in accordance with your national legislation and the Directives 2002/96/EC.
By disposing of these products correctly, you will help to save valuable resources and prevent any potential negative effects on human health and the environment which could otherwise arise from inappropriate waste handling.
For more information about collection and recycling of old products, please contact your local municipality, your waste disposal service or the point of sale where you purchased the items.
[For business users in the European Union] If you wish to discard electrical and electronic equipment, please contact your dealer or supplier for further information.
[Information on Disposal in other Countries outside the European Union]
This symbol is only valid in the European Union. If you wish to discard these items, please contact your local authorities or dealer and ask for the correct method of disposal.
(weee_eu_en_01)
Yamaha Global Site
http://www.yamaha.com/
Yamaha Downloads
http://download.yamaha.com/
Manual Development Department 2015 © Yamaha Corporation Published 11/2015 MWHD-A0 Printed in China
Marke : YAMAHA
Modell : SWP1
Kategorie : Schalter