
VT-2440 - Fernbedienung V-TAC - Kostenlose Bedienungsanleitung
Finden Sie kostenlos die Bedienungsanleitung des Geräts VT-2440 V-TAC als PDF.


| Produkttyp | Fernbedienung |
| Modell | VT-2440 |
| Marke | V-TAC |
| Eingangsspannung | 3 V (2 × AAA-Batterien) |
| Übertragungsleistung | 6 dBm |
| Standby-Stromverbrauch | 20 μA |
| Modulationsverfahren | GFSK |
| Abmessungen | ∅80 × 12 mm |
| Garantie | 2 Jahre |
| Kompatible Geräte | VT-2431 (separat erhältlich) |
| Funktionen | Ein/Aus, Nachtlichtmodus, Dimmschieberegler (1–100 % Helligkeit) |
| Installation | Schraubbefestigung, Pfeil nach oben |
| Batterietyp | AAA (2 Stück, nicht im Lieferumfang) |
| Schutzart | Nur für Innenräume, nicht feucht |
| WEEE-Nummer | 00133970 |
| Hersteller | V-TAC Europe Ltd., Bulgarien |
Häufig gestellte Fragen - VT-2440 V-TAC
Benutzerfragen zu VT-2440 V-TAC
0 Frage zu diesem Gerät. Beantworten Sie die, die Sie kennen, oder stellen Sie Ihre eigene.
Eine neue Frage zu diesem Gerät stellen
Laden Sie die Anleitung für Ihr Fernbedienung kostenlos im PDF-Format! Finden Sie Ihr Handbuch VT-2440 - V-TAC und nehmen Sie Ihr elektronisches Gerät wieder in die Hand. Auf dieser Seite sind alle Dokumente veröffentlicht, die für die Verwendung Ihres Geräts notwendig sind. VT-2440 von der Marke V-TAC.
BEDIENUNGSANLEITUNG VT-2440 V-TAC

INNOVATIVE LED LIGHTING
WEEE Number: 80133970
INSTALLATION INSTRUCTION
TOUCH DIMMER
TECHNICAL DATA:
| MODEL | VT-2440 |
| INPUT VOLTAGE | 3V (AAA x 2PCS)(BATTERY NOT INCLUDED) |
| TRANSMISSION POWER | 6dBm |
| STANDBY POWER CONSUMPTION | 20μA |
| MODULATION METHOD | GFSK |
| DIMENSION | 80 × 12 mm |
2 YEARS
WARRANTY
INTRODUCTION & WARRANTY
Thank you for selecting and buying V-TAC product. V-TAC will serve you the best. Please read these instructions carefully before starting the installation and keep this manual handy for future reference. If you have any another query, please contact our dealer or local vendor from whom you have purchased the product. They are trained and ready to serve you at the best. The warranty is valid for 2 years from the date of purchase. The warranty does not apply to damage caused by incorrect installation or abnormal wear and tear. The company gives no warranty against damage to any surface due to incorrect removal and installation of the product. The products are suitable for 10-12 Hours Daily operation. Usage of product for 24 Hours a day would void the warranty. This product is warranted for manufacturing defects only.
WARNING!
-
Please make sure to turn off the power before starting the installation.
-
Installation should only be done by a certified electrician.
-
For Indoor use only
-
In the using of the remote, if the indicated lamp blinking quickly, please change the battery in time. Please
don't use poor quality battery to avoid the leaking of battery liquid to damage the remote.
- This product is precise electronic product; don't use it in humid, high temperature, dust and high voltage
environment; Saving it at indoor, dry and no static electricity environment
- Please don't use the remote on the wide-range metal or strong electromagnetic wave area, otherwise, it will badly affect the controlling distance.

This marking indicates that this product should not be disposed of with other household wastes.

Caution, risk of electric shock.
PRODUCT KEY DIAGRAM

MULTI-LANGUAGE
MANUAL QR CODE Please scan the QR code to access the manual in multiple languages.
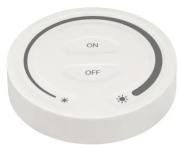
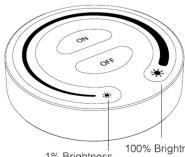
OFF: Short press to turn off the light; Long press to night light mode.
Dimming Slider: Toucg adjust 1\~100% brightness.
INSTALLATION DIAGRAM



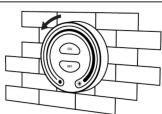

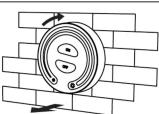
INSTALLATION INSTRUCTION
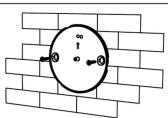
- Install the remote to the selected place; Keep the two screw on the same level; Install it with arrow up.
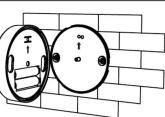
- Install battery (AAA Battery x 2PCS), then fix it on the base.
- Press downward and rotate to the left to fix it
- Dismantling: Rotate to the right, then plunk it down.
LINKING INSTRUCTIONS
-
Switch off the light, after 10 seconds switch on again.
-
When the light on, short press press "ON" 3 times within 3 seconds.
-
The light blink 3 times slowly means the linking is done successfully.
Note: If the light not blink slowly, the linking failed, PIs switch off the light again, and follow the above steps again.
UNLINKING INSTRUCTIONS
-
Switch off the light, after 10 seconds switch on again.
-
When the light on, short press "ON" 5 times within 3 seconds.
-
The light blinking 10 times quickly, means the unlinking successfully.
Note: If the light not blink quickly, the unlink failed, pls switch off the light again, and follow the above steps to unlink again.
COMPATIBLE DEVICES
Compatible with the below devices
(Not included; available to buy separately)
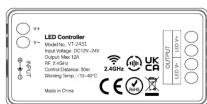
(SKU: 2911
VT-2431)
(NOT INCLUDED)


IN CASE OF ANY QUERY/ISSUE WITH THE PRODUCT, PLEASE REACH OUT TO US AT: SUPPORT@V-TAC.EU
FOR MORE PRODUCTS RANGE, INQUIRY PLEASE CONTACT OUR DISTRIBUTOR OR NEAREST DEALERS. V. TAG EUROPE LTD. BULGARIA PLOVDIV 4000. RUI L KARAYELOW OR
DEALERS. V-TAC EUROPE LTD. BOLGARIA, FLOVDIV 4000, BOL.E.KARAVELOW 9B
Marke : V-TAC
Modell : VT-2440
Kategorie : Fernbedienung