
Linea 3 in 1 - Babyscale Chipolino - Kostenlose Bedienungsanleitung
Finden Sie kostenlos die Bedienungsanleitung des Geräts Linea 3 in 1 Chipolino als PDF.


| Produkttyp | Kinderwagen 3-in-1 (mit Babywanne und Autositz) |
| Geeignet für | Neugeborene bis ca. 4 Jahre (bis 22 kg) |
| Maximales Kindesgewicht (Kinderwagen) | 22 kg |
| Maximales Kindesgewicht (Babywanne) | 9 kg |
| Maximales Kindesgewicht (Autositz) | 13 kg (Körpergröße 40–87 cm) |
| Gurtsystem | 5-Punkt-Sicherheitsgurt |
| Sitzpositionen | Zwei: zum Elternteil oder nach vorne gerichtet |
| Rückenlehnenverstellung | 3-fach verstellbar |
| Sonnendach | Ausziehbar mit Sichtfenster |
| Fußstützenverstellung | Verstellbar |
| Feststellbremse | Fußpedal |
| Einkaufskorb | Max. 3 kg Belastung |
| Vorderräder | Schwenkbar und feststellbar |
| Hinterräder | Fest montiert |
| Bezugsmaterial | Polyester (100 %) |
| Reinigung | Mit feuchtem Tuch und milder Seife; aggressive Reiniger vermeiden |
| Zusammenklappbar | Ja, mit Verriegelung |
| Autositz-Kompatibilität | Modell LINEA (im Lieferumfang enthalten) |
| Aufbewahrung | Innen, trocken und sauber |
| Hersteller | Chipolino |
Häufig gestellte Fragen - Linea 3 in 1 Chipolino
Benutzerfragen zu Linea 3 in 1 Chipolino
0 Frage zu diesem Gerät. Beantworten Sie die, die Sie kennen, oder stellen Sie Ihre eigene.
Eine neue Frage zu diesem Gerät stellen
Laden Sie die Anleitung für Ihr Babyscale kostenlos im PDF-Format! Finden Sie Ihr Handbuch Linea 3 in 1 - Chipolino und nehmen Sie Ihr elektronisches Gerät wieder in die Hand. Auf dieser Seite sind alle Dokumente veröffentlicht, die für die Verwendung Ihres Geräts notwendig sind. Linea 3 in 1 von der Marke Chipolino.
BEDIENUNGSANLEITUNG Linea 3 in 1 Chipolino
INSTRUCTION MANUAL FOR STROLLER AND CARRY COT – PARTS OF SET "LINEA" 3 IN 1
LINEA

natural_image
Exterior view of a modern baby stroller with black frame and gray body (no text or symbols visible)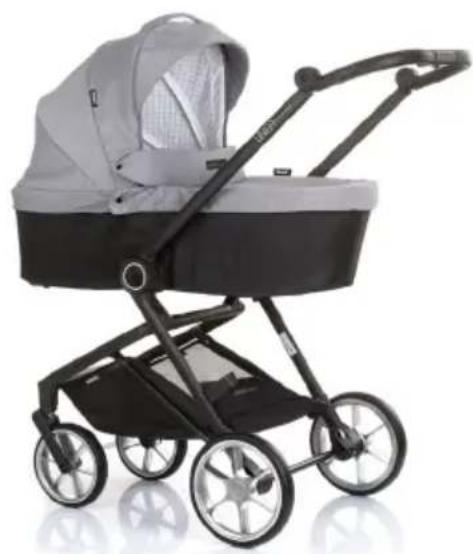
natural_image
Black and white baby stroller with gray back cover and black body, no visible text or symbolsChipolino has been
This stroller — has been manufactured in accordance with the Product Safety Directive 2001/95/EU of the European Parliament and The Council and with European standard EN 1888-1+A1:2022 “Child care articles. Wheeled child conveyances. Part 1: Baby strollers and carry cot”, EN 1888-2+A1:2022 “Child care articles. Wheeled child conveyances. Part 2: baby strollers for children from 15 kg to 22 kg” and EN 1466: 2023 “Child care articles. Carry cots and stands. Safety requirements and test methods” and the regulations of national law, including Consumer Protection Law.
FOLLOW ALL WARNINGS, INSTRUCTIONS AND RECOMMENDATIONS IN THIS MANUAL IN ORDER TO GUARANTEE THE SAFE USE OF THIS PRODUCT:
CAUTION! WARNINGS!
✿ WARNING! NEVER LEAVE YOUR CHILD UNATTENDED!
✿ WARNING! USE THE CARRY COT ONLY FOR A CHILD, WHO CANNOT SIT UNAIDED, ROLL OVER AND CANNOT PUSH ITSELF ON ITS HANDS AND KNEES! MAXIMUM WEIGHT OF THE CHILD: 9 KG!
✿ WARNING! USE THE CARRY COT ONLY ON FLAT, HORIZONTAL AND DRY SURFACE!
✿ WARNING! NEVER USE CARRY COT ON A STAND!
✿ WARNING! ALWAYS USE THE RESTRAINT SYSTEM (SAFETY BELTS)!
✿ WARNING! MAKE SURE THAT ALL LOCKING MECHANISMS ARE ENGAGED BEFORE USE.
✿ WARNING! MAKE SURE YOUR CHILD IS AT SAFE DISTANCE AWAY FROM THE STROLLER DURING ADJUSTMENTS, FOLDING OR UNFOLDING OF THE STROLLER!
✿ WARNING! DO NOT ALLOW YOUR CHILDREN TO PLAY NEAR THE PRODUCT WIHTOUT SUPERVISION!
✿ WARNING! DO NOT USE THE PRODUCT IF ANY PART IS BROKEN, TORN OR MISSING!
✿ WARNING! BEFORE USE CHECK IF ALL DEVICES WHICH ARE ATTACHED TO THE SEAT, CARRY COT OR CAR SEAT ARE CORRECTLY AND WELL FIXED!
✿ WARNING! THIS PRODUCT IS NOT SUITABLE FOR RUNNING OR SKATING!
✿ FOR NEWBORN BABY USE THE MOST LYING POSITION OF THE BACKREST OF THE SEAT UNIT!
✿ USE THE SITTING POSITION OF THE SEAT UNIT ONLY AFTER CHILD HAS REACHED 6 MONTHS OLD! THE SITTING POSITION OF THE SEAT IS NOT SUITABLE FOR BABIES YOUNGER THAN 6 MONTHS!
✿ KEEP AWAY FROM FIRE! Do not use the product near open fire or source of strong heat!
DO NOT LIFT THE STROLLER BY THE FRONT BAR!
Use the stroller for a child weighing not more than 22 kg.!
Use the carry cot for a child weighting up to 9 kg.!
- Initial assembly, folding and unfolding to be done only by adult!
Do not place in seat additional mattress!
Do not place in carry cot additional mattress!
When using the carry cot, baby's head must be at higher level to his body.
❖ Always engage the parking device when the stroller has stopped and is not moving, especially when you place or take out your child from it!
Make sure the safety belts are fastened and fit well to the child before usage.
The maximum load for the storage basket is 3 kg.
Do not overload the stroller! Always balance your stroller in a way to keep it stable and prevent the risk of tip-over!
◆ Stroller and carry cot are intended for use for one child at a time!
Do not use any spare parts or other components, which are not approved by the producer! The producer does not take any responsibility for the safety of the child when you have not used the proper and original spare parts, approved and provided by him!
Do not apply any changes or modifications to the stroller's construction! Contact the dealer or an authorized repair service for advice and/or repair instead!
✿ Car seat does not replace a carrycot or a bed. Should your child need to sleep, then he should be placed in a suitable cot or bed.
- Check periodically and discontinue the usage, if you find worn out or loose joints, damaged or missing parts! There is a risk of injury of the child!
Do not allow children younger than 3 years near the stroller during the assembly or disassembly, in order to prevent the risk of injury or swallowing of small parts!
Do not place in the product any additional strings, cords or objects (toys, pillows, etc.) in order to avoid the risk of strangulation!
Do not position the product near objects that may pose strangulation risk, such as strings, blinds or curtain cords, etc.
✿ Never use the stroller on stairs or escalators! Use extra care when going up or down a step or a curb in order to avoid possible injury.
IMPORTANT! Overheating may put your baby's life in danger! Be aware of the environment temperature and your baby's attire and make sure it is not too cold or too hot.
- We recommend you to consult with medical specialist regarding the safety of baby’s sleep.
The packaging of the product must be kept out of the reach of children to avoid the risk of strangulation!

natural_image
Simple line drawing of a baby sitting in a chair with a bandage, enclosed in a circle (no text or symbols)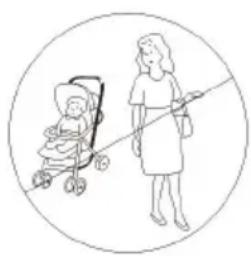
natural_image
Illustration of a woman walking with a stroller and a child in a stroller, enclosed in a circle (no text or symbols)
natural_image
Line drawing of a person in a stroller inside a circle (no text or symbols)
natural_image
Illustration of a woman carrying a stroller with a baby, enclosed in a circle (no text or symbols)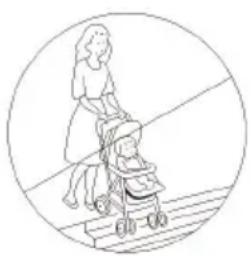
natural_image
Simple line drawing of a woman pushing a baby stroller inside a circular frame (no text or symbols)MAIN FEATURES
✿ Seat unit is suitable for newborn babies and children aged up to 4 years or weighing up to 22 kg (whichever comes first);
- Carry cot is suitable for one child aged less than 6 months and weighting not more than 9 kg. It can be used separately or attached to stroller's frame;
- Car seat for babies with height from 40 up to 87 cm and weight ≤ 13 kg., model LINEA. It is safe and compatible with stroller's frame;
◆ 5-point safety harness system;
- Seat unit can be installed in 2 modes – mother facing mode and motion facing mode;
Adjustable canopy;
Adjustable leg rest.
MAIN PARTS

| 1. Folding button 8. Storage basket | |
| 2. Canopy 9. Button for front wheels removal | |
| 3. Recline of seat button 10. Button for rear wheels removal | |
| 4. Цип на сенника 11. Parking device | |
| 5. Button for front bumper bar removal 12. Front bumper bar | |
| 6. Leg rest adjustment button 13. Handle | |
| 7. Seat release button 14. Seat | |
 Frame - 1 pc. Frame - 1 pc. | |
  Front wheels - 2 pcs. Rear wheels Front wheels - 2 pcs. Rear wheels |   - 2 pcs. - 2 pcs. |
ASSEMBLY INSTRUCTIONS AND FUNCTIONS
This stroller is supplied partially assembled. In order to complete the assembly, you do not need any tools.
WARNING! Follow exactly the instructions given and check the pictures.
WARNING! After each operation, make sure that you have followed the instructions correctly.
WARNING! Make sure the fixing is stable, as check if the pins jump out of the openings.
WARNING! In most cases after the completion of an operation you will hear a clicking sound.
The assembly, disassembly and functions are numbered from 1 to 15. Use the operations descriptions given in this manual and their matching picture.
1 – UNFOLDING THE STROLLER
Take out the folded frame out of the box ^① . Unlock the fixing (c) and open the frame until you reach the position shown in figure ^② . Move the slider (a) and at the same time press button (b) ^③ . Open fully the stroller ^④ and ^⑤ . Unfold the canopy as well ^⑥ .
WARNING! By fixing of stroller in open position you must hear a click sound.
2 - ASSEMBLY AND REMOVAL OF FRONT WHEELS
Place the front wheel to the frame opening and press (a) until you hear a „click”. Make sure that the wheels are well fixed by trying to pull them out.
Press the button for removal (b) take the wheel out.
3 - ASSEMBLY AND REMOVAL OF REAR WHEELS
Place the rear wheel to the rear axle opening (a) and press until you hear a „click”. Make sure that the wheels are well fixed by trying to pull them out.
Press the button (b) on the rear axle to remove the wheel from the frame.
4 – INSTALLING THE SEAT
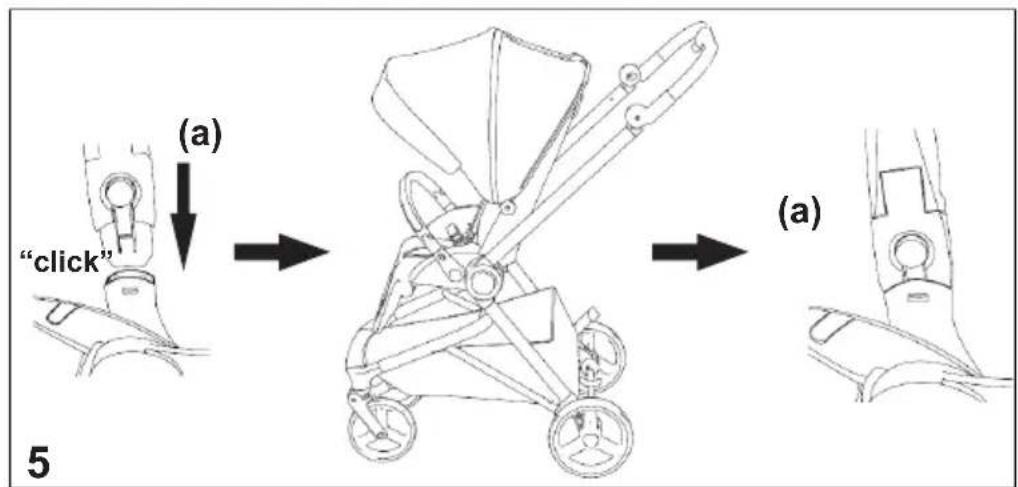
Open the seat, so that the backrest is in upright position (a). Place the seat on the frame (a) and press until you hear a „click” and the seat is fixed. Make sure that the seat is well fixed by trying to pull it out.
Note: Seat can be installed in two directions – baby is facing the parent (face to face mode) or baby is facing to the front.
5 - ASSEMBLY AND REMOVAL OF FRONT BUMPER
Place both endings of bumper to the frame front part and press down until you hear a „click“ and bumper is fixed.
Press the buttons for removal (a) at both sides of front bumper bar and remove the bumper bar from the frame.
6 - SEAT ASSEMBLY IN TWO DIRECTIONS
The seat may be installed in two directions – the child may be facing to the front or rearward to the back – facing the parent.
To change the seat direction, press the buttons for removal (a) at both sides of frame and pull the seat out. Rotate the seat at 180^ , place it on the frame and press until you hear a „click“ and seat is fixed (b).
| WARNING! CHANGE THE POSITION OF THE SEAT ONLY WHEN THERE IS NO CHILD IN IT! |
7 - RESTRAINT SYSTEM (5-POINT SAFETY HARNESS)
WARNING! ALWAYS USE THE RESTRAINT SYSTEM (SAFETY BELTS), TO AVOID FALLING OR SLIPPING OF THE CHILD! Use the safety belts for newborn babies and for babies, who can sit alone and unaided and can push her/himself on hands or knees as well!
7-2 - Join the two parts (1 and 2), as shown in the figure.
7-2 – Insert the joined parts (4 and 5) in the central buckle (3). When belt is fastened you will hear a „click“
7-3 - Adjust the length of the shoulder straps with the adjusters (6).
The belts may be adjusted on three height levels by inserting each of the shoulder belts through the corresponding buckle.
WARNING! Belt must be snug to child's body and must not be twisted! Set the length of belts through length adjusters.
WARNING! Periodically check to ensure that the seat belt is securely attached to the stroller frame as well as securely fastened.
WARNING! The belts should not be worn or torn, and plastic buckles and fasteners must be sturdy, free of damage and secure.
To unlock the safety belts, press the button (7) at central buckle and split the belts.
8 - CANOPY ADJUSTMENT
Pull with your hand (a) to open the canopy.
Push with your hand (b) to fold the canopy.
You can use the canopy window (c) by opening the flap.
9 – BACKREST ADJUSTMENT
Backrest can be set in 3 different positions as shown in the figure (I, II, III).
Press the button (a) up and move the seat to your desired position.
Note: Each position fix is accompanied by „click” sound.
10 – LEG REST ADJUSTMENT
Press the buttons (a) simultaneously and move the leg rest from high to lower position.
Push the leg rest up with your hand in order to raise it. By fixing you must hear „click“ sound.
11 – PARKING DEVICE
Press the pedal down to activate the parking device (1 - P).
Press the pedal inwards in order to release the parking device (2 - 1).
CAUTION! Always activate the parking device when the stroller is not in motion in order to avoid the risk of sliding of the stroller.
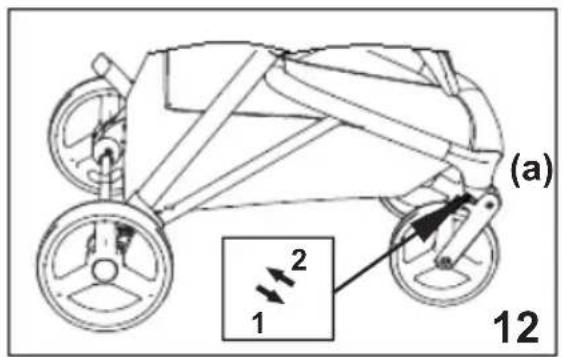
12 - SWIVEL AND STRAIGHT MOTION OF FRONT WHEELS
Move the slider out (1), in order to block the swivel motion of the wheels.
Move the slider in (2) in order to activate the swivel motion of the wheels.
Note: When using the stroller on uneven surfaces, fix the wheels for straight motion only.
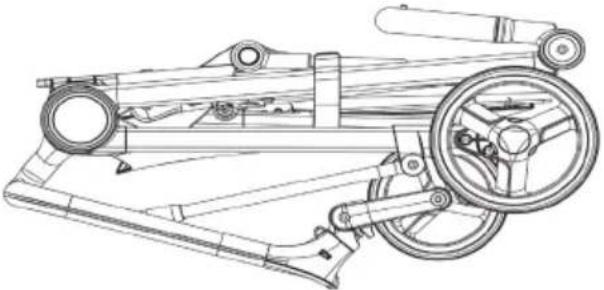
13 - FOLDING THE STROLLER
CAUTION! Always activate the parking device and empty the storage basket before folding the stroller.
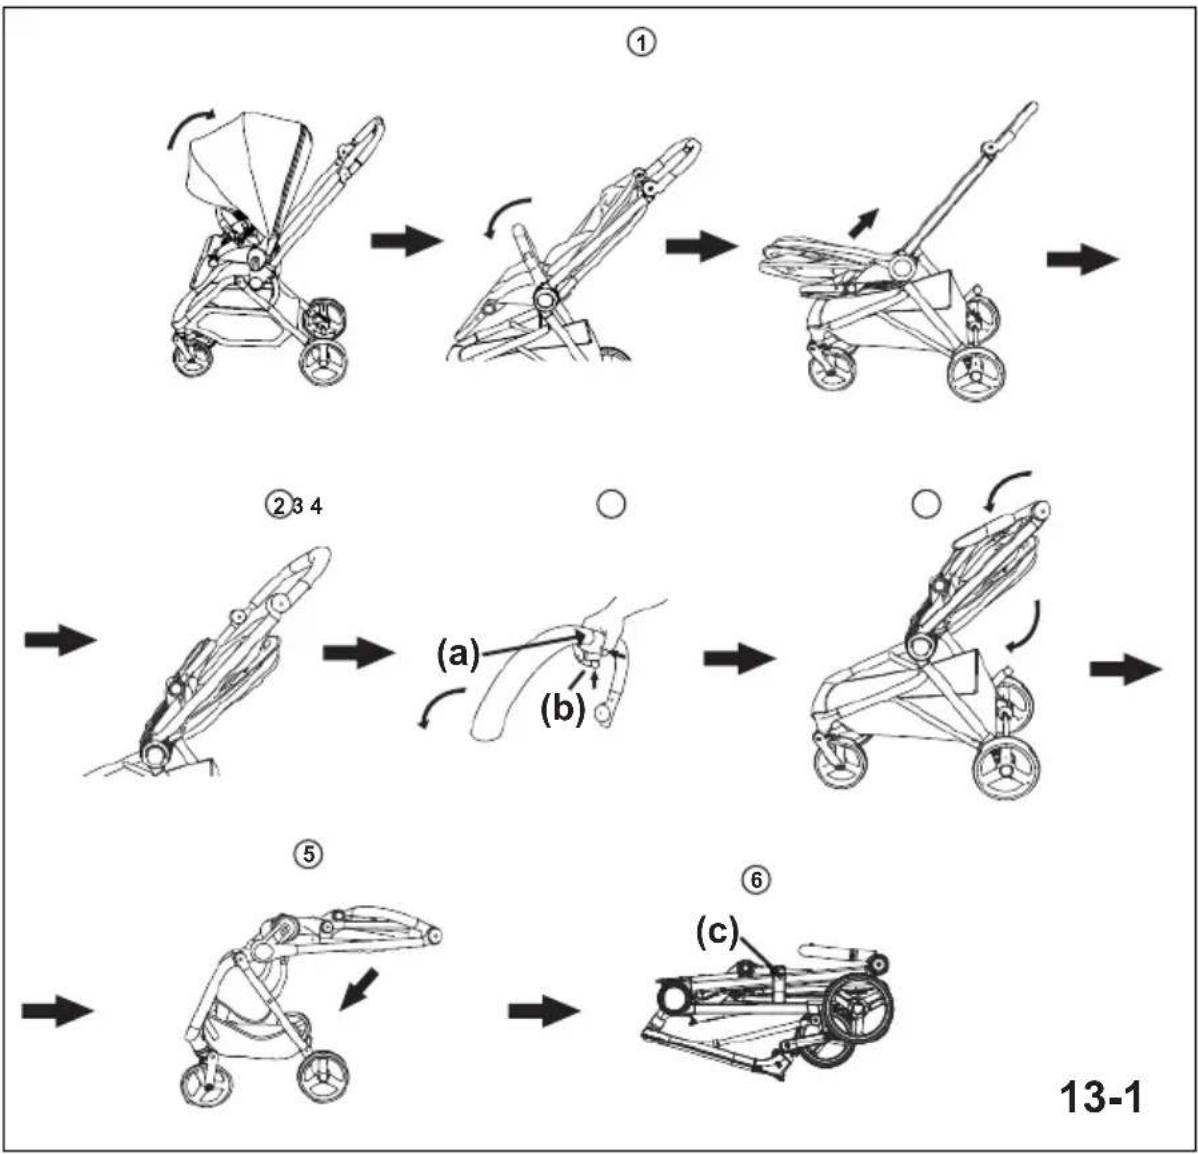
13-1 - Folding of stroller when it is in motion direction
① Fold the canopy. Set the backrest in position „II“, at the handle level. Press the button for recline and fold the seat forwards.
② Move the folded seat upwards to handle.
③ Move the slider (a) and at the same time press the button (b), fold the handle inwards.
④ and ⑤ After folding the handle, press down until the stroller folds.
⑥Lock with the fixing (c).
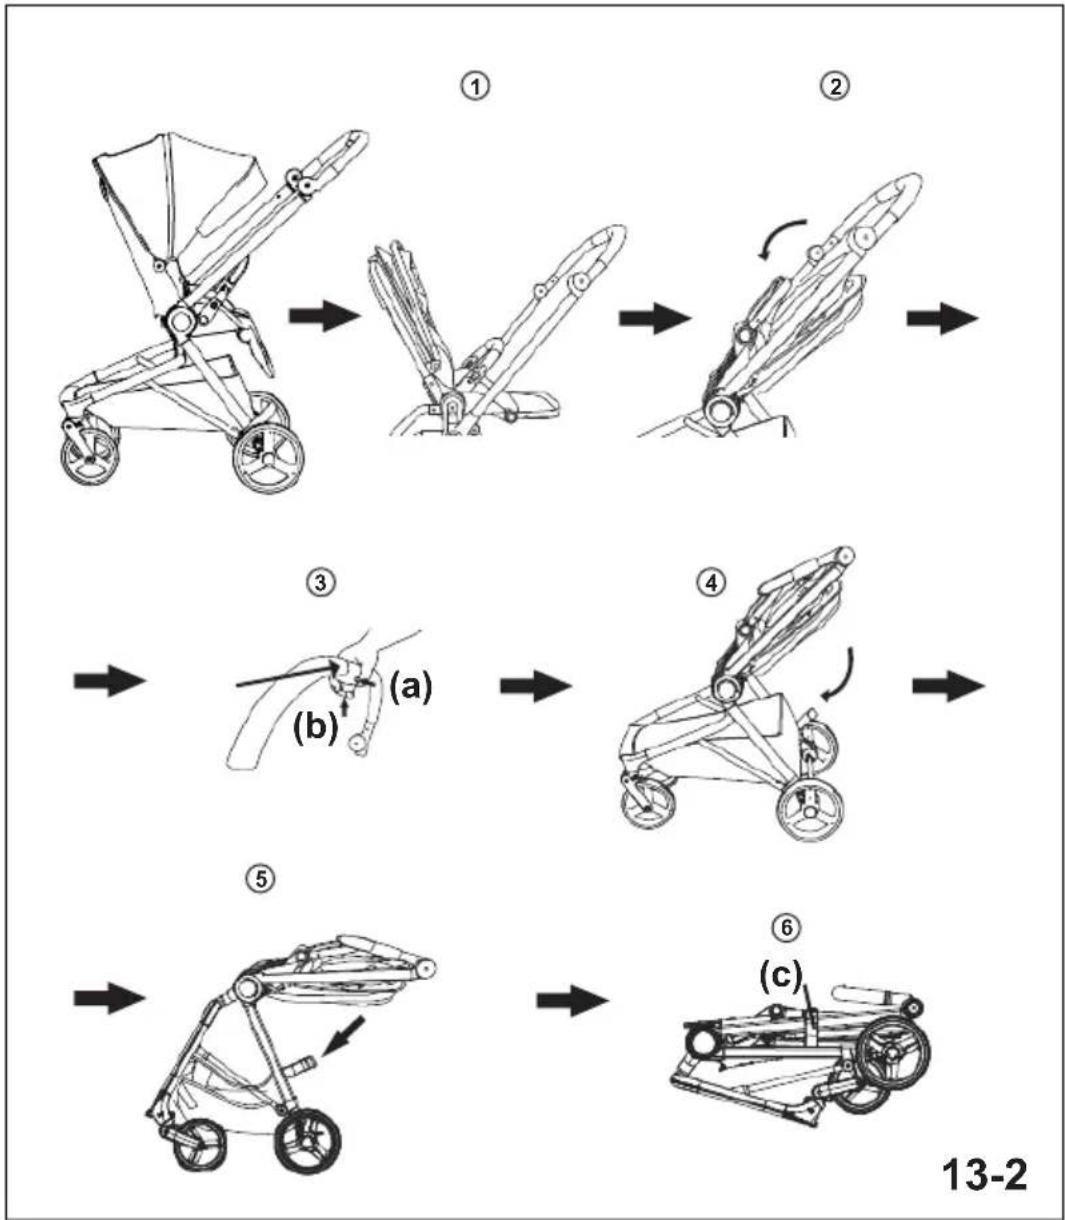
13-2 - Folding of stroller when it is in reverse to motion direction (facing the parent)
①Fold the canopy.
② Press the seat recline button, fold and move the seat to the handle.
③ Move the slider (a) and at the same time press the button (b).
④ Fold the handle inwards.
⑤Press down the handle until stroller folds.
⑥Lock with the fixing (c).
14 - CARRY COT
WARNING! Baby's head should be above the level of his body!
WARNING! THE CARRY COT MUST ALWAYS BE INSTALLED IN FACE TO FACE MODE!
Note: For your comfort before installation of carry cot or cat seat, always apply the parking device.
14-1 – Turn the carry cot upside down. Place vertically elements A and B. Pull out each of the supports (C), until the axels (D and E) fall in the grooves (F and G) and are fixed. When supports are fixed you will hear a „click“.
14-2 - Place the mattress in the carry cot and fasten the zippers I and H.
14-3 – Pull the canopy with your hand to open it and fasten the velcro straps J and K. Place the foot cover on the cot and fasten the snap buttons L and M at both sides.
For folding of carry cot, do the same actions in reverse order.
14-4 – Installing the carry cot: Place the carry cot on the stroller frame as shown in the picture. Press down until you hear a „click“ and the cot is fixed.
14-5 – Removal of carry cot from the frame: Press the buttons for removal (1) at both sides of the frame and pull up the carry cot (2).
15 - INSTALLATION OF CAR SEAT ON THE FRAME OF STROLLER
WARNING! THE CAR SEAT MUST ALWAYS BE INSTALLED IN FACE TO FACE MODE!
Note: For your comfort before installation of carry cot or cat seat, always apply the parking device.
15-1 - The car seat model „LINEA” may be installed on the frame using adaptors (1). Install the adaptors to the car seat (if they are not pre-installed). By fixing you must hear a click sound.
To remove the adaptors from the car seat, press the button for removal (A) and pull the adaptor down.
15-2 - Push the canopy with your hand to fold it (2) and or pull it to open it (3).
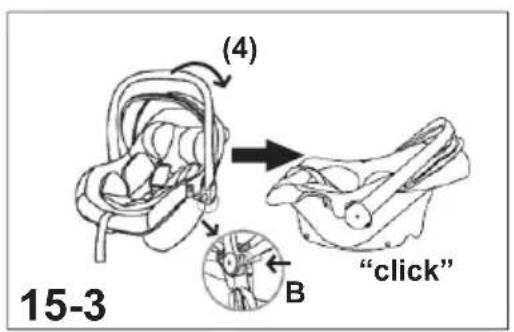
15-3 – Press the buttons (B) at both sides of car seat and move the handle forth or back to required position. By fixing you must hear a click sound.
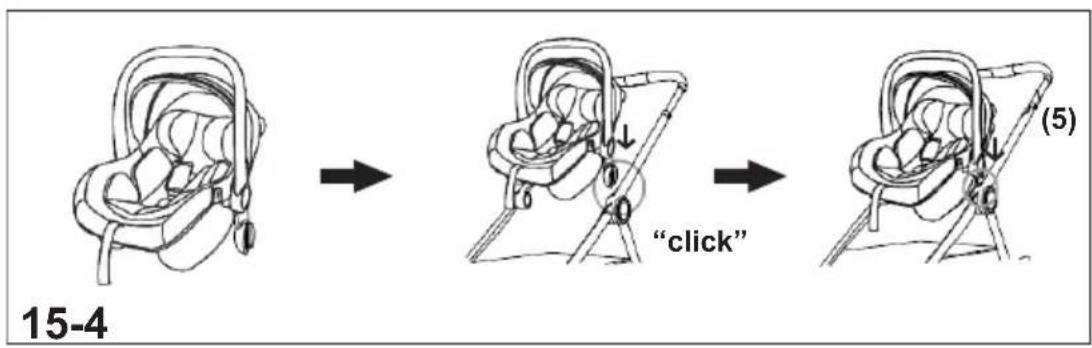
15-4 – Install the car seat with adaptors on the frame. When it is fixed you will hear a „click“.
To remove the car seat, you, must press the buttons for removal at both sides (5) of frame and take it out of the frame.

flowchart
graph TD
    A["1: Vehicle chassis with stroller"] --> B["2: Stroller with handle"]
    B --> C["3: Blade with fulcrum, labeled 'a' and 'b'"]
    C --> D["4: Stroller with handle, labeled '4'"]
    D --> E["5: Click button"]
    E --> F["6: Stroller with handle, labeled '6'"]
    F --> A




flowchart
graph TD
    A["①"] --> B["②"]
    B --> C["7-1"]
    C --> D["③"]
    D --> E["7-2"]
    E --> F["④"]
    F --> G["click"]
    G --> H["⑤"]
    H --> I["⑥"]
    I --> J["⑦"]
    J --> K["7-3"]
    K --> L["⑥"]
    L --> M["⑦"]
    M --> N["⑥"]
    style A fill:#f9f,stroke:#333
    style B fill:#f9f,stroke:#333
    style C fill:#f9f,stroke:#333
    style D fill:#f9f,stroke:#333
    style E fill:#f9f,stroke:#333
    style F fill:#f9f,stroke:#333
    style G fill:#f9f,stroke:#333
    style H fill:#f9f,stroke:#333
    style I fill:#f9f,stroke:#333
    style J fill:#f9f,stroke:#333
    style K fill:#f9f,stroke:#333
    style L fill:#f9f,stroke:#333
    style M fill:#f9f,stroke:#333


flowchart
graph TD
    A["Step ①: Start of stroller"] --> B["Step ②: Stroller moves left"]
    B --> C["Step ③: Stroller moves right"]
    C --> D["Step ④: Stroller moves right"]
    D --> E["Step ⑤: Stroller moves left"]
    E --> F["Step ⑥: Stroller moves right"]
    style A fill:#f9f,stroke:#333
    style F fill:#f9f,stroke:#333
flowchart
graph TD
    A["Step ①: Stroller with handle"] --> B["Step ②: Stroller with blade"]
    B --> C["Step ③: Stroller with wing"]
    C --> D["Step ④: Stroller with blade"]
    D --> E["Step ⑤: Stroller with wheel"]
    E --> F["Step ⑥: Stroller with frame"]

flowchart
graph TD
    A["Car Body Part"] --> B["Headset A B"]
    B --> C["Headset B C D E F G"]
    C --> D["Arrow to 'click' point"]
    D --> E["Arrow to 'click' point"]
    style A fill:#f9f,stroke:#333
    style B fill:#ccf,stroke:#333
    style C fill:#cfc,stroke:#333
    style D fill:#fcc,stroke:#333


CARE AND MAINTENANCE GUIDELINES
The brakes and wheels wear out faster than other parts. Replace them when necessary.
◆ Regularly oil the moving parts. Use silicone oil or silicone spray for oiling.
- Clean and oil all dirty metal and plastic parts regularly.
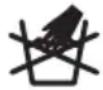
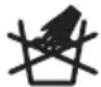
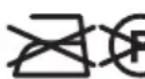
- Clean the fabrics, plastic parts and metal parts with damp cotton cloth or sponge and mild soap.
Do not use aggressive detergents, solvents, bleach or spirits to clean your stroller.
Always leave the stroller to fully dry after cleaning before you use it or store it. Mold could form if you keep your stroller moist.
Always store your stroller indoors in clean and dry place. Do not expose to direct environment influence - sun, rain, moisture and high temperature intervals.
Stroller fabric
composition: polyester
Lining and filling: 100 % polyester



Used materials: plastic, textile, metal.
Carry cot fabric
composition: polyester
Lining and filling: 100 % polyester


KKLI024xxxx
KKLIC024xxxx


- INSTRUCTION MANUAL FOR STROLLER AND CARRY COT – PARTS OF SET "LINEA" 3 IN 1
- Chipolino has been
- FOLLOW ALL WARNINGS, INSTRUCTIONS AND RECOMMENDATIONS IN THIS MANUAL IN ORDER TO GUARANTEE THE SAFE USE OF THIS PRODUCT:
- CAUTION! WARNINGS!
- MAIN FEATURES
- MAIN PARTS
- ASSEMBLY INSTRUCTIONS AND FUNCTIONS
- – UNFOLDING THE STROLLER
- - ASSEMBLY AND REMOVAL OF FRONT WHEELS
- - ASSEMBLY AND REMOVAL OF REAR WHEELS
- – INSTALLING THE SEAT
- - ASSEMBLY AND REMOVAL OF FRONT BUMPER
- - SEAT ASSEMBLY IN TWO DIRECTIONS
- - RESTRAINT SYSTEM (5-POINT SAFETY HARNESS)
- - CANOPY ADJUSTMENT
- – BACKREST ADJUSTMENT
- – LEG REST ADJUSTMENT
- – PARKING DEVICE
- - SWIVEL AND STRAIGHT MOTION OF FRONT WHEELS
- - FOLDING THE STROLLER
- 13-1 - Folding of stroller when it is in motion direction
- 13-2 - Folding of stroller when it is in reverse to motion direction (facing the parent)
- - CARRY COT
- - INSTALLATION OF CAR SEAT ON THE FRAME OF STROLLER
- CARE AND MAINTENANCE GUIDELINES
- Stroller fabric
- Carry cot fabric
Marke : Chipolino
Modell : Linea 3 in 1
Kategorie : Babyscale