
EWH30SIBEEEC - Chauffe-eau instantané et chaudière ELECTROLUX - Kostenlose Bedienungsanleitung
Finden Sie kostenlos die Bedienungsanleitung des Geräts EWH30SIBEEEC ELECTROLUX als PDF.


| Produkttyp | Elektrischer Speicher-Wassererhitzer |
| Modell | EWH30SIBEEEC |
| Marke | Electrolux |
| Nennvolumen (nutzbar) | 25 l |
| Abmessungen (B × H × T) | 435 × 635 × 260 mm |
| Gewicht (netto) | 15,3 kg |
| Heizleistung | 700 W (Low) / 1300 W (Mid) / 2000 W (Turbo) |
| Spannung / Frequenz | 230 V ~ 50 Hz |
| Nennstrom | 8,7 A |
| Heizzeit (10 °C auf 75 °C) | ca. 99 Minuten |
| Maximale Wassertemperatur | 75 °C |
| Schutzart | IPX4 |
| Energieeffizienzklasse | A (senkrechte Installation) |
| Steuerung | Digitales Bedienfeld mit Display, Touch- oder Tastenbedienung |
| Funktionen | Smart, Timer (3 Timer), Bacteria Stop, No Frost, Wi-Fi |
| Anode | Elektronische Titan-Anode (aktiv) |
| Heizelement | Trockenes Heizelement (kein direkter Kontakt mit Wasser) |
| Sicherheitseinrichtungen | RCD (Fehlerstromschutzschalter), Überhitzungsschutz, Überdruckschutz (Sicherheitsventil) |
| Installation | Senkrecht oder waagerecht, Wandmontage |
| Wasseranschluss | G 1/2 Zoll |
| Lieferumfang | Wassererhitzer, Sicherheitsventil, RCD mit Anleitung, Montageanker, Bedienungsanleitung |
Häufig gestellte Fragen - EWH30SIBEEEC ELECTROLUX
Benutzerfragen zu EWH30SIBEEEC ELECTROLUX
0 Frage zu diesem Gerät. Beantworten Sie die, die Sie kennen, oder stellen Sie Ihre eigene.
Eine neue Frage zu diesem Gerät stellen
Laden Sie die Anleitung für Ihr Chauffe-eau instantané et chaudière kostenlos im PDF-Format! Finden Sie Ihr Handbuch EWH30SIBEEEC - ELECTROLUX und nehmen Sie Ihr elektronisches Gerät wieder in die Hand. Auf dieser Seite sind alle Dokumente veröffentlicht, die für die Verwendung Ihres Geräts notwendig sind. EWH30SIBEEEC von der Marke ELECTROLUX.
BEDIENUNGSANLEITUNG EWH30SIBEEEC ELECTROLUX
GB · Sealed storage electric water heater · User's manual
AL · Hermetikisht ngrohës uji elektrik me rezervuar
- Manuali i përdorimit
PL · Hermetycznie akumulacyjny elektryczny podgrzewacz wody · Instrukcja obsługi
RO · Ermetic încălzitor de apă electric de stocare
- Instructiuni de exploatare
BG · Херметично акумулиращ електрически бойлер
• Ръководство за експлоатация
GR · Σφραγισμένο ηλεκτρικός θερμοσίφωνας αποθήκευσης
.Οδηγίες χρήσης
CZ · Hermeticky elektrický akumulační ohřívač vody
• Návod k použití
Fill your life with comfort
Get quick access to instructions, additional product information and support at our website home-comfort.com
2 http://www.home-comfort.com
- ENGLISH 4
- SHQIP 16
- POLSKI 30
- ROMÂNĂ 44
- БЪЛГАРСКИ 58
- ΕΛΛΗΝΙΚΑ 72
- ČESKÝ 86
4 http://www.home-comfort.com
CONTENT
- SAFETY RULES 5
- DESTINATION 6
- COMPLETE SET 6
- DEVICE ARRANGEMENT 7
- CONTROL PANEL 8
- WATER HEATER INSTALLATION 11
- CONNECTING TO THE WATER SUPPLY 11
- CONNECTING TO THE POWER GRID 12
- OPERATION....12
- INSTALLATION DIMENSIONS AND DIMENSIONS.... 13
- SPECIFICATIONS 13
- RCD (GROUND FAULT INTERRUPTER).... 13
- TROUBLESHOOTING 14
- CARE AND MAINTENANCE 14
- TRANSPORT AND STORAGE....15
- RECYCLING....15
- WARRANTY 15
- DATE OF MANUFACTURE....15
WE THINK ABOUT YOU
Thank you for purchasing an Electrolux appliance. You have chosen a product, backed by decades of professional experience and innovations.
Unique and stylish, it was created with care for you. Therefore, whenever you use it, you can be sure that the results will always be excellent.
Welcome to Electrolux!
At our website you can:

Find product recommendations, user manuals, maintenance information: http://www.home-comfort.com/support/

While selling this device, dealer must fill "Product details" section located in the inside of the back cover of this manual.
Designation

Caution/Important safety information

Common information and recommendations
Warranty service is performed according to the terms specified in the "Warranty" section.
Note:
In the text of this manual, the storage electric water heater may have such technical names as appliance, device, etc.
Safety rules

Warning!
Do not use portable outlets. Improper installation and operation of the electric water heater can cause accidents or property damage.
- The power outlet must be securely grounded. The rated current of the power outlet must be at least 10 A. Keep the socket and plug dry at all times to prevent a short circuit in the electrical system.
- The wall on which the water heater is installed must be rated for twice the total weight of the water heater filled with water.
- A safety check valve should be installed at the cold water inlet (see Fig. 1).
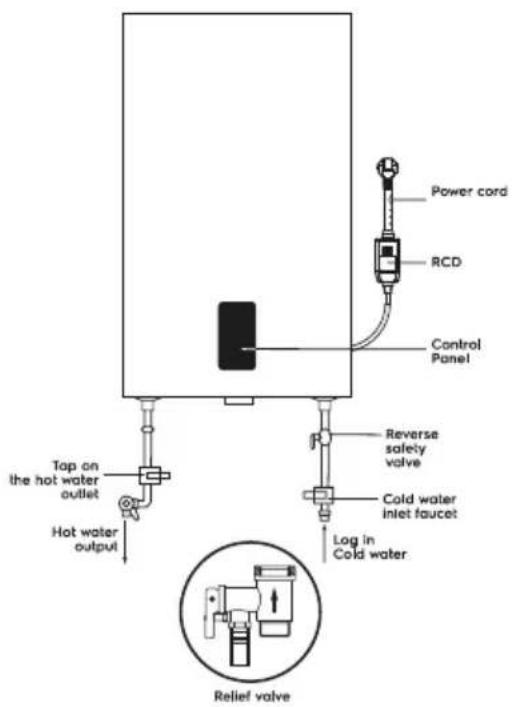
Fig. 1
- When using the water heater for the first time (or when using it for the first time after maintenance or cleaning), do not power up the water heater until it is full. The hot water tap should be opened while filling the water heater tank. While filling the tank of the water heater, open the hot water tap to bleed air. As soon as the tank is filled with water and water flows from the tap, the tap can be closed.
- During water heating, water may come out of the pressure relief vent of the safety relief valve. This is normal. However, in the event of large leaks, contact a service technician. The pressure outlet must never be blocked under any circumstances; Otherwise it may cause the water heater to malfunction.
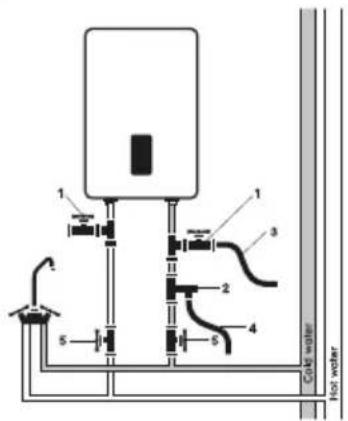
- The pressure vent on the pressure relief valve (item 3 in Fig. 5) Install a drain tube and lead it to the sewer in case water is drained and excessive pressure is relieved*. The drain tube connected to the pressure outlet must point downward.
- The water temperature inside the water heater can reach up to 75^ . To avoid scalding, you can adjust the water temperature using the mixer tap.
Water Drain:
The water heater must be completely drained if it will not be used for a long time or if the temperature in the room where it is installed may drop below 0°C. Drain can be carried out with the safety valve and there may be leakage under the valve stem.
A tee can be provided for the drain with a valve between the valve and the sleeve (item 1, fig. 5).
Before draining the water heater, don't forget:
- Disconnect the power supply from the device.
• Make sure that the water inside the tank is at a safe temperature. - Close the cold water supply to the tank by closing the stop valve.
- Shut off the hot and cold water supply water to the apartment.
- Open the hot water supply to the mixer to relieve the pressure inside the tank.
- Open the shutoff valve on the tee fitting on the hot water outlet of the water heater (if a tee fitting has been installed), Otherwise, dismantle the connection pipe at the water heater outlet.
- Connect the drain hose (item 3 in Fig. 5) to the shutoff valve.
- At the tee on the cold water inlet to the water heater and direct it into the sewer, or into the place where the water drains.
- Open the stopcock and wait for the water to drain completely.

Warning!
The installation of the supplied safety valve is a mandatory requirement. Do not install any shut-off valve between the safety valve and the and the tank inlet, as well as blocking the discharge port of the safety valve.
- Do not leave a water heater filled with water without power and heating water in a room where the temperature may be below 0°C.
- In case of long absences, repair, technological and preventive work on the water supply line, it is necessary to close individual stop valves on the cold water supply line to the water heater and on the hot water outlet line, as well as to turn off the water heater and disconnect from the power supply by pulling the plug from the socket.
- If any part of the water heater is damaged, contact a service technician for repair. Use only replacement parts supplied by the manufacturer.
- This appliance is not intended for use by persons (including children) with reduced physical, sensory or mental capabilities, or lack of life experience or knowledge, unless they are supervised or instructed. Children should be supervised to ensure that they do not play with the appliance.
Destination
The electric storage water heater is designed for heating cold tap water. It is used exclusively. The water from the water heater is not intended for drinking or cooking.
Installation and initial start-up of the heater must be carried out by a qualified technician, who can be held responsible for the correct installation and give recommendations on the use of the heater.
Wiring must comply with current standards and regulations.
Before installing the water heater, make sure the grounding electrode of the outlet is properly grounded. If the grounding electrode is missing. The water heater must be grounded by a separate grounding conductor to the ground terminal on the heater element flange fastener in the outlet. Do not install or operate the product if grounding is not available.
Complete set
The electric storage water heater is complete with the basic elements for installation and connection. The water heater set includes:
• water heater with power cord—1 pc;
- safety valve—1 pc;
• RCD with instructions for use—1 pc;
- fixing anchors for mounting.
For 30L, 50L-2 pcs; for 80L, 100L-4 pcs;
- user manual—1 pc;
• warranty card (in the manual)—1 pc.
Device arrangement
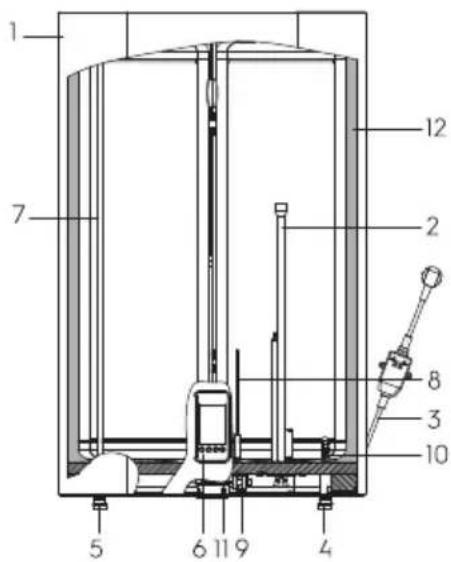
Fig. 2
- Hull
- Dry heating element housing
- Power cord with RCD
- Cold water inlet
- Hot water output
- Control Panel
- Hot water supply pipe
- Electronic anode
- Safety thermostat
- Cold water intake pipe into the tank (with diffuser)
- A place for a speaker
- Thermal insulation
Automatic water temperature control:
When you open the hot water tap on the mixer tap at the water heater outlet, cold water starts flowing in. The water in the tank mixes and its temperature decreases. The thermostat sensor reacts to the falling water temperature and the heating element (heating element) switches on automatically and heats the water up to the set temperature. When the temperature reaches the set point, the heating element is automatically switched off.
Levels of water heater protection:
• protection against overheating;
• protection against excessive hydraulic pressure.
• RCD (Ground Fault Interrupter).
The steel inner tanks with a special protective coating are made using the advanced electrostatic dry enameling method. Enamel properties:
- increased adhesive ability and high ductility (hardened at 850°C);
- expands or contracts with temperature changes in the same proportion as the walls of the inner tank, without creating micro-cracks that could lead to corrosion.
As additional protection against corrosion of the internal tank, the water heater is equipped with a magnesium anode and electronic titanium anode. The dry heating element (PHE) is placed in protective metal covers, which exclude direct contact of the heating elements with water, respectively, no scaling is formed on the heating elements, which increases their service life and prolongs their service life.
The water heater has three heating power modes:
- LOW (700 W)
. MID (1300 W)
• TURBO (2000 W).
Depending on the water temperature, the background image is displayed as follows:
• From 5 to 35°C—calm smooth water;
- From 36 to 55^ C -agitated water;
- 56 to 75^ C - boiling water, bubbles.
Depending on the water temperature, the heating indicator is displayed as follows:
• From 5 to 30°C—indication in blue;
• 31 to 50°C-orange display;
- 51 to 55^ C -indication is green;
- 56 to 75^ C -indication in red.
Control Panel
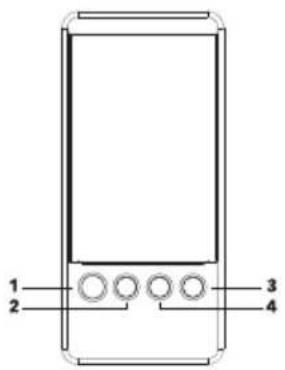
Fig. 3
1. On/off/back button.
On/off button to turn the unit on/off. Button to return to the previous menu section.
2. Menu, OK.
Menu entry button, selection confirmation button.
3. Menu navigation button: up, left.
4. Menu navigation button: down, right.
Information indicators on the display
| [04-05] | Locking Display Buttons |
| [05-06] | Unlocking Display Buttons |
| 1 [21-50] 5 | Display the current time |
| [07-08] | Wi-Fi connection |
| [09-10] | Display electric anode |
| [10-11] | Display current heating power |
| [13-14] [15-16] [17-18] | Displaying target temperature values |
| [19-20] 2 °C | Display current temperature value |
| [21-22] [23-24] [25-26] | Activate Timer function |
| [27-28] | Activate Bacteria Stop function |
| [29-30] | Turning on No Frost function |
| STA [29-30] DBY | Turning on standby mode |
| ST [30-31] RT | Switch on Smart function |
| HEA [32-33] G UP | Heating progress display |
Turning on the device
Press and hold button 1, the display will alternately show the Electrolux logo and the name of the device when the device is switched on. If this is the first time you have switched on the heater, you will first be prompted to select the interface language and then set the current date and time. When the initial setup is complete, the device will go into Stand by mode.
Standby mode (standby mode)
The heater does not heat water in this mode. The temperature in the tank and the current time are displayed.
Changing the display orientation
Since a horizontal If the unit is mounted vertically or horizontally, the orientation of the display can also be changed horizontally and vertically accordingly. To change the orientation, press buttons 1 and 2 simultaneously for a few seconds.
Icon color indication
- The element is grayed out and/or crossed out. This function is disabled and not selected:
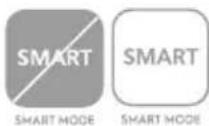
• Element and caption in white. This section is not selected:
- The item and the caption are in blue. This feature is enabled and not selected:
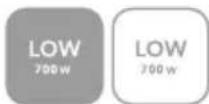
- The item is white on a blue background and the caption is blue. This function is selected:
Control interlock
To lock the control panel, press buttons 3 and 4 simultaneously, the screen will display the Locked icon.
To unlock the control panel, press buttons 3 and 4 as well, the screen will not show the Unlocked icon.
Heating temperature setting
Use buttons 3 and 4 to set the target heating temperature. Button 3 to decrease the value, button 4 to increase the temperature value. The available range is from 30 to 75°C.
No Frost—Anti-freeze function
This function keeps the tank temperature below 5^ C to prevent the tank from freezing. This function is enabled by default.
Bacteria Stop
The professional antibacterial heat treatment function of the water stops the proliferation of bacteria, such as ligionella, which grow when the device is not used for a long time. The water in the appliance is heated to a temperature of 70°C and maintained at this temperature for 20 minutes. This function will be triggered if the temperature in the tank has not risen above 70°C for a week.
Timer
There are 3 timers available for setting in the device. They can be activated, deactivated and changed. By default, these timers are off. To change Timer 1, select it and press button 2, you will go to the settings of this timer. The time for which the hot water is needed and the timer repeat, as well as the switching on and off of Timer 1, are available for setting. Changing the settings of Timers 2 and 3 is done in the same way.
By default, all three timers have the same settings:
- the time by which the water must be heated—17:00;
- repetition—once;
- timer off.
Smart function
When Smart is active, the water heater remembers your settings for 7 days and then repeats them for the next 7 days. The device remembers
The function allows you to prepare the water at the desired temperature only when you need it, thereby saving energy costs. The function allows you to prepare water at the desired temperature only when you need it, thereby saving energy costs. The rest of the time the temperature in the tank is maintained at 40^ C.
Display brightness
Display backlight brightness control: 50 or 100%.
Auto Display Off-Display Timeout
Set the display timeout. When this function is activated, there are three selectable values: 15, 30 and 60 seconds. The default setting is 30 seconds.
Date and time
This section allows you to set the current date and time of the device.
The correct time and date are necessary for the Timer and Smart functions to work properly.
Language
The interface language setting is available in English.
Diagram of the SI EEC settings menu
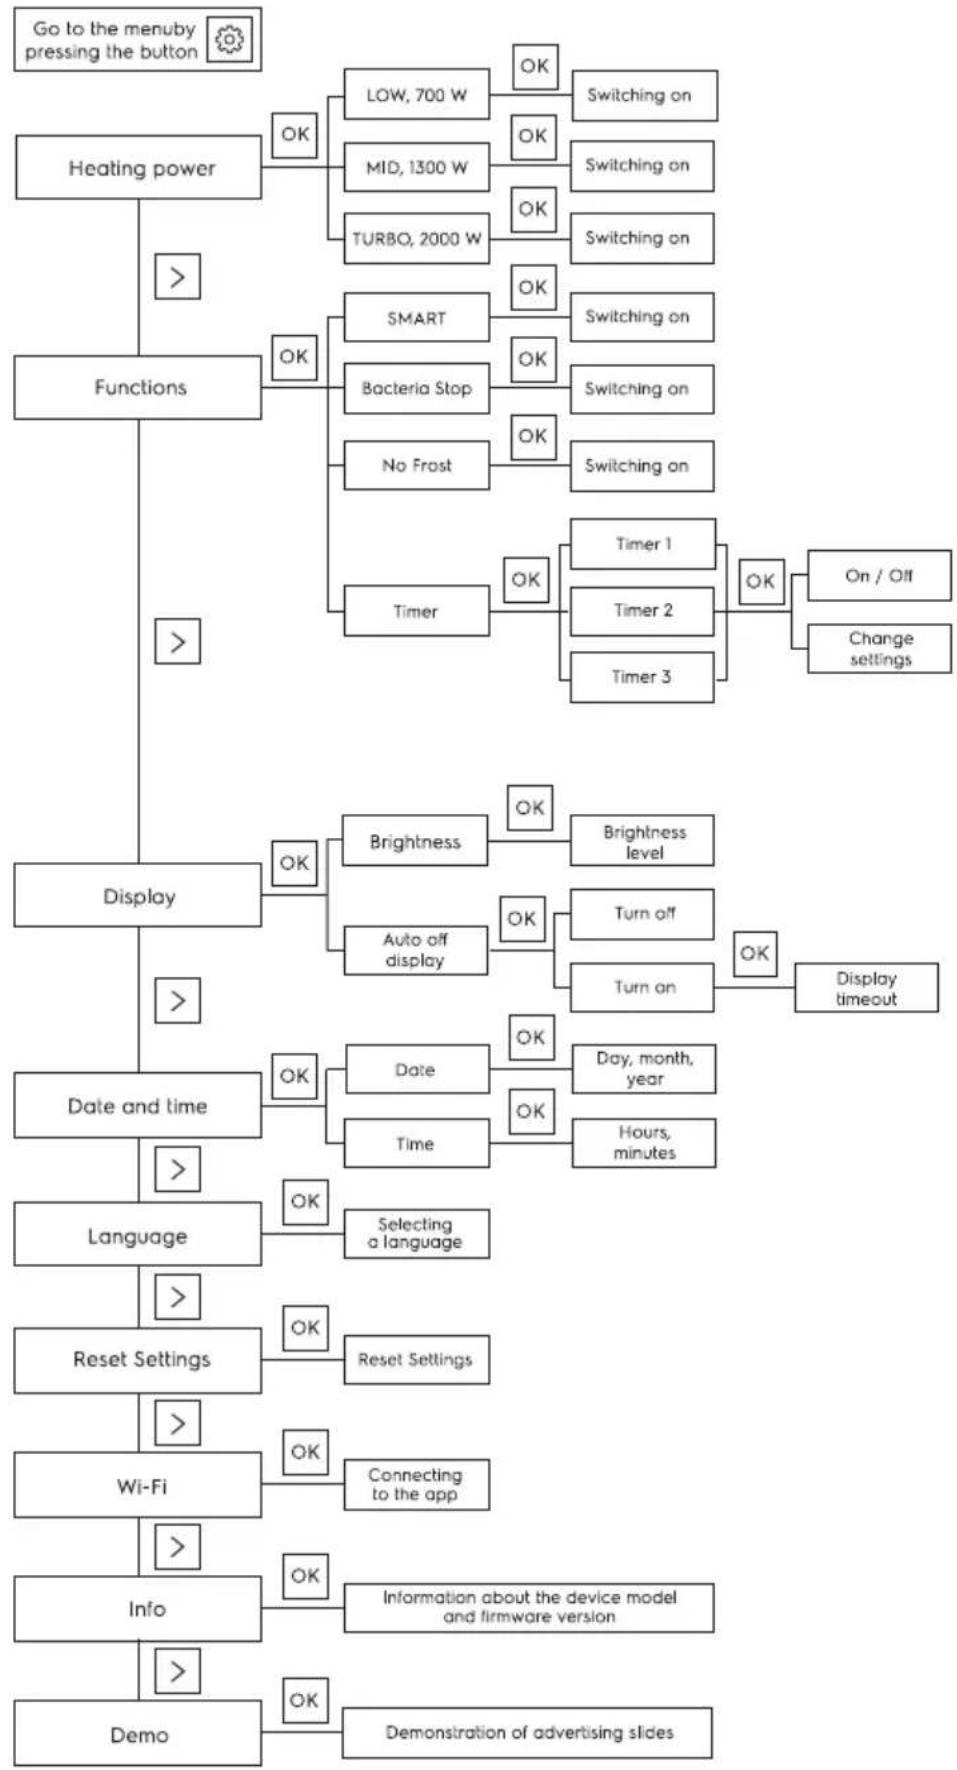
flowchart
graph TD
    A["Go to the menuby pressing the button"] --> B["Heating power"]
    B --> C[">"]
    B --> D["Functions"]
    D --> E[">"]
    D --> F["Display"]
    F --> G[">"]
    F --> H["Date and time"]
    H --> I[">"]
    H --> J["Language"]
    J --> K[">"]
    J --> L["Reset Settings"]
    L --> M[">"]
    L --> N["Wi-Fi"]
    N --> O[">"]
    N --> P["Info"]
    P --> Q[">"]
    P --> R["Demo"]

    B --> S["OK: LOW, 700 W"]
    B --> T["OK: MID, 1300 W"]
    B --> U["OK: TURBO, 2000 W"]

    S --> V["OK: SWITCHing on"]
    T --> W["OK: SWITCHing on"]
    U --> X["OK: Switching on"]

    D --> Y["OK: SMART"]
    D --> Z["OK: Bacteria Stop"]
    D --> AA["OK: No Frost"]

    Y --> AB["OK: SWITCHing on"]
    Z --> AC["OK: Switching on"]

    D --> AD["OK: Timer"]
    AD --> AE["Timer 1"]
    AD --> AF["Timer 2"]
    AD --> AG["Timer 3"]

    AE --> AH["OK: On / Off"]
    AF --> AI["Change settings"]

    F --> AJ["OK: Brightness"]
    F --> AK["OK: Brightness level"]
    F --> AL["OK: Auto off display"]
    AL --> AM["OK: Turn off"]
    AL --> AN["OK: Turn on"]

    H --> AO["OK: Date"]
    H --> AP["OK: Day, month, year"]
    H --> AQ["OK: Time"]
    AQ --> AR["OK: Hours, minutes"]

    J --> AS["OK: Selecting a language"]

    L --> AT["OK: Reset Settings"]

    N --> AU["OK: Connecting to the app"]

    P --> AV["OK: Information about the device model and firmware version"]

    R --> AW["OK: Demonstration of advertising slides"]
Water heater installation
Make sure that the electric water heater is installed using original parts provided by the manufacturer, which can support the weight of the water heater filled with water. Do not mount the water heater on the bracket until do not make sure that the attachment is securely fastened. Otherwise, the electric water heater could fall
The following table describes the labels in this manual and the corresponding labels in this manual.
When selecting locations for mounting bolt holes, make sure that both sides of the bathroom walls
or other room up to the water heater body there is a clearance of at least
0.2 m and at least 0.5 m on the pipe connection side to facilitate access for maintenance when necessary.
If the water heater is supplied directly from wells, wells or water towers, a coarse filter for the cold water entering the water heater must be used to operate the water heater.
The coarse filter can be purchased from specialty stores. If the coarse filter is not installed, the product warranty is not valid.
The electric water heater must be installed on a solid vertical surface (wall). The installation of SI EEC series water heaters is greatly facilitated by the possibility to install them both vertically and horizontally anywhere in your home, in a heated (!)
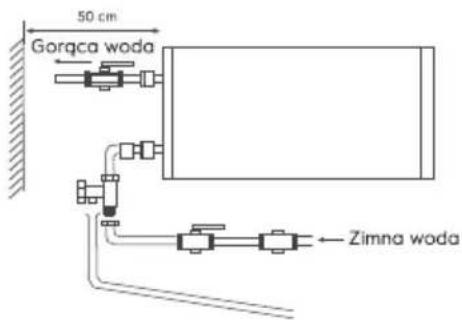
room. It is advisable to install the heater as close as possible to where the hot water is used, because the shorter the length of the pipes, the less heat is lost. As shown in Fig. If the heater is installed horizontally, the supply pipes should be on the right-hand side. When installing the heater close to a wall, leave the recommended clearance for maintenance. Do not install the heater on a horizontal surface and up against the floor. After selecting the mounting location, locate the two fastening bolts with hooks (depending on the specifications of the selected product). Make two holes in the wall to the required depth corresponding to the size of the mounting bolts, insert the screws, rotate the hook upwards, tighten the nuts firmly and then install the electric water heater on it (see Fig. 4). If the bathroom is too small to accommodate the water heater, it can be installed in any other room, protected from direct sunlight and rain.
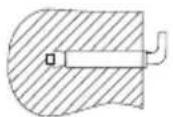
Fig. 4. Mounting anchor for mounting.
Connecting to the water supply
To connect the water heater to the water mains use pipes with a diameter of G1/2.

Warning!
It is not recommended to use any additional materials for the installation of the flexible hose and the safety valve that are not included in the water heater. The coupling nut of the flexible hose has a rubber gasket that ensures a tight connection between the hose and the safety valve. When tightening, avoid sudden jerking forces and limit the tightening torque to 25-30 N*m.
Install complete rubber gaskets on the ends of the threaded connections to prevent leaks when connecting the piping.
If you want to implement a water supply system for several water points, use the connection method (see Fig. 5).
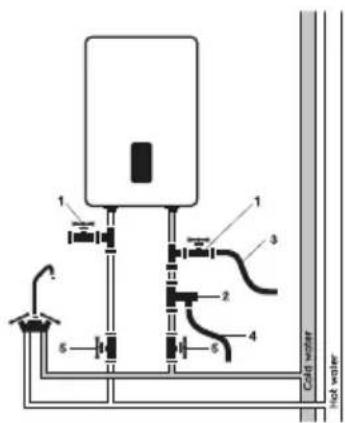
Fig. 5
- Tees
- Relief valve
- Drain tube
- Drain hose
- Valves

Warning!
If the appliance is installed horizontally, the water supply pipes must be on the left, placement of the supply pipes on the right is not allowed!
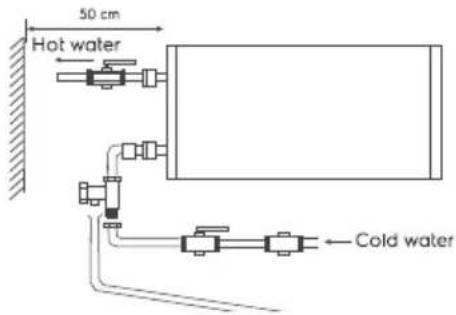
Fig. 6
Connecting to the power grid
All storage water heaters of the SI EEC series are designed to connect to an electrical network with a single-phase voltage of 230 V. Before connecting, make sure that the power supply at the place of connection complies with the specifications on the rating plate of the appliance. Observe the applicable electrical safety regulations when installing the heater. When installing the water heater in the bathroom or toilet, take into account the restrictions related to the existence of prohibited and protective volumes (spaces).
Prohibited volume is the space limited by the tangential and vertical planes in relation to the outer edges of the bathtub, toilet or shower unit and the plane above them, or above the floor if the plumbing is mounted on the floor, at a height of 2.25 m.
A protective volume is a space whose enclosing horizontal planes coincide with the planes of the forbidden volume, and whose vertical planes are 1 meter from the corresponding planes of the forbidden volume.
Calculated data for copper
Selection of cable (wire) cross-section by power and length in copper, U = 230 V, one phase
| R, kW | 1 | 2 | 3 | 3,5 | 4 | 6 | 8 |
| I, A | 4,5 | 9,1 | 13,6 | 15,9 | 18,2 | 27,3 | 36,4 |
| Cross-section of current-carrying core, mm^2 | 1 | 1 | 1,5 | 2,5 | 2,5 | 4 | 6 |
| Maximum permissible cable length at specified cross-section, m | 34,6 | 17,3 | 17,3 | 24,7 | 21,6 | 23 | 27 |
Operation
Filling with water
In order to fill the tank completely with water, it is necessary:
• open the hot water tap on the faucet;
- open the water supply valve to the water heater;
• wait for the water to come out of the faucet;
- close the hot water tap on the faucet and make sure there are no leaks.
If water flows from the hot water tap—the tank is full of water. Only then can the tank be connected to the power grid.
In the case of uncertainty as to whether there is water in the water heater, do not connect it to the mains.
Connecting to the power grid

Watch out!
Connect to the mains only after filling with water (the opposite may cause burning of the heating element and damage to the device).
Plug the water heater into an outlet, then the display on the panel lights up control. This indicates that the water heater is switched on and is supplied with power. Set the desired water heating level from low to high using the heating temperature control. The water heating temperature will be shown on the display as it heats up. Heating water is switched off automatically when the set temperature is reached and is switched on to reheat automatically. When the water temperature reaches the set temperature, the heating will stop.
Installation dimensions and dimensions
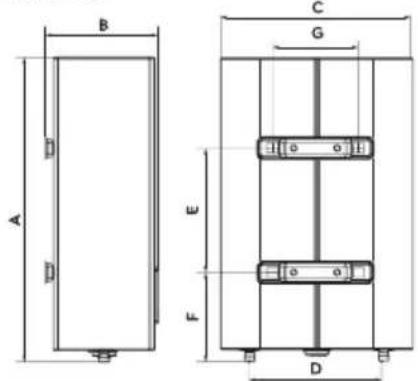
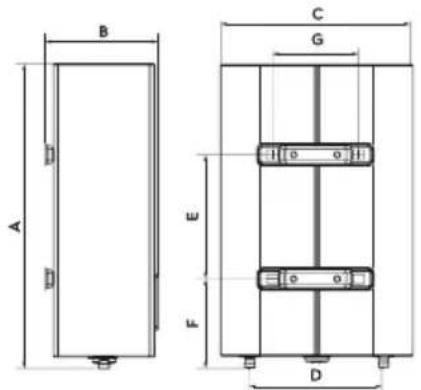
Fig. 7
| Options/Model | EWH 30 SI EEC/EWH 30 SI BE EEC/EWH 30 SI SE EEC | EWH 50 SI EEC/EWH 50 SI BE EEC/EWH 50 SI SE EEC | EWH 80 SI EEC/EWH 80 SI BE EEC/EWH 80 SI SE EEC | EWH 100 SI EEC/EWH 100 SI BE EEC/EWH 100 SI SE EEC |
| A, mm | 635 | 970 | 920 | 1135 |
| B, mm | 250 | 250 | 333 | 333 |
| C, mm | 435 | 435 | 555 | 555 |
| D, mm | 360 | 360 | 430 | 430 |
| E, mm | 280 | 550 | 430 | 600 |
| F, mm | 201 | 201 | 267 | 267 |
| G, mm | 197 | 197 | 197 | 197 |
Specifications
| Options/Model | EWH 30 SI EEC/EWH 30 SI BE EEC/EWH 50 SI BE EEC/EWH 80 SI EEC/EWH 100 SI EEC/EWH 30 SI SE EEC | EWH 50 SI EEC/EWH 50 SI BE EEC/EWH 80 SI BE EEC/EWH 80 SI SE EEC | EWH 80 SI EEC/EWH 100 SI BE EEC/EWH 100 SI SE EEC |
| Nominal (usable) volume, l | 25 | 41 | 65 |
| Rated power, W | 700/1300/2000 | ||
| Nominal voltage, V-Hz | 230-50 | ||
| Rated current, A | 8,7 | ||
| Minimum water pressure, bar | 80 000 (0,8) | ||
| Maximum water pressure, bar* | 600 000 (6) | ||
| Maximum water temperature, °C | 75 | ||
| Heating time from 10 to 75 °C**, min. | 99 | 162 | 256 |
| Protection against electric shock | 1 | ||
| Moisture protection | IPX4 | ||
| Energy efficiency class*** | A | B | B |
| Device dimensions (W×H×D), mm | 435×635×260 | 435×970×260 | 555×920×350 |
| Package dimensions (W×H×D), mm | 680×485×280 | 1010×485×280 | 970×605×362 |
| Net weight, kg | 15,3 | 22,6 | 29,0 |
| Gross weight, kg | 17,0 | 25,0 | 32,6 |
* At the maximum pressure, the excess pressure is released through the pressure relief valve. If the water mains pressure exceeds 6 bar (nominal working pressure), a pressure reducing valve must be installed.
** Heating times are given at full heating power and are based on ideal ambient conditions.
*** Energy efficiency calculated for vertical installation.
The manufacturer reserves the right to make changes.
RCD (Ground Fault Interrupter)
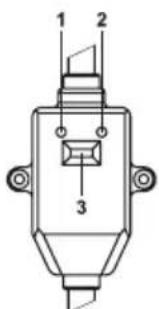
Fig. 8
• 100% prevention of electric shock.
- Follow the installation instructions when connecting the electric water heater household battery heater.
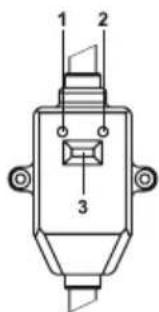
• The Power indicator (1) will light up if the RCD is not activated.
- Press the TEST button (2) to test the RCD. Power indicator (1) will be disabled.
- Press button (3) to reset the RCD.
Troubleshooting
| Refusals | Reasons | Fixing |
| No water coming out of the hot water tap | 1. The water supply is cut off.2. The water pressure is too low.3. The water-wire inlet valve is blocked. | 1. Wait for the water supply to resume.2. Use the water heater when the water pressure increases again.3. Open the water inlet tap. |
| Temperature, of hot water supplied exceeds the permissible level of 75°C | Temperature control system failure (red indicator stays on) | 1. The water heater must be immediately disconnected from the mains.2. Contact a service technician for repairs. |
| Error E1 is displayed on the display | No water in the tank | 1. Wait for the water supply to resume.2. Open the water inlet tap. |
| Error E2 appears on the display | 1. The thermostat is damaged.2. The heating element is damaged.3. Faulty electronic board. | Contact a service technician |
Care and maintenance

Warning!
Always disconnect the water heater from the power supply before servicing.
The heater does not require additional maintenance. It is necessary to wipe the body from time to time with a soft cloth or a damp sponge in order not to damage the heater body. Do not use harsh chemicals.
Active anode
SI EEC series water heaters are equipped with an active (electronic) anode. Anode is a titanium rod and provides corrosion protection whenever the water heater is connected to the mains. If error E6 or E7 appears on the display, the electronic anode is not functioning and the water heater is not protected against corrosion. Contact a service center to solve the problem.
Heating element (TEH)
Tubular electric heater (TEH) is designed to heat water in the inner tank by converting electrical energy into heat. The formation of limescale (scale) on its surface can lead to poor heat transfer, overheating and premature failure of the heating element. Regularly inspect and, if necessary, descale its surface with a descaling agent. The heating element warranty is void if one or more of the following conditions are met:
• the hardness of the water exceeds 25 °F,
• the thickness of the scale layer on the
surface of the heating element is more than 5 mm.

Watch out!
Scale build-up on the heating element and sludge in the internal tank can lead to water heater failure and is grounds for refusal of warranty service. Regular maintenance is a preventive measure and is not covered by the warranty.
The pressure relief device should be checked for operation at regular intervals to remove lime deposits. It is not allowed to install switches, outlets, and sockets in the forbidden space and lighting fixtures. Circuit breakers are not permitted in the safety space, but grounded sockets may be installed.
The water heater should be installed outside the prohibited volume so that it is not exposed to jets of water. A properly rated circuit breaker should be installed to ensure safe operation of the water heater. For daily use, it is advisable to keep the water heater plugged in, as the thermostat only turns the heat on when it is required to maintain the set temperature. Have your water heater serviced regularly by an authorized service center.

Never remove the water heater cover without first disconnecting it from the power supply.
Transport and storage
Water heaters in the manufacturer's packaging can be transported by all types of covered transport in compliance with the rules for the transportation of goods applicable for this type of transport. Transportation conditions are at temperature from minus 50 to plus 50°C and at relative humidity of up to 80% at plus 25°C. During transportation, any possible impact and movement of packaged water heaters inside the vehicle should be excluded. Transportation and stacking should be done in accordance with the handling signs indicated on the packaging. Water heaters have to be stored in the manufacturer's packaging under storage conditions from +1°C to +40°C and relative humidity up to 80% at 25°C).
Recycling

The time-expired appliance can't be disposed with household waste (2012/19/EU).
Warranty
Warranty service is performed according to the terms specified in the "Warranty" section.
Warranty:
- Warranty period for the item is two years from the purchase date. If any defects occur due to defects in materials and/or workmanship during this two-year warranty period, the item should be repaired or replaced.
- Free maintenance or replacement is possible only in case if convincing evidence is provided, for example a stub, which confirms that the day when the service is requested, is within the warranty period.
- The warranty does not cover products and/or parts of the product that are subjects to deterioration, may be considered as expendable supplies or which are made of glass.
- The warranty is void if the defect is caused by damage ensuing by misuse, poor maintenance (for example, a failure occurred due to ingress of foreign objects or liquids) or if changes or repairs were performed by persons not authorized by the Manufacturer.
- For the correct use of the product, the user must strictly follow all included in the manual instructions, and also must avoid any action or manipulation described as unwanted or indicated so in this manual.
- These warranty restrictions do not affect your statutory rights.
Support:
The support during and after the warranty period is available in all countries where the product is officially distributed. Please contact your dealer for help.
Date of manufacture
The date of manufacture is indicated on a sticker on the body of the appliance, and also encrypted in Code-128. The date of manufacture is determined as follows:

month and year of production
Do not remove and keep safe the serial number on the device's body. If the serial number sticker is lost or damaged, it will not be possible to restore the production date if necessary.
Importer:
Manufacturer: CladSwiss AG,
Bahnhofstrasse 27, 6300 Zug, Switzerland.
E-mail: info@cladswiss.com
Made in PRC.
Electrolux is a registered trademark used under license from AB Electrolux (publ.).
The manufacturer reserves the right to modify the design and characteristics of the device.
This manual may contain technical and typing errors. Changes to technical characteristics and assortment are subject to change without notice.
Mistakes and typing errors may be permitted in texts and numeric notations.
Product design and technical data may vary from the one pictured on the packaging.
Please refer to a sales consultant for more detailed information.
ZAWARTOŚĆ
- ZASADY BEZPIECZEŃSTWA....31
- PRZEZNACZENIE....32
- KOMPLETOWANIE 32
- URZADZENIE URZADZENIA 33
- PANEL STEROWANIA 34
- MONTAŻ PODGRZEWACZA WODY 37
- PRZYŁĄCZE DO WODOCIĄGU 37
- PODŁĄCZENIE DO SIECI ELEKTRYCZNEJ 38
- EKSPLOATACJA 38
- WYMIARY I WYMIARY INSTALACYJNE....39
- SPECYFIKACJE 39
- RCD (URZADZENIE ZABEZPIECZAJACE) 39
- ROZWIAZYWANIE PROBLEMÓW....40
- PIELEGNACJA I KONSERWACJA 40
- TRANSPORT I MAGAZYNOWANIE 41
- UTYLIZACJA 41
- GWARANCJA 41
- DATA PRODUKCJI....41
MYŚLIMY O WAS
Dziękujemy że kupili urządzenia Electrolux. Wybrali Państwo produkt poparty dziesięcioleciami doświadczenia zawodowego i innowacji.
Wyjątkowy i stylowy, stworzony z troską o państwie. Dlatego za każdym razem, gdy go będzie używać, możecie być pewni, że efekty zawsze będą doskonałe.
Witamy w Electrolux!
Na naszej stronie internetowej możesz:

Znależć rekomendacje produktów, instrukcje obsługi, informacje o konserwacji: http://www.home-comfort.com/support/

Sprzedając to urządzenie, sprzedawca powinie wypełnić rozdział „Szczegóły produktu”, co się znajduje na wewnętrznej stronie tylnej okładki niniejszej instrukcji.
Używane symbole
⚠️ Uwaga/Ważne informacje dotyczące bezpieczeństwa
i Generalne informacje i zalecenia
Serwis gwarancyjny jest wykonywany na warunkach określonych w punkcie "Gwarancja".
Uwaga:
W tekście tej instrukcji akumulacyjny elektryczny podgrzewacz wody może mieć takie nazwy techniczne jak urządzenie, device, aparat itp.
Zasady bezpieczeństwa

Uwaga!
Zabrania się używania przenośnych gniazd. Nieprawidłowa instalacja i obsługa elektrycznego podgrzewacza wody może spowodować wypadki lub szkody majątkowe.
- Gniazdo zasilania musi być bezpiecznie uziemione. Prąd znamionowy gniazda nie powinien być niższy 10 A. gniazdo i wtyczka powinny być zawsze suche, aby zapobiec zwarciom w sieci elektrycznej.
- Ściana, na której zainstalowany jest podgrzewacz wody, musi być przystosowana do obciążenia dwukrotnie większego niż całkowita masa podgrzewacza wody wypełnionego wodą.
- Zawór zwrotny bezpieczeństwa należy zainstalować w miejscu wlotu zimnej wody (patrz rys. 1).
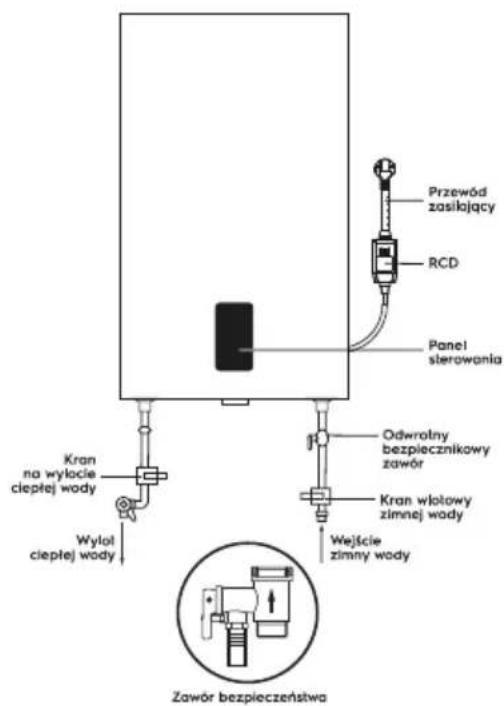
Rys.1
- Przy pierwszym użyciu podgrzewacza wody (lub przy pierwszym użyciu po konserwacji lub czyszczeniu) nie należy włączać podgrzewacza wody do momentu całkowitego napełnie nia go wodą. Podczas napełniania zbiornika podgrzewacza wody należy otworzyć kran
ciepłej wody, aby spuścić powietrze. Po napełnieniu zbiornika wodą i wypłynięciu wody z kranu kran można zamknąć.
- Podczas podgrzewania wody z otworu wylotowego ciśnienia zwrotnego zaworu bezpieczeństwa może wypływać woda. To normalne zjawisko. Jednak w przypadku dużych wycieków należy skontaktować się z technikami serwisowymi. W żadnym wypadku nie należy blokować otworu zwalniającego ciśnienie; w przeciwnym razie może to spowodować awarię podgrzewacza wody.
- Na Otwór wylotowy ciśnienia w zaworze bezpieczeństwa (pozycja 3 na rys. 5) konieczne jest zainstalowanie rury spustowej i wyprowadzenie jej do kanalizacji w przypadku spuszczenia wody i przepełnienia nadciśnienia*. Rura spustowa połączona z otworem uwalniającym ciśnienie powinna być skierowana w dół.
- Temperatura wody wewnątrz podgrzewacza wody może osiągnąć 75°C. Aby uniknąć poparzeń, można regulować temperaturę wody za pomocą kranu miksera.
Odpływ wody:
Z podgrzewacza wody należy całkowicie spuścić wodę, jeśli nie będzie on używany przez długi czas lub temperatura w pomieszczeniu, w którym jest zainstalowany, może spaść poniżej 0°C. odpływ można wykonać za pomocą zaworu bezpieczeństwa, podczas gdy who—możliwe jest wyciek spod trzpienia zaworu.
Do odpływu można zapewnić Trójnik z zaworem między zaworem a tuleją (poz. 1, rys. 5).
Przed spuszczeniem wody z podgrzewacza wody nie zapomnij:
- Odłączyć zasilanie od urządzenia.
- Upewnij się, że woda wewnątrz zbiornika ma bezpieczną temperaturę.
- Odciąć dopływ zimnej wody do zbiornika zamykając zawór odcinający.
- Odciąć dopływ ciepłej i zimnej wody do mieszkania
- Otwórz dopływ ciepłej wody na mikserze, aby zmniejszyć ciśnienie wewnątrz zbiornika.
- Otworzyć zawór odcinający na trójniku zamontowanym na króćcu wylotowym
ciepłej wody z podgrzewacza wody (w przypadku, gdy Trójnik został zainstalowany), w przeciwnym razie zdemontować rurę przyłączeniową na wylocie z podgrzewacza wody.
- Podłączyć wąż spustowy (poz. 3 na rys. 5) do zaworu odcinającego.
Na trójniku na Włocie Zimnej Wody do podgrzewacza wody i skieruj go do kanalizacji lub do miejsca odprowadzania wody. - Otwórz zawór odcinający i poczekaj, aż woda całkowicie spłynie.

Uwaga!
Instalacja zaworu bezpieczeństwa zawartego w dostawie jest koniecznością. Zabrania się instalowania jakichkolwiek zaworów odcinających między zaworem bezpieczeństwa i wlotem do zbiornika oraz zablokowanie otworu spustowego zaworu bezpieczeństwa.
- Nie pozostawiaj podgrzewacza wody wypełnionego wodą bez zasilania i podgrzewania wody w pomieszczeniu, w którym temperatura może być niższa niż 0°C.
- W przypadku długotrwałej nieobecności, prac naprawczych, technologicznych i pro-filaktycznych na linii zaopatrzenia w wodę, konieczne jest odcięcie poszczególnych zaworów odcinających na linii zaopatrzenia w zimną wodę do podgrzewacza wody i na linii wylotowej gorącej wody, a także wyłączenie podgrzewacza wody i odłączenie od zasilania, wyjmując wtyczkę z gniazdka.
- W przypadku uszkodzenia jednej z części podgrzewacza wody należy skontaktować się z technikami serwisowymi w celu przeprowadzenia naprawy. Należy używać wyłącznie części zamiennych dostarczonych przez producenta.
- Urządzenie nie jest przeznaczone do użytku przez osoby (w tym dzieci) o zdolnościach fizycznych, zmysłowych lub umysłowych lub w przypadku braku doświadczenia życiowego lub wiedzy, chyba że są pod nadzorem lub pouczeni o korzystaniu z urządzenia przez osobę odpowiedzialną za ich bezpieczeństwo. Dzieci powinny być nadzorowane, aby zapobiec zabawom z urządzeniem.
Przeznaczenie
Elektryczny podgrzewacz wody typu akumulacyjnego jest przeznaczony do podgrzewania zimnej wody pochodzącej z sieci wodociągowej. Stosuje się wyłącznie do celów domowych woda z podgrzewacza wody nie jest przeznaczona do picia i gotowania.
Instalacja i pierwsze uruchomienie podgrzewacza wody musi być wykonane przez wykwalifikowanego specjalistę, który może być odpowiedzialny za prawidłowość instalacji i wydać zalecenia dotyczące użytkowania podgrzewacza wody.
Podczas łączenia należy przestrzegać obowiązujących standardów i przepisów. Przed zainstalowaniem podgrzewacza wody upewnij się, że elektroda uziemiająca gniazda jest prawidłowo uziemiona. W przypadku braku elektrody uziemiającej w gnieździe konieczne jest uziemienie podgrzewacza wody oddzielnym przewodem uziemiającym do zacisku uziemienia na łączniku kołnierza elementu grzejnego. W przypadku braku uziemienia zabrania się instalacji i eksploatacji produktu.
Kompletowanie
Elektryczny podgrzewacz wody typu zbiorczego jest wyposażony w podstawowe elementy do instalacji i podłączenia. W skład zestawu podgrzewacza wody wchodzi:
- Podgrzewacz wody z przewodem zasilającym—1 szt.;
• 1 x zawór bezpieczeństwa;
• RCD z instrukcją użytkowania—1 szt.;
• kotwy montażowe do montażu.
Dia 30 L-50 L-2 szt.; dla 80 l, 100 L-4 szt.;
• 1 x Instrukcja obsługi;
• karta gwarancyjna (w instrukcji)—1 szt.
Urządzenie urządzenia
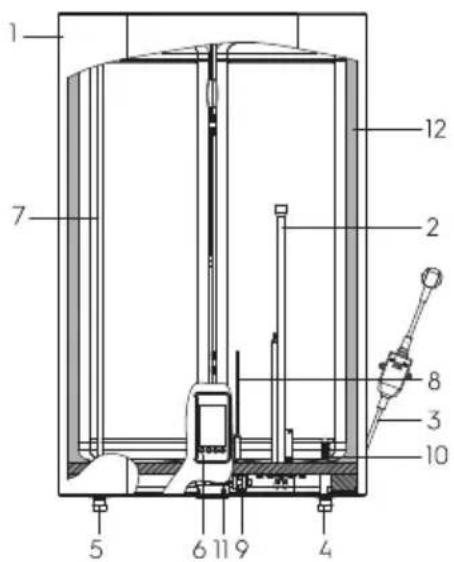
Rys. 2
- Obudowa
- Obudowa suchego elementu grzejnego
- Przewód zasilający z RCD
- Wlot zimnej wody
- Wylot ciepłej wody
- Panel sterowania
- Rura doprowadzająca ciepła wodę
- Anoda elektroniczna
- Termostat ochronny
- Rura wlotowa zimnej wody do zbiornika (z dyfuzorem)
- Miejsce na kolumnę
- Izolacja cieplna
Automatyczna kontrola temperatury wody:
Po otwarciu kranu ciepłej wody na mikserze na wylocie podgrzewacza wody zimna woda zaczyna płynąć do wlotu. Woda w zbiorniku miesza się, a jej temperatura spada. Czujnik termostatu reaguje na obniżenie temperatury wody, element grzewczy (ten) włącza się automatycznie i podgrzewa wodę do określonej temperatury. Gdy temperatura osiągnie ustawioną wartość, grzałka automatycznie się wyłącza.
Poziomy ochrony podgrzewacza wody:
- zabezpieczenie przed przegrzaniem;
- zabezpieczenie przed przekraczającym normę ciśnieniem hydraulicznym.
• RCD (urządzenie zabezpieczające).
Stalowe zbiorniki wewnętrzne ze specjalną powłoką ochronną są wykonane zaawansowaną metodą elektrostatycznego emaliowania na sucho. Właściwości szkliwa:
- zwiększona przyczepność i wysoka plastyczność (hartowana w temperaturze 850°C);
- rozszerza się lub kurczy przy zmianach temperatury w tej samej proporcji co ściany zbiornika wewnętrznego, nie tworząc mikropęknięć, w których może powstać ognisko korozji.
Jako dodatkową ochronę zbiornika wewnętrznego przed korozją, Podgrzewacz wody jest wyposażony w anodę magnezową i elektroniczną anodą tytanową. Suchy termiczny element grzejny (ten) jest umieszczony w metalowych ośtonach ochronnych, które eliminują bezpośredni skok elementów grzejnych z wodą, odpowiednio na elementach grzejnych nie powstaje szumowina, co zwiększa ich żywotność i wydłuża żywotność.
Podgrzewacz wody ma trzy tryby mocy grzewczej:
- LOW (700W)
. MID (1300W)
• TURBO (2000W).
W zależności od temperatury wody obraz tła jest wyświetlany w następujący sposób:
- Od 5 do 35°C—spokojna powierzchnia wody;
. Od 36 do 55°C—woda falujqca;
• 56 do 75°C—wrząca woda, bąbelki.
W zależności od temperatury wody wskaźnik ogrzewania jest wyświetlany w następujący sposób:
- Od 5 do 30°C—wskazanie koloru niebieskiego;
- Od 31 do 50°C—wskazanie koloru pomarańczowego;
- Od 51 do 55°C—wskazanie koloru zielonego;
- 56 do 75°C—wskazanie koloru czerwonego.
Panel sterowania
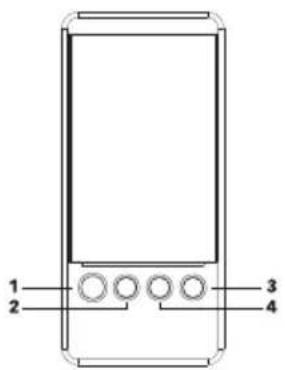
Rys. 3
1. Włączanie / wyłączanie / cofanie.
Przycisk włączania / wyłączania urządzenia. Przycisk powrołu do poprzedniej sekcji menu.
2. MENU, OK.
Przycisk wejścia do menu, przycisk potwierdzenia wyboru.
3. Przycisk nawigacji w menu: w góre, w lewo.
4. Przycisk nawigacji w menu: w dół, w prawo.
Wskaźniki informacyjne na wyświetlaczu
| Blokada przycisków wyświetlacza | |
| Odblokowanie przycisków wyświetlacza | |
| 14:45 | Wyświetlanie aktualnego czasu |
| Połączenie przez Wi-Fi | |
| Wyświetlanie anody elektrycznej | |
| MID | Wyświetlanie aktualnej mocy grzewczej |
| 54°C | Wyświetlanie wartości temperatury docelowej |
| 52°C | Wyświetlanie wartości bieżącej temperatury |
| Włączanie funkcji Timera | |
| BS | Włączanie funkcji Bacteria Stop |
| NF | Włączanie funkcji No Frost |
| STANDBY | Włączanie trybu gotowości |
| SMART | Włączanie funkcji Smart |
| HEATING UP | Wyświetlanie procesu ogrzewania |
Włączanie urządzenia
Naciśnij i przytrzymaj przycisk 1, po włączeniu urządzenia na wyświetlaczu pojawi się logo Electrolux, nazwa urządzenia. Jeśli włączysz Podgrzewacz wody po raz pierwszy, najpierw urządzenie wyświetlii monit o wybranie języka interfejsu a następnie skonfigurować aktualną datę i godzinę. Po zakończeniu konfiguracji podstawowej urządzenie przejdzie w tryb Stand by.
Tryb Standby (STANDBY)
W tym trybie Podgrzewacz wody nie ogrzewa wody. Wyświetlacz pokazuje temperaturę w zbiorniku i aktualny czas.
Zmiana orientacji wyświetlacza
Ponieważ przewidziana jest pozioma i pionowy montaż urządzenia, orientacja wyświetlacza może być również zmieniona odpowiednio na poziomą i pionową. Aby zmienić orientację, należy przytrzymać jednocześnie przyciski 1 i 2 na kilka sekund.
Wyświetlanie kolorów ikon
- Element jest szary i / lub przekreślony. Ta funkcja jest wyłączona i nie jest zaznaczona:
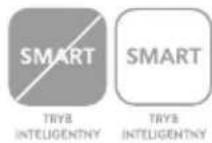
- Element i podpis w kolorze białym. Ta sekcja nie jest wybrana:
- Element i podpis w kolorze niebieskim. Ta funkcja jest włączona i nie jest wybrana:
- Element w kolorze białym na niebieskim tle i podpis w Kolorze Niebieskim. Ta funkcja jest wybrana:

Blokada sterowania
Aby zablokować Panel sterowania, musisz jednocześnie przytrzymać przyciski 3 i 4, na ekranie pojawi się ikona zablokowane. Aby odblokować Panel sterowania, musisz również przytrzymać przyciski 3 i 4, na ekranie pojawi się ikona odblokowana.
Ustawienie temperatury grzania
Aby ustawić docelową temperaturę ogrzewania, użyj przycisków 3 i 4. Przycisk 3, aby zmniejszyć wartość, przycisk 4, Aby zwiększyć wartość temperatury. Dostępny zakres od 30 do 75°C.
No Frost—Funkcja "Anti-Frost" ta funkcja utrzymuje temperaturę w zbiorniku co najmniej 5°C, zapobiegając zamarzaniu zbiornika. Domyślnie ta funkcja jest włączona.
Bacteria Stop
Funkcja profesjonalnej antybakteryjnej obróbki termicznej wody, pozwala zatrzymać namnażanie się bakterii, np. ligionelli, rozmrażających się przy długotrwałym nieużywaniu urządzenia. Woda w urządzeniu jest podgrzewana do temperatury 70°C. i utrzymywana na tym poziomie przez 20 minut. Ta funkcja będzie działać, jeśli temperatura w zbiorniku nie wzrośnie powyżej 70°C. w ciągu tygodnia.
Timer
Do Ustawienia w urządzeniu dostępne są 3 timery. Można je włączyć, wyłączyć i zmienić. Domyślnie te timery są wyłączone. Aby zmienić Timer 1 wybierz go i naciśnij przycisk 2, przejdiesz do ustawień tego timera. Do Ustawienia dostępny jest czas, do którego potrzebna jest gorąca woda i powtarzanie timera, a także włączanie i wyłączanie Timera 1. Zmiana ustawień timerów 2 i 3 w podobny sposób.
Domyślnie wszystkie trzy timery mają te same ustawienia wstępne:
- czas do którego należy ogrzać wodę—17:00;
- powtórka-raz;
- wyłączenie timera.
Funkcja Smart
Dzięki aktywnej funkcji Smart Podgrzewacz wody zapamiętuje ustawienia przez 7 dni i powtarza je przez następne 7 dni. Urządzenie zapo-miga czas, w którym wykonano odpływ wody i temperaturę ogrzewania. Funkcja umożliwia przygotowanie wody o wymaganej temperaturze tylko wtedy, gdy jest to potrzebne, oszczędzając w ten sposób koszty energii elektrycznej. Przez resztę czasu temperatura w zbiorniku jest utrzymywana na poziomie 40°C.
Jasność wyświetlacza
Regulacja jasności podświetlenia wyświetlacza: 50 lub 100%.
Automatyczne wyłączanie wyświetlacza- timeout dis-play
Ustawienie limitu czasu wyświetlania. Po włączeniu tej funkcji do wyboru są 3 wartości: 15, 30 i 60 sekund. Domyślnie ta funkcja jest włączona, 30 sekund.
Data i godzina
W tej sekcji dostępne są ustawienia bieżącej daty i godziny urządzenia. Prawidłowy czas i data są niezbędne do prawidłowego działania funkcji timera i Smart.
Język
Dostępne są następujące ustawienia języka interfejsu: angielski.
Schemat menu ustawień SI EEC
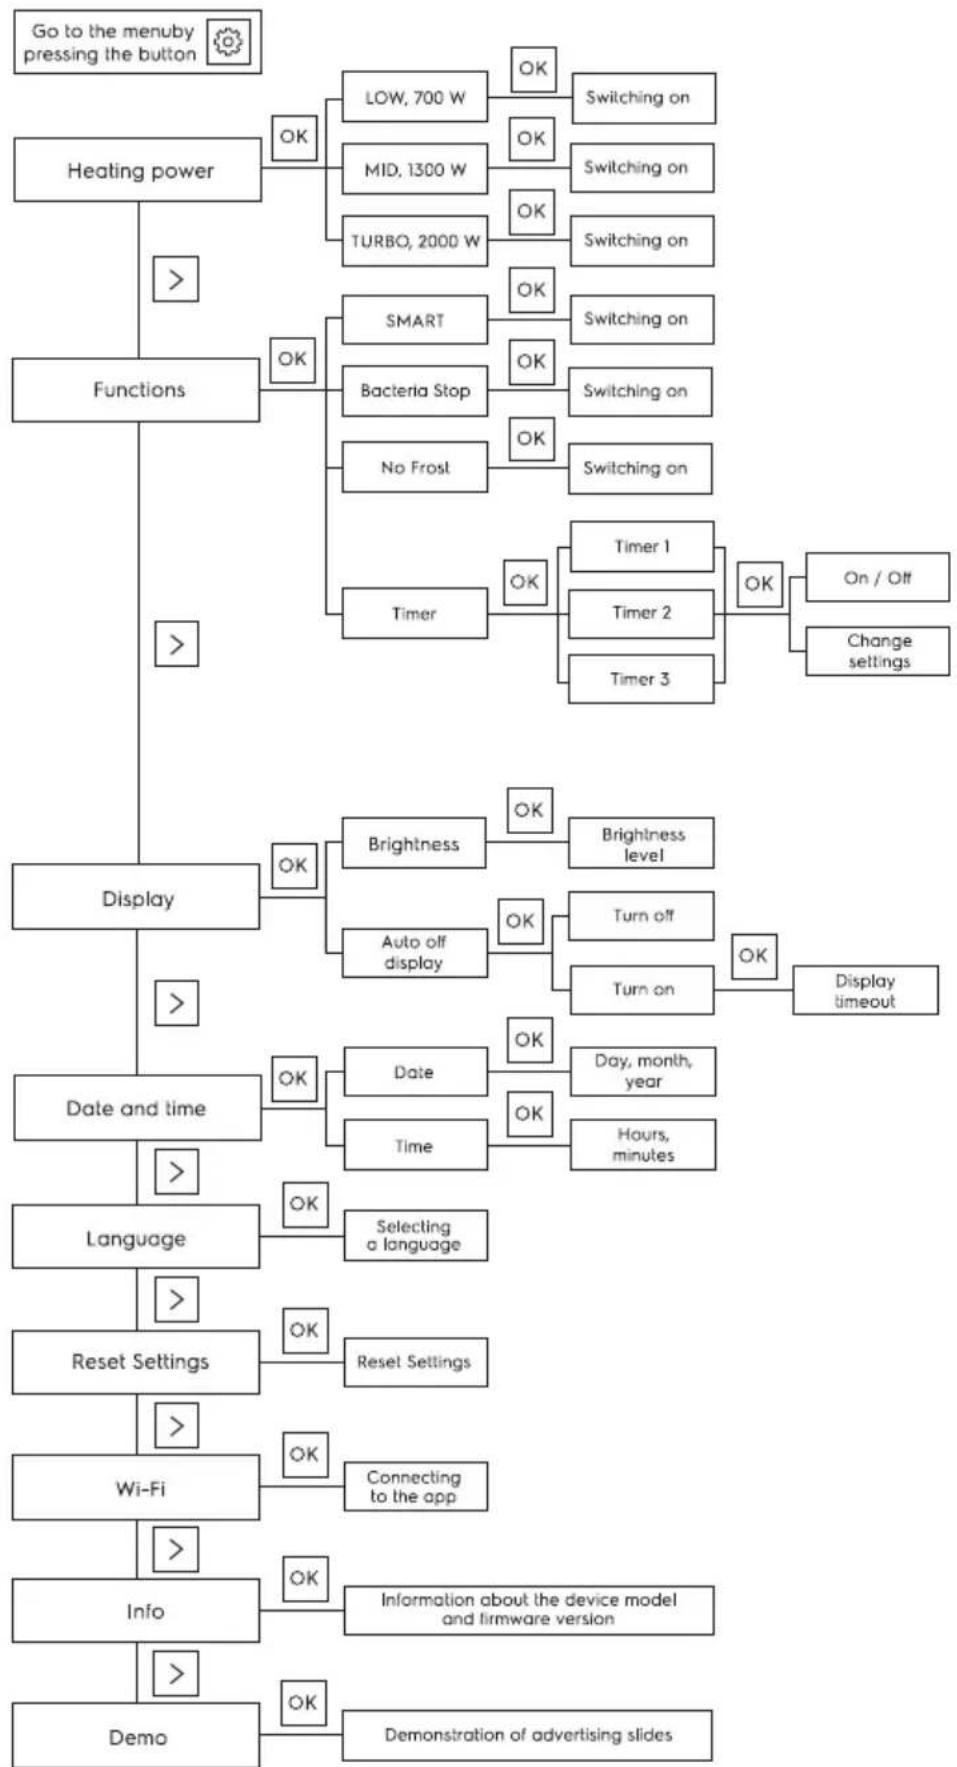
flowchart
graph TD
    A["Go to the menuby pressing the button"] --> B["Heating power"]
    B --> C[">"]
    B --> D["Functions"]
    D --> E[">"]
    D --> F["Display"]
    F --> G[">"]
    F --> H["Date and time"]
    H --> I[">"]
    H --> J["Language"]
    J --> K[">"]
    J --> L["Reset Settings"]
    L --> M[">"]
    L --> N["Wi-Fi"]
    N --> O[">"]
    N --> P["Info"]
    P --> Q[">"]
    P --> R["Demo"]

    B --> S["OK: LOW, 700 W"]
    B --> T["OK: MID, 1300 W"]
    B --> U["OK: TURBO, 2000 W"]

    S --> V["OK: SWITCHing on"]
    T --> W["OK: SWITCHing on"]
    U --> X["OK: SWITCHing on"]

    D --> Y["OK: SMART"]
    D --> Z["OK: Bacteria Stop"]
    D --> AA["OK: No Frost"]

    Y --> AB["OK: SWITCHing on"]
    Z --> AC["OK: Switching on"]

    D --> AD["OK: Timer"]
    AD --> AE["OK: Timer 1"]
    AD --> AF["OK: Timer 2"]
    AD --> AG["OK: Timer 3"]

    F --> AH["OK: Brightness level"]
    F --> AI["OK: Auto off display"]

    H --> AJ["OK: Date"]
    H --> AK["OK: Time"]

    J --> AL["OK: Selecting a language"]

    L --> AM["OK: Reset Settings"]

    M --> AN["OK: Connecting to the app"]

    R --> AO["OK: Information about the device model and firmware version"]

    R --> AP["OK: Demonstration of advertising slides"]

    S --> AQ["Switching on"]
    T --> AR["Switching on"]

    V --> AS["Switching on"]

    W --> AT["Switching on"]

    X --> AU["Switching on"]

    Y --> AV["Timer 1"]
    Y --> AW["Timer 2"]
    Y --> AX["Timer 3"]

    AD --> AY["OK: On / Off"]
    AD --> AZ["Change settings"]

    AJ --> BA["Display timeout"]
Montaż podgrzewacza wody
Upewnij się, że do instalacji elektrycznego podgrzewacza wody używane są oryginalne części dostarczone przez producenta, które mogą wytrzymać ciężar podgrzewacza wody wypełnionego wodą. Nie instaluj podgrzewacza wody na uchwycie, dopóki nie upewnij się, że uchwyt jest bezpiecznie zainstalowany. W przeciwnym razie Elektryczny podgrzewacz wody może spaść ze ściany, co spowoduje jego uszkodzenie lub może spowodować poważne obrażenia. Wybierając miejsca pod otwory na śruby mocujące, upewnij się, że po obu stronach ścian łazienki lub innego pomieszczenia do obudowy nagrzewnicy wodnej jest szczelina co najmniej 0,2m, a od strony podłączenia rur co najmniej 0,5m, w celu ułatwienia dostępu podczas konserwacji w razie potrzeby. W przypadku, gdy woda bezpośrednio ze studni, pokładów lub wież ciśnień wchodzi do podgrzewacza wody, konieczne jest użycie filtra zgrubnego do zimnej wody wchodzącej do podgrzewacza wody. Filtr zgrubny można kupić w specjalnych sklepach. Jeśli filtr zgrubny nie jest zainstalowany, gwarancja na produkt nie jest objęta gwarancją.
Elektryczny podgrzewacz wody powinien być zainstalowany na twardej pionowej powierzchni (ścianie). Instalacja podgrzewaczy wody serii SI EWG jest znacznie łatwiejsza dzięki możliwości zainstalowania ich zarówno pionowo, jak i poziomo w dowolnym miejscu w domu, w otapli (!) umieszczenie. Wskazane jest zainstalowanie podgrzewacza wody jak najbliżej miejsca użycia ciepłej wody, ponieważ im mniejsza długość rur, tym mniejsze straty ciepła. Jak pokazano na ryc. 6, W przypadku poziomej instalacji podgrzewacza wody rura podajnika powinna znajdować się po prawej stronie. Gdy podgrzewacz wody znajduje się obok ściany, pozostaw zalecaną wolną przestrzeń do konserwacji. Nie instalować podgrzewacza wody na poziomej powierzchni i blisko podłogi. Po wybraniu miejsca montażu określ miejsca na dwie śruby z hakami (w zależności od specyfikacji wybranego produktu). Wywierć w ścianie dwa otwory o nieprzekraczalnej głębokości odpowiadające wymiarowi śrub mocujących, włóż śruby, obróć hak do góry, mocno dokręć nakrętki, a następnie zainstaluj na nim Elektryczny podgrzewacz wody (patrz rys. 4). Jeśli łazienka jest zbyt mała, aby zainstalować podgrzewacz wody, można ją zainstalować w każdej innej łazience, która jest chroniona przed bezpośrednim działaniem promieni słonecznych i deszczu.
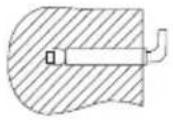
Rys. 4. Kotwa montażowa do montażu.
Przyłącze do wodociągu
Do podłączenia podgrzewacza wody do sieci wodociągowej stosuje się rury o średnicy G1/2.

Uwaga!
Aby zainstalować elastyczny eyeliner i zawór bezpieczeństwa, nie zaleca się stosowania dodatkowych materiałów, które nie są dołączone do podgrzewacza wody. Nakrętka z elastycznym eyelinerem ma gumową uszczelkę, która zapewnia szczelność potączenia eyelinera i zaworu bezpieczeństwa. Podczas dokręcania należy wykluczyć gwałtowne siły szarpania, a także ograniczyć moment dokręcania do 25-30 N*m.
Aby uniknąć wycieków podczas podłączania rurociągu, na końcach połączeń gwintowych należy zainstalować kompletne gumowe uszczelki.
Jeśli konieczne jest wdrożenie systemu zaopatrzenia w wodę dla kilku punktów poboru wody, użyj metody SOE-Dingen (patrz rys. 5).
Rys. 5
- Trójnik
- Zawór bezpieczeństwa
- Rura spustowa
- Wąż spustowy
- Zawór

Uwaga!
Podczas poziomej instalacji urządzenia rury doprowadzające wodę powinny znajdować się po lewej, umieszczenie rur zasilających po prawej stronie jest niedopuszczalne!
Rys. 6
Podłączenie do sieci elektrycznej
Wszystkie podgrzewacze wody akumulacyjnej serii SI EWG są przystosowane do podłączenia do sieci elektrycznej o napięciu jednofazowym 230V upewnij się, że parametry sieci elektrycznej w miejscu pod klucz odpowiadają parametrom znajdującym się na tabliczce z danymi technicznymi urządzenia. Podczas instalowania podgrzewacza wody należy przestrzegać obowiązujących zasad bezpieczeństwa elektrycznego. Podczas instalowania podgrzewacza wody w łazience lub toalecie należy wziąć pod uwagę ograniczenia związane z istnieniem zakazanego, i ochronnych objętości (przestrzeni).
Zakazana objętość to przestrzeń ograniczona stycznymi i pionowymi płaszczyznami w stosunku do zewnętrznych krawędzi wanny, toalety lub prysznica i płaszczyzną umieszczoną nad nimi lub nad podłoga, jeśli instalacja wodno-kanalizacyjna jest zamontowana na podłodze, na wysokości 2,25 m.
Objętość ochronna to przestrzeń, w której płaszczyzny poziome, które są rysowane, pokrywają się z płaszczyznami objętości zabronionej, a płaszczyzny pionowe są oddalone od odpowiednich płaszczyzn objętości zabronionej o 1 metr.
Obliczone dane dla miedzi
Wybór przekroju kabla (drutu) według mocy i długości miedzi, U = 230 B, jednofazowy
| R, kW | 1 | 2 | 3 | 3,5 | 4 | 6 | 8 |
| I, A | 4,5 | 9,1 | 13,6 | 15,9 | 18,2 | 27,3 | 36,4 |
| Przekrój rdzenia przewodzącego, mm ^2 | 1 | 1 | 1,5 | 2,5 | 2,5 | 4 | 6 |
| Maksymalna dopuszczalna długość kabla przy określonym przekroju, m | 34,6 | 17,3 | 17,3 | 24,7 | 21,6 | 23 | 27 |
Eksploatacja
Napetnianie wodą
Aby całkowicie napełnić zbiornik wodą, musisz:
- otwórz kran ciepłej wody na mikserze;
- otwórz zawór doprowadzający wodę do podgrzewacza wody;
- poczekaj, aż woda wypłynie z kranu;
- zamknąć kran ciepłej wody na baterii i upewnić się, że nie ma wycieków.
Jeśli woda płynie z kranu Ciepłej Wodyzbiornik jest całkowicie wypełniony wodą. Dopiero wtedy możesz podłączyć zbiornik do sieci elektrycznej.
W razie wątpliwości, czy istnieje w podgrzewaczu wody woda, nie podłączaj jej do zasilania.
Podłączenie do sieci elektrycznej

Uwaga!
Podłączenie do sieci elektrycznej odbywa się dopiero po napełnieniu wodą (odwrotność może spowodować spalenie elementu grzejnego i uszkodzenie urządzenia).
Wóż wtyczkę podgrzewacza wody do gniazdka, a następnie zaświeci się wyświetlacz na panelu sterowania. Oznaczało, że podgrzewacz wody jest włączony i zasilany. Ustaw za pomocą regulacji temperatury ogrzewania Wymagany poziom ogrzewania wody od niskiego do wysokiego. Temperatura podgrzewania wody zostanie wyświetlona na wyświetlaczu w miarę nagrzewania. Podgrzewanie wody wyłącza się automatycznie po osiągnięciu ustawionej temperatury i włącza się automatycznie do podgrzewania. Gdy temperatura wody osiągnie wartość zadaną, ogrzewanie zatrzyma się.
Wymiary i wymiary instalacyjne
Rys. 7
| Opcje/Model | EWH 30 SI EEC/EWH 30 SI BE EEC/EWH 30 SI SE EEC | EWH 50 SI EEC/EWH 50 SI BE EEC/EWH 50 SI SE EEC | EWH 80 SI EEC/EWH 80 SI BE EEC/EWH 80 SI SE EEC | EWH 100 SI EEC/EWH 100 SI BE EEC/EWH 100 SI SE EEC |
| A, mm | 635 | 970 | 920 | 1135 |
| B, mm | 250 | 250 | 333 | 333 |
| C, mm | 435 | 435 | 555 | 555 |
| D, mm | 360 | 360 | 430 | 430 |
| E, mm | 280 | 550 | 430 | 600 |
| F, mm | 201 | 201 | 267 | 267 |
| G, mm | 197 | 197 | 197 | 197 |
Specyfikacje
| Opcje / Model | EWH 30 SI EEC/ EWH 30 SI BE EEC/ EWH 50 SI BE EEC/ EWH 80 SI EEC/ EWH 100 SI EEC/ EWH 30 SI SE EEC | EWH 50 SI EEC/ EWH 50 SI BE EEC/ EWH 80 SI BE EEC/ EWH 100 SI BE EEC/ EWH 50 SI SE EEC | EWH 80 SI EEC/ EWH 80 SI BE EEC/ EWH 100 SI SE EEC | EWH 100 SI EEC/ EWH 100 SI SE EEC |
| Nominalna (użyteczna) objętość, l | 25 | 41 | 65 | 81 |
| Moc znamionowa, w | 700/1300/2000 | |||
| Napięcie znamionowe, V ~ Hz | 230~50 | |||
| Prąd znamionowy, A | 8,7 | |||
| Minimalne ciśnienie wody, bar | 80 000 (0,8) | |||
| Maksymalne ciśnienie wody, bar* | 600 000 (6) | |||
| Maksymalna temperatura wody, °C | 75 | |||
| Czas nagrzewania od 10 do 75°C**, min. | 99 | 162 | 256 | 316 |
| Ochrona przed porażeniem elektrycznym | 1 | |||
| Ochrona przed wilgocią | IPX4 | |||
| Klasa efektywności energetycznej*** | A | B | B | C |
| Wymiary urządzenia (szer.*wys.*gt.), mm | 435×635×260 | 435×970×260 | 555×920×350 | 555×1135×350 |
| Wymiary opakowania (szer.*wys.*gt.), mm | 680×485×280 | 1010×485×280 | 970×605×362 | 1185×605×362 |
| Waga netto, kg | 15,3 | 22,6 | 29,0 | 33,5 |
| Waga Brutto, kg | 17,0 | 25,0 | 32,6 | 37,0 |
* Przy maksymalnym ciśnieniu rozpoczyna się odprowadzanie nadmiaru ciśnienia przez zawór bezpieczeństwa. Jeśli ciśnienie w sieci wodociągowej przekracza 6 barów (nominalne ciśnienie robocze), konieczne jest zainstalowanie zaworu redukcyjnego.
** Czas nagrzewania jest wskozany przy pełnej mocy grzewczej i obliczany w idealnych warunkach otoczenia.
*** Elektywność energetyczna obliczona dla instalacji pianowej.
Producent zastrzega sobie prawo do wprowadzania zmian.
RCD (urządzenie zabezpieczające)
• 100-procentowa ochrona przed porażeniem prądem.
- Postępuj zgodnie z instrukcją instalacji podczas podłączania elektrycznego podgrzewacza wody do akumulatora domowego.
- nie RCD zaświeci się kontrolka Power (1).
- Aby przetestować RCD, naciśnij przycisk TEST (2). Wskaźnik Zasilania (1) zostanie wyłączony.
- Aby ponownie uruchomić RCD, naciśnij przycisk (3).
Rozwiązyanie problemów
| Odmowa | Przyczyna | Usuwanie |
| Nie ma wody z kranu ciepłej wody | 1. Dopływ wody do sieci wodociągowej jest zablokowany.2. Ciśnienie wody jest zbyt niskie.3. Zawór wlotowy wody jest zablokowany. | 1. Poczekaj na wznowienie przepływu wody.2. Użyj podgrzewacza wody, gdy ciśnienie wody ponownie wzrośnie.3. Otwórz kran wlotowy wody. |
| Temperatura doprowadzanej ciepłej wody przekracza dopuszczalny poziom 75°C | Awaria systemu regulacji temperatury (czerwona kontrolka nie gaśnie) | 1. Konieczne jest natychmiastowe wyłączenie podgrzewacza wody z sieci.2. Skontaktuj się z technikami serwisowymi w celu przeprowadzenia naprawy. |
| Na wyświetlaczu pojawia się błąd E1 | Brak wody w zbiorniku | 1. Poczekaj na wznowienie przepływu wody.2. Otwórz kran wlotowy wody. |
| Wyświetlacz pokazuje błąd E2 | 1. Uszkodzony termostat.2. Uszkodzony element grzejny.3. Wadliwa tablica elektroniczna. | Skontaktuj się ze specjalistą serwisu |
Pielęgnacja i konserwacja

Uwaga!
Przed konserwacją zawsze odłączaj Podgrzewacz wody od sieci elektrycznej.
Podgrzewacz wody nie wymaga dodatkowej konserwacji. Od czasu do czasu należy wytrzeć obudowę miękką szmatką lub wilgotną gąbką, aby nie uszkodzić obudowy podgrzewacza wody.
Zabronione jest stosowanie agresywnych środków chemicznych.
Aktywna anoda
Podgrzewacze wody serii SI EWG są wyposażone w anodę aktywną (elektroniczną). Anoda jest to pręt tytanowy i zapewnia ochronę przed korozją zawsze, gdy podgrzewacz wody jest podłączony do sieci zasilającej. Pojawienie się błędu E6 lub E7 na wyświetlaczu oznacza, że anoda elektroniczna nie działa, a Podgrzewacz wody jest bez zabezpieczenia antykorozyjnego. Aby rozwiązać problemy, należy skontaktować się z centrum serwisowym.
Element grzejny (Teng)
Element grzejny (TEN) przeznaczony jest do podgrzewania wody w zbiorniku wewnętrznym poprzez zamianę energii elektrycznej na
ciepło. Powstawanie kamienia (kamienia) na jego powierzchni w celu przegrzania i przedwczesnej awarii elementu grzejnego. Regularnie sprawdzaj iw razie potrzeby odkamień jego powierzchnię środkiem odkamieniającym.
Gwarancja na element grzejny nie jest ważna w przypadku spełnienia jednego lub więcej warunków:
- twardość wody przekracza 25 °F,
- grubość warstwy kamienia na powierzchni elementu grzejnego wynosi ponad 5 mm.

Uwaga!
Nagromadzenie się kamienia na grzejniku i obecność osadu w zbiorniku wewnętrznym może spowodować awarię podgrzewacza wody i stanowić podstawę do odmowy serwisu gwarancyjnego. Regularna konserwacja, jest środkiem zapobiegawczym i nie jest objęta gwarancją.
Urządzenie obniżające ciśnienie powinno być regularnie sprawdzane pod kątem działania w celu usunięcia osadów wapiennych.
W niedozwolonej przestrzeni nie wolno instalować przełączników, gniazd i oprawy oświetleniowe. W przestrzeni ochronnej instalacja przełączników jest zabroniona, jednak możliwe jest zainstalowanie gniazd z uziemieniem. Podgrzewacz wody musi być
zainstalowany poza objętością zabronioną, tak aby nie był narażony na działanie strumieni wody. Aby zapewnić bezpieczne działanie podgrzewacza wody, należy zainstalować wyłącznik automatyczny o odpowiedniej mocy. W codziennym użytkowaniu zaleca się, aby podgrzewacz wody był podłączony do prądu, ponieważ termostat włącza ogrzewanie tylko wtedy, gdy jest to konieczne do utrzymania ustawionej temperatury.
Podgrzewacz wody powinien być regularnie serwisowany w autoryzowanym centrum serwisowym.

W żadnym wypadku nie należy zdejmować pokrywy podgrzewacza wody bez uprzedniego odłączenia go od sieci elektrycznej.
Transport i magazynowanie
Podgrzewacze wody w Opakowaniu Producenta mogą być transportowane wszystkimi rodzajami transportu wewnętrznego zgodnie z zasady przewozu towarów obowiązujące w tym rodzaju transportu. Warunki transportu w temperaturze od minus 50 do plus 50°C i przy wilgotności względnej do 80% przy plus 25°C). Podczas transportu należy wykluczyć ewentualne uderzenia i ruchy opakowań z podgrzewaczami wody wewnątrz środka Trans krawca. Transport i układanie odbywa się zgodnie ze znakami manipulacyjnymi podanymi na opakowaniu. Podgrzewacze wody powinny być przechowywane w Opakowaniu Producenta w warunkach przechowywania od PLUS 1°C do plus 40°C i wilgotności względnej do 80% w 25°C).
Utylizacja

Urządzenie, którego termin upłynąt, nie może być wyrzucane wraz z odpadami domowymi (2012/19/UE).
Gwarancja
Serwis gwarancyjny jest wykonywany na warunkach określonych w punkcie "Gwarancja".
Gwarancja:
- Okres gwarancji wynosi dwa lata od daty
zakupu. Jeśli w trakcie dwuletniego okresu gwarancji wystąpią jakiekolwiek wady spowodowane wadami materiałowymi i/lub produkcyjnymi, przedmiot należy naprawić lub wymienić.
- Bezpłatna naprawa lub wymiana jest możliwa tylko w przypadku dostarczenia przekonujących dowodów, na przykład odcinka, który potwierdza, że dzień zgłoszenia usługi mieści się w okresie gwarancyjnym.
- Gwarancja nie obejmuje produktów i/ lub części produktu, które ulegają zepsuciu, mogą być uważane za materiały zużywalne lub które są wykonane ze szkła.
- Gwarancja traci ważność, jeżeli wada jest spowodowana uszkodzeniem wynikającym z niewłaściwego użytkowania, złej konserwacji (np. Awaria powstała na skutek wniknięcia ciał obcych lub płynów) lub jeśli zmiany lub naprawy zostały wykonane przez osoby nieupoważnione przez Producenta.
- Dla prawidłowego użytkowania produktu użytkownik musi ściśle przestrzegać wszystkich instrukcji zawartych w instrukcji obsługi, i powinien powstrzymać się od wszelkich działań lub manipulacji, które są opisane jako niepożądane lub o których są wskazówki w instrukcji obsługi.
- Te ograniczenia gwarancyjne nie mają wpływu na twoje prawa.
Wsparcie:
Wsparcie w okresie gwarancyjnym i po jego zakończeniu jest dostępne we wszystkich krajach, w których produkt jest oficjalnie dystrybuowany. Skontaktuj się ze sprzedawcq, aby uzyskać pomoc.
Data produkcji
Data produkcji jest podana na naklejce na korpusie urządzenia, a także zaszyfrowana w Code-128. Datę produkcji określa się w następujący sposób:

Miesiąc i rok produkcji
Nie usuwaj i numeru seryjnego na korpusie urządzenia. Jeśli naklejka z numerem seryjnym zostanie zgubiona lub uszkodzona, w razie potrzeby nie będzie możliwe wyjaśnienie daty produkcji.
Importer:
Producent: CladSwiss AG, Bahnhofstrasse 27, 6300 Zug, Szwajcaria E-mail: info@cladswiss.com
Wyprodukowano w Chinach
Electrolux jest zastrzeżonym znakiem towarowym używanym na licencji firmy AB Electrolux (publ.).
Producent pozostawia za sobą prawo do zmiany konstrukcji i właściwości urządzenia.
Ta instrukcja może zawierać błędy techniczne i pisarskie. Zmiany parametrów technicznych i asortymentu mogą ulec zmianie bez powiadomienia.
Błędy i pomyłki w tekście i liczbach są dozwolone. Konstrukcja i dane techniczne urządzenia mogą różnić się od przedstawionych na opakowaniu. Aby uzyskać więcej informacji, skontaktuj się z konsultantem ds. Sprzedaży.
- Fill your life with comfort
- http://www.home-comfort.com
- CONTENT
- WE THINK ABOUT YOU
- Designation
- Note:
- Safety rules
- Warning!
- Water Drain:
- A tee can be provided for the drain with a valve between the valve and the sleeve (item 1, fig. 5).
- Destination
- Complete set
- Device arrangement
- Automatic water temperature control:
- Levels of water heater protection:
- The water heater has three heating power modes:
- Control Panel
- On/off/back button.
- Menu, OK.
- Menu navigation button: up, left.
- Menu navigation button: down, right.
- Turning on the device
- Standby mode (standby mode)
- Changing the display orientation
- Icon color indication
- Control interlock
- Heating temperature setting
- No Frost—Anti-freeze function
- Bacteria Stop
- Timer
- Smart function
- Display brightness
- Auto Display Off-Display Timeout
- Date and time
- Language
- Diagram of the SI EEC settings menu
- Water heater installation
- Connecting to the water supply
- Connecting to the power grid
- Calculated data for copper
- Operation
- Filling with water
- Watch out!
- RCD (Ground Fault Interrupter)
- Care and maintenance
- Active anode
- Heating element (TEH)
- Transport and storage
- Recycling
- Warranty
- Warranty:
- Support:
- Date of manufacture
- Importer:
- ZAWARTOŚĆ
- MYŚLIMY O WAS
- Używane symbole
- Uwaga:
- Zasady bezpieczeństwa
- Uwaga!
- Odpływ wody:
- Do odpływu można zapewnić Trójnik z zaworem między zaworem a tuleją (poz. 1, rys. 5).
- Przeznaczenie
- Kompletowanie
- Urządzenie urządzenia
- Automatyczna kontrola temperatury wody:
- Poziomy ochrony podgrzewacza wody:
- Podgrzewacz wody ma trzy tryby mocy grzewczej:
- Panel sterowania
- Włączanie / wyłączanie / cofanie.
- Przycisk nawigacji w menu: w góre, w lewo.
- Przycisk nawigacji w menu: w dół, w prawo.
- Włączanie urządzenia
- Tryb Standby (STANDBY)
- Zmiana orientacji wyświetlacza
- Wyświetlanie kolorów ikon
- Blokada sterowania
- Ustawienie temperatury grzania
- Funkcja Smart
- Jasność wyświetlacza
- Automatyczne wyłączanie wyświetlacza- timeout dis-play
- Data i godzina
- Język
- Schemat menu ustawień SI EEC
- Montaż podgrzewacza wody
- Przyłącze do wodociągu
- Podłączenie do sieci elektrycznej
- Obliczone dane dla miedzi
- Eksploatacja
- Napetnianie wodą
- Wymiary i wymiary instalacyjne
- Specyfikacje
- RCD (urządzenie zabezpieczające)
- Pielęgnacja i konserwacja
- Aktywna anoda
- Element grzejny (Teng)
- W żadnym wypadku nie należy zdejmować pokrywy podgrzewacza wody bez uprzedniego odłączenia go od sieci elektrycznej.
- Transport i magazynowanie
- Utylizacja
- Gwarancja
- Gwarancja:
- Wsparcie:
- Data produkcji
Marke : ELECTROLUX
Modell : EWH30SIBEEEC
Kategorie : Chauffe-eau instantané et chaudière