
WRI525BC - Dunstabzugshaube WESTINGHOUSE - Kostenlose Bedienungsanleitung
Finden Sie kostenlos die Bedienungsanleitung des Geräts WRI525BC WESTINGHOUSE als PDF.


| Produkttyp | Dunstabzugshaube (Integrierte Haube) |
| Modell | WRI525BC |
| Marke | Westinghouse |
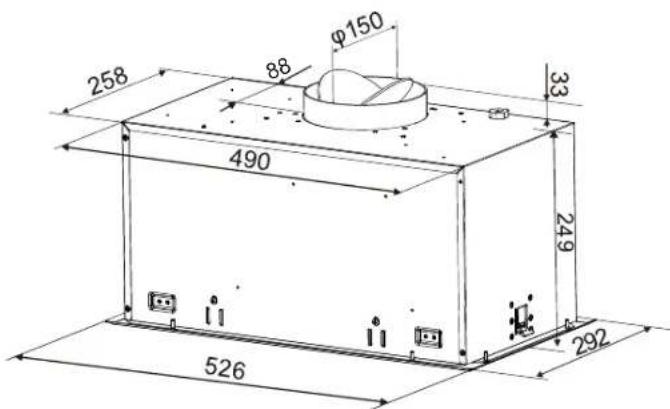
| Abmessungen (B x T x H) | 526 x 490 x 258 mm |
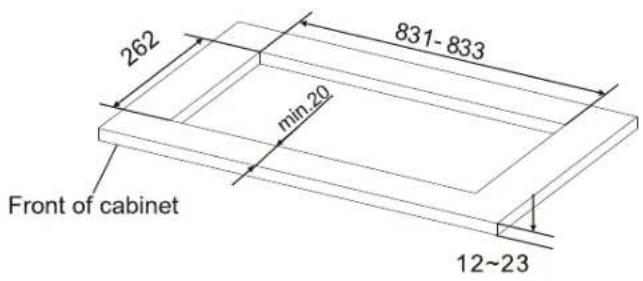
| Ausschnittmaß (B x T) | 493 x 262 mm |
| Gewicht | ca. 10 kg |
| Stromversorgung | 220–240 V, 50 Hz, 10 A |
| Leistungsaufnahme | ca. 200 W (max.) |
| Lüfterstufen | 3 Stufen + PowerBoost |
| Beleuchtung | LED, 2,5 W (DC 12 V) |
| Luftförderung | max. 450 m³/h (Schätzwert) |
| Abluftanschluss | 150 mm (rund) |
| Mindestabstand (Elektro-/Gasherd) | 600 mm / 620 mm |
| Funktionen | Hob2Hood, Nachlaufautomatik (5 Min.), Kohlefilter-Alarm, Fettfilter-Alarm |
| Filtertyp | Fettfilter (Aluminium, waschbar) + Kohlefilter (optional, austauschbar) |
| Reinigung Fettfilter | Alle 4 Wochen, manuell oder im Geschirrspüler (Kurzprogramm, niedrige Temperatur) |
| Kohlefilterwechsel | Alle 3 Monate (bei Umluftbetrieb) |
| Geräuschpegel | ca. 55 dB(A) (max. Stufe) |
| Sicherheitsmerkmale | Überhitzungsschutz, Kindersicherung (nicht spezifiziert) |
| Garantie | 2 Jahre (Australien/Neuseeland) |
Häufig gestellte Fragen - WRI525BC WESTINGHOUSE
Benutzerfragen zu WRI525BC WESTINGHOUSE
0 Frage zu diesem Gerät. Beantworten Sie die, die Sie kennen, oder stellen Sie Ihre eigene.
Eine neue Frage zu diesem Gerät stellen
Laden Sie die Anleitung für Ihr Dunstabzugshaube kostenlos im PDF-Format! Finden Sie Ihr Handbuch WRI525BC - WESTINGHOUSE und nehmen Sie Ihr elektronisches Gerät wieder in die Hand. Auf dieser Seite sind alle Dokumente veröffentlicht, die für die Verwendung Ihres Geräts notwendig sind. WRI525BC von der Marke WESTINGHOUSE.
BEDIENUNGSANLEITUNG WRI525BC WESTINGHOUSE
natural_image
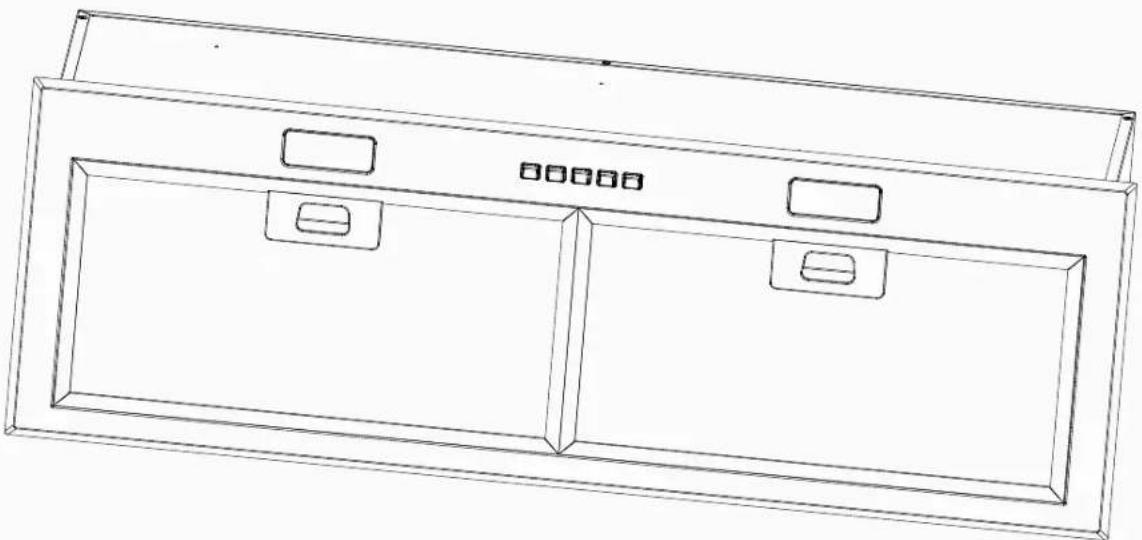
Line drawing of a rectangular cabinet or drawer with two side compartments and two recessed slots (no text or symbols)INTEGRATED RANGEHOOD
WRI515SC WRI525BC
WRI815SC WRI825BC
Enjoy peace of mind.
Register your appliance today.
Stay updated on better living services,
safely notices and shop for accessories.
- Open the camera app
on your smartphone
and point at the QR
code to scan
Product Registration QR
code is located on the
front of underside of your appliance.
- Tap the notification or link to open t
registration form.
- Complete your details and enjoy peace
of mind.
WELCOME TO WESTINGHOUSE
Thank you for purchasing a Westinghouse appliance. You've chosen a product that brings with it decades of professional experience and innovation. Ingenious and stylish, it has been designed with you in mind. So whenever you use it, you can be safe in the knowledge that you'll get great results every time.
Welcome to Westinghouse.
LEGEND
The symbols you will see in this booklet have these meanings:

WARNING!
This symbol indicates information concerning your personal safety

CAUTION!
This symbol indicates information on how to avoid damaging the rangehood

IMPORTANT!
This symbol indicates tips and information about use of the rangehood

ENVIRONMENT!
This symbol indicates tips and information about economical and ecological use of the rangehood
CONDITIONS OF USE
This appliance is intended to be used in household and similar applications such as:
• Staff kitchen areas in shops, offices and other working environments
- Farm houses
- By clients in hotels, motels and other residential type environments
• Bed and breakfast type environments.
• Catering and similar non-retail applications
3 Important safety instructions
4 Installation
8 Operation and maintenance
11 Warranty
RECORD MODEL AND SERIAL NUMBER HERE:
Model:
Serial No:
IMPORTANT INFORMATION THAT MAY IMPACT YOUR MANUFACTURER'S WARRANTY
Adherence to the directions for use in this manual is extremely important for health and safety. Failure to strictly adhere to the requirements in this manual may result in personal injury, property damage and affect your ability to make a claim under the Westinghouse manufacturer's warranty provided with your product. Products must be used, installed and operated in accordance with this manual. You may not be able to claim on the Westinghouse manufacturer's warranty in the event that your product fault is due to failure to adhere this manual.
SAFETY INSTRUCTIONS
Please read this manual carefully prior to installing and using the rangehood in order to avoid damage or injury. The manufacturer will not accept liability for damage caused from not following these instructions. If you need assistance contact Customer Care. Please keep the manual for future reference and pass it on to any new owners of the appliance.

ENVIRONMENT!
Remove and discard any packaging material before using this accessory. Most of the packaging materials are recyclable. Please dispose of those materials through your local recycling depot or by placing them in the appropriate collection containers.

WARNING!
- This appliance is not intended for use by persons (including children) with reduced physical, sensory mental capabilities, or lack of experience and knowledge, unless they have been given supervision or instruction concerning use of the appliance by a person responsible for their safety. Children should be supervised to ensure that they do not play with the appliance.
- Ensure the rangehood is switched off before carrying out maintenance, to avoid any possibility of electric shock.
- Grease filters must be removed every four weeks (maximum) for cleaning to reduce the risk of fire. Do not flambe or have an exposed flame under the rangehood.
• This rangehood is not recommended for barbecues.
- The exhaust air from the rangehood must not be discharged into any heating flue, which may carry combustion products from other sources.
- Exhaust air must not be discharged into a wall cavity, unless the cavity is designed for the purpose.
- There must be adequate ventilation of the room when the rangehood is used at the same time as appliances burning gas or other fuels.
• Always cover lit gas burners with pots or pans when the rangehood is in use.
- Always switch off gas burners before you remove pots or pans.
- Range hoods and other cooking fume extractors may adversely affect the safe operation of appliances burning gas or other fuels (including those in other rooms) due to back flow of combustion gases. These gases can potentially result in carbon monoxide poisoning. After installation of a rangehood other cooking fume extractor, the operation of flued gas appliances should be tested by a competent person to ensure that back flow of combustion gases does not occur.

CAUTION
- Accessible parts may become hot when used with cooking appliance.
- Regulations concerning the discharge of air have to be fulfilled.
- Failure to install the screws or fixing device in accordance with these instructions may result in electrical hazards.
- In order to avoid a hazard due to inadvertent resetting of the thermal cut-out, this appliance must not be supplied through an external switching device, such as a timer, or connected to a circuit that is regularly switched on and off by the utility.
Cleaning
- Wipe the rangehood body and flue with a sponge or soft cloth soaked in warm soapy water, and dry with a soft cloth, for stainless steel models apply a stainless steel protector. Do not use oven cleaners or other abrasive materials.
- There is a fire risk if cleaning is not carried out in accordance with the instructions.
Electrical Connection
- Check that the mains voltage matches with the voltage on the data plate inside the rangehood.
- Check that the installation complies with standards of local gas and electricity authorities.
- If the supply cord is damaged, it must be replaced by the manufacturer or its service agent or a similarly qualified person in order to avoid a hazard.
- This appliance has a 1.2m power cord and 10A plug, ensure that the plug is accessible after installation.
Accessories
- Use 150mm round exhaust ducting for best performance.
- When using semi-rigid duct always install duct with the wire helix pulled taut to minimise pressure loss.
• Try to keep exhaust duct short and straight. - Keep bends in the exhaust duct to a minimum.
- Do not restrict exhaust duct.
- Reducing the size of the exhaust duct will reduce the airflow of the rangehood. Please read instructions carefully. Service calls resulting from incorrect installation will be charged for.
Installation must comply in all respects with your gas and electrical authorities. This rangehood is an indoor domestic appliance, and has been manufactured and tested to comply with Australian and New Zealand Standard AS/NZS 60335.2.31
INSTALLATION
Standard ducting installation
It is recommended that the unit be positioned at a minimum of 600mm for an electric cooktop and 620mm for a gas cooktop, and no further from the cooktop than 800mm. The unit becomes less effective as the distance from the cooking surface to the rangehood increase.
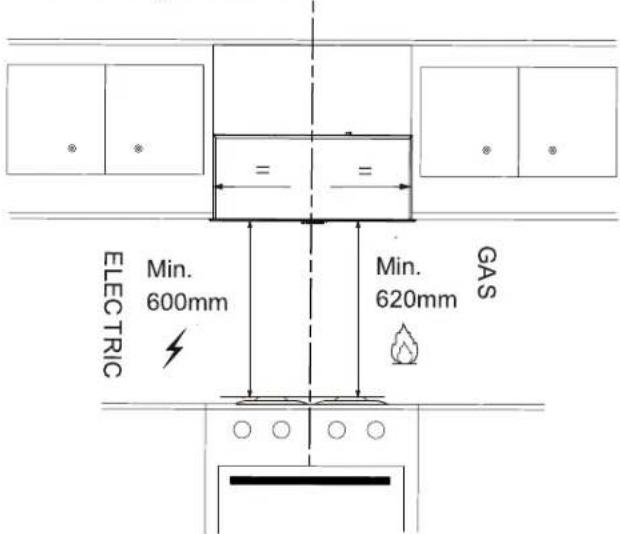
Note:1. The hoods and hobs are mounted symmetrically in the center; 2. If the cooktop manufacturer specifies a greater clearance then that must be used.
Fixing point dimensions for WRI515SC&WRI525BC
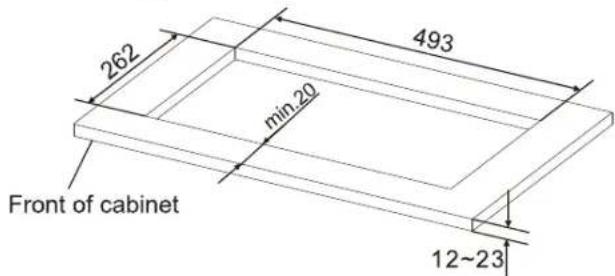
Product dimensions for WRI515SC&WRI525BC
Fixing point dimensions for WRI815SC&WRI825BC
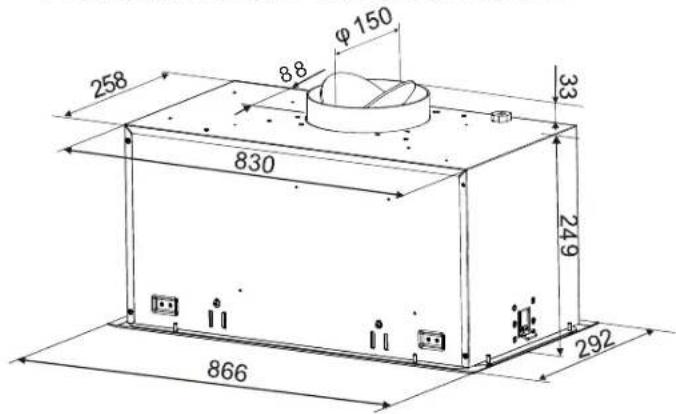
Product dimensions for WRI815SC&WRI825BC
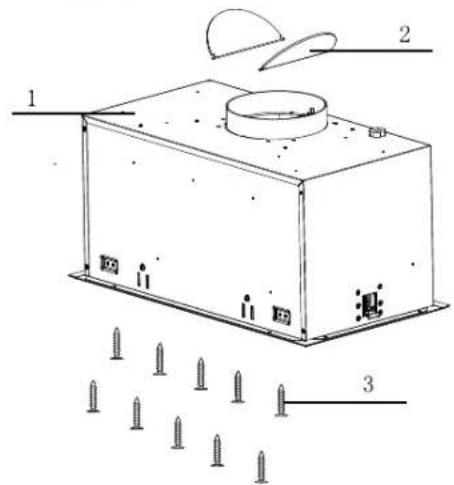
The items shown below are supplied
1.Hood body;
2.Vane x2;
3. Mounting screws (WRI515SC/WRI525BC:8x pan head screws 3.5x25mm, WRI815SC/WRI825BC:10xpan head screws 3.5x25mm
Parts to be purchased
- Aluminum tape or cable ties to secure flue pipe;
- Rigid or semi rigid duct;
- Carbon filter(Applicable to products installed for recirculation mode)
Cutting the cabinet
Cut the slot in the cabinet according to the fixing point dimension.
Fixing the rangehood
- Remove the grease filter(s)
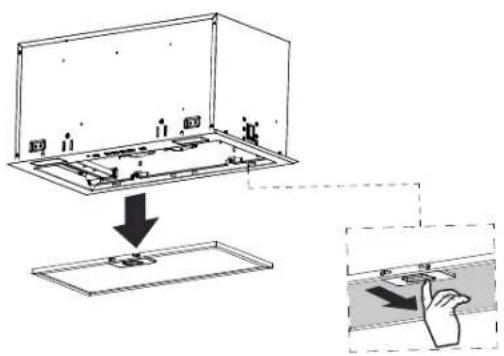
- Unscrew the face panel screws from body and release the terminals of button and lights
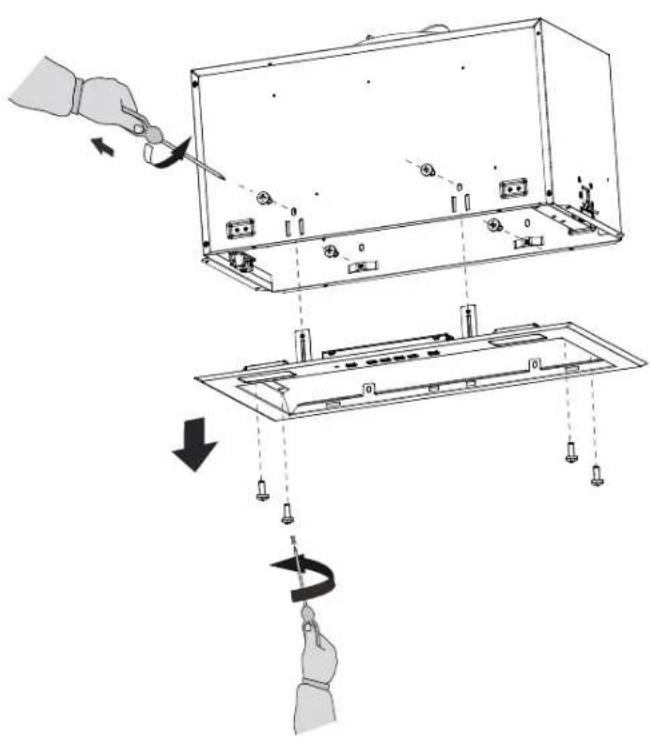
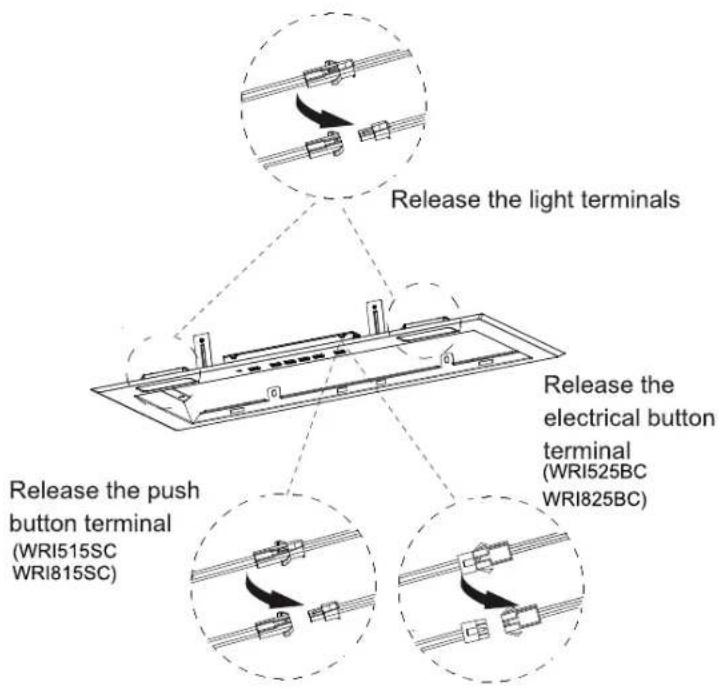
flowchart
graph TD
    A["Release the light terminals"] --> B["Release the electrical button terminal (WRI525BC WRI825BC)"]
    B --> C["Release the push button terminal (WRI515SC WRI815SC)"]
INSTALLATION
3.Push upwards the range hood to the cabinet from bottom side until you hear the 'click' sound. Fasten the fasteners by turning the screw clock-wise.
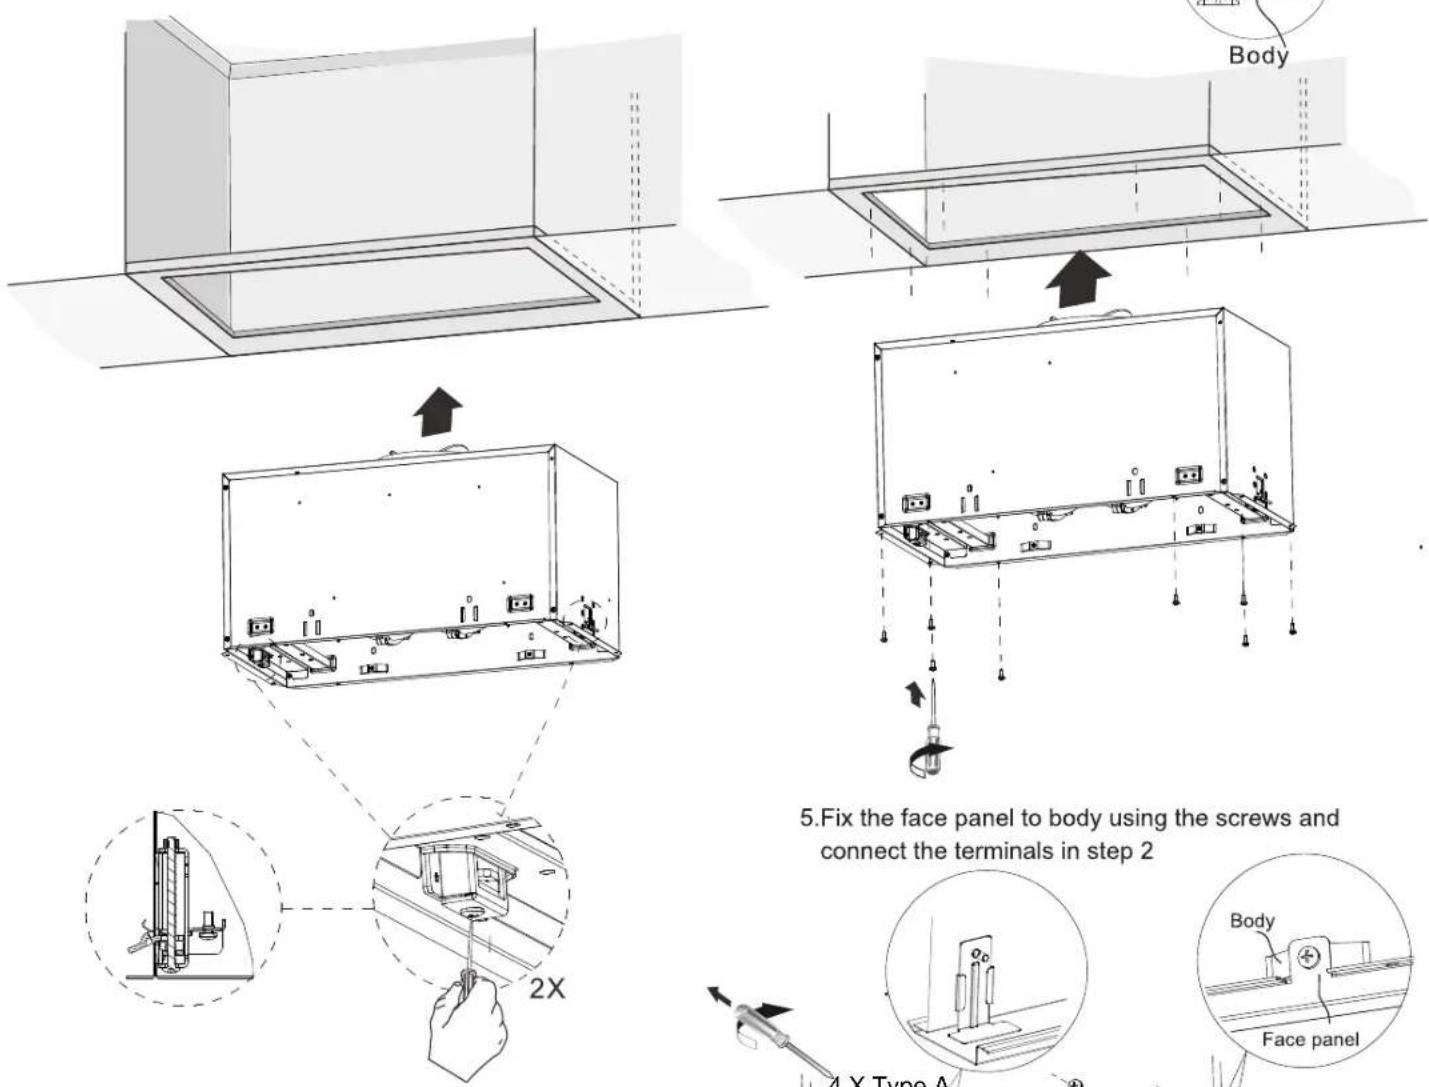
- Fix the range hood using the supplied screws to fix the range hood.
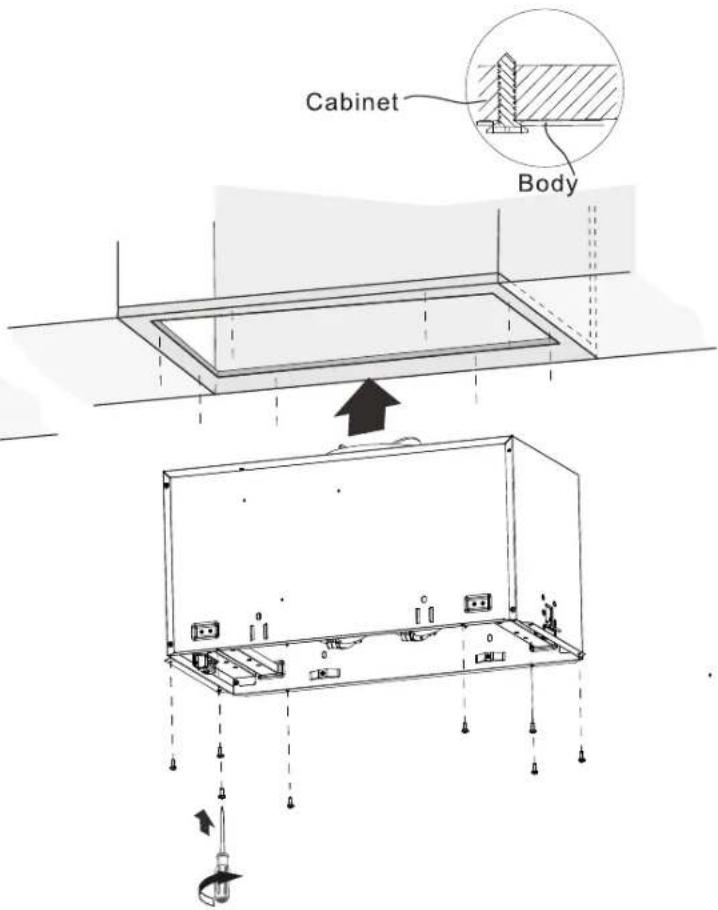
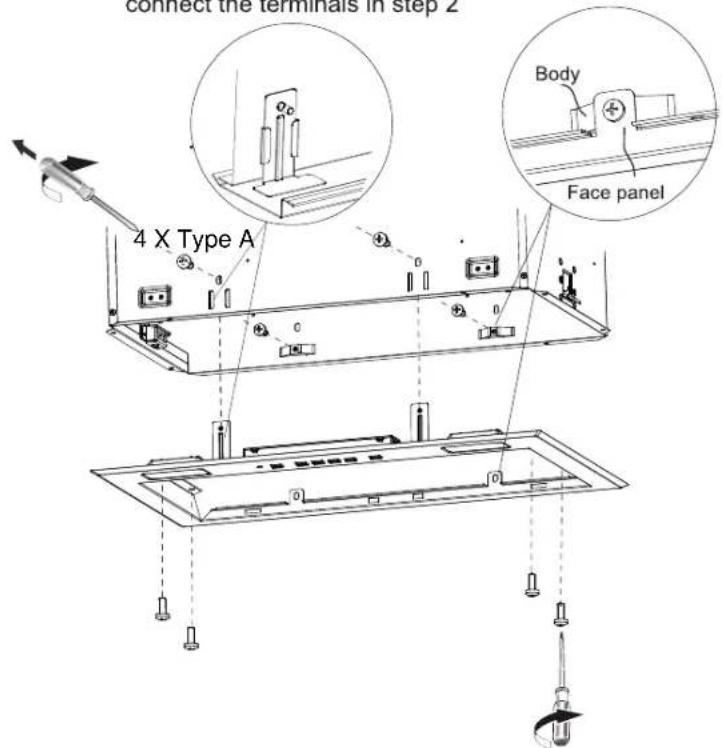
NOTE: Customer can adjust 4 screws(type A) to reduce the gap between hood body and cabinet
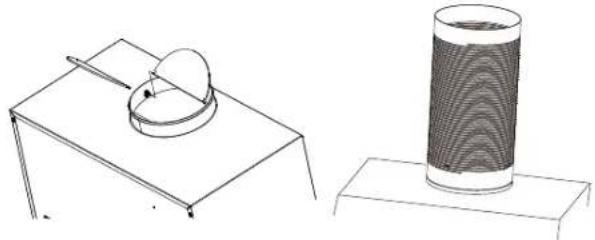
Fixing the vanes and flue pipe
Fix the vanes in accessories and a 150mm, non-combustible, rigid flue pipe to the exhaust transition duct using cable ties or duct tape.
natural_image
Technical line drawing of a mechanical assembly with a circular component and a cylindrical component (no text or symbols)
IMPORTANT!
If using a simi-rigid duct, always install duct with thewire helix pulled taut to minimise pressure and noise
Ducting accessories
For best performance, a 150mm ducting is recommended
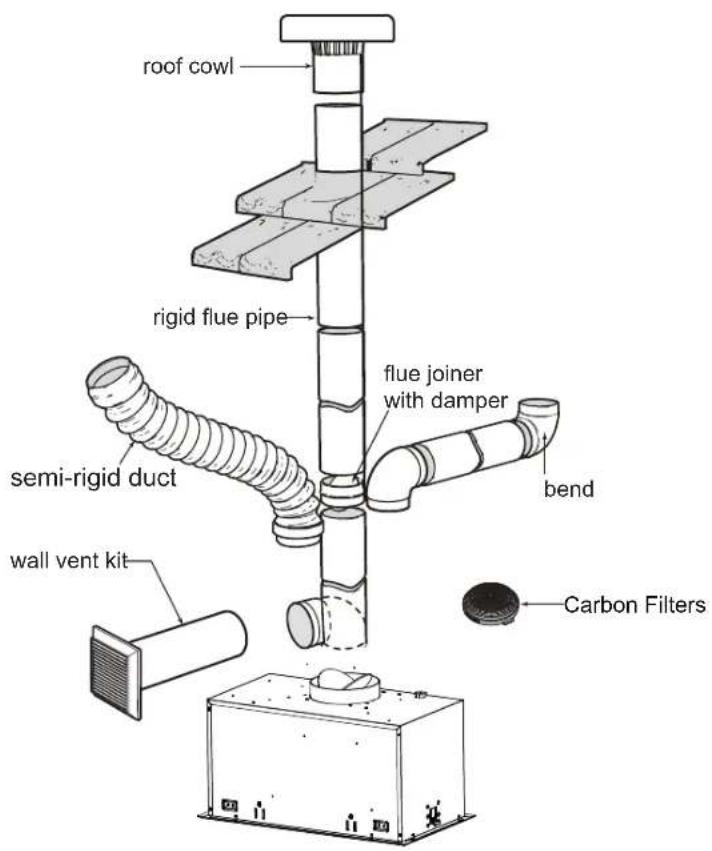
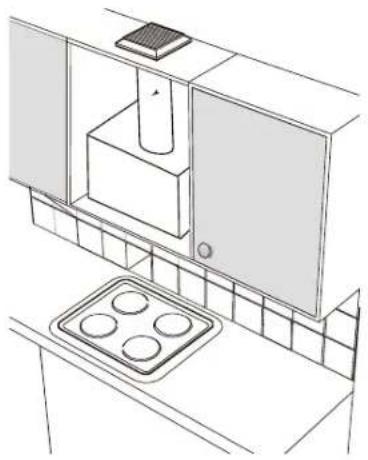
Ducted recirculating installation
natural_image
Line drawing of a kitchen setup with a microwave oven, cabinet, and tray (no text or symbols)Accessories can be bought from your local appliance retailer, or in Australia at our online spare parts and accessories store:shop.westinghouse.com.au or scan below QR code

Unilux_Venting-Ducting

Carbon Filter
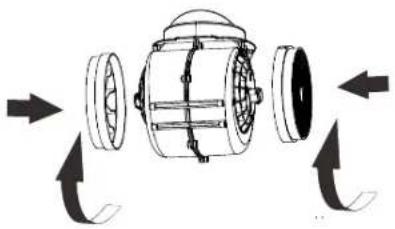
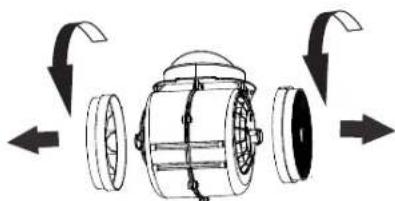
Optional carbon fiteres diminish cooking odours in the recirculated air. Depending on the frequency of use and the type of cooking, the expected life of carbon fitters is 3 months. Using carbon fitters will reduce the airflow of the rangehood. Please install the carbon fitters as following picture shown.
natural_image
Diagram of a mechanical device with internal components and directional arrows indicating motion (no text or symbols)(Install the carbon filter)
natural_image
Diagram of a mechanical device with rotating parts and directional arrows indicating motion (no text or symbols)(Uninstall the carbon filter)
OPERATION & MAINTENANCE
Control operation
WRI515SC WRI815SC
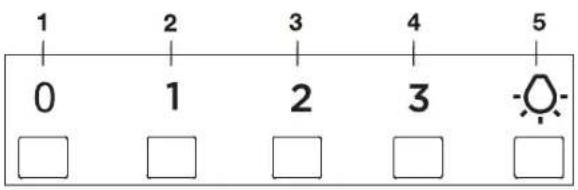
1 Fan off
2 Fan speed 1
3 Fan speed 2
4 Fan speed 3
5 Light on/off
Turning on/off the fan
Press any fan level button to turn on required fan level. Press 0 to turn off the fan. Or press other fan level button to change the fan level.
Fan speeds
Fan speed 1: While heating up food, cooking with covered pots, light frying, light boiling
Fan speed 2: While cooking with covered pots on multiple cooking zones or burners, frying, boiling
Fan speed 3: While boiling, frying big quantities of food without a lid, cooking on multiple cooking zones or burners, grilling, intensive frying, wok cooking
Turning on/off the light
Press button: Q to turn on the light, press: Q once again to turn off the light.
WRI525BC WRI825BC
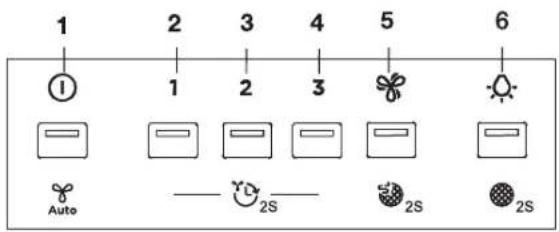
1 On/off
2 Fan speed 1
3 Fan speed 2
4 Fan speed 3
5 Power Boost
6 Light on/off
Turning on the fan
Option 1: Press the power button
Pressing the ①will turn on the hood at fan speed 2 or the last used fan speed (except for Power Boost speed) with the light on.
Option 2: Directly select fan speed
Turning off the fan
Pressing the ① will turn off the hood at any fan speed.
Fan speeds
Fan speed 1: While heating up food, cooking with covered pots, light frying, light boiling
Fan speed 2: While cooking with covered pots on multiple cooking zones or burners, frying, boiling
Fan speed 3: While boiling, frying big quantities of food without a lid, cooking on multiple cooking zones or burners, grilling, intensive frying, wok cooking
Power boost: While boiling, frying large quantities of food without a lid and of high humidity. Suitable fan speed for cooking that generates high amount of cooking fumes.
When operating at maximum speed, the hood will return to previous setting after 6 minutes.
Turning on/off the light
Press button- -to turn on the light, press- -once again to turn off the light
Delay off
To activate delay off function, press and hold selected fan speed for 2 seconds. The indicator of the selected fan speed will flash and the hood will run at that fan speed for the next 5 minutes before shutting down automatically. To deactivate the delay off function, press any of the fan speed buttons or press the ON/OFF button and the delay off function will be turned off
Activating/Deactivating the carbon filter saturation alarm
The activation of the carbon filter alarm is advised for recirculating installations, where by carbon filters are installed in the hood. To activate the alarm, hold the button for 5 seconds, upon which the indicator will flash twice. To deactivate the alarm, hold the button for 5 seconds, upon which the indicator will flash once.
Grease filter saturation alarm
When the:Indicator starts to flash, it signals that it is necessary to wash the grease filters This alarm is triggered after the hood has been in operation for 15hrs. To dismiss & reset the alarm after cleaning the filters, press & hold the button for 2 seconds(Refer to Care and cleaning)
Carbon filter saturation alarm
When the ✅ indicator starts to flash, it signals that it is necessary to change the activated carbon filter. This alarm is triggered after the hood has been in operation for 180hrs. To dismiss & reset the alarm after cleaning, press & hold the ✅ button for 2 seconds
Hob2Hood
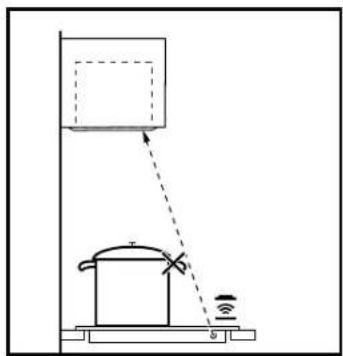
This is an advanced automatic function which connects the hob to a special hood. Both the hob and the hood have an infra-red signal communicator. Speed of the fan is defined automatically on basis of mode setting and temperature of the hottest cookware on the hob. You can also operate the fan from the hob manually.
Hints and Tips for Hob2Hood function
When you operate the hob with Hob2Hood function:
- Protect the hood panel from direct sunlight.
- Do not spot halogen light on the hood panel.
- Do not cover the hob panel.
- Do not interrupt the signal between the hob and the hood (for example with a hand or a cookware handle).
When Hob2Hood is triggered by hob, the ① indicator will be on. This indicates that the Hob2Hood is active
natural_image
Simple line drawing of a cooking setup with a pot, scale, and a hanging container (no text or symbols)i IMPORTANT!
It may happen that other remote controlled appliances may block the signal. To avoid it do not operate the remote of the appliance and the hob at the same time.
Rangehoods with the Hob2Hood function
To find the full range of rangehoods which work with this function refer to our consumer website. The rangehoods that work with this function must have the
symbol Auto or
Maintenance
! WARNING!
- Before maintenance or cleaning is carried out, the rangehood should be disconnected from the main power supply. Ensure that the rangehood is switched off at the wall socket and the plug removed.
- External surfaces are susceptible to scratches and abrasions, so please follow the cleaning instructions to ensure the best possible result is achieved without damage.
- There is a fire risk if cleaning is not carried out in accordance with the instructions.
- Do not change the light bulb or carry out maintenance immediately after use as the bulb and the rangehood maybe hot. Allow it to cool first.
Use both hands for removing and re-fitting the filter to avoid accidentally dropping the filter on to your cooktop or kitchen bench.
Take care of sharp edges during installation, maintenance and cleaning. When the filters, light cover or fascia panel are removed, wear gloves for protection.
Care and cleaning
Cleaning steel surface
Clean stainless steel surfaces using non-abrasive cleaning products that are specifically or use on stainless steel. To ensure best results also use an even pressure and follow the grain of the stainless steel. Use of a soft cloth reduces the risk of scratching. If the cloth is wet ensure that a dry soft cloth is used to wipe down the surface again reducing the risk of any surface rust appearing.
Cleaning grease filters
The filter must be cleaned at least once a month using non aggressive detergents, either by hand or in the dishwasher, which must be set to a low temperature and a short cycle. The openings must be placed downwards to let the water run out of the filters. The cleaning agents will make the aluminium filter turn dull, this is normal.
Carbon filter
The carbon filter should only be used if you want to use the hood in the recirculation function. This filter cannot be cleaned or re-used and as a general rule, the activated carbon filter should be changed as carbon filter requirement.
Replacing the light
Ensure light is cool before removing
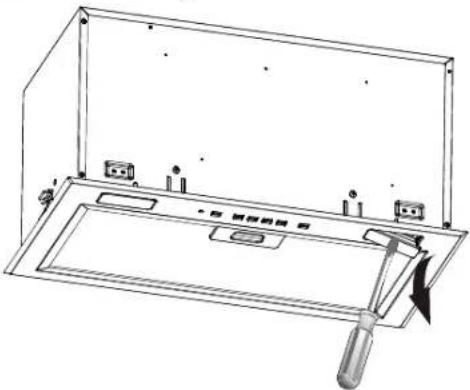
This range hood requires two LED light
Replace the LED lights by using the flat screw driver
Disconnect the light socket
Replace with new LED light
Suitable light for replacement
WRI515SC/WRI815SC:
Specification of light: ROHS/AC220-240V/2.5W/100LM
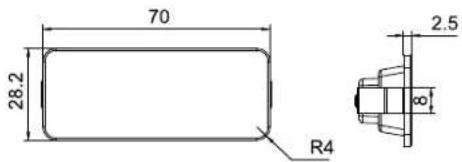
(CTH06-102) DSS-2.5 W-H-70x28.2mm
WRI525BC/WRI825BC:
Specification of light:ROHS/DC12V/2.5W/100LM
(CTH06-101) DSS-2.5 W-S-70x28.2mm
Dimension of light

Electrolux Warranty
FOR SALES IN AUSTRALIA AND NEW ZEALAND
APPLIANCE: WESTINGHOUSE RANGEHOODS
This document sets out the terms and conditions of the product warranties for Westinghouse Appliances. It is an important document. Please keep it with your proof of purchase documents in a safe place for future reference should there be a manufacturing defect in your Appliance. This warranty is in addition to other rights you may have under the Australian Consumer Law.
1. In this warranty:
(a) 'ACL' or 'Australian Consumer Law' means Schedule 2 to the Competition and Consumer Act 2010;
(b) 'Appliance' means any Electrolux product purchased by you and accompanied by this document;
(c) 'ASC' means Electrolux's authorised serviced centres;
(d) 'Westinghouse' is the brand controlled by Electrolux Home Products Pty Ltd of 163 O'Riordan Street, Mascot NSW 2020, ABN 51 004 762 341 in respect of Appliances purchased in Australia and Electrolux (NZ) Limited (collectively "Electrolux") of 3-5 Niall Burgess Road, Mount Wellington, in respect of Appliances purchased in New Zealand;
(e) 'Warranty Period' means the period specified in clause 3 of this warranty;
(f) 'you' means the purchaser of the Appliance not having purchased the Appliance for re-sale, and 'your' has a corresponding meaning.
- Application: This warranty only applies to new Appliances, purchased and used in Australia or New Zealand and is in addition to (and does not exclude, restrict, or modify in any way) other rights and remedies under a law to which the Appliances or services relate, including any non-excludable statutory guarantees in Australia and New Zealand.
- Warranty Period: Subject to these terms and conditions, this warranty continues for in Australia for a period of 24 months and in New Zealand for a period of 24 months, following the date of original purchase of the Appliance.
- Repair or replace warranty: During the Warranty Period, Electrolux or its ASC will, at no extra charge if your Appliance is readily accessible for service, without special equipment and subject to these terms and conditions, repair or replace any parts which it considers to be defective. Electrolux may, in its absolute discretion, choose whether the remedy offered for a valid warranty claim is repair or replacement. Electrolux or its ASC may use refurbished parts to repair your Appliance. You agree that any replaced Appliances or parts become the property of Electrolux.
- Travel and transportation costs: Subject to clause 7, Electrolux will bear the reasonable cost of transportation, travel and delivery of the Appliance to and from Electrolux or its ASC. Travel and transportation will be arranged by Electrolux as part of any valid warranty claim.
- Proof of purchase is required before you can make a claim under this warranty.
- Exclusions: You may not make a claim under this warranty unless the defect claimed is due to faulty or defective parts or workmanship. This warranty does not cover:
(a) light globes, batteries, filters or similar perishable parts;
(b) parts and Appliances not supplied by Electrolux;
(c) cosmetic damage which does not affect the operation of the Appliance;
(d) damage to the Appliance caused by:
(i) negligence or accident;
(ii) misuse or abuse, including failure to properly maintain or service;
(iii) improper, negligent or faulty servicing or repair works done by anyone other than an Electrolux authorised repairer or ASC;
(iv) normal wear and tear;
(v) power surges, electrical storm damage or incorrect power supply;
(vi) incomplete or improper installation;
(vii) incorrect, improper or inappropriate operation;
(viii) insect or vermin infestation;
(ix) failure to comply with any additional instructions supplied with the Appliance;
In addition, Electrolux is not liable under this warranty if:
(a) the Appliance has been, or Electrolux reasonably believes that the Appliance has been, used for purposes other than those for which the Appliance was intended, including where the Appliance has been used for any non-domestic purpose;
(b) the Appliance is modified without authority from Electrolux in writing;
(c) the Appliance's serial number or warranty seal has been removed or defaced
- How to claim under this warranty: To enquire about claiming under this warranty, please follow these steps:
(a) carefully check the operating instructions, user manual and the terms of this warranty;
(b) have the model and serial number of the Appliance available;
(c) have the proof of purchase (e.g. an invoice) available;
(d) telephone the numbers shown below.
-
Australia: For Appliances and services provided by Electrolux in Australia: Electrolux goods come with guarantees that cannot be excluded under the Australian Consumer Law. You are entitled to a replacement or refund for a major failure and for compensation for any other reasonably foreseeable loss or damage. You are also entitled to have the Appliance repaired or replaced if the Appliance fails to be of acceptable quality and the failure does not amount to a major failure. 'Acceptable quality' and 'major failure' have the same meaning as referred to in the ACL.
-
New Zealand: For Appliances and services provided by Electrolux in New Zealand, the Appliances come with a guarantee by Electrolux pursuant to the provisions of the Consumer Guarantees Act, the Sale of Goods Act and the Fair Trading Act. Where the Appliance was purchased in New Zealand for commercial purposes the Consumer Guarantee Act does not apply.
-
Confidentiality: You accept that if you make a warranty claim, Electrolux and its agents including ASC may exchange information in relation to you to enable Electrolux to meet its obligations under this warranty.
Important Notice
Before calling for service, please ensure that the steps listed in clause 8 above have been followed.
| AUSTRALIA | FOR SERVICEor to find the address of your nearest authorised service centre in AustraliaPLEASE CALL 13 13 49For the cost of a local call | FOR SPARE PARTSor to find the address of your nearest spare parts centre in AustraliaPLEASE CALL 13 13 50For the cost of a local call |
| NEW ZEALAND | FOR SERVICEor to find the address of your nearest authorised service centre in New ZealandPLEASE CALL 0800 10 66 10 | FOR SPARE PARTSor to find the address of your nearest spare parts centre in New ZealandPLEASE CALL 0800 10 66 20 |
For more information on all Westinghouse appliances, or for dimension and installation information, call into your retailer, phone or email our customer care team or visit our website:
AUSTRALIA
phone: 13 1349
email: customercare@electrolux.com.au
web: westinghouse.com.au
NEW ZEALAND
phone: 0800 10 66 10
email: customercare@electrolux.co.nz
web: westinghouse.co.nz


- INTEGRATED RANGEHOOD
- WELCOME TO WESTINGHOUSE
- LEGEND
- WARNING!
- CAUTION!
- IMPORTANT!
- ENVIRONMENT!
- CONDITIONS OF USE
- RECORD MODEL AND SERIAL NUMBER HERE:
- IMPORTANT INFORMATION THAT MAY IMPACT YOUR MANUFACTURER'S WARRANTY
- SAFETY INSTRUCTIONS
- CAUTION
- Cleaning
- Electrical Connection
- Accessories
- INSTALLATION
- Standard ducting installation
- The items shown below are supplied
- Parts to be purchased
- Cutting the cabinet
- Fixing the rangehood
- OPERATION & MAINTENANCE
- Turning on/off the fan
- Fan speeds
- Turning on/off the light
- Turning on the fan
- Turning off the fan
- Delay off
- Activating/Deactivating the carbon filter saturation alarm
- Grease filter saturation alarm
- Carbon filter saturation alarm
- Hob2Hood
- i IMPORTANT!
- ! WARNING!
- Care and cleaning
- Cleaning steel surface
- Cleaning grease filters
- Carbon filter
- Replacing the light
- Suitable light for replacement
- Dimension of light
- Electrolux Warranty
- In this warranty:
- AUSTRALIA
- NEW ZEALAND
Marke : WESTINGHOUSE
Modell : WRI525BC
Kategorie : Dunstabzugshaube