
Lynx-5000E - Nicht kategorisiert KYOCERA - Kostenlose Bedienungsanleitung
Finden Sie kostenlos die Bedienungsanleitung des Geräts Lynx-5000E KYOCERA als PDF.

| Produkttyp | Robustes Smartphone |
| Marke | Kyocera |
| Modell | Lynx-5000E |
| Abmessungen (H×B×T) | 152 × 75 × 12 mm |
| Gewicht | 220 g |
| Displaygröße | 5,0 Zoll |
| Displayauflösung | 1280 × 720 Pixel |
| Prozessor | Qualcomm Snapdragon 430 |
| Arbeitsspeicher (RAM) | 3 GB |
| Interner Speicher | 32 GB |
| Hauptkamera | 13 MP |
| Frontkamera | 5 MP |
| Akku-Kapazität | 4000 mAh |
| Betriebssystem | Android 9.0 |
| Schutzklasse | IP68 |
| Besonderheiten | Robustes Gehäuse, wasserdicht, stoßfest |
| Lieferumfang | Netzteil, USB-Kabel, Kurzanleitung |
Häufig gestellte Fragen - Lynx-5000E KYOCERA
Benutzerfragen zu Lynx-5000E KYOCERA
0 Frage zu diesem Gerät. Beantworten Sie die, die Sie kennen, oder stellen Sie Ihre eigene.
Eine neue Frage zu diesem Gerät stellen
Laden Sie die Anleitung für Ihr Nicht kategorisiert kostenlos im PDF-Format! Finden Sie Ihr Handbuch Lynx-5000E - KYOCERA und nehmen Sie Ihr elektronisches Gerät wieder in die Hand. Auf dieser Seite sind alle Dokumente veröffentlicht, die für die Verwendung Ihres Geräts notwendig sind. Lynx-5000E von der Marke KYOCERA.
BEDIENUNGSANLEITUNG Lynx-5000E KYOCERA
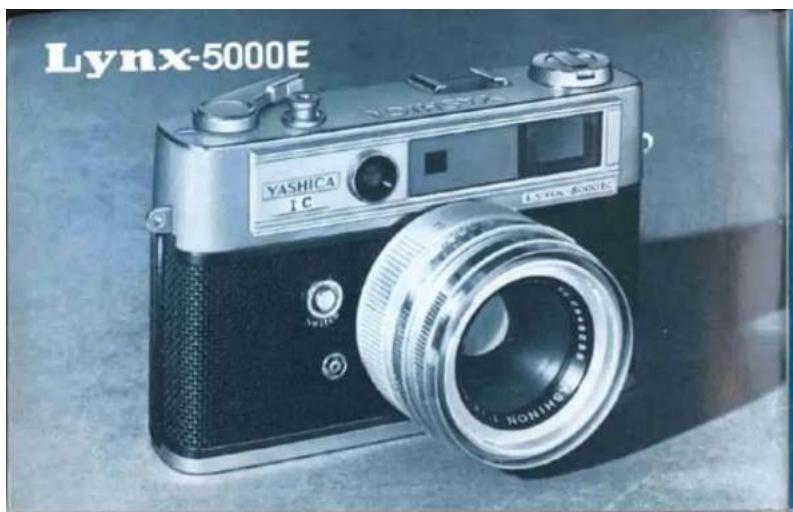
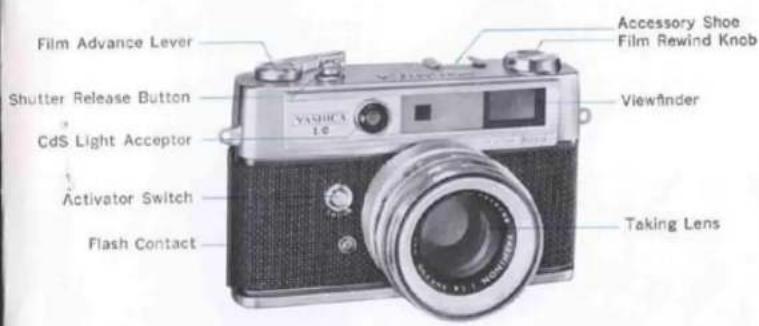
You are now the owner of the YASHICA Lynx-5000E which offers outstanding performance and assures maximum picture-taking versatility. For the first time in the world, the Lynx-5000E features an electronic exposure computer incorporating an integrated circuit (IC) and a set of transistors. Indicator lamps in the finder provide greater ease and accuracy in correct exposure setting. This unique system is completely shock-resistant and is invulnerable to damage. Coupled with this remarkable feature, the superb Yashinon lens which delivers sharp and crisp results in both color and black-and-white will certainly give you boundless pleasure in photography.
OUTLINE OF CAMERA OPERATION
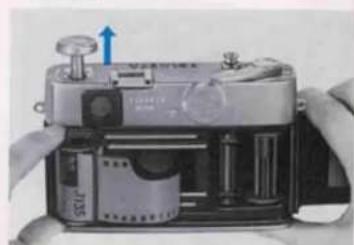
1 After loading the film, set the figure equivalent to the ASA speed rating of the film in use in the ASA speed indicator window.
natural_image
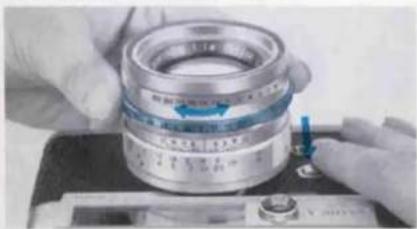
Close-up of a hand holding a cylindrical mechanical component, no visible text or symbols2 Preselect the desired shutter speed.
natural_image
Close-up of hands assembling a mechanical bearing component with blue arrows indicating direction (no visible text or symbols)3 While pressing the activator button, sight through the viewfinder and rotate the aperture ring until the red "OVER" or "UNDER" indicator lamp turns off to signal correct exposure setting.

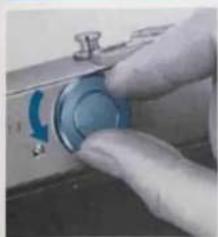
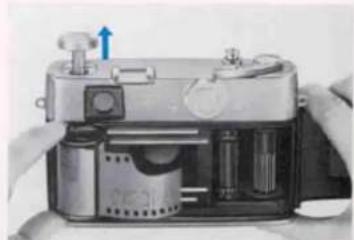
INSTALLING THE BATTERIES
natural_image
Close-up of a hand pressing a blue button on a kitchen sink (no visible text or symbols)
natural_image
Close-up of a metallic mechanical component with three blue cylindrical ports and a small protruding knob (no visible text or symbols)Open the battery compartment lid by turning it counter-clockwise. As illustrated, install two mercury batteries so that their plus (+) side faces towards you and close the lid securely.
Use two 1.3V mercury batteries (Mallory RM640R or equivalent).
Precautions on Handling the Mercury Batteries
- To prevent unnecessary drain of battery power, the electric current is supplied only over the duration the activator button is depressed.
- Do not throw used mercury batteries into trash cans or waste receptacles.
- Do not dismantle mercury batteries or leave them where children can get hold of them. Never throw used batteries in the fire.
- Ordinarily, a set of mercury batteries will provide sufficient power over a access to about one and a half years, but it is advisable to make replacement before the battery power is completely exhausted.
- The mercury batteries should be replaced if the red "UNDER" and "OVER" lamps fail to turn on, even when you turn the aperture ring in either direction.
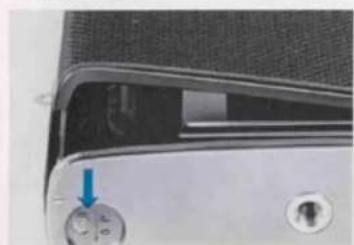
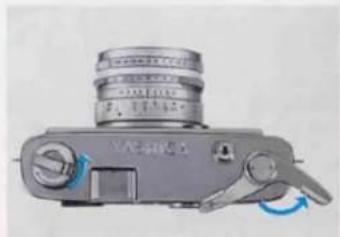
LOADING THE FILM
- The rear cover will pop open when the rear cover lock on the camera base is moved in the direction of the arrow and then pressed down.
natural_image
Close-up of a device's front panel showing a control knob with an arrow pointing to it (no visible text or symbols)Avoid direct sunlight when loading your film. Make it a rule to load in the shade,
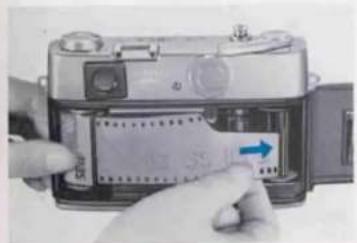
- Pull out the film rewind knob, place the film cassette into the film chamber and return the rewind knob to its original position.
natural_image
Close-up of hands operating a vintage camera with visible internal components and a blue arrow indicating motion (no text or symbols)-
Draw out some length of the film from the cassette and introduce the tip of the film leader into one of the slots on the take-up spool.
-
After ascertaining that the sprocket teeth properly catch the perforations along both edges of the film, manipulate the film advance lever. When it is determined that the film is advancing properly, close the rear cover.
natural_image
Close-up of hands inserting a card into a digital camera module (no visible text or symbols)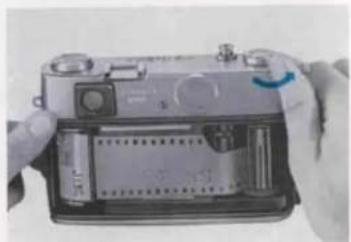
natural_image
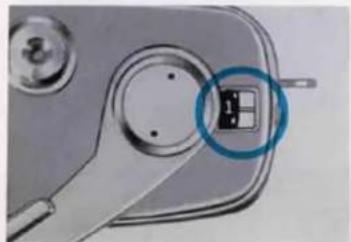
Close-up of hands holding a battery pack with a switch, no visible text or symbols- All the while during film loading, the exposure counter will register the letter "S" (Start). Release the shutter and wind the film advance lever alternately until the figure "1" appears in the counter window. (The exposure counter of the Lynx-5000E automatically resets to "S" when the rear cover is opened.)
natural_image
Close-up of a mechanical component with a highlighted square symbol (no text or symbols present)- When the counter shows the figure "1", you're now ready to shoot your first frame. Manipulation of the film advance lever then automatically registers count of exposures. If the film rewind knob rotates when the film advance lever is wound, it is an indication that the film is advancing properly. Make sure the film advance lever is given a full stroke until it goes no further.
natural_image
Close-up of a metallic camera with lens and control knob (no visible text or symbols)REWINDING THE FILM
natural_image
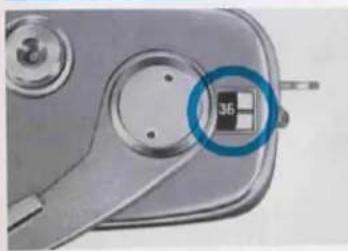
Close-up of a mechanical component with a circular annotation highlighting a small black square (no text or symbols visible)- When the exposure counter registers the figure "36" (20 in case of 20-exposure load), it means that the full length of the film has been exposed. Do not wind the film forcibly, because it may tear or come loose from the cassette, making it impossible to rewind.
When the full length of the film has been
natural_image
Close-up of a metallic mechanical component with a blue-tipped knob (no visible text or symbols)- Push the film rewind button on the camera base. (This button pops out when the film advance lever is manipulated, resetting the mechanism for smooth film wind.)
exposed, rewind it into the cassette before opening the rear cover for unloading.
natural_image
Close-up of a hand using a tool to adjust a small mechanical component (no visible text or symbols)- Fold out the crank-handle on the film rewind knob and turn it in the direction of the arrow. A slight resistance will be felt when the film pulls off the take-up spool, but continue winding the crank-handle.
natural_image
Close-up of a mechanical device with a blue arrow indicating direction, showing internal components and no visible text or symbols.- When the crank-handle rotates freely without any resistance, open the rear cover, pull out the rewind knob and take out the film cassette.
EXPOSURE SETTING
natural_image
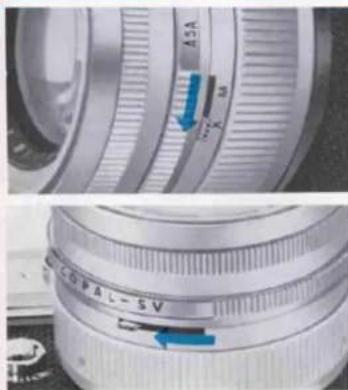
Close-up of a mechanical component with multiple circular parts and a blue arrow pointing to a specific part (no visible text or symbols)1. SET THE ASA SPEED RATING
Turn the ASA speed control lever and set the figure denoting the ASA speed rating of the film loaded in the camera in the ASA speed indicator window. Correct exposure will not be assured unless the ASA speed is set properly.
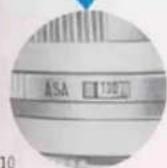
ASA DIAL
| 800 | 400 | 200 | 100 | 50 | 32 | 16 | 10 |
| ASA 80 | ASA 25 | ASA 12 |
The ASA speed rating is clearly specified on the box in which the film is supplied or on the instruction sheet which comes with the film.
| LIGHTING CONDITIONS | SHUTTER SPEEDS |
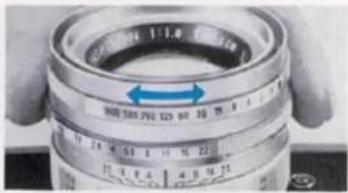
2. PRESELECT THE SHUTTER SPEED
Turn the shutter speed control ring and align the desired shutter speed setting with the red indicator line.
When using a film with a speed rating of ASA 100, refer to the table given on this page for standard shutter speed setting.
- Set the shutter speed at 1/1000 sec. to freeze fast-moving subjects, such as aircrafts and automobiles, or when shooting sport scenes.
● Shutter speed of 1/500 sec. is fast enough for ordinary moving subjects.
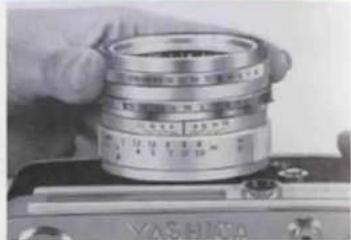
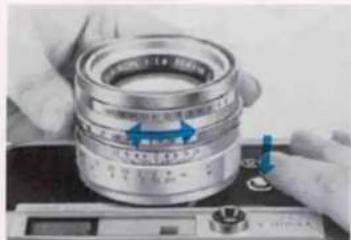
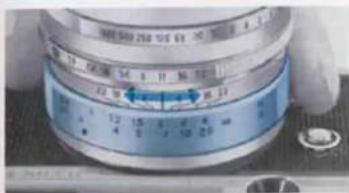
3. TURN THE APERTURE RING WHILE PRESSING THE ACTIVATOR BUTTON
Sight through the viewfinder while rotating the aperture ring and you will see the "OVER" or "UNDER" indicator lamp. The point where the lamps turn off indicates correct exposure setting.
natural_image
Close-up of hands assembling a mechanical bearing component on a workbench (no visible text or symbols)| VIEWFINDER FIELD | ||
| Over-exposure.....Rotate the aperture ring in the direction of the red arrow ◀ (left motion) until the "OVER" indicator lamp turns off. | If rotation of the aperture ring fails to turn off the "OVER" indicator lamp, select a faster shutter speed or else mount an ND or other type of filter over the lens and make exposure adjustment all over again. | |
| When both indicator lamps do not light, it signifies correct exposure setting. | ||
| UNDER▶ | Under-exposure.....Turn the aperture ring in the direction of the red arrow ▶ (right motion) until the "UNDER" indicator lamp turns off. | In case the "UNDER" indicator lamp fails to turn off, select a slower shutter speed or turn to flash photography. |
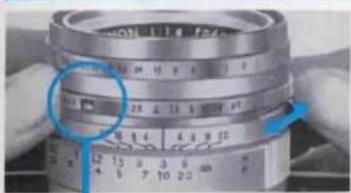
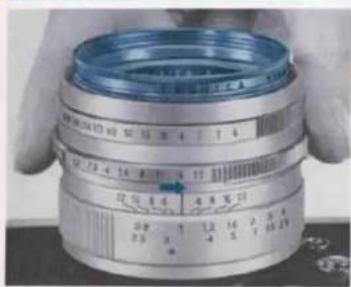
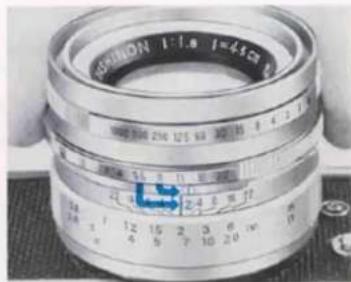
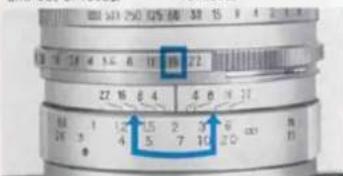
COMBINATION OF SHUTTER SPEED AND LENS APERTURE
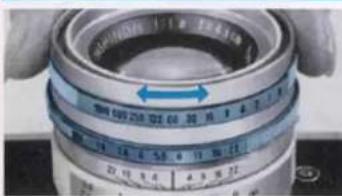
natural_image
Close-up of a camera lens with measurement markings and hands holding it (no readable text or symbols)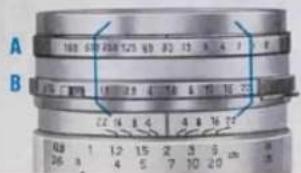
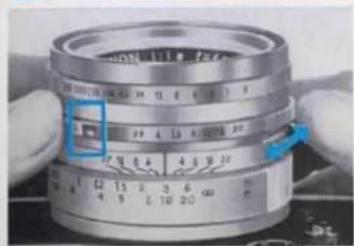
Once set to correct exposure, the Lynx-5000E provides the option of selection of a number of speed/aperture combinations to maintain the given light value, because the shutter speed control ring (A) is coupled to the aperture ring (B).
If, as illustrated in the lower photo, the correct exposure is determined to be f/5.6 at 1/30 sec., any one of the shutter speed/lens aperture combinations enclosed within the blue lines can be selected by simply turning the shutter speed control ring (A).
EXPOSURE ADJUSTMENT WHEN USING FILTERS
When shooting snow or beach scenes with a filter over the lens, compensation for exposure must be made according to the exposure factor of the filter in use (2X in case of Y.2 filter). With the Lynx-5000E, this exposure compensation is accomplished through adjustment of the aperture setting.
If the correct exposure setting under the prevailing light condition is f/16 at 1/250 sec., exposure compensation when using a filter with a factor of 2X should be made by turning the aperture ring by one setting to f/11. With a 4X filter, the aperture setting must be adjusted by two stops to f/8.
Note: In the above circumstance after adjustments have been made, disregard the red "OVER" indicator lamp which will turn on and press the shutter button. If lighting condition changes just prior to making an exposure, make exposure adjustment all over again.
EXPOSURE SETTING WHEN SHOOTING AGAINST LIGHT

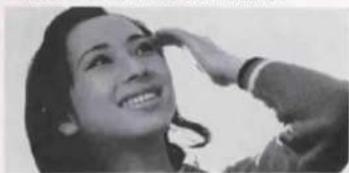
natural_image
Black-and-white portrait of a smiling woman with shoulder-length hair (no text or symbols visible)Exposure set in the normal manner
natural_image
Black-and-white photo of a smiling woman with hand near face (no text or symbols visible)Exposure reading taken by approaching the prime subject
When shooting against light or photographing a subject near a window, or against an excessively bright background such as snow-covered landscape, the prime subject is liable to appear extremely dark (under-exposed) if exposure is set in the normal manner.
To obtain sparkling results in such cases (See lower photo), approach your prime subject and take exposure reading by seeing to it that the bright light in the background is warded off from the light acceptor.
in case the prime subject cannot be approached, proper compensation must be made by adjusting the lens aperture.
Note: See footnote on page 15.
In order to obtain perfect exposure of the prime subject when shooting against light, it is necessary to give from twice to four times the normal exposure. The range of exposure adjustment in this case depends upon the intensity of the light in the background.
-
In case the light in the background is of comparatively low intensity, open the lens aperture by one setting. If the correct exposure setting is f/11 at 1/125 sec., set the aperture at f/8.
-
In case of exceedingly bright background, open the lens aperture by two settings.
If correct exposure determined according to normal method is f/11 at 1/125 sec., turn the aperture ring and adjust the aperture setting to f/5.6.
Note: See footnote on page 15.
natural_image
Close-up of a metallic camera lens with visible aperture and adjustment knobs (no text or symbols on the lens itself)VIEWFINDER
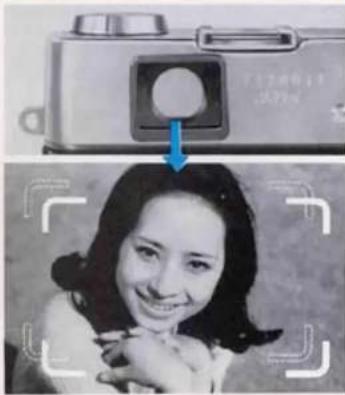
natural_image
Black-and-white photo of a smiling woman holding a camera, with a blue arrow pointing to the camera (no visible text or symbols)The viewfinder of the Lynx-5000E incorporates a bright frame outlining the exact area which will be reproduced on the film plane.
It also features automatic parallax compensation. In other words, the viewfinder frame moves diagonally in accordance with the focusing range to make compensation for the slight difference between the field covered by the viewfinder and that of the camera lens. Regardless of the camera-to-subject range, therefore, the picture you compose within this frame will be reproduced on the film plane.
FOCUSING
natural_image
Close-up of a mechanical dial with blue and white casing, showing measurement markings (no readable text or symbols)Focus adjustment is accomplished by turning the focusing ring while observing the image in the focusing spot in the center of the viewfinder field.
If, as shown in the lower left photo, two identical images appear in the center of the finder field, rotate the focusing ring until they are perfectly superimposed. This simple procedure permits precise focusing.

natural_image
Close-up of a smiling child's face with a blue arrow pointing to the right side (no text or symbols visible)FLASH PHOTOGRAPHY
natural_image
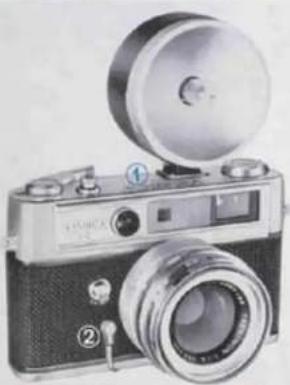
Vintage camera with dual lens and external frame (no visible text or symbols)Mount the flash unit on the accessory shoe ① of the Lynx-5000E. Plug the PC cord of the unit into the flash contact ② of the camera, and you're ready for flash photography.
The exposure in flash photography should be determined in accordance with the guide number of the flash bulb or electronic flash unit in use (refer to instructions supplied with the bulbs or unit).
(The correct aperture setting is obtained by dividing the guide number by the distance from the flash unit to your subject.)
The Yashica AG-D flash gun can be used on a camera with the direct contact shoe, as a cordless flash gun.
When using M-class flashbulbs, switch the sync selector lever to "M". Set the sync selector lever to "X" when using F-class flashbulbs or electronic flash unit.
| Type of flashbulb | Contact | Range of synchronization |
| M class | M | All shutter speeds |
| F class | X | 1/30 sec. or slower shutter speeds |
| Electronic flash | X | All shutter speeds |

natural_image
Close-up of a metallic camera lens with visible aperture and adjustment knob (no text or symbols)USE OF CABLE RELEASE · BULB EXPOSURE
natural_image
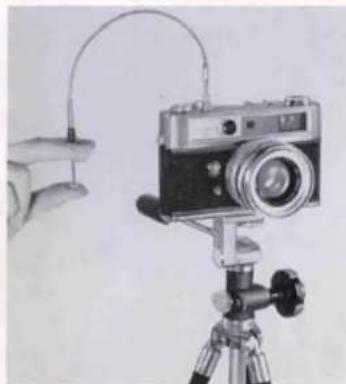
Illustration of a vintage camera mounted on a tripod with a hand holding a small object nearby (no text or symbols visible)USE OF CABLE RELEASE
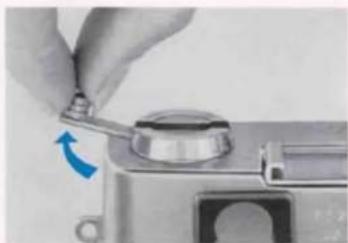
To prevent erratic movement during exposure, it is advisable to mount the camera on a tripod and to use a cable release when shooting at 1/30 sec. or slower shutter speeds. Mount the cable release in the threaded socket on the shutter release button.
BULB EXPOSURE
When the shutter control ring is adjusted to B (bulb) setting, the shutter will remain open over the duration the shutter release button is depressed. This B setting is used when long exposure of more than one second is required, and is effective in shooting night scenes, fireworks, etc.
SELF-TIMER
By using the self-timer, you can put yourself in the picture.
① Set the sync selector lever to "X".
② Charge the shutter by winding the film advance lever.
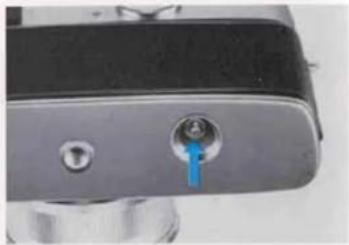
① Set the self-timer by moving the self-timer lever located on the bottom of the lens barrel in the direction of the arrow (See lower left photo).
Secure focus (if you are all alone, focus on the spot where you plan to stand), press the shutter release button, set yourself at the predetermined position without delay and face the camera.
The self-timer trips the shutter approximately 7 to 8 seconds after the shutter release is pressed.
DEPTH OF FIELD
Aperture set at f/1.8 Objects in the background appear blurred and out of focus.
Aperture set at f/16 Objects in the background appear sharply focused.
By depth of field, it is meant the range over which objects in the foreground and background appear acceptably sharp when the camera lens is focused on a subject at a given distance.
The depth of field becomes more extensive when the lens aperture is closed to a smaller opening and likewise increases in proportion to the camera-to-subject distance.
The depth of field can be determined by referring to the table on the following page or by directly reading off the depth-of-field scale engraved on the lens barrel.
In case the camera lens is focused on a subject at a distance of two meters and the correct aperture setting is f/16, the range indicated by the figure "16" on both side of the index (1) is the depth of field. In other words, all objects within the range of about 1.3 meters to 5 meters will appear acceptably sharp on the film plane.
Depth of Field Table
YASHINON F:1.8/45mm
| m\F | 1.8 | 2.8 | 4 | 5.6 | 8 | 11 | 16 | 22 |
| 0.8 | 0.780.82 | 0.770.83 | 0.760.84 | 0.750.86 | 0.730.89 | 0.700.93 | 0.661.01 | 0.621.11 |
| 0.9 | 0.880.92 | 0.870.94 | 0.850.96 | 0.830.98 | 0.811.02 | 0.781.07 | 0.731.17 | 0.681.32 |
| 1 | 0.971.03 | 0.961.05 | 0.941.07 | 0.921.10 | 0.891.15 | 0.851.22 | 0.801.35 | 0.761.55 |
| 1.2 | 1.161.24 | 1.141.27 | 1.111.30 | 1.081.35 | 1.041.47 | 0.991.53 | 0.911.75 | 0.842.11 |
| 1.5 | 1.441.57 | 1.401.61 | 1.371.66 | 1.371.74 | 1.251.87 | 1.182.06 | 1.042.48 | 0.973.28 |
| 2 | 1.892.13 | 1.822.20 | 1.772.31 | 1.692.46 | 1.582.72 | 1.473.15 | 1.314.25 | 1.167.36 |
| 3 | 2.753.30 | 2.633.49 | 2.503.75 | 2.344.17 | 2.145.00 | 1.945.67 | 1.6715.1 | 1.43∞ |
| 5 | 4.345.89 | 4.056.45 | 3.747.53 | 3.409.43 | 2.9915.2 | 2.6065.0 | 2.13∞ | 1.76∞ |
| 10 | 7.6714.4 | 6.7918.9 | 5.9730.7 | 5.14∞ | 4.26∞ | 3.50∞ | 2.71∞ | 2.12∞ |
| ∞ | 32.8∞ | 21.1∞ | 14.8∞ | 10.5∞ | 7.38∞ | 5.37∞ | 3.69∞ | 2.69∞ |
| ^F | 1.8 | 2.8 | 4 | 5.6 | 8 | 11 | 16 | 22 |
| 2.0 | 2.54 | 2.51 | 2.48 | 2.43 | 2.36 | 2.28 | 2.16 | 2.03 |
| 2.56 | 2.70 | 2.74 | 2.80 | 2.89 | 3.02 | 3.26 | 3.60 | |
| 3.0 | 2.52 | 2.88 | 2.83 | 2.77 | 2.68 | 2.58 | 2.43 | 2.27 |
| 3.08 | 3.13 | 3.19 | 3.27 | 3.40 | 3.58 | 3.92 | 4.44 | |
| 3.5 | 3.39 | 3.34 | 3.27 | 3.19 | 3.08 | 2.94 | 2.74 | 2.54 |
| 3.61 | 3.68 | 3.76 | 3.88 | 4.06 | 4.32 | 4.84 | 5.65 | |
| 4.0 | 3.86 | 3.79 | 3.71 | 3.60 | 3.45 | 3.28 | 3.04 | 2.78 |
| 4.15 | 4.24 | 4.35 | 4.50 | 4.76 | 5.12 | 5.87 | 7.11 | |
| 5.0 | 4.78 | 4.57 | 4.56 | 4.39 | 4.17 | 3.92 | 3.57 | 3.02 |
| 5.24 | 5.38 | 5.56 | 5.82 | 6.25 | 6.90 | 8.34 | 11.1 | |
| 7.0 | 6.58 | 6.37 | 6.13 | 5.84 | 5.46 | 5.04 | 4.47 | 3.97 |
| 7.48 | 7.77 | 8.15 | 8.73 | 9.76 | 11.5 | 16.1 | 31.5 | |
| 10.0 | 9.16 | 8.75 | 8.31 | 7.78 | 7.11 | 6.41 | 5.51 | 4.72 |
| 11.0 | 11.7 | 12.6 | 14.0 | 16.9 | 22.7 | 53.7 | ∞ | |
| 15.0 | 13.2 | 12.4 | 11.5 | 10.5 | 9.30 | 8.14 | 6.74 | 5.58 |
| 17.4 | 19.1 | 21.6 | 26.3 | 38.8 | 95.7 | ∞ | ∞ | |
| 30.0 | 23.5 | 21.0 | 18.6 | 16.1 | 12.4 | 11.1 | 8.66 | 6.83 |
| 41.5 | 52.8 | 78.2 | ∞ | ∞ | ∞ | ∞ | ∞ | |
| ∞ | 108 | 69.2 | 48.4 | 34.6 | 24.2 | 17.6 | 12.1 | 8.81 |
| ∞ | ∞ | ∞ | ∞ | ∞ | ∞ | ∞ | ∞ |
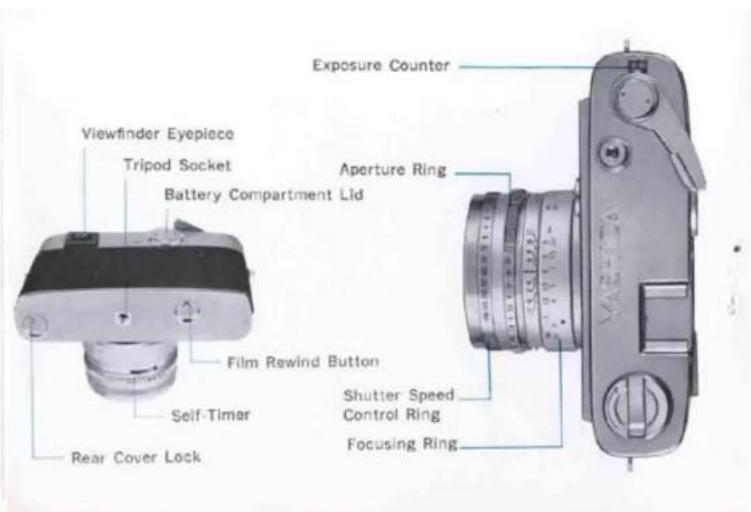
DESCRIPTION OF PARTS
FEATURES
- Yashinon 45 mm f/1.8 lens
- COPAL SV shutter with speeds from 1 to 1/1000 sec. and B
- Built-in self-timer, M-X flash sync.
- Bright frame range/viewfinder with
automatic parallax compensation ● Electronic IC exposure control with CdS sensor; "Over", "Under" indicator lamps visible through the finder; sensitivity range from EV 3 to 17 at ASA 100; ASA range from 10-800; works on two 1.3V mercury batteries
● Minimum focusing range at 2.6 feet (0.8m) ● Aperture range from f/1.8 to f/22 - Single-stroke film advance lever charges shutter and registers count on auto-resetting exposure counter
- Crank-handle film rewind
- Multi-slot take-up spool for easy loading
- Accepts 46 mm screw-in filter and 54 mm slip-on lens shade
ACCESSORIES
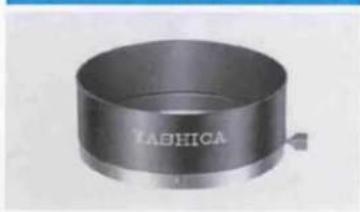
natural_image
Metallic cylindrical object with engraved text 'RADHICA' on its side (no other visible text or symbols)YASHICA LENS SHADE
The use of the lens shade is recommended when shooting subjects against light. Your Lynx-5000E accepts a 54mm slip-on type lens shade.
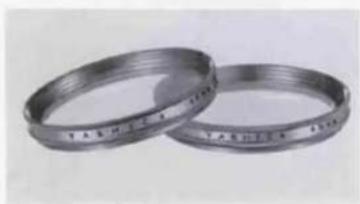
natural_image
Two metallic ring rings with engraved markings, no visible text or symbols on the rings themselves.YASHICA FILTERS
Use 46mm screw-in type filters with your Lynx-5000E. Yashica filters for either color or black-and-white photography are available.
682S10Y1