
37-0108 - Laserwasserwaage Viper - Kostenlose Bedienungsanleitung
Finden Sie kostenlos die Bedienungsanleitung des Geräts 37-0108 Viper als PDF.


| Produkttyp | Laser Dart Line (Laserlinie für Darts) |
| Marke | Viper |
| Modell | 37-0108 |
| Laserklasse | Klasse II Laserprodukt |
| Maximale optische Ausgangsleistung | <5 mW |
| Wellenlänge | 650 nm - 660 nm |
| Batterietyp | 4 x AA (nicht enthalten) |
| Externe Stromversorgung | AC/DC-Adapter 5 V, 1000 mA, positive Außenpolarität (nicht enthalten, Art.-Nr. 42-9987) |
| Befestigung | Direkt an der Wand oder unter einem Dartboard-Kabinett |
| Wurfabstandsmessung | Einstellbar mit temporärer Linie |
| Warnhinweise | Nicht direkt in den Laser blicken; von Kindern fernhalten; nicht in die Augen richten; spiegelnde Oberflächen vermeiden |
| Garantie | 90 Tage ab Kaufdatum auf Herstellungsfehler (durch ursprünglichen Käufer) |
| Zulassung | Erfüllt FDA-Strahlenschutzstandards 21 CFR Kapitel 1, Unterkapitel J |
| Zubehör | AC-Adapter (separat erhältlich), 4 AA-Batterien (nicht enthalten) |
| Entsorgungshinweis | Batterien umgehend und ordnungsgemäß entsorgen, nicht verbrennen |
Häufig gestellte Fragen - 37-0108 Viper
Benutzerfragen zu 37-0108 Viper
0 Frage zu diesem Gerät. Beantworten Sie die, die Sie kennen, oder stellen Sie Ihre eigene.
Eine neue Frage zu diesem Gerät stellen
Laden Sie die Anleitung für Ihr Laserwasserwaage kostenlos im PDF-Format! Finden Sie Ihr Handbuch 37-0108 - Viper und nehmen Sie Ihr elektronisches Gerät wieder in die Hand. Auf dieser Seite sind alle Dokumente veröffentlicht, die für die Verwendung Ihres Geräts notwendig sind. 37-0108 von der Marke Viper.
BEDIENUNGSANLEITUNG 37-0108 Viper
Laser Dart Line Mounting Instructions #37-0108
AVOID EXPOSURE LASER RADIATION IS EMITTED FROM THE APERTURE

AVOID DIRECT EYE EXPOSURE
Max Output <5mW, Wavelength 650nm-660mm, Class II Laser Product

Complies with FDA Radiation Performance Standards 21 CFR Chapter 1, Subchapter J
GLD Products, Muskego, WI 53150, Model #37-0108
ACCESSION NO:1410047-000
When the laser beam dims, or stops operating, replace batteries
Dispose of batteries promptly and properly, Do not burn them
Use only fresh batteries of the required size and type
Do not mix old and new batteries, or different types
If you do not plan to use the Laser Dart Line for a month or more remove batteries,
batteries can leak chemicals that can damage electronic parts
WARNING! Never look directly into the laser
WARNING! Keep away from children
WARNING! Never point the device towards anyone's eyes
WARNING! Laser light can also be dangerous when reflected on a mirror-like surface
WARNING! Use of controls or adjustments, or the performance of procedures other than specified herein,
can result in hazardous radiation exposure
Read all instructions carefully before mounting the Laser Dart Line.
The Laser Dart Line can be mounted directly to a wall or the underside of a dartboard cabinet.
Required tools: pencil, screws, screwdriver, tape measure, drill, drill bit, and level.
Instructions
1) Mount your dartboard or dart cabinet. With one hand, place the Laser Dart Line on the wall or cabinet directly below and centered to the dartboard. With your other hand, level the Laser Dart Line.

2) Locate the two mounting holes on the front of the Laser Dart Line. Use a pencil, marker, or nail to mark the center of the holes on the wall or cabinet.

3) Drill a pilot hole on each mark that you created in step two. If using plastic anchors for dry wall, plaster, or cement, drill the holes so that the anchors fit snugly. Insert the plastic anchor. If drilling into a wood cabinet or wood stud, only pilot holes will be necessary.
4) Align the Laser Dart Line with the anchors or pilot holes and screw the Laser Dart Line into place. The screws will expand the plastic anchors. Before tightening the screws, check that the Laser Dart Line is level.
5) Remove the front battery cover and insert 4 AA batteries. The Laser Dart Line can also be powered by an AC to 5v 1000 mA adapter with DC plug polarity configured as positive (+) outside and negative (-) inside. (4 AA Batteries and adapter not included). Adapter item #42-9987 is available from GLD Products.

CAUTION:
The power adapter is not a battery charging device.
Do not plug in the power adapter when the Laser Dart Line is turned on.
Remove all the batteries before plugging in the power supply.
6) Measure the distance for your throw line
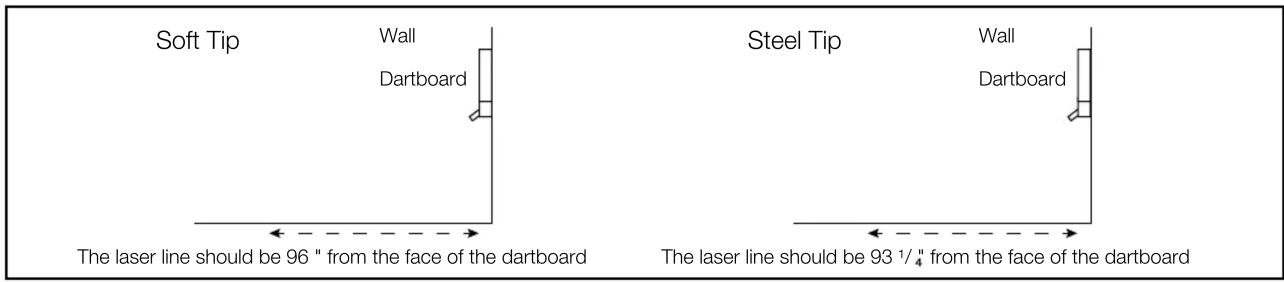
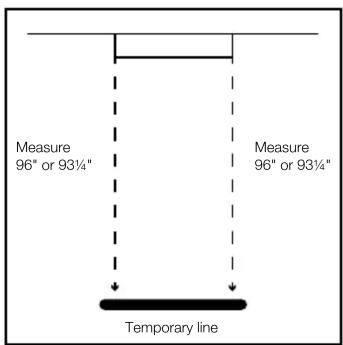
Use a common household item, such as a broom handle or ruler, to make a temporary line at the correct distance. Measure from each side of the dartboard to the temporary line.

7) Once your laser throw line is set, tighten the 2 screws next to ball to secure the Laser Line in place.
8) WARNING: AVOID DIRECT EYE EXPOSURE
Turn the Laser Dart Line on and position the laser head until it is fl ush with your temporary line.
9) If your surface area is uneven, loosen either the left or right screw and place shims behind the housing of the Laser Dart Line until the Laser Dart Line is in the correct position.
Please call or consult the GLD website, gldproducts.com, to order the 5V 1000ma Positive Outer Power Adapter, #42-9987.
WARRANTY: Great Lakes Dart Mfg, Inc. warrants this product to be free of defects in material and workmanship for a period of 90 days by the original purchaser of the unit. This warranty covers manufacturers defects only, not normal wear and tear. This warranty does not apply to products damaged through accidents, misuse, or neglect. Your warranty is void if service is attempted by anyone other than the manufacturer or authorized agent. Great Lakes Dart Mfg., Inc. reserves the right to make an inspection and determination of all warranty claims. For questions concerning products of Great Lakes Dart Mfg., Inc., please call our Customer Service Representatives at 1-800-225-7593.




Marke : Viper
Modell : 37-0108
Kategorie : Laserwasserwaage