
LED-320 IBSMT - Fernseher Grunkel - Kostenlose Bedienungsanleitung
Finden Sie kostenlos die Bedienungsanleitung des Geräts LED-320 IBSMT Grunkel als PDF.


| Produkttyp | Fernseher |
| Marke | Grunkel |
| Modell | LED-320 IBSMT |
| Bildschirmdiagonale | 32 Zoll (81 cm) |
| Displaysystem | LED |
| Abmessungen (mit Ständer) | Ca. 73,5 x 44,0 x 8,0 cm (B x H x T) |
| Gewicht (mit Ständer) | Ca. 4,5 kg |
| Stromversorgung | AC 100–240 V ~ 50/60 Hz |
| Leistungsaufnahme (Betrieb) | 56 W |
| Leistungsaufnahme (Standby) | < 0,5 W |
| Hauptfunktionen | DVB-T2, DVB-S2, HDMI, USB, VGA, CI-Slot, PVR, Mediaplayer, Android |
| Anschlüsse | 2× HDMI, 1× USB, 1× VGA, 1× AV (Cinch), 1× Antennenanschluss, 1× Satellitenanschluss, 1× RJ45 (LAN), 1× Optischer Audioausgang, 1× Kopfhörerausgang |
| Fernbedienung | Ja (inkl. Batterien AAA) |
| Energieeffizienzklasse | A+ (geschätzt) |
| Reinigung | Nur mit einem trockenen Tuch reinigen |
| Sicherheitshinweise | Nicht in der Nähe von Wasser oder Wärmequellen aufstellen; Lüftungsschlitze nicht blockieren; Netzstecker leicht zugänglich halten; Gerät nicht Regen oder Feuchtigkeit aussetzen |
| Mitgeliefertes Zubehör | Bedienungsanleitung, Fernbedienung, Netzkabel, 2× AAA-Batterien |
| Reparatur | Nur durch qualifiziertes Servicepersonal; keine eigenmächtigen Reparaturen |
Häufig gestellte Fragen - LED-320 IBSMT Grunkel
Benutzerfragen zu LED-320 IBSMT Grunkel
0 Frage zu diesem Gerät. Beantworten Sie die, die Sie kennen, oder stellen Sie Ihre eigene.
Eine neue Frage zu diesem Gerät stellen
Laden Sie die Anleitung für Ihr Fernseher kostenlos im PDF-Format! Finden Sie Ihr Handbuch LED-320 IBSMT - Grunkel und nehmen Sie Ihr elektronisches Gerät wieder in die Hand. Auf dieser Seite sind alle Dokumente veröffentlicht, die für die Verwendung Ihres Geräts notwendig sind. LED-320 IBSMT von der Marke Grunkel.
BEDIENUNGSANLEITUNG LED-320 IBSMT Grunkel
USER MANUAL
Model NO.: LED-320 IBSMT

IMPORTANT
Please read this manual carefully before installing and operating the TV.
Keep this manual handy for further reference
Content
Safety Information....2
Important Safety Precautions 3
TV Buttons And Terminal Interface 4
External device connection diagram 5
Install And Connect TV 6
Setup Wizard 7
Help....25
Specifications....26
Remote Controller....27
Safety Information
CAUTION
RISK OF ELECTRIC SHOCK DO NOT OPEN
High voltages are used in the operation of this product. to reduce the risk of electric shock, do not remove cover of the cabinet, refer servicing to qualified service personal
If the TV any changes or coarse adjustment, electric shocks to be hurt, do not attempt to open a machine-maintenance, customer contact centres needed overhaul.

The exclamation point within an equilateral triangle is intended to alert the user to the presence of important operating in the literature accompanying the appliance.

natural_image
Warning symbol of a lightning bolt inside a triangle (no text or numbers)Warning The lightning flash with arrowhead symbol within an equilateral triangle, is intended to alert the user to the presence of uninsulated dangerous voltage within the products enclosure that may be of sufficient magnitude to constitute a risk of electric shock to persons.
Important Safety Precautions
1) Read these instructions.
2) Keep these instructions.
3) Heed all warnings.
4) Follow all instructions.
5) Do not use this apparatus near water.
6) Clean only with dry cloth.
7) Do not block any ventilation openings. Install in accordance with the manufacturer's instructions.
8) Do not install near any heat sources such as radiators, heat registers, stoves, or other apparatus (including amplifiers) that produce heat.
9) Do not defeat the safety purpose of the polarized or grounding-type plug. A polarized plug has two blades with one wider than the other. A grounding type plug has two blades and a third grounding prong. The wide blade or the third prong are provided for your safety, If the provided plug does not fit into your outlet, consult an electrician for replacement of the obsolete outlet.
10) Protect the power cord from being walked on or pinched particularly at Plugs, convenience receptacles, and the point where they exit from the apparatus.
11) Only use attachments /accessories specified by the manufacturer.
12) Use only with the cart, stand, tripod, bracket, or table specified by the manufacturer, or sold with the apparatus. When a cart is used caution when moving the cart/apparatus combination to avoid injury tip-over.
13) Unplug this apparatus during lightning storms or when unused for long periods of time. Caution:

14) To reduce the risk of fire or electric shock, do not expose this apparatus to rain or moisture.
15) The mains plug is used as disconnect device, the disconnect device shall remain readily operable.
16) The socket-out shall be installed near the equipment and shall be easily accessible.
17) This product should never be placed in a built-in installation such as a bookcase or rack unless proper ventilation is provided or the manufacture's instructions have been adhered to.
18) The apparatus shall not be exposed to dripping or splashing and that no objects filled with liquid, such as vases, shall be placed on the apparatus.
19) Do not place any sources of danger on the apparatus (e.g. liquid filled objects, lighted candles).
20) Wall or Ceiling Mounting - The appliance should be mounted to a wall or ceiling only as recommended by the manufacturer.
21)

Never place the TV, remote control or batteries near naked flames or other heat sources, including direct sunlight. To prevent the spread of fire, keep candles or other flames away from the TV, remote control and batteries at all times.
22) The USB terminal should be loaded with 0.5 A under normal operation.
These servicing instructions are for use by qualified service personnel only. To reduce the risk of electric shock do not perform any servicing other than that contained in the operating instructions. unless you are qualified to do so.
23) The battery shall not be exposed to excessive heat such as sunshine, fire or the like.
24) This equipment is a Class II or double insulated electrical appliance. It has been designed in such a way that it does not require a safety connection to electrical earth
25) The maximum using environment temperature is 45 degrees. The Maximum using altitude is 2000 meters
TV Buttons And Terminal Interface
TV Buttons
Note: The following is only functional schematic, And the actual position and arrangement of different models may be different.
VOL+
VOL -
CH+
CH-
MENU
SOURCE

(1):Turn ON/OFF Power.
SOURCE: External Signal Input Selection.
MENU: Display Main MENU And Confirm MENU Item Selection.
CH+/-:Selecting Channel.
VOL+/-:Adjusting Volume.
Terminal Interface
 | AV inputExternal AV Signal Input |  | EARPHONE outputWhen earphones are plugged in,speakers are disabled |
 | HDMI inputDigital signal input from HDMI video connector. |  | USB inputConnect a USB device here to playits media files or to recordprogramsvia the PVR function. |
 | ANT 75Connect the antennal/cadle tv input(75/VHF/UHF) |  | RJ45Connect the Internet. |
 | CI SLOTThe card reader input CI(common interface) this requires CAM (conditional access module) used for pay TV. |  | OPTICALDigital Audio Output. |
 | VGA inputPC analog signal input |  | PC AUDIO INPUTVGA input and audio input when VGA input |
 | ANT 75(S2)Connect the satellite TV input | ||
External device connection diagram
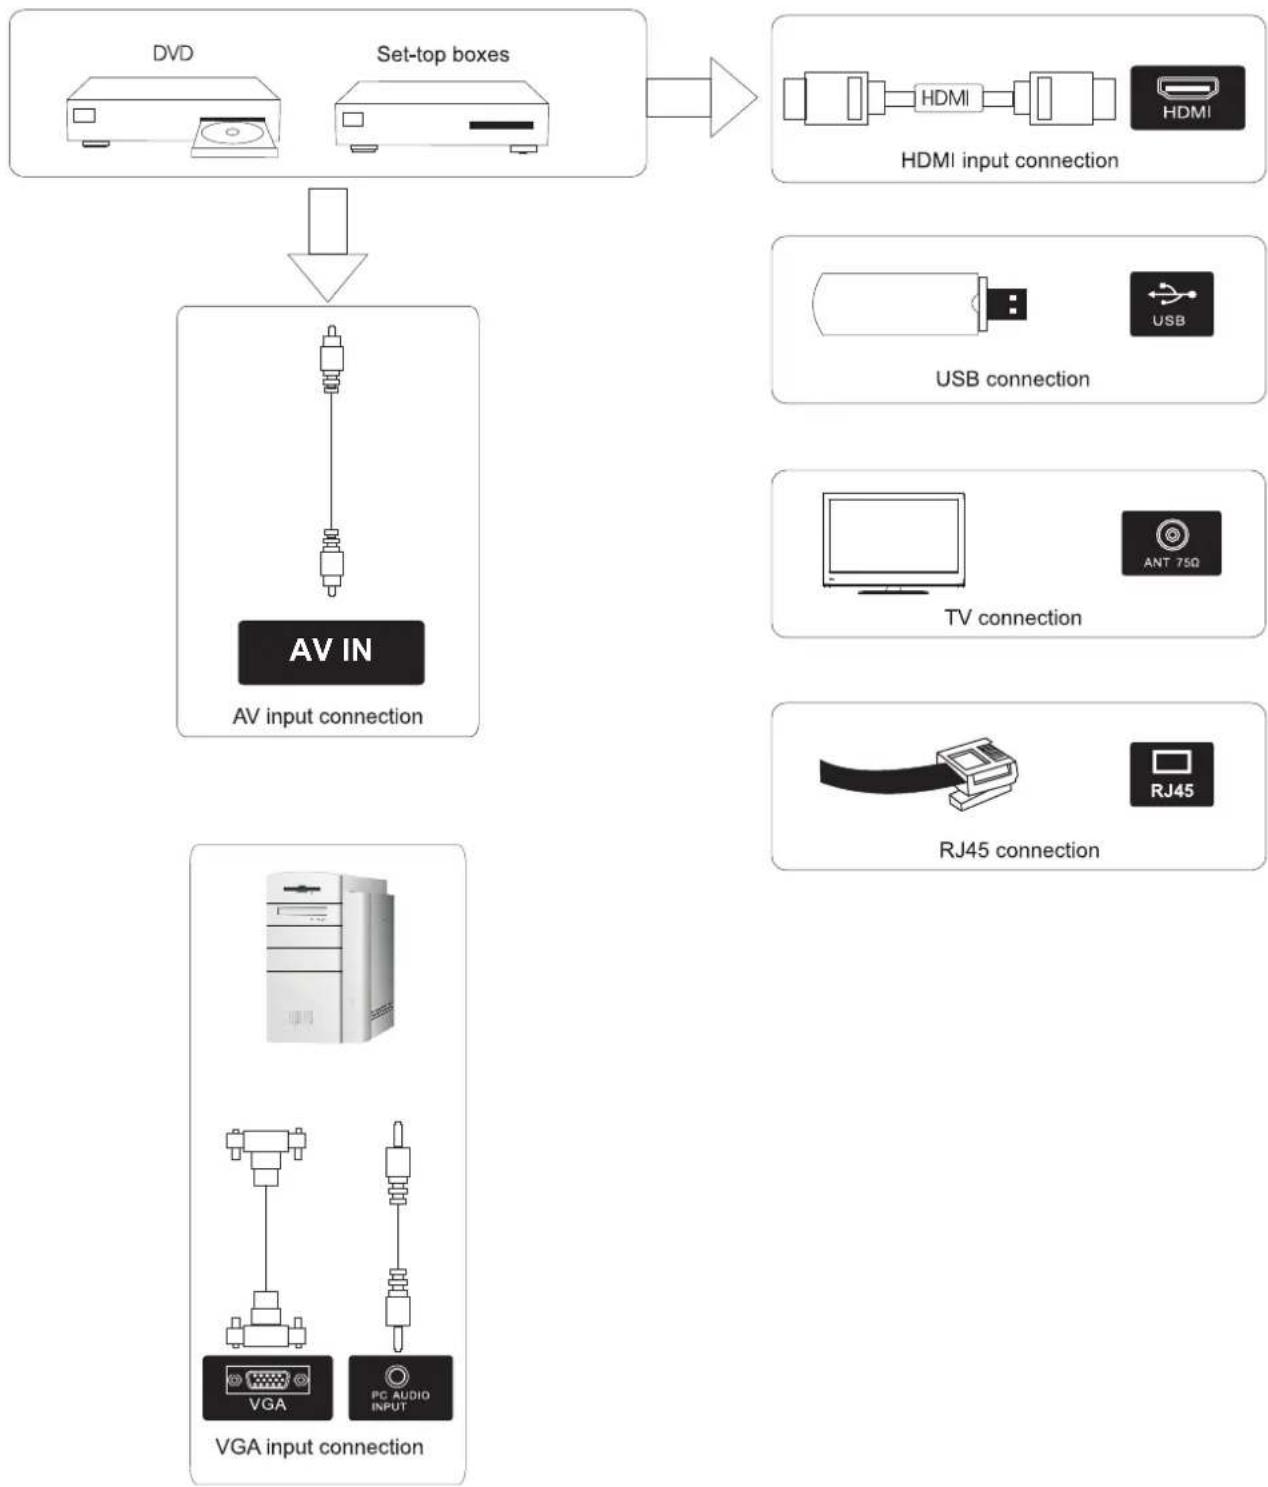
flowchart
graph TD
    A["DVD"] --> C["Set-top boxes"]
    B["AV IN"] --> C
    C --> D["HDMI input connection"]
    E["VGA"] --> F["PC AUDIO INPUT"]
    G["USB"] --> H["USB connection"]
    I["TV"] --> J["ANT 75Ω"]
    K["RJ45"] --> L["RJ45 connection"]
Install And Connect TV
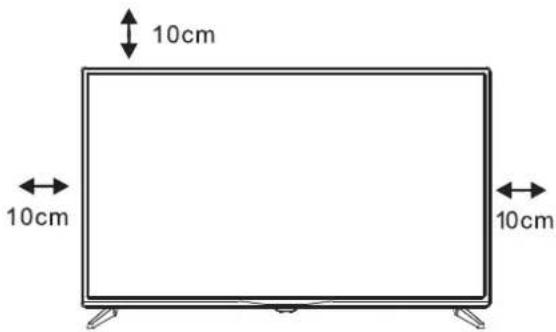
3
Set your TV
To put your TV in a firm place which can bear the weight of the TV.
To avoid danger, please don't expose the TV near water or heating place (such as light, candle, heating machine), do not block the ventilation at the back of TV.
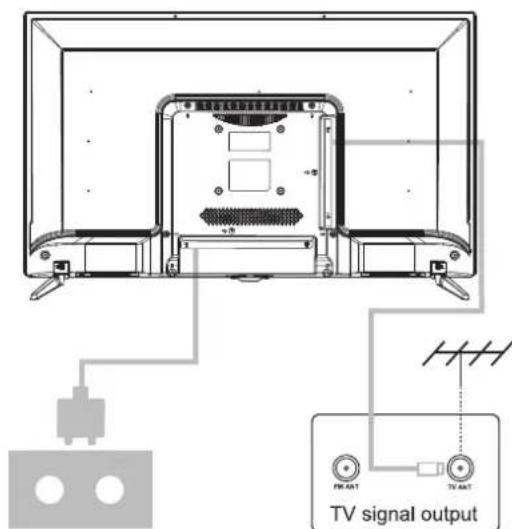
2
1
Connect antenna and power
- Connect the antenna cable to the antenna socket on the back of the TV.
- To plug the power cord of TV (AC 100-240V\~50/60Hz).
Turn on TV
- Press the power button of the TV the indication light will turn to green. if it is on standby mode (the light is red), press the power button on the remote control to turn on the TV.
Note:
Picture for reference purposes only.
TV Stand Installation Instructions
-
Open the carton and remove the TV and scattered accessories and base (some models without base).
-
to avoid the injury of the TV, covered with a soft mattress, put it on the table, face down on a soft mattress, the base of the neck is fixed on the TV with screws.
3.screw the base and connected to the TV.
- the installation is complete.
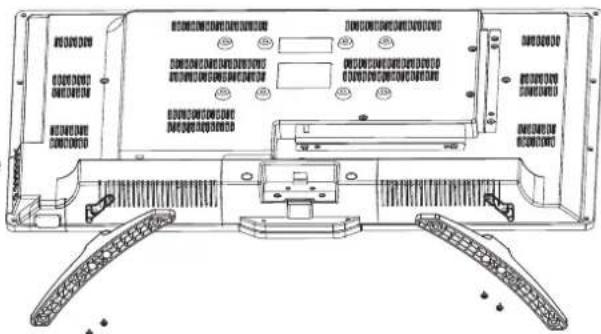
Note:
Picture for reference purposes only.
Setup Wizard
1.SOURCE
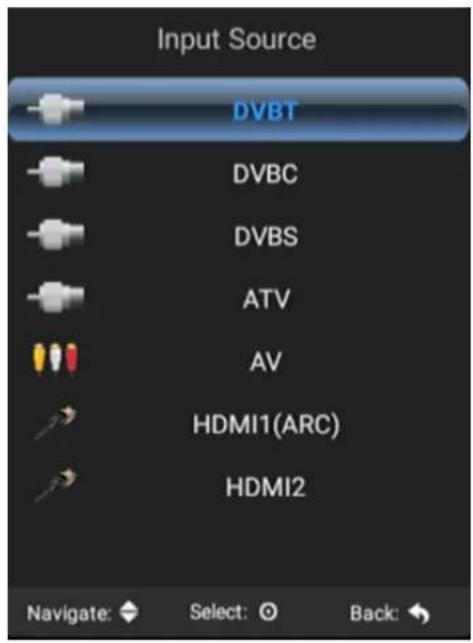
According to the "source" button to display the input source menu, select the corresponding input signal source by the next button, press the confirm button you can enter the relevant signal source.)
2.TV MENU
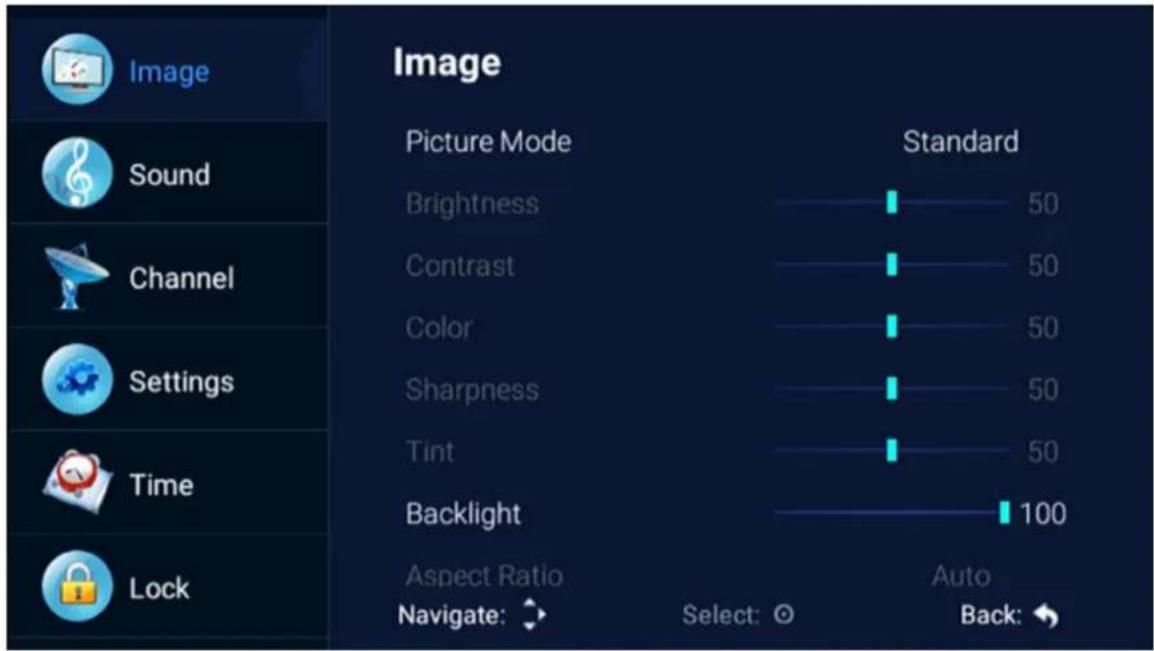
Press the "menu" button to display the menu, press the up and down keys to select the appropriate settings, press the right button to enter the relevant settings.
(1) Picture
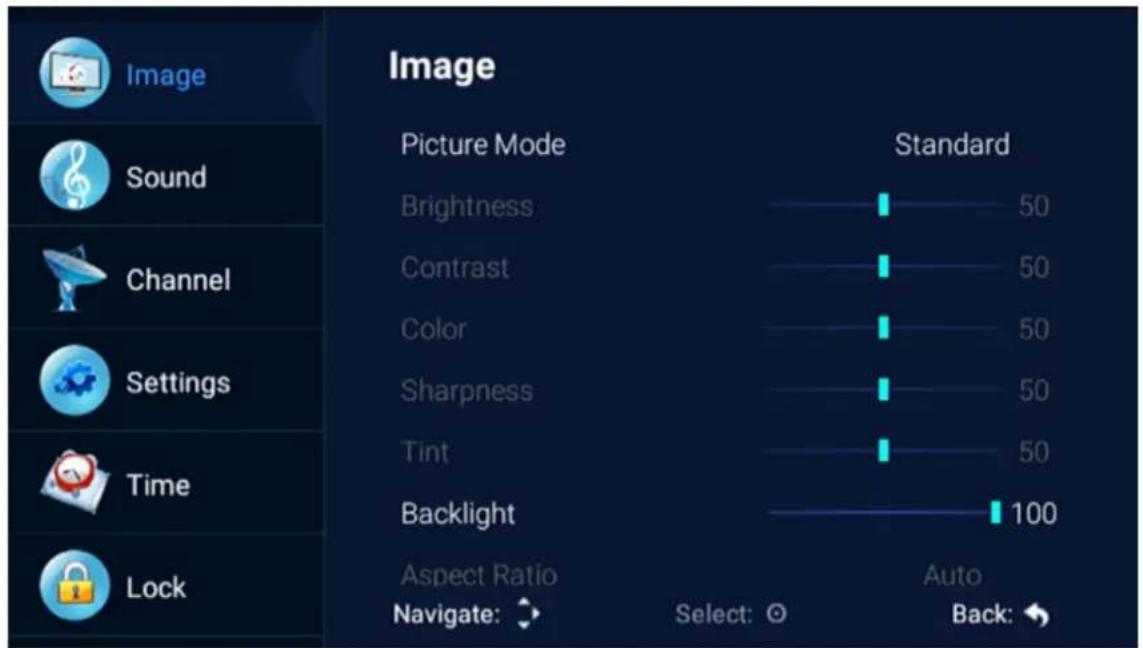
Picture Mode
Choose the picture menu with left and right keys, and press OK button for next operation. Then the up and down arrows can be used to select this item. The picture mode can be switched to standard/soft/lightness/user.
The brightness, contrast, hue, saturation, sharpness
When the image pattern in the user mode, through the arrow keys, can change the contrast ratio, brightness, sharpness, saturation, backlight numerical.
Backlight
Select backlight through the upper and lower keys, then use the arrow keys to change the backlight value.
Aspect Ratio
You can select ZOOM1, ZOOM2, 16:9 or 4:3 with left and right keys when the option of Aspect Ratio is picked.. The aspect ration will automatically change in auto mode.
Color temperature
Select the option of color temperature by the above-mentioned way, then change its setting with left and right keys. The color temperature can be cod, nature, warm, user mode.
Noise Reduction
Press up/down key to select "Noise Reduction" option. Press left/right key to select "Off", "Weak", "Middle", "Strong" and "Auto" to improve the picture sharpness.
(2) Sound
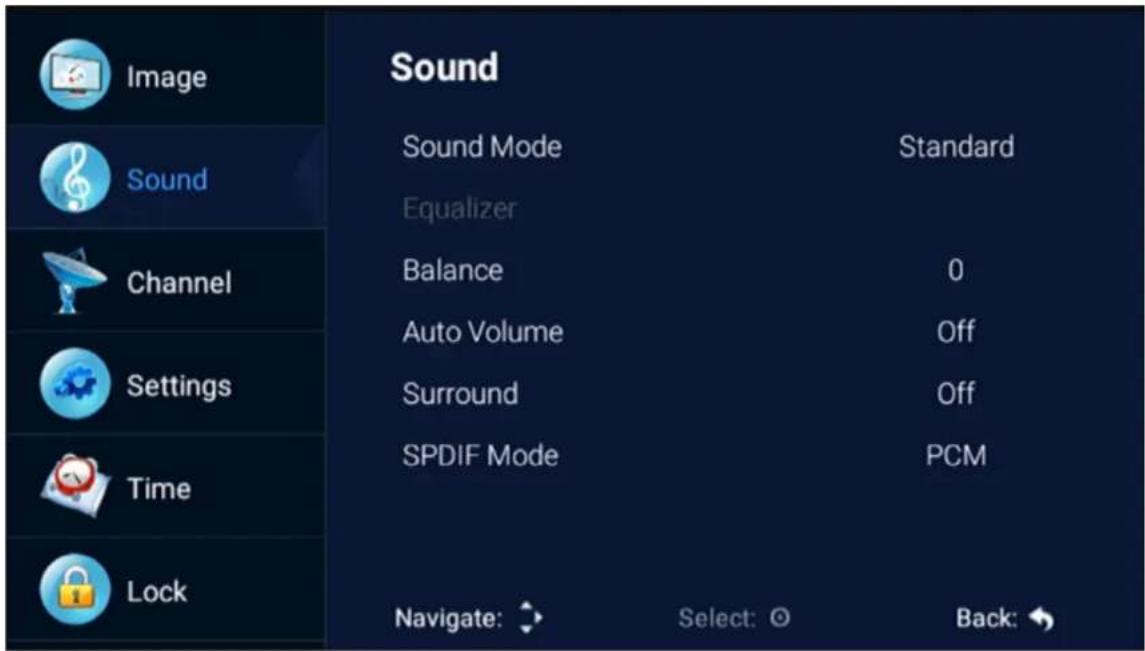
Sound mode
Select the sound menu by using the up and down keys, press the right click "sound mode" option, and press the left and right buttons to switch the sound mode to music / movie / motion / user.
Equalizer
Through the up and down keys selected "equalizer" option, and then press the OK key system will appear different bandwidth frequency level.
Balance
If the volumes of the left speaker and the right speaker are not the same, you can adjust the "Balance" to suit your personal preference.
Auto Volume、Surround
Select the automatic volume control options, after the key about to open or close the automatic volume control function, this method is also suitable for adjusting the surround sound.
SPDIF Mode
This is used to select "SPDIF Mode". This option is only used in HDMI/DTV mode.
(3) Channel
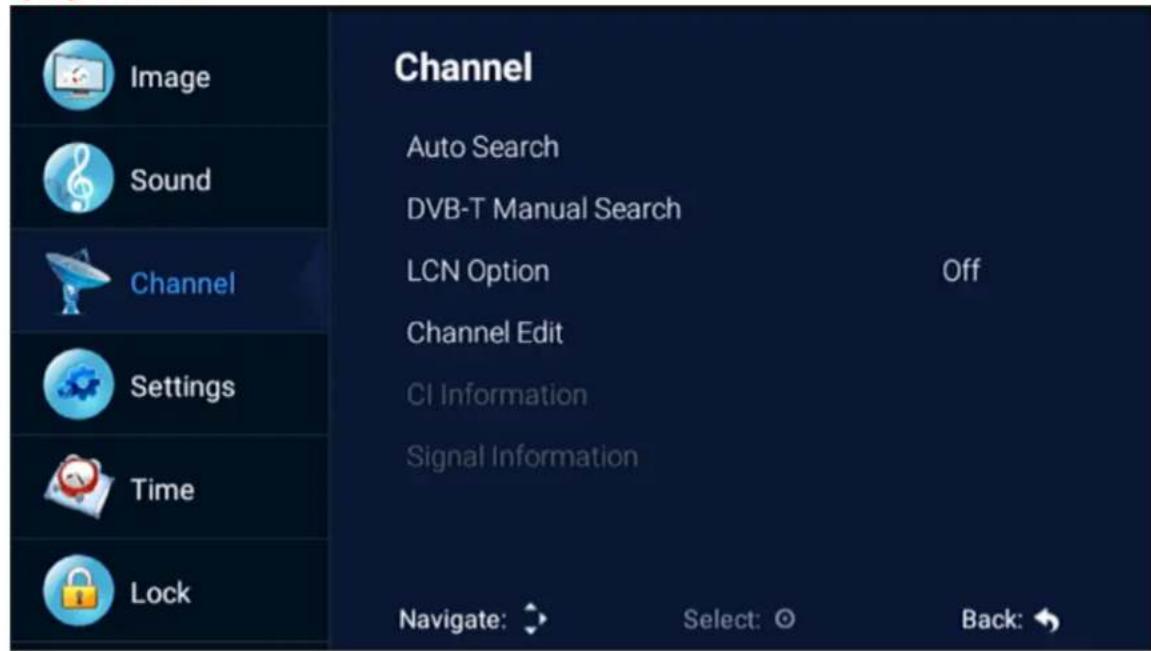
DVB-T Auto Search
Select option of Auto Tuning under the up and down keys .Then press OK button and the auto tuning will begin.
DTV Manual Search
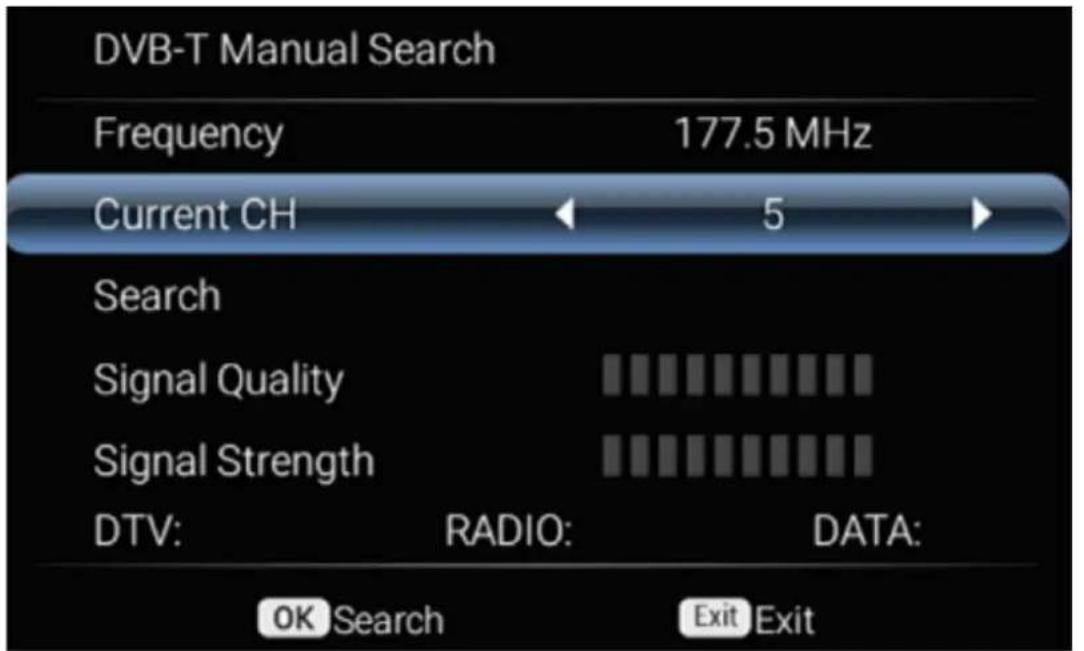
ATV
To simulate the manual search, choose a good storage to Taiwan, you need, you can also choose color and sound format, press the arrow keys to select "search" option, and press left key can search, but also by fine tuning the frequency changes, select the best frequency.
DTV-S Auto Search
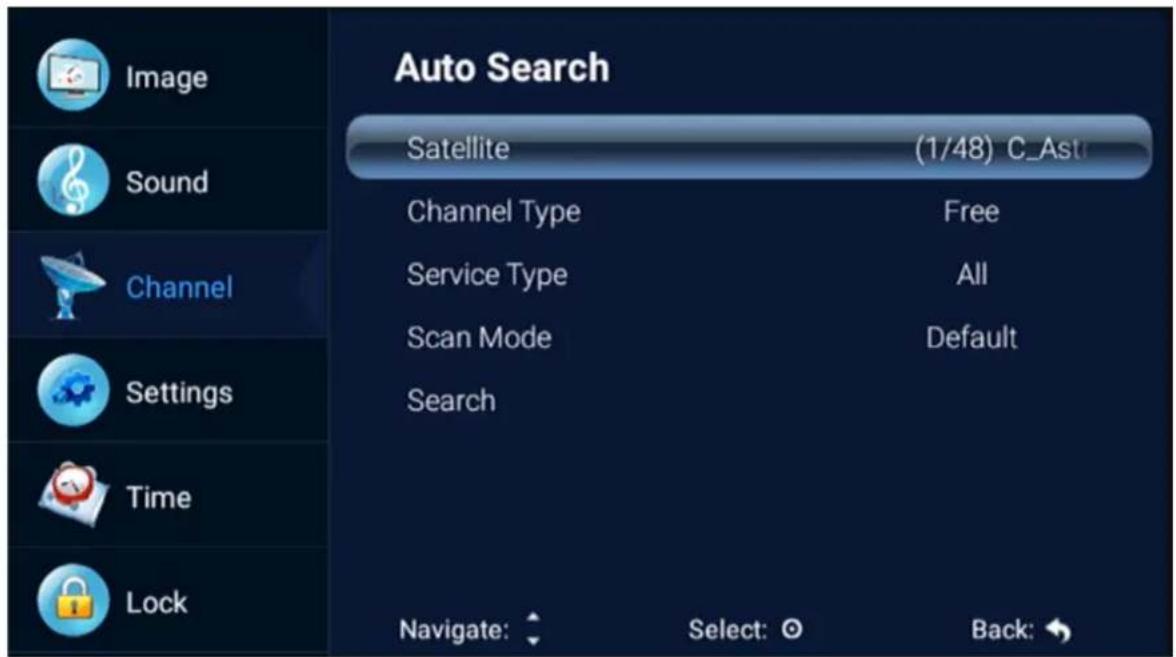
Satellite
Select the appropriate satellite according to the local satellite model.
Channel Type
Choose the Satellite type.
Service Type
Satellite Service type
Scan Mode
Satellite Scan Mode.
DTV-S Manual Search
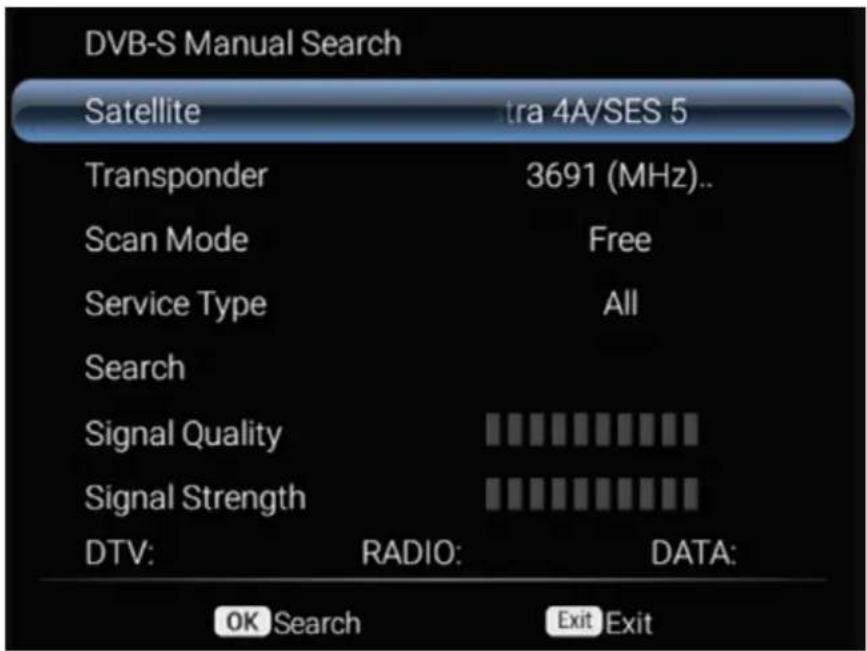
Satellite
According to local satellite model, the satellite model selection.
Channel Edit
Select the signal information option, press OK key to enter the next interface, will show the strength of the signal.
(4) Setting Adjustment
 | Image | Settings | |
 | Sound | OSD time | 15 Seconds |
| PVR Option | |||
 | Channel | PVR List | |
 | Settings | Blue screen | Off |
| No Signal Standby | Off | ||
 | Time | CEC | Off |
| Auto Standby | Off | ||
 | Lock | Auto Power on | Off |
| Navigate: ➤ Select: ⊙ Back: ➤ | |||
OSD Time
Press the "menu display time" option, through the left and right direction keys can be changed to 5 seconds, 10 seconds, 15 seconds, 20 seconds, 30 seconds, always optional
PVR Option
Press up/down button to select "PVR Option" option.
PVR LIST
You can retrieve the video file recorded by the "REC" in the USB flash drive and play it back.
Blue Screen
Press "On" or "Off" Blue Screen..
No Signal Standby
Press up/down button to select "No Signal StandBy" option. Press left/right button to choose "On" or "Off". If set "On", TV will auto standby after 10 minutes in
"No Signal" states. (In VGA mode, if no any operation 15 seconds later, TV will enter standby mode.)
CEC
Press up and down key to select the option, and then open or close by the left and right CEC function. When cec opens, you can choose to turn on or off Auto Standby, Auto Power on, ARC, Device List, TV shutdown, cec devices will also automatically shut down.
Audio Language Setting
Press the up or down key to select Audio Language Setting or Second Audio Language, then use the left and right arrow keys to select a language.
Second Language
Press the up or down key to select Second Language or Second Subtitle Language, then use the left and right arrow keys to select the subtitle language.
Reset
Select the "restore default settings" option by using the up and down keys, and then click OK to enter the next window. Can choose to confirm or cancel, choose to confirm the television will restart, the menu data will restore the initial data, choose to cancel also back to the menu interface.
(5) Time setting
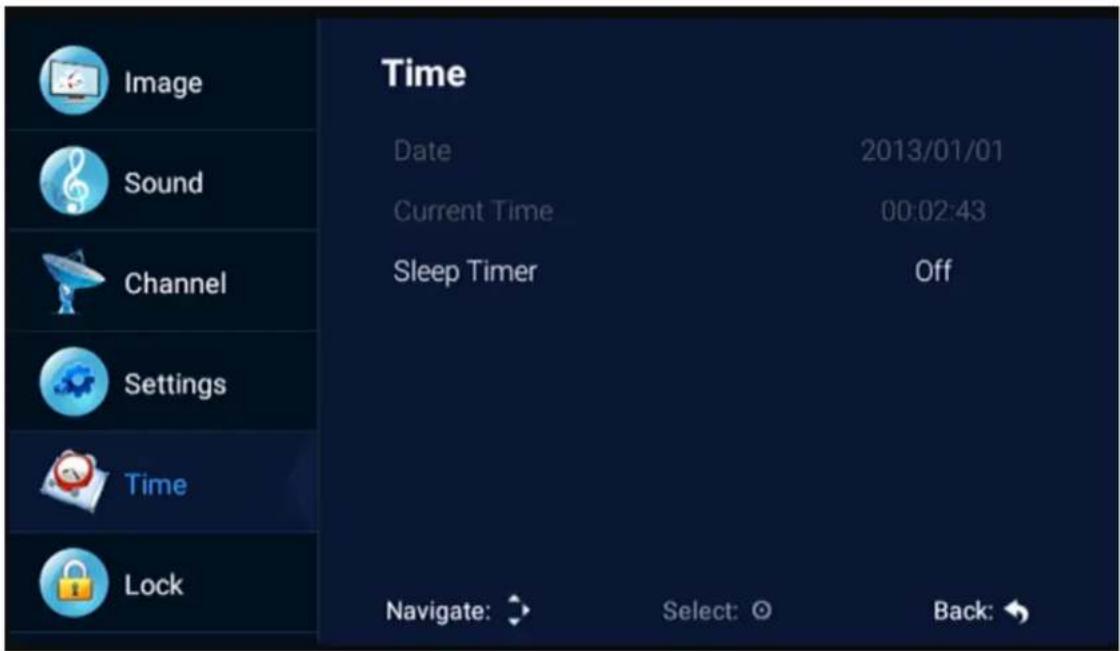
Date, Current time
This is not adjustable, when there is a signal when the automatic calibration.
Sleep time
The system provide many options of sleep time.
(6) Lock
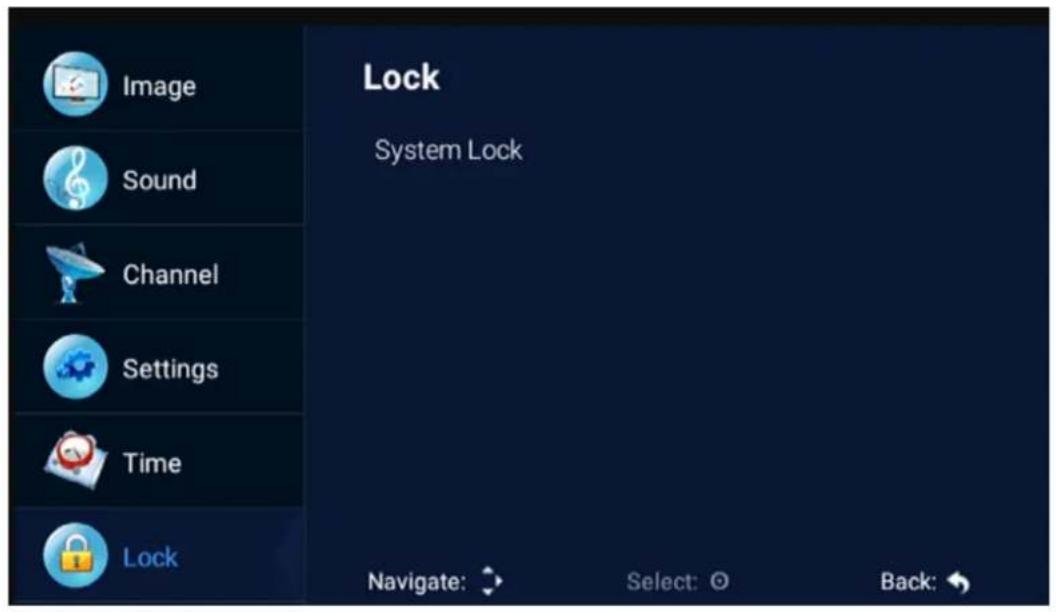
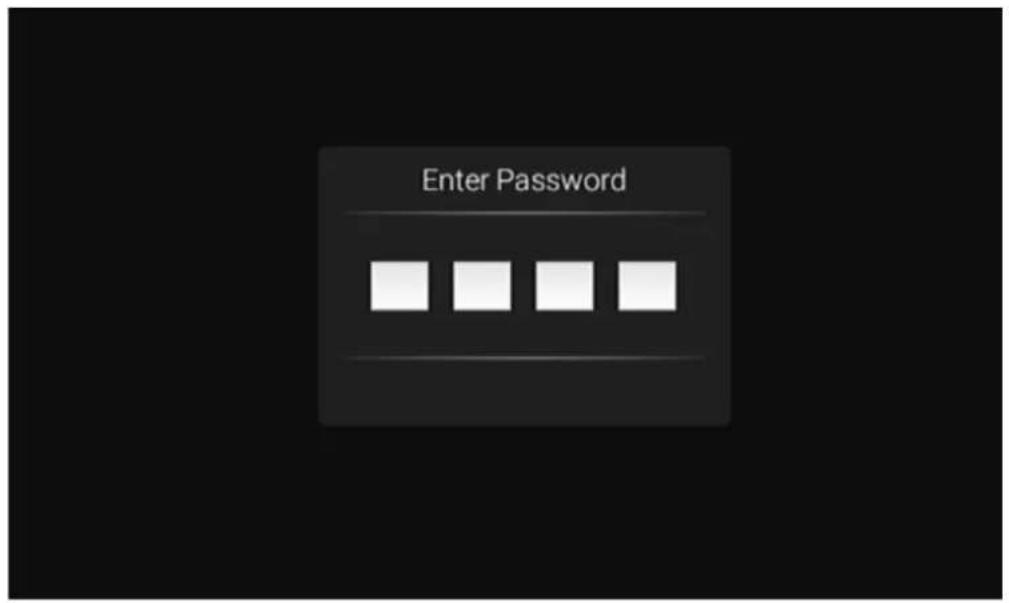
Choose the option of Lock System with the up and down keys .Then open the lock function with left and right keys. Please remember that initial password is 0000.If you want to adjust password, you firstly should select option of set password and then input old password, new password. When new password you input again is correct and make sure above operation, this mean that you successfully reset password. When you want to shield some programs you don't like, please select the option of block program and input the channel number.
Hotel mode
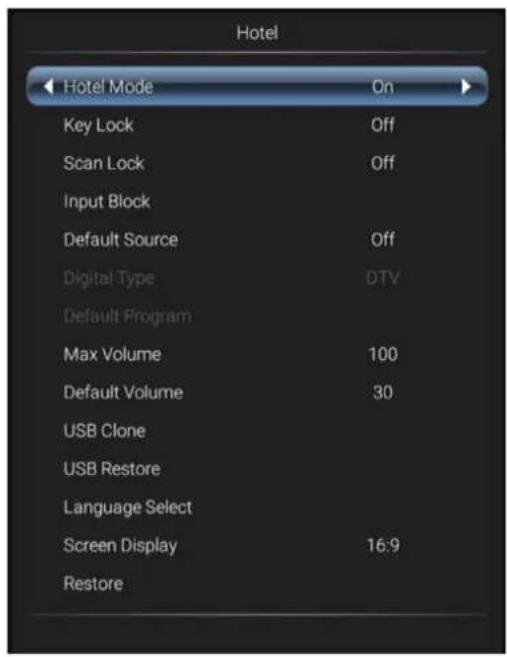
In the mode, you can manage the opening and closing of the relevant channels, set the language, screen ratio operation
3.Media part
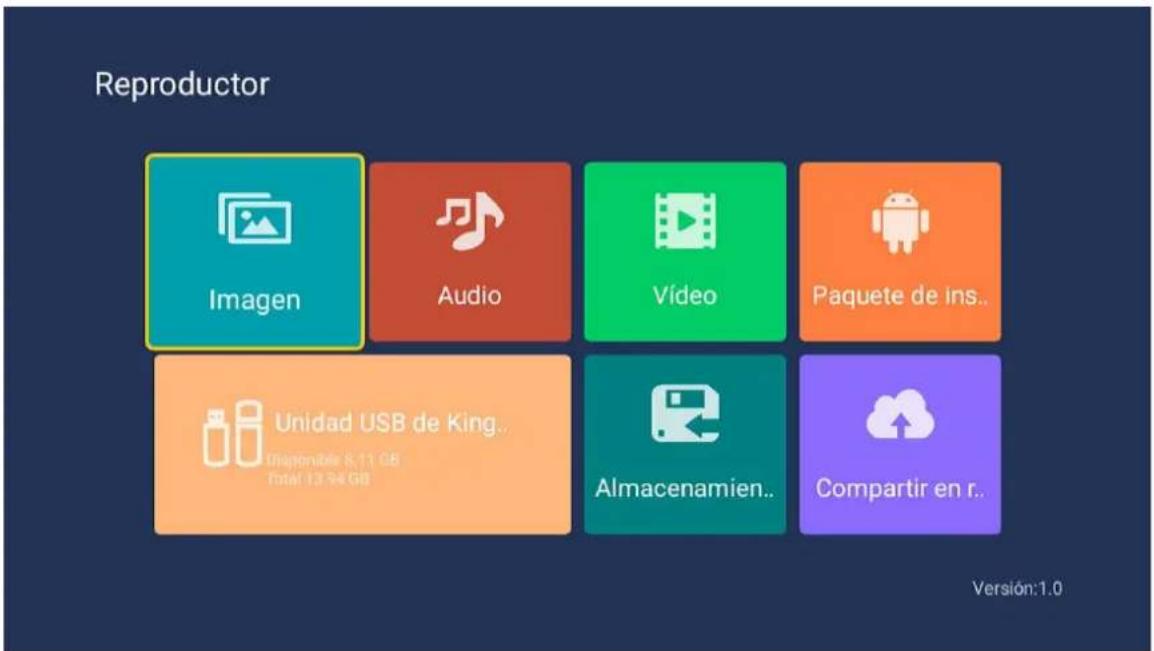
(1) Picture
Through the up and down keys to select the "picture" icon, press the confirmation button to confirm, and then press right to the folder, press the confirmation button to open the appropriate folder. After selecting the picture, press the confirmation key to open the picture, can carry on some operation through the left and right keys.
(2) Music
Through the up and down keys to select the "song" icon, press the confirmation button to confirm, and then press right to the folder, press the confirmation button to open the appropriate folder. After selecting the song, press the confirmation key to open the song, you can make some operation through the left and right keys.
(3) Video
Through the upper and lower keys selected "video" icon, press the confirmation key to confirm, then press right to the folder, press the confirmation key to open the corresponding folder. After the selection of the video, press the confirmation key to open the video, you can make some operation through the left and right.
4. Android part
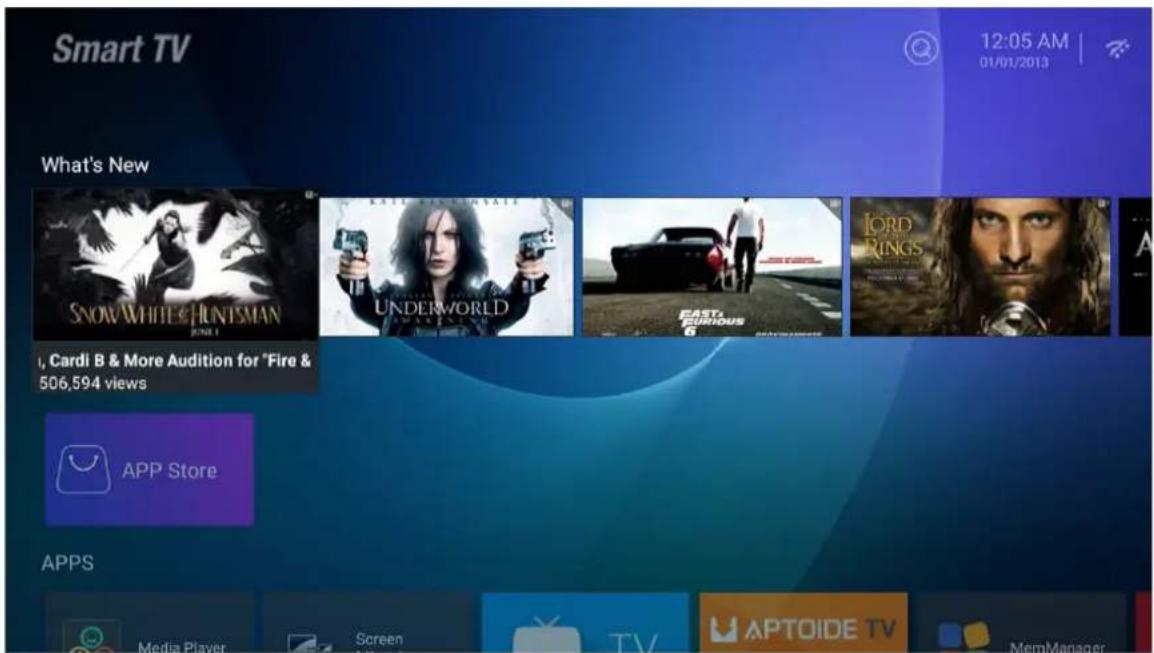
(1) Home
(2) Settings
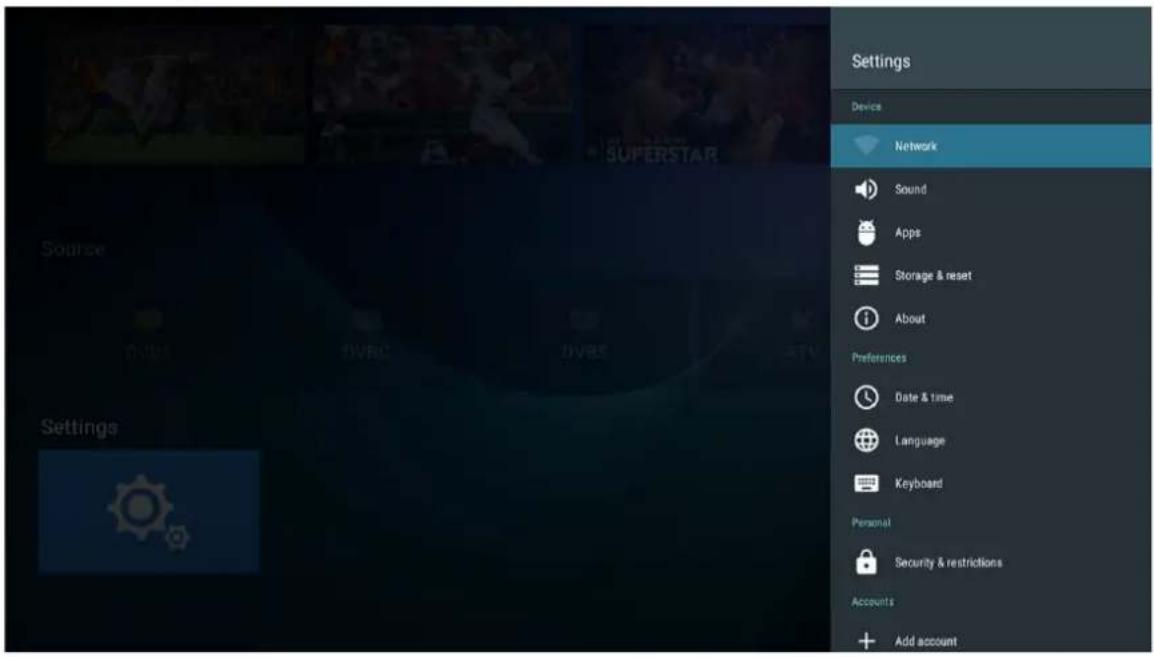
Pick the image of setting and Press OK button to appear the interface of the android setting. The following is a brief description of the function of each menu:
Network
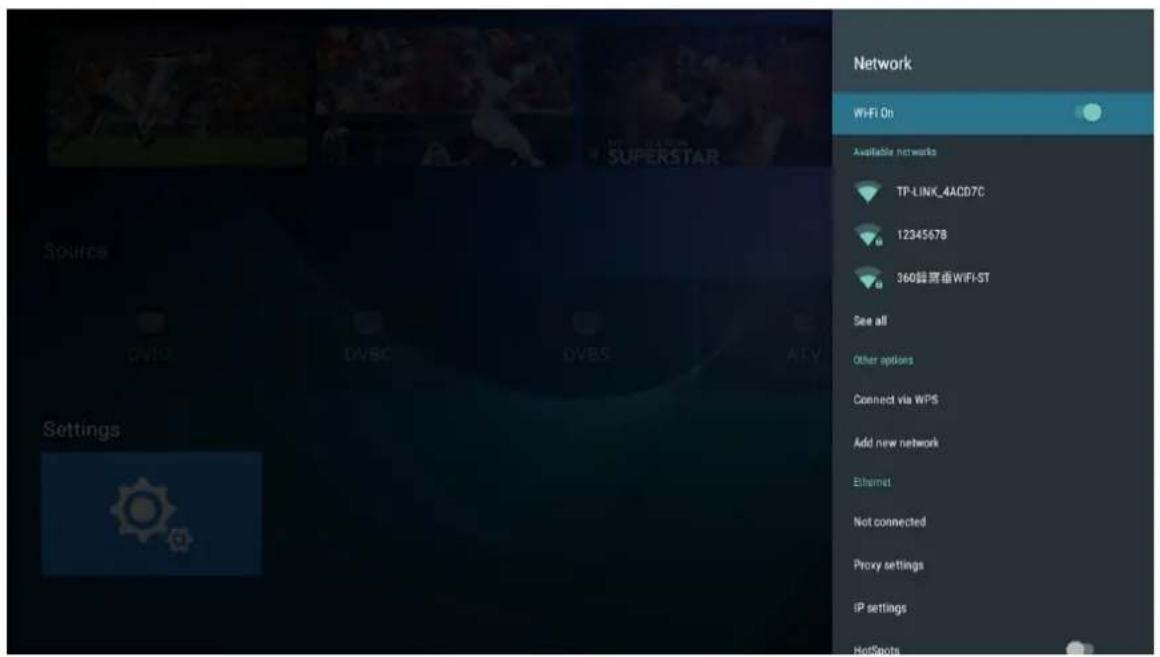
Enter the "Network" menu item "Wi-Fi", you can open or close the Wi-Fi connection function, there are 4 types of connection: select focus and enter the password in the list of connections, use without-password protected connection, manually add hot name to connect, and point-to-point direct connection.
Sound
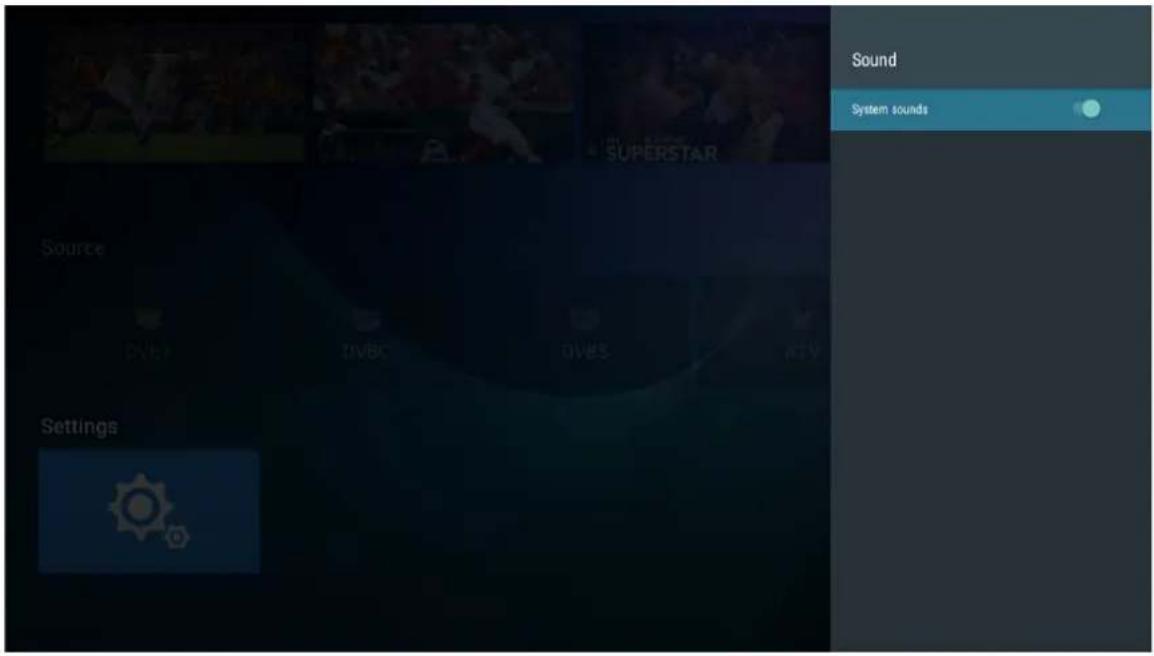
Set key tone
Apps
In the menu, you can view the application of the installation, running applications and all of the application.
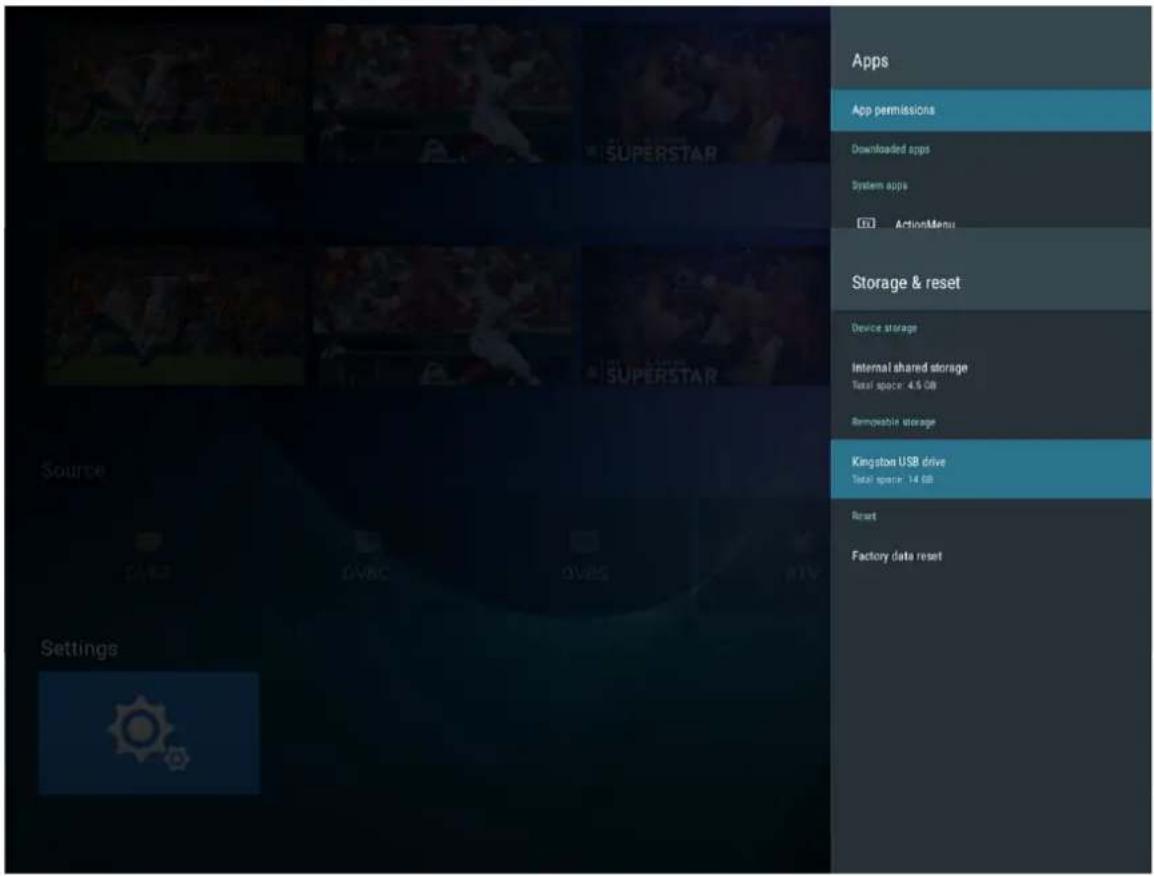
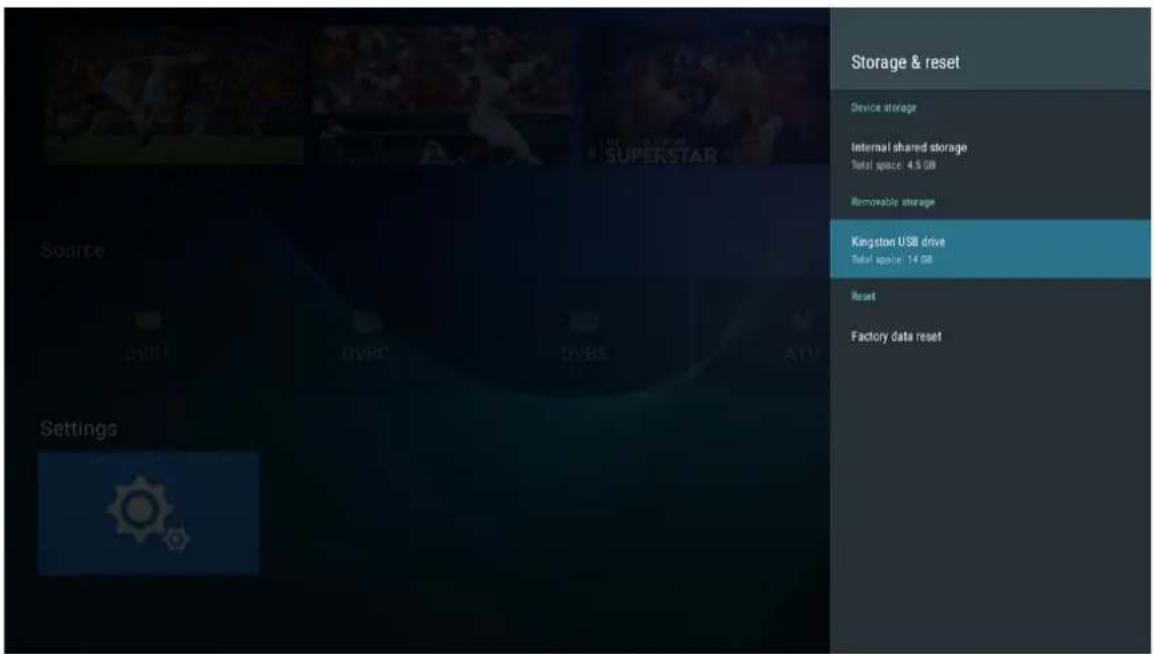
Display & reset
Here you can view the details of the internal storage space and the use of SD card, and in the option of backup& reset, you can do factory data reset. After resetting, the data on TV will be erased. For system update).
About
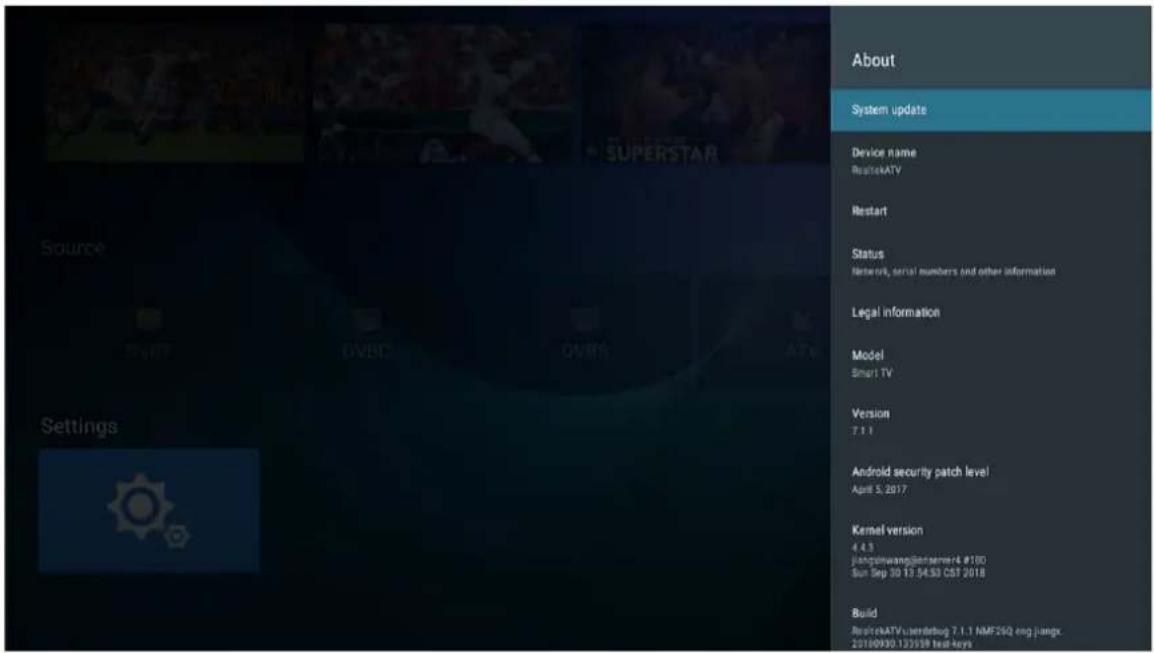
You can view and set the relevant information for the OTA update, you can also view the model, Android version, version number information.
Date & Time
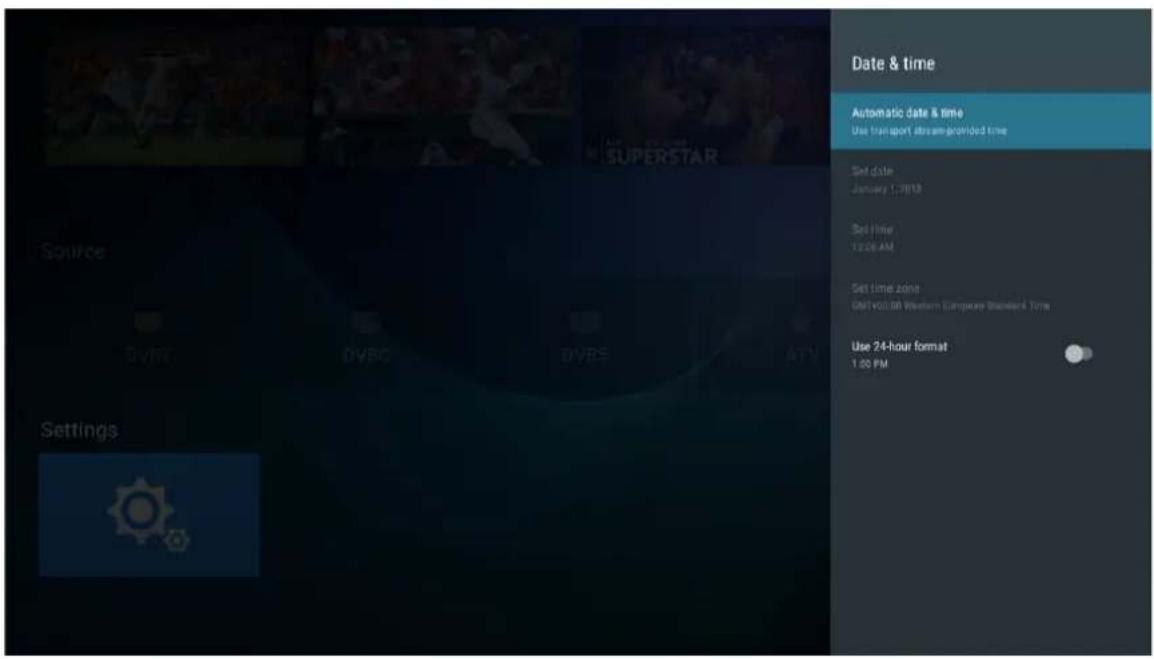
In this part, you can modify the date and time, and also choose to synchronize with the date&time of the network..
Language
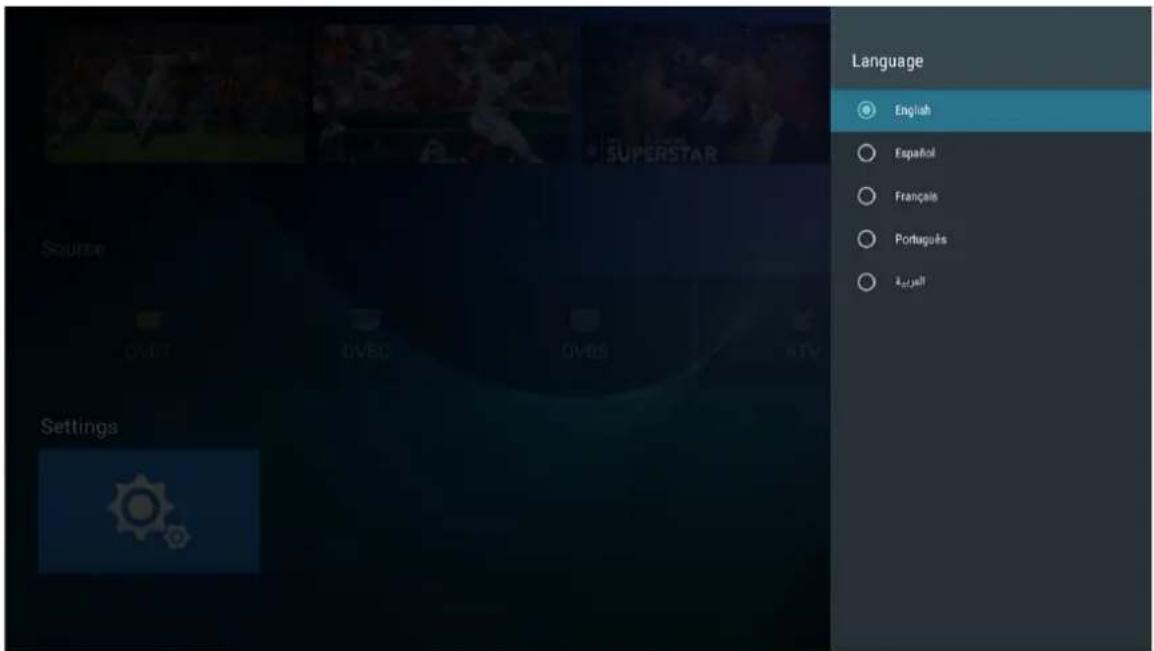
System language can be selected here.
Keyboard
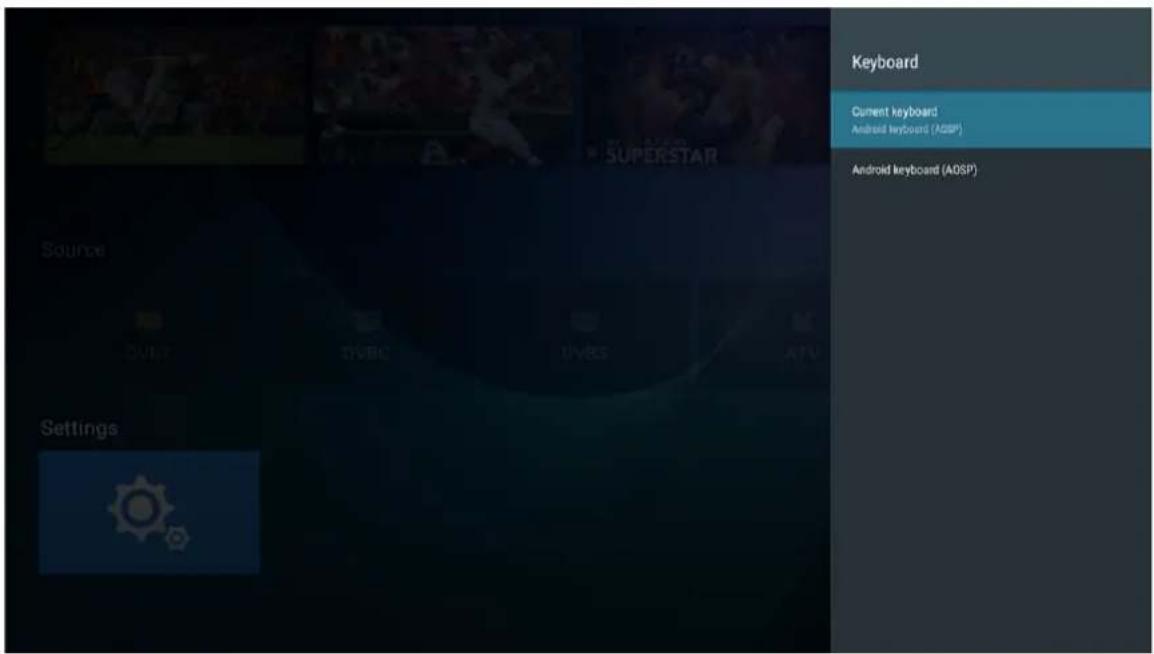
Users can be based on personal preferences of the keyboard input settings, you can also view the personal dictionary.
Security & restrictions
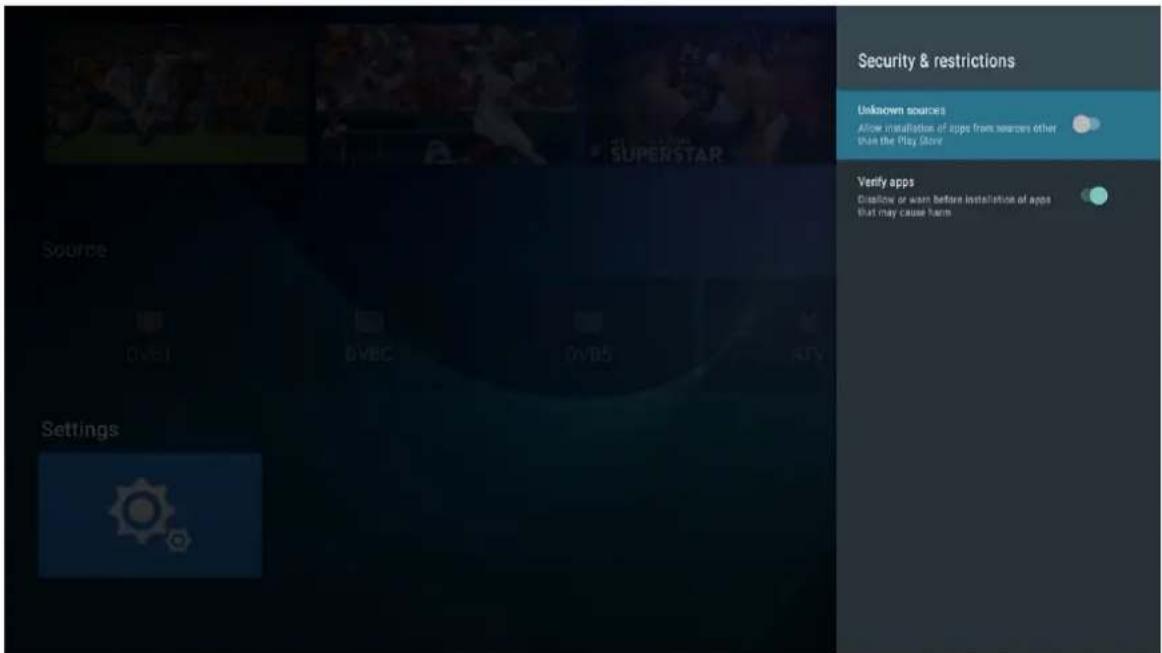
The user can set the security function in the menu: whether to allow the installation of unknown source program, application program verification, limit the application to access your account, allowing Android device manager to lock device or erase the data on the device has been lost.
Help
| No power | ·Check if the AC cord of TV is plugged in or not. If there's still no power, please disconnect the plug, and reconnect to the socket after 60 seconds. Turn the power back on. |
| Signal not received properly | ·Double or phantom images may appear on your TV if there are high buildings or mountains close to where you are. You can adjust the image thru manual operation: consult instruction of vernier regulation, or adjust the direction of the external antenna.·If you use an indoor antenna, under certain circumstances signal reception may be more difficult. Adjust the direction of the antenna for optimum reception. If this does not improve reception, you may have to switch to an external antenna. |
| No picture | ·Check if the antenna at the back of the TV is connected properly.·View other channels to see if the problem still occurs. |
| Video appears with no audio | ·Try increasing the volume.·Check if the TV's sound is on mute or not. |
| Audio is present, but video does not appear or is discolored | ·Try adjusting the contrast and brightness. |
| Static noise affects video and audio quality | ·Check if the antenna at the back of the TV is connected properly. |
| Broken lines on screen | ·Electrical appliances such as hair dryers or vacuums etc. may be interfering with your TV set. Switch these appliances off. |
| Remote doesn't work | ·Make sure the plastic bag which came with the remote control is removed. Try using the remote in a shorter distance from the TV. Check if the placement of the batteries is correct, or try using new batteries with the remote control.·The TV will go into Standby mode if it receives no response in a few minutes. |
| No video (PC mode) | ·Please check if the cable is connected to the VGA port correctly, or if the cable is bent in some places. |
| Vertical line blinking (PC Mode) | ·Enter the main menu, and adjust the vertical placement to eliminate the vertical line. |
| Horizontal tearing (PC Mode) | ·Adjust the horizontal placement of the screen to clear any horizontal lines. |
| Screen is too bright or dark (PC Mode) | ·Adjust the brightness or contrast in the main menu. |
| No response from the PC | ·Check if the PC's display resolution is set to a compatible resolution for the TV. |
| Lines appearing when a device is connected to the RCA port | ·Make sure you are using a cable of good quality. |
| Problems are unresolved | ·Unplug the power cable and wait for 30 seconds, then reconnect to the socket. If problems still persist, do not attempt to repair the TV by yourself. Kindly contact the service center. |
Do not leave your TV displaying a static image, whether it is from a paused video, menu screen, etc. for an extended period of time, doing so will damage the display and may cause image burn-in.
Specifications
| Screen Size | power Consumption | Main accessories |
| 32" | 56W | User's manual x1Remote controller x1Power cord x12 x AAA Batteries |
| 40" | 70W |
| Operation Frequency | Transmitting Power | |
| WiFi | 2400~2483.5 | Less Than 100mW |

LIFE TIME : 60,000 Hrs
Remote Controller
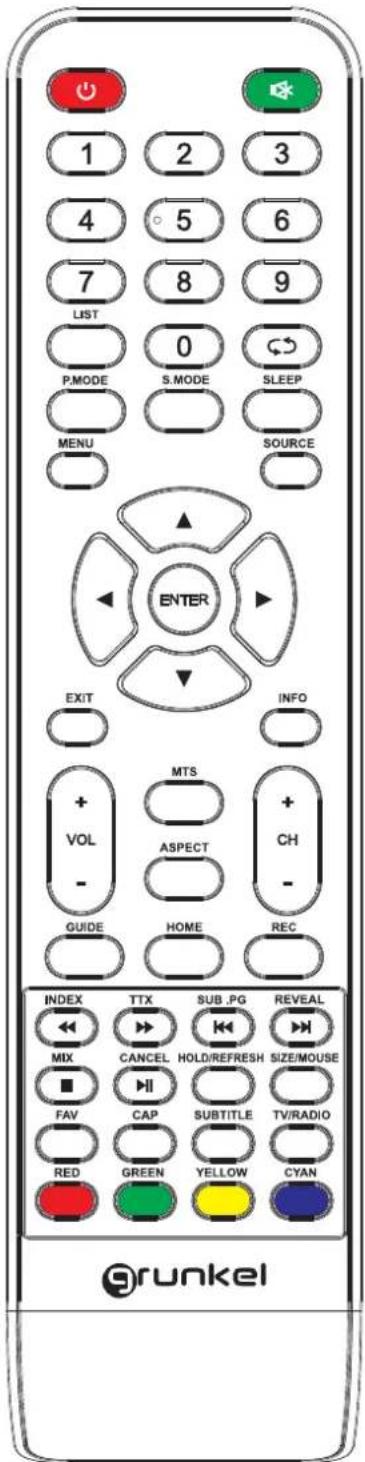
- POWER: Turn on the TV or enter standby mode.
2.MUTE: Turn off the sound and turn on when press again.
3.0-9: Figures "0-9" are used to directly input channel number.
-
LIST: Press to open the channels list.
-
☑ Press this button to toggle between the current and the previous programme you were you were viewing
6.S.MODE: Select the different sound mode directly.
7.SLEEP: Set the sleep time.
- MTS: Press to select the MTS mode.(for example,Nicam, BTSC,MONO,STEREO .eg )
9.P.MODE: Select the different picture mode directly.
10.MENU: Start system menu and return to upper menu.
11.SOURCE: Input source selection button.
- ▲▼ ◀▶ Press ▼▲ button to select items.
Press ◀▶ button to adjust it.
-
ENTER: To confirm the choice with the highlighted menu item.
-
EXIT: Press to exit the OSD menu.
-
INFO: Press to display the source and channel's info.
Battery Installation:
Remove the battery compartment lid on the rear of the remote control by sliding the lid down, then off. Put two AAA batteries inside the battery compartment with their + and - ends aligned as indicated. Do not mix old and new batteries or different types of batteries Refix the battery compartment lid. Slide the lid until you hear it click into place.
Using the Remote Control:
Unless stated otherwise, the remote control can operate all the features of the TV.
Always point the remote control directly at the remote sensor in the front of the TV.
CAUTION:
Batteries installed in the unit should not be exposed to excessive heat such as sunshine, fire and the like.
Remote Controller
Descriptions of television remote control
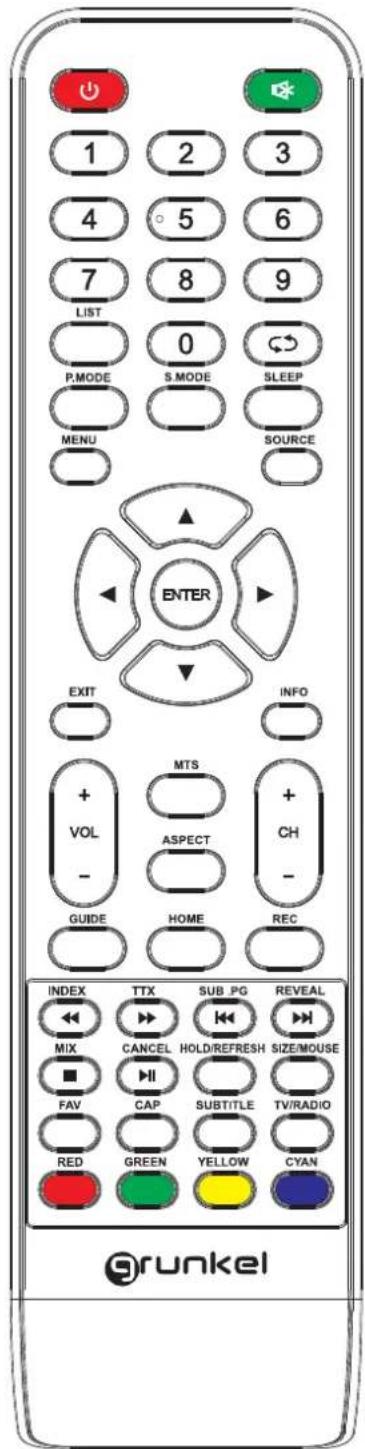
16.VOL+: Increase the volume.
17. REFRESH: Refresh page.
HOLD: HOLD On or Off for current page display.
18.VOL-: Decrease the volume.
19. CAP: A key to the current image is saved to the disk.
20.PLAY/PAUSE: Press to PLAY/PAUSE in the USB mode.
start play and PAUSE, in USB mode.
CANCEL: When a page is selected in the mode of text, it may take some time before it becomes available, pressing the CANCEL key will return to the TV mode. When the required page is found, the page number will appear at the top of the TV picture, press the CANCELkey to return to the mode of text for you to browse this page.
21.TV/RADIO: When watching channel, allows you to switch between TV and Radio modes.
22.STOP: Press to STOP in the USB mode.
MIX: TV and TXT pictures are mixed together (transparent background)
23.GREEN/RED/YELLOW/CYAN button
24.CH+: Increase the program.
25.HOME: A key back to the android home page.
26.CH-: Decrease the program.
27. ASPECT: Aspect function.
28. MOUSE: Mouse switch.
SIZE: Change the size of display in Teletext mode.
- SUBTITLE: To display subtitle in USB mode.
- REC: Record begin in PVR mode.
- GUIDE: Launches the EPG (Electronic Program Guide)
- FAV: Press to add or remove your favorite channels under tv menu.
- FF: Press to fast forward in USB mode.
TXT: Switch the teletext on and off.
- PREV: Press to skip backwards in USB mode
SUB. PG: Press to access sub page.
- FR: Press to fast reverse in USB mode.
INDEX: Request the Index page in Teletext mode.
- NEXT: Press to skip forward in USB mode.
REVEAL: Reveal or Hide the hidden words.


- USER MANUAL
- IMPORTANT
- Content
- Safety Information
- CAUTION
- Important Safety Precautions
- TV Buttons And Terminal Interface
- TV Buttons
- Install And Connect TV
- Set your TV
- Connect antenna and power
- Turn on TV
- Note:
- TV Stand Installation Instructions
- Setup Wizard
- 1.SOURCE
- 2.TV MENU
- Picture Mode
- The brightness, contrast, hue, saturation, sharpness
- Backlight
- Aspect Ratio
- Color temperature
- Noise Reduction
- Sound
- Sound mode
- Equalizer
- Balance
- Auto Volume、Surround
- SPDIF Mode
- Channel
- DVB-T Auto Search
- ATV
- Satellite
- Channel Type
- Service Type
- Scan Mode
- Channel Edit
- Setting Adjustment
- OSD Time
- PVR Option
- PVR LIST
- Blue Screen
- No Signal Standby
- CEC
- Audio Language Setting
- Second Language
- Reset
- Time setting
- Date, Current time
- Sleep time
- Hotel mode
- 3.Media part
- Picture
- Music
- Video
- Android part
- Home
- Apps
- Display & reset
- Help
- Specifications
- Remote Controller
- Battery Installation:
- Using the Remote Control:
- CAUTION:
- Descriptions of television remote control
Marke : Grunkel
Modell : LED-320 IBSMT
Kategorie : Fernseher