
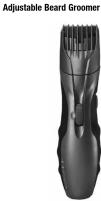
MB-200 - Bartschneider REMINGTON - Kostenlose Bedienungsanleitung
Finden Sie kostenlos die Bedienungsanleitung des Geräts MB-200 REMINGTON als PDF.

| Produkttyp | Bartschneider |
| Marke | Remington |
| Modell | MB-200 |
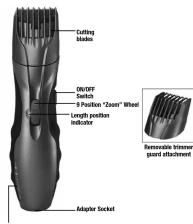
| Schnittlängeneinstellungen | 9 Stufen (1,5 mm – 18 mm) |
| Ladezeit | ca. 14–16 Stunden |
| Batterietyp | Wiederaufladbar (Ni-MH) |
| Betrieb | Kabellos (Akkubetrieb) |
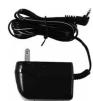
| Stromversorgung | Netzadapter (im Lieferumfang) |
| Klingenmaterial | Edelstahl |
| Gehäusematerial | Kunststoff |
| Abnehmbarer Kammaufsatz | Ja |
| Einstellrad | Zoom-Rad für präzise Längenwahl |
| LED-Ladeanzeige | Ja (grün während des Ladens) |
| Maße (ca.) | 15 x 4 x 3 cm |
| Gewicht (ca.) | 150 g |
| Reinigung | Klinge abnehmbar, mit beiliegender Bürste reinigen; nicht unter Wasser abspülen |
| Sicherheitshinweise | Nicht in Wasser tauchen; vor Reinigung Netzstecker ziehen |
| Lieferumfang | Trimmer, Netzadapter, Bedienungsanleitung |
Häufig gestellte Fragen - MB-200 REMINGTON
Benutzerfragen zu MB-200 REMINGTON
0 Frage zu diesem Gerät. Beantworten Sie die, die Sie kennen, oder stellen Sie Ihre eigene.
Eine neue Frage zu diesem Gerät stellen
Laden Sie die Anleitung für Ihr Bartschneider kostenlos im PDF-Format! Finden Sie Ihr Handbuch MB-200 - REMINGTON und nehmen Sie Ihr elektronisches Gerät wieder in die Hand. Auf dieser Seite sind alle Dokumente veröffentlicht, die für die Verwendung Ihres Geräts notwendig sind. MB-200 von der Marke REMINGTON.
BEDIENUNGSANLEITUNG MB-200 REMINGTON
REMINGTON®
MB-200
Register Your New Product Today!
By registering your new Remington® product, you will receive these important benefits: Proof of Ownership • Product Protection • Product Registration • Special Offers Register online at: www.RemingtonProducts.com
IMPORTANT SAFETY INSTRUCTIONS
When using electrical appliances, especially when children are present, basic safety precautions should always be followed, including the following:
READ ALL INSTRUCTIONS BEFORE USING.
KEEP AWAY FROM
WATER.
DANGER
As with most electrical appliances,
electrical parts and electrically live even when switch is off. To reduce the risk of death by electric shock
■ Do not reach for a trimmer that
has fallen into water. Unplug immediately.
■ Do not use while bathing or in a shower.
■ Do not place or store trimmer where it can fall or be pulled into a
tub or sink. Do not place in or drop into water or other liquid.
■ Except when charging, always upplan this trigger from the
displays the writer from the electrical outlet immediately after using
■ Unplug this trimmer before
表决意见:
WARNING
to reduce the risk of burns, fire, electric shock or injury to persons
■ Your trimmer should never be left unattended when plucked
in, except when charging your
■ Do not use outdoors or
products are being used or where vapor is being administered.
■ Do not use this trimmer with a newspaper before discarding. It is
damaged or broken cutting unit, as facial injury may occur, suggested that you contact local town/city officials to determine
■ Always attach plug to trimmer, four different to a dirt. To proper battery/ redentition sites) in your area.
■ Do not attempt to rechange disconnect, turn all controls to OFF,
then remove adapter from outlet, then detach power cord from the
trimmer for storage. charger. ■ For broadband are only
■ Always store your thinner and adapter in a moisture-free ■ For household use only.
area. Make sure the cord is disconnected from the spinner
KEEP AWAY FROM CHILDREN
SAVE THESE INSTRUCTIONS
Product Features
Before Using Your Trimmer
■ Beard, mustache, or sidesum hairs should be dry. Avoid
using lotions before using your trimper.
■ Be certain trimmer guard is at
the desired setting. When first using, you may want to begin
on a higher setting (#9-longest held to prevent tripping off tax
Hair) to prevent thinning on the much hair initially.
■ For first-time use, or if the trimmes has not been used for

Operating Your Trimmer
Charging/Recharging To recharge these models, use only
the charging adapter provided.
■ Turn the trimmer off. Insert the adapter plus into the bottom of
the trimmer, then plug the adapter into an electric wall outlet. The
and an electric wall outlet the charging indicator will glow green
indicating unit is charging. A full charge will take approx. 14-16
hours.
■ Your thinner cannot be overcharged. You may leave it
plugged in between uses. However, if the trimmer is not going to
If the earlier is not going to be used for an extended period
(2 weeks), Unplug the unit and recharge when resuming use.
■ Charge the trimmer at
temperatures between 40 – 90°F, to avoid adversely affecting
battery life. ■ In order to preserve the life of
■ In order to preserve the wire of the batteries, they should be fully
discharged every six months and then fully charged for 24 hours.
■ Rechargeable batteries included
(pie battery removal section for proper disposal of batteries)
Coated Packemable
Cored Rechargeable Operation (MB-200)
Plugging in the adapter cord will not provide power in the trimmer, but
provide power to the refrigerator, but only recharge the batteries.
Hair Length Selector and Removable Trimmer Guard
Homovable Transfer Status Attachment
NOTE: trimmer guard must be attached to the trimmer in order to
use the hair length selector. The hair length selector and trigger
The full-length selector and third guard attachment ensures precise
trimming and has nine adjustable positions:
Setting
1 Stubble look 1.5 mm 0.06"
2 2.5 mm 0.1" 3 Short 4 mm 0.16
4 5.5 mm 0.22" 5 Medium 7 mm 0.28"
6 9 mm 0.35"
7 11 mm 0.43" 8 Long 14 mm 0.55"
9 18 mm 0.71"
■ To adjust, roll the "Zoomi Wheel" toward the top of the trimmer
to adjust for longer length, and
Toward the bottom of the trimmer for shorter length. The wheel will
click into one of nine positions. ■ Bayia trimpsine at one of the
longest settings (#6 or #9 to avail
accidentally thinning hair too short). As you become familiar w
the settings, you can then select your desired length setting.


To replace: ■ To ordain improvement is in OFF
■ Be certain dinner is in OFF position.
■ While holding the trimmer in one hand, and holding the
"Zoom Wheel" to prevent it from
turning, slide the guard the top of the trimmer
"clicks" into position.
NOTE: the trimmer guard attachment are only be shield on the trimmer.
Can only be placed on the winner one way; if it does not fit properly,
remove and reverse it.
| How to Use | |
| Trimming Beards | Define the Beard LineRemove Trimmier gaunt attachment.cBurnout vertically with cutting beards having you.Start with coat of beard line. With the cutting bales resting slightly against your skin. Use motules based on shape or size (see the form to be detectable in your face and mouth). But from the head to face is a good view, whichever is preferred.To Tin and Taper the BeardLengthTrimmer gauge attachment of it.Turn to trim the door power switch to OIL and beige trimming.Turn to trim the door power switch to tan. |
| To Trim the Beard's hair LengthTrimmer gauge attachment of it.Turn to trim the door power switch to tan. | Trim to trim the door power switch to tan. |

Marke : REMINGTON
Modell : MB-200
Kategorie : Bartschneider