
WX066 - Nicht kategorisiert WORX - Kostenlose Bedienungsanleitung
Finden Sie kostenlos die Bedienungsanleitung des Geräts WX066 WORX als PDF.


| Produkttyp | Tragbarer Arbeitstisch (Sidekick™) |
| Modell | WX066 |
| Marke | WORX |
| Abmessungen (aufgebaut) | Ca. 80 x 60 x 70 cm |
| Abmessungen (zusammengeklappt) | Ca. 60 x 40 x 10 cm |
| Gewicht | Ca. 7 kg |
| Maximale Belastung | Ca. 100 kg |
| Material | Kunststoff und Metall |
| Verriegelung | Sicherheits-Drehknöpfe |
| Beine | Klappbar, vollständig ausziehbar |
| Zubehör | 4 Klemmhunde (Clamp dogs), 2 Verbindungsschlösser (Link locks) |
| Kompatibilität | Kompatibel mit anderen WORX®-Stützprodukten |
| Transport | Zusammenklappbar, Tragegriff |
| Anwendung | Halten und Stützen von Werkstücken beim Sägen, Bohren etc. |
| Reinigung | Mit feuchtem Tuch abwischen; keine aggressiven Reinigungsmittel |
| Sicherheitshinweise | Nicht auf das Produkt stellen; loses Haar und Kleidung vermeiden; nur auf festem, ebenem Untergrund verwenden. |
| Ersatzteile | Klemmhunde und Verbindungsschlösser separat erhältlich |
| Garantie | Siehe separates Garantiedokument |
Häufig gestellte Fragen - WX066 WORX
Benutzerfragen zu WX066 WORX
0 Frage zu diesem Gerät. Beantworten Sie die, die Sie kennen, oder stellen Sie Ihre eigene.
Eine neue Frage zu diesem Gerät stellen
Laden Sie die Anleitung für Ihr Nicht kategorisiert kostenlos im PDF-Format! Finden Sie Ihr Handbuch WX066 - WORX und nehmen Sie Ihr elektronisches Gerät wieder in die Hand. Auf dieser Seite sind alle Dokumente veröffentlicht, die für die Verwendung Ihres Geräts notwendig sind. WX066 von der Marke WORX.
BEDIENUNGSANLEITUNG WX066 WORX
WORX
Portable Work Table
WX066
SAFETY INSTRUCTIONS
WARNING: This product can expose you to chemicals including lead, phthalate or bisphenol A which are known to the State of California to cause cancer, birth defects or other reproductive harm. Wash your hands after use. For more information go to www.P65Warnings.ca.gov.
WARNING: When using this product, always follow basic safety precautions. Failure to follow all instructions listed below may result in personal injury.
Read all instructions before attempting to operate this product. Save these instructions for future reference.
- Keep work area clear and well lit.
- Cluttered areas can increase the risk of injury.
- Make sure all moving parts are free from interference.
-
Ensure Sidekick™ is set up on firm level ground and is
-
Ensure Sluckick is set up on him, level ground and is stable.
-
Keep other people away.
-
Keep other people away. Do not let other people, especially
- Do not let other people, especially children, not involved in the work touch the tool and keep them away from the work area. 5. Be aware of over-balancing. When a large piece of material supported by the Sidekicky is cut, the
-
Be aware of over-balancing. When a large piece of material supported by the Sidekick—is cut remaining piece may be heavy enough to tip over. Always ensure the work piece is well supported.
-
Check that locking knobs are securely locked and legs are fully extended, with tray flat before
operating Sidekick™
- The tool must be used only for its intended purpose. Any use other than those mentioned in
these instructions will be considered a case of misuse.
The manufacturer shall not be liable for any damage or injury resulting from misuse.
-
Never stand on this product.
-
Dress properly
- Do not wear loose clothing or jewelry, which can be caught in moving parts.
- Non-skid footwear is recommended when working outdoors.
- Secure long hair, or wear protective hair covering.
- Use personal
- Use face or dust mask when working operations create or involve dust
- Use face of dust mask when working operations create or involve dust. 11. Save all warnings and instructions for future reference. Refer to them frequently and use them
- Save all warnings and instructions for future reference here to them frequently and use them to instruct others using Sidekick™. If you loan someone Sidekick™, loan them these instructions to prevent
misuse of the product and possible iniu
- Do not use tools in damp or wet locations. Damp or wet conditions prevent appropriate clamping
pressure and grip on the work piece.
- Check for damaged parts. Before using the tool, it should be carefully checked to ensure it will operate
properly and perform its intended function.
- When not in use, tools should be stored in a secure, dry place, out of the reach of children and
unauthorized usage.
- Warning
- The use of any accessory or attachment other than those recommended in this instruction manual may present
a risk of personal injury.

Warning-To reduce the risk of injury, user must read instruction manual.

Warning

Pinch points

Lock

Unlock
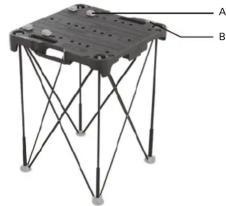
COMPONENT LIST
A. Clamp dogs (4 pieces
B. Link locks (2 pieces)
natural_image
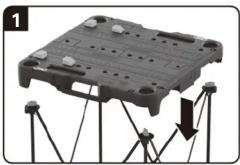
3D diagram of a mechanical structure with labeled components A and B, showing no text or symbols beyond labelsTo use Sidekick™, open the legs fully and put the table on the legs. (See Fig. 1) Rotate the locking knobs as shown to secure the legs to the table. (See Fig. 2)
NOTE: Before using, check that the table is horizontal and all locking knobs lock securely.
natural_image
3D model of a black electronic device with mounting holes and a downward arrow indicating rotation (no text or symbols)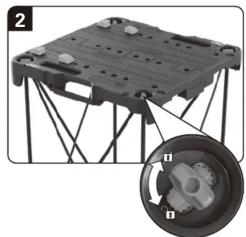
natural_image
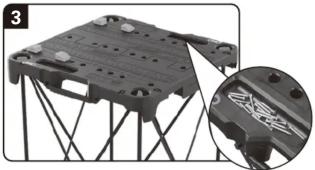
Close-up of a black plastic tray with a mechanical component, showing a close-up inset (no text or symbols visible)Use the recesses for storage. (See Fig. 3)
natural_image
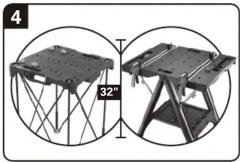
Close-up of a black plastic mechanical component with metal supports and mounting holes, shown in an inset magnified view (no text or symbols visible)If desired, Sidekick ^™ is compatible with other WORX ^® support products. (See Fig. 4, 5)
natural_image
Two views of a metal table with supports and metal racks, showing front and side views (no text or symbols)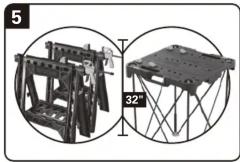
natural_image
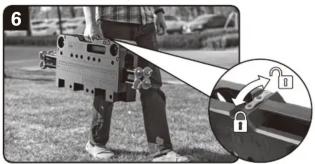
Two circular diagrams showing mechanical components: one with a frame and the other a metal frame structure (no text or symbols)To carry Sidekick™ safely, only transport when folded. Remove the table from the legs, collapse the legs and put inside the folded table top. Latch close with the two included link locks. Carry the table by the handle, close to the body. (See Fig. 6)
natural_image
Person using a robotic device on grass, with an inset showing a lock mechanism (no text or symbols visible)
Marke : WORX
Modell : WX066
Kategorie : Nicht kategorisiert