EV-Y2501-AMWQ - Sicherheitskamera Enforcer - Kostenlose Bedienungsanleitung
Finden Sie kostenlos die Bedienungsanleitung des Geräts EV-Y2501-AMWQ Enforcer als PDF.


Benutzerfragen zu EV-Y2501-AMWQ Enforcer
0 Frage zu diesem Gerät. Beantworten Sie die, die Sie kennen, oder stellen Sie Ihre eigene.
Eine neue Frage zu diesem Gerät stellen
Laden Sie die Anleitung für Ihr Sicherheitskamera kostenlos im PDF-Format! Finden Sie Ihr Handbuch EV-Y2501-AMWQ - Enforcer und nehmen Sie Ihr elektronisches Gerät wieder in die Hand. Auf dieser Seite sind alle Dokumente veröffentlicht, die für die Verwendung Ihres Geräts notwendig sind. EV-Y2501-AMWQ von der Marke Enforcer.
BEDIENUNGSANLEITUNG EV-Y2501-AMWQ Enforcer
ENFORCER®
4-in-1 HD TVI, CVI, AHD, Analog Turret Cameras
Manual
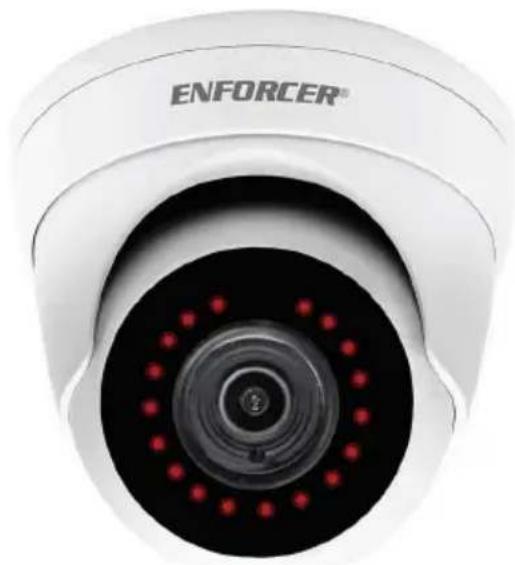
natural_image
Close-up of a white ENFORCER security camera with red LED lights on the central lens (no text or symbols visible beyond branding)EV-Y2501-A2WQ shown
| Model # | Lens | Resolution | Voltage | Style | Color |
| EV-Y2251-A2WQ | 2.8mm | 2MP | 12VDC | Turret | White |
| EV-Y2251-AMWQ | 2.8~12mm | 2MP | 12VDC | Turret | White |
| EV-Y2501-A2WQ | 2.8mm | 5MP | 12VDC | Turret | White |
| EV-Y2501-A2GQ | 2.8mm | 5MP | 12VDC | Turret | Gray |
| EV-Y2501-AMWQ | 2.8~12mm | 5MP | 12VDC | Turret | White |
| EV-Y2501-AMGQ | 2.8~12mm | 5MP | 12VDC | Turret | Gray |
Features:
- ICR Module
• D-WDR (Digital Wide Dynamic Range) - Joystick OSD control
• Heavy-duty vandal-resistant design
• Rugged, weatherproof (IP66) construction
- Split-glass design eliminates IR reflection
- Cables concealed in bracket to prevent tampering
Specifications:
| Model | EV-Y2251-A2WQ | EV-Y2501-A2WQ | EV-Y2501-A2GQ | EV-Y2251-AMWQ | EV-Y2501-AMWQ | EV-Y2501-AMGQ | |
| Housing color | White | Gray | White | Gray | |||
| Type | Fixed Turret Camera | Varifocal Turret Camera | |||||
| Formats | TVI (Default) / CVI / AHD / Analog (CVBS) | ||||||
| CMOS | 1/2.7" 2MP CMOS | 1/2.7" 5MP CMOS | 1/2.7" 2MP CMOS | 1/2.7" 5MP CMOS | |||
| Resolution (HD) | 1920x1080 | 2592x1944 | 1920x1080 | 2592x1944 | |||
| 3DNR | Yes | No | Yes | No | |||
| 2DNR | Yes | ||||||
| D-WDR | Yes | ||||||
| OSD (On-Screen Display) | Yes | ||||||
| Cable OSD control | Yes | ||||||
| Megapixels | 2MP | 5MP | 2MP | 5MP | |||
| Lens | 2.8mm ICR | 2.8~12mm ICR | |||||
| Viewing Angle | 121° | 38°~138° | |||||
| # of IR LEDs | 18 (SMT) | 40 (SMT) | |||||
| IR Range | Up to 65ft (20m) | Up to 148ft (45m) | |||||
| FPS | PAL:25FPS NTSC:30FPS | 20FPS | PAL:25FPS NTSC:30FPS | 20FPS | |||
| F Stop | F1.6 | F2.0 | F1.6 | F2.0 | |||
| Minimum illumination | IR On | 0Lux | |||||
| IR Off | 0.05Lux | ||||||
| S/N Ratio | 35dB | ||||||
| Shutter control | Auto | ||||||
| Gain control | Auto | ||||||
| Operating voltage | 12VDC | ||||||
| Current Draw | IR On | 320mA | 440mA | ||||
| IR Off | 80mA | 80mA | |||||
| IP Rating | IP66 | ||||||
| Operating temperature | -22°~131° F (-30°~55° C) | ||||||
| Dimensions | 3^15/_16"x3^9/_16" ( 100x90 mm) | 4^15/_16"x4^5/_16" ( 125x110mm) | |||||
| Weight | 16.72-oz (474g) | 1-lb, 9.3-oz (720g) | |||||
Parts List:
| 1x Turret camera | 3x Screws | 3x Screw anchors |
| 1x Power Balun | 1x OSD Manual | 1x Mounting template |
| 1x Manual |
Overview:
EV-Y2251-A2WQ / EV-Y2501-A2WQ
/ EV-Y2501-A2GQ:
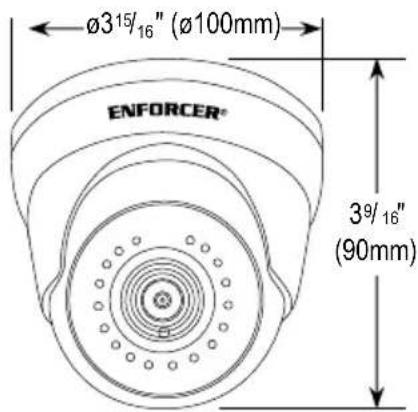
text_image
Ø3¹⁵/₁₆" (Ø100mm) ENFORCER® 3⁹/₁₆" (90mm)EV-Y2251-AMWQ / EV-Y2501-AMWQ
/ EV-Y2501-AMGQ:
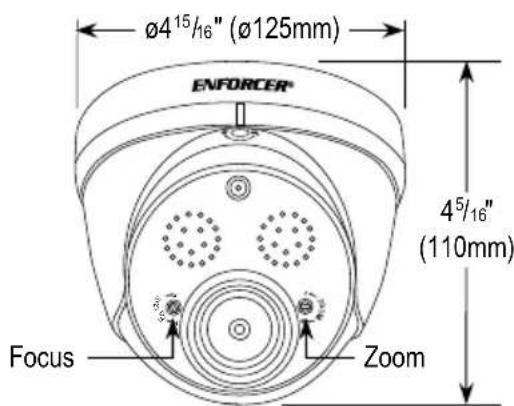
text_image
Ø4¹⁵/h₆" (Ø125mm) ENFORCER® 4⁵/₁₆" (110mm) Focus ZoomOverview:
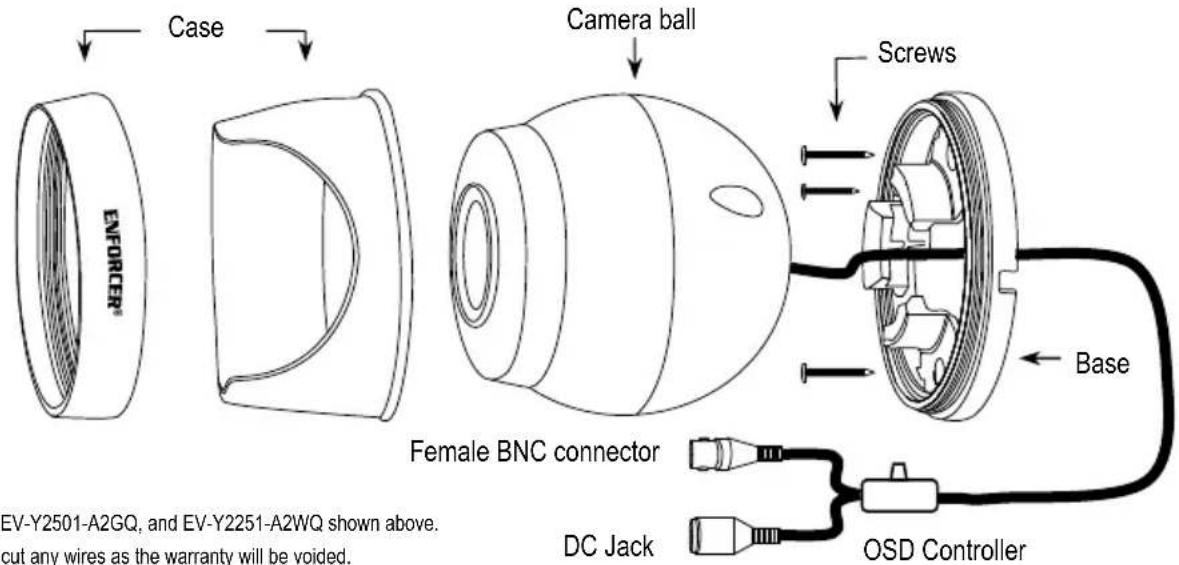
text_image
Case ENFORCER® Camera ball Screws Female BNC connector DC Jack Base OSD Controller EV-Y2501-A2GQ, and EV-Y2251-A2WQ shown above. cut any wires as the warranty will be voided.OSD Controller Settings:
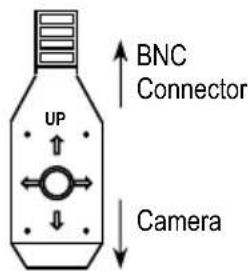
To set format via the OSD controller, move the controller in the direction of the desired setting, hold for 5 seconds, and release when the camera restarts. See chart below.
| Direction | Format Setting |
| Up AHD | |
| Down | CVBS/Analog |
| Left | TVI |
| Right CVI |
text_image
BNC Connector UP CameraNOTE: Do not press joystick in when setting different modes.
Before Starting:
- Use the camera within the given temperature and voltage limits.
-
Do not point the camera at the sun. Heat could damage the camera, even when not in use.
-
Do not subject the camera to strong vibrations.
- Do not mount the camera in areas exposed to radiation, strong magnetic fields, or strong electrical signals.
Installation:
- Run a 12VDC power supply wire and a video cable with a male BNC connector through the wall to where the camera is to be mounted.
- Loosen the outer case ring and remove the case from the base.
NOTE: The camera ball is NOT attached to the case or the base. It sits loose inside the case. Therefore, be very careful when removing the case from the base. Do not drop the camera ball.
- Mount the base to the wall using the three included mounting screws. If the wall is made of dry wall, brick, or similar material, it may be necessary to use the included screw anchors.
-
Run the camera's BNC and power connectors through the camera base, and connect to the video and power wires that were run through the wall.
-
Put the case over the camera ball and onto the base.
- Holding the case loosely on the base, turn the camera ball to the desired direction. Use a small screwdriver to adjust the zoom and focus of the camera ball if needed, via the holes marked "ZOOM" and "FOCUS" on the top of the camera ball (EV-Y2501-AMWQ, EV-Y2251-AMWQ, and EV-Y2501-AMGQ only).
NOTE: Before securing installation, make sure to check both the day and night images. Adjust the camera ball in a way so that there are no objects blocking the camera's view.
- Use the OSD controller joystick to adjust camera settings (see the separate OSD manual).
- Once the ball is pointing in the desired direction, tighten the outer case ring to secure the camera in its position.
- Do a final test of the video camera and monitor.
Troubleshooting:
| The screen is black | Check that the camera is powered upCheck that the power supply's polarity is correctCheck that the monitor is powered upCheck that the video cable connecting the camera to the monitor is connected properly |
| The image is foggy or washed out at night | Check that there are no objects very close to the cameraCheck that there are no highly reflective objects in the scene |
| The screen image is dim | Clean the lens using a soft, clean clothCheck that the light source is adequate |
| The screen image has poor contrast | Adjust the monitor's contrast knobChange the position of the camera |
| The screen image flickers | Change the position of the camera, check cables and format setting |
| The screen image is distorted | Change the position of the camera, check cables and format setting |
| The camera case is hot | Check that the correct power supply is in use |
| IR LEDs do not turn on | Check that the correct power supply is in use |
WARNING: Stop using the camera if you see a malfunction such as smoke or unusual heat, as it could cause fire or electric shock. Do not open the case of this device, as there are no user-serviceable components inside. Do not cut any wires as the warranty will be voided.
IMPORTANT: Users and installers of this product are responsible for ensuring this product complies with all national, state, and local laws and statutes related to monitoring and recording audio and video signals. SECO-LARM will not be held responsible for the use of this product in violation of any current laws or statutes.
FCC COMPLIANCE STATEMENT
THIS DEVICE COMPLIES WITH PART 15 OF THE FCC RULES. OPERATION IS SUBJECT TO THE FOLLOWING TWO CONDITIONS: (1) THIS DEVICE MAY NOT CAUSE HARMFUL INTERFERENCE AND (2) THIS DEVICE MUST ACCEPT ANY INTERFERENCE RECEIVED, INCLUDING INTERFERENCE THAT MAY CAUSE UNDESIRED OPERATION.
Notice: The changes or modifications not expressly approved by the party responsible for compliance could void the user's authority to operate the equipment.
IMPORTANT NOTE: To comply with the FCC RF exposure compliance requirements, no change to the antenna or the device is permitted. Any change to the antenna or the device could result in the device exceeding the RF exposure requirements and void user's authority to operate the device.
WARRANTY: This SECO-LARM product is warranted against defects in material and workmanship while used in normal service for three (3) years from the date of sale to the original customer. SECO- LARM's obligation is limited to the repair or replacement of any defective part if the unit is returned, transportation prepaid, to SECO-LARM. This Warranty is void if damage is caused by or attributed to acts of God, physical or electrical misuse or abuse, neglect, repair or alteration, improper or abnormal usage, or faulty installation, or if for any other reason SECO-LARM determines that such equipment is not operating properly as a result of causes other than defects in material and workmanship. The sole obligation of SECO-LARM and the purchaser's exclusive remedy, shall be limited to the replacement or repair only, at SECO-LARM's option. In no event shall SECO- LARM be liable for any special, collateral, incidental, or consequential personal or property damage of any kind to the purchaser or anyone else.
NOTICE: The SECO-LARM policy is one of continual development and improvement. For that reason, SECO-LARM reserves the right to change specifications without notice. SECO-LARM is also not responsible for misprints. All trademarks are the property of SECO-LARM U.S.A., Inc. or their respective owners. Copyright © 2020 SECO-LARM U.S.A Inc. All rights reserved.
SECO-LARM® U.S.A., Inc.
16842 Millikan Avenue, Irvine, CA 92606
Phone: (949) 261-2999 | (800) 662-0800
Website: www.seco-larm.com
Email: sales@seco-larm.com

PICRN3
MI_EV-Y2xx1-AxxQ_200512.docx