
MP-EU5002 - Projektor MAXELL - Kostenlose Bedienungsanleitung
Finden Sie kostenlos die Bedienungsanleitung des Geräts MP-EU5002 MAXELL als PDF.


| Produkttyp | Videoprojektor |
| Modell | MP-EU5002 |
| Marke | Maxell |
| Projektionstechnologie | LCD |
| Helligkeit | 5000 ANSI-Lumen |
| Native Auflösung | 1920 x 1080 (Full HD) |
| Kontrastverhältnis | 10.000:1 |
| Lampenlebensdauer (Normalmodus) | ca. 5000 Stunden |
| Lampenlebensdauer (Eco-Modus) | ca. 10.000 Stunden |
| Lautsprecher | 1 x 10 Watt |
| Anschlüsse | HDMI, VGA, USB, Composite, Audio |
| Projektionsverhältnis | 1,2 - 1,8:1 |
| Gehäusematerial | Kunststoff |
| Betriebsspannung | 100-240 V AC, 50/60 Hz |
| Stromverbrauch (Normalbetrieb) | ca. 350 W |
| Stromverbrauch (Standby) | < 0,5 W |
| Gewicht | ca. 5,2 kg |
| Abmessungen (B x T x H) | 390 x 310 x 130 mm |
| Lüftergeräusch (Normalmodus) | 35 dB |
| Eco-Modus Lüftergeräusch | 29 dB |
| Fernbedienung | Ja (IR) |
| Filterreinigung | Alle 500 Stunden empfohlen |
Häufig gestellte Fragen - MP-EU5002 MAXELL
Benutzerfragen zu MP-EU5002 MAXELL
0 Frage zu diesem Gerät. Beantworten Sie die, die Sie kennen, oder stellen Sie Ihre eigene.
Eine neue Frage zu diesem Gerät stellen
Laden Sie die Anleitung für Ihr Projektor kostenlos im PDF-Format! Finden Sie Ihr Handbuch MP-EU5002 - MAXELL und nehmen Sie Ihr elektronisches Gerät wieder in die Hand. Auf dieser Seite sind alle Dokumente veröffentlicht, die für die Verwendung Ihres Geräts notwendig sind. MP-EU5002 von der Marke MAXELL.
BEDIENUNGSANLEITUNG MP-EU5002 MAXELL
LCD Projector
MP-EU5002/MP-EW5002/MP-EX5002
User's Manual (concise)
Thank you for purchasing this product.
This is the basic manual on the product.
Visit our website to get the detailed manuals and the latest information on the product. Check them before using the product, for safe use and utilization of the product.
Our website: See the attached sheet.
⚠ WARNING ▶ Before using this product, be sure to read all manuals for this product. After reading them, store them in a safe place for future reference.
▶Heed all the warnings and cautions in the manuals or on the product.
▶ Follow all the instructions in the manuals or on the product.
NOTE • In this manual, unless any comments are accompanied, “the manuals” means all the documents provided with this product, and “the product” means this projector and all the accessories came with the projector.
Contents
[Non-Text]
First of all 2
Entries and graphical symbols explanation .....2
Important safety instruction ....2
Regulatory notices 3
About Electro-Magnetic Interference ....3
Disposal of Old Equipment and Batteries
Only for European Union and countries with recycling systems ....5
Contents of package.... 5
Preparing for the remote control ..... 6
Arrangement 7
Connecting with your devices 9
Fastening the adapter cover 10
[Non-Text]
Connecting to a power supply ..... 11
Fastening the cable 11
Turning on the power 12
Adjusting the projector's elevator ..... 13
Displaying the picture 14
Turning off the power 15
Cleaning and replacing the air filter .. 16
Installing or replacing the internal clock battery 17
Specifications 18
Troubleshooting - Warranty and after-service .... 19
First of all
Entries and graphical symbols explanation
The following entries and graphical symbols are used for the manuals and the product as follows, for safety purpose. Please know their meanings beforehand, and heed them.
⚠ WARNING This entry warns of a risk of serious personal injury or even death.
⚠️CAUTION This entry warns of a risk of personal injury or physical damage.
NOTICE This entry notices of fear of causing trouble.
Important safety instruction
The following are important instructions for safely using the product. Be sure to follow them always when handling the product. The manufacturer assumes no responsibility for any damage caused by mishandling that is beyond normal usage defined in these manuals of this projector.
⚠ WARNING ▶ Never use the product in or after an abnormality (ex. giving off smoke, smelling strange, took a liquid or an object inside, broken, etc.) If an abnormality should occur, unplug the projector urgently.
▶ Situate the product away from children and pets.
▶ Keep small parts away from children and pets. If swallowed, consult a physician immediately for emergency treatment.
▶ Do not use the product when there is fear of a thunderbolt.
▶ Unplug the projector from the power outlet if the projector is not used for the time being.
▶ Do not open or remove any portion of the product, unless the manuals direct it. For internal maintenance, leave it to your dealer or their service personnel.
▶ Use only the accessories specified or recommended by the manufacturer.
▶ Do not modify the projector or accessories.
▶ Do not let any things or any liquids enter to the inside of the product.
▶ Do not wet the product.
▶ Do not place the projector where any oils, such as cooking or machine oil, are used. Oil may harm the product, resulting in malfunction, or falling from the mounted position. Do not use adhesive such as threadlocker, lubricant and so on.
▶ Do not apply a shock or pressure to this product.
- Do not place the product on an unstable place such as the uneven surface or the leaned table.
- Do not place the product unstably. Place the projector so that it does not protrude from the surface where the projector is placed on.
- Remove all the attachments including the power cord and cables, from the projector when carrying the projector.
▶ Do not look into the lens and the openings on the projector, while the light source is on, since the projection ray may cause a trouble on your eyes.
▶ Do not approach the exhaust vents, while the light source is on. Also after the light source goes out, do not approach them for a while, since too hot.
Regulatory notices
About Electro-Magnetic Interference
In CANADA
CAN ICES-3(B) / NMB-3(B).
In the US, and other places where the FCC regulations are applicable
Declaration of Conformity: See the attached sheet.
This device complies with part 15 of the FCC Rules. Operation is subject to the following two conditions: (1) This device may not cause harmful interference, and (2) this device must accept any interference received, including interference that may cause undesired operation. This equipment has been tested and found to comply with the limits for a Class B digital device, pursuant to Part 15 of the FCC Rules.
These limits are designed to provide reasonable protection against harmful interference in a residential installation. This equipment generates, uses, and can radiate radio frequency energy and, if not installed and used in accordance with the instructions, may cause harmful interference to radio communications. However, there is no guarantee that interference will not occur in a particular installation. If this equipment does cause harmful interference to radio or television reception, which can be determined by turning the equipment off and on, the user is encouraged to try to correct the interference by one or more of the following measures:
- Reorient or relocate the receiving antenna.
- Increase the separation between the equipment and receiver.
- Connect the equipment into an outlet on a circuit different from that to which the receiver is connected.
- Consult the dealer or an experienced radio/TV technician for help.
INSTRUCTIONS TO USERS: This equipment complies with the requirements of FCC (Federal Communication Commission) equipment provided that the following conditions are met. Some cables have to be used with the core set. Use the accessory cable or a designated-type cable for the connection. For cables that have a core only at one end, connect the core to the projector.
CAUTION: Changes or modifications not expressly approved by the party responsible for compliance could void the user's authority to operate the equipment.
Regulatory notices (continued)
Product label
The position of the label is shown in the drawing below.
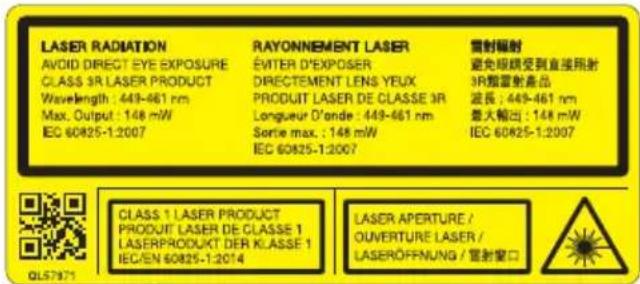

As with any bright source, do not stare into the direct beam, RG2 IEC 62471-5:2015.

natural_image
Simple line drawing of a device with no text, numbers, or symbolsLaser Aperture
Laser evaluation standard:
IEC60825-1: 2007, IEC60825-1: 2014,
EN60825-1: 2014
Internal Laser Specifications
Max. Output: 95W
Wave Length: 449 - 461nm
- This projector is classified as a class 1 laser product that complies with IEC60825-1:2014 and JIS C 6802:2014, and as a class 3R laser product that complies with IEC60825-1:2007. Improper handling may cause injury. Be careful of the following.
- If an abnormality occurs in the projector, turn it off immediately, unplug the power cord from the outlet, and consult your dealer or service company. If you continue to use it, it may cause not only electric shock or fire but also vision disorder.
- Do not disassemble or modify the projector. The projector has a high-power laser device inside. It may cause serious injury.
- Do not look into the beam while projecting an image. Do not look into the lens through optical devices such as magnifiers or telescopes. It may cause vision disorder.
• Make sure that nobody is looking into the lens when you turn on the projector by remote control away from the projector. - Do not let children operate the projector. If children could possibly operate the projector, they must be accompanied by an adult.
- Do not expose optical devices such as magnifiers or reflection mirrors to a projected image. It may cause bad effects on the human body if you continue to use it. It may also cause fire or accidents.
- Do not disassemble the projector when you dispose of it. Dispose of it according to laws and regulations of each country or region.
⚠️CAUTION ▶Use of controls or adjustments or performance of procedures other than those specified herein may result in hazardous radiation exposure.
Regulatory notices (continued)
Disposal of Old Equipment and Batteries Only for European Union and countries with recycling systems

7KH□DERYH□PDUN□LV□LQ□FRPSOLDQFH□ZLWK□WKH□:DVWH□(OHFWULFDC (TXLSPHQW□LUHFWLYH□□□□□□□□(8□:(((□□7KH□PDUN□LQGLFDWHV□WKH UHTXLUHPHQW□127□WR□GLVSRVH□WKH□HTXLSPHQW□LQFOXGLQJ□DQ\V GLVFDUGHG□EDWWHULHV□DV□XQVRUWHG□PXQLFLSDO□ZDVWH□EXW□ FROOHFWLRQ□V\VWHPV□DYDLODEOH□,I□WKH□EDWWHULHV□RU□DFFXP ZLWK□WKLV□HTXLSPHQW□GLVSOD\WKH□FKHPLFDO□V\PERO□+J□&G□RU PHDQV□WKDW□WKH□EDWWHU\KDV□D□KHDY\PHWDO□FRQWHQW□RI□PRU 0HUFXU\□RU□PRUH□WKDQ□□□□□□&DGPLXP□RU□PRUH□WKDQ□□□□□/HDG
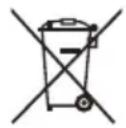
Note for the battery symbol (bottom symbol):☐7KLV\PERO\PLJKW EH\XVHG\LQ\FRPELQDWLRQ\ZLWK\D\FKHPLFDO\V\PERO\,Q\WKLV\FDVH ZLWK\WKH\UHTXLUHPHQW\VHW\E\WKH'\LUHFWLYH\IRU\WKH\FKHPLFT
Contents of package
<RXU□SURMHFWRU□VKRXOG□FRPH□ZLWK□WKH□LWHPV□VKRZQ□EHORZ□&KHFN□DUH□LQFOXGHG□&RQWDFW□RXU□GHDOHU□LPPHGLDWHO□LI□DQ□LWHPV□DUH□5HIHU□WR□JXUH□F-8□DW□WKH□EDFN□RI□WKLV□PDQXDO□
5HPRWHFRQWUROZLWKWZR\$EDMREUPHWDO
| 3RZHUFRUG | 6FUHZ |
| &RPSXWHUFDEOH | +0,FDEOHKROGHU |
| 8VHUVPDQXDO | [IRU03(8] |
| 6HFXULWODEHO | IRU03(::03(); |
| /HQVFRYHU | &DEOHWLHODUJH[ |
| $GDSWHUFRYHU | &DEOHWLHPHGLXP |
| 7KHDFHVVRUERRN | IRU03(8) |
| 8VHUVODQXDOFRQFLVHLVDEDVLF | IRU03(::03(); |
| PDQXDO5HDGWKHGDLOHGPDQXDOV | &DEOHWLHPVPDOO[ |
| 2SHUDWLQJ*XLGH'HWFIURPRXU | HUULWHFRUH |
| ZHEVLWH1 |
⚠ WARNING Ż.HHS□VPDOO□SDUWV□DZD\IURP□FKLOGUHQ□DQG□SHWV□7DNH□QRW□WR□SXW□LQ□WKH□PRXWK□,I□VZDOORZHG□FRQVXOW□D□SK\VLFLDQ□LPPHHPHUJHQF\WUHDWPHQW□ ⚠ CAUTION Ż,I□WKH□GLVF□FRPHV□ZLWK□WKLV□SURGXFW□XVH□LW□LQ□D□FRPSGULYH□1HYHU□LQVHUW□WKH□GLVF□LQWR□D□QRQ□FRPSXWHU□GLVF□GULYH□,QLQWR□DQ□LQFRPSDWLEOH□GLVF□GULYH□PD\SURGXFH□D□ORXG□QRLVH□DQG□UHVSHDNHU□GDPDJH□
NOTE□□□.HHS□WKH□RULJLQDO□SDFNLQJ□PDWHULDOV□IRU□IXWXUH□UHVKLSP□WR□XVH□WKH□RULJLQDO□SDFNLQJ□PDWHULDOV□ZKHQ□PRYLQJ□WKH□SURMHFV□FDXWLRQ□IRU□WKH□OHQV□
Preparing for the remote control
Please insert the batteries into the remote control before using it. If the remote control starts to malfunction, try to replace the batteries. If you will not use the remote control for long period, remove the batteries from the remote control and store them in a safe place.
-
Remove the battery cover.
-
Align and insert the two AA batteries (Use the appropriate AA carbon-zinc or alkaline batteries (non-rechargeable) in accordance with laws and regulations.) according to their plus and minus terminals as indicated in the remote control.
-
Put the battery cover back to the former state.

natural_image
Illustration of a hand holding two batteries with one partially open, no text or symbols present⚠ WARNING ▶ Always handle the batteries with care and use them only as directed. Improper use may result in battery explosion, cracking or leakage, which could result in fire, injury and/or pollution of the surrounding environment.
- When replacing the batteries, replace both of the batteries with new batteries of the same type. Do not use a new battery with a used battery.
- Be sure to use only the batteries specified. Do not use batteries of different types at the same time. Do not mix a new battery with used one.
- Make sure the plus and minus terminals are correctly aligned when loading a battery.
- Keep a battery away from children and pets.
- Do not recharge, short circuit, solder or disassemble a battery.
- Do not place a battery in a fire or water. Keep batteries in a dark, cool and dry place.
- If you observe battery leakage, wipe out the leakage and then replace a battery. If the leakage adheres to your body or clothes, rinse well with water immediately.
- Obey the local laws on disposing the battery.
Arrangement
Refer to tables T-1 to T-3 and figures F-1 and F-2 at the end of this manual to determine the screen size and projection distance. The values shown in the table are calculated for a full size screen.
① Screen size (diagonal)
(b) Projection distance (±10%, from the projector's end)
c1, c2 Screen height (±10%)
Installation position, picture mode, altitude, and operating environment may affect the brightness of the display.
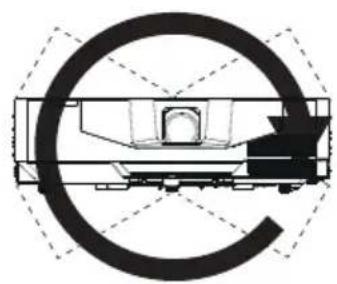
This projector will perform in a free tilt angle, as shown in the figures below.
Tilt 360^
Horizontal 360^
Vertical 360^
(combination of
horizontal and vertical)
natural_image
Pure mechanical cross-section diagram without any text, numbers, or symbols
natural_image
Pure diagram of a truck with a circular arrow symbol, no text or labels present
natural_image
Abstract geometric diagram with overlapping rings and arrows, no text or symbols present(continued on next page)
⚠ WARNING ▶ Install the projector where you can access the power outlet easily.
▶ Install the projector in a stable horizontal position.
- Do not use any mounting accessories except the accessories specified by the manufacturer. Read and keep the manuals of the accessories used.
- For special installation such as ceiling mounting, be sure to consult your dealer beforehand. Specific mounting accessories and services may be required.
- Do not put the projector on its side, front or rear position. If the projector falls or is knocked over, it could cause injury and/or damage to the projector.
- Do not attach nor place anything on the projector unless otherwise specified in the manual.
▶ Do not install the projector near thermally conductive or flammable things.
▶ Do not place the projector where any oils, such as cooking or machine oil, are used.
▶ Do not place the projector in a place where it may get wet.
⚠️CAUTION ▶Place the projector in a cool place with sufficient ventilation.
- Keep a space of 50~cm or more between a side of the projector and other objects such as walls.
- Do not stop up, block nor cover the projector's vent holes.
- Do not place the projector at places that are exposed to magnetic fields, doing so can cause the cooling fans inside the projector to malfunction.
- When you use the projector with the air filter facing towards the ceiling, it is clogged more frequently. Clean the air filter periodically.
▶ Avoid placing the projector in smoky, humid or dusty place. - Do not place the projector near humidifiers.
NOTICE ▶ Position the projector to prevent light from directly hitting the projector's remote sensor.
▶ Positional deviation or distortion of a projected image, or shift of the focus may occur due to ambient conditions, and so on. They tend to occur until the operation becomes stable, especially within about 30 minutes after the light source is turned on. Check and readjust them as necessary.
▶ Do not place the product in a place where radio interference may be caused. For details, see the "Operating Guide". (☐1)
Connecting with your devices
Before connecting the projector to a device, consult the manual of the device to confirm that the device is suitable for connecting with this projector and prepare the required accessories, such as a cable in accord with the signal of the device. Consult your dealer when the required accessory did not come with the product or the accessory is damaged.
After making sure that the projector and the devices are turned off, perform the connection, according to the following instructions. Refer to figures F-3 to F-6 at the end of this manual. For details, see the “Operating Guide”. (☐1) Before connecting the projector to a network system, be sure to read “Network Guide”. (☐1)
⚠ WARNING ▶ Use only the appropriate accessories. Otherwise it could cause a fire or damage the projector and devices.
- Use only the accessories specified or recommended by the projector's manufacturer. It may be regulated under some standard.
- Neither disassemble nor modify the projector and the accessories.
- Do not use the damaged accessory. Be careful not to damage the accessories. Route a cable so that it is neither stepped on nor pinched out.
⚠️CAUTION ▶For a cable with a core at only one end, connect the end with the core to the projector. That may be required by EMI regulations.
▶ Before connecting the projector to a network system be sure to obtain the consent of the administrator of the network.
▶ Do not connect the LAN port to any network that might have the excessive voltage.
The designated USB wireless adapter that is sold as an option is required to use the wireless network function of this projector.
▶ Before removing the USB storage device from the port of the projector, be sure to use the REMOVE USB function on the thumbnail screen to secure your data. Before you insert or pull out the USB wireless adapter from the projector, turn off the power of the projector and pull out the power cord's plug from the outlet. Do not touch the USB wireless adapter while the projector is receiving AC power.
NOTE • Do not turn on or off the projector while connected to a device in operation, unless that is directed in the manual of the device.
- Some input ports are selectable in the use. For details, see the "Operating Guide". (1)
- Be careful not to mistakenly connect a connector to a wrong port.
- If an oversized USB storage device blocks the LAN port, use a USB extension cable to connect the USB storage device.
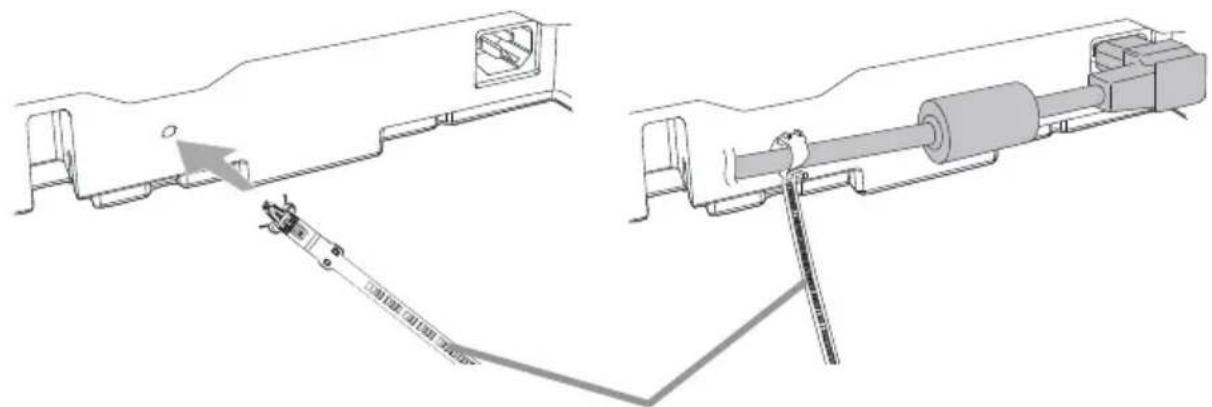
Ferrite core for MHL cable
When connecting a MHL cable to this projector, attach the ferrite core that is supplied with the projector to the MHL cable.
Refer to the following figure to attach the core to the cable nearby one end of the cable firmly, and secure it using the cable tie.
Be sure to connect the end of the cable to the projector.

Fastening the adapter cover
Use the supplied adapter cover to prevent the USB wireless adapter (optional) from coming off easily and prevention from burn injury.
- Loosen the screw on the bottom left of the USB TYPE A port.
- Insert the tab of the cover into the hole at the upper right of the USB TYPE A port in the direction of the arrow.
- Align the screw holes on the projector and the cover. Then insert the screw removed from the projector into the hole and tighten the screw.

⚠ WARNING ▶ Keep small parts away from children and pets. Take care not to put in the mouth. Heat may build up in the USB wireless adapter, so disconnect the projector power cord for more than 10 minutes before touching it to avoid possible burns.
Connecting to a power supply
- Put the connector of the power cord into the AC (AC inlet) of the projector.
- Firmly plug the power cord's plug into the outlet. In a couple of seconds after the power supply connection, the POWER/STATUS1 indicator will light up in steady orange.

Please remember that when the DIRECT POWER ON function is activated, the connection of the power supply makes the projector turn on.
When the AUTO POWER ON function is activated and the projector is receiving an input signal, it is turned on by connecting to the power supply.
⚠ WARNING ▶ Please use extra caution when connecting the power cord, as incorrect or faulty connections may result in fire and/or electrical shock.
- Do not touch the power cord with a wet hand.
- Only use the power cord that came with the projector. If it is damaged, consult your dealer to get a new one. Never modify the power cord.
- Only plug the power cord into an outlet whose voltage is matched to the power cord. The power outlet should be close to the projector and easily accessible. Unplug the power cord for complete disconnection.
- Do not distribute the power supply to multiple devices. Doing so may overload the outlet and connectors, loosen the connection, or result in fire, electric shock or other accidents.
- Connect the ground terminal for the AC inlet of this unit to the ground terminal of the building using an appropriate power cord (bundled).
NOTICE ▶This product is also designed for IT power systems with a phase-to-phase voltage of 220 to 240 V.
Fastening the cable
Use the supplied cable tie to fasten the cable.
natural_image
Technical line drawing of a mechanical assembly with two views (top and side), showing internal components and a tool inserted into a shaft (no text or symbols present)Cable tie - large
Turning on the power
- Make sure that the power cord is firmly and correctly connected to the projector and the outlet.
- Make sure that the POWER/STATUS1 indicator is steady orange. Then remove the lens cover.
- Press the STANDBY/ON button on the projector or the remote control.
The projection light source will light up, and the POWER/STATUS1 indicator will begin blinking in green. When the power is completely on, the indicator will stop blinking and light in steady green.

⚠ WARNING ▶ A strong light is emitted when the projector's power is on. Do not look into the lens of the projector or look inside of the projector through any of the projector's openings, since the projection ray may cause a trouble on your eyes.
NOTE • Please power on the projector prior to the connected devices. • The projector has the DIRECT POWER ON function, which can make the projector automatically turn on. For details, see the "Operating Guide". (1)
Adjusting the projector's elevator
Lengthening or shortening the elevator foot shifts the projection position and the projection angle. Turn the elevator foot to adjust its length.

⚠ WARNING ▶ Do not lengthen the elevator foot over 25 mm. The foot lengthened exceeding the limit may come off and drop the projector down, and result in an injury or damaging the projector.
⚠️CAUTION ▶ Do not place the projector with an inclination exceeding 5 degrees. The projector leaned exceeding the limit could cause malfunction and shorten the life of the projector.
When the place to put the projector is slightly uneven to the left or right, use the Rear elevator foot to place the projector horizontally. A spacer is installed on the Rear elevator foot at the time of shipment, and the projector is ready for use. If necessary, detach the spacer, and the elevator foot can be manually twisted to make more precise adjustments.
⚠ WARNING ▶ Keep the spacer away from children and pets. Be careful not to let them swallow the spacer. If swallowed consult a physician immediately for emergency treatment.
NOTE • You can attach the spacers to set the projector back to the factory default after adjusting the foot. If you install the projector in a different place in the future, it is recommended to keep the spacers and reuse them.
Displaying the picture
- Activate your signal source. Turn the signal source on, and make it send the signal to the projector.
- Press INPUT button on the projector or the remote control. Select a desirable input referring to the displayed input list.
- Use the VOLUME + / VOLUME - buttons to adjust the volume.
To turn off the sound, press the MUTE button on the remote control.
- Press the ASPECT button on the remote control. Each time you press the button, the projector switches the mode for aspect ratio in turn.
- Use the ZOOM ring to adjust the screen size.
- Use the FOCUS ring to focus the picture.

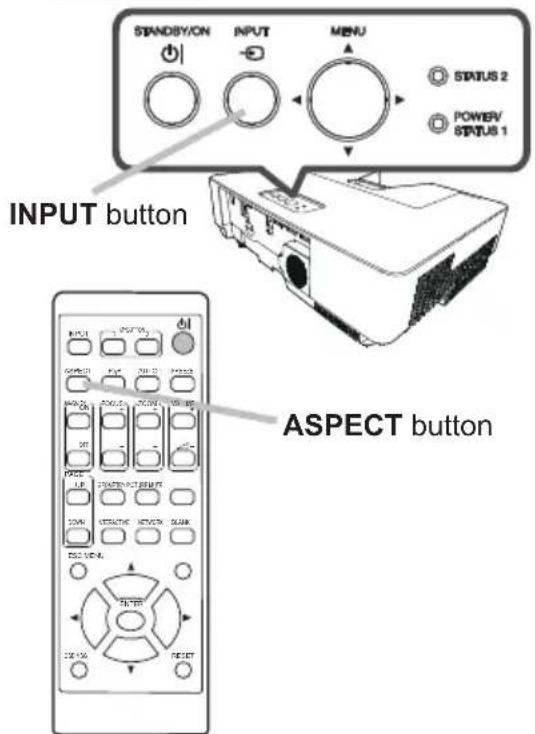
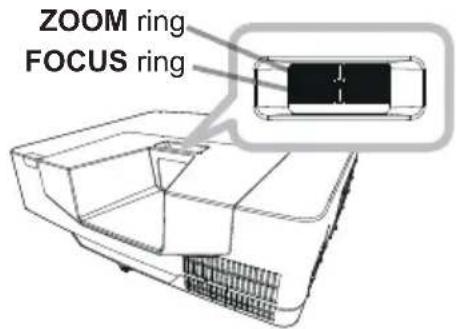
⚠ WARNING ▶ If you wish to have a blank screen while the light source is on, use the BLANK function (see the Operating Guide (1)).
Taking any other action may cause the damage on the projector. Blocking the beam by something causes high temperature and could result in fire or smoke.
(continued on next page)
NOTE • The ASPECT button does not work when no proper signal is input.
- For details, see the "Operating Guide". (1)
- There may be some noise and/or the screen may flicker for a moment when an operation is made. This is not a malfunction.
Turning off the power
- Press the STANDBY/ON button on the projector or the remote control.
The message “Power off?” will appear on the screen for about 5 seconds. -
Press the STANDBY/ON button again while the message appears.
The light source will go off, and the POWER/STATUS1 indicator will begin blinking in orange. Then the POWER/STATUS1 indicator will stop blinking and light in steady orange when the light source cooling is completed. -
Attach the lens cover, after the POWER/STATUS1 indicator turns in steady orange.
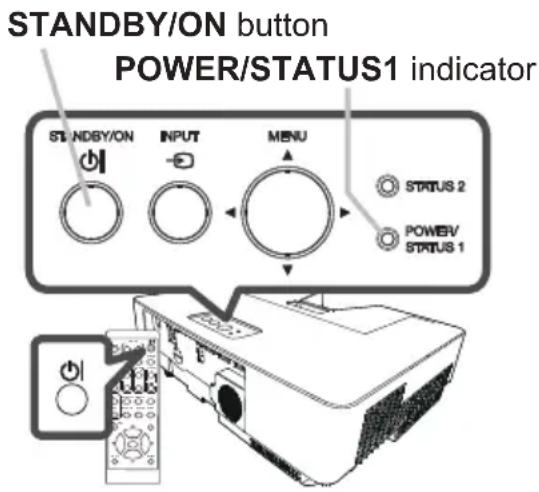
⚠ WARNING ▶ Do not touch around the exhaust vents during use or just after use, since it is too hot.
▶ Unplug the power cord for complete disconnection. The power outlet should be close to the projector and easily accessible.
NOTE • Please power off the projector after any connected devices are powered off.
- This projector has the AUTO POWER OFF function that can make the projector turn off automatically. For more information, see the “Operating Guide”. (1)
Cleaning and replacing the air filter
Please check and clean the air filter periodically. When the indicators or a message prompts you to clean the air filter, comply with it as soon as possible. The filter unit is attached to inner side of the filter cover. If a filter of the filter unit is damaged or heavily soiled, replace the whole unit with a new one.
- Turn the projector off, and unplug the power cord. Allow the projector to sufficiently cool down.
- Use a vacuum cleaner on and around the filter cover.
- Pick and pull up the filter cover knobs to take it off.
- Press up slightly the bottom side knobs to unlock the bottom side of the filter unit. Take the filter unit off.
- Use a vacuum cleaner for the filter vent of the projector.
- There are two types of filter unit. Check if your filter unit can be separated as shown in the illustration. Separate it if it can be separated.
- Use a vacuum cleaner for each part of the filter unit. If any part of the filter unit is damaged or heavily soiled, replace the whole unit with new one. To purchase the new filter unit, inform your dealer of the type number as follows.
If your filter unit is separable type: UX43931 If your filter unit is not separable type: UX43251 - Put the filter unit back in an upright state into the projector.
- Put the filter cover back into the place.

- Turn the projector on and reset the filter time using the FILTER TIME item in the EASY MENU.
(1) Press the MENU button to display a menu.
(2) Point at the FILTER TIME using the ▼/▲ button, then press the ▶ button. A dialog will appear.
(3) Press the ▶ button to select "OK" on the dialog. It performs resetting the filter time.
⚠ WARNING ▶ Before taking care of the air filter, make sure the power cord is not plugged in, then allow the projector to cool sufficiently. ▶ Use only the air filter of the specified type. Do not use the projector without the air filter or the filter cover. It could result in a fire or malfunction to the projector. ▶ Clean the air filter periodically. If the air filter becomes clogged by dust or the like, internal temperatures rise and could cause a fire, a burn or malfunction to the projector.
NOTE • Please reset the filter time only when you have cleaned or replaced the air filter, for a suitable indication about the air filter. • The projector may display the message such as the “CHECK THE AIR FLOW” or turn off the projector, to prevent the internal heat level rising.
Installing or replacing the internal clock battery
This product has an internal clock. When you use the function that requires the internal clock ("Event Scheduling" in the Network Guide), install a new battery. If the internal clock starts to malfunction, try to replace the battery.
Use the following type of battery, and follow the steps below.
MAXELL, Part No. CR2032 or CR2032H
- Turn the projector off, and unplug the power cord. Allow the projector to cool sufficiently.
- Turn the battery cover fully counterclockwise using a coin or the like, and pick the cover up to remove it.
- Pry up the old battery using a flathead screwdriver or the like to take it out. Do not use any metal tools. While prying it up, put a finger lightly on the battery since it may pop out of the holder.
- Install a new battery in place. Slide the battery in under the plastic claw, and push it into the holder until it clicks.
- Replace the battery cover in place, then turn it clockwise to fix by using a coin or the like.
Battery Cover

⚠ WARNING Always handle the batteries with care and use them only as directed. Battery may explode if mistreated. Do not recharge, disassemble or dispose of in fi re. And also improper use may result in cracking or leakage, which could result in fi re, injury and/or pollution of the surrounding environment. Do not ingest battery. Chemical Burn Hazard.
It can cause severe internal burns in just 2 hours and can lead to death.
▶ If you think batteries might have been swallowed or placed inside any part of the body, seek immediate medical attention.
- Keep new and used batteries away from children and pets. If the battery compartment does not close securely, stop using the product and keep it away from children and pets.
▶ If you observe battery leakage, wipe out the leakage and then replace a battery. If the leakage adheres to your body or clothes, rinse well with water immediately.
▶ Be sure to use only the specified batteries.
- Do not use damaged batteries.
- Do not use any metal tools.
- Make sure the plus and minus terminals are correctly aligned when loading a battery.
- Do not short circuit or solder a battery.
▶ Do not allow a battery in a fire or water. Keep batteries in a dark, cool and dry place.
▶ Obey the local laws on disposing a battery.
Specifications
| Item Specification | |
| Product name Liquid crystal projector | |
| Liquid Crystal Panel | MP-EX5002: 786,432 pixels (1024 horizontal x 768 vertical)MP-EW5002: 1,024,000 pixels (1280 horizontal x 800 vertical)MP-EU5002: 2,304,000 pixels (1920 horizontal x 1200 vertical) |
| Light Source Laser Diode | |
| Speaker | 16 W mono |
| Power supply/Rated current | MP-EW5002/MP-EX5002:AC 100-120 V: 3.7 A, AC 220-240 V: 1.9 AMP-EU5002:AC 100-120 V: 3.8 A, AC 220-240 V: 1.9 A |
| Power consumption | MP-EW5002/MP-EX5002:AC 100-120 V: 360 W, AC 220-240 V: 350 WMP-EU5002:AC 100-120 V: 370 W, AC 220-240 V: 360 W |
| Temperature range | 0 ~ 40°C (Operating)35 ~ 40°C (The brightness of the light source is reduced automatically.) |
| Size | 512 (W) x 152 (H) x 424 (D) mm506 (W) x 136 (H) x 424 (D) mm (Not including protruding parts.)Refer to figure F-7 at the back of this manual. |
| Weight (mass) | approx. 7.5 kg |
| Ports | COMPUTER IN1 D-sub 15 pin mini jack x1COMPUTER IN2/MONITOR OUT D-sub 15 pin mini jack x1HDMI1 HDMI connector x1HDMI2/MHL HDMI/MHL connector x1HDMI3 (MP-EU5002 only) HDMI connector x1VIDEO RCA jack x1AUDIO IN1 3.5 mm (stereo) mini jack x1AUDIO IN2 3.5 mm (stereo) mini jack x1AUDIO IN3 (R, L) RCA jack x2AUDIO OUT 3.5 mm (stereo) mini jack x1USB TYPE A USB type A connector x2USB TYPE B USB type B connector x1CONTROL D-sub 9 pin plug x1LAN RJ45 jack x1 |
| Optional parts | Fi Iter unitIf the filter unit originally installed is separable type: UX43931If the filter unit originally installed is not separable type: UX43251Mounting accessory:HAS-9110 (Bracket for ceiling mount)HAS-104S (Bracket for low ceiling mount)HAS-204L (Fixing adapter for low ceilings)HAS-304H (Fixing adapter for high ceilings)USB wireless adapter:USB-WL-5G* For more information, please consult your dealer. |
Troubleshooting - Warranty and after-service
If an abnormal operation (such as smoke, strange odor or excessive sound) should occur, stop using the projector immediately.
Otherwise if a problem occurs with the projector, first refer to “Troubleshooting” of “Operating Guide” and “Network Guide”, and run through the suggested checks. If this does not resolve the problem, please consult your dealer or service company. They will tell you what warranty condition is applied.
Check our website where you may find the latest information for this product.
NOTE • The information in this manual is subject to change without notice.
- The illustrations in this manual are for illustrative purposes. They may differ slightly from your projector.
- The manufacturer assumes no responsibility for any errors that may appear in this manual.
- The reproduction, transfer or copy of all or any part of this document is not permitted without express written consent.
Manufacturing year and month
The manufacturing year and month of this projector is indicated as follows in the serial number of the rating label on the projector.
Example:
F 8 C x 0 0 0 0 1 L Manufacturing month: A = January, B = February, ... L = December. = Manufacturing year: 8 = 2018, 9 = 2019, 0 = 2020, ...
End User License Agreement for the Product Software
Software in the product consists of the plural number of independent software modules and there exist our copyright and/or third party copyrights for each of such software modules. The product also uses software modules that we have developed and/or produced. And there exist our copyright and intellectual property for each of such software and related items including but not limited to the software related documents.
These rights above are protected by copyright law and other applicable laws. And the product uses software modules licensed as Freeware upon GNU GENERAL PUBLIC LICENSE Version 2 and GNU LESSER GENERAL PUBLIC LICENSE Version 2.1 established by Free Software Foundation, Inc. (U.S.) or license agreements for each software.
Check our website for license agreements for such software modules and other software. (1)
Contact dealer in your region for inquiry regarding licensed software. Refer to license agreements of each software on the web page for detail of the license conditions and so on. (The original in English is carried since the license agreement is established by third party other than us.)
Because the program (the software module) is licensed free of charge, the program is provided "as is" without warranty of any kind, either expressed or implied, to the extent permitted by applicable law. And we do not take any responsibility or compensate for loss of any kind (including but not limited to loss of data, loss of accuracy or loss of compatibility with interface between other programs) by the software concerned and/or use of the software concerned to the extent permitted by applicable law.
Trademark acknowledgment
- Microsoft®, Internet Explorer® and Windows® are registered trademarks of Microsoft Corporation in the U.S. and/or other countries.
- HDMI®, HDMI High-Definition Multimedia Interface® and HDMI® logo are trademarks or registered trademarks of HDMI Licensing Administrator, Inc. in the United States and other countries.
- Blu-ray Disc™ and Blu-ray™ are trademarks of Blu-ray Disc Association.
- MHL®, the MHL logo, and Mobile High-Definition Link are trademarks or registered trademarks of MHL, LLC in the United States and other countries.
All other trademarks are the properties of their respective owners.


- LCD Projector
- MP-EU5002/MP-EW5002/MP-EX5002
- User's Manual (concise)
- Contents
- First of all
- Entries and graphical symbols explanation
- Important safety instruction
- Regulatory notices
- About Electro-Magnetic Interference
- In CANADA
- In the US, and other places where the FCC regulations are applicable
- Regulatory notices (continued)
- Product label
- Disposal of Old Equipment and Batteries Only for European Union and countries with recycling systems
- Contents of package
- Preparing for the remote control
- Arrangement
- Connecting with your devices
- Ferrite core for MHL cable
- Fastening the adapter cover
- Connecting to a power supply
- Fastening the cable
- Turning on the power
- Adjusting the projector's elevator
- Displaying the picture
- Turning off the power
- Cleaning and replacing the air filter
- Installing or replacing the internal clock battery
- Troubleshooting - Warranty and after-service
- Manufacturing year and month
- End User License Agreement for the Product Software
- Trademark acknowledgment
Marke : MAXELL
Modell : MP-EU5002
Kategorie : Projektor