AX-TOYCAM2 - Nicht kategorisiert Axxess - Kostenlose Bedienungsanleitung
Finden Sie kostenlos die Bedienungsanleitung des Geräts AX-TOYCAM2 Axxess als PDF.


Benutzerfragen zu AX-TOYCAM2 Axxess
0 Frage zu diesem Gerät. Beantworten Sie die, die Sie kennen, oder stellen Sie Ihre eigene.
Eine neue Frage zu diesem Gerät stellen
Laden Sie die Anleitung für Ihr Nicht kategorisiert kostenlos im PDF-Format! Finden Sie Ihr Handbuch AX-TOYCAM2 - Axxess und nehmen Sie Ihr elektronisches Gerät wieder in die Hand. Auf dieser Seite sind alle Dokumente veröffentlicht, die für die Verwendung Ihres Geräts notwendig sind. AX-TOYCAM2 von der Marke Axxess.
BEDIENUNGSANLEITUNG AX-TOYCAM2 Axxess
Installation Instructions for AX-TOYCAM2
AX-TOYCAM2 Toyota Back-Up Camera Retain/Add-On 2006-2013
FEATURES
- Retains the factory back-up camera to an aftermarket radio
- Allows an aftermarket camera to be added to the factory screen*
* Display and navigation model radios only
INTERFACE COMPONENTS
- AX-TOYCAM2 harness
APPLICATIONS
| TOYOTA | Prius | 2010-2011 | |
| 4-Runner (with a factory amp) | 2012-2013 | Sienna | 2008-2010 |
| 4-Runner | 2006-2011 | Sequoia (with a factory amp) | 2008-2012 |
| Avalon | 2011-2012 | Tundra (with a factory amp) | 2007-2013 |
| Camry | 2007-2011 | Venza (with NAV) | 2009-2012 |
| Highlander | 2008-2012 | ||
TOOLS REQUIRED
- Cutting tool • Tape • Crimping tool
- Connectors (example: butt connectors, bell caps, etc.)
CAUTION! All accessories, switches, climate controls panels, and especially air bag indicator lights must be connected before cycling the ignition. Also, do not remove the factory radio with the key in the on position, or while the vehicle is running.

Axxess Integrate axxessinterfaces.com • metraonline.com
REV. 5/17/16
© COPYRIGHT 2004-2016 METRA ELECTRONICS CORPORATION
Installation Instructions for AX-TOYCAM2

Connections to be made
The AX-TOYCAM2 can be connected two different ways
To retain the factory back-up camera to an aftermarket radio:
- Connect the Black wire to chassis ground.
- Connect the Yellow wire to accessory power.
- Connect the male Yellow RCA jack to the rear camera input of the aftermarket radio.
- Connect the reverse wire from the aftermarket radio, to the reverse signal in the vehicle.
- Disregard the loose Green/Purple wire, it will not be used in this application.
To allow an aftermarket camera to be added to the OEM screen:
- Connect the Black wire to the ground wire of the aftermarket camera.
- Connect the Yellow wire to battery wire of the aftermarket camera.
- Connect the female Yellow RCA jack to the aftermarket camera.
The following (2) steps are only required if a wire is not present in the factory harness.
- If a wire is not present in pin-5 of the 5-pin connector of the factory radio, unplug the connector, then insert the metal pin of the loose Green/Purple wire into it. Connect the harness back into the radio.
- Connect the other end of the loose Green/Purple wire to the reverse wire of the vehicle.
5 Pin Harness
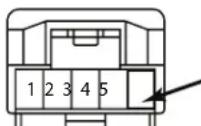
This is the wire view of the connector in the vehicle

KNOWLEDGE IS POWER
Enhance your institution and enrollment status by enrolling in the most recognized and respected
mobile electronics schools in our industry.
Log onto www.1stafcrnishafe.com or da 604-364-6719 for more information and ta
toward a berlier town perow.

Metra recommends MECP certified Artificial

Axxess Integrate axxessinterfaces.com • metraonline.com
REV. 5/17/16
© COPYRIGHT 2004-2016 METRA ELECTRONICS CORPORATION
AX-TOYCAM2
Retener/Añadir cámara de reversa de Toyota 2006-2013
CARACTERÍSTICAS
- Retiene la cámara de reversa de fábrica para un radio de mercado secundario
- Permite que se añada una cámara de mercado secundario a la pantalla de fábrica*
* Sólo Pantalla y modelo de navegación radios
COMPONENTES DE LA INTERFASE
- Arnés AX-TOYCAM2
APLICACIONES
| TOYOTA | Prius | 2010-2011 | |
| 4-Runner (con un amp de fábrica) | 2012-2013 | Sienna | 2008-2010 |
| 4-Runner | 2006-2011 | Sequoia (con un amp de fábrica) | 2008-2012 |
| Avalon | 2011-2012 | Tundra (con un amp de fábrica) | 2007-2013 |
| Camry | 2007-2011 | Venza (con NAV) | 2009-2012 |
| Highlander | 2008-2012 | ||
HERRAMIENTAS REQUERIDAS
- Herramienta de corte • Cinta • Ponchadora
- Conectores (ejemplo: conectores de extremo, de campana, etc.)
¡PRECAUCIÓN! Todos los accesorios, interruptores, paneles de controles de clima y especialmente las luces del indicador de las bolsas de aire deben estar conectados antes ciclar la ignición. Además, no quite el radio de fábrica con la llave en la posición o de encendido ni con el vehículo funcionando.

Axxess Integrate axxessinterfaces.com • metraonline.com
REV. 5/17/16
© COPYRIGHT 2004-2016 METRA ELECTRONICS CORPORATION
Conexiones que se deben hacer
El AX-TOYCAM2 puede conectarse de dos maneras distintas
Para retener la cámara de reversa de fábrica para un radio de mercado secundario:
- Conecte el cable negro a la tierra del chasis.
- Conecte el cable amarillo a la alimentación de accesorios.
- Conecte el conector RCA macho amarillo RCA en la entrada de la cámara de reversa del radio de mercado secundario.
- Conecte el cable de marcha atrás del radio de mercado secundario, a la señal de marcha atrás en el vehículo.
- Ignore el cable suelto verde/púrpura, no se utilizará en esta aplicación
Para permitir que se añada una cámara de mercado secundario a la pantalla de equipo original:
- Conecte el cable negro al cable de tierra de la cámara de mercado secundario.
- Conecte el cable amarillo al cable de la batería de la cámara de mercado secundario.
- Conecte el conector RCA hembra amarillo a la cámara de mercado secundario.
Los siguientes (2) pasos sólo son necesarios si el cable no está presente en el arnés de la fábrica.
- Si un cable no está presente en pin-5 del conector de 5 pines del radio de fábrica, desenchufe el conector, luego inserte el pasador metálico del cable verde/púrpura suelta en ella. Conecte el arnés de nuevo en la radio.
- Conecte el otro extremo del cable suelto verde/púrpura al cable inversa del vehículo.

EL CONOCIMIENTO ES PODER Rejora sus habitadores de insalesión y fabricación inscribiendose en la escuela de dispositores electrónicas materiales más recomendada y resolutada de nuestra industria. Registrarse en www.indalero.medicas.com o ítems al 810-354-6782 para obtener más información y avance hasta un futuro mayor.
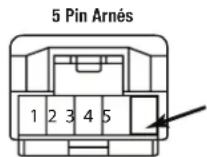
Esta es la vista de cable del conector en el vehículo


Axxess Integrate axxessinterfaces.com • metraonline.com
REV. 5/17/16
© COPYRIGHT 2004-2016 METRA ELECTRONICS CORPORATION