
M12 - Objektiv AXIS - Kostenlose Bedienungsanleitung
Finden Sie kostenlos die Bedienungsanleitung des Geräts M12 AXIS als PDF.

| Produkttyp | Objektiv |
| Marke | Axis |
| Modell | M12 |
| Kategorie | CCTV-Objektiv |
| Bauform | Festbrennweite |
| Brennweite | 2,8 mm |
| Blende | F2.0 |
| Bildwinkel | 90° (diagonal) |
| Gewinde | M12 x 0,5 |
| Sensorgröße | 1/3" |
| IR-Korrektur | Ja |
| Material | Metallgehäuse, Glaslinsen |
| Gewicht | 10 g |
| Abmessungen (D x L) | 14 mm x 14 mm |
| Lieferumfang | Objektiv, Schraubwerkzeug |
| Oberflächenvergütung | mehrfach entspiegelt |
| Anwendung | IP-Kameras, Überwachungskameras |
| Reinigung | Mikrofasertuch, Linsenreiniger |
| Sicherheitshinweis | Nicht direkt in die Linse schauen |
| Ersatzteile | Erhältlich über Axis-Partner |
Häufig gestellte Fragen - M12 AXIS
Benutzerfragen zu M12 AXIS
0 Frage zu diesem Gerät. Beantworten Sie die, die Sie kennen, oder stellen Sie Ihre eigene.
Eine neue Frage zu diesem Gerät stellen
Laden Sie die Anleitung für Ihr Objektiv kostenlos im PDF-Format! Finden Sie Ihr Handbuch M12 - AXIS und nehmen Sie Ihr elektronisches Gerät wieder in die Hand. Auf dieser Seite sind alle Dokumente veröffentlicht, die für die Verwendung Ihres Geräts notwendig sind. M12 von der Marke AXIS.
BEDIENUNGSANLEITUNG M12 AXIS
Instructions
Follow these instructions to replace the lens. In order to set the focus and position the lens, the camera must be connected to the network. For instructions, please refer to the Installation Guide supplied with the camera.
Important!
Detaching/attaching the lens with force may cause irreparable damage to the lens holder, no force is needed.
Follow the instructions below to replace the lens on the following models :
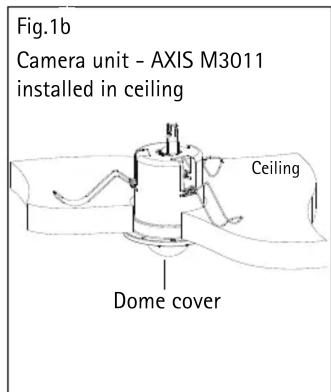
- AXIS M3011
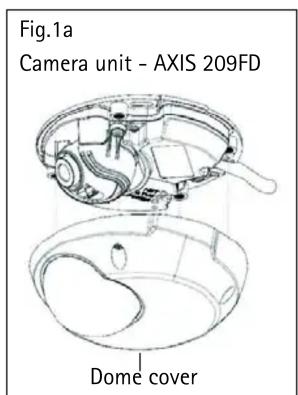
- AXIS 209FD
- AXIS 209FD-R
- AXIS 209FD-R M12
- AXIS 209MFD
• AXIS 209MFD-R M12/SPLIT - AXIS 209MFD-R
- AXIS 209MFD-R M12
• AXIS 209MFD-R M12/SPLIT
Note: Applies to P/N 0283-00X-08 or higher P/N is located on the product label
Replace the lens
Follow these instructions to replace the lens:
- Remove the dome cover, see FIG.1a and FIG.1b.
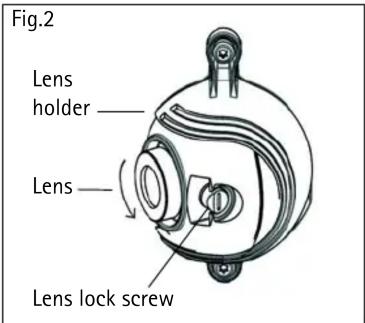
- Unlock the lens lock screw by turning it 180^ , counter-clockwise (Fig. 2).
- Rotate the lens counter-clockwise to detach it (Fig. 2).
- Carefully attach the new lens and be sure to insert it gently, no force is needed.
Set the focus
In order to set the focus and position the lens, the camera must be connected to the network. For instructions, please refer to the Installation Guide supplied with the camera. After installation, follow the instructions below:
Note: Due to the dome's refraction, the image might appear slightly out of focus once the dome has been placed. To compensate, focus on an object slightly closer than the intended area.
E.g. for AXIS 209MFD 16MM lens, rotate approximately 270 degrees counter-clockwise before attaching the dome.
- Open the camera's Live View page in a web browser.
- To adjust the focus, manually rotate the lens until the image on the Live View page is satisfactory.
- Gently lock the lens by turning the lens lock screw approximately 180^ clockwise, until it clicks in place.
Position the lens
- Open the Live View page in a web browser.
- Checking the image in the Live View page, carefully move the lens to the desired position.
Replace the dome cover
- Attach the dome cover.
- Using the supplied allen/hex key, gently tighten the 4 screws (Fig. 1a/1b).
The installation of the lens is now complete. For more information on the functionality of the network camera, please refer to the user documentation available from the Axis web site at www.axis.com or from the AXIS Network Camera CD supplied with the camera.
Important!
Attaching the lens with force may cause damage to the lens holder.