SFD35 - Blitz Bower - Kostenlose Bedienungsanleitung
Finden Sie kostenlos die Bedienungsanleitung des Geräts SFD35 Bower als PDF.


Benutzerfragen zu SFD35 Bower
0 Frage zu diesem Gerät. Beantworten Sie die, die Sie kennen, oder stellen Sie Ihre eigene.
Eine neue Frage zu diesem Gerät stellen
Laden Sie die Anleitung für Ihr Blitz kostenlos im PDF-Format! Finden Sie Ihr Handbuch SFD35 - Bower und nehmen Sie Ihr elektronisches Gerät wieder in die Hand. Auf dieser Seite sind alle Dokumente veröffentlicht, die für die Verwendung Ihres Geräts notwendig sind. SFD35 von der Marke Bower.
BEDIENUNGSANLEITUNG SFD35 Bower
BOWER
SFD35
Dual Autofocus Flashgun
Dedicated System
natural_image
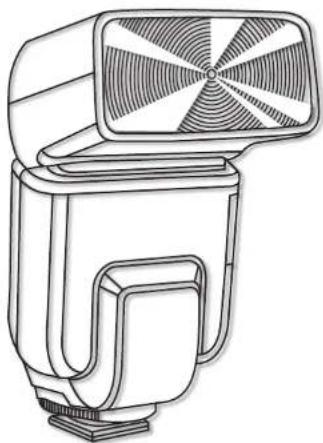
Line drawing of a compact electronic device with a circular fan and rectangular head (no text or symbols)OPERATING INSTRUCTION MANUAL
text_image
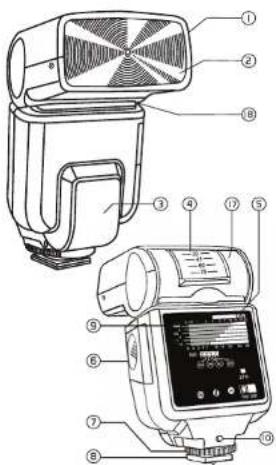
Technical diagram of a flash unit with numbered parts for identification and labeling
for Nikon
for Canon
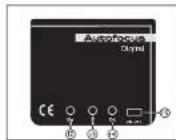
for Sony
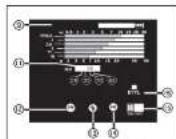
NOMENCLATURE
1.4 position Zoom Head
-
Fresnel lens
-
AF illuminator beam
-
Bounce Head Scale
-
ISO Setting knob
-
Battery Compartment Lid
-
Locking Ring 1
Release Button (For Sory)
-
Hot Shoe Foot
-
Exposure/Distance Table
-
Flash Test Button
-
ISO/Zoom Head Setting Window
-
Power On Indicator
-
Ready Lamp
-
Green Auto Check Lamp
-
ON/OFF Switch
-
E-TTL Indicator (For Canon)
Flash Mode Switch (for Nikon)
-
Vertical Bounce Flash Head
-
Horizontal Swivel Pivot
PRECAUTIONS
Before you start to operate the flash unit, please read the following caution to prevent possible damages.
- This flash unit can only be used on the camera brand according to the dedicated mounting which is designed for.
- Any attempt to dismantle the flash will result in possible electric shocks or burns. If the outer casing is cracked or flash unit is faulty, please return to the authorized dealer for repairs by authorized personnel.
- Do not attempt to trigger the flash close to eyes. Keep at least 1m/3.3ft when taking flash photography.
- When the flash unit is not used for extended period of time (more than 2 weeks), remove all batteries to prevent battery leakage.
- Try to charge fully and fire the flash several times in a month to ensure that the electronic circuitry as well as the capacitor is kept in a tip-top condition.
- During battery replacement, replace all 4 batteries of the same type at the same time.
- Flash unit should be kept dry at all times as it is not either waterproof or weatherproof. Often it impractical to repair/replace components damaged by water.
- Care must be taken as this flash unit is a precise equipment. Any accident knocks or drop may result in permanent damage to the circuitry and components which may not be feasible to undergo repairs.
- Always store the flash unit in a cool dry place, away from heat or direct sunlight. Never store the flash in a drawer or upboard containing naphthalene or camphor (moth balls) as these will have a negative effects on the circuitry of the flash unit.
- Do not use a thinner, benzene or other cleaning agents to remove dirt or fingerprint from the unit. Use a soft, moistened cloth instead
INSTALLING THE BATTERIES
Ensure that the ON/OFF switch (15) is in the OFF position. Slide the battery compartment Lid (6) toward the front of the flash and flip up until the battery chamber is fully exposed. Insert 4 AA sized batteries according to the battery polarity indication as shown inside the battery chamber. Close the battery compartment lid (5) by pushing it down while sliding towards the back of the flash.
MOUNTING THE FLASH ON THE CAMERA
Ensure that ON/OFF (15) switch is at the OFF position. Slide the Hotshoe Foot (8) onto the camera's hotshoe and fasten the locking ring (7) in an anti-clockwise motion. To detach the flash unit, turn the locking ring (7) in a clockwise motion until it stops For Sony Alpha DSLR, ensure that the camera's hotshoe is fully push in until the Release button (7) pop up. To detach the flash unit, depress the release button (7) and at the same time pull the flash unit from the camera's hotshoe.
Note: Ensure camera inbuilt flash is at the close position Grasp the bottom of the flash to prevent damage to the holshoe foot (8) and camera holshoe.
OPERATING THE FLASH
Slide the ON/OFF switch to the left and wait for a humming sound to be heard (occur when the flash is switch on). When the ready lamp(13) located the back of the flash light up, the flash is ready to fire. Pressing the flash test button (10) will fire the flash to insure its operation.
AUTO STANDBY SYSTEM
To conserve battery power, the flash unit will automatically turn to standby mode when the flash is not used for approximate 3 minutes. To on the flash again, either press the flash test button (10) or switch off and on again using the ON/OFF switch. When the flash is not in use for extended period of time, slide the ON/OFF switch to the off position.
EXPOSURE/DISTANCE TABLE\*
This is a guide table showing the maximum effective range based on different combination of ISO, zoom lens and aperture setting. Base on the ISO window (11), setting the ISO setting knob (5) according to the ISO and zoom head position will show the maximum effective TTL range of the flash unit.
For example, at ISO 100 set at zoom position 50mm, the effective TTL range, according to 5 different Fristop setting is listed out as follows:
| F/stop Maximum Effective TTL Range (ISO 100) |
| F2.0 17m / 56ft |
| F2.8 12m / 40ft |
| F4.0 8.5m / 28ft |
| F5.6 6.0m / 20ft |
| F8.0 4.3m / 14ft |
*For Canon and Nikon only
USING THE AUTO CHECK LAMP
The green auto check lamp (14) located at the back of the flash is used to ensure that your subject is within the effective TTL range of the flash unit. When the ready lamp (13) is on, press the camera shutter release button to fire the flash. If your subject is within the effective TTL range, the green auto check lamp will illuminate for approximate 2 seconds indicating correct flash exposure has been obtained. If the green auto check lamp does not illuminate, it meant that the subject is not within the effective range. In this situation, move closer to the subject and try again.
FLASH MODE SWITCH SELECTION (For Nikon only)
The flash mode switch (16) is used to select between automatic balanced i-TTL flash mode (BL) and standard i-TTL mode (STD). Regardless of the flash mode selected, preflashes are fired by the flash and reflected to the camera auto flash sensor, after which the camera will automatically control the flash output for correct exposure.
AUTOMATIC BALANCED (BL) i-TTL mode
When this mode is selected, preflash will first be fired to determine the subject and background lighting. The flash output will then be automatic adjusted for a perfect balanced exposure lighting between the subject and the background.
STANDARD (STD) i-TTL mode
When this mode is selected, preflash will first be fired to determine the subject lighting. The flash output will then be automatically adjusted to ensure that the main subject is sufficiently exposed regardless of the background lighting. This mode is mainly used for long distance photography and often produce well illuminated subject. This mode is particularly useful when there is strong background lighting which may render underexposed subject when BL mode is being used.
PROGAM TTL MODE
Program TTL mode is one of the most popular and easy way of using Digital SLR cameras.
This flash unit provide full automatic TTL(Through the lens) control of flash exposure when used on dedicated model with inbuilt hotshoe dedication which provides the ETTL/TTL (for Canon) or i-TTL (for Nikon) auto flash metering features (Please refer to your camera owner's manual).
When using the flash unit outdoor under sunlight, the flash will automatically reduce its output to properly illuminate the subject. To use this flash unit in program mode, set your camera to 'P' (Program) mode or 'Auto' mode.
Once the camera is set to any of the above 2 modes, the flash unit will automatically fire the correct exposure to properly illuminate the main subject and background. This TTL dedicated mode can be used on practically any situation ranging from total darkness to daylight/ambient light.
Below are the steps that you need to follow to use the flash unit in program TTL mode:
-
Set the camera to P or Auto mode.
-
Slide the ON/OFF switch to the ON position.
-
For Canon: If the camera body supports E-TTL, the E-TTL indicator (16) will light up; For Nikon: Select the flash mode (16) (Automatic Balance iTTL or Standard iTTL)*.
-
Check that distance to the subject is within the effective TTL range as indicated on the exposure/distance table.
-
Focus on the subject
-
Press the shutter button fully to take the picture after ensuring that the ready lamp is on. When the flash is fully charged, the flash indicator will also be lit in the camera viewfinder.
-
To confirm that the flash unit fires the correct exposure, the Green autocheck lamp will light up for approximate 2 seconds. In the event that the green lamp does not lit, retake the picture at a closer distance
* -Depends on your camera body. Check your owner manual for availability of Automatic Balanced or Standard i-TTL features.
Auto TTL Mode
This flash unit can also be used with the camera set at any of the preset program mode (AV-Aperture priority, TV-Shutter Speed priority, Manual Exposure).
AV Aperture Priority Mode
This mode permits you to set the aperture value manually while the shutter speed will be automatically set by the camera. When using this mode, the flash exposure will be automatic controlled by the camera base on the corbination of shutter speed, aperture value and the flash mode (16) selected on the flash unit.
TV Speed Priority Mode
This mode permits you to select your desired shutter speed* and the aperture value will be automatically selected by the camera. When using this mode, the flash exposure will be automatically controlled by the camera based on the combination of shutter speed, aperture value and the flash mode (16)selected on the flash unit.
*Check with your camera manual for the maximum flash synchronization speed.
Manual Mode
This mode permits you to manually select your desired shutter speed and the aperture value. When using this mode, them flash exposure will be automatically controlled by the camera base d on the combination of shutter speed, aperture value and the flash mode (18) selected on the flash unit.
USING THE ZOOM HEAD
For wide angle picture taken at 28mm, set the zoom head position of the flash unit to 28mm or 35mm (35mm equivalent) depending on the zoom position of the lens*. This will help to ensure that the angle of lens coverage is adequately illuminated by the flash unit.
For telephoto pictures taken at 85mm and above (35mm equivalent), set the zoom head position to 85mm on the flash unit.
*Note: For Canon Digital 5LR cameras, the lens conversion factor to 35mm equivalent is usually 1.6x of the range indicated on the camera lens. For example, a zoom range of 18-55mm, when converted into 35mm equivalent is approximate 29 - 80mm.
*Note: For Nikon Digital SLR cameras, the lens conversion factor to 35mm equivalent is usually 1.5x of the range indicated on the camera lens. For example, AF-S Nikkor 18-55mm ED lens, when converted into 35mm equivalent is approximate 27 - 82.5mm.
USING THE BOUNCE AND SWIVEL HEAD
When using a direct flash on the subject, pictures taken will either result in excessive shadow being formed behind the subject or that the subject will be slightly over illuminated even though flash control is automatic.
To resolve the above two issues, you can use different combination of bounce head position ranging from 0-90 degree as well as the swivel feature from 0-330 degree. In this way, you can eliminate the shadow issues as well as produce more natural pictures.
For best results, it is recommended to bounce/swivel off white walls or ceiling with the zoom head set at the 50mm position. To ensure correct flash exposure, check that the green auto check lamp lit after taking the picture.
*Note that the maximum flash distance is reduce considerably because light travel indirectly to the subject over an increased distance and will usually lose 2-3 aperture of light (listops) even though the reflection surface is white. The bounce and swivel head must be adjusted properly to achieve the best possible lighting effect.
TROUBLESHOOT GUIDE
If for some reasons, the flash unit does not work properly, refer to the below troubleshooting guide.
| Problem Issue | Possible cause(s) Solution | |
| Flash unit charges but does not fire | Batteries are exhausted | Replace all 4 batteries (recommended NMH batteries) |
| Metal contacts on either the flash unit or camera are dirty | Use microfibre cloth to wipe the metal contacts and ramount the flash | |
| Flash unit does not change at all | Orientation of the batteries is wrong | Install again the battery polarity according to the indication in the battery compartment |
| Battery compartment lid is not being close fully | Reopen the battery compartment lid and close it so that the end of the lid alight perfectly with the main body of the flash unit | |
| Metal contacts inside battery compartment is dirty | Use microfibre cloth to wipe the metal contacts and reload the batteries | |
| Batteries completely exhausted | Replace all 4 batteries (recommended NMH batteries) | |
| AF illumination beam does not light up in low light / complete darkness situation | Camera body does not provide AF illumination by flash unit or lens is set at manual focus mode | Check your owner operating manual switch lens focusing to AF mode |
| Dark corners observed at the four extreme corners of pictures | Position of the zoom head is incorrectly set | Recheck the correct angle of the lens, taking into consideration of the 1.0x magnification factor and adjust the zoom head to the correct position |
| Auto check lamp does not lit up | Distance to the subject is too far and pictures may be underexposed | Relake at a closer distance |
| Flash unit does not fire at all | Check that the ready lamp on the flash unit as well as the flash indicator in the viewfinder appear before taking pictures | |
| Power On indicator does not lit up | Flash unit has not been used for more than 3 minutes | Press the test button to fire and the flash will resume back to normal operation |
| Ready Lamp does not lit up even though Power On indicator is lit | Batteries are completely exhausted | Replace all 4 batteries (recommended NMH batteries) |
| ETTL indicator does not light up (for Canon only) | Camera body does not provide ETTL metering | Check your owner operating manual |
Technical Specifications
Flash TTL working range for ISO 100
| Fislop\Zoom Position | 28mm 35 | mm 50mm | 85mm | |
| F4.0 | 0.7 - 6.8m | 0.7 - 7.8m | 0.8 - 8.5m | 0.8 - 9.0m |
| F5.6 | 0.7 - 4.8m | 0.7 - 5.5m | 0.8 - 6.1m | 0.8 - 6.4m |
| F8.0 | 0.7 - 3.4m | 0.7 - 3.8m | 0.8 - 4.3m | 0.8 - 4.5m |
| F11 | 0.9 - 2.5m | 0.9 - 2.8m | 0.9 - 3.1m | 0.9 - 3.3m |
| F16 | 0.9 - 1.7m | 0.9 - 2.0m | 0.9 - 2.1m | 0.9 - 2.2m |
Camera Type
| For Canon | : Direct hotshoe contact mount flash with standard TTL-E- TTL for Canon cameras. |
| For Nikon | : Direct hotshoe contact mount flash with ITTL for Nikon cameras. |
| For Sony | Direct hotshoe contact mount flash with Dynax ADI / PTTL for Sony Alpha DSLR camera |
Guide No : 34 in meters / 112 in feet at 50mm (ISO 100)
| Circuitry | :IGBT (Insulated Gate Bipolar Transistor) |
| Automatic TTL range | :0.9 – 17.0m / 3.0 – 58ft (F2.0) |
AF illumination range : 0.9 - 8.0m / 3.0 - 26ft
| Angle of illumination | : 28mm-35mm-50mm-85mm (35mm equivalent) |
| Bounce Angle | : Up 30-45-60-75-90 |
Swivel Angle : Left 60-75-90-120-150-180 / Right 60-75-90-120-150
| Dedication | : Canon TTL / E-TTL / E-TTL IINikon i-TTL systemSony ADI / PTTL system |
Exposure check : Green Auto Check Lamp confirmation
Flash Duration : 1/700 sec (full power)
Auto Standby : 3 minutes
Color temperature : 5600k
| Number of flashes | : Approximate 150 – 300 (Alkaline batteries) |
| Approximate 100 – 200 (Ni-Cd, Ni-MH batteries) |
| Recycling Time | : Approximate 6 sec (Alkaline batteries) |
| Approximate 4 sec (Ni-Cd, Ni-MH batteries) |
Power Source : 4x AA Alkaline, NiCad or NiMH batteries
| Dimension (mm) | : 76 (W) x 60 (H) x 185(L) |
| Weight | : 280g (without batteries) |
Specifications are subjected to changes without prior notice. The program in this flash unit is being upgraded constantly to meet new demands in the market. As such, new changes to the specifications may not be reflected in this manual.