V-Mic D3 - Mikrofon Deity - Kostenlose Bedienungsanleitung
Finden Sie kostenlos die Bedienungsanleitung des Geräts V-Mic D3 Deity als PDF.


Benutzerfragen zu V-Mic D3 Deity
0 Frage zu diesem Gerät. Beantworten Sie die, die Sie kennen, oder stellen Sie Ihre eigene.
Eine neue Frage zu diesem Gerät stellen
Laden Sie die Anleitung für Ihr Mikrofon kostenlos im PDF-Format! Finden Sie Ihr Handbuch V-Mic D3 - Deity und nehmen Sie Ihr elektronisches Gerät wieder in die Hand. Auf dieser Seite sind alle Dokumente veröffentlicht, die für die Verwendung Ihres Geräts notwendig sind. V-Mic D3 von der Marke Deity.
BEDIENUNGSANLEITUNG V-Mic D3 Deity
1. Power On&Off/LED Status
Long press (>2½) the LCF/Power button to turn on/off the mic, connect the mic and recording device with the included TRRS coded audio cable, then you can start recording.
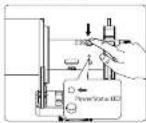
+Orange light fades out = standby +Long green light= recording device connected +Long red light= low power
If the microphone is in standby mode for 15 minutes it will automatically turn off. When in standby mode, it will quick-wave/sleep automatically when your device turns off.
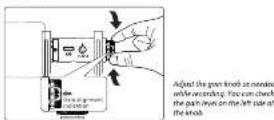
4. Gain Adjustment
+20dB Gain can be added as needed by adjusting the gain knob. When calibrating your microphone to a camera, start with your gain knob posting at 6.
Foreward
Thank you for purchasing the DUTY V-Mc O3 Pro
Instructions
• Please read this product manual carefully.
- Keep this product manual. Always include this product manual when passing the products on to third parties.
- Need all warnings and follow all instructions in this product manual

WARNING: Do not place the product in a place where there
Zis are corrosive chemicals to protect the product from corrosion, corrosion may cause the product to malfunction.
• Use only a micrometer and dry cloth for cleaning the product.
• Operate carefully to not cause any damage by dropping or physical
shocking it
* Keep all liquids away from the product. Liquids entering the product can short-circuit the electric risks or damage the mechanics.
- Keep storing the product in a dry, clean, dust-free environment
* Please have the product checked by the authorized service or agent if
your product has some problems. Please note that this warranty does
not apply to repair arising out of the malfunction of unauthorized disassembly, although you may equal such remain on a schematic
1.2.3
• The product is certificated by RoHS and CE. Please operate the product in
compliance with the operation standards. Please note that this warranty
does not apply to repair arising out of the malfunction, although you
may request such repairs on a chargeable basis.
• The instructions and information in this manual are based on thorough
controlled company testing procedures if the design and specification change
- This design is supported by the
Intended Use
Intended use of the DEITY V-Mac D1 Pro includes
* The user has read the instructions of this manual
• The user is using the products within the operating conditions and
limitations described in this product manual.
- "Improper use" means using the products other than as described in
These instructions or under operating conditions which differ from those developed herein.
2.2.1.1.1
1
5. Low-cut Filter (LCF)
Click the LIF button on the top to cycle through 25Hz, 150Hz, or turn off
the low-out as needed.
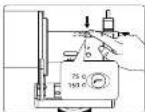
- LCT status LED×75Hz blue light=25Hz low-cut
- LCF status: UID(150Hz) blue light=250Hz (one-cut)
-Both LCF status LEDs are off= the LCF is disabled
Source: The research report was filed with the previous author's title and reference
Nonstandard, please use low-barrier when it is necessary, otherwise trigger direct ways reporting. Low-Cut is easy to reduce high-wind needs.
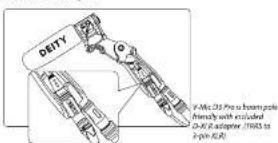
6. How to Use D-XLR(Only for Kit Version)?
Plug the D-XLR into your XLR cable, connect the TRIS cable between the D3 Pro and the D-XLR. When phantom power is turned on the LED light of the D3 Pro will turn green.
text_image
DEITY P-Mic D3 Pro is formed pole friendly with included D-IC R adopter (TRAS to R-pin (LPR)1
Item Check List
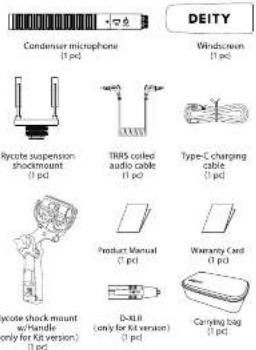
Package includes the following items:
text_image
DEITY Condenser microphone (1 pc) Windscreen (1 pc) Rycote suspension shockmount (1 pc) TIR5 coiled audio cable (1 pc) Type-C charging cable (1 pc) Product Manual (1 pc) Warranty Card (1 pc) D-MLB (only for Kit version) (1 pc) Carying bag (1 pc)2
Specifications
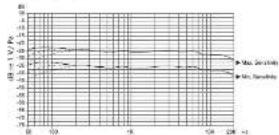
- Frequency Response
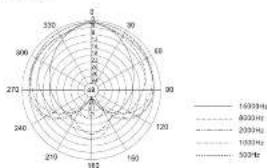
- Polar Pattern
radar
| Angle | 16933 Hz | 8000 Hz | 2000 Hz | 10500 Hz | 5000 Hz | |---|---|---|---|---|---| | 0 | 16933 | 8000 | 2000 | 10500 | 5000 | | 30 | 16933 | 8000 | 2000 | 10500 | 5000 | | 60 | 16933 | 8000 | 2000 | 10500 | 5000 | | 90 | 16933 | 8000 | 2000 | 10500 | 5000 | | 120 | 16933 | 8000 | 2000 | 10500 | 5000 | | 152 | 16933 | 8000 | 2000 | 10500 | 5000 | | 182 | 16933 | 8000 | 2000 | 10500 | 5000 | | 219 | 16933 | 8000 | 2000 | 10500 | 5000 | | 249 | 16933 | 8000 | 2000 | 10500 | 5000 | | 279 | 16933 | 8000 | 2000 | 10500 | 5000 | | 319 | 16933 | 8000 | 2000 | 10500 | 5000 | | 359 | 16933 | 8000 | 2000 | 10500 | 5000 | | 399 | 16933 | 8000 | 2000 | 10500 | 5000 | | 439 | 16933 | 8000 | 2000 | 10500 | 5000 | | 479 | 16933 | 8000 | 2000 | 10500 | 5000 | | 519 | 16933 | 8000 | 2000 | 10500 | 5000 | | 559 | 16933 | 8000 | 2000 | 10500 | 5002
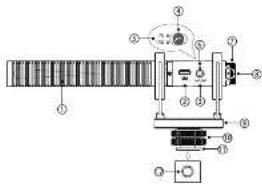
Nomenclature
text_image
Technical diagram of a mechanical device with numbered components for identification① Acoustic Slots ② Type-C Changing Socket ③ 3.5mm TRRS Audio Output Socket ④ Low-cut Filter (LCF)/Power Button ⑤ Low-cut Filter (LCF) Status LED ⑥ Power / Status LED
⑦ Gain Adjustment Knob ⑧ Gain Alignment Line ⑨ Shockmount Base ⑩ Locking Wheel ⑪ Cold Shoe ⑬ 3/8" to 1/4" Removable Themed Sknee
4
- Performance Parameter
| Polar Pattern | Super Cardoid |
| Maximum SPL | 130 dB SPL (g/100 Hz, 1% THD mm HCC) |
| Frequency Range | 50Hz-20kHz |
| THD | ±0.1% |
| Output impedance | 200Ω |
| Sensitivity | >4dB~4dB to 100Pa g/Hz |
| Line-out Filter, CT | 75Hz/150Hz |
| Sigma Noise | max. Band (0-2dB sensitivity: 1m to 10dB/Hz/Hz) |
| Battery life | ≤60hrs |
| Battery capacity | 320mAh |
| Working Current | 6.3mA |
| Temperature range | -10°C to -90°C |
| Battery Charger | USB Type-C color |
| Charging Time | <2hrs |
| Dimensions | 921 x 18mm |
| Net Weight | 140gm/sec per 78gJ |
Things You Might Want to Know:
-
According to our many tests, we have found some recording devices which are incompatible with D3 Pro because of the different interface standard. The list will be updated in the future if necessary. Please visit or website for the list. https://www.demymc.com/v-mc-d3-pro/
-
After checking the mic is working properly, please kindly switch it off and change it fully (100%) then start using it.
-
When installing, please avoid the acoustic slots being blocked by the shockmount.
E
Operations
1.How to Charge the Battery?
The battery is charged using the induced Type-C cable connected to a SWTA (or higher current) USB Charger (Not included).
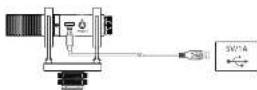
"When charging, the LED light will flash between red and green"
*When full charged, the LED light stays green.
2. Microphone Installation
*First, mount the microphone to the camera's cold-shoe. *Second, twist the lock down to secure it to the camera.
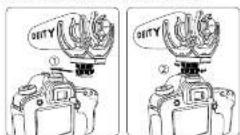
*V Mic D3 Prep works out of the box with Cameras, Recorders, Smart phones, Laptops, and Tablets that feature "Plug-in-Power".
4
Rycote is trademark or registered trademark of Rycote in China or other countries. All other corporate and product names and trademarks mentioned in this manual are the property of their respective owners.
Detailed product manual for CHTY & Mcl DS Pro can be found on www.dltpris.com
9.