YNE3-RX - Fernbedienung Yongnuo - Kostenlose Bedienungsanleitung
Finden Sie kostenlos die Bedienungsanleitung des Geräts YNE3-RX Yongnuo als PDF.


Benutzerfragen zu YNE3-RX Yongnuo
0 Frage zu diesem Gerät. Beantworten Sie die, die Sie kennen, oder stellen Sie Ihre eigene.
Eine neue Frage zu diesem Gerät stellen
Laden Sie die Anleitung für Ihr Fernbedienung kostenlos im PDF-Format! Finden Sie Ihr Handbuch YNE3-RX - Yongnuo und nehmen Sie Ihr elektronisches Gerät wieder in die Hand. Auf dieser Seite sind alle Dokumente veröffentlicht, die für die Verwendung Ihres Geräts notwendig sind. YNE3-RX von der Marke Yongnuo.
BEDIENUNGSANLEITUNG YNE3-RX Yongnuo
YONGNUO
DIGITAL
YNE3-RX
无线闪光灯接收器
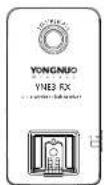
用户手册
功能介绍
本产品需配合兼容的主控单元(发射器)使用
本用户手册假定为使用YN-E3-RT作为发射器,有关发射器的设置及操作,请参阅其用户手册。
- 支持的闪光模式:ETTL,M,MULTI
- 支持遥控快门功能,测试闪光
- 支持PC接口输出
支持USB固件升级
支持引向单触点内光灯 - LCD屏率显示
兼容的发射器(主控单元):
YN-E3-RT/YN600EX-RT
ST-E3-RT/600EX-RT
兼容的E-TTL闪光灯列表(部分):
性能 600EX(RT)/580EXII/430EXII
永诺 YNS68EX(Ⅱ)/YN565C/YN468C(Ⅱ)/
YN467CJD/YN465C
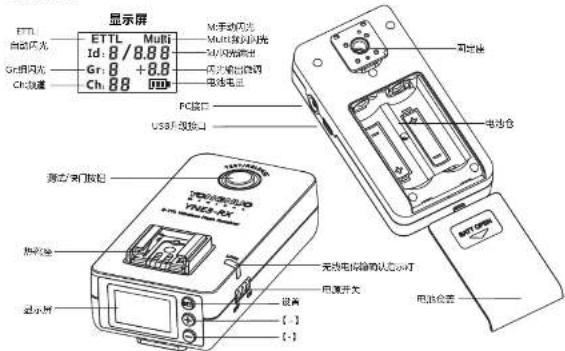
各部位名称
text_image
显示屏 ETTL Multi Id: 8/8.88 Gr组闪光 Gr 8 +8.8 Ch线圈 Ch: 8.8 100 M手动开关 Multi指示灯光 M2R发光输出 低压输出调制 电池电芯 PC接口 USBF-极接口 测试/阀门按钮 TEN3-RX 无功电锁锁的默认可 电源开关 电源仓云 设置 (·) (·)固定座:可通过热靴固定蜗母或利用热靴牢固
定在灯架上。
PC接口:连接闪光灯作输出使用。
USB升级接口:连接电脑作固件升级使用。
测试/快门按钮:半按,短按都是测试闪光;
长按为遥控快门
无线电传输确认指示灯(LINK):与主控单元
连接亮绿色,未连接亮红色。
热靴座:连接,固定闪光灯。
电池仓:安装2节AA池。
电源开关:【ON】开启电源,【OFF】电源
关闭。
显示屏:显示闪光模式、闪光输出功率、ID。
频道、分组、电量等图标
【设置】按钮:按【SET】键选择编辑的参
数,按[+]、[-]按钮改变参数。5s内设操
作或长按【SET】键即为保存。
[+]、[-]按钮:更改参数。
注意事项
在使用前,请通读并完全理解本使用说明书
以及了解相机和闪光灯的使用方法,以保证您能熟悉操作和正确使用。
连接或安装本产品时,请关闭所有设备电源。
请不要使产品受到强烈震动,否则产品可能会发生故障。
长时间不使用时,请将接收器的电源关闭,将电池取出。
请保持干燥,勿用湿手接触产品,亦不可
将产品浸入水中或暴露雨中,否则可能引起设备无法正常使用,甚至损坏。
请勿置于高温中,如阳光直射下的封闭汽车内,控制面板等高温地方。
请勿在易燃易爆场合中使用,违反此警告可能引起爆炸或火灾。
本产品涉及电池,关于电池的使用请严格按照相关规定,否则会引起财产损失或人身伤
害。
使用前准备
1.安装两节电池
打开电池仓,根据电池仓正负两极方向安装两
节AA电池(不含),可以使用两节1.2V充电电池,并合上电池仓盖。
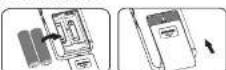
- 当屏幕显示<0>时,请及时更换电池。
长期不使用产品请将电池取出。
更换电池时,请两节一起更换。
关于显示屏照明
当操作按钮时,液晶显示屏以绿色点亮数秒。
当设定功能时,照明持续到设定结束为止。
使用前准备
- 固定接收器,安装闪光灯
1)利用热靴固定螺母或热靴聊固定接收器于灯
架上
2)松开闪光灯锁定装置,将闪光灯热就固定
完全插入接收器热孔座。
3)锁紧
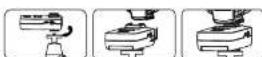
注意:接收器热瓶只能安装数码单反适用的闪
光灯,不能安装高压闪光灯,否则可能损坏接
收器。
3. 打开电源
将电源开关滑至【ON】开启电源,滑动至
【OFF】关闭电源。
设置频道、分组、ID
· 发射器与接收器必须设置为相同频道及
ID才能使用。
1. 设定频道
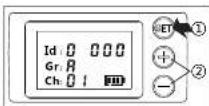
按【SET】按钮,Ch对应的数字闪烁。
· 按【+】、【-】选择AUTO或频道1-15。
2.设置分组
· 按【SET】按钮,直至Gr对应的数字闪烁。
按【+】、【-】选择A-E五个分组。
3.设置无线ID
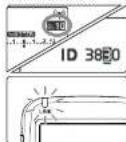
- 按【SET】按钮,直至Id显示的数字闪烁。
按【+】。【-】选择设定的位置或数字。
无线连接状态
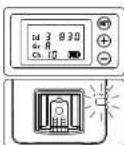
- 接收器与发射器无线连接驱动 LINK指
示灯以绿色点亮
YN-E3-RT
YNE3-RX
测试闪光灯
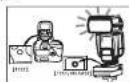
- 使用发射器或接收器测试按钮测试闪光,半按或短按YNE3-RX上的【TEST/RELEASE】按钮测试闪光。
无线闪光拍摄
操作主控单元,设置参与闪光的分组的模
式或闪光输出,完全按下相机快门按钮时,接
收器上的闪光灯闪光。最多支持5个分组,一共15个单元。
示例
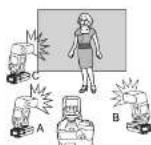
闪光灯显示屏及接收器显示屏将在完成闪
光后,显示该次内光模式或输出
- 使用通用型(单触点)闪光灯时,需手动调整闪光输出,回电状态不会返回给主控发射器。
无线快门功能
-
在相机上安装支持无线遥控兼容的主控单元,如YN-E3-RT。
-
长按接收器【TEST/RELEASE】按钮将触发
相机快门,如果接收器上安装了闪光灯,将
根据主控单元设置的该组参数同步闪光。
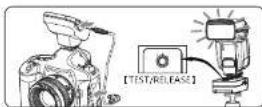
只支持单张拍摄。
相机使用B门模式的该功能不支持。
对于2012年以后发售的EOS数码相机,不
需要快门线,有关主控单元的快门线连接,请参考其使用手册。
PC接口触发
- 需根据不同接口的闪光灯选购PC闪光灯同
步线,
- 使用PC同步线带螺母一端连接接收器,连接
线另一端连接影率灯或其他支持PC接口的闪
光灯
2.手动调整闪光灯的输出并拍摄照片。
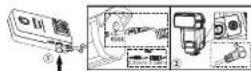
PC接口只作为输出。
- 可同时使用热靴座上的闪光灯和与PC接口连接的闪光灯。
清除闪光灯接收器设置
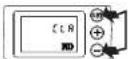
- 同时按下【SET】与【-】按钮,屏幕显示
“CLA”,接收器恢复出厂设置。

固件升级
- 登录永诺官网
(http://www.hkyongnuo.com/s-detail.
php?ID=360)下载升级程序及最新固件。
-
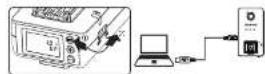
关闭接收器电源,使用USB-MINIB连接线(不含)与电脑进行连接。
-
按住【SET】按钮的同时开机,显示屏将显
示当前同件版本,进入同件升级界面。
- 按软件上的提示完成固件升级操作。
规格参数
类型: 无线闪光灯接收器
距离:
频道: AUTO,频道1-15
分组
频率:2405-2475MHz
无线电ID:0000-9999
USB固件升级
适用电池: AAX2节(支持1.2V充电电池)
连续工作时间:24小时
尺寸:92.5*50*37mm
王重:
接收器 X1 PC-635同步线 X1
6.35-3.5适配器X1 保修卡X1
用户手册 x1
本手册中的功能是依据本公司的测试条件
获得。设计和规格如有变更,恕不另行通知。
本手册中的承诺(YONGNUO)徽标是深圳
市永诺摄影器材股份有限公司 在中国或/和其
他国家(地区)的注册商标。其他所有商标均为其各自所有者拥有。
v1.0
YONGNUO
DIGITAL
YNE3-RX
E-TTL Wireless Flash Receiver
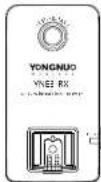
User Manual
Cautions
Read this user manual while also referring to your camera's & flash's user manual before using in order to correct use this product.
Please turn off power supplies of all equipment when connecting or installing the product.
Please don't make products subject to strong vibration, otherwise the product may malfunction.
- Long time when not in use, please put the receiver's power off, remove the battery.
Please keep it dry. Be sure not to use wet hand to touch the product. It is also not allowed to immerse the product into waster or make it be exposed in the rain, otherwise it may not work normally or even be damaged.
Do not store under high temperature, such as a covered car under direct sunlight, the dashboard and other high temperature place.
Do not use it in explosive situations, violation of this warning may cause an explosion or fire. This product involves battery, please be in strict accordance with the relevant provisions on the use of the battery, otherwise it would cause property damage or personal injury.
Wireless Flash Trigger
- Operate the master unit, set the flash group and flash output, when pressing the shutter release button, the flash on the receiver will fire. Supports maximum 5 groupings, total 15 units.
Example
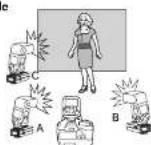
- The flash screen and receiver screen will display the flash mode and output of current flash when finish flashing.
. When using the universal( single contact) flash, it need manual adjust the flash output, the recycling state will not return to the master transmitter.
Function Introduction
The product should be used with the compatible master unit(transmitter), this manual is assume that used with the YN-E3-RT as the transmitter, concerning the settings and operation of the transmitter, please refer to the user manual.
- Supports flash mode: ETTL,M,MULTI
- Supports remote shutter release function, test flash
- Supports PC output interface
- Supports USB firmware upgrade
- Supports single contact triggering
- Supports single contact flash triggering
- LCD Display
The compatible transmitter(master unit): YN-E3-RT/YN600EX-RT/ST-E3-RT/600EX-RT
Parts of the compatible E-TTL flash list: Canon 600EX(RT)/580EXQ/430EXII Yongnuo YN568EX(II)/YN565C/YN468C(II)/YN467C(II)/YN465C
Preparation Before Use
1. Install two batteries
Open the battery compartment, install two AA batteries (not include) according to the battery positive and negative poles (you can use two 1.2V rechargeable batteries), then close the battery door.
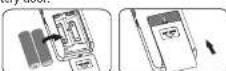
- When the battery indicator displays
About the LCD Panel Illumination When operating the buttons, the LCD will bright with green in a few seconds. When setting the functions, the light will last until the setting finish.
Wireless Shutter Release
-
Install the compatible master unit which supports wireless shutter release on the camera, such as YN-E3-RT.
-
Long press the [TEST/RELEASE] button of the receiver will release the camera shutter, if the receiver installed a flash, it will synchronous flash according to the master unit.
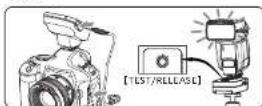
- Only support single shot. - The function is not supported when the camera using "Bulb" mode. - As for the EOS digital cameras released after 2012, regarding to the shutter release connection of the master unit, please refer to its user manual.
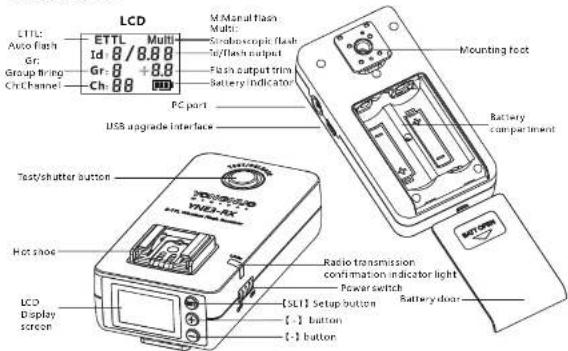
Name of Parts
text_image
LCD ATTL: Axco Flash Gr: Group firing Ch: Channel ETTL Multi Id 8/8.88 Gr 8 +8.8 Ch 88 HD M-Serial flash Multi: Cranoscopic flash Te/flash output Flash output trim Battery Indicator PC port USB upgrade Interface Mounting foot Battery compartment Test/shutter button VMS-AX Hot shoe LCD Display screen Radio transmission confirmation indicator light Power switch [SLI] Setup button [-] button [-] button Battery doorPreparation Before Use
2.Fix the receiver, install the flash 1) Fix on the light bracket through the hot shoe screw nut or hot shoe foot.
2) Loose the flash locking device, insert the flash hot shoe fixed foot into the receiver hot shoe. 3) Lock the flash.
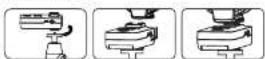
Note: The hot shoe of receiver can only used with the flash which suitable for the DSLR cameras, could not be used with the high voltage flash, otherwise it may damage the receiver.
3.Turn on the power
Slide the power switch to the [ON] will turn on the power supply, slide to [OFF] will turn off the power supply.
PC Port Triggering
- Purchase corresponding PC flash sync cord according to the flashes needs. 1. Use an end of PC sync cord with nuts to the receiver. The other end of the PC sync cord connects to strobe flashes or other flashes which supporting PC port. 2. Adjust flash output and short.
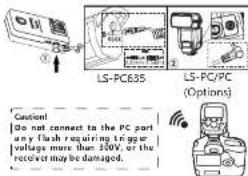
text_image
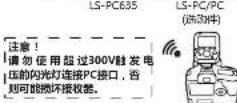
LS-PC635 LS-PC/PC (Options) Caution! Do not connect to the PC part any flash requiring tri-gaur voltage more than 300V, or the receiver may be damaged.- The PC port is for output using only. - Flashes on the hot shoe and connecting to the PC port can be used at the same time.
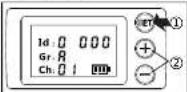
Set the Channel, Grouping, ID
- The transmitter and receiver need to set to the same channel and wireless radio ID for use.
1. Channel setting
- Press the [SET] button, the corresponding Ch number will blink.
- Press the [+] 、 [-] to choose AUTO or channel 1-15
2.Group setting
- Press the [SET] button until the corresponding Gr number blinking.
- Press the [+] , [ ] to choose A E five groups.
3.Wireless radio ID setup
- Press the [SET] button until the corresponding Id number blinking.
- Press the [+] , [-] button to select the location set and number.
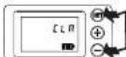
Clear flash receiver settings
- Press the 【SET】 and 【 】 buttons at the same time, the screen will display "CLA" and the receiver will restore factory settings.

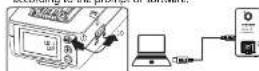
Firmware Update
- Log in the YONGNUO official website (http://www.hkyongnuo.com/e-
detaily.php?ID=360) to download the firmware update software and the latest firmware.
-
Power off, use USB-MINIB cable (not include) connect to PC.
-
Press the
button and set the power switch to . the LCD will display current
version, that into firmware upgrade interface. 4.Complete the firmware upgrade operation
according to the prompt of software.
Mounting foot: Fix on the fixed stand through the hot shoe screw nut or through the hot shoe adapter.
PC Port: Connect the flash as output.
USB upgrade interface: Connect the computer for firmware upgrade
Test/shutter button: Half press, short press for flash test, long press for remote shutter Radio transmission confirmation indicator.
Radio transmission confirmation light(LINK): Connect the master unit will bright on the green light, not connected will bright on red light.
Hot shoe: install the flash. Battery compartment: Install two AA batteries. Power switch: [ON] power on, [OFF] power off. LCD display screen: Display the icon of flash mode, flash output power, Id, channel grouping, battery indicator and etc.
【Set】setup button: Press the [SET] button to choose the parameters as needed, press the
[+] , [-] button to change the parameters. No operation in 5 seconds or long press the [SET] button will save the parameters.
[+] , [-] button : Change the parameters.
Wireless Connection State
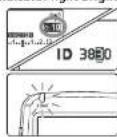
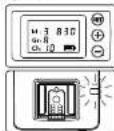
- When transmission between the receiver and transmitter is established, the indicator light bright on green.
YN-E3-RT
YNE3-RX
Test flash
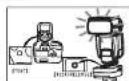
- Use the transmitter or receiver test button to test the flash. You can half press or short press the [TEST/RELEASE] button on YNE3-RX to test the flash.
Specifications
Type: Wireless flash receiver
Distance. Channel:
Groups 5 groups/A/B/C/D/E
Frequency 2405-2475MHz
Wireless ID
USB firmware upgrade:
Compatible battery: AAX2 (supports 1.2V rechargeable batteries)
Working time:
Size:
Weight
Accessories: Receiver X1 PC-635 sync c
ord X1 6.35-3.5 adapter X1
User n
23rd YI
The functions of this user manual are based on test conditions of our company. Further notice will not be given if the design and specifications change.
The YONGNUO logo in this manual includes the registered trademark or trademark of Shenzhen Yongnuo Photography Equipment Co., Ltd in China or/and other countries(regions). All other trademarks are the property of their respective owners.