CS-HDBTP2UKA-70 - Computerkabel Metra - Kostenlose Bedienungsanleitung
Finden Sie kostenlos die Bedienungsanleitung des Geräts CS-HDBTP2UKA-70 Metra als PDF.


Benutzerfragen zu CS-HDBTP2UKA-70 Metra
0 Frage zu diesem Gerät. Beantworten Sie die, die Sie kennen, oder stellen Sie Ihre eigene.
Eine neue Frage zu diesem Gerät stellen
Laden Sie die Anleitung für Ihr Computerkabel kostenlos im PDF-Format! Finden Sie Ihr Handbuch CS-HDBTP2UKA-70 - Metra und nehmen Sie Ihr elektronisches Gerät wieder in die Hand. Auf dieser Seite sind alle Dokumente veröffentlicht, die für die Verwendung Ihres Geräts notwendig sind. CS-HDBTP2UKA-70 von der Marke Metra.
BEDIENUNGSANLEITUNG CS-HDBTP2UKA-70 Metra
Metra®
HOME THEATER GROUP
HDMI HDBaseT KVM Extender
CS-HDBTP2UKA-70
User manual
4Kx2K 60Hz
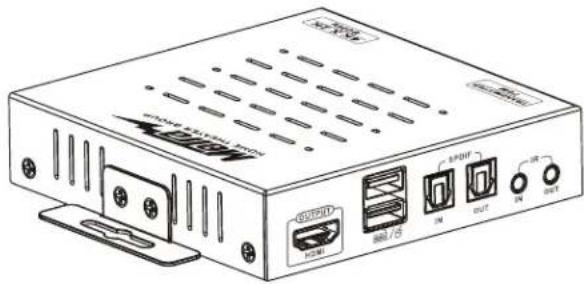
text_image
Technical diagram of a network device with labeled ports and connectors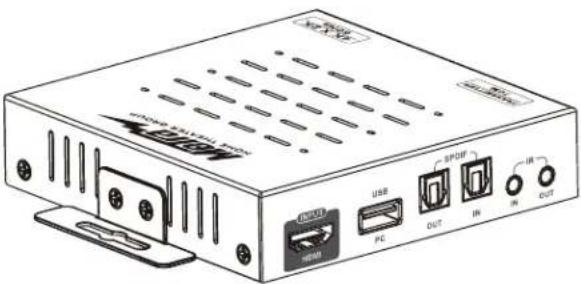
text_image
Diagram of a USB drive module with labeled ports and ports including USB, PC, and output indicatorsThank you for purchasing this product. For optimum performance and safety, please read the instructions carefully and keep the manual for future reference.
Please read below safety instructions carefully before installation and operation:
- Please pay attention to all the warnings and hints on this device.
- Do not expose this unit to rain, moisture and liquid.
- Do not put any stuff into the device.
- Do not repair or open this device without professional people's guidance.
- Shut off power and make sure environment is safe before installation.
- Do not plug-in/out the connected cables when it is in using.
- Use DC12V/2A. Make sure the specification matched if using 3: party DC adapters.
- Introduction
This HDBaseT single network cable KVM extender transmits HDMI signal up to 70 meters over cat6 fluently and clearly. It is lossless in signal and supports 3D, 24bits deep color, 4kx2k, CEC, HDCP and ultra HD 4KX2K@60Hz. It allows access to a computer system from a remote console by USB connectors(USB keyboard and mouse). ARC (Audio Return Channel) function enables audio from a compatible display to be routed back from the receiver unit to the transmitter. This product supports to power over network cable, just connect the power adapter with the receiver unit, can keep this device working well. It's a perfect solution for audio&video transmission in applications of HD conference system, HD multimedia education system, HD digital advertising and signage etc.
- Features
- Support bi-directional IR pass back.
- Uncompressed HDMI video signal.
- Supported resolution is up to ultra HD 4Kx2K@60Hz.
- Support HDBaseT2.0, HDCP2.2, CEC, 24 deep color.
- Support LPCM, DTS-HD and Dolby True HD audio.
- Support KVM function, remote control conveniently
- Transmit 4Kx2K@60Hz signal over cat6 up to 70 meters.
- Can be powered by network cable. It only needs to connect the 12V power on the receiver unit, both transmitter and receiver start work.
- Support ARC function.
- Package Contents
TX Sender x1pcs
RX Receiver x1pcs
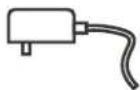
DC12V/2A
x1pcs
User manual
x1pcs
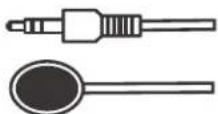
IR blaster extension
cable x1pc
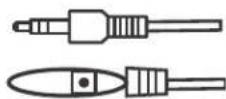
IR receiver extension
cable x1pc
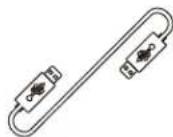
USB Cable x 1pcs
• Installation Requirements
- HDMI source devices: with HDMI OUTPUT interface, DVD, PS3, STB, PC etc.
- Display devices : With HDMI INPUT port, SDTV, HDTV, projector
3. Network cables :
UTP/STP Cat6/Cat6A/Cat7 network cables, which following the standard of IEEE-568B.
- Panel Description
1. TX Sender
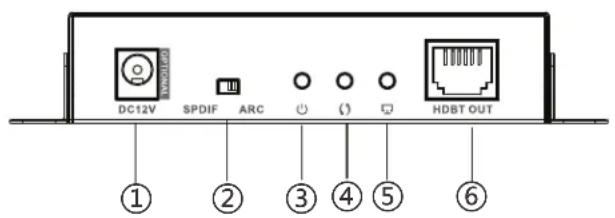
text_image
DC12V SPDIF ARC ( ) HDBT OUT ① ② ③ ④ ⑤ ⑥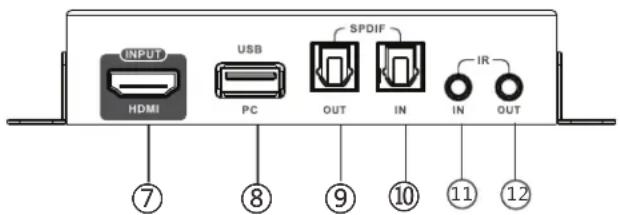
text_image
INPUT HDMI USB PC SPDIF OUT IN IN IR OUT ⑦ ⑧ ⑨ ⑩ ⑪ ⑫| 1 | Power input | Connect with DC12V/2A power adapter(optional) |
| 2 | SPDIF/ARC switch | SPDIF: bi-directional SPDIF audioARC: Audio Return Channel |
| 3 | Power indicator | LED indicator turn on when power on |
| 4 | Data transmission indicator | It turns on when the transmitter unit and the receiver unit connect well with each other, and it flashes when there is no transmission between the transmitter unit and the receiver unit. |
| 5 | Connection indicator | It flashes when the receiver unit connected well with the HDMI display device, and it turns off when no transmission between the receiver unit and the display device. |
| 6 | HDBT Output | To connect with receiver by network cable |
| 7 | HDMI input | Connect with HDMI source device |
| 8 | USB port | To connect with PC |
| 9 | SPDIF audio output | Connect with optical cable |
| 10 | SPDIF audio input | Connect with optical cable |
| 11 | IR receiver extension cable interface | Connect with IR receiver extension cable. Please make sure the remote control is within the required range of IR receiver |
| 12 | IR blaster extension cable interface | Connect with IR blaster extension cable. Please put the IR blaster close to source device to best transmit the IR signal from receiver |
2. RX Receiver
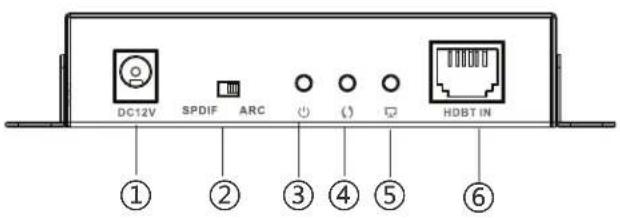
text_image
DC12V SPDIF ARC HDBT IN ① ② ③ ④ ⑤ ⑥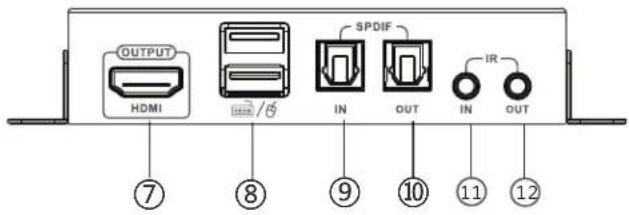
text_image
OUTPUT HDMI SPDIF IN OUT IN IR OUT ⑦ ⑧ ⑨ ⑩ ⑪ ⑫| 1 | Power input | Connect with DC12V/2A power adapter |
| 2 | SPDIF/ARC switch | SPDIF: bi-directional SPDIF audioARC: Audio Return Channel |
| 3 | Power indicator | LED indicator turn on when power on |
| 4 | Data transmission indicator | It flashes when the receiver unit connected well with the HDMI display device, and it turns off when no transmission between the receiver unit and the display device. |
| 5 | Connection indicator | It turns on when the transmitter unit and the receiver unit connect well with each other, and it flashes when there is no transmission between the transmitter unit and the receiver unit. |
| 6 | HDBT input | To connect with transmitter by network cable |
| 7 | HDMI output | Connect with HDMI display device |
| 8 | USB port | To connect with keyboard/mouse |
| 9 | SPDIF audio output | Connect with optical cable |
| 10 | SPDIF audio input | Connect with optical cable |
| 11 | IR receiver extension cable interface | Connect with IR receiver extension cable. Please make sure the remote control is within the required range of IR receiver |
| 12 | IR blaster extension cable interface | Connect with IR blaster extension cable. Please put the IR blaster close to source device to best transmit the IR signal from receiver |
- Specification
| Items Specifications | |||
| HDMI signal:Support HDMI2.0 HDCP2.2, support CEC and 24bits deep color | |||
| Resolution Supported | 480i/480P/576i/576P/720P/1080i/1080P/3D/3840×2160 | ||
| Audio:LPCM、 | DTS Digital, Dolby Digital | ||
| Network cable: | CAT6、CAT6A、CAT7 | ||
| Transmission length | CAT6 | 70m | 1080p@60Hz, 1080p@60Hz 3D, 3840×2160@60Hz |
| CAT6A | 70m | ||
| CAT7 | 70m | ||
| IR control | Support 20~60kHz wide frequency devices and Bi-directional IR transmission | ||
| Working temperature | 0~55°C | ||
| Storage temperature | -10~70°C | ||
| Humidity | 0~90%(no condensation) | ||
| Power supply | DC12V/2A x1pcs | ||
| Power consumption | TX: <6W; RX: <8W | ||
| Product dimension | 109.49(L)x87.0(W)x23.4(H)mm | ||
| Material | Iron alloy material | ||
| Weight | TX:240g RX:240g | ||
| Color | Black | ||
Disclaimer
The product name and brand name may be registered trademark of related manufacturers.TM and ® may be omitted on the user manual.
The pictures on the user manual are just for reference, and there may be some slight difference with the real products.
We reserve the rights to make changes without further notice to a product or system described herein to improve reliability, function or design.
• F A Q
Q: No output on screen?
A: 1) Firstly, please check and make sure the power supply is connected well. Then, check and make sure all cables are connected correctly.
2) Please check and make sure the right HDMI input port of the TV/ screen has been chosen.
3) Please check and make sure there is HDMI signal to be fed into transmitter unit, and check and make sure the receiver unit has been connected well with the display device.
Q: Data transmission indicator flashes and no output?
A: Check and make sure the HDMI display device has been switched to the right HDMI input channel.
Q: Connection indicator keeps off?
A: Check whether the TX's HDMI IN has signal input and make sure RX's OUT is well connected with HDMI display.
Q: Output image with snow point?
A: Change the HDMI cable between the transmitter unit and the source device, it will be better to use a shorter HDMI cable for re-testing.
•:Installation Procedures
1. To make a Cat6/6A/7 network cable
Follow the standard of IEEE-568B:
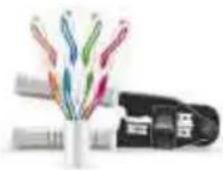
| 1 | white and orange | 4 | blue | 7 | white and brown |
| 2 | orange | 5 | white and blue | 8 | brown |
| 3 | white and green | 6 | green | ||
2. Connections

flowchart
graph LR
    PC["PC"] -->|HDMI input| Sender["Sender"]
    Sender -->|USB| Sender
    Sender --> Receiver["Receiver"]
    Receiver -->|HDMI output| Display["HDMI display"]
    Receiver -->|USB| Keyboard["mouse"]
    subgraph Sender
        Sender1["Server"]
        Sender2["Sender"]
    end
    subgraph Receiver
        Receiver1["Receiver"]
        Receiver2["Receiver"]
    end
[ NOTE ] : It is recommended to power from the receiver unit
3. Bi-directional IR pass back
1) It supports bi-directional IR pass back. User can control DVD at RX end and control TV at TX end.
2) If control at RX end, please connect IR blaster extension cable with IR OUT of TX and connect IR receiver extension cable with IR IN of RX. If control at TX end, please connect IR receiver extension cable with IR IN of TX and connect IR blaster extension cable with IR OUT of RX.

HOME THEATER GROUP
866.839.9187
460 Walker Street, Holly Hill, FL 32117
www.MetraHomeTheater.com