
HDR-AS300 - Sportkamera SONY - Kostenlose Bedienungsanleitung
Finden Sie kostenlos die Bedienungsanleitung des Geräts HDR-AS300 SONY als PDF.

| Produkttyp | Sportkamera |
| Marke | Sony |
| Modell | HDR-AS300 |
| Kategorie | Action-Kamera |
| Videoauflösung | Full HD (1920 x 1080) |
| Bildstabilisierung | SteadyShot (elektronisch) |
| WLAN | Ja (802.11 b/g/n) |
| NFC | Ja |
| GPS | Ja |
| Akku | NP-BX1 (wiederaufladbar) |
| Speicherkarten | microSD/microSDHC/microSDXC, Memory Stick Micro |
| Wasserdicht | Bis 60 m mit Unterwassergehäuse |
| Anschlüsse | Micro USB, HDMI, Mikrofonbuchse |
| Abmessungen (ca.) | 75,0 x 51,0 x 30,0 mm (nur Kamera) |
| Gewicht (ca.) | 90 g (nur Kamera) |
| Lieferumfang | Kamera, Unterwassergehäuse MPK-UWH1, Micro USB-Kabel, Akku NP-BX1, Befestigungsschnalle, Kurzanleitung |
| Funktionen | Zeitraffer, Loop-Aufnahme, Live-Streaming, Zeitcode/User Bit |
| Reinigung | Mit einem weichen, trockenen Tuch abwischen |
| Sicherheitshinweise | Nicht ohne Gehäuse in Wasser verwenden; Akku nicht überladen |
| Ersatzteile/Reparatur | Erhältlich über Sony-Service; Gehäuse und Akku austauschbar |
Häufig gestellte Fragen - HDR-AS300 SONY
Benutzerfragen zu HDR-AS300 SONY
0 Frage zu diesem Gerät. Beantworten Sie die, die Sie kennen, oder stellen Sie Ihre eigene.
Eine neue Frage zu diesem Gerät stellen
Laden Sie die Anleitung für Ihr Sportkamera kostenlos im PDF-Format! Finden Sie Ihr Handbuch HDR-AS300 - SONY und nehmen Sie Ihr elektronisches Gerät wieder in die Hand. Auf dieser Seite sind alle Dokumente veröffentlicht, die für die Verwendung Ihres Geräts notwendig sind. HDR-AS300 von der Marke SONY.
BEDIENUNGSANLEITUNG HDR-AS300 SONY
Digital 4K Video Camera Recorder Digital HD Video Camera Recorder
Startup Guide
This guide describes the necessary preparations to start using the camera, the basic operations, and so on. For details, refer to the "Help Guide" (web manual).
http://rd1.sony.net/help/cam/1640/h_zz/

For the detailed information on how to use the camera and software,
visit the following Web site.
http://www.sony.net/actioncam/support/


FDR-X3000/HDR-AS300
Read This First
What is needed to make an appealing movie with the camera
5 Creating your movie
You can edit movies by using Sony's application software. • Action Cam App (For smartphone/tablet) • Action Cam Movie Creator (For PC) http://www.sony.net/acmc/
http://www.sony.net/acap/


© 2016 Sony Corporation
http://www.sony.net/
Printed in China

4586864110
Checking the bundled items
The number in the parentheses indicates the quantity of that item bundled.
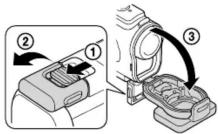
- Camera (1) / Underwater Housing (MPK-UWH1) (1) Camera is set in the Underwater Housing. Open the cover of the case as illustrated below.
- Micro USB cable (1)
- Rechargeable battery pack (NP-BX1) (1)
- Attachment Buckle (1)
- Startup Guide (this document) (1)
• Reference Guide (1)
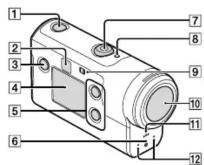
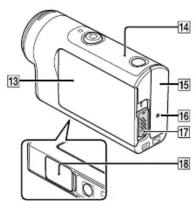
Name of main parts
1 (on/standby) button
2 IR remote receiver (FDR-X3000 only)
3 MENU button
4 Display panel
5 UP/DOWN buttons
6 REClamp
7 REC (Movie/Still image) button/
ENTER (Menu execute) button
8 REC/LIVE lamp
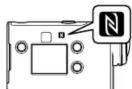
9 N (N mark)
10 Lens
11 Speaker
12 Microphones
13 Battery cover
14 GPS sensor
15 Connector cover (HDMI OUT, Multi/Micro USB Terminal, Mic jack)
16 REClamp
17 Lock lever
18 Memory card cover
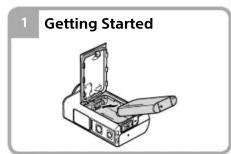
Getting Started
Charging the battery pack
1 Slide the lock lever down to open the battery cover, then insert the battery pack.
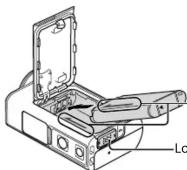
Align the direction of the arrows on the camera and the battery pack
-Lock lever
2 Close the cover securely, then slide the lock lever up to lock.
Confirm that the yellow mark on the lock lever is not visible.
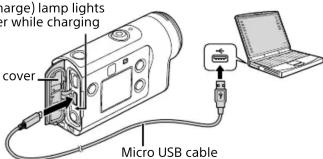
3 Open the connector cover, then connect the inactivated camera to an activated computer with the micro USB cable (supplied).
CHG (Charge) lamp lights
in amber while charging
V
Connector cover
Inserting a memory card
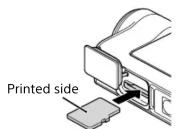
microSD card/
microSDHC card/
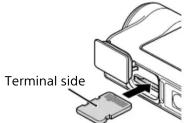
Memory Stick Micro™
(Mark2) media
Memory cards that can be used with the camera
| Memory card MP4 XAVC S | ||
| Memory Stick MicroTM (Mark2) media | ○ (Mark2 only) | - |
| microSD memory card | ^*1 | - |
| microSDHC memory card | ^*1 | ^*2 |
| microSDXC memory card | ^*1 | ^*2 |
*1 SD Speed Class 4 (on faster, or UHS Speed Class 1 ( ) or fasten)
^*2 A memory card that fulfills all the following specifications:
- 4 GB or more of memor
- SD Speed Class 10(CLASS⑩), or UHS Speed Class 1 (L) or faster
A memory card that is UHS Speed Class 3 (3) is required when you record at
100 Mbps or faster (FDR-X3000 only).
Notes
- Operation with all memory cards is not assured. For details about memory cards other than cards manufactured by Sony, contact the individual makers.
- Confirm the direction of the memory card. If you forcibly insert the memory card in the wrong direction, the memory card, memory card slot, or image data may be damaged.
- Format the memory card with the camera before use.
- Confirm that the connector cover and the battery pack/memory card cover are securely closed and any foreign matter is not stuck in the cover before use. Otherwise, it may result in water immersion.
Setting the clock
When the camera is turned on for the first time by pressing the d(on/standby) button, the area/daylight saving time (summer time)/date and time setting screen is displayed.
Press the UP or DOWN button to select an item, then press the ENTER button to execute.
Hints
- The date and time/area/daylight saving time (summer time) setting screen is also displayed after the settings are reset.
- Regions are defined by the time difference between Greenwich Mean Time (GMT) and the standard time of your home. For details on the time difference, refer to "The list of time differences for world capitals" in the "Help Guide" (web manual).
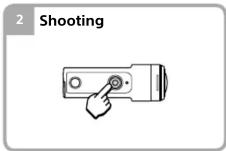
Shooting
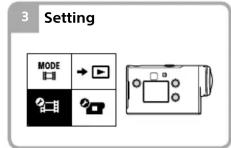
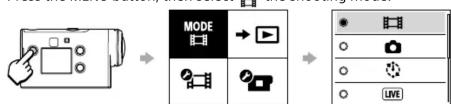
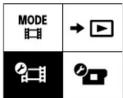
Setting the shooting mode
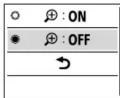
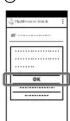
Press the MENU button, then select MODE the shooting mode.
flowchart
graph LR
    A["Mobile Phone Icon"] --> B["MODE"]
    B --> C["→"]
    C --> D["OK"]
    D --> E["Cancel"]
List of modes
| Icons | Shooting modes |
| Movie mode | |
| Photo mode | |
| Time-lapse capture mode | |
| Live streaming mode | |
| Loop recording mode |
Setting the movie format
Press the MENU button, then select ⚡ (Shooting Settings) → the movie format (default: MP4).
Select shoot images in 4K quality (FDR-X3000 only).
Shooting
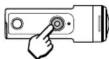
Press the REC button to start shooting.
To stop shooting, press the REC button again. * When you press the REC button while the "One touch recording" setting is "ON," recording starts with the last shooting mode set before the camera was turned off.
Notes
- During periods of extended shooting, camera temperature may rise to a point where shooting stops automatically.
- If you use the camera while it is connected to an external power supply with the micro USB cable (supplied), you can reduce the battery consumption for shooting or playing back images. In this case, a charged battery pack is required.
Setting
Press the MENU button, press the UP or DOWN button to select the item, then press the ENTER button to execute.
1 Shooting screen 2 MENU screen
MENU button
→
ENTER button
→
4 Settings screen

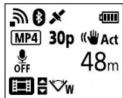
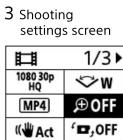
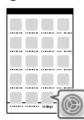
Shooting Settings*1
| Icons Settirg items | |
| 1080 30pHQ | Image quality setting |
| MP4 | Movie format |
| Time-lapse capture image size | |
| 5 min | Loop recording time |
| Still image mode switching | |
| 10f 1s | Still image shooting interval |
| OFF | Self-timer |
| 1s | Time-lapse shooting interval |
| 300 | Time-lapse shot number |
| SteadyShot (Movie) | |
| SteadyShot (Still) | |
| Angle setting | |
| OFF | Zoom setting |
| Flip | |
| ± 0.0 | AE shift |
| AET | Time-lapse AE mode |
| SCN N | Scene |
| AWB | White balance |
| Color mode | |
| ON | Audio recording setting |
| OFF | Wind noise reduction |

Camera Settings
| Icons Setting items | |
| + OFF | Airplane mode |
| Wi-Fi connection setting | |
| Wi-Fi Hi Power Setting ^*2 | |
| ON | Bluetooth setting |
| Bluetooth remote controller power setting | |
| × ON | GPS log |
| Format | |
| TC/UB | Time code/user bit ^*3 |
| IR remote ^*3 | |
| HDMI | HDMI settings ^*4 |
| Back ground music ^*2 | |
| USB ON | USB power supply |
| Beep | |
| Beep volume | |
| Lamp setting | |
| One touch recording | |
| AUTO OFF 60 s | Auto power off |
| NTSC → PAL | Switching NTSC/PAL |
| Date & time setting | |
| Area setting | |
| Daylight saving time (summer time) setting | |
| Ver. | Version |
| RESET | Resetting the settings |
*1 Which items can be set depends on the shooting mode.
^*2 This setting is only available in some countries and regions.
*3 This setting is only available with FDR-X3000.
*4 A portion of this setting is only available with FDR-X3000.
For details about setting items, refer to "Changing the Settings" in the "Help Guide" (web manual).
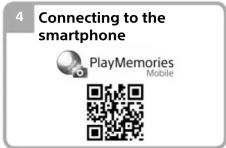
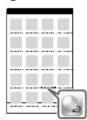
Connecting to the smartphone
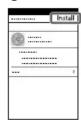
Installing PlayMemories Mobile™ on your smartphone

Android OS
Search for PlayMemories Mobile on Google Play, then install it.

iOS
Search for PlayMemories Mobile on App Store, then install it.

- When using iOS, One-touch functions (NFC) are not available.
Notes
- Update PlayMemories Mobile to the latest version if you have already installed it on your smartphone.
- The Wi-Fi function described in this manual is not guaranteed to work with all smartphones and tablets.
- The operation methods and display screens for the application are subject to change without notice by future upgrades.
- For more information about PlayMemories Mobile, refer to the following website.
(http://www.sony.net/pmm/) - Google play may not be supported depending on country or region. In this case, search for "PlayMemories Mobile" on the internet then install it.
Connecting
◆ Using the One-touch Function to connect to an NFC-enabled Android smartphone
Set Wi-Fi to ON on the camera, and touch the N N mark) of the smartphone against the N N mark) of the camera. When PlayMemories Mobile starts, settings are automatically applied to establish Wi-Fi connection.
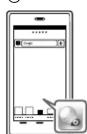
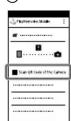
◆ Using the QR Code to connect to a smartphone via Wi-Fi
① Turn on the camera, and set Wi-Fi to ON on the camera.
② Select the shooting mode:
③ Start PlayMemories Mobile on the smartphone
④ Select [Scan QR Code of the Camera] displayed on the PlayMemories Mobile screen.
⑤ Select [OK] (If a message is displayed, select [OK] again).
⑥ Read the QR Code that is printed on the sticker attached to the rear of the camera's battery cover.
③
④
⑤
⑥
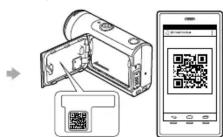
Android
⑦ When [Connect with the camera?] is displayed on the smartphone, select [OK].
iPhone/iPad
⑦ Install a profile (setting information) to your smartphone according to the on-screen directions.
⑧ On the Home screen, select [Settings] → [Wi-Fi].
⑨ Select the SSID.
⑩ Return to the Home screen, then start PlayMemories Mobile.
⑦
⑧
⑨

⑩
Recalling your user ID and password without the sticker
If the sticker has peeled off or is unreadable, you can recall your user ID and password by the following procedure.
① Insert a charged battery pack into the camera.
② Connect the camera to a computer with the micro USB cable (supplied).
③ Press the (on/standby) button to turn the camera on.
④ Display [Computer] → [PMHOME] → [INFO] → [WIFI_INF.TXT] on your computer, then confirm your ID and password.
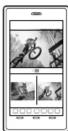
Creating your movie
Editing a movie with the Action Cam App
The Action Cam App allows you to import movies to your smartphone to edit them easily. In addition, you can create time-lapse movies. For more information about the Action Cam App, refer to the following website. http://www.sony.net/acap/
Install the Action Cam App that is compatible with your smartphone.


Note
- Google play may not be supported depending on country or region.
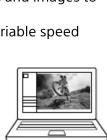
Editing a movie with Action Cam Movie Creator
Action Cam Movie Creator allows you to import movies and images to your computer and to edit the movies.
In addition, you can add effects (such as Multi View, variable speed playback, and so on) and create time-lapse movies.
For more information about Action Cam Movie Creator, refer to the following website. http://www.sony.net/acmc/
[Non-Text]

- Digital 4K Video Camera Recorder Digital HD Video Camera Recorder
- Startup Guide
- Read This First
- What is needed to make an appealing movie with the camera
- Creating your movie
- Checking the bundled items
- Name of main parts
- Getting Started
- Charging the battery pack
- Inserting a memory card
- Notes
- Setting the clock
- Hints
- Shooting
- Setting the shooting mode
- Setting the movie format
- Setting
- Connecting to the smartphone
- Installing PlayMemories Mobile™ on your smartphone
- Android OS
- iOS
- Connecting
- Android
- iPhone/iPad
- Recalling your user ID and password without the sticker
- Creating your movie
- Editing a movie with the Action Cam App
- Note
- Editing a movie with Action Cam Movie Creator
Marke : SONY
Modell : HDR-AS300
Kategorie : Sportkamera