Isomax 2 - Mikrofon Countryman - Kostenlose Bedienungsanleitung
Finden Sie kostenlos die Bedienungsanleitung des Geräts Isomax 2 Countryman als PDF.


Benutzerfragen zu Isomax 2 Countryman
0 Frage zu diesem Gerät. Beantworten Sie die, die Sie kennen, oder stellen Sie Ihre eigene.
Eine neue Frage zu diesem Gerät stellen
Laden Sie die Anleitung für Ihr Mikrofon kostenlos im PDF-Format! Finden Sie Ihr Handbuch Isomax 2 - Countryman und nehmen Sie Ihr elektronisches Gerät wieder in die Hand. Auf dieser Seite sind alle Dokumente veröffentlicht, die für die Verwendung Ihres Geräts notwendig sind. Isomax 2 von der Marke Countryman.
BEDIENUNGSANLEITUNG Isomax 2 Countryman

natural_image
Close-up of a golden saxophone with black plastic stand (no text or symbols visible)
text_image
COUNTRYMAN ASSOCIATES, INC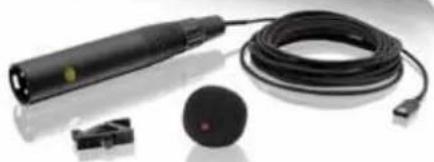
natural_image
Product photo of a black handheld electronic device with coiled cable, connector, and circular sensor (no visible text or symbols)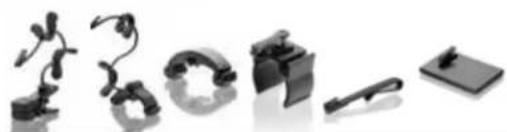
natural_image
Collection of industrial robotic components and a flatboard, no visible text or symbols
COUNTRYMAN ASSOCIATES INC
I2 INSTRUMENT
MICROPHONE
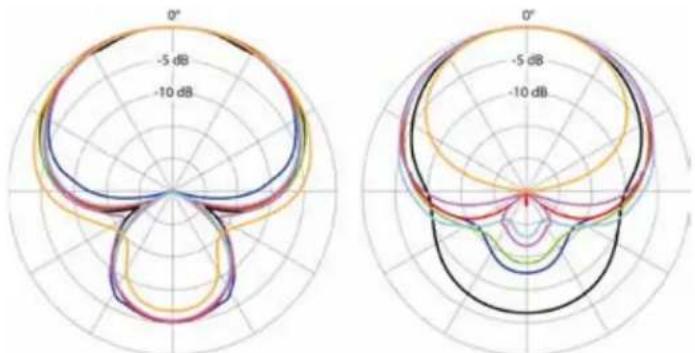
The new I2 Instrument Microphone has been engineered from the ground up for natural on- and off-axis frequency response, low noise, and precise polar patterns with deep nulls. Its tiny size makes it perfect for distance miking that is invisible in front of audiences on camera.
12 Instrument Microphone Competitor Microphone
Unparalleled Precision: The I2 maintains excellent pattern control and frequency response at all angles, for uncolored recordings and reduced feedback issues.

natural_image
Close-up of a red violin and string instrument with black strings, no visible text or symbolsComplete Control: Flexible close miking techniques are aided by Countryman's line of instrument mounts, which position securely and gently to strings, brass, and more.
natural_image
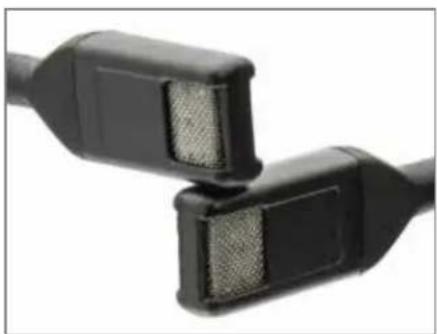
Close-up of two black USB connectors with textured surfaces, no visible text or symbolsEffortless Possibilities: Small size and sonic precision makes it ideal for X-Y, M-S, and other techniques that rely on accurate coincident positioning and consistent patterns.
Supplied with carrying case, windscreen, and basic clip (also available: brass, cello, violin, flute, guitar, and stage mounts)
Frequency Response:
Omnidirectional: 20 Hz to 20 kHz
Directional: 50 Hz to 20 kHz
Output Impedance:
1 kHz: 130 Ohm
< 100 Hz: 250 Ohm
Sensitivity:
High Gain: -40 dBV/Pa (10 mV/Pa) at 1KHz
Low Gain: -56.5 dBV/Pa (1.5 mV/Pa) at 1 kHz
Maximum SPL
High Gain Omni: 130 dB SPL at 1%
High Gain Directional: >> 130 dB SPL at 1%
Low Gain Omni: 150 dB SPL at 1%
Low Gain Directional: >> 150 dB SPL at 1%
Equivalent Input Noise (Pressure Mode):
High Gain: 20 dB SPL (A-Weighted)
Low Gain: 38 dB SPL (A-Weighted)
Frequency Response
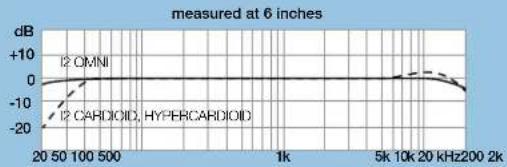
line
| Frequency | Amplitude (dB) | | --------- | -------------- | | 20 | -20 | | 50 | -10 | | 100 | 0 | | 500 | 0 | | 1k | 0 | | 5k | 0 | | 10k | 0 | | 20k | 0 | | 200 | 0 |Polar Response
omnidirectional
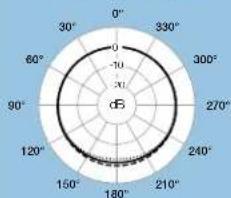
radar
| Angle | Value | |---|---| | 0° | -10 | | 30° | -5 | | 60° | 0 | | 90° | 5 | | 120° | 10 | | 150° | 15 | | 180° | 20 | | 210° | 25 | | 240° | 30 | | 270° | 35 | | 300° | 40 | | 330° | 45 | | 360° | 50 |
500 Hz
1 kHz
10 kHz
cardioid hypercardioid
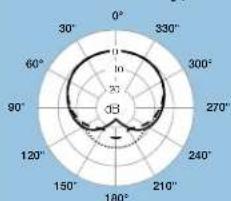
radar
| Angle | Value | |---|---| | 0° | 10 | | 30° | 23 | | 60° | 23 | | 90° | 23 | | 120° | 23 | | 150° | 23 | | 180° | 23 | | 210° | 23 | | 240° | 23 | | 270° | 23 | | 300° | 23 | | 330° | 23 | | 360° | 23 |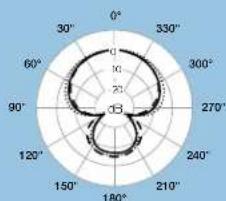
radar
| Angle (°) | Value | |---|---| | 0 | 10 | | 30 | 20 | | 60 | 25 | | 90 | 30 | | 120 | 25 | | 150 | 20 | | 180 | 15 | | 210 | 10 | | 240 | 5 | | 270 | 5 | | 300 | 10 | | 330 | 15 | | 360 | 20 |I2 Instrument Microphone: Frequently Asked Questions
Which pattern should I choose?
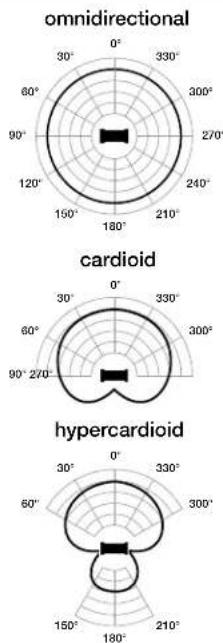
To get the best performance, know the angles where your microphone is most sensitive to sound, and which angles offer the best rejection of unwanted sounds.
- The omnidirectional pattern picks up all sounds from all directions equally. It has the flattest frequency response, the lowest noise level, and is the least susceptible to wind noise and vibration. The omnidirectional microphone is often used for recording and sound reinforcement of acoustic instruments such as percussion, guitar, saxophone, and piano.
- The cardioid pattern is most effective at picking up sound directly in front of the microphone, and is least sensitive to sound directly behind the microphone. Overall the cardioid picks up about 1/3 less ambient noise than the omnidirectional, so the working distance (the distance a performer could be positioned from the microphone) is approximately 1.7 times that of the omni. The cardioid is an excellent choice when you can position the microphone directly toward the sound you wish to record (a lead singer, for example) and directly away from unwanted sound sources (a crowd or loud monitor).
- The hypercardioid pattern has a narrower pick up pattern in front than the cardioid, overall better rejection of ambient noise, and the working distance is about twice that of the omni. The hypercardioid has a small "pick-up lobe" directly behind the microphone. This means that the maximum rejection areas are behind and to the sides (about 60 degrees away from the rear of the microphone on either side). The hypercardioid is the best choice when the loudest unwanted sounds—like speakers—can be positioned in these nulls.
How can I mic a piano?
text_image
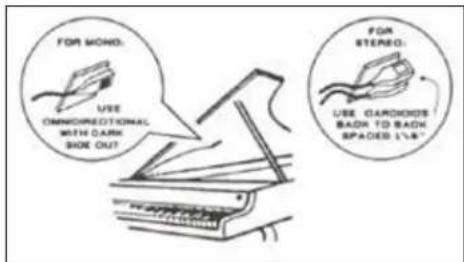
FOR MONO. USE OMNIDIRECTIONAL WITH CARM SHOE OUT FOR STEMO. USE CARDIOIDS BACK TO BACK SPACED 1/4+For mono: use double-sided foam tape to attach an I2 Omni facing the lid of the grand piano near the center board, or positioned over the strings on a mic stand. For stereo: place two I2 Cardioid mics on edge 1/8" apart facing left and right. The lid should always be open 3" to 6" (Closing the lid creates a "boxy" sound.)
natural_image
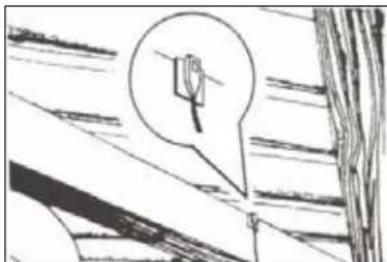
Illustration of a rose inside a speech bubble, with abstract background lines and no visible text or symbolsIf the lid must be closed or removed, place an I2 Omni on one of the support braces near the middle of the instrument, as shown. Experiment with placement to avoid resonances. For stereo try one on the long support near the middle and one near the upper treble section.
natural_image
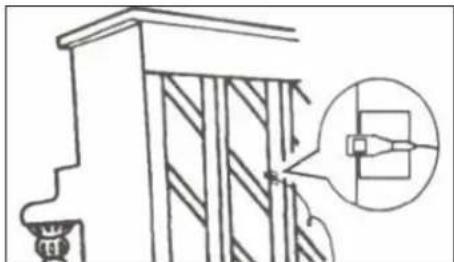
Technical line drawing of a window frame with an inset showing a close-up of a component (no text or symbols)For upright pianos try affixing an l2 Omni to one of the central backposts, as shown. Experiment with placement as not all parts of the soundboard resonate the same. Two mikes in different areas should yield even better results.
How can I mic a saxophone?
natural_image
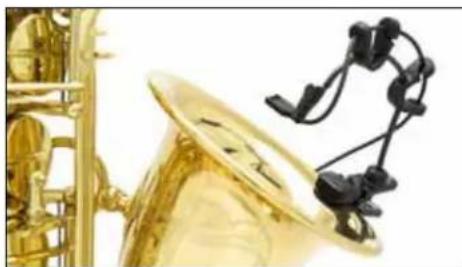
Close-up of a golden saxophone with black string clasp (no visible text or symbols)The I2 Brass Instrument Mount has vibration-damping jaws that tightly grip the bell, with an adjustable wire that can be positioned at the center of the bell or placed to capture sound through the keys.
How can I mic a violin / viola?
natural_image
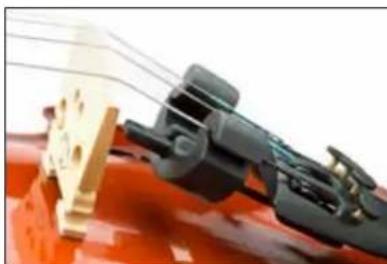
Close-up of mechanical components with metallic brackets and a wooden base, set against a red background (no visible text or symbols)The I2 Violin Mount positions the microphone between the bridge and tailpiece in a secure, vibration isolating mount. Point the microphone toward the violin body.
How can I mic a cello / double bass?
natural_image
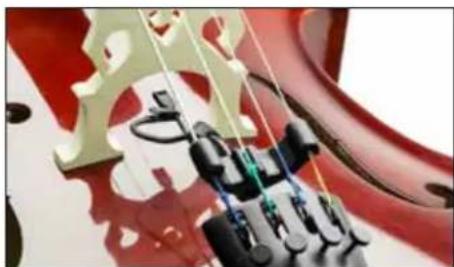
Close-up of a red guitar fretboard with black and white strings, no visible text or symbolsThe positioning arm on the I2 Cello Mount allows for a variety of microphone positions, including under the bridge or over the F-hole. Make sure the silver (active) side is pointed toward the body.