R35 - Hi-Fi PRIMARE - Kostenlose Bedienungsanleitung
Finden Sie kostenlos die Bedienungsanleitung des Geräts R35 PRIMARE als PDF.


Benutzerfragen zu R35 PRIMARE
0 Frage zu diesem Gerät. Beantworten Sie die, die Sie kennen, oder stellen Sie Ihre eigene.
Eine neue Frage zu diesem Gerät stellen
Laden Sie die Anleitung für Ihr Hi-Fi kostenlos im PDF-Format! Finden Sie Ihr Handbuch R35 - PRIMARE und nehmen Sie Ihr elektronisches Gerät wieder in die Hand. Auf dieser Seite sind alle Dokumente veröffentlicht, die für die Verwendung Ihres Geräts notwendig sind. R35 von der Marke PRIMARE.
BEDIENUNGSANLEITUNG R35 PRIMARE
text_image
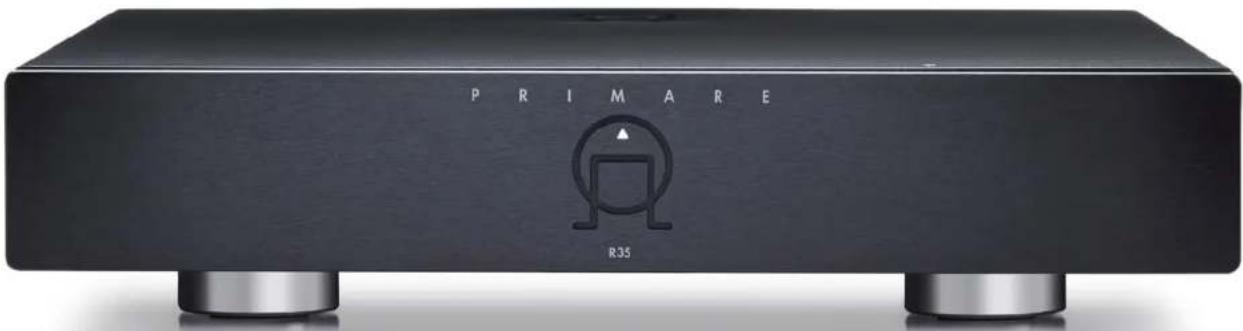
PRIMARE R35R35 Phono PReamPlifieR
User Guide

PRIMARE
CAUTION
TO REDUCE THE RISK OF FIRE, REPLACE WITH THE SAME TYPE AND RATING OF FUSE.
ATTENTION
UTILISER UN FUSIBLE DE RECHANGE MÊME TYPE.
Safety compliance
This product has been designed to meet the IEC 60065 international electrical safety standard.
CAUTION
RISK OF ELECTRIC SHOCK DO NOT OPEN
ATTENTION
RISQUE DE CHOC ELECTRIQUE NE PAS OUVRIR

The lightning flash with an arrowhead symbol within an equilateral triangle, is intended to alert the user to the presence of uninsulated 'dangerous voltage' within the product's enclosure that may be of sufficient magnitude to constitute a risk of electric shock to persons.

The exclamation point within an equilateral triangle is intended to alert the user to the presence of important operating and maintenance (servicing) instructions in the literature accompanying the product.
CAUTION: To reduce the risk of electrical shock do not remove cover (or back). No user serviceable parts inside. Refer servicing to qualified service personnel.
WARNING: To reduce the risk of fire or electrical shock, do not expose this apparatus to rain or moisture.
CAUTION: In Canada and the USA, to prevent electric shock, match the wide blade of the plug to the wide slot in the socket and insert the plug fully into the socket. This product is designed and manufactured to meet strict quality and safety standards. However, you should be aware of the following installation and operation precautions.
1. Take heed of warnings & instructions
You should read all the safety and operating instructions before operating this appliance. Retain this handbook for future reference and adhere to all warnings in the handbook or on the appliance.
2. Water and moisture
The presence of electricity near water can be dangerous. Do not use the appliance near water – for example next to a bathtub, washbowl, kitchen sink, in a wet basement or near a swimming pool, etc.
3. Object or liquid entry
Take care that objects do not fall and liquids are not spilled into the enclosure through any openings. Liquid-filled objects such as vases should not be placed on the equipment.
4. Ventilation
Do not place the equipment on a bed, sofa, rug or similar soft surface, or in an enclosed bookcase or cabinet, since ventilation may be impeded. We recommend a minimum distance of 50mm around the sides and top of the appliance to provide adequate ventilation.
5. Heat
Locate the appliance away from naked flames or heat producing equipment such as radiators, stoves or other appliances (including other amplifiers) that produce heat.
6. Climate
The appliance has been designed for use in moderate climates.
7. Racks and stands
Only use a rack or stand that is recommended for use with audio equipment. If the equipment is on a portable rack it should be moved with great care, to avoid overturning the combination.
8. Cleaning
Unplug the unit from the mains supply before cleaning. The case should normally only require a wipe with a soft, damp, lint-free cloth. Do not use paint thinners or other chemical solvents for cleaning.
We do not advise the use of furniture cleaning sprays or polishes as they can cause indelible white marks if the unit is subsequently wiped with a damp cloth.
9. Power sources
This appliance must be connected to a mains socket outlet using the supplied power cord. To disconnect this apparatus from power, you must disconnect the power cord. Make sure the power cord is always easily accessible.
Only connect the appliance to a power supply of the type described in the operating instructions or as marked on the appliance.
This is a Class 1 device and must be earthed.
The power switch is a single-pole switch. When the switch is in the "Off" position, the appliance is not completely disconnected from the main power.
10. Power-cord protection
Power supply cords should be routed so that they are not likely to be walked on or pinched by items placed upon or against them, paying particular attention to cords and plugs, and the point where they exit from the appliance.
11. Grounding
Ensure that the grounding means of the appliance is not defeated.
12. Power lines
Locate any outdoor antenna/aerial away from power lines.
13. Non-use periods
If the unit has a stand-by function, a small amount of current will continue to flow into the equipment in this mode. Unplug the power cord of the appliance from the outlet if left unused for a long period of time.
14. Abnormal smell
If an abnormal smell or smoke is detected from the appliance, turn the power off immediately and unplug the unit from the wall outlet. Contact your dealer immediately.
15. Servicing
You should not attempt to service the appliance beyond that described in this handbook. All other servicing should be referred to qualified service personnel.
16. Damage requiring service
The appliance should be serviced by qualified service personnel when:
A. the power-supply cord or the plug has been damaged, or
B. objects have fallen, or liquid has spilled into the appliance, or
C. the appliance has been exposed to rain, or
D. the appliance does not appear to operate normally or exhibits a marked change in performance, or
E. the appliance has been dropped or the enclosure damaged.

The CE symbol indicates that this Primare product complies with the EMC (Electromagnetic Compatibility) and LVD (Low Voltage Directive) standards of the European Community.
The WEEE symbol indicates this Primare product complies with the European Parliament and Council Directive 2002/96/EC concerning Waste Electrical and Electronic Equipment (WEEE). This product must be appropriately recycled or processed in accordance with these directives. Consult your local waste disposal authority for guidance.
The RoHS symbol indicates that Primare products are designed and manufactured to comply with the Restriction of Hazardous Substances (RoHS) as stated in the European Parliament and Council Directive 2002/95/EC.
Copyright and acknowledgments
Copyright © 2019 Primare AB. All rights reserved.
Primare AB
Limstensgatan 7
21616 Limhamn
Sweden
http://www.primare.net
Issue: R35/1
The information in this guide is believed to be correct as of the date of publication. However, our policy is one of continuous development and so the information is subject to change without notice, and does not represent a commitment on the part of Primare AB.
Primare is a trademark of Primare AB.
This guide was produced by
Human-Computer Interface Ltd.
http://www.interface.co.uk
R35 Phono Preamplifier User Guide 3
R35 Phono Preamplifier User G
CONTENTS
Welcome!
Getting Started 7
1 Unpack the R35 7
2 Connect the cartridge 7
3 Connect to a preamplifier 7
4 Connect power 7
5 Switch on 7
Automatic standby 7
Back-panel connections 8
Technical specification 9
Outputs 9
Performance 9
General 9
Additional information 10
Phase 10
Burn-in 10
Trigger 10
Setting the impedance and capacitance 10
Index 11
WELCOME!
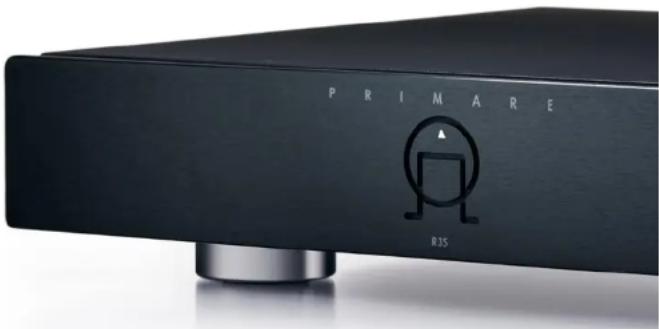
Congratulations on selecting your new R35 Phono Preamplifier
This user guide describes the features and explains how to set up the preamplifier for ideal system matching to virtually any moving magnet or moving coil phone cartridge.
For additional support and assistance please contact your local authorized Primare dealer, or visit our website at www.primare.net.
text_image
PRIMARE R35GETTING STARTED
1 Unpack the R35
Your R35 is supplied with the following components:
- Mains cable
- IR/Trigger cable
• AC Polarity Pen (with batteries)
If any of these items are missing please contact your supplier. We recommend you retain the packaging in case you need to transport the unit at a later date.
2 Connect the cartridge
The R35 accepts either a moving-magnet cartridge or a moving-coil cartridge:
- Set the MM/MC selector to the appropriate position for your cartridge.
The gain can be selected between three options using a switch on the back panel.
- Set the gain selector to the appropriate position for your cartridge.
- Connect the cartridge to the RCA inputs.
- If the turntable provides a ground connection, connect this to the Ground terminal on the back panel to minimise hum pickup.
By default the R35 is configured for an input impedance of 47kΩ (MC input) or 2.5kΩ (MM setting), and an input capacitance of 1nF (MC setting) or 100pF (MM setting), but you can adjust this using the DIP switches under the plates on the back panel. For more information see Setting the impedance and capacitance, page 10.
3 Connect to a preamplifier
- Connect the R35 to the preamplifier or processor using either the left and right RCA outputs, or the left and right XLR outputs.
If you are using the RCA outputs use high quality stereo RCA leads.
If you are using the XLR outputs use balanced XLR cables.
4 Connect power
- Plug one end of the mains cable supplied with the R35 into the power connector on the back panel, and connect the other end to a wall socket.
If this cable is not suitable for your power outlets please contact your supplier for an alternative cable.
Note: See Phase, page 10, for information about getting the best sound from your R35.

WARNING: Always disconnect the R35 from the mains power before connecting or disconnecting any cables.
- Switch on the R35, using the switch on the back panel.
The R35 will go into standby mode, indicated by the front panel light dimly illuminated.
5 Switch on
- Press the front panel standby switch, in the middle of the Primare logo.
The indicator light will blink for a few seconds before staying on.
If no signal is present for 20 minutes the R35 will automatically go into standby to save power.
Automatic standby
By default, if no signal is present for 20 minutes the R35 will automatically go into standby to save power.
To disable automatic standby
- Press and hold down the front panel button for a few seconds, and release once the indicator light has flashed two times and become steadily illuminated.
To re-enable automatic standby
- Turn the R35 off and then on again using the switch on the back panel.
BACK-PANEL CONNECTIONS
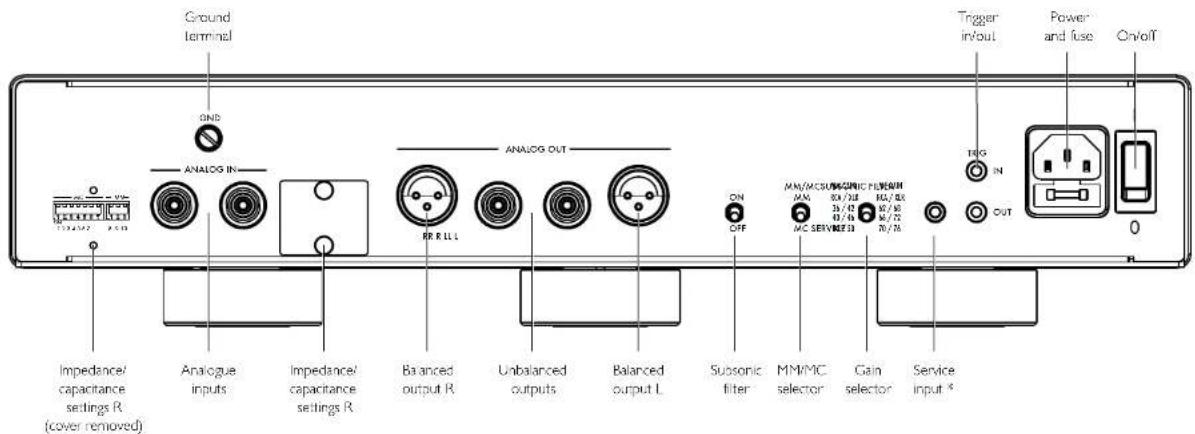
The following diagram explains the function of each of the connectors on the back panel:
text_image
Ground terminal OND ANALOG IN RR R LL L ANALOG OUT Impedance/ capacitance settings R (cover removed) Analogue inputs Impedance/ capacitance settings R Balanced output R Unbalanced outputs Balanced output L ON OFF MM/MCSU/MPACIFIC FILTER MAX 80/160 30/76 MAX/80 MAX/72 MAX/76 Subsonic filter MM/MC selector Gain selector Service input * Trigger in/out Power and fuse On/off TUG IN OUT* The SERVICE input is a 3.5 mini-jack for use by an authorized dealer or service technician to update or service the R35.
TECHNICAL SPECIFICATION
Outputs
Type
2 × RCA 100Ω
2 × XLR 200Ω
Maximum output level: 11V rms
Inputs
2 × RCA
Performance
Gain at 1kHz
MM RCA: Adjustable 36, 40, 44dB
MM XLR: Adjustable 42, 46, 50dB
MC RCA: Adjustable 62, 66, 70dB
MC XLR: Adjustable 68, 72, 76dB
Impedance loading
MM: Adjustable 2.5, 47kΩ
MC: Adjustable 10Ω - 47kΩ (21 steps)
Capacitive loading
MM: Adjustable 100, 200, 300, 400pF
MC: Adjustable 100pF, 1nF
Channel separation
MM: 80dB 1kHz
MC: 77dB 1kHz
THD + noise
MM: <0.02% 20Hz - 20kHz
MC: <0.03% 20Hz - 20kHz
Signal to noise ratio
MM: 85dB 1kHz A-weighted 5mV input Gain
MC: 76dB 1kHz A-weighted 0.5mV input Gain
Subsonic filter
-3dB/12Hz, 12dB/octave
RIAA correction
± 0.2dB
General
Power consumption
Standby: <0.5W
Operating: <20W
Size
430 x 384 x 92mm (WxDxH) with knobs and connectors.
Weight
9.5kg
Colour
Black or titanium
Note: features and specifications are preliminary and
subject to change.
ADDITIONAL INFORMATION
These instructions help you get the best possible sound from your R35.
Phase
The phase of the AC supply can make a significant difference to the sound.
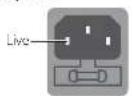
Use the Polarity Pen supplied with the R35 to verify which pin is live on your AC power cable.
Ensure that the live pin of the AC power cable is connected to the left-hand pin of the power connector, viewed from the back panel:
Burn-in
Your Primare will start to sound best after an initial burn-in of approximately 24 hours.
You will notice a further smaller improvement in sound quality for at least another 3 days' playing.
Trigger
For convenience the R35 can be powered on and off via a remote link cable, avoiding the need to switch it on or off separately from the preamplifier in the system.
To power the R35 on and off remotely from a Primare processor or preamplifier connect the TRIG OUT signal from the processor/preamplifier to the TRIG IN socket on the R35, using a twin core cable terminated in 3.5mm jack plugs.
The TRIG OUT socket can be used to daisy-chain the remote output to further Primare products.
Setting the impedance and capacitance
By default the R35 is configured for an input impedance of 47kΩ (MC input) or 2.5kΩ (MM setting), and an input capacitance of 1nF (MC setting) or 100pF (MM setting), but you can adjust this using the DIP switches under the plates on the back panel.
- Remove both plates by unscrewing the retaining thumb screws.

text_image
MC MM 1 2 3 4 5 6 7 1 2 3 4 5 6 7 ON 8 9 10 Moving coil settings Moving magnets settings- Set the switches up (OFF) or down (ON) according to the following tables.
You only need to set the switches appropriate to the type of cartridge you are using.
There are two sets of switches, one for the L channel and one for the R channel. Set the L and R switches to the same positions.
Choosing the correct settings
Details of the correct settings will be provided in the documentation for the cartridge you are using. We suggest listening to values either side of the recommended ones to choose the ideal settings for your system.
MM impedance
| Switch8 | |
| 47kΩ | OFF |
| 2.5kΩ | ON |
MM capacitance
Switch910
| 100pF | OFF | OFF |
| 200pF | OFF | ON |
| 300pF | ON | OFF |
| 400pF | ON | ON |
MC impedance
Switch123456
| 10Ω | ON ON ON ON ON ON |
| 15Ω | ON OFF ON ON OFF ON |
| 18Ω | OFF OFF ON OFF OFF ON |
| 20Ω | OFF OFF OFF OFF ON |
| 25Ω | ON ON ON ON ON OFF |
| 30Ω | ON ON OFF ON ON OFF |
| 40Ω | ON OFF ON OFF ON OFF |
| 50Ω | OFF OFF OFF OFF ON OFF |
| 60Ω | ON ON ON ON OFF OFF |
| 70Ω | OFF OFF ON ON OFF OFF |
| 80Ω | ON ON OFF ON OFF OFF |
| 90Ω | ON OFF OFF ON OFF OFF |
| 100Ω | OFF OFF OFF ON OFF OFF |
| 150Ω | ON ON ON OFF OFF OFF |
| 180Ω | OFF ON ON OFF OFF OFF |
| 200Ω | ON OFF ON OFF OFF OFF |
| 250Ω | OFF OFF ON OFF OFF OFF |
| 400Ω | ON ON OFF OFF OFF OFF |
| 600Ω | OFF ON OFF OFF OFF OFF |
| 1kΩ | ON OFF OFF OFF OFF OFF |
| 47kΩ | OFF OFF OFF OFF OFF OFF |
MC capacitance
| Switch7 | |
| 100pF OFF | |
| 1nF ON |
INDEX
a
Analogue inputs and outputs 8
Automatic standby 7
T
Technical specification 9
Trigger input and output 8, 10
B
Back panel 8
Balanced outputs 8
U
Unbalanced inputs and outputs 8
C
Capacitance, setting 10
Cartridge, connecting 7
G
Gain selector 7, 8
Ground terminal 7, 8
m
MM/MC selector 7, 8
P
Phase 10
Power, connecting 7
R
Resistance, setting 10
S
Setting the resistance and capacitance 10
Standby, automatic 7
Subsonic filter 8
Switching on 7
R35 Phono Preamplifier User Guide 11
P R I M A R E
THE SOUND AND VISION OF SCANDINAVIA SINCE
LIMSTENSGATAN 7, 216 16 LIMHAMN, SWEDEN More information at primare.net