
XR-1750 - Kassettenrekorder SONY - Kostenlose Bedienungsanleitung
Finden Sie kostenlos die Bedienungsanleitung des Geräts XR-1750 SONY als PDF.


| Produkttyp | Kassettenrekorder mit UKW/MW-Radio |
| Marke | Sony |
| Modell | XR-1750 |
| Einbauart | Autoeinbau (DIN-Schacht) |
| Abmessungen (B × H × T) | ca. 188 × 58 × 182 mm |
| Einbaumaße (B × H × T) | ca. 182 × 53 × 161 mm |
| Gewicht | ca. 1,2 kg |
| Stromversorgung | 12 V DC (negative Masse) |
| Maximale Ausgangsleistung | 35 W × 4 (an 4 Ohm) |
| Nennausgangsleistung | 13 W × 4 (20 Hz – 20 kHz, 1 % Klirrfaktor) |
| Kassettenteil | 4-Spur-2-Kanal-Stereo |
| Gleichlaufschwankungen | 0,08 % (WRMS) |
| Frequenzgang Kassette | 30 – 20.000 Hz |
| Signal-Rausch-Abstand Kassette | 58 dB |
| UKW-Tuner | 87,5 – 107,9 MHz |
| MW-Tuner | 530 – 1710 kHz |
| Klangregelung | Bass ±8 dB bei 100 Hz, Höhen ±8 dB bei 10 kHz |
| D-Bass | Einstellbar (Stufe 1–3) |
| Fernbedienung | Optional (Drehfernbedienung RM-X2S) |
| Sicherung | 10 A |
| Anschlüsse | Antenne, Lautsprecher (4), hinterer Line-Ausgang, Steuerleitungen |
| Mitgeliefertes Zubehör | Einbausatz, Frontplattengehäuse |
Häufig gestellte Fragen - XR-1750 SONY
Benutzerfragen zu XR-1750 SONY
0 Frage zu diesem Gerät. Beantworten Sie die, die Sie kennen, oder stellen Sie Ihre eigene.
Eine neue Frage zu diesem Gerät stellen
Laden Sie die Anleitung für Ihr Kassettenrekorder kostenlos im PDF-Format! Finden Sie Ihr Handbuch XR-1750 - SONY und nehmen Sie Ihr elektronisches Gerät wieder in die Hand. Auf dieser Seite sind alle Dokumente veröffentlicht, die für die Verwendung Ihres Geräts notwendig sind. XR-1750 von der Marke SONY.
BEDIENUNGSANLEITUNG XR-1750 SONY
FM/AM Cassette Car Stereo
Operating Instructions
EN
Owner's Record
The model and serial numbers are located on the bottom of the unit.
Record the serial number in the space provided below.
Refer to these numbers whenever you call upon your Sony dealer regarding this product.
Model No. XR-1750 Serial No.
For installation and connections, see the supplied installation/connections manual.
XR-1750
© 1997 by Sony Corporation
Warning
This equipment has been tested and found to comply with the limits for a Class B digital device, pursuant to Part 15 of the FCC Rules. These limits are designed to provide reasonable protection against harmful interference in a residential installation. This equipment generates, uses, and can radiate radio frequency energy and, if not installed and used in accordance with the instructions, may cause harmful interference to radio communications. However, there is no guarantee that interference will not occur in a particular installation. If this equipment does cause harmful interference to radio or television reception, which can be determined by turning the equipment off and on, the user is encouraged to try to correct the interference by one or more of the following measures:
— Reorient or relocate the receiving antenna.
— Increase the separation between the equipment and receiver.
— Connect the equipment into an outlet on a circuit different from that to which the receiver is connected.
— Consult the dealer or an experienced radio/TV technician for help.
You are cautioned that any changes or modifications not expressly approved in this manual could void your authority to operate this equipment.
Welcome!
Thank you for purchasing the Sony Cassette Car Stereo. This unit lets you enjoy a variety of features by using a rotary remote.
Table of contents
Getting Started
Resetting the unit 4
Setting the clock 4
Cassette Player
Listening to a tape 5
Playing a tape in various modes 5
Radio
Memorizing stations automatically — Best Tuning Memory (BTM) 6
Memorizing only the desired stations ..... 7
Receiving the memorized stations 7
Other Functions
Adjusting the sound characteristics 8
Muting the sound 8
Changing the sound and beep tone 8
Additional Information
Precautions 9
Maintenance 10
Dismounting the unit 10
The rotary remote labels 10
Location of controls 11
Specifications 12
Troubleshooting guide 13
Index 14
EN
Getting Started
Resetting the unit
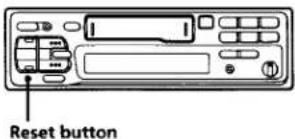
Before operating the unit for the first time or after replacing the car battery, you must reset the unit.
Press the reset button with a pointed object, such as a ball-point pen.
text_image
Reset buttonNote
Pressing the reset button will erase all the memorized program and memory functions.
EN
Setting the clock
The clock has a 12-hour digital indication. For example, setting it to 10:08
1 Press DSPL for two seconds.

The hour digit flashes.
① Set the hour digits.

text_image
+000 -000 To go forward To go backward② Press SEL momentarily.
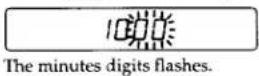
③ Set the minute digits.
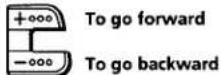

2 Press DSPL momentarily.

The clock starts.
Note
If the POWER SELECT switch on the bottom of the unit is set to the B position, the clock cannot be set unless the power is turned on. Set the clock after you have turned on the radio.
Cassette Player
Listening to a tape
Insert a cassette.
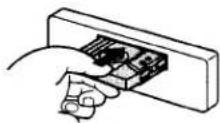
Playback will start automatically.
If a cassette is already inserted, press SOURCE repeatedly until "TAPE" is displayed.
TAPE
The side facing up is being played.
TRPE
The side facing down is being played.
Tip
To change the tape transport direction, press MODE (◀) during tape playback.
| To | Press |
| Stop playback | OFF |
| Eject the cassette |
Fast-winding the tape
During playback, press either side of SEEK/AMS for one seconds.

Fast-forward
Rewind
To start playback during fast-forwarding or rewinding, press MODE (◄◄►).
Locating the beginning of a track — Automatic Music Sensor (AMS)
You can skip up to nine tracks at one time.
During playback, press either side of SEEK/AMS momentarily.

To locate the succeeding tracks
To locate the preceding tracks
Note
The AMS function may not work when :
• the blanks between tracks are shorter than 4 seconds
• there is noise between tracks
• there are long sections of low volume or quiet sections.
Changing the displayed items
Each time you press DSPL during tape playback, the displayed item changes as follows:

* While the ATA function is activated.
Playing a tape in various modes
Searching for the desired track — Intro scan
Press ① during playback.
"INTRO" appears on the display.
The first 10 seconds of all the tracks are played.
When you find the desired track, press again. The unit returns to the normal playback mode.
Playing tracks repeatedly — Repeat play
Press ② during playback.
"REP" appears on the display.
When the current played track is over, it will be played again from the beginning.
To cancel this mode, press again.
EN
Switching to the radio while fast-winding a tape — Automatic Tuner Activation (ATA)
Press ⑤ during playback. "ATA" appears on the display.
When fast-forwarding or rewinding with SEEK/AMS for two seconds, the tuner will turn on automatically.
To cancel this mode, press ⑤.
Skipping blanks during tape playback — Blank skip
Press ⑥ during playback.
"BL.SKIP" appears on the display.
Blanks longer than eight seconds will automatically be skipped during tape playback.
EN
To cancel this mode, press ⑥.
text_image
RadioMemorizing stations automatically
— Best Tuning Memory (BTM)
This function selects from the currently received band the stations with the strongest signals and memorizes them in order of their frequency.
PREVENTING ACCIDENTS!
When tuning in while driving, use the automatic tuning or memory preset search function instead of manual tuning.
1 Press SOURCE repeatedly to select the tuner.
Each time you press SOURCE, the source changes as follows:
TAPE ↔ TUNER
2 Press MODE repeatedly to select the band.
Each time you press MODE, the band changes as follows:
FM1 → FM2 → FM3 → AM1 → AM2
3 Press BTM for two seconds.
Notes
- The unit will not store stations with weak signals on the preset number buttons. If there are only a few stations
received, some preset number buttons will remain empty. - When there is a preset number indicated on the display, the unit will store stations on all preset number buttons from the one currently displayed.
Memorizing only the desired stations
Up to 6 stations on each band (FM1, FM2, FM3, AM1 and AM2) can be stored on the preset number buttons in the order of your choice. Therefore, 18 FM stations can be memorized. If you try to store another station on the same preset number button, the previously stored station will be erased.
1 Press SOURCE repeatedly to select the tuner.
2 Press MODE repeatedly to select the band.
3 Press SEEK/AMS to search for the station you wish to store on a preset number button.
4 Press the desired preset number button (① to ⑥) for two seconds.
The number of the selected preset number button appears on the display.
Receiving the memorized stations
1 Press SOURCE repeatedly to select the tuner.
2 Press MODE repeatedly to select the band.
3 Press the preset number button (① to ⑥) momentarily on which the desired station is stored.
Changing the displayed items
Each time you press DSPL, the display changes between the frequency and the clock.
If you cannot tune in a preset station
Press either side of SEEK/AMS momentarily to search for the station (automatic tuning).
Scanning stops when a station is received. Press either side of the button repeatedly until the desired station is received.
Note
If the automatic tuning stops too frequently, press (LCL) to lights up "LCL" on the display (local seek mode). Only the stations with relatively strong signals can be tuned in.
Tip
If you know the frequency, press and hold either side of (SEEK/AMS) until the desired station is received (manual tuning).
EN
text_image
Other FunctionsAdjusting the sound characteristics
1 Select the item you want to adjust by pressing SEL repeatedly. VOL (volume) → BAS (bass) → TRE (treble) → BAL (balance) → FAD (fader)
2 Adjust the selected item by pressing either ⊕ or ⊖.
Adjust within three seconds after selecting. (After three seconds the button will again serve as the volume control button.)
EN
Muting the sound
Press MUTE.
The "MUTE" indication flashes.
To restore the previous volume level, press again.
Changing the sound and beep tone
Boosting the bass sound — D-bass
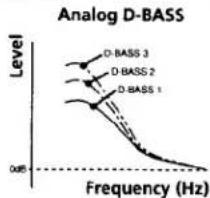
You can enjoy clear and powerful bass sound. The D-bass function boosts the low frequency signal with a sharper curve than conventional bass boost.
You can hear the bass line more clearly even if the vocal sound is the same volume. You can emphasize and adjust the bass sound easily with the D-bass control. This effect is similar to the one you get when you use an optional subwoofer system.
line
| Frequency (Hz) | Level | | -------------- | ----- | | D-BASS 1 | 0 dB | | D-BASS 2 | 0 dB | | D-BASS 3 | 0 dB |Adjusting the bass curve
Turn the D-BASS control to adjust the bass level (1, 2 or 3).
"D-BASS" appears in the display.
To cancel, turn the control to the OFF position.
Muting the beep tone
Press ⑥ while pressing SEL.
To obtain the beep tone again, press these buttons again.
Note
If you connect an optional power amplifier and do not use the built-in amplifier, the beep tone will be disabled.
text_image
Additional InformationPrecautions
- If your car was parked in direct sunlight - resulting in a considerable rise in temperature inside the car, allow the unit to cool off before operating it.
- If no power is being supplied to the unit, check the connections first. If everything is in order, check the fuse.
- If no sound comes from the speakers of a 2-speaker system, set the fader control to the center position.
- When the tape is played back for a long period, the cassette may become warm because of the built-in power amplifier. However, this is not a sign of malfunction.
If you have any questions or problems concerning your unit that are not covered in this manual, please consult your nearest Sony dealer.
To maintain high quality sound
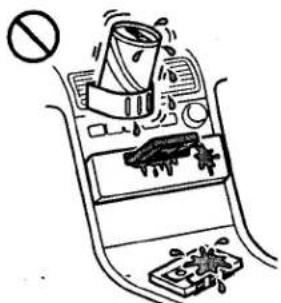
If you have drink holders near your audio equipment, be careful not to splash juice or other soft drinks onto the car audio. Sugary residues on this unit or cassette tapes may contaminate the playback heads, reduce the sound quality, or prevent sound reproduction altogether.
Cassette cleaning kits cannot remove sugar from the tape heads.
text_image
Diagram showing a kitchen sink with a bag, cleaning items, and a hand holding a bag with a 'No' symbol indicating no waste.Notes on Cassettes
Cassette care
- Do not touch the tape surface of a cassette, as any dirt or dust will contaminate the heads.
- Keep cassettes away from equipment with built-in magnets such as speakers and amplifiers, as erasure or distortion on the recorded tape could occur.
- Do not expose cassettes to direct sunlight, extremely cold temperatures or moisture.
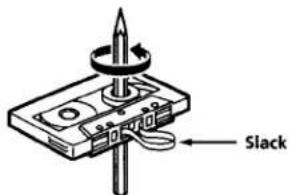
- Slack in the tape may cause the tape to be caught in the machine. Before you insert the tape, use a pencil or similar object to turn the reel and take up any slack.
text_image
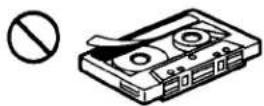
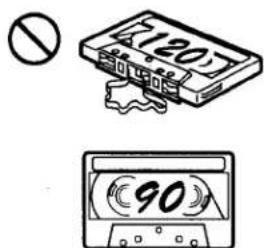
Slack- Distorted cassettes and loose labels can cause problems when inserting or ejecting tapes. Remove or replace loose labels.
Cassettes longer than 90 minutes
The use of cassettes longer than 90 minutes is not recommended except for long continuous play. The tapes used for these cassettes are very thin and tend to be stretched easily. Frequent playing and stopping of these tapes may cause them to be pulled into the cassette deck mechanism.
text_image
(120) 90EN
Maintenance
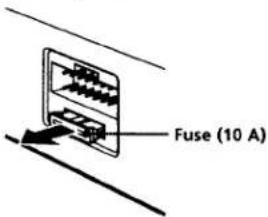
Fuse Replacement
When replacing the fuse, be sure to use one matching the amperage rating stated on the fuse. If the fuse blows, check the power connection and replace the fuse. If the fuse blows again after replacement, there may be an internal malfunction. In such a case, consult your nearest Sony dealer.
text_image
Fuse (10 A)Warning
Never use a fuse with an amperage rating exceeding the one supplied with the unit as this could damage the unit.
EN
Dismounting the unit
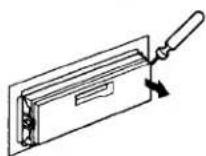
1 While pushing in on the left side of the front cover, insert the tip of a thin screwdriver as shown in the illustration, then pry off the front cover.
Thin screwdriver (Be careful to not break the front cover.)
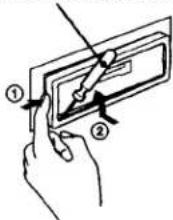
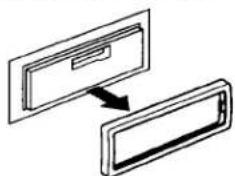
2 Repeat step 1 on the right side. Then the front cover will be removed.
natural_image
Diagram showing two rectangular compartments with a central slot, connected by an arrow (no text or symbols)10
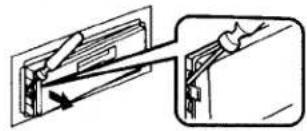
3 Use a thin screwdriver to push in the clip on the left side of the unit, then pull out the left side of the unit until the catch clears the mounting.
natural_image
Diagram showing a mechanical assembly with arrows indicating direction (no text or symbols)4 Repeat step 3 on the right side.
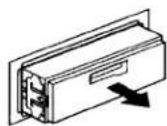
5 Slide the unit out of the mounting.
The rotary remote labels
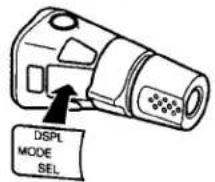
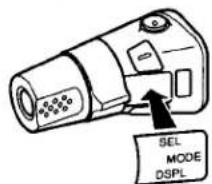
You can control this unit with the optional rotary remote (RM-X2S). Some labels are supplied with the rotary remote. Attach that label that matches the functions of the master unit and the mounting position of the rotary remote. When you mount the rotary remote, attach the label as in the illustration below.
text_image
SEL MODE DSPLSpecifications
AUDIO POWER SPECIFICATIONS
POWER OUTPUT AND TOTAL HARMONIC DISTORTION
13 watts per channel minimum continuous average power into 4 ohms, 4 channels driven from 20 Hz to 20 kHz with no more than 1% total harmonic distortion.
Cassette player section
| Tape track | 4-track 2-channel stereo |
| Wow and flutter | 0.08 % (WRMS) |
| Frequency response | 30 – 20,000 Hz |
| Signal-to-noise ratio | 58 dB |
Tuner section
FM
| Tuning range | 87.5 – 107.9 MHz |
| Antenna terminal | External antenna connector |
| Intermediate frequency | 10.7 MHz |
| Usable sensitivity | 8 dBf |
| Selectivity | 75 dB at 400 kHz |
| Signal-to-noise ratio | 65 dB (stereo),68 dB (mono) |
| Harmonic distortion at 1 kHz | |
| 0.5 % (stereo),0.3 % (mono) | |
| Separation | 35 dB at 1 kHz |
| Frequency response | 30 – 15,000 Hz |
| Capture ratio | 2 dB |
AM
| Tuning range | 530 - 1,710 kHz |
| Antenna terminal | External antenna connector |
| Intermediate frequency | 10.71 MHz/450kHz |
| Sensitivity | 30 μV |
General
| Outputs | Power antenna control lead Power amplifier control lead Rear line out (1) |
| Tone controls | Bass ± 8 dB at 100 Hz Treble ± 8 dB at 10kHz |
| Power requirements | 12 V DC car battery (negative ground) |
| Dimensions | Approx. 188 × 58 × 182 mm ( 7^1/2 × 2^3/8 × 7^1/4 in. ) (w/h/d) |
| Mounting dimensions | Approx. 182 × 53 × 161 mm ( 7^1/2 × 2^3/8 × 7^1/4 in. ) (w/h/d) |
| Mass | Approx. 1.2 kg (2 lb. 10 oz.) |
| Supplied accessories | Parts for installation and connections (1 set) Front panel case (1) |
| Optional accessories | Rotary remote RM-X2S RCA pin cord RC-63 (1 m), RC-64 (2 m), RC-65 (5 m) |
Power amplifier section
| Outputs | Speaker outputs(sure seal connectors) |
| Speaker impedance | 4 - 8 ohms |
| Maximum power output | 35 W × 4 (at 4 ohms) |
Design and specifications are subject to change without notice.
Troubleshooting guide
The following checklist will assist in the correction of most problems you may encounter with your unit.
Before going through the checklist below, refer to the operating procedures.
General
| Problem | Cause/Solution |
| No sound. | Adjust the volume with⊕Set the fader control to the center position for 2-speaker systems. |
| No beep tone. | An optional power amplifier is connected and you are not using the built-in amplifier.The beep tone is muted. |
Tape playback
| Problem | Cause/Solution |
| Playback sound is distorted. | Contamination of the tape head. → Clean the head. |
| The AMS does not operate correctly. | There is noise in the space between tracks.A blank space is too short (less than four seconds).▶▶ on (SEEK/AMS) is pressed immediately before the following track.◀◀ on (SEEK/AMS) is pressed immediately after the track starts.A long pause, or a passage of low frequencies or very low sound level is treated as a blank space. |
Radio reception
| Problem | Cause/Solution |
| Preset tuning is not possible. | • Store the correct frequency.• The broadcast is too weak. |
| Automatic tuning is not possible. | The broadcast is too weak. → Use manual tuning. |
If the above-mentioned solutions do not help to improve the situation, consult your nearest Sony dealer.
EN
Index
A
Automatic Music Sensor (AMS) 5
Automatic tuning 7
Automatic Tuner Activation (ATA) 6
R, S
Radio 6,7
Repeat play 5
Reset 4
Rewind 5
Rotary remote 10
B
Balance 8
Bass 8
Best Tuning Memory (BTM) 6
Blank skip 6
T, U, V, W, X, Y, Z
Tape playback 5
Treble 8
C
Clock 4
D, E
D-BASS (D-Bass) 8
Display 5,7
F, G, H
Fader 8
Fast-forward 5
Fuse 10
I, J, K
Intro scan 5
L
Local seek mode (LCL) 7
M, N, O, P, Q
Manual tuning 7
Mute 8