RX5 - Fahrradlampe Roxim - Kostenlose Bedienungsanleitung
Finden Sie kostenlos die Bedienungsanleitung des Geräts RX5 Roxim als PDF.


Benutzerfragen zu RX5 Roxim
0 Frage zu diesem Gerät. Beantworten Sie die, die Sie kennen, oder stellen Sie Ihre eigene.
Eine neue Frage zu diesem Gerät stellen
Laden Sie die Anleitung für Ihr Fahrradlampe kostenlos im PDF-Format! Finden Sie Ihr Handbuch RX5 - Roxim und nehmen Sie Ihr elektronisches Gerät wieder in die Hand. Auf dieser Seite sind alle Dokumente veröffentlicht, die für die Verwendung Ihres Geräts notwendig sind. RX5 von der Marke Roxim.
BEDIENUNGSANLEITUNG RX5 Roxim

ROXIM
THE BIKE LIGHT REDEFINED
RX5 instruction manual
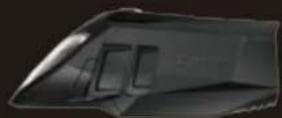
ROXIM, MAXIMUM PERFORMANCE LIGHTS
Max. 55 Lux Lights up 5x60 meters Runtime up to 23 Hours 2 hours emergency light Safe 180 degree light output


© 2011 Copyright of ROXIM technologies, inc.
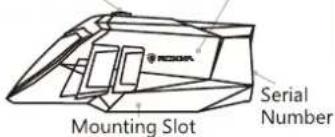
PARTS AND NAMES
RX5 unit
Button & Indicator Battery Cover
text_image
Mounting Slot Serial NumberO'FIT bracket

text_image
Bracket Mount Release Lever Steel Latch Rubber pad Strap Strap Clip Clamping LeverHOW TO MOUNT
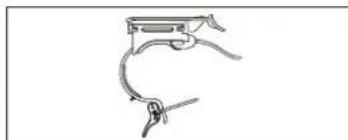
A Light Bracket Fitting:
1 Open up clamping lever & steel latch
natural_image
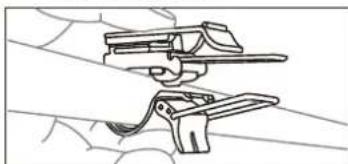
Simple line drawing of a mechanical clamp or bracket (no text or symbols)2 Slip the bracket over the handlebar, and push or pull strap to an approx diameter of the bars
natural_image
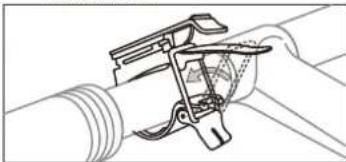
Line drawing of a mechanical clamp or bracket assembly (no text or symbols)3 Hook the latch over the strap into the recessed slot
natural_image
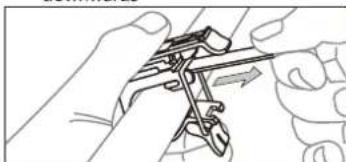
Technical line drawing of a mechanical clamp or bracket assembly (no text or symbols)4 Pull strap firmly by hand till tight. Make sure the lever is not pointing downwards
natural_image
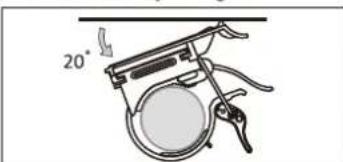
Line drawing of hands holding a tool with a handle and spring (no text or symbols)5 Adjust the bracket angel to face down on the front by 20 degrees
natural_image
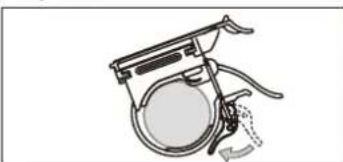
Diagram of a mechanical device with a 20-degree angle indicator (no text or symbols present)6 Push the lever down till it locks into place
natural_image
Line drawing of a bicycle with a wheel and attached gear (no text or symbols)B Battery Installation:
7 Push bottom of the light unit by thumb as diagram to separate the body and the battery cover
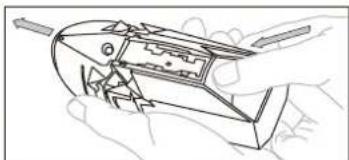
natural_image
Line drawing of a hand holding a mechanical component with internal gears and shafts (no text or symbols)8 Remove the complete cover from the light
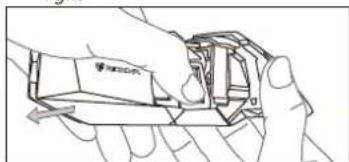
natural_image
Line drawing of a hand holding a small mechanical component (no text or symbols)9 Remove batteries (if any)
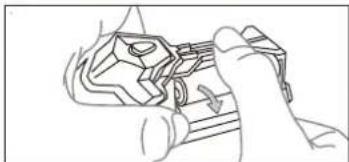
natural_image
Line drawing of a hand using a tool to adjust or install a mechanical component (no text or symbols present)10 Replace/fit batteries as per diagram on the inside of the battery housing
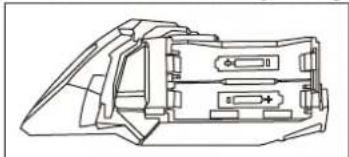
natural_image
Technical line drawing of a mechanical component with internal channels and mounting holes (no text or symbols)11 Slide cover back over the light and push forward till securely clicked in
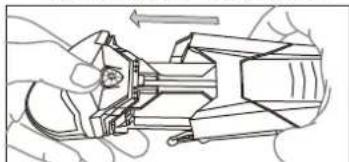
natural_image
Technical line drawing of a mechanical assembly with no visible text or symbols
Light Installation:

Slide the light into the bracket from behind, till it clicks into place
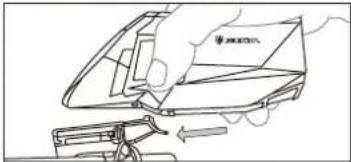
natural_image
Line drawing of a hand using a device to lift a vehicle (no text or symbols)
Vertical beam angel adjustment: The beam needs to be adjusted up/downwards for best possible safety and vision. Pull the level upwards, move the light up or down and secure the lever by pushing it downwards again till it locks in
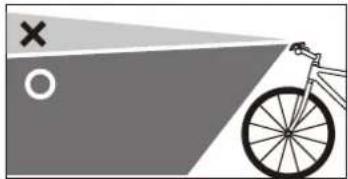
natural_image
Simple line drawing of a bicycle with a cross and circle on the left, no text or symbols present
Horizontal angle adjustment: Adjust the light to point exactly forward, by moving it by hand left or right
HOW TO REMOVE

Removing the light only: Press down the release lever at the back of bracket and slide the light backwards to remove
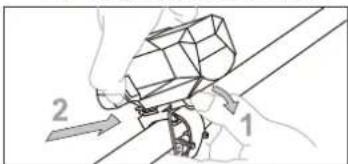
text_image
Technical diagram showing a mechanical assembly with labeled parts 1 and 2, likely illustrating a process or assembly step.
Remove bracket: pull the clamping lever upwards and unlock the steel latch from the top of the bracket. Take bracket out.
HOW TO USE

Lighting Mode Options:
| RXS MODELS | ||||
| Modes | Premium | Cruise | Ranger | Speed |
| Extreme | ● | ● | ● | ● |
| Power | ● | ● | ● | ● |
| ECO | — | — | — | ● |
| DRL | White | Amber | Red/Blue | — |
| Power + DRL | ● | ● | ● | — |
| ECO + DRL | ● | ● | ● | — |
: Available, — : Not Available
The Ranger model has red+blue flashing lights. Local laws could prohibit the use of this light, please check with the authorities.
| MODES | BRIGHTNESS | RUN TIME |
| Extreme | 55 LUX | 6 hours |
| Power | 30 LUX | 9.5 hours |
| ECO | 12 LUX | 23 hours |
| DRL | 45 Hours | |
| Power + DRL | 30 LUX | 8 hours |
| ECO + DRL | 12 LUX | 15.5 hours |
*DRL: the two smaller LED's are also lit-up. Runtime with rechargeable Sony 2,700mAh batteries. Note: the use of standard batteries will result in different runtimes than claimed, depending on the battery quality.

Switch/Button Operation:
| Functions | Button |
| ON/OFF | Press & hold 0.5 sec |
| Switch Mode | Press 1 time |
| Advanced | Press & hold 2 sec |
The twin operation modes, Standard and Advanced, are decided by pressing down the button 0.5 or 2.0 seconds.
Standard operation mode (0.5 sec), required for maximum light output. Cycle of modes:

* The RX5 Speed model has an Economy (ECO) setting instead of DRL.
Advanced operation mode (2 sec), required for DRL. Cycle of modes:


LED Indicator: Color indications:
The Blue or Purple color shows light mode, The Red color shows battery status.
The light indicator will first show the light mode and battery level. It will keep on repeating the signals for 30 seconds. If the switch is operated at anytime, it will again show mode + battery status for another 30 seconds.
| Battery Status | Lighting Mode | State of Indicator |
| FULL | EXTREME | Steady PURPLE |
| FULL | POWER | Steady BLUE |
| FULL | ECO / DRL | Blinking BLUE |
| <70% | EXTREME | Steady PURPLE, Blinking RED |
| <70% | POWER | Steady BLUE, Blinking RED |
| <70% | ECO / DRL | Blinking BLUE, Blinking RED |
| LOW | ANY | Blinking RED |
Note: If the battery status becomes too low, it will only allow ECO or DRL modes. If the battery status drops below just 3%, it will switch automatically to Nighttime Alerting Mode, which will last for up to 2 hours. This feature is not available on the RX5 Speed model.
LIMITED WARRANTY
ROXIM warrants this product against defects in material or workmanship for a period of 1 year from original date of purchase of the product.
If the product fail to work due to ordinary consumer use, ROXIM will repair or replace the defect at no charge. It does not cover product issues caused by any other reason, including but not limited to product issues due to acts of God, misuse, or modifications of or to any part of ROXIM product. This Limited Warranty does not cover consumables (such as degradation of battery, manual, etc.).
The Limited Warranty is invalid if the factory-applied serial number has been altered or removed from the product.
For latest version of warranty statement and specific instruction of services, please refer to our web site.
ROXIM web:
http://www.roxim.net/
PRODUCT SPECIFICATIONS
RX5 Specification:
- 4 models with multiple modes
- Runs on 4x AA batteries, rechargeable or standard†
- 1x CREE Hi-power white LED with Roxim 180 degree lens technology
- Roxim battery management system with constant light output
◇ Battery status indication system
Size:Width 63mm,Height 50mm,Length 125mm
Weight: Light+bracket 150grams; batteries* 120grams
Accessories: MB-10A O'FIT bracket; fit on ∅ 22mm\~35mm handlebars
* Recommended battery is Sony 2700mAh Ni-Mh HR6 (no batteries are included)
† From environmental point of view, the recommend batteries are rechargeable NiHN batteries
ROXIM TECHNOLOGIES, INC.
No. 5, Lane 388, Sec. 1, Jieshou Rd.,
Sanxia, New Taipei City 237, Taiwan
TEL:886(2)8671-1688
FAX:886(2)8671-7388
Services: services@roxim.net

ROXIM
www.roxim.net
UGX05010410EB