RM/375 - Fritteuse Ramtons - Kostenlose Bedienungsanleitung
Finden Sie kostenlos die Bedienungsanleitung des Geräts RM/375 Ramtons als PDF.


Benutzerfragen zu RM/375 Ramtons
0 Frage zu diesem Gerät. Beantworten Sie die, die Sie kennen, oder stellen Sie Ihre eigene.
Eine neue Frage zu diesem Gerät stellen
Laden Sie die Anleitung für Ihr Fritteuse kostenlos im PDF-Format! Finden Sie Ihr Handbuch RM/375 - Ramtons und nehmen Sie Ihr elektronisches Gerät wieder in die Hand. Auf dieser Seite sind alle Dokumente veröffentlicht, die für die Verwendung Ihres Geräts notwendig sind. RM/375 von der Marke Ramtons.
BEDIENUNGSANLEITUNG RM/375 Ramtons
INSTRUCTION MANUAL

amtons
Ideas for easy living
natural_image
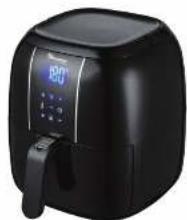
Black air fryer with digital display and control knob (no visible text or symbols)OIL FREE AIR FRYER
Model No.: RM/375
Please save these instructions.
Attentions
Please read this instruction manual carefully before using this appliance, save it and make sure it's in good condition for future reference.
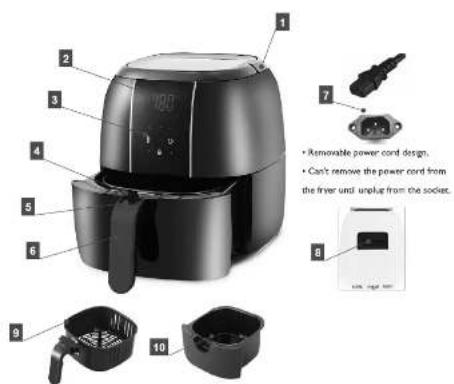
A-1 Product Introduction
text_image
1 2 3 4 5 6 7 • Renovable power cord design. • Can't remove the power cord from the fryer and unplug from the socket. 8 9 10- Concealed pull handle and air inlet 2. LED display 3. Sensor touch control panel
- Basket release button cover 5. Basket release button 6. Frying basket handle
- Mains power cord 8. Air outlet & oil smoke filter 9. Frying basket
- Frying pot
E-1 SPECIFICATION:
MODEL: RM/375
Rated voltage: 220-240V
Rated frequency: 50/60Hz
Rated input power: 1200-1400W
MADE IN CHINA FOR HYPERMART LTD
prevent unevenly fried ingredients.
4. Add some oil to fresh potatoes for a crispy result. Fry your ingredients in the fryer within a few minutes after you added the oil.
5- Do not prepare extremely greasy ingredients such as sausages in the fryer.
6- Snacks that can be prepared in an oven can also be prepared in the fryer;
7- The optimal amount for preparing crispy fries is 500 grams.
8. Use pre made dough to prepare filled snacks quickly and easily. Pre made dough also requires a shorter preparation time than home-made dough.
9- You can also use the fryer to reheat ingredients. To reheat ingredients, set the temperature to 150°C/302
T for up to 10 minutes.
D-1 Care & Cleaning
Clean the appliance after every use.
The pot, basket and grill net(optional) have a coating. Do not use metal kitchen utensils or abrasive cleaning materials to clean them, as this may damage the coating.
1- Remove the mains plug from the wall socket and let the appliance cool down.
Note: Remove the pot to let the fryer cool down more quickly.
2-Wipe the outside of the appliance with a moist cloth.
3 Clean the pot, basket with hot water, some washing-up liquid and a non-abrasive sponge. You can use a degreasing liquid to remove any remaining dirt.
Note: The pot and baskets are dishwasher-proof.
Tip: If dirt is stuck to the basket, or the bottom of the pot, fill the pot with hot water with some washing-up liquid. Put the basket in the pot and let the pot and the basket soak for approximately 10 minutes.
4- Clean the inside of the appliance with hot water and a non-abrasive sponge.
5- Clean the heating element with a cleaning brush to remove any food residues.
6- Make sure all parts are clean and dry.
7- Remove the power cord and store it with the fryer.
A-2 Sensor touch control panel
Fast review, turn to "C-I" for operation details.

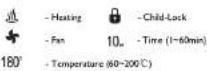
01 - Frozen fries (program 1)
02 - Home-Made friea (program 2)
03 Steak (program 3)
04 - Drumstick (program 4)
05 - Fish (program 5)
06 - Cup cake (program 6)
- Rise/Reduce Temperature (5°C/presi)
- Rise/Reduce Time (lmin/press)
- Auto cooking programs (6 menus)
- Start/Pause
- Child-Lock/STOP (press for 3s unlock, one time to lock)
Danger:
- Never immerse the housing, which contains electrical components and the heating elements in water nor rinse the unit under the tap.
- Avoid any liquid entering the appliance to prevent electric shock or short-circuit.
- Keep all ingredients in the basket or prevent any contact from heating elements.
Do not cover the air inlets and the air outlet when the appliance is working.
Do not fill the pot with oil as this may cause a fire hazard.
- Don't touch the inside of the appliance while it is operating.
B-1 Warning
For your safety, this appliance complies with the safety regulations and directives in effect at the time of manufacture (Low voltage Directive, Electromagnetic Compatibility, Food Contact Materials Regulations, Environment...).
2- Check that the power supply voltage corresponds to that shown on the appliance (a ternating current).
3- Given the diverse standards in effect, if the appliance is used in a country other than that in which it is purchased, have it checked by an approved service centre.
4- This appliance is designed for domestic use only. In case of professional use, inappropriate use or failure to comply with the instructions, the manufacturer accepts no responsibility and the guarantee will be void.
5- Read and follow the instructions for use. Keep them for future use.
6- Do not operate any appliance with a damaged cord or plug or after the appliance malfunctions, or has been dropped or damaged in any manner. Return the appliance to your point of purchase. Do not take the appliance apart yourself.
7. Do not use an extension lead. If you accept liability for doing so, only use an extension lead which is in good condition and is suited to the power of the appliance.
B- Do not leave the cord hanging.
9- Do not unplug the appliance by pulling on the cord.
10- Always unplug the appliance immediately after use; when moving it: prior to any cleaning or maintenance.
C-1 Before the first use
1- Remove all packaging materials.
2- Remove any stickers or labels from the appliance. (Except the rating label!)
3- Thoroughly clean the basket and the pot with hot water, some washing-up liquid and a non-abrasive sponge.
C-4 Part 2
This table below helps you to select the basic settings for the ingredients you want to prepare, please refer to the recipe book for more different ingredients.
Note: Keep in mind that these settings are indications. As ingredients differ in origin, size, shape as well as brand, we cannot guarantee the best setting for your ingredients.
Table : Menu
| Type | Min to Max (g) | Time (min) | Temp (°C) | Remark |
| Frozen chips | 200-500 | 12-20 | 200°C | Shake at 1/2 time |
| Home-made chips | 200-500 | 16-30 | 180-200°C | add 1/2 spoon of oil, Shake |
| Breadcrumbed cheese snacks | 200-300 | 8-15 | 180°C | |
| Chicken Nuggets | 200-500 | 10-15 | 200°C | |
| Filet of Chicken | 200-500 | 18-25 | 200°C | Turn over if wanted |
| Drumsticks | 200-500 | 18-22 | 180°C | Turn over if wanted |
| Steak | 200-500 | 8-15 | 180°C | Turn over if wanted |
| Pork chops | 200-500 | 10-20 | 180°C | Turn over if wanted |
| Hamburger | 200-500 | 7-14 | 180°C | Turn over if wanted |
| Frozen fish fingers | 100-400 | 6-12 | 180°C | Turn over if wanted |
| Cup cake | 5 units | 15-18 | 200°C |
C-5 Tips for cooking
- Smaller ingredients usually require a slightly shorter preparation time than larger ingredients.
2- A larger amount of ingredients only requires a slightly longer preparation time, a smaller amount of ingredients only requires a slightly shorter preparation time.
3- Shaking smaller ingredients halfway through the preparation time optimises the end result and can help
12- Add 3 minutes to the preparation time when the appliance is cold, or you can also let the appliance preheat without any ingredients inside approx. 3-4 minutes. In that case.
13- Some ingredients require shaking halfway through the preparation time. To shake or turn over the ingredients, put the pot out of the appliance by the handle and shake it or turn over the ingredients by fork (or tongs). Then put the pot back into the fryer.
Caution: Do not press the basket release button during shaking or turn over the ingredients.
14 After finishing cooking, pull the pot out of the appliance and place it on a heat resistant surface. And check if the ingredients are ready. If the ingredients are not ready yet, simply slide the pot back into the appliance and set the timer to a few extra minutes.
15- To remove the ingredients, press the basket release button and lift the basket out of the pot. The frying basket and the ingredients are hot. You can use a fork (or tongs) to take out the ingredients. To remove large or fragile ingredients, use a pair of tongs to lift the ingredients out of the basket. Empty the basket into a bowl or onto a plate.
C-3 Secure switch
This appliance is equipped with a secure switch. When pulling the pot out of the fryer during it's working, the fryer will stop heating and timer on hold automatic until the pot is put back.
Suggestion: It's better to pull out the pot not longer than 30s, to make sure the stable temperature inside the pot to have better result.
*Note: You can also clean these parts in the dishwasher.
4- Wipe the inside and outside of the appliance with a moist cloth. This appliance works on hot air. Do not fill the basket with oil or frying lot.
5- Use on a flat and stable, heat resistant work surface, away from any water splashes or any sources of heat.
6- When in operation, never leave the appliance unattended.
7- This appliance is not designed to be used by people (including children) with a physical, sensory or mental impairment, or people without knowledge or experience, unless they are supervised or given prior instructions concerning the use of the appliance by someone responsible for their safety.
8. Children must be supervised to ensure that they do not pay with the appliance.
9 This electrical appliance operates at high temperatures which may cause burns. Do not touch the hot surfaces of the appliance (pot, air out et...).
10- Do not switch on the appliance near flammable materials (blinds, curtains...) or close to an external heat source (gas stove, hot plate...etc.)
11- In the event of fire, never try to extinguish the flames with water. Unplug the appliance. Close the electric brake, if it is not dangerous to do so. Smother the flames with a damp moth.
12- Do not move the appliance when it is full of hot food.
13- Never immerse the appliance in water!
CAUTION:
Do not fill the pot with oil or any other liquid.
Do not put anything on top of the appliance.
This disrupts the airflow and affects the hot air frying result.
C-2 Using the appliance
The air fryer can be used to prepare a large range of ingredients. The recipe booklet included serves as a guide to using the appliance better.
Part I
1- Carefully pull the pot out of the fryer horizontally, and put the ingredients into the basket. Note: Never fill the baskets exceed the amount indicated in the table, as this could affect the quality of the end result.
2- Slide the pot back into the fryer.
Never use the pot without the basket in it.
Warning: Do not touch the pot during and some time after use, as it gets very hot. Only hold the pot by the handle.
- Standby mode connect the mains plug to an earthed wall socket, then hear the "Beep" notice, display shows icon "12". After finish cooking or without any operation for 1 min, the fryer will turn to standby mode automatically.
-
Unlock & Temperature setting press "☐" for 3s to unlock, then display shows "180°C" "0min" and background light on. Press "☐" or "▼" to increase or decrease the temperature, temperature "±5°C" with every press or long press to the wanted temperature. *Mac 200°C, Min: 60°C.
5- Time setting press "+” or “-” to adjust the time from 10min, time will “±1min” with every press or long press to the wanted time. *Max: 60min, Min: 1min.
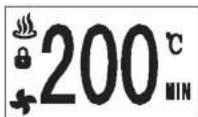
6- Start cooking: after finishing setting of temperature and time, then press " " to start cooking, display shows heating icon " " and fan icon " " . Pre-set temperature and remaining time shows on display alternately during cooking. -
Adjustable: during cooking, you are able to adjust the temperature and time if wanted.
8- Pause/Continue: press " ", the fryer stop working, press again to continue. STOP: press to stop cooking.
9- Finish cooking when cooking time out, can hear "Beep" four times consecutive, display shows and stop heating, then turn to standby mode automatically. - Fast cooking press " " to have fast cooking, cooking start with 180°C and 10min acquiescenty, you can adjust the temperature and time as point 7.
11- Auto menus press "①" can select the auto cooking programs, press order y to select the type of ingredients from "0 |"-06"
| Type | Weight(g) | Temp (°C) | Time (min) |
| 01 Frozen fries | 350 | 200°C | 16 |
| 02 Home Made fries | 350 | 200°C | 18 |
| 03 Steak | 300 | 180°C | 15 |
| 04 Drumstick | 300 | 180°C | 20 |
| 05 Fish | 300 | 200°C | 12 |
| 06 Cup cake | 5 units | 200°C | 17 |