HIC3601 - Herd Thor - Kostenlose Bedienungsanleitung
Finden Sie kostenlos die Bedienungsanleitung des Geräts HIC3601 Thor als PDF.


| Produkttyp | Induktionskochfeld |
| Modell | HIC3601 |
| Marke | Thor |
| Breite | 36 Zoll (915 mm) |
| Tiefe | 21 Zoll (534 mm) |
| Höhe | 2 5/32 Zoll (55 mm) |
| Spannung | 240 V / 60 Hz |
| Gesamtleistung | 9600 W |
| Leistungsstufen | 1 bis 9 (100 W – 3700 W pro Zone) |
| Boost-Funktion | Ja, max. 10 Minuten, dann automatisch Stufe 9 |
| Timer | 1 bis 99 Minuten, automatische Abschaltung |
| Kindersicherung | Manuell und automatisch nach 5 Min. Inaktivität |
| Restwärmeanzeige | „H“ für jede Kochzone |
| Anzahl Kochzonen | 5 (vorne links, hinten links, Mitte, vorne rechts, hinten rechts) |
| Material Kochfläche | Glaskeramik |
| Gehäusematerial | Metall |
| Einbauart | Einbau (Drop-in) |
| Einbaumaße (B x T) | 35 5/8 Zoll x 19 3/8 Zoll (905 mm x 492 mm) |
| Über Backofen installierbar | Ja, Mindestabstand 2 3/4 Zoll (70 mm) |
| Leistungsaufnahme Standby | Nicht angegeben |
| Reinigung | Glaskeramikreiniger und Glasschaber für hartnäckige Verschmutzungen |
| Sicherheitsmerkmale | Überhitzungsschutz, automatische Abschaltung, Kindersicherung, Restwärmeanzeige |
| Garantie | 1 Jahr beschränkte Garantie (USA/Kanada) |
| Zubehör | Bedienungsanleitung, Montageanleitung |
Häufig gestellte Fragen - HIC3601 Thor
Benutzerfragen zu HIC3601 Thor
0 Frage zu diesem Gerät. Beantworten Sie die, die Sie kennen, oder stellen Sie Ihre eigene.
Eine neue Frage zu diesem Gerät stellen
Laden Sie die Anleitung für Ihr Herd kostenlos im PDF-Format! Finden Sie Ihr Handbuch HIC3601 - Thor und nehmen Sie Ihr elektronisches Gerät wieder in die Hand. Auf dieser Seite sind alle Dokumente veröffentlicht, die für die Verwendung Ihres Geräts notwendig sind. HIC3601 von der Marke Thor.
BEDIENUNGSANLEITUNG HIC3601 Thor
THOR KITCHEN®
Induction Cooktop 30 inch & 36 inch
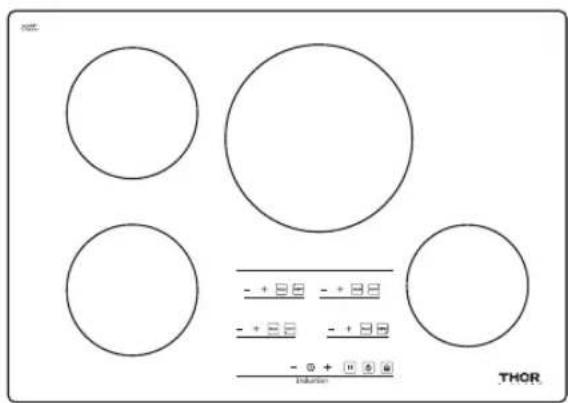
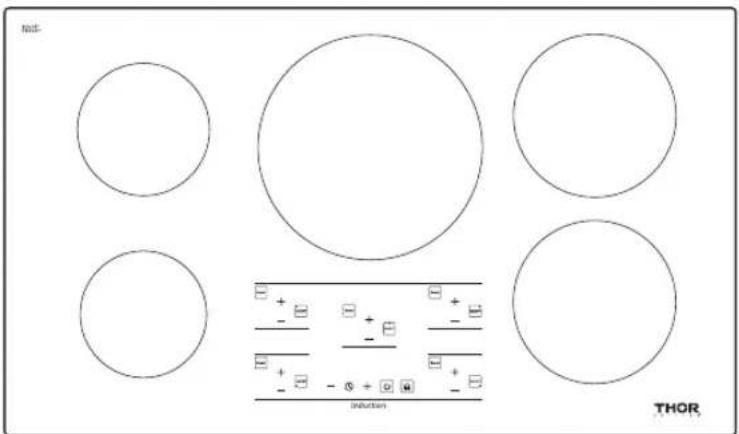
User Manual
&
Installation Instructions
IMPORTANT SAFETY INSTRUCTIONS
Carefully read the important information regarding installation, safety and maintenance.
Keep these instructions for future reference.

Intertek 4001726

Table of Contents
IMPORTANT SAFETY INFORMATION....3
INTRODUCTION TO INDUCTION COOKING....9
CARE AND CLEANING....12
IMPORTANT INSTALLATION INSTRUCTIONS....13
COUNTER INSTALLATION INSTRUCTIONS....15
CONTROL PANEL OVERVIEW....16
SPECIFICATIONS....18
HOW TO USE....19
OTHER FUNCTIONS....21
TROUBLESHOOTING ERROR CODES....22
Please read the entire instruction manual prior to using your unit.
You can download an owner's & installation manual at www.thorkitchen.com
READ ALL INSTRUCTIONS BEFORE USE
Read and follow all instructions before using the cooktop to prevent the risk of fire, electric shock, personal injury, or damage when using the cooktop or appliances with the cooktop. This guide does not cover all possible conditions that may occur. Always contact your service technician or manufacturer about problems that you do not understand.

WARNING: For your safety, the information in this manual must be followed to minimize the risk of fire, electric shock or to prevent property damage, personal injury or death.
IMPORTANT NOTICE: RADIO INTERFERENCE
This unit has been tested and found to comply with the limits for a class B digital device, pursuant to Part 18 of the FCC rules. These limits are designed to provide reasonable protection against harmful interference in a residential installation.
This unit generates, uses and can radiate radio frequency energy and, if not installed and used in accordance with the instructions, may cause harmful interference to radio communications.
However, there is no guarantee that interference will not occur in a particular installation. If this unit does cause harmful interference to radio or television reception, which can be determined by turning the unit off and on.
The user is encouraged to try to correct the interference by one or more of the following measures:
• Reorient or relocate the radio and/or television receiving antennae.
• Increase the distance between the cooktop unit and radio or television receiver
- Connect the cooktop unit into an outlet or a circuit different from that to which the radio or television receiver is connected.
READ ALL INSTRUCTIONS BEFORE USE
SAFETY PRECAUTIONS
- Do not attempt to repair or replace any part of your cooktop unless it is specifically recommended in this manual. All other service should be referred to a qualified technician.
- Remove all tape and packaging wrap before using the appliance. Destroy the carton and plastic bags after unpacking the appliance. Never allow children to play with packaging material.
- The safety aspects of this appliance comply with accepted technical standards.
Know how to disconnect the electrical power to the appliance at the circuit breaker or fuse box in case of an emergency. Mark the breaker or fuse for ease of identification and swift action if necessary.
- Do not repair or replace any part of the appliance. All servicing should be done only by a qualified technician to avoid the risk of personal injury and damage to the appliance. Never modify or alter the construction of an appliance such as removal of panels, wire covers or any other permanent part of the product.
- Storage on appliance: Flammable materials should not be stored near or on the cooking surface. This includes paper, plastic and cloth items, such as cookbooks, plastic ware and towels, as well as flammable liquids. Do not store explosives, such as aerosol cans, on or near the appliance. Flammable materials may explode and result in fire, injury or property damage.
- Do not leave children alone. Children should not be left alone or unattended in the area where an appliance is in use. They should never be allowed to sit or stand on any part of the appliance.
- Do not store or use gasoline or other flammable vapors and liquids in the vicinity of this or any other appliance.

CAUTION Items of interest to children should not be stored in cabinets above a cooktop or on the backsplash of a cooktop-children climbing on the cooktop to reach items could be seriously injured

WARNING Never use your appliance for warming or heating a room.

WARNING Persons with a pacemaker or similar medical device should exercise caution using or standing near an induction unit while it is in operation, as the electromagnetic field may affect the working of the pacemaker or similar medical device. It would be advisable to consult your doctor or the pacemaker or similar medical device manufacturer about your particular situation.

CAUTION DO NOT touch Cooking Zones or areas near these surfaces. Cooking Zones may be hot from residual heat even though they are dark in color. Areas near the Cooking Zones may become hot enough to cause burns. During and after use, do not touch or let clothing or other flammable materials touch these areas until they have had sufficient time to cool.
READ ALL INSTRUCTIONS BEFORE USE
SAFETY PRECAUTIONS
- Wear proper apparel. Loose-fitting or hanging garments should never be worn while using the appliance. Do not let clothing or other flammable materials contact hot surfaces.
- Do not use water or flour on grease fires. Smother the fire with a pan lid, or use baking soda, a dry chemical or foam-type extinguisher.
- When heating fat or grease, watch it closely. Fat or grease may catch fire if allowed to become too hot.
- Use only dry pot holders. Moist or damp pot holders on hot surfaces may result in burns from steam. Do not let the pot holders touch hot surface units. Do not use a towel or other bulky cloth instead of a pot holder.
- Do not heat unopened food containers. Buildup of pressure may cause the container to burst and result in injury.
ELECTRICAL SAFETY

WARNING
- If the surface is cracked, switch off the appliance to avoid the possibility of electric shock. Do not reuse your COOKTOP until the glass surface has been changed.
- When using the COOKTOP, never use aluminum foil, products wrapped in aluminum foil, or deep-frozen food in aluminum cookware.
-
If the supply cord is damaged, it must be replaced by the manufacturer, its service agent or similarly qualified persons in order to avoid a hazard.
-
The installation and connection of the new appliance must only be carried out by qualified personnel.
- Flush-mounted appliances may only be operated following installation in suitable cabinets and workplaces which conform to the relevant standards. This ensures sufficient protection against electric shock as required by certification agencies.
- If your appliance malfunctions or breaks, switch off all cooking zones and contact Service Center.
- Proper Installation – Be sure your appliance is properly installed and grounded by a qualified technician.
CHILD SAFETY

WARNING
- This appliance is not intended for use by young children or infirm persons unless they have been adequately supervised by a responsible person to ensure that they can use the appliance safely.
- Young children should be supervised to ensure that they do not play with the appliance.
- Accessible parts may become hot during use. Young children should be kept away.
READ ALL INSTRUCTIONS BEFORE USE
SAFETY DURING USE
- This appliance may only be used for normal cooking and frying in the home. It is not designed for commercial or industrial purposes.
- Do not use the cooktop to heat the room.
• Take care when plugging in electric appliances near the cooktop. Cords must not come into contact with the hot surface. This could cause damage to the cooktop and cable insulation.
• Overheated fats and oils catch fire quickly. You should supervise cooking when preparing foods in fat or oil.
• After use, switch off the cooktop element by its control and do not rely on the pan detector.
- Always keep the control panels clean and dry. Do not let liquids or grease remain on the cooktop controls area. Spilled or burnt-on foods can activate or deactivate the appliance. Clean the controls area thoroughly to resume normal operation of the appliance.
- Never place combustible items on the cooktop.
- Never keep any combustible items or aerosol cans in a drawer located under the cooktop.
- Avoid placing metal cooking utensils on the cooking surface areas. Metal objects can become hot and cause burns.
- Know which touch keypad controls each surface of the cooking zones.
- Clean the appliance regularly to keep all parts free of grease that could catch fire. Exhaust fan ventilation hoods and grease filters should be kept clean. Do not allow grease to accumulate on hood or filter. Greasy deposits in the fan could catch fire. Refer to hood manufacturer's instructions for cleaning.
- Use proper pan size. This appliance is equipped with one or more Cooking Zones of different sizes.
- Select utensils having flat bottoms large enough to cover the Cooking Zones. The pan detection sensors will not allow the affected cooking zones to operate without a pan present.
- Do not place any object on or near the control keypad area in order to prevent accidental activation of the cooktop controls.
- Utensil handles should be turned inward and should not extend over adjacent cooking zones to reduce the risk of burns, ignition of flammable materials, and spillage due to unintentional contact with the utensil.
- Never leave prepared food on the Cooking Zones. Boil-overs cause smoke and greasy spillovers that may ignite or a pan that has boiled dry may melt or become damaged.
- Protective liners: Do not use aluminum foil to line any part of the cooktop. Only use aluminum foil as recommended after the cooking process, if used as a cover to be placed over the food. Any other use of aluminum foil may result in the risk of electric shock, fire or short circuit.
- Glazed cooking utensils: Only certain types of glass, glass/ceramic, ceramic, earthenware, or other glazed utensils are suitable for range top service without breaking due to the sudden change in temperature. Check the manufacturer's recommendations for cooktop use.
- Ventilating hood: The ventilating hood above your cooking surface should be cleaned frequently so the grease from cooking vapors does not accumulate on the hood or filter.
READ ALL INSTRUCTIONS BEFORE USE
SAFETY DURING USE
- Do not clean or operate a broken cooktop. If cooktop should break, cleaning solutions and spillovers may penetrate the broken cooktop and create a risk of electric shock. Contact a qualified technician immediately.
- Clean cooktop with caution. If a wet sponge or cloth is used to wipe spills on a hot cooking area, be careful to avoid a steam cloud. Some cleaners can produce harmful fumes if applied to a hot surface.
- Do not place hot cookware on cold cooktop glass. This could cause glass to break.
- Do not slide pans across the cooktop surface. They may scratch the cooktop surface.
- Do not let pans boil dry. This may cause permanent damage in the form of breakage, fusion or marking that can affect the ceramic-glass cooktop (this type of damage is not covered by your warranty).
- Never leave surface units unattended at high heat settings. Boil-overs cause smoke and greasy spillovers that may ignite.

CAUTION
DO NOT pick up the supplied bridge pan handles after cooking. They might be hot and there is a risk of burning yourself.
SAFETY WHEN CLEANING
• Always switch off the appliance before cleaning.
- For safety reasons, do not clean the appliance with a steam jet or high-pressure cleaner.
- Clean the cooktop in accordance with the maintenance and cleaning instructions in this manual.
- Steam cleaner is not to be used for cleaning of the cooktop.
- Do not use harsh abrasive cleaners or rough metal scrapers to clean the cooktop glass since they can scratch the surface, which may result in shattering of the glass.
COOK MEAT AND POULTRY THOROUGHLY
Cook meat and poultry thoroughly-meat to at least an INTERNAL temperature of 160^ F and poultry to at least an INTERNAL temperature of 180^ F. Cooking to these temperatures usually protect against foodborne illness.
READ ALL INSTRUCTIONS BEFORE USE
HOW TO AVOID DAMAGE TO THE APPLIANCE
- Prior to using your cooktop for the first time, apply the recommended cooktop cleaning cream to the ceramic surface. Buff with a non-abrasive cloth or pad. This will make cleaning easier when soiled from cooking. The special cooktop cleaning cream leaves a protective finish on the glass to help prevent scratches and abrasions.
- Do not use the cooktop as a work surface or storage space.
- Please be careful on the edges when moving pots and pans around.
- Do not have the cooking zones on with empty pans or with no pots or pans on them.
- Ceramic glass is very tough and impervious to sharp temperature changes but is not unbreakable. It can be damaged if particularly hard or sharp objects fall onto it.
- Be very cautious when using pots made of cast iron or other pots with rough edges or burrs. Moving these can cause scratches on glass.
- If sugar or a mixture containing sugar falls onto a hot cooking zone and melts, remove immediately, while still hot. If left to cool down, it may damage the surface when removed.
NOTE: There is a risk of burning yourself when the glass scraper is used on a hot cooking zone! - Keep meltable objects or materials away from the ceramic glass surface, for example, plastic utensils, aluminum foil or cooking wraps. If any materials or foods melt on the ceramic-glass surface, these should be cleaned up immediately.
DISPOSAL OF OLD APPLIANCES
To protect the environment, it is important that worn-out appliances are disposed of in the correct manner.
- The appliance must not be disposed of with household rubbish.
- You can obtain information about collection or public refuse disposal sites from your local health council or environmental health office.

CAUTION Before disposing of old appliances, please make them inoperable so they cannot be a source of danger. To do this, have a qualified person disconnect the appliance from the house circuitry.
READ AND FOLLOW THIS SAFETY INFORMATION CAREFULLY
SAVE THESE INSTRUCTIONS
INDUCTION COOKING
How Induction Cooking Works
An induction coil is beneath the ceramic glass cooking surface. This generates magnetic fields, which act directly on the base of the pots and pans as compared to methods that first heat the ceramic glass. This means that the base of the pan is immediately heated up, saving time and energy.
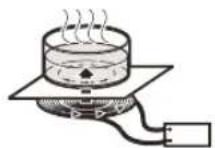
Since the heat required for cooking is generated directly in the base of the pan, the Cooking Zone itself warms up only slightly. The cooktop becomes hot from the heat from the base of the pan.
NOTE: If there is no pot or pan on the cooking zone, there is no energy transfer (heating up). This prevents the Cooking Zones being switched on and becoming hot accidentally.
IMPORTANT
- Remove all tape and packaging wrap before using the appliance. Destroy the carton and plastic bags after unpacking the appliance. Never allow children to play with packaging materials.
- Electromagnetic fields can affect electronic circuits and interfere with portable radios and phones.
- Do not put magnetically active objects (e.g. credit cards, computer diskettes, cassettes) on or near the ceramic glass surface while one or more induction cooking zones are in use!
- Do not put any metallic objects (e.g., spoons, pan lids) on the Cooking Zones as they can become hot when the Cooking Zones are in use.
Selecting Cookware
The magnetic Cooking Zone sensors located below the cooktop surface require the use of cookware made with magnetic material in order to start the heating process on any of the Cooking Zones. When purchasing pans, look for cookware specifically labeled by the manufacturer for use with induction cooktops.
Pots and Pans
- In principle, all pots and pans with magnetic bases are suitable. These include steel, steel-enamel as well as cast-iron pots and pans.
- High grade steel pans with a mixed metal base are suitable for induction only if the manufacturer has expressly marked them as such. In that case, they have a magnetic material in the base.
- If you wish to use a special type of pan (e.g., a pressure cooker, simmering pan, wok), please follow the manufacturer's instructions and do not use a very thin pan.
NOTE: Some cookware can produce noises when used on induction cooking zones. This is not a fault in the cooktop, and its function will not be impaired in any way as a result.
Suitability Test
If you are not sure if a pot or pan is suitable for use with your induction cooktop, you can find out with a few simple tests:
- Place a pot filled with a little water (1/8" or 1/4") on the Cooking Zone. Set the Cooking Zone to full power (power level 9).
Selecting Cookware

CAUTION The pan base of suitable kitchenware heats up within a few seconds! The water should boil rapidly.
- You can also check cookware suitability with a magnet. If the magnet remains fixed to the base of the pan, the pan is suitable for induction cooking.
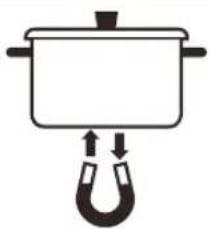
natural_image
Simple line drawing of a pot with a hook and arrows indicating force or movement (no text or symbols)Avoiding Scratches
It is recommended to always use heavier gauge stainless steel cookware on your induction cooktop surface. This will help reduce the possibility of developing scratches on the ceramic surface. Low-quality cookware can scratch the cooktop surface.
Cookware should always be lifted over the ceramic cooktop surface to prevent scratching. Sliding any type of cookware over the ceramic cooktop can affect the overall appearance of the cooktop. Over time, sliding ANY type of cookware over the ceramic cooktop may alter the overall appearance of the cooktop. Eventually, the buildup of scratches can make cleaning the surface difficult and degrade the overall appearance of the cooktop.
Scratches can also result from grains of sand (e.g., after washing vegetables) which are dragged with the pot across the cooking surface.
Use Flat-Bottomed Cookware
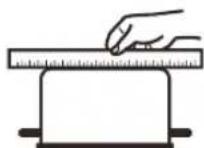
Cookware must fully contact the surface of the cooking element. Use flat-bottomed pans sized to fit the cooking element and the amount of food being prepared. Check for flatness by rotating a ruler across the bottom of the cookware with a base less than 5".
For Best Results
Always follow the recommendations for proper cookware type and size. In addition:
- Do not use dirty pans with grease buildup. Always use pans that are easy to clean after cooking and make sure that the bottoms of the pans are clean and dry.
- When cooking with large amounts of liquid, use large pots so that nothing can boil over.
- Do not let pans boil dry. This may cause permanent damage in the form of breakage, fusion or marring that can affect the ceramic cooktop (this type of damage is not covered by your warranty).
- Match the pan size and Cooking Zone to the amount of food being prepared.
Tips for Saving Energy
• Always position pots and pans before you switch on the Cooking Zone.
- Dirty cooking zones and cookware use more electricity.
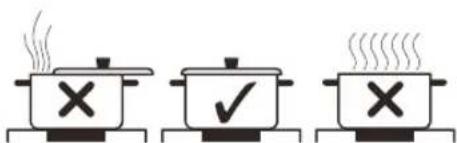
- Whenever possible, always have the lid firmly placed on the pots and pans so that they are completely covered.
Selecting Cookware
Cookware Selection and Placement
It is important that the proper cookware be used and placed correctly on the cooktop. ANY one of the incorrect conditions shown below may be detected by the sensors located below the ceramic cooktop surface. If this happens, one or more of the Cooking Zones will not heat, and an E will appear in the affected Cooking Zone display. Correct the problem before attempting to use the cooktop.
Correct
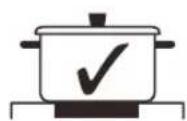
Cookware centered correctly on Cooking Zone surface.
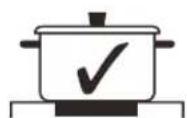
Flat pan bottom & straight sides.
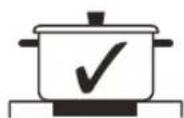
Pan size meets or exceeds the recommended minimum size for the Cooking Zone.
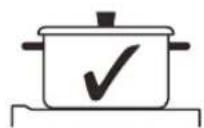
Pan rests completely on the cooktop surface.
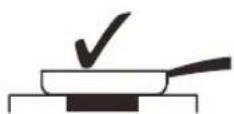
Pan is properly balanced.
Incorrect
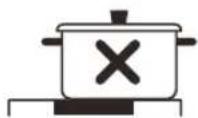
Cookware not centered on Cooking Zone surface.
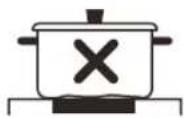
Curved or warped pan bottoms or sides
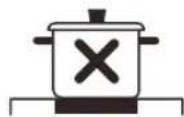
Pan does not meet the minimum size required for the Cooking Zone used.
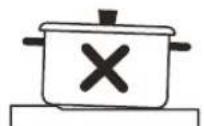
Pan bottom rests on cooktop trim or does not rest completely on the cooktop surface.
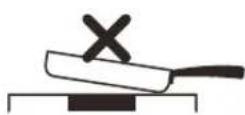
Heavy handle tilts pan.
Cooking Noise
It is normal for cooktop to generate minor noises or buzz while in use. The sounds you may hear depend on cookware material, size of pan, amount of contents, power level and heating elements used.
- Heavy pans such as enameled cast iron pans are quieter than light weight multi-ply stainless steel pans.
- Pans that cover entirely the heating element are less noisy.
- Cooktop may produce noises if the pan contents are cold. As pan warms up, the sound will diminish.
- Hearing a low humming noise or buzz is normal when cooking on high settings. When reducing power levels, the noise level will decrease as well.
- When using simultaneous heating elements at certain power levels, the magnetic fields may interact and produce a soft whistle or intermitted "hum". By lowering or raising the power level settings of one or both of the elements, these noises can be reduced or eliminated.
Cleaning the Cooktop
General cleaning for induction ceramic glass cooking surfaces is considerably easier than for cooking surfaces with radiant heating.
NOTE: To prevent accidental activation of the controls, it is recommended that you set the CHILD LOCK feature before cleaning.
IMPORTANT
- Cleaning agents must not come into contact with the hot ceramic glass surface. All cleaning agents must be rinsed off thoroughly with clean water.
- Do not use any aggressive cleaners such as grill or oven sprays, coarse scouring cleansers or abrasive pan cleaners.
- Clean the ceramic-glass surface after each use when it is warm to the touch or cold. This will prevent spills from becoming burnt on. Remove water marks, grease and discoloration with a glass scraper and ceramic glass cleaner.
NOTE: You may purchase glass scrapers and ceramic glass cleaners from your local hardware store.
General Cleaning
- When it is cool, wipe the ceramic glass surface with a damp cloth and a small amount of ceramic glass cleaner.
- Wipe dry with a clean cloth.
- Once a week, thoroughly clean the entire ceramic-glass cooking surface with a commercially available ceramic glass cleaner.
- Then, wipe the ceramic glass surface using a clean, soft cloth dampened with clean water and polish dry with a clean lint-free cloth.
Removing Heavy Soil
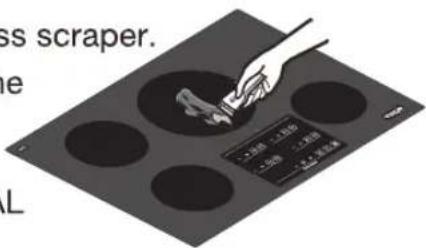
To remove food that has boiled over or stubborn spills, use a glass scraper.
- Hold the glass scraper at an angle of about 45^ to the ceramic-glass surface.
- Remove soiling by sliding the blade across the area.
- Use a ceramic glass cleaner as described in GENERAL CLEANING.
Problem Soils
- Remove sugar, melted plastic, aluminum foil, or other meltable materials with a glass scraper immediately and while still hot. Failure to do so can cause permanent damage to the cooktop surface. If the Cooking Zone has already cooled down, warm it up again.
IMPORTANT: There is a risk of burning yourself when the glass scraper is used on a hot Cooking Zone. Use care and wear an oven mitt.
- Then clean the cooktop normally when it has cooled down.
NOTE: Scratches or dark marks on the ceramic glass surface caused by a pan base with sharp edges cannot be removed. However, they do not impair the function of the cooktop.
Cooktop ventilation
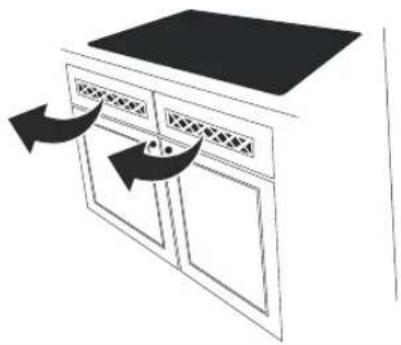
- It is very important to provide adequate ventilation for optimal operation. Installing over vented cabinets is highly recommended.
natural_image
Line drawing of a kitchen appliance with a double door and ventilation grilles, showing airflow direction (no text or symbols)
WARNING Allow enough space between cooktop and cabinet for proper airrow. If airflow is blocked, burners can overheat and stop working temporarily.
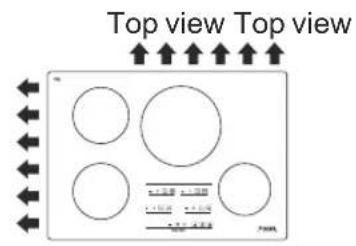
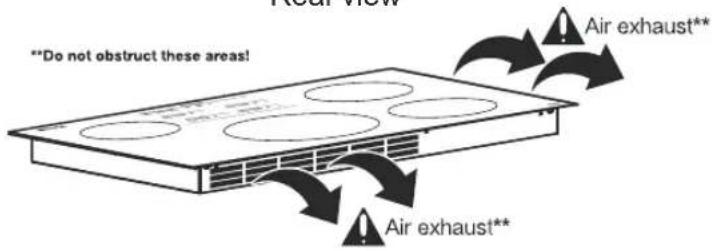
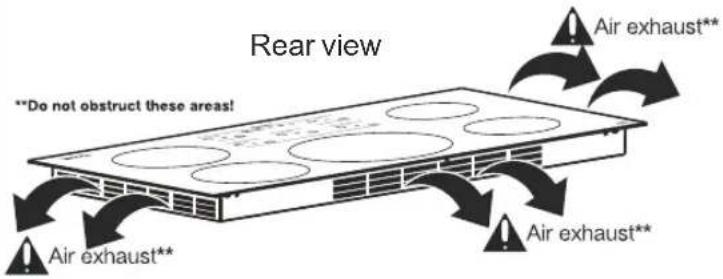
Cooktop ventilation areas - DO NOT OBSTRUCT!
Keep ventilation areas clear, to allow proper airflow.
30 inch
Model: HIC3001
Rear view
36 inch
Model: HIC3601
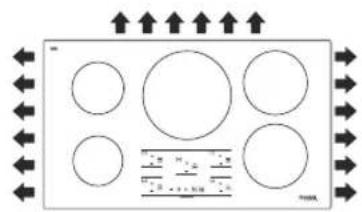
flowchart
graph TD
    A["Top Rectangle"] --> B["Left Circle"]
    A --> C["Right Circle"]
    A --> D["Left Circle"]
    A --> E["Right Circle"]
    A --> F["Bottom Rectangle"]
    G["Central Box"] --> H["Left Circle"]
    G --> I["Right Circle"]
    G --> J["Left Circle"]
    G --> K["Right Circle"]
    G --> L["Bottom Rectangle"]
    M["Arrow Up"] --> N["Arrow Down"]
    O["Arrow Up"] --> P["Arrow Down"]
    Q["Arrow Up"] --> R["Arrow Down"]
    S["Arrow Up"] --> T["Arrow Down"]
    U["Arrow Up"] --> V["Arrow Down"]
    W["Arrow Up"] --> X["Arrow Down"]
    Y["Arrow Up"] --> Z["Arrow Down"]
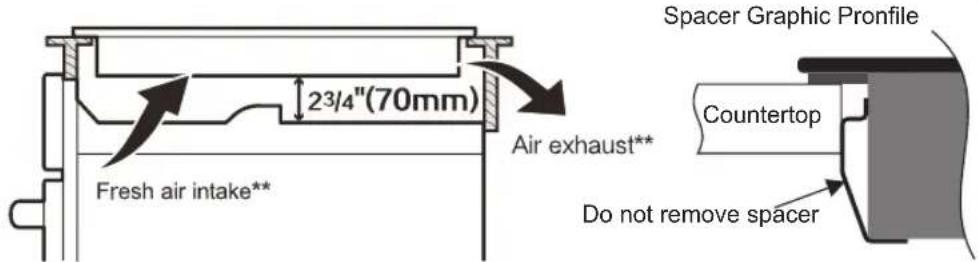
Recommended space between cooktop base if installing above oven

CAUTION
It is very important to keep 2 3/4"(70mm) distance between the cooktop and the oven.

CAUTION During cooking, built-in fan inside the cooktop will operate constantly to keep the internal components cool. The air intake is on the bottom of the cooktop box, and the warm air exhaust is located on the back and side of rim, as shown on the schematic. If the air intake or the exhaust is obstructed, the cooktop safeties will either diminish the power output or shut down the unit.
Preparing the Installation Location
Important – Save for the local electrical inspector's use.
- All electric cooktops run off a three phase, two live wire cable, 240 Volt, 60 Hertz, AC-only electrical supply with ground.
• Maximum distance between cooktop and overhead cabinetry is 30 inches(76.2 cm)

WARNING DO NOT apply any sealant along the perimeter. The cooktop must breath freely.

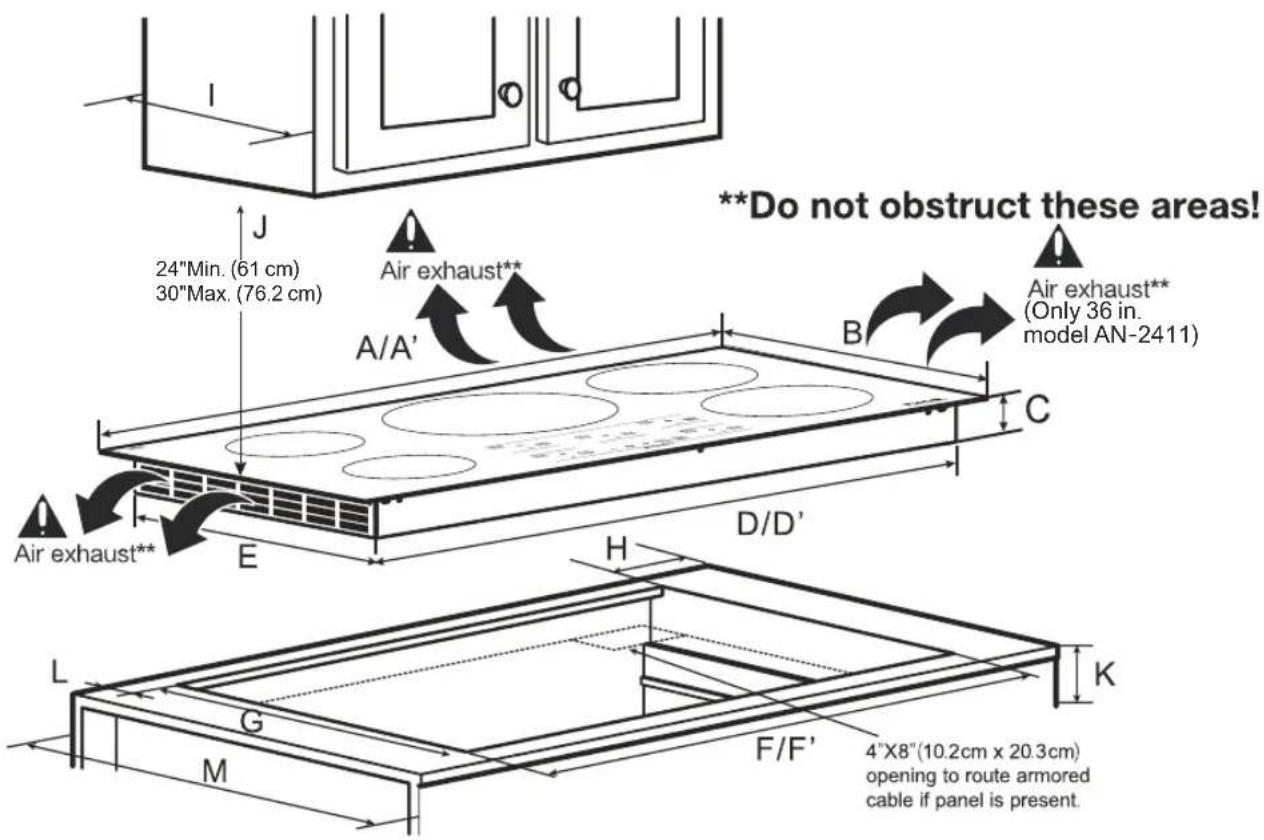
Model:HIC3001
| Unit | A | B | C | D | E | F | G | H Min | I | J | K | L | M | |
| Min | Max | Min | Min | Min | ||||||||||
| Inch | 30 | 21 | 2^5/_32 | 28^19/_32 | 19^3/_8 | 29^5/_8 | 19^7/_8 | 13/16 | 12 | 24 | 30 | 4^15/_16 | 1^1/_2 | 24 |
| mm | 762 | 534 | 55 | 726 | 492 | 753 | 505 | 20 | 305 | 610 | 762 | 125 | 38 | 610 |
Model: HIC3601
| Unit | A' | B | C | D' | E | F' | G' | H Min | I | J | K | L | M | |
| Min | Max | Min | Min | Min | ||||||||||
| Inch | 36 | 21 | 5/32 | 34 3/8 | 19 3/8 | 35 5/8 | 19 7/8 | 13/16 | 12 | 24 | 30 | 415/16 | 11/2 | 24 |
| mm | 915 | 534 | 55 | 873 | 492 | 899 | 505 | 20 | 305 | 610 | 762 | 125 | 38 | 610 |
All dimensions are stated in inches and millimeters (mm).
Allow 2" (5 cm) space below the armored cable opening to clear the electric cable and allow space for installation of the junction box on the wall at the back of the cooktop.
Before installing the cooktop
- Visually inspect the cooktop for damage. Also make sure all cooktop screws are on tight.
- Place the cooktop into the countertop cut-out.
Model and Serial Number Location
The serial plate is located at the front edge of the cooktop. When ordering parts or making inquiries about your cooktop, be sure to include the model and serial numbers.
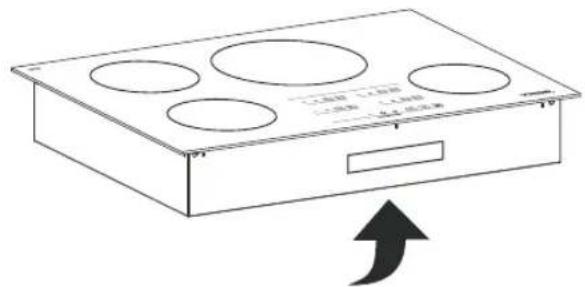
natural_image
Simple line drawing of a rectangular appliance with four circular cutouts and an arrow pointing upward (no text or symbols)Serial plate is located at the front edge of the burner box of the cooktop.
Connecting to a 3 wires power supply cable electrical system
- Disconnect the power supply.
- In the circuit breaker, fuse box, or junction box, connect appliance and power supply cable wires as shown below.
- HIC3001: Circuit breaker fuse rating must be above 40 A, and wire should be 2/8 or 3/8 copper.
HIC3601: Circuit breaker fuse rating must be above 50 A, and wire should be 2/6 or 3/6 copper. - Minimum acceptable size of conductors should be no less than 10AWG, copper only, and no less than 167°F.
- A wire-binding screw or stud used in the wire terminal should be 10 or larger.
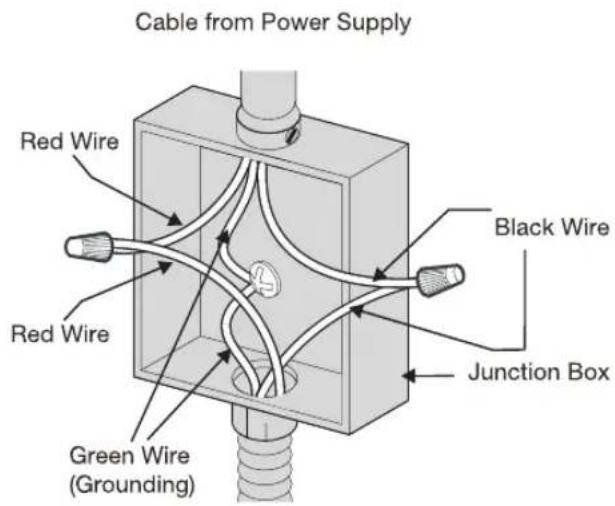

WARNING
- The electrical power to the cooktop must be shut off while line connections are being made. Failure to do so could result in serious injury or death.
- An extension cord must not be used with this appliance. Such use may result in a fire, electrical shock or other personal injury.
Model:HIC3001
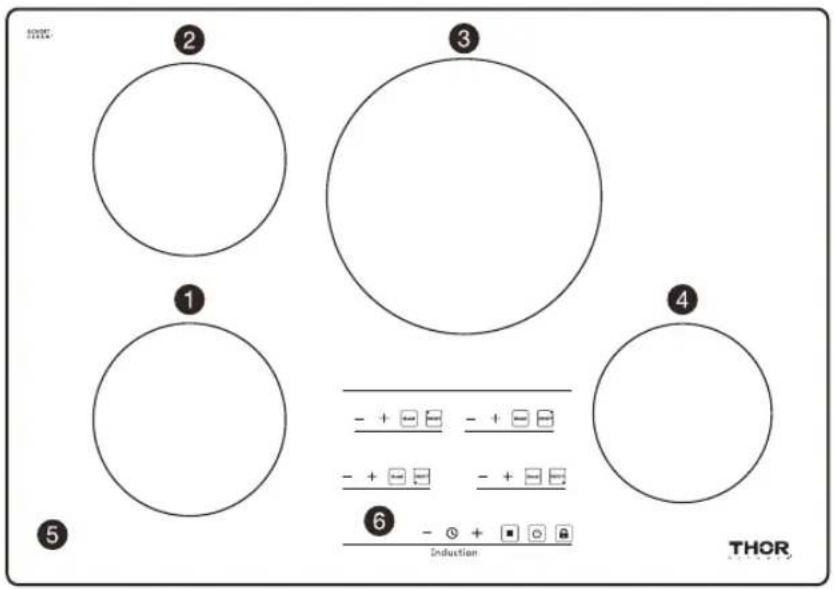
① Front left cooking zone
② Back left cooking zone
③ Back right cooking zone
④ Front right cooking zone
5 Ceramic glass
⑥ Touch control panels
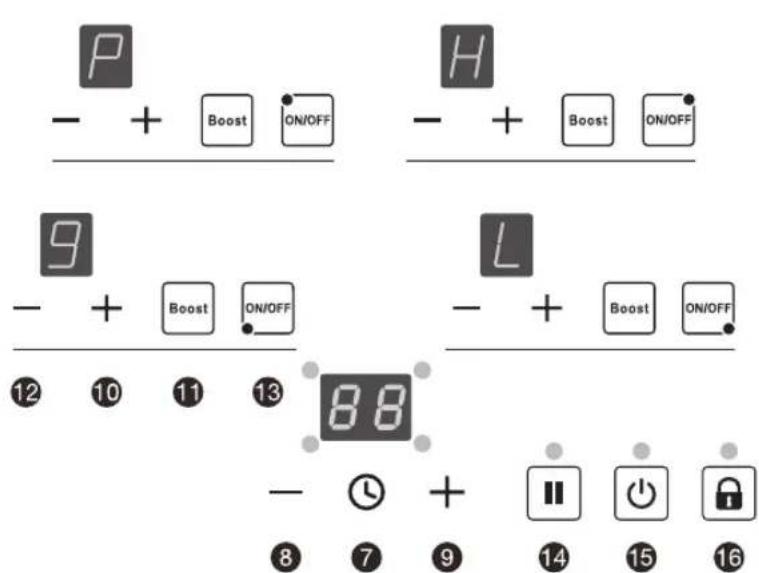
⑦ Timer control keys
8 Lower time key
9 Raise time key
⑩ Raise power key
11 Power boost
⑫ Lower power key
13 On/Off
14 Pause Resume /
15 Power button
16 Child safety lock
Model: HIC3601
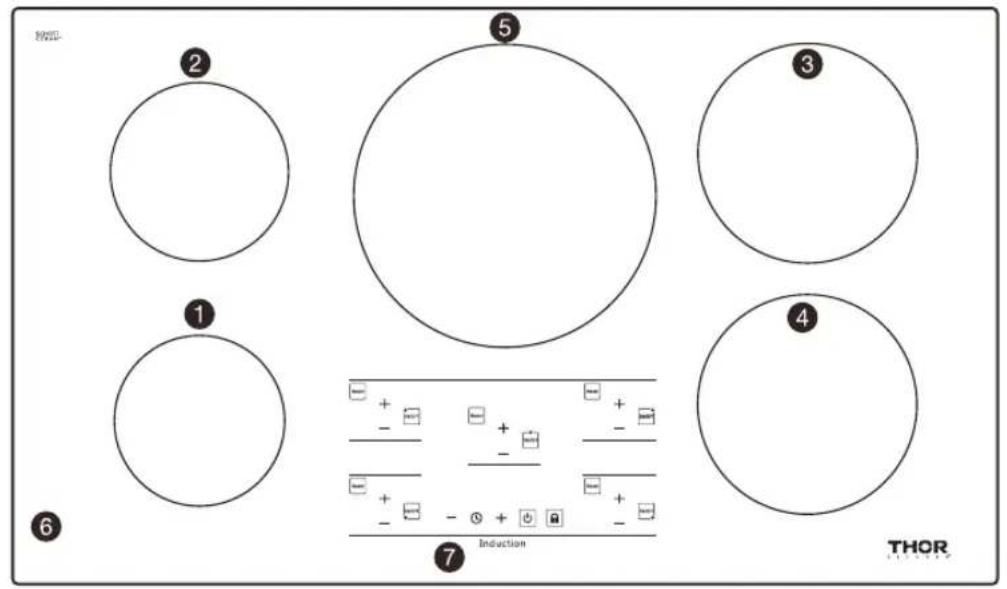
① Front left cooking zone
② Back left cooking zone
③ Back right cooking zone
4 Front right cooking zone
⑤ Middle cooking zone
6 Ceramic glass
⑦ Touch control panels
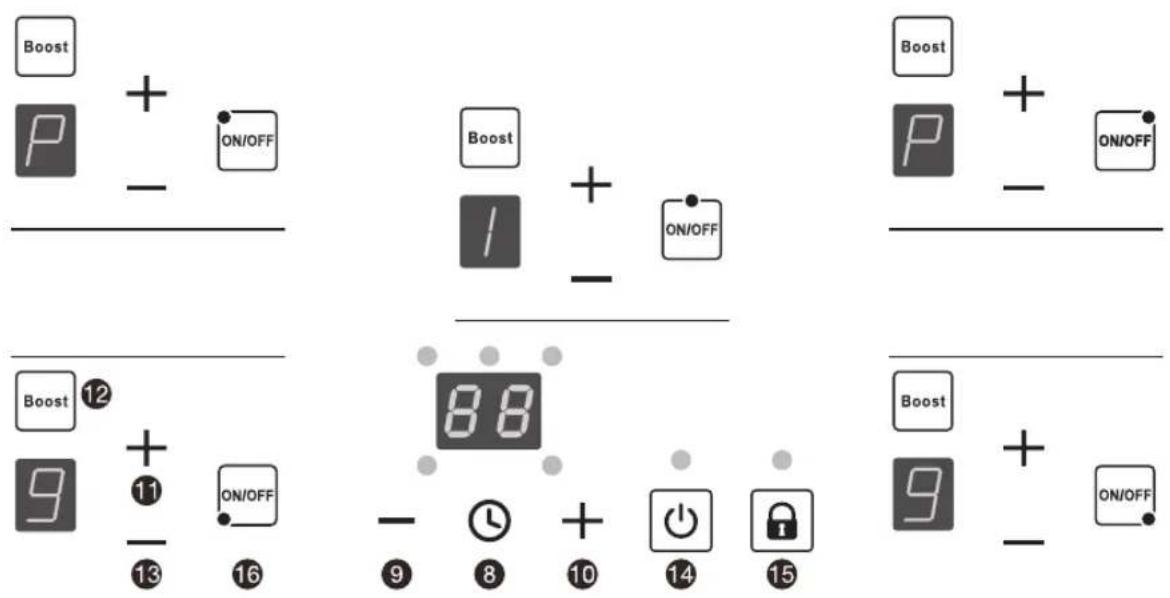
⑧ Timer control keys
9 Lower time key
⑩ Raise time key
⑪ Raise power key
12 Power boost
13 Lower power key or power off
14 Power button
⑮ Child safety lock
16 On/Off
| Model | Model:HIC3001 | Model: HIC3601 |
| Power Rating | 7400 Watts | 9600 Watts |
| Voltage | 240V / 60Hz | |
| Power Range | 100W - 3700W | |
| Level Selection | Select settings 1 through 9 | |
| Max Time | Set timer from 1 to 99 minutes | |
| Material | Glass Ceramic Top / Metal Body | |
| Unit Measurements | 30"Wx21"Dx2 5/32"H | 36"Wx21"Dx2 5/32"H |
| Installation Type | Drop-in | |
| Installs Over Built-in Oven | Yes | |
| Installation Dimensions (WxD) | 35 5/8"x19 3/8" | 29 5/8"x19 3/8" |
Heating Power of Each Cooking Zone
Model:HIC3001
| Rated power\Level | 1 | 2 | 3 | 4 | 5 | 6 | 7 | 8 | 9 | P |
| Left down | 100W | 200W | 300W | 600W | 1000W | 1200W | 1400W | 1600W | 1800W | 2500W |
| Left up | 100W | 200W | 300W | 600W | 1000W | 1200W | 1400W | 1600W | 1800W | 2500W |
| Right down | 100W | 200W | 300W | 600W | 800W | 1000W | 1100W | 1200W | 1400W | 1800W |
| Right up | 100W | 200W | 400W | 600W | 1000W | 1400W | 1600W | 2000W | 2400W | 3700W |
Model: HIC3601
| Rated power\Level | 1 | 2 | 3 | 4 | 5 | 6 | 7 | 8 | 9 | P |
| Left down | 100W | 200W | 300W | 600W | 800W | 1000W | 1200W | 1400W | 1600W | 2000W |
| Left up | 100W | 200W | 300W | 600W | 800W | 1000W | 1100W | 1200W | 1400W | 1800W |
| Middle | 100W | 200W | 400W | 600W | 1000W | 1400W | 1600W | 2000W | 2400W | 3700W |
| Right up | 100W | 200W | 300W | 600W | 1000W | 1200W | 1400W | 1600W | 1800W | 2500W |
| Right down | 100W | 200W | 300W | 600W | 1000W | 1200W | 1400W | 1600W | 1800W | 2500W |
Standby Mode
Upon inserting the power plug into an electric socket, the induction cooktop will make a sound once, and all the digital lights on the cooktop will blink once, indicating the unit enters into Standby Mode.
Readiness Mode
While on standby mode, press the main ⏻ key, the induction cooktop will make a "beep" sound once indicating that it is ready to use. If only the indicator light above the ⏻ key is lit up, the unit will automatically return to standby mode if any key not pressed within 30 seconds.

Switching on the cooktop and cooking zones
Place a compatible pot or pan on the cooking zone you wish to use.
With the cooktop being ON as mentioned above, press the desired cooking zone "ON/OFF" key. The display will blink and show a "0".
Press either the "+" key to start at 9, "-" key to start at 1, or "Boost" key, to select a cooking level. The cooking zone will automatically turn on readiness mode if a key is not pressed within 30 seconds.
Press the minus key (-) to lower the cooking level.
Press the plus key (+) to raise the cooking level.
Pressing the "Boost" key will show on the display as a "P", boosting the heating power to the highest level.
Boost is the highest power level, designed for quickly heating or boiling larger quantities. Boost will operate for a maximum of 10 minutes. After 10 minutes, it will automatically revert to power level 9.

natural_image
Simple line drawing of a cooking pot with four panes (no text or symbols)Suitable for induction cooktop

Lock
Activating the Child Safety Lock during cooktop use
Child Lock prevents activation of any sensor key, except for the ⏻ key and the 🔒 key.
A. Manual
Press the 🔒 key to activate the function. The unit will make a "beep" sound and the indicator light will turn on above the 🔒 key. The controls are now locked.
B. Automatic
The induction cooktop will automatically enter into Lock mode if any key is not pressed within 5 minutes. The unit will make a "beep" sound and the indicator light will turn on above the 🔒 key when the automatic Lock mode is activated.

Switch off the lock
While in Lock mode, press the 🔒 key to deactivate the function. The indicator light will turn off.
Pause/Resume
Use the "function to pause the entire hob for Max. 10 minutes while cooking, the bob will be automatically switched off if "is not touched again within 10 minutes.
Turn off
a. Press the desired cooking zone on "ON/OFF" key the desired element will shut off. The Unit is now on readiness mode.
b. Press the ⏻ key, it will make a "beep" sound once, and it will turn off. The unit is now on standby mode.
Note: Please do not pull the power plug until the cooling fan has stopped.

Timer
Setting the Timer to Automatic switch-off
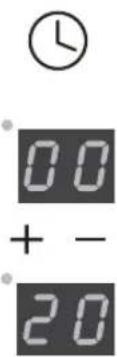
With the desired heating zone Powered ON, press the ⏻ key. The timer display will blink and show a "00", Press the "+" or "-" to increase or decrease to the desired time until the desired time appears in the display (Choose up to 99 minutes). Once the Timer is set, if keys haven't been pressed after 5 seconds, it will begin to countdown, the timer display will remain lit, the indicator for that particular burner will flash. When the time is completed, a "beeping" sound will go off indicating that the time is up, and selected heating zone shut off automatically.
If you want to set another burner to switch-off automatically, press ⏻ key to until the desired timer indicator blinks, repeat the same steps.
If you want to check the remaining time for another zone, press the Ⓛ until the indicator for the desired burner blinks.
If more than one switch-off time is programmed, the shortest time remaining will show in the display, the indicator for that particular burner will flash.
Cancelling the timer
Press the ⏻ until the indicator for the desired burner blinks, then press the "+" or "-" to set the timer to "00". The Timer display will blink for 5 seconds and then turn off, indicating that the timer of selected heating zone has been cancelled.

WARNING
Your cooktop has a residual heat indicator 11 for each Cooking Zone. This indicator will warn that this area has been used and is still giving off enough heat to cause burns.
Avoid touching the burner when this indicator is shown. Although the cooktop is OFF, the H will stay lit until the cooktop has cooled down.
Other Functions
Power Sharing
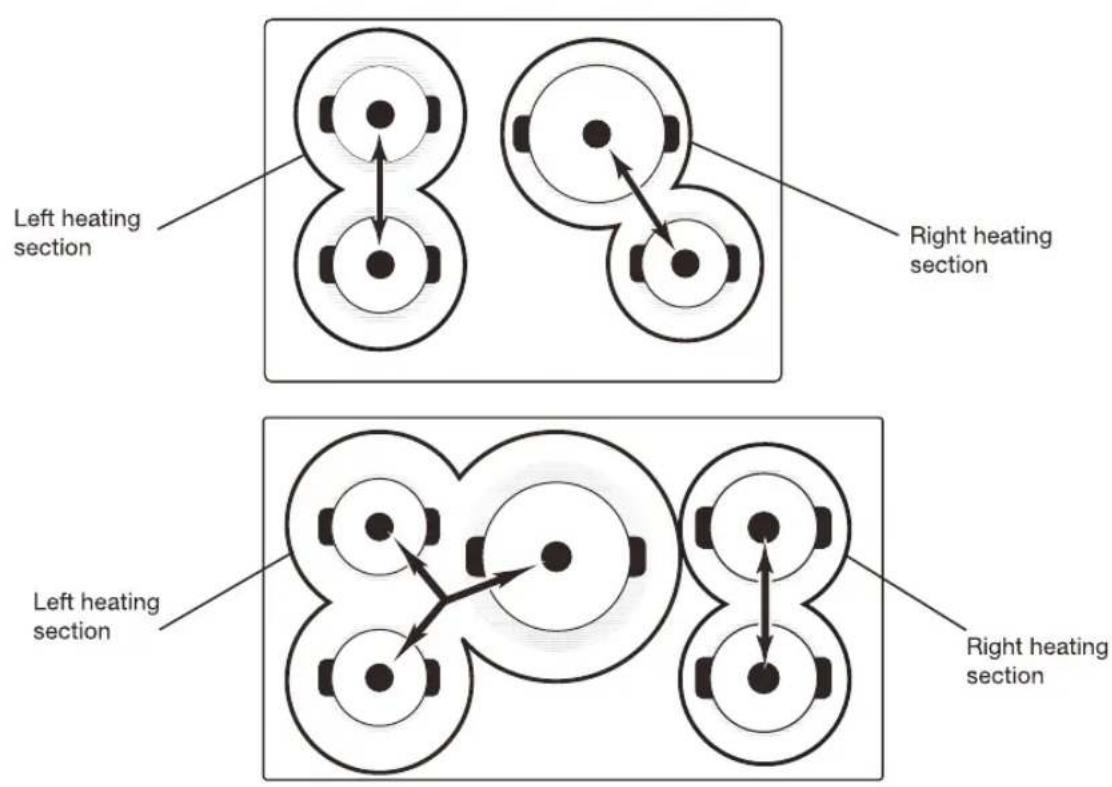
Your cooktop is equipped with four induction Cooking Zones within two heating sections. The right and left Cooking Zones are powered by two independent induction inverters, one inverter for each of the two heating sections. Two Cooking Zones in a heating section share the power of one inverter. This is called power sharing.
For example, if you are cooking on both right Cooking Zones, the last power level set will be maintained, while the first Cooking Zone may experience a slight reduction in the power level.
Power Sharing Tips
Remember to set the power level for the food item you wish to keep constant last. When using two Cooking Zones, you can maintain a constant power level for two pans on separate heating sections. Place one pan on one of the Cooking Zones of the left heating section and the other pan on one of the Cooking Zones of the right heating section.
Troubleshooting Error Codes
If the display shows an error code, please refer to this sheet for a potential solution.
| Error Code | Possible Cause | Solution |
| Cooktop does not work | · Cooktop controls are locked. | · Make sure Lock mode is turned off. |
| · Circuit breaker has tripped or fuse is blown. | · Reset the circuit breaker or replace the fuse. | |
| · Power outage. | · Check house lights to confirm power outage. | |
| · Installation wire not complete. | · Contact manufacturer. | |
| Cooktop does not heat up | · No cookware or improper cookware placement on the cooking zone. | · Make sure the cookware is centered on the cooking zone, and the cookware is also of correct type for induction cooking. See SELECTING COOKWARE page. |
| · Incorrect cookware size for selected cooking zone. | · The bottom of the cookware must be large enough to cover the cooking zone. | |
| · Cookware is not properly resting on the cooking zone. | · The bottom of the cookware must be flat and centered on the cooking zone. | |
| · Incorrect cooking zone detected | · Make sure the correct control is ON for the cooking zone being used. | |
| · No power to cooktop | · See "Cooktop does not work" issue above. | |
| Cooktop turns off while cooking | · Internal cooktop heat sensor has detected high temperatures inside the cooktop, activating automatic shut off. | · Make sure the cooktop vents are not blocked. |
| · Liquid or objects placed around the control panel. | · The cooktop control panel may read liquids or objects obstructing the panel, which can cause the cooktop to shut off. Clean up spills or remove objects, then restart the unit. | |
| Power boost does not work | · Power boost is being used on multiple cooking zones in addition to using total power of 7400W and 9600W. | · This is a normal occurrence. |
| The fans keep running for one minute after the unit has been switched off | · The electronics are cooling down | · This is a normal occurrence. |
If the display shows an error code, please refer to this sheet for a potential solution.
| Error Code | Possible Cause | Solution |
| "E" appears on the Power display | Electronics fault error message of specific cooking zone. | See E0, E1, E2, E3, E7, E8, E9, EE |
| "E0" appears in the Timer display | IGBT overheating. | Turn off unit until to allow IGBT to cool. Restart unit. |
| "E1" appears in the Timer display | No cookware found or improper placement of cookware on the cooking zone. | Make sure the cookware is centered on the cooking zone, and that it's also induction compatible. See SELECTING COOKWARE |
| "E2" appears in the Timer display | Supplied voltage to cooktop is too low. | If the voltage of the power supply to the cooktop is too low, it cannot operate properly and will show this error code.This may be caused by reduced voltage being supplied to the house circuit. If the connections are correct and supplied voltage returns to normal, the code will disappear. |
| "E3" appears in the Timer display | Supplied voltage to cooktop is too high. | If the voltage of the power supply to the cooktop is too high, it cannot operate properly and will show this error code.This may be caused by increased voltage being supplied to the house circuit. If the connections are correct and the supplied voltage returns to normal, the code will disappear. |
| "E7" appears in the Timer display | NTC1 break off | Turn OFF the cooktop; then shut of the power at the fuse or circuit breaker for about 30 seconds. Turn the power back on to the cooktop then press the POWER button to turn on the unit. If the error message is still being displayed, call for service. |
| "E8" appears in the Timer display | NTC1 short circuit | |
| "E9" appears in the Timer display | NTC2 break off | |
| "EE" appears in the Timer display | NTC2 short circuit | |
| "F" appears in the display | communication interrupt Call for service. |
LIMITED WARRANTY
Your appliance is covered by a one-year limited warranty. For one year from your original date of purchase, Thor Kitchen (hereafter “THOR”) will pay for all cost for repairing or replacing any parts of this appliance that prove to be defective in materials or workmanship when such appliance is installed, operated and maintained according to instructions attached to or furnished with the product, this warranty only applies in the USA and Canada. THOR KITCHEN authorizes no person to change or add to any obligations under this warranty. Obligations for service and parts under this warranty must be performed by Thor or an authorized service company. Product features or specifications as described or illustrated are subject to change without notice.
Exclusions This warranty will not cover the following:
- Serial number that have been removed, altered or cannot be readily determined;
- Product that has been transferred from its original owner to another party or outside the USA or Canada;
- Rust on the interior or exterior of the unit;
- Products purchased "as-is" are not covered by this warranty;
- Food loss or wine loss due to any refrigerator freezer or wine cooler failures;
- Products used in a commercial setting;
- Service calls which do not involve malfunction or defects in materials or workmanship, or in accordance with the provided Instructions;
- To correct the installation of your appliance or to instruct how to use the appliance;
- Expenses for making the appliance accessible for service, such as removal of trim, cupboards, shelves, etc., which are not part of the appliance when it is shipped from the factory;
- Service calls to repair or replace appliance light bulbs, air filters, other consumables, or knobs, handles, or other cosmetic Parts;
- Surcharges including, but not limited to, any after-hour, weekend, or holiday service calls, tolls, ferry trip charges, or mileage expense for service calls to remote areas, including Hawaii, Alaska and Canada;
- Damages to the finish of appliance or home incurred during installation, including but not limited to floors, cabinets, walls, etc.;
- Damages caused by: services performed by unauthorized service companies; use of parts other than genuine Thor parts or parts obtained from persons other than authorized service companies; or external causes such as abuse, misuse, inadequate power supply, accidents, fires, or acts of God;
- Do not let pans boil dry. This may cause permanent damage in the form of breakage, fusion, or marking that can affect the ceramic-glass cooktop. (This type of damage is not covered by your warranty);
- Due to hot cookware placed on cold cooktop glass;
- Sliding a pot or pan or the use of sharp objects across the ceramic surface.
DISCLAIMER OF IMPLIED WARRANTIES; LIMITATIONS OF REMEDIES
CUSTOMER'S SOLE AND EXCLUSIVE REMEDY UNDER THIS LIMITED WARRANTY SHALL BE PRODUCT REPAIR AS PROVIDED HEREIN. IMPLIED WARRANTIES, INCLUDING WARRANTIES OF MERCHANTABILITY OR FITNESS FOR A PARTICULAR PURPOSE, ARE LIMITED TO ONE YEAR OR THE SHORTEST PERIOD ALLOWED BY LAW. THOR KITCHEN SHALL NOT BE LIABLE FOR INCIDENTAL OR CONSEQUENTIAL DAMAGES. SOME STATES AND PROVINCES DO NOT ALLOW THE EXCLUSIONS OR LIMITATION OF INCIDENTAL OR CONSEQUENTIAL DAMAGES, OR LIMITATIONS ON THE DURATION OF IMPLIED WARRANTIES OF MERCHANTABILITY OR FITNESS, SO THESE EXCLUSIONS OR LIMITATIONS MAY NOT APPLY TO YOU. THIS WARRANTY GIVES YOU SPECIFIC LEGAL RIGHTS. AND YOU MAY ALSO HAVE OTHER RIGHTS WHICH VARY FROM STATE TO STATE OR PROVINCE TO PROVINCE.
- THOR KITCHEN®
- Induction Cooktop 30 inch & 36 inch
- User Manual
- &
- Installation Instructions
- Table of Contents
- READ ALL INSTRUCTIONS BEFORE USE
- IMPORTANT NOTICE: RADIO INTERFERENCE
- SAFETY PRECAUTIONS
- ELECTRICAL SAFETY
- WARNING
- CHILD SAFETY
- SAFETY DURING USE
- CAUTION
- SAFETY WHEN CLEANING
- COOK MEAT AND POULTRY THOROUGHLY
- HOW TO AVOID DAMAGE TO THE APPLIANCE
- DISPOSAL OF OLD APPLIANCES
- READ AND FOLLOW THIS SAFETY INFORMATION CAREFULLY
- SAVE THESE INSTRUCTIONS
- INDUCTION COOKING
- How Induction Cooking Works
- IMPORTANT
- Selecting Cookware
- Pots and Pans
- Suitability Test
- Avoiding Scratches
- Use Flat-Bottomed Cookware
- For Best Results
- Tips for Saving Energy
- Cookware Selection and Placement
- Correct
- Incorrect
- Cooking Noise
- Cleaning the Cooktop
- General Cleaning
- Removing Heavy Soil
- Problem Soils
- Cooktop ventilation
- Cooktop ventilation areas - DO NOT OBSTRUCT!
- Recommended space between cooktop base if installing above oven
- Preparing the Installation Location
- Before installing the cooktop
- Model and Serial Number Location
- Connecting to a 3 wires power supply cable electrical system
- Heating Power of Each Cooking Zone
- Standby Mode
- Readiness Mode
- Switching on the cooktop and cooking zones
- Lock
- Activating the Child Safety Lock during cooktop use
- Manual
- Automatic
- Switch off the lock
- Pause/Resume
- Turn off
- Timer
- Setting the Timer to Automatic switch-off
- Cancelling the timer
- Other Functions
- Power Sharing
- Power Sharing Tips
- Troubleshooting Error Codes
- LIMITED WARRANTY
- DISCLAIMER OF IMPLIED WARRANTIES; LIMITATIONS OF REMEDIES
Marke : Thor
Modell : HIC3601
Kategorie : Herd