
ELAX-2812BPTZ - Sicherheitskamera Monacor - Kostenlose Bedienungsanleitung
Finden Sie kostenlos die Bedienungsanleitung des Geräts ELAX-2812BPTZ Monacor als PDF.


| Produkttyp | Sicherheitskamera (PTZ) |
| Modell | ELAX-2812BPTZ |
| Marke | Monacor |
| Auflösung | Full HD (1920 x 1080 Pixel) |
| Schwenkbereich | 360° endlos |
| Neigebereich | 0° bis 90° |
| Zoom | 12-fach optischer Zoom |
| Nachtsicht | IR-LEDs, Reichweite bis zu 30 m |
| Bewegungserkennung | Ja, einstellbar |
| Videoausgang | HDMI (1080p), BNC (analog) |
| Stromversorgung | 12 V DC ±10 % |
| Leistungsaufnahme | Max. 15 W |
| Abmessungen (B x H x T) | 180 x 200 x 180 mm |
| Gewicht | 1,5 kg |
| Schutzart | IP66 (wetterfest) |
| Betriebstemperatur | -10 °C bis +50 °C |
| Montage | Wand- oder Deckenmontage (inkl. Halterung) |
| Reinigung | Gehäuse mit leicht feuchtem Tuch reinigen; keine aggressiven Reinigungsmittel verwenden |
| Sicherheit | Passwortschutz für Einstellungen; Überwachung nicht in privaten Räumen ohne Einverständnis |
| Ersatzteile | Netzteil und Halterung separat erhältlich |
| Reparierbarkeit | Reparatur nur durch autorisiertes Fachpersonal |
Häufig gestellte Fragen - ELAX-2812BPTZ Monacor
Benutzerfragen zu ELAX-2812BPTZ Monacor
0 Frage zu diesem Gerät. Beantworten Sie die, die Sie kennen, oder stellen Sie Ihre eigene.
Eine neue Frage zu diesem Gerät stellen
Laden Sie die Anleitung für Ihr Sicherheitskamera kostenlos im PDF-Format! Finden Sie Ihr Handbuch ELAX-2812BPTZ - Monacor und nehmen Sie Ihr elektronisches Gerät wieder in die Hand. Auf dieser Seite sind alle Dokumente veröffentlicht, die für die Verwendung Ihres Geräts notwendig sind. ELAX-2812BPTZ von der Marke Monacor.
BEDIENUNGSANLEITUNG ELAX-2812BPTZ Monacor
Mini PTZ Camera ELAX-2812BPTZ
Quick installation guide V1.0.0
PREFACE
Summary
Document describes unpacking inspection device structures installation and quick configuration tool in details
Signal instruction
These symbols may appear with meanings as following
| SIGNAL | INSTRUCTION |
| High potential damage. If it impossible, it will form users with high damages. | |
| Intermediate or low potential damage. If intermediate, it will form users with low damages. | |
| Potential damage. If neglected, it may issue damages on device, data lost, weather performance, or uncomfortable results. | |
| Sensitive devices for tools. | |
| High solve. | |
| High level radiation. | |
| Helps for solving problems or saving your time. | |
| Extra information for the systems. |
Important Safety Notices
The following contents are specification for using the devices correctly please read these notices and warnings carefully and obey while using it
Attention
1.1 Power
- All installation and operation here should conform to your local electrical safety codes
*Only use a regulated 12 V power supply unit with a minimum rating of 2 A.
- Please protect power cable being trampled or squeezed especially in the socket, and exit Junction
1.2 Environment
- Avoid focusing on highlight (such as the sun or lights), otherwise it may cause over explosion phenomenon (this is not device's problem) or may damage camera's CMOS.
- Please transport, use and store the camera under allowable temperate and humidity range. Do not put the device under wet, dusly extremely hot or cold, strong electromagnetic radiation or unstable lighting conditions etc.
* Prevent water or other liquid falling into the camera.
- Please keep the ventilation around the device.
• No heavy stress, violent vibration or water splash are allowed during the transportation and storage.
- When transporting the camera, it should use company packing or use same quality material packing.
- Thunder-proof device is recommended to be adopted for preventing thunder better.
1.3 Operation and maintenance
Do not dismantle the camera since no components inside which can be repaired by users. Do not touch the CMOS optic component directly you can use the blower to clean the dust on the lens surface if necessary, please gently clean the dust with dry cloth which is slightly wet with alcohol.
Please use soft cloth to clean the device. For heavy dirt, please put little detergent on thecloth to clean and dry. Do not use volatile solvent, such as Alcohol, Benzene or Diluent-sor irritant and abrasiveness cleanser to clean the device. Otherwise, it will damage the device or weaken camera working performance.
The material of front cover is optic component please do not touch or clean the surface directly. For cleaning, please use professional optical cleaning method Inadaptable cleaning method (e.g. cleaning directly with cloth) may result in a harmful effect on theinfrared function of the camera.
Warning:
- Be sure to use all the accessories recommended by manufacturer and the installation and repairs should be conducted by professionals.
Please make sure the CMOS component is out of the radiation of laser beam devices. Otherwise it may result in damage on the component.
Special explanation
- Because our company continuously adopts new technologies product parameters change without prior notice. Some function of products may have slight difference after the updates.
- For receiving the latest procedures and additional instruction document please contact the company's customer service department.
- If there are any problems while using the camera, please feel free to contact the supplier or the company's customer service department.
- Because of the real environment and other unstable factors, some data may be different with instruction guide. If there are any questions and disputes please regard the
• Company's final explanation as the criterion. - Please follow instruction guide, we are not liable for any problems caused byman-made damage
This manual is for reference only. slight difference may be found in users interface
1 Checking Box
1.1 Checking Steps
When user received the bullet PTZ Camera, please check whether it has obviously damage on the appearance of equipment Packing material can stand accidental Crash on transport. Please open the package and check all the components are included. Please reference the following form.
1.2 Accessories
Be sure to use all the accessories recommended by manufacturer
| Details NO: | |
| Camera 1 PCS | |
| Manual | 1 PCS |
Packing details
2 Equipment connect
2.1 Cable interface
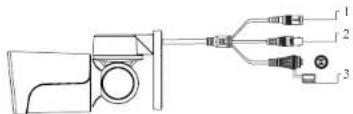
You can refer to the following figure for multiple function combination cable information. See Figure 2-1. there might be some differences among different serial products
natural_image
Pure electrical circuit lines without any symbols2-1 Cable Draft
| NO Connector Function | ||
| 1 | Power | Power connector input DC 12V Power |
| 2 | Video | Video connector |
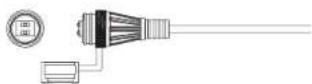
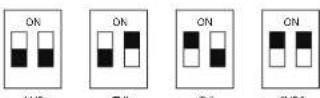
| 3 | DIP Switch | Setting mode with video |
2-2 Cable function explain
4IN1 Bullet PTZ Camera support with UTC (Video coaxial control), support with 4 video mode output (AHD, TVI, CVI, CVBS), setting via DIP Switch
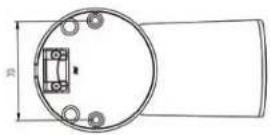
2.2 Structure size
(Unit: mm)
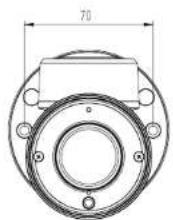
2-3 Dimension
2-4 Dimension
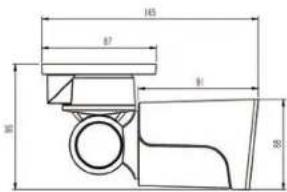
text_image
145 87 9 30 302-5 Dimension
3 Equipment Install
The wall wight for install the camera, must be can stand 3 times as much as the camera.
- Pls Choose cleanly, smooth wall. Drilled hole according with the bracket hole. Putting with the bulged tube Then Fixed the camera under the ceiling.
- Pls Choose cleanly ,smooth wall .Drilled hole according with the bracket hole . Putting with the bulged tube
Wall mounted
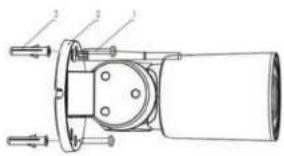
text_image
Technical diagram of a mechanical component with numbered parts and directional arrows indicating flow or assembly.3-1 Draft dimension
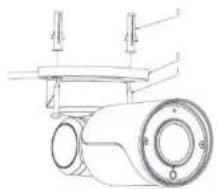
natural_image
Technical line drawing of a mechanical assembly with no visible text or symbols3-2 Dimension
4 Bracket change
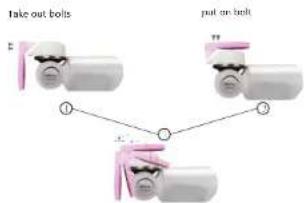
The fault of the bracket is walled mounted. For ceiling mounted, if need, change it by uself. As picture, take out 2 bolts, motion the bracket with 180
text_image
Take out bolts put an bolt ① ②4-1 Equipment change draft
5 Camera setting
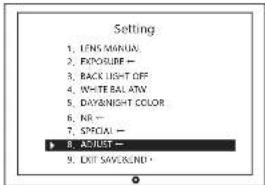
PTZ control is made via the PTZ menu of the recorder connected (control protocol "Coax").
To show the camera menu, call up the preset 95.
| NO function command check | |||
| 1 | Menu | call 25 | |
| 2 | R Mode setting | set 70 call N | N: 1 Auto 2 Open 3 close |
| 3 | R security setting | set 71 call N | Range of settings 1-10 10 - highest security and |
| 4 | Reset/Restart | call 96 or call 74 | |
| 5 | History default | call 92 or call 61 | |
text_image
Setting 1. LENS MANUAL 2. EXPOBURE — 3. BACK LIGHT OFF 4. WHITE BALL ATW 5. DAY&NIGHT COLOR 6. NR — 7. SPECIAL — 8. ADJUST — 9. EXIT SAVES/END5-1 Main menu
text_image
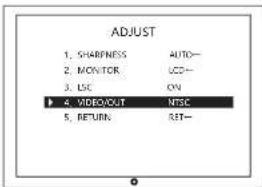
ADJUST 1. SHARPNESS AUTO— 2. MONITOR UCD— 3. LSC ON 4. VIDEO/OUT NTSC 5. RETURN RET—5-2 Submenu ADJUST
text_image
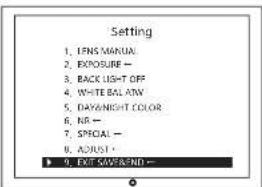
Setting 1. IFNS MANUAL 2. EXPOSURE - 3. BACK LIGHT OFF 4. WHITE BAL AW 5. DAY/WNIGHT COLOR 6. NR - 7. SPECIAL - 8. ADJUST - 9. EXE-SAVE-END -When all settings have been made, use EXIT to exit the menu.
6 Appendix
Toxic or Hazardous Materials or Elements
| Component Name | Toxic or Hazardous Materials or Elements | |||||
| Pb | Hg | Cd | Cr Vt | PBB | PBDE | |
| Circuit board assembly | ○ | ○ | ○ | ○ | ○ | ○ |
| Housing | ○ | ○ | ○ | ○ | ○ | ○ |
| Connector Cable | ○ | ○ | ○ | ○ | ○ | ○ |
| Packaging components | ○ | ○ | ○ | ○ | ○ | ○ |
| Accessories | ○ | ○ | ○ | ○ | ○ | ○ |
o indicate that the concentration of the hazardous substance in all homogeneous materials in the parts is below the relevant threshold of the SI/T11363-2006 standard.
x. indicate that the concentration of the hazardous substance of at least one of all homogeneous materials in the parts is over the relevant threshold of the
SI/T11363-2006 standard. In the usage period, if users use this product correctly, these materials will not be harmful to users and their possession. Users are not allowed to deal with these materials or components. Please recycle these materials to corresponding departments ruled by laws.