Dis - Uhr Obaku - Kostenlose Bedienungsanleitung
Finden Sie kostenlos die Bedienungsanleitung des Geräts Dis Obaku als PDF.


Benutzerfragen zu Dis Obaku
0 Frage zu diesem Gerät. Beantworten Sie die, die Sie kennen, oder stellen Sie Ihre eigene.
Eine neue Frage zu diesem Gerät stellen
Laden Sie die Anleitung für Ihr Uhr kostenlos im PDF-Format! Finden Sie Ihr Handbuch Dis - Obaku und nehmen Sie Ihr elektronisches Gerät wieder in die Hand. Auf dieser Seite sind alle Dokumente veröffentlicht, die für die Verwendung Ihres Geräts notwendig sind. Dis von der Marke Obaku.
BEDIENUNGSANLEITUNG Dis Obaku
HOW TO USE THE CLASP
HOW TO USE THE CLASP
OPEN
- Open the security clasp
- Pull the hook over the pin
CLOSE
- Close clasp (it should snap)
- Close the security clasp
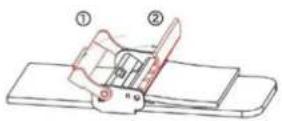
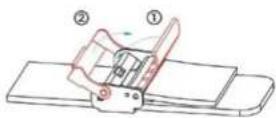
ADJUSTABLE MESH BRACELET
Obaku's soft mesh bracelets are easily adjustable. Simply insert a small screwdriver or similar tool into the clasp as shown in the picture. Lift up the clasp and move it to the desired position. Make sure the clasp is set in one of the indentations on the back of the bracelet. Snap the clasp securely into place. Link bracelets can be adjusted anywhere watches are serviced.
STANDARD INSTRUCTIONS - SET DATE AND TIME
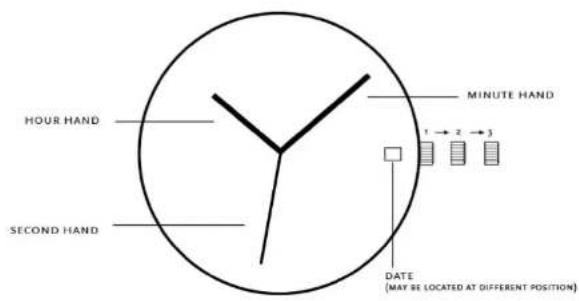
text_image
HOUR HAND SECOND HAND MINUTE HAND 1 → 2 → 3 DATE (MAY BE LOCATED AT DIFFERENT POSITION)SET THE DATE AND TIME
- Pull the crown out to the 2nd position.
- Turn the crown counter-clockwise to set the date*.
- Pull the crown out to the 3rd position. Turn the crown to set hour and minute hands.
- When the crown is pushed back to the 1st position, the second hand begins to run.
*If the date is set between the hours of 9 p.m. and 1 a.m., the date may not change the following day.
MULTIFUNCTION DAY/DATE
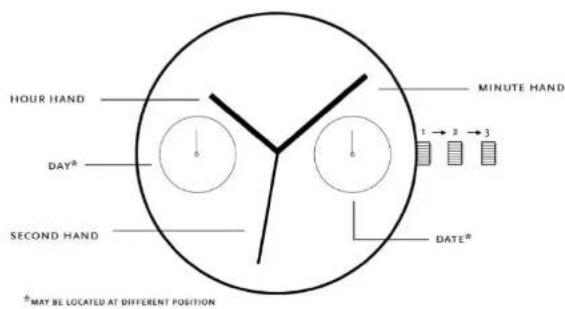
text_image
HOUR HAND DAY* SECOND HAND MINUTE HAND 1 → 2 → 3 DATE* †MAY BE LOCATED AT DIFFERENT POSITION1. SET THE DAY
Pull the crown to the 3rd position. Turn the hands in a clockwise direction to set the day. The hands should be turned clockwise, advancing the hour hand by 24 hours per day.
NOTE: Do not set the day by turning the crown in a counterclockwise direction, as there is a possibility that the date will not change over if set in this way.
*The day changes somewhere between 0:00 a.m. and 5:30 a.m. or a little later.
2. SET THE TIME
To ensure the time is set accurately, first turn the minute hand 5 minutes ahead of desired time and then turn back (counterclockwise) to the desired time. When the crown is pushed back to the 1st position, the second hand begins to run.
NOTE: Make sure you have correctly set the a.m. / p.m. before setting the time. When the day changes over, it is a.m.
3. SET THE DATE (BY QUICK OPERATION)
Pull the crown to the 2nd position. Turn the crown counterclockwise.
Note: Do not set the date between the hours of 9 p.m. to 00.30 a.m. as the date may not change correctly the next day.
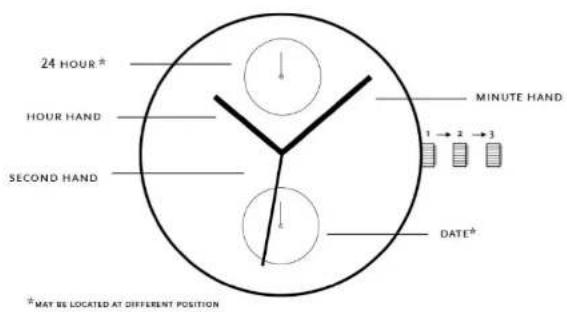
MULTIFUNCTION DATE/24 HOUR
text_image
24 HOUR* HOUR HAND SECOND HAND MINUTE HAND 1 → 2 → 3 DATE* * MAY BE LOCATED AT DIFFERENT POSITION1. SET THE TIME
Pull the crown to the 3rd position. Turn the hands in a clockwise direction to set the time. To ensure the time is set accurately, first turn the minute hand 5 minutes ahead of desired time and then turn back (counterclockwise) to the desired time.
NOTE: Make sure you have correctly set a.m. / p.m. before setting the time. When the day changes over, it is a.m. (day changes over between 0:00 a.m. and 5:30 a.m. or a little later). Check a.m. / p.m. by the 24 hour hand.
2. SET THE DATE (BY QUICK OPERATION)
Pull the crown to the 2nd position. Turn the crown counterclockwise.
Note: Do not set the date between the hours of 9 p.m. to 00.30 a.m. as the date may not change correctly the next day.
CHRONOGRAPH
text_image
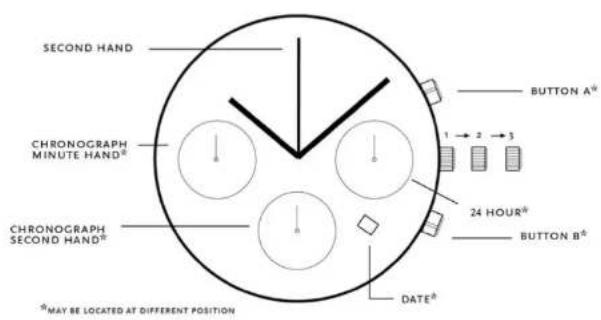
SECOND HAND CHRONOGRAPH MINUTE HAND* CHRONOGRAPH SECOND HAND* * MAY BE LOCATED AT DIFFERENT POSITION BUTTON A* 1 → 2 → 3 24 HOUR* BUTTON B* DATE* *SET THE DATE AND TIME
- Pull the crown out to the 2nd position.
- Turn the crown counter-clockwise to set the date*.
- Pull the crown out to the 3rd position. Turn the crown to set the hour and minute hands.
- When the crown is pushed back to the 1st position, the second hand begins to run. *If the date is set between the hours of 9 p.m. and 1 a.m., the date may not change the following day.
USING THE CHRONOGRAPH
This chronograph is able to measure and display time in 1/1 second united up to a maximum of 59 minutes and 59 seconds.
- Press button A to start or stop the watch.
- Press button B to reset the stopwatch in its original position.
RESETTING THE CHRONOGRAPH (ALSO AFTER REPLACING BATTERY)
When the chronograph second hand does not return to zero position after it has been reset and when the battery has been replaced.
- Pull the crown out to the 3rd position.
- Press button A to set the chronograph second hand to the zero position.
The chronograph hand can be advanced rapidly by continuously pressing button A.
- Return the crown to position 1.
SOLAR
text_image
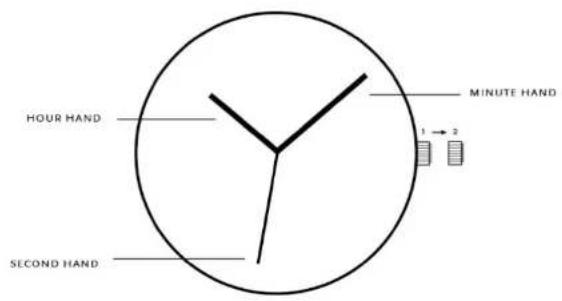
HOUR HAND SECOND HAND MINUTE HAND 1 → 2HOW TO SET THE TIME
- Pull the crown out to the 2nd position when the second hand is at the 12'oclock position.
- Turn the crown to set the hour and the minute hands
- when setting the minute hand, advance it to 4 or 5 minutes ahead of the desired time and then turn it back to the exact time.
- Push the crown back to the 1st position.
AUTOMATIC
text_image
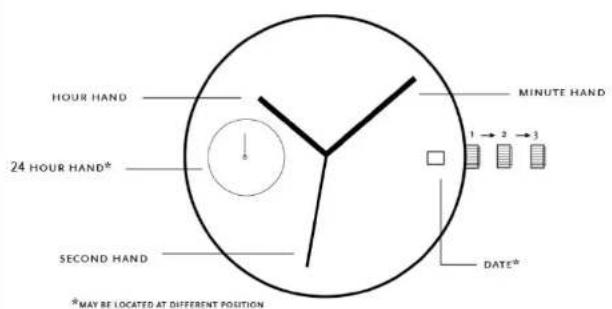
HOUR HAND 24 HOUR HAND* SECOND HAND MINUTE HAND 1 → 2 → 3 DATE* * MAY BE LOCATED AT DIFFERENT POSITIONWINDING THE MAINSPRING
Automatic winding watch can also be hand winded by turning the crown clockwise in Normal position. Wind several times clockwise. It will start to move naturally.
SETTING THE TIME
- Pull the crown out to the 2nd Click Position.
- Turn the crown to set hour and minute hands.
- After the time has been set, push the crown back to the Normal position. *24Hour hand moves linked with the center Hour and Minute hand.
SETTING THE DATE
- Pull the crown out to the 1st Click Position.
- Turn the crown counter-clockwise to set the date.
* If the date is set between the hours of around 9:00 PM and 1:00 AM, the date may not change on the following day.
- After the date has been set, push the crown back to the normal position.
DUAL TIME
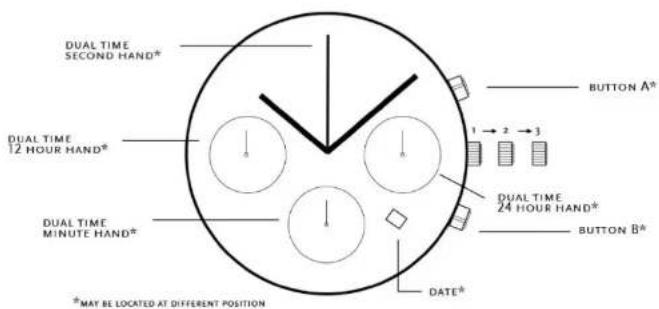
text_image
DUAL TIME SECOND HAND* DUAL TIME 12 HOUR HAND* DUAL TIME MINUTE HAND* * MAY BE LOCATED AT DIFFERENT POSITION BUTTON A* 1 → 2 → 3 DUAL TIME 24 HOUR HAND* BUTTON B* DATE*ADJUSTING DUAL TIME HANDS POSITION
- After setting or changing the battery, before setting the time, check if the dual time hour hand and dual time minute hand are at the "o" (12 o'clock) position. * If either the dual time hour hand or the dual time minute hand is not at the "o" position, reset it/them following the procedure shown below:
-
Pull out the crown to second click
-
Keep the buttons A & B pressed at the same time for more than 2 seconds, then release the buttons.
* Dual time minute hand moves and returns to where it was
- Press button A or B to reset the dual time hands to "o" position.
- Button A: dual time hour hand and dual time minute hand move counterclockwise
- Button B: dual time hour hand and dual time minute hand move clockwise
- The dual time hour hand moves correspondingly with the dual time minute hand
- The dual time hour hand and dual time minute hand move quickly if the respective buttons are kept pressed.
- Push the crown back in the normal position.
LOCAL TIME SETTING
-
Pull out the crown to second click when the second hand is at the 12 o'clock position.
-
Turn the crown to set the hour and minute hands. (make sure 24 hour hand is set correctly).
-
Push the crown back in the normal position in accordance with a time signal.
• The 24 hour hand moves correspondingly with the hour hand.
- The moment the date changes is midnight. When setting the hour hand, make sure that AM/PM is correctly set by using the 24 hour hand as an AM/PM indicator.
DUAL TIME SETTING
* When moving to a country or area in a different time zone, adjust the dual time hour hand to that countr/area.
Quick set the dual time:
- Crown at normal position.
-
Adjust the time by pressing the button A or B.
-
Button A: -1 hour / push
- Button B: +1 hour / push
Precise adjustmen of the dual time:
-
Pull out the crown to second click when the second hand is at the 12 o'clock position.
-
Adjust the time by pressing the button A or B.
-
Button A: -1 minute / push
-
Button B: +1 minute / push
-
Push the crown back in the normal position in accordance with a time signal.
DATE SETTINGS
* Before setting the date, be sure to set the time.
- Pull out the crown to the first click.
- Turn the crown clockwise until the desired date appears.
- Push the crown back in the normal position.
* Do not set the date during any time between 9:00 P.M. and 1:00 A.M. Otherwise, the date may not change properly. If it is necessary to set the date during that time period, first change the time to any time outside it, set the date and then reset the correct time.