F-270 - Nähmaschine Silver Reed - Kostenlose Bedienungsanleitung
Finden Sie kostenlos die Bedienungsanleitung des Geräts F-270 Silver Reed als PDF.


Benutzerfragen zu F-270 Silver Reed
0 Frage zu diesem Gerät. Beantworten Sie die, die Sie kennen, oder stellen Sie Ihre eigene.
Eine neue Frage zu diesem Gerät stellen
Laden Sie die Anleitung für Ihr Nähmaschine kostenlos im PDF-Format! Finden Sie Ihr Handbuch F-270 - Silver Reed und nehmen Sie Ihr elektronisches Gerät wieder in die Hand. Auf dieser Seite sind alle Dokumente veröffentlicht, die für die Verwendung Ihres Geräts notwendig sind. F-270 von der Marke Silver Reed.
BEDIENUNGSANLEITUNG F-270 Silver Reed
OPERATION MANUAL
MODEL F-370/270
PREFACE
Our congratulations to you on the purchase of your new knitting machine — Model 370/270.
This Operation Manual has been prepared to assist you in using and operating your knitting machine. It is composed of four parts as prescribed below.
PART 1 - Using 370/270KL ...... Pages 1-20
Part one contains the easy-to-follow basic information required for yarn preparation before knitting, setting up of the machine, cast on and stockinet knitting with the Main Carriage.
The Lace Carriage and its use is covered in PART 3.
If you are anxious to knit a garment in stockinet knitting while using the Main Carriage, refer to the Knitting Manual. Should you wish to use the Lace Carriage instead, refer to PART 3.
PART 2 — Using 370/270K Carriage....Pages 21–42
Part two gives necessary information to knit a wide range of stitch patterns in mono/polycolours using the Punch Card. Over ninety stitch pattern samples have been introduced in the Pattern Book.
PART 3 - Using 370/270L Carriage....Pages 43-60
Part three contains the easy-to-follow basic information required for the Lace Carriage covering setting up of the Lace Carriage, cast on, stockinet knitting and how to knit lace patterns using the Punch Card.
PART 4 - Using 370/270KL ...... Pages 61-71
Part four guides you to WHAT TO DO, HOW TO DO and MAINTENANCE of the machine as a lifetime companion of yours.
If you are in need of further information or knitting accessories for your machine, please do not hesitate to call on your nearest knitting shop or service centre.
Enjoy knitting!
ERRATA
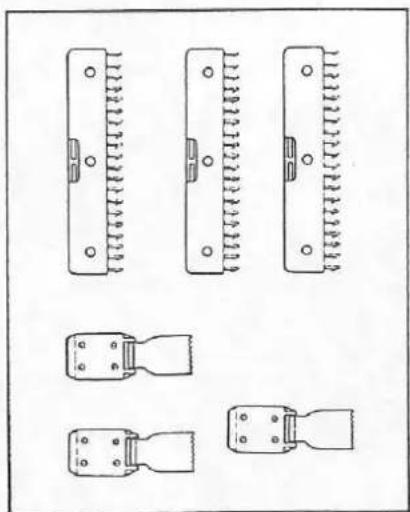
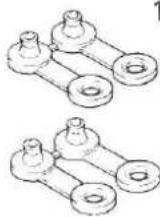
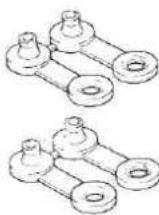
The "comb weights" and the "claw weights" written in the instruction book have been changed to "wide claw weights" as shown below. The wide claw weights can be used in the same way as the previous weights.
comb weights claw weights
wide claw weights
natural_image
Illustration of six different electronic component packages with pin layouts and mounting holes (no text or symbols)

text_image
Hand-drawn diagram showing three rectangular blocks with wavy lines and question marks, likely for counting or puzzle solving.CONTENTS
PAGE MACHINE AND ACCESSORIES....1
PREPARATION OF YARNS....3
SETTING UP THE KNITTER AND KNITTING 4
PATTERN KNITTING WITH MAIN CARRIAGE....21
Fair Isle (Knit-In). 25
Slip stitch pattern 27
Slip stitch pattern in colour. 27
Tuck stitch pattern 29
Tuck stitch pattern in colours....30
Tuck lace....31
Punch lace 32
Weaving 33
Plating 35
Single motif....37
LACE CARRIAGE 43
PATTERN KNITTING WITH LACE CARRIAGE....54
Plain lace 56
Fashion lace....57
Single motif lace 59
HELPFUL HINTS....61
MAINTENACE 71
REPACKING THE KNITTER 72
INDEX....73
MACHINE AND ACCESSORIES
text_image
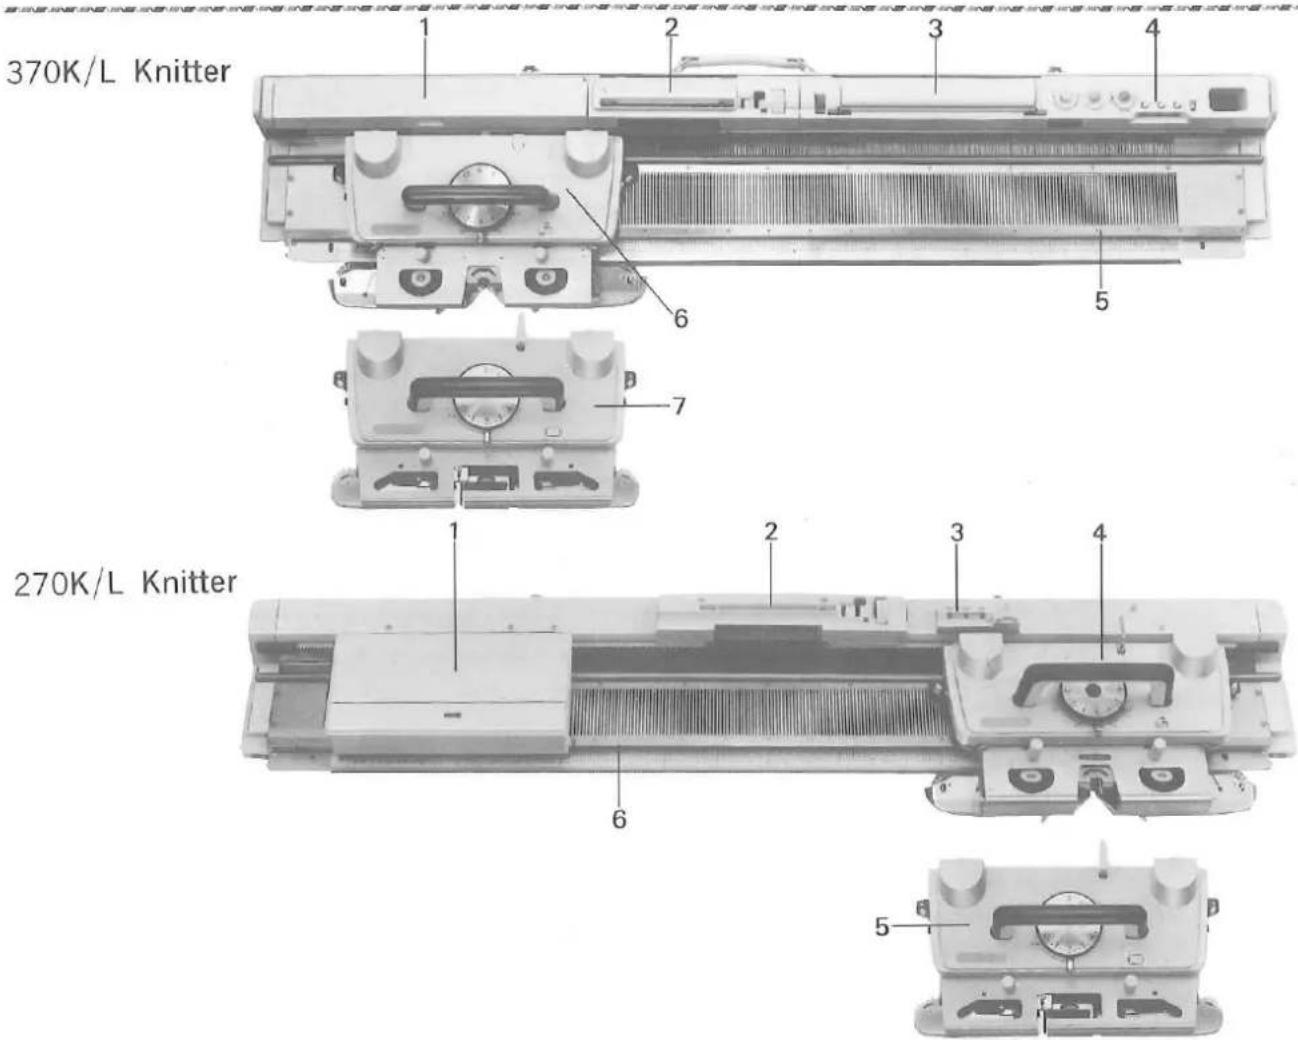
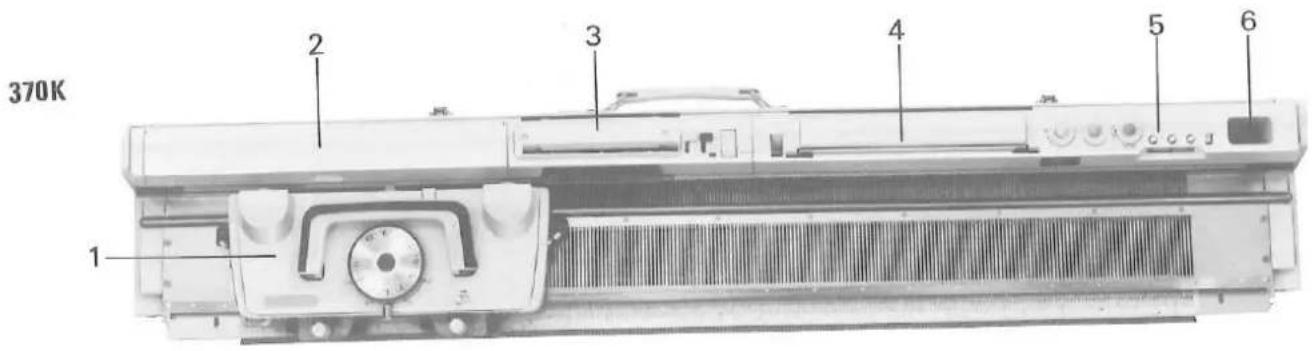
370K/L Knitter 1 2 3 4 5 6 7 270K/L Knitter 1 2 3 4 6 5370K/L
1 Built-in Accessory Box
2 Pattern Card Panel
3 Knit Contour (Radar)
4 Row Counter
5 Needle Bed
6 Main Carriage
7 Lace Carriage
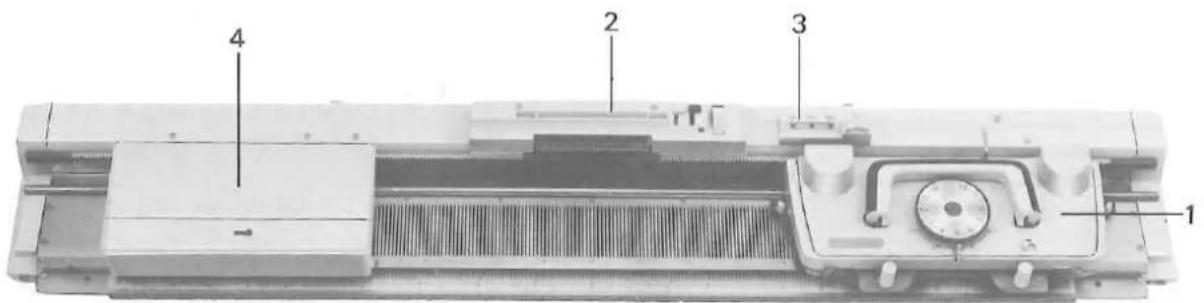
270K/L
1 Accessory Box
2 Pattern Card Panel
3 Row Counter
4 Main Carriage
5 Lace Carriage
6 Needle Bed
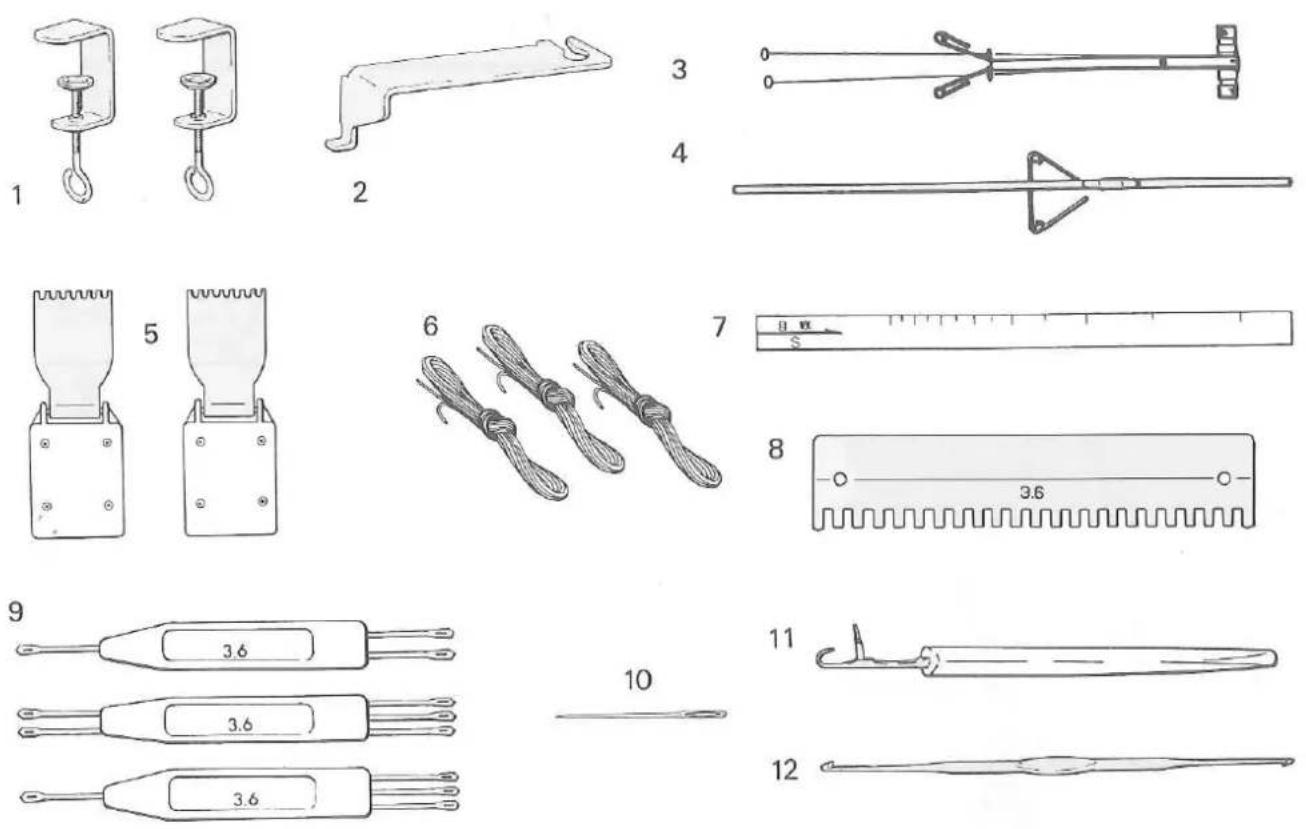
ACCESSORIES - 370/270K
1 Clamp (2) 07321201
2 Carriage Fastener
370KL 07080617
270KL 07241201
3 Auto Tension 07011604
4 Yarn Rod 07021751
5 Claw Weight (2) 07422009
6 Ravel Cord (3) 07335268
7 Gauge Scale 08255267
8 Needle Pusher 07295264
9 Transfer Tool
1 x 2 07355266
1 x 3 07365265
2×3 07375264
10 Tapestry Needle 07402001
11 Tappet 07315260
12 Crochet Hook 07440621
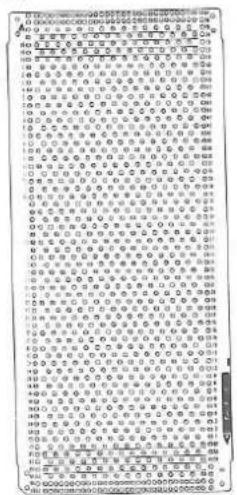
13 Punch Card (20) 07555261
14 Card Snap (4) 07195266
15 Yarn Separator (4) 07725260
16 Point Cam M (4)
left 07645260
right 07635261
17 New Magic Cam (2)
left 07171754
right 07161755
18 Point Cam E (2)
left 07665268
right 07655269
19 Card Guide*
17581000
20 Spare Needle (3)
01135268
21 Oil
07922008
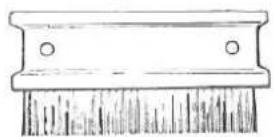
22 Cleaning Brush
07342009
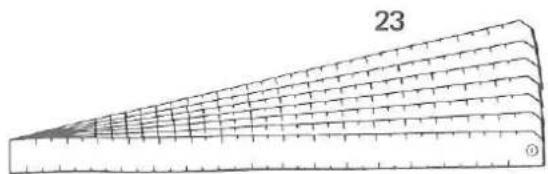
23 Scale Set**
Stitch Scale (8) 08145260
Centre Scale (6) 08242117
24 Pattern Paper (19)** 07740509
* exclusive for 270K/L
** exclusive for 370K/L
(To order, specify part name with part number)
13
text_image
Scanned page of dense Chinese text with a grid layout, likely from a historical or literary manuscript.14

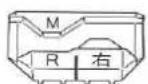
16
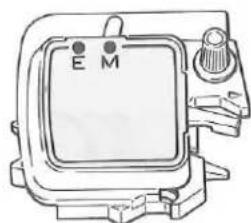
natural_image
Line drawing of a mechanical device with labeled points E and M (no text or symbols beyond labels)17
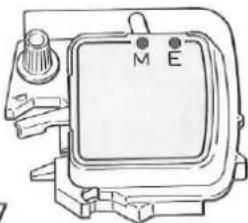
natural_image
Line drawing of a mechanical device with labeled ports M and E (no text or symbols beyond labels)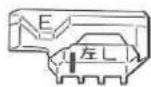
3
21
19
20
natural_image
Three identical line drawings of a symmetrical abstract shape with sharp ends, no text or symbols present.
natural_image
Diagram of a conical structure with numbered label '23' and a circled number (①) at the base, showing layered grid patterns without any text or symbols.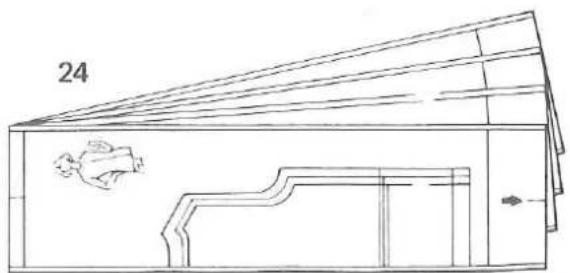
natural_image
Technical line drawing of a mechanical component with a small inset image (no text or symbols)PREPARATION OF YARNS
This machine is applicable to the range of yarns, from cotton thread to medium size yarn. But for practice, it is best to use light yarn (see page 9).
Correct preparation of yarns before you start knitting is very important. This extra care will make knitting more enjoyable, easier, and the quality of your garment much better.
natural_image
Industrial machine with a coiled cable and handle, no visible text or symbols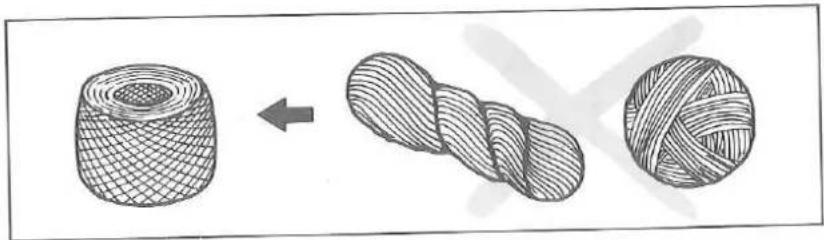
natural_image
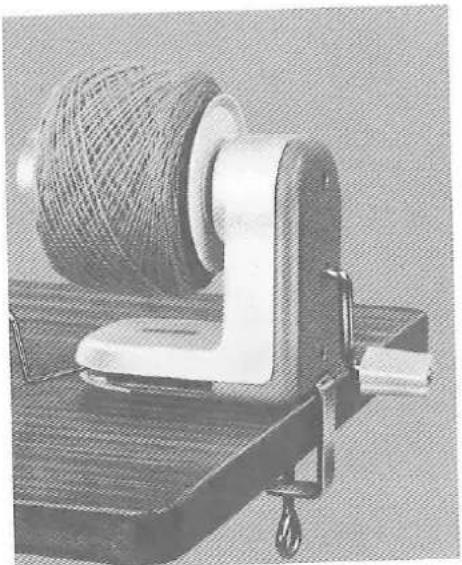
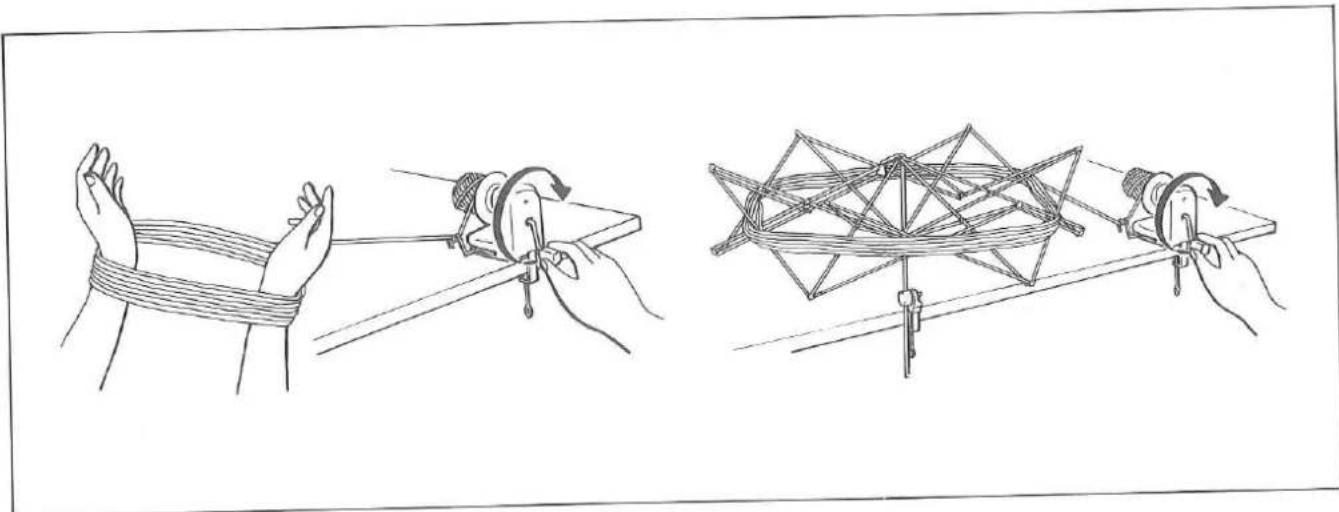
Diagram showing three types of textile fibers: a wire coil, a twisted rope, and a ball (no text or symbols)It is not possible to knit from a hank of yarn or hand wound ball, as for machine knitting it is essential for the yarn to feed into the machine freely. Place the hank onto your arms or a Skein Holder and wind into a ball using the Yarn Ball Winder.
The Skein Holder and Yarn Ball Winder are useful optional accessories.
natural_image
Illustration of three hand techniques for tying a string knot, showing rope binding and structural arrangement (no text or symbols)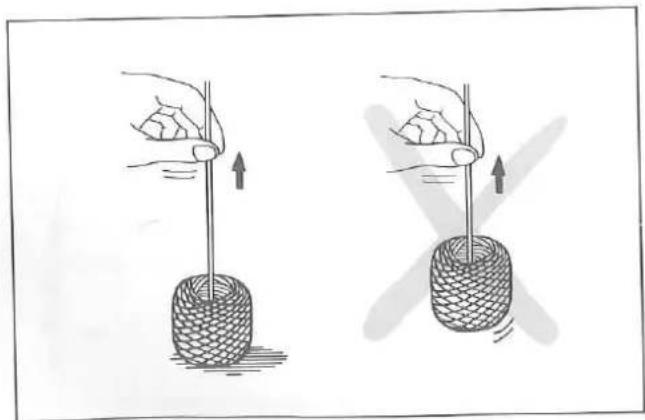
natural_image
Illustration of two hands holding a woven rope with arrows indicating direction (no text or symbols)When yarn is rewound, ensure that the yarn end comes out freely without lifting the ball from the table.
We recommend you wax the yarn during winding by simply letting the yarn run over an ordinary white candle or knitting wax.
SETTING UP THE KNITTER
natural_image
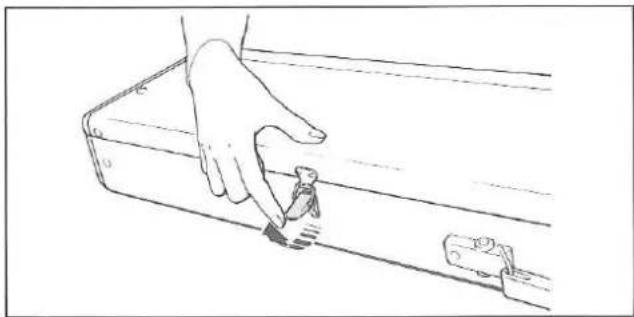
Line drawing of a hand pressing down on a briefcase with a small object nearby (no text or symbols)Place the Knitter on a table with the Carrying Handle away from you.
Unfasten the latches.
natural_image
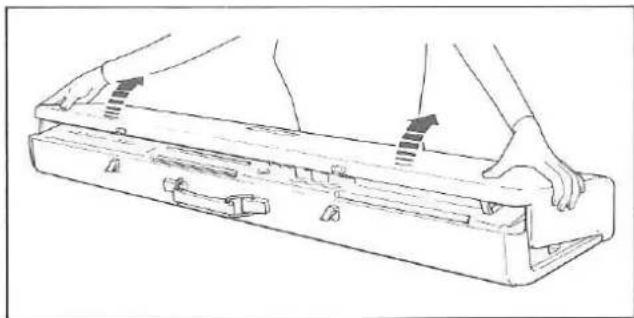
Line drawing of a briefcase with hands holding it, showing internal components and arrows indicating movement (no text or symbols)Lift the Top Cover slightly, pull it towards you and remove it from the Knitter.
natural_image
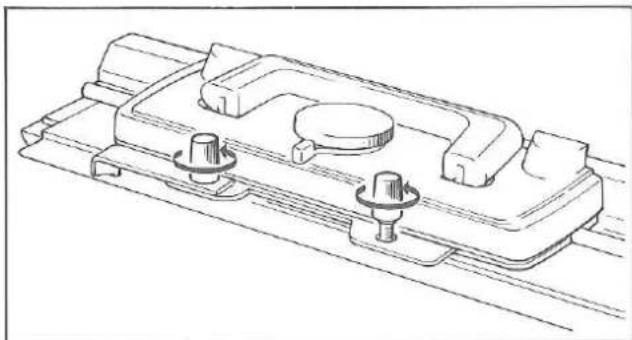
Technical line drawing of a mechanical component with mounting flanges and a central knob (no text or symbols)Loosen both Arm Nuts by turning them in the arrowed direction.
natural_image
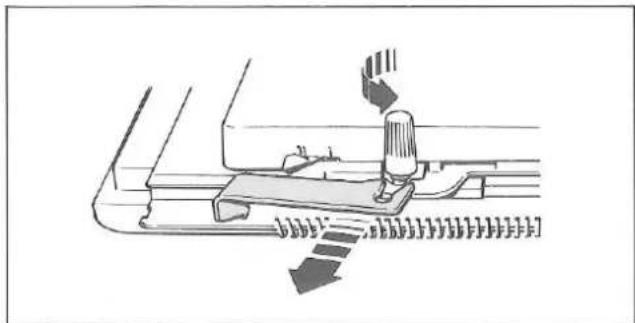
Diagram of a mechanical device with motion arrows indicating movement (no text or symbols)Remove the Carriage Fastener.
Do not lose the Carriage Fastener as this is used for securing the Carriage to the Needle Bed while the Knitter is not in use.
natural_image
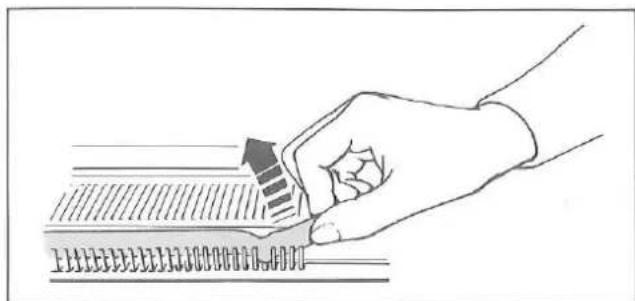
Illustration of a hand holding a pen with an arrow indicating compression or insertion (no text or symbols present)Remove cardboard needle protector from the front of the Needle Bed.
text_image
370K 1 2 3 4 5 6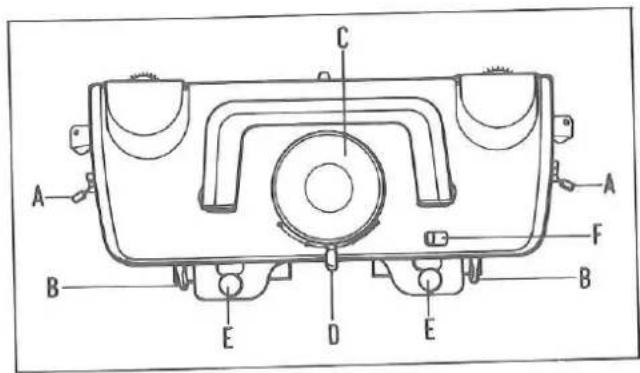
text_image
A B C D E F A B E E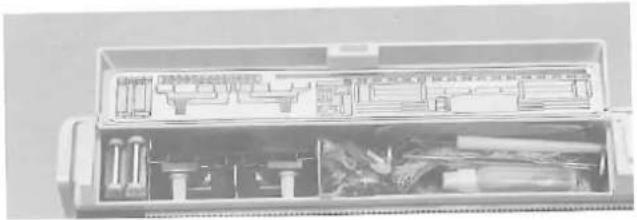
natural_image
Interior view of a mechanical tool kit with open casing and internal components (no visible text or symbols)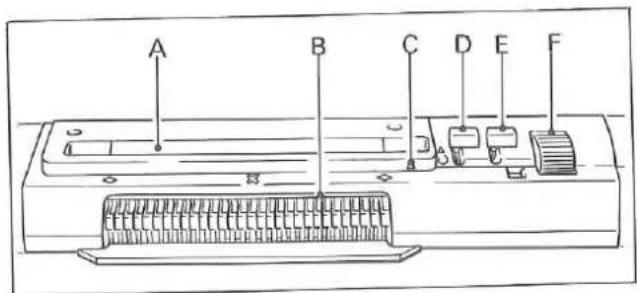
text_image
A B C D E F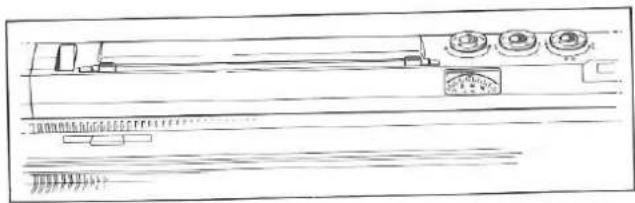
natural_image
Line drawing of a mechanical assembly with rollers and a housing (no text or symbols)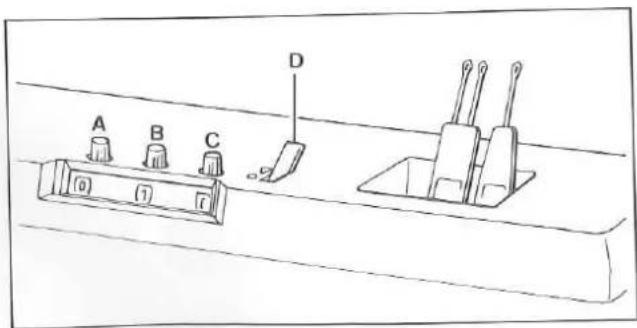
text_image
A B C 0 1 7 D1. CARRIAGE
A - Side Levers
B - Russel/Front Levers
C - Stitch Dial
D - Cam Lever
E - Arm Nuts
F - Release Lever
2. BUILT-IN ACCESSORY BOX
Squeeze open the lid to take out the accessories.
3. PATTERN CARD PANEL
A - Punch Card Insertion Slit
B - Touch Levers
C - Card Row Number Indicator
D - Stop Knob
E - L Knob
F - Punch Card Feeding Dial
4. KNIT CONTOUR (RADAR)
See Knitting Manual.
5. ROW COUNTER
To reset numbers, turn the knurled knobs "A", "B" and "C" to either direction.
"D" - Row Counter Set Lever
▼......operating position
●.....locked position
6. TOOL HOLDER
270K
text_image
1 2 3 4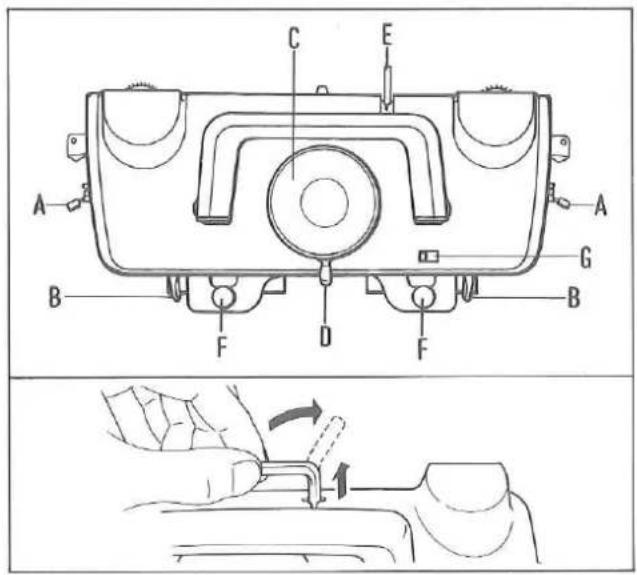
text_image
Technical diagram of a device with labeled components and a hand tool interacting with a component, showing assembly steps.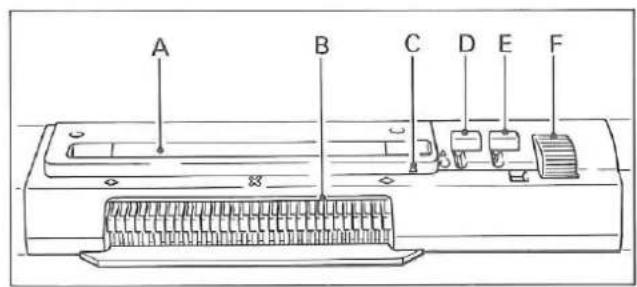
text_image
A B C D E F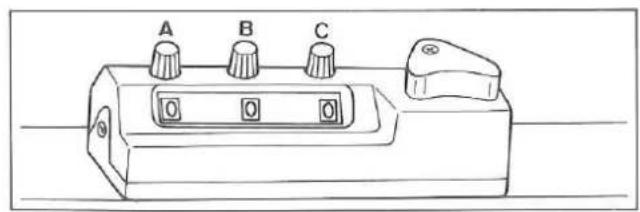
natural_image
Line drawing of a mechanical device with three labeled buttons (A, B, C) and a handle, no text or symbols present.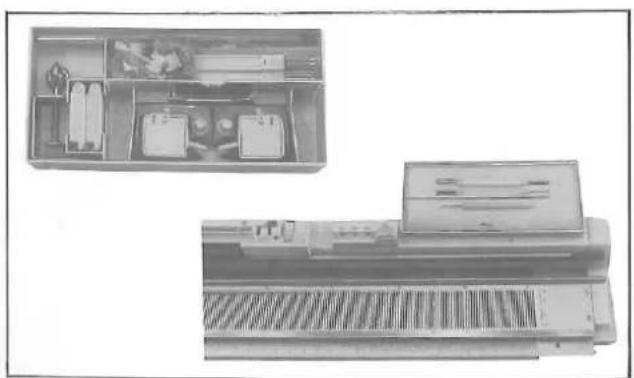
natural_image
Two views of a portable electronic device with internal compartments and control panels (no visible text or symbols)1. CARRIAGE
A - Side Levers
B - Russel/Front Levers
C - Stitch Dial
D - Cam Lever
E - Row Counter Tripper*
F - Arm Nuts
G - Release Lever
* To engage the Row Counter Tripper with the Row Counter, lift it and point it towards the Row Counter. To disengage the Row Counter Tripper, lift it and turn it to the side.
2. PATTERN CARD PANEL
A - Punch Card Insertion Slit
B - Touch Levers
C - Card Row Number Indicator
D - Stop Knob
E - L Knob
F — Punch Card Feeding Dial
3. ROW COUNTER
To reset numbers, turn the knurled knobs "A", "B" and "C" to either direction.
4. ACCESSORY BOX
Lift the Accessory Box and remove it from the Knitter.
- Use the Accessory Box Lid as an accessory tray by fitting it onto the pin on the right side of casement.
natural_image
Line drawing of a mechanical setup with two clips and a rotating mechanism (no text or symbols)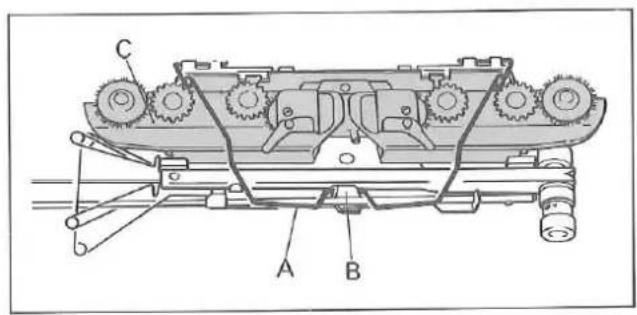
text_image
Technical diagram of a tracked vehicle with labeled components A, B, and C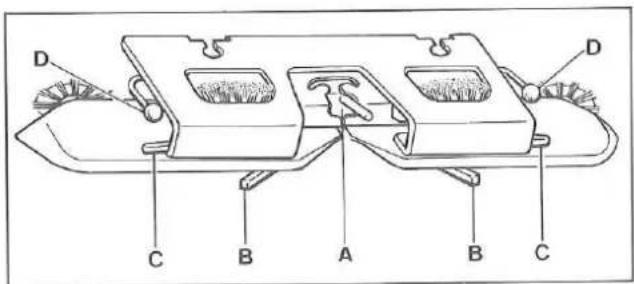
text_image
D C B A B C D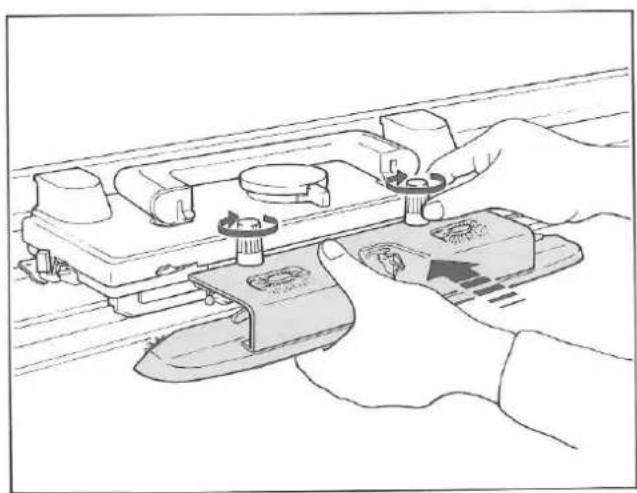
natural_image
Illustration of hands operating a mechanical device with adjustment knobs and a control panel (no text or symbols visible)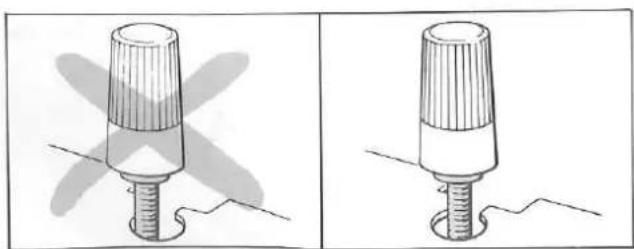
natural_image
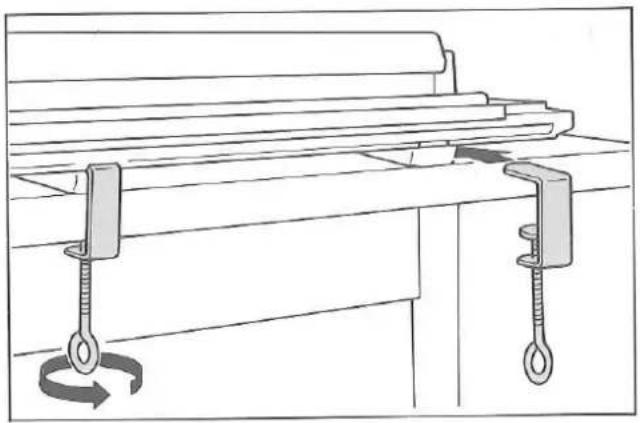
Two identical diagrams showing a cylindrical object with ribbed structure and a base, each with a shaded cross-section (no text or symbols)CLAMP
Insert the Clamps into the slots at the bottom of Needle Bed.
Fasten the Clamps by turning screws in the arrowed direction.
ARM
Release the wire spring "A" from holding bracket "B" located inside the Top Cover and remove the Arm "C".
A - Yarn Feeders
B - Tuck Knobs
C - Weaving Knobs
D - Weaving Yarn Holders
Insert the Arm under the two Arm Nut screws.
Push the Arm as far as it goes and tighten the Arm Nuts firmly by turning them in the arrowed direction.
Do not attach this Arm to the Lace Carriage.
Ensure that the Arm Nuts fit correctly into the cut-out of the Arm.
natural_image
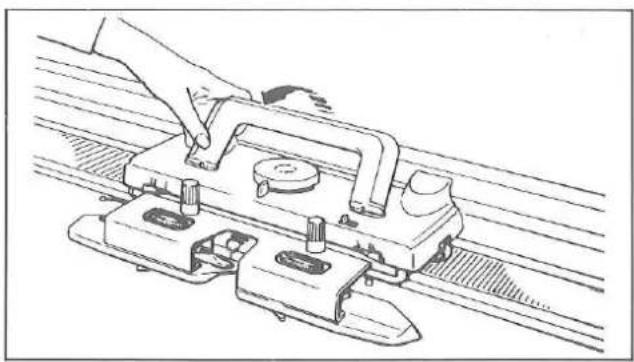
Technical line drawing of a mechanical assembly with a hand operating a workpiece (no text or symbols present)Raise the Carriage Handle.
text_image
Technical diagram showing two mechanical or electrical components labeled A and B, with no visible text or symbols beyond labels.AUTO TENSION
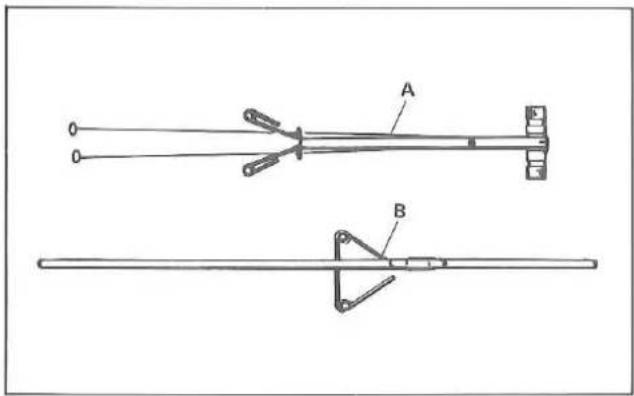
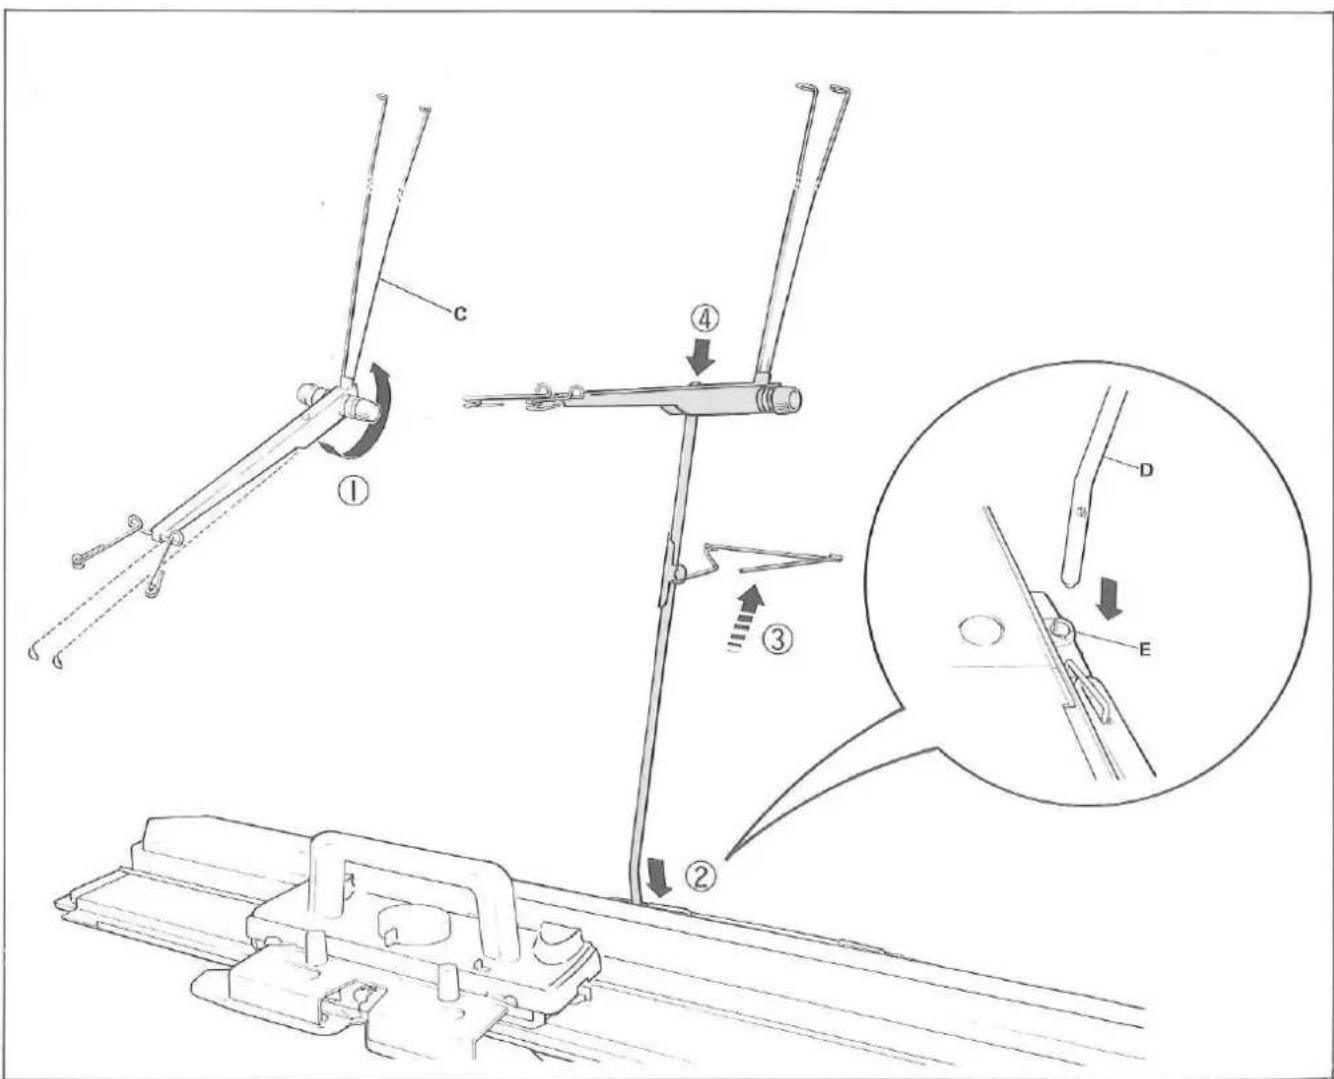
Remove the Auto Tension "A" and Yarn Rod "B" from the inside of the Top Cover.
① Turn the two Tension Springs "C" until they snap into position.
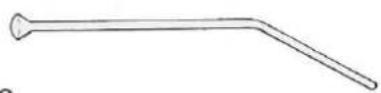
② Insert the short hent end of the Yarn Rod "D" into the left side handle bracket socket "E".
③ Raise the Tension Guide.
④ Place the Auto Tension onto the Yarn Rod.
text_image
Technical diagram illustrating mechanical assembly steps with labeled components and directional arrows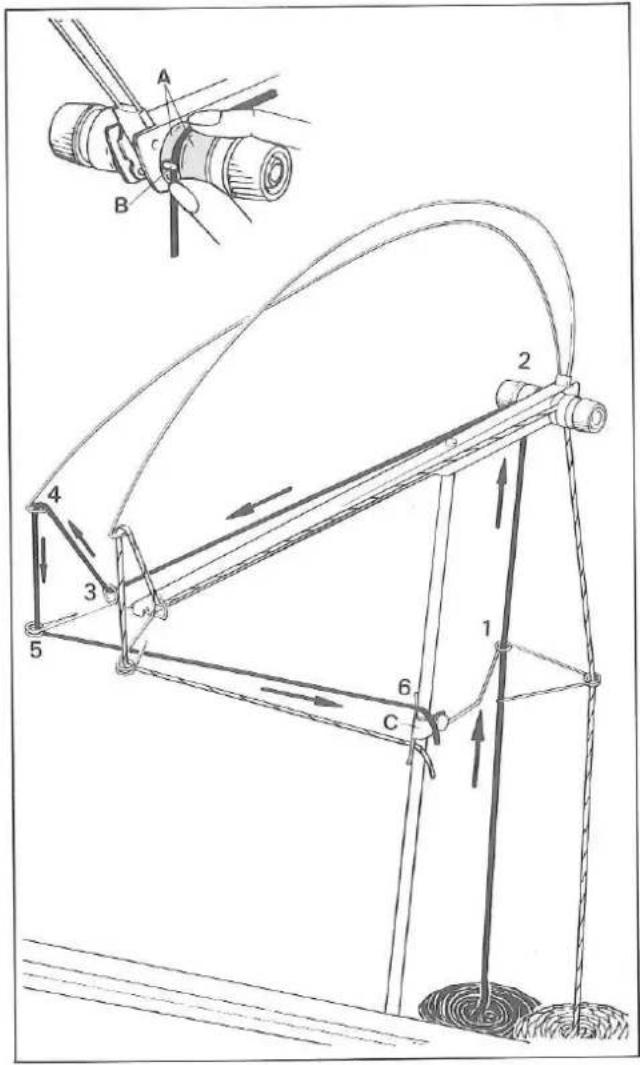
text_image
Technical diagram of a mechanical linkage system with labeled components and directional arrows indicating motion or force.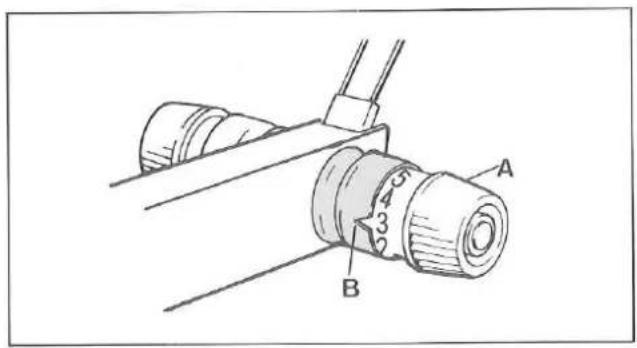
text_image
Technical diagram of a mechanical component with labeled parts A and B, showing assembly or assembly details.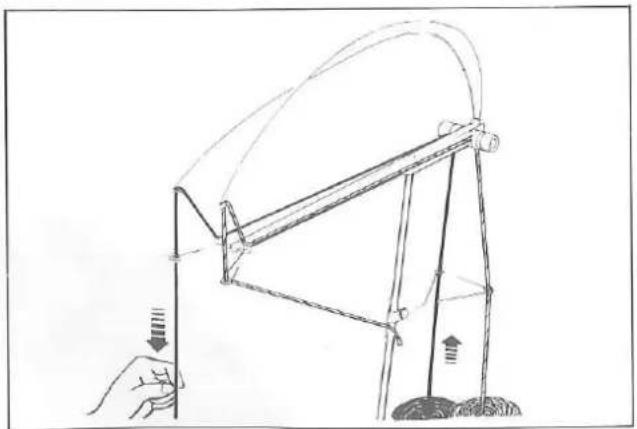
natural_image
Hand holding a pole with arrows indicating force or movement, next to a simple mechanical structure (no text or symbols)THREADING AUTO TENSION WITH TWO COLOUR YARNS A, B
For practice, prepare TWO NEW BALLS OR CONES of different colour light 3-ply yarns A, B and thread them as follows:—
MAIN YARN A
Thread the left side of Auto Tension as follows:—
- through left Tension Guide eyelet,
- between two Tension Discs "A" and under the copper colour Guide Pin "B",
- through left yarn guide eyelet,
- through left Tension Spring eyelet,
- through left yarn guide eyelet.
Pull the yarn end and hook it in the upper Yarn Clip "C".
SECOND YARN B
Thread the second yarn into the right side of Auto Tension in the same manner as you threaded the main yarn into the left side of the Auto Tension.
Hook the yarn end in the lower Yarn Clip.
ADJUSTING TENSION DIAL
Adjust the Tension Dial according to the type and thickness of the yarn by setting the selected number to correspond with notch "B".
In this instance, 3 is suitable.
Cotton or nylon thread ..... 6-7
Thin yarn (2-ply)....4-5
Medium yarn (4-ply). 3
Incorrect threading of the Auto Tension will never assure success in knitting. Before going further, ensure that:
- correct tension is given to yarn,
- yarn comes out freely from yarn ball.
It is advisable to pull out a certain length of yarn of the ball before starting to knit.
text_image
A B C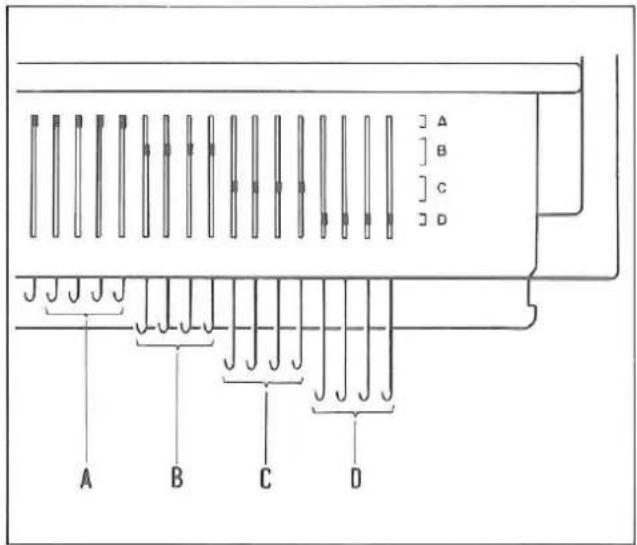
text_image
A B C D Δ B C D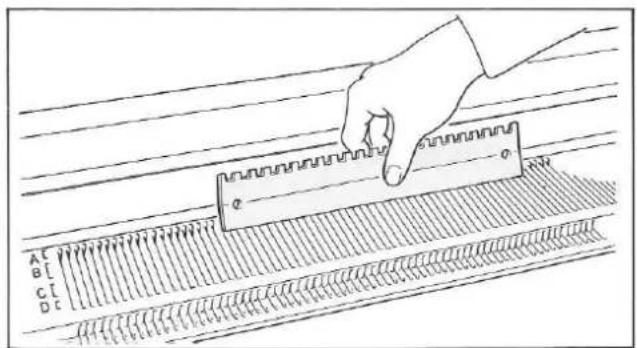
text_image
A B C D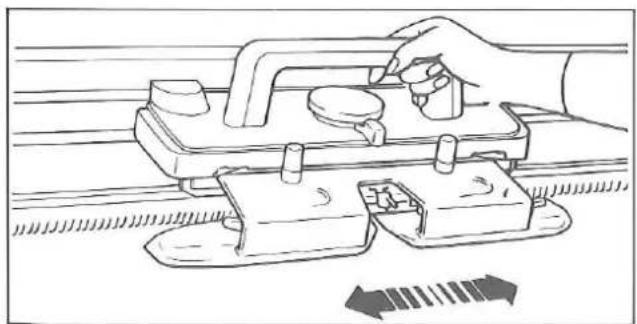
natural_image
Line drawing of a hand using a tool to adjust or install a mechanical component, with no visible text or symbols.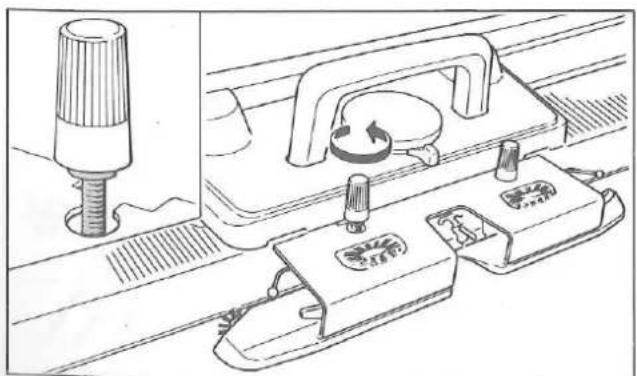
natural_image
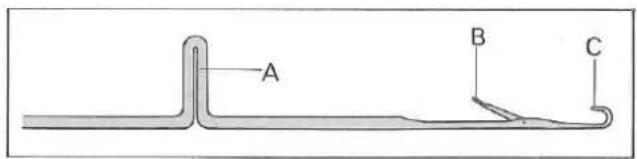
Technical line drawing of a mechanical assembly with no visible text or symbolsLATCH NEEDLE
A - butt
B - latch
C - hook
NEEDLE POSITIONS
On both left and right ends of the Needle Bed, the letters A, B, C and D associated with the corresponding brackets "]} are engraved.
To operate the needles, align their butts within the brackets.
A - needles do not knit.
B — needles knit stockinet and stitch pattern.
C - needles knit stockinet only.
D — needles do not knit with Russel Levers at I.
needles are knitted back to B position with Russel Levers at II.
NOTE: NEEDLE POSITIONS C AND D ARE NOT TO BE USED WHEN KNITTING WITH THE LACE CARRIAGE.
ALIGNING NEEDLES
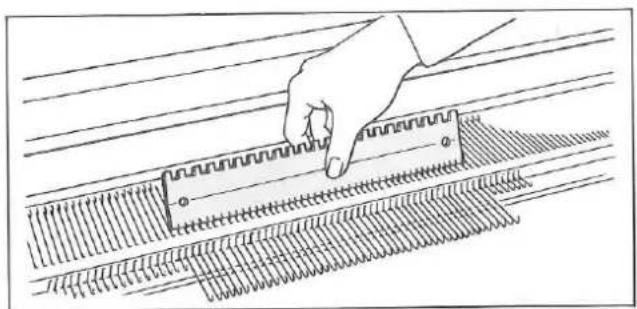
Ensure all needles are in the "J" A non-knitting position. If some needles are not, using the straight edge of the Needle Pusher push the needles to "A" non-knitting position.
Slide the Carriage across the Needle Bed a few times to ensure it moves smoothly.
If the Carriage does not slide smoothly, ensure that the Arm Nut fits correctly into the cut-out of the Arm.
natural_image
Line drawing of a hand adjusting a spring-loaded component on a textured surface (no text or symbols)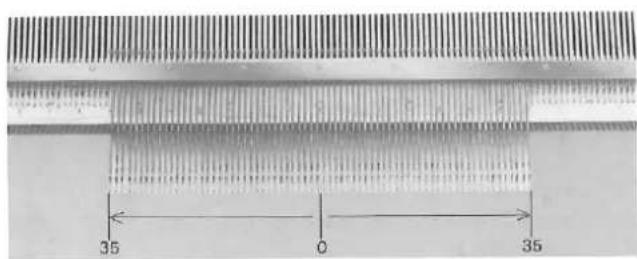
text_image
35 0 35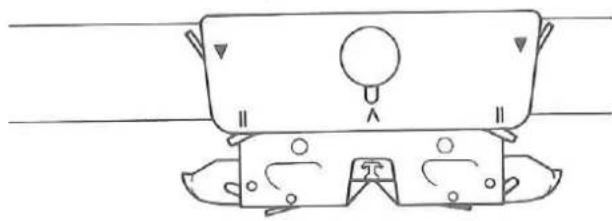
natural_image
Line drawing of a mechanical component with mounting holes and a central circular feature (no text or symbols)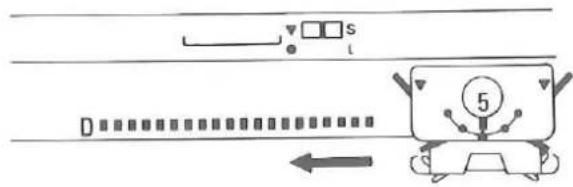
text_image
Diagram showing a device with labeled components and directional arrow, likely illustrating a system or control system.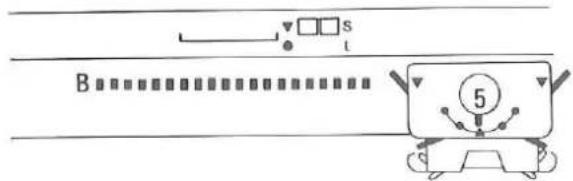
text_image
B 5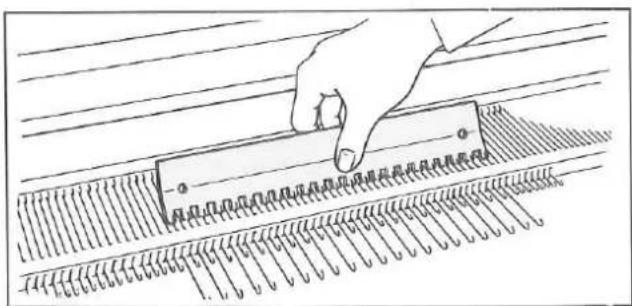
natural_image
Hand using a tool to measure a rectangular object on a textured surface (no text or symbols visible)TO CAST ON
Push up 35 needles on the right and left side of centre (0), 70 needles in total, from A position to D using the Needle Pusher.
SETTING CARRIAGE
Stitch Dial 5
Cam Lever....Λ
Side Levers (left and right)....▼
Russel Levers (left and right)....II
Weaving Knobs (left and right)......O
Tuck Knobs (left and right)......O
Slowly move the Carriage across the Needle Bed until it has passed all the needles.
The needles are aligned in B position. Place the Carriage at the right side.
Using the Needle Pusher, push every 2nd needle from B to D position.

natural_image
Pure diagram of parallel lines with diagonal connectors, no text or symbols present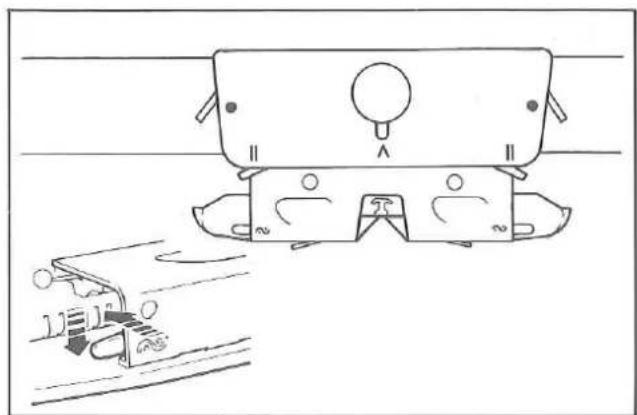
natural_image
Simple line drawing of a vehicle with two cars and a road, no text or symbols presentBoth Side Levers....
Both Weaving Knobs....
To set the Weaving Knob to ≈, slightly push it forward, it will drop into position.
natural_image
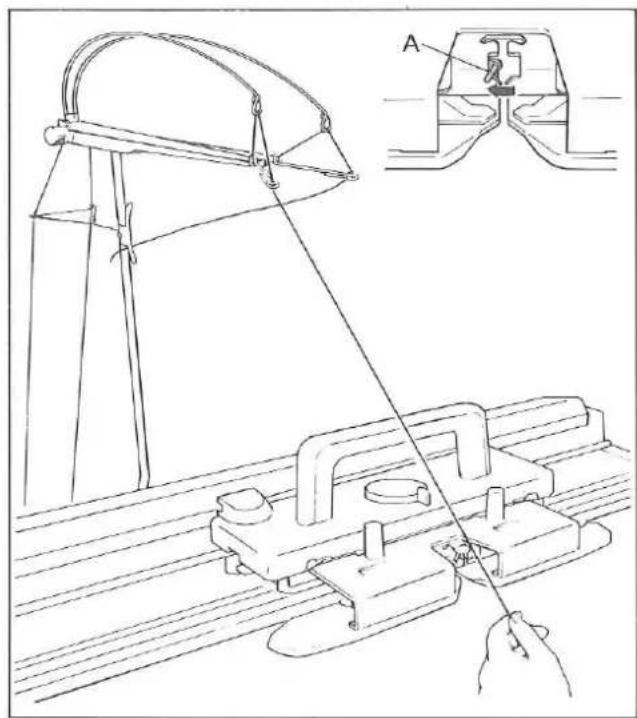
Technical line drawing of a mechanical assembly with a hand operating a tool, showing part A and a close-up view (no text or symbols)Open Yarn Feeder by moving the Yarn Feeder Gate "A" to the left.
Remove the main yarn end from the upper Yarn Clip and bring it to the Yarn Feeder.
text_image
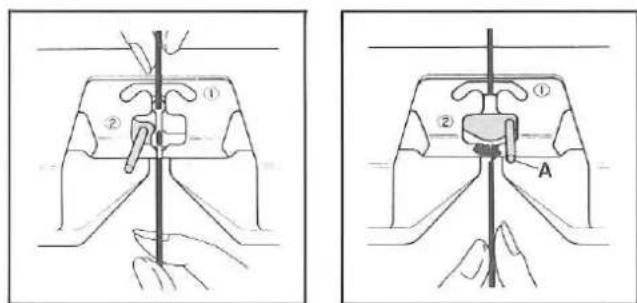
Technical diagram showing two mechanical assembly steps with labeled components and hand positionsHold the yarn with both hands and slide it into the Yarn Feeder.
Close the Yarn Feeder by moving the Yarn Feeder Gate "A" to the right.
natural_image
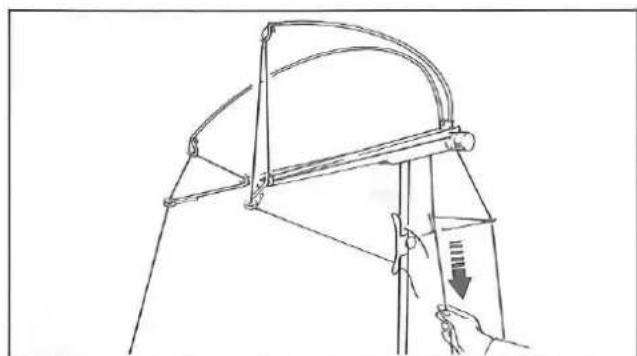
Line drawing of a mechanical device with a hand holding a paper, showing a handle and part of a curved structure (no text or symbols)Hold yarn end beneath the Arm and eliminate slack yarn by pulling the yarn down at the back of Yarn Rod until the Tension Spring is nearly in a horizontal position.
natural_image
Diagram of a hand using a tool to interact with a mechanical device, showing spring-like hooks and a lever mechanism (no text or symbols)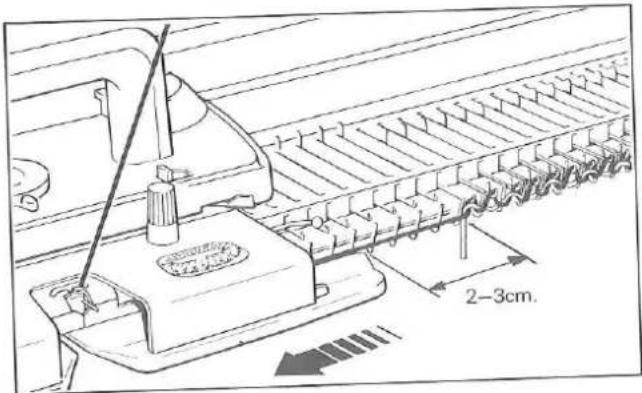
text_image
2-3cm.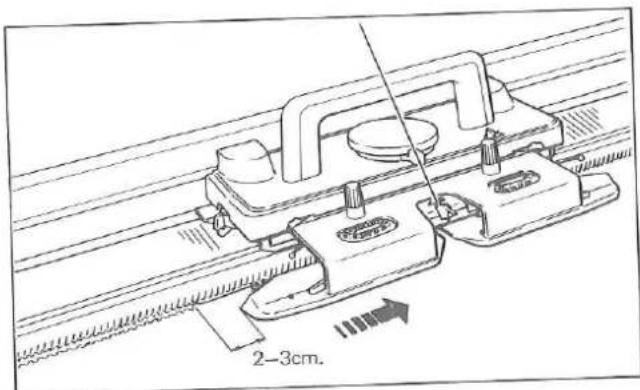
text_image
2-3cm.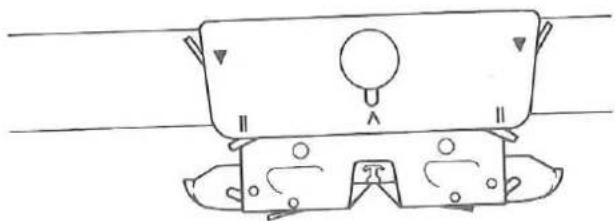
natural_image
Simple line drawing of a mechanical component with no text or symbols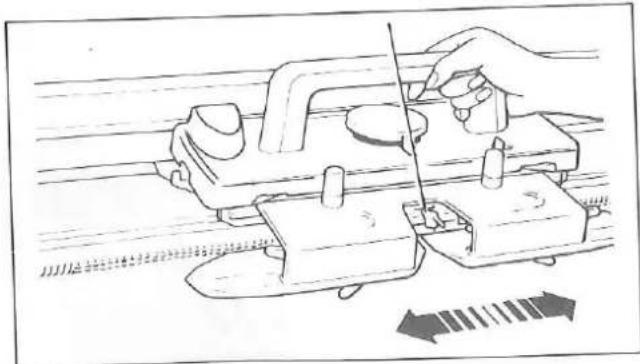
natural_image
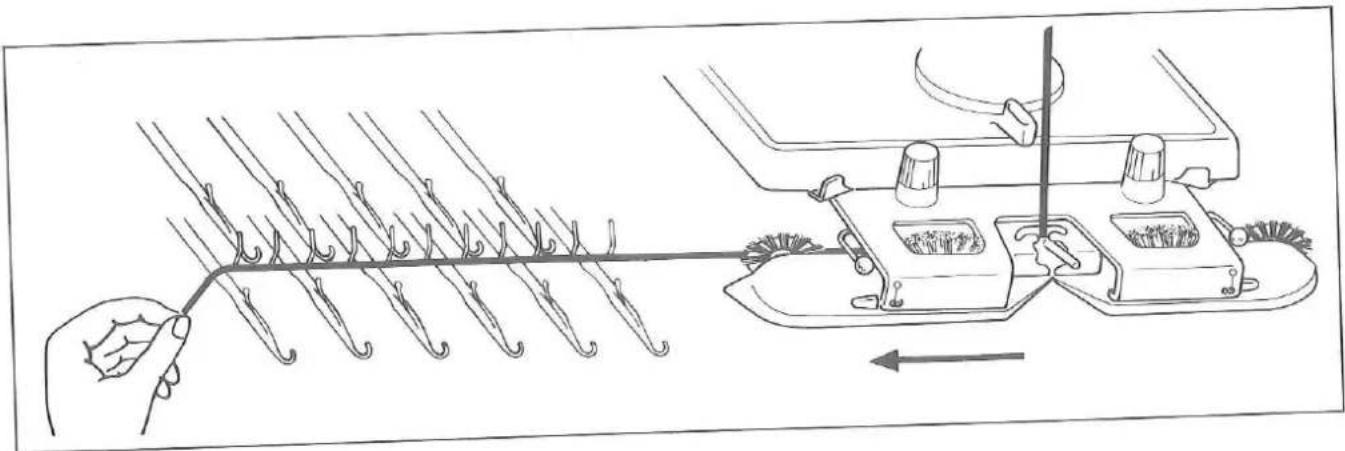
Illustration of a hand using a tool to cut or adjust a mechanical component, with directional arrows indicating movement (no text or symbols)Pull yarn approximately 40cm. and extend it from underneath the Plastic Round Brush Cover in the Arm and lay it across all needles in D position.
Hold the yarn end at the left side of the needles.
Slowly move the Carriage from right to left until it has passed all the needles, knitting 1 row.
Ensure that the Arm has passed the last knitting needle by approximately 2–3cm.
Knit 3 rows.
On each row, ensure that the Arm has passed the last knitting needle by approximately 2–3cm.
Both Side Levers....▼ Both Weaving Knobs.....○
Knit 20 rows.
text_image
T S θ O L F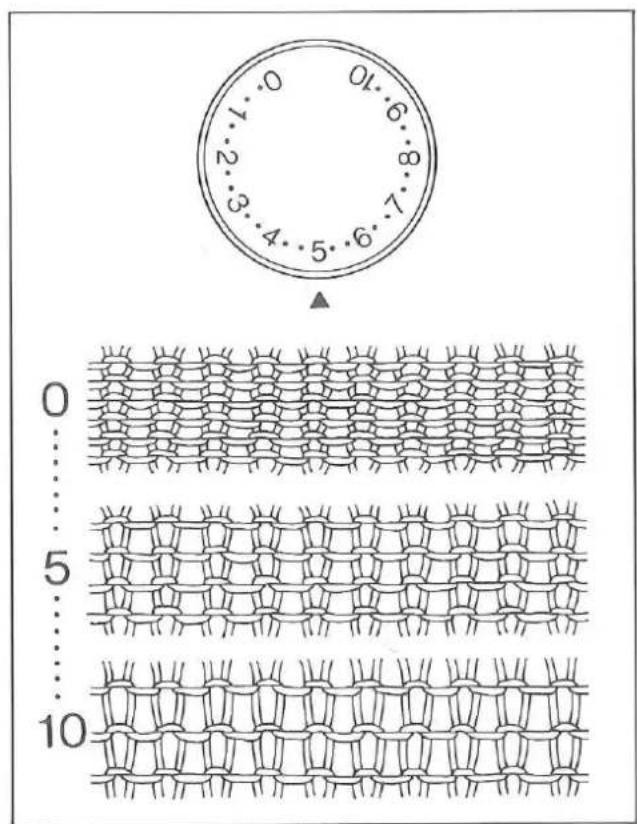
text_image
0 10 5 10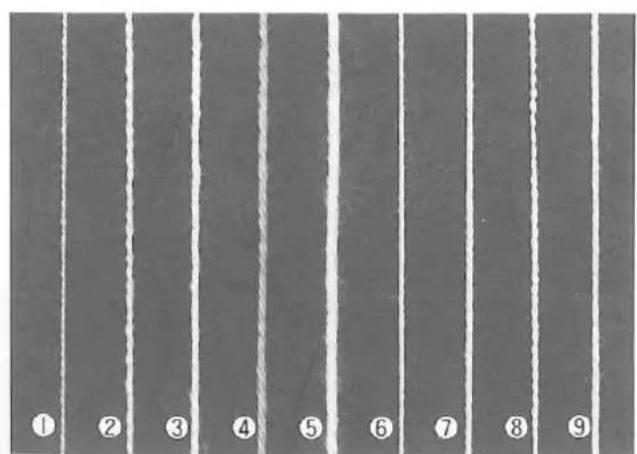
text_image
① ② ③ ④ ⑤ ⑥ ⑦ ⑧ ⑨CAM LEVER
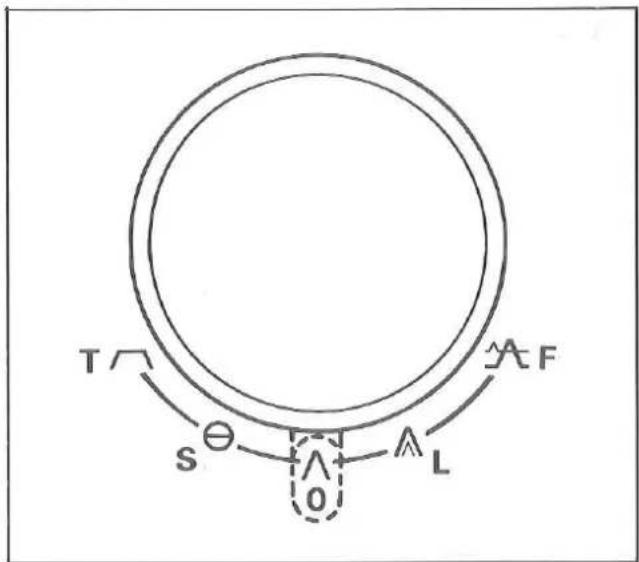
The Cam Lever is given 5 positions. By setting the Cam Lever to the selected position, various stitch types can be knitted when the Punch Card is used together.
Each positions is marked as shown below.
F A : FAIR ISLE (KNIT-IN)
L A : PUNCH LACE
0 ∧ : STOCKINET (No pattern Card is needed)
S Θ : SLIP
T ∩ : TUCK
LEARNING ABOUT STITCH SIZE AND YARN
STITCH DIAL
Ensure that the correct Stitch Dial number is always selected for the yarn you will select.
Stitch Dial regulates the size of a stitch. When the Stitch Dial is set to 0, the tightest stitch size is obtained. (smallest stitch)
When the Stitch Dial is set to 10, the loosest stitch size is obtained. (largest stitch)
To select a number, turn the Stitch Dial until the required number or dot corresponds to ▲.
If the tension is too tight — it will be difficult or even impossible to knit, you will use more yarn and waste money — your garment will be hard and uncomfortable to wear.
If the tension is too loose — your garment will have no shape or will very soon lose its shape.
For practice, continue to knit with different Stitch Dial numbers as follows:—
- with the Stitch Dial number 3, knit 10 rows - tightest stitch size is obtained.
- with the Stitch Dial number 9, knit 10 rows – loosest stitch size is obtained.
| Type of yarn | Stitch Dial |
| 1 Super fine yarn | 1 - 2 |
| 2 Extra fine yarn | 2 - 4 |
| 3 Fine yarn | 3 - 5 |
| 4 Medium fine yarn | 5 - 7 |
| 5 Medium yarn | 7 - 9 |
| 6 Cotton yarn (fine) | 4 - 5 |
| 7 Cotton yarn (normal) | 5 - 7 |
| 8 Synthetic yarn (fine) | 3 - 4 |
| 9 Synthetic yarn (normal) | 4 - 5 |
natural_image
Close-up of a textured fabric with horizontal striped pattern (no text or symbols)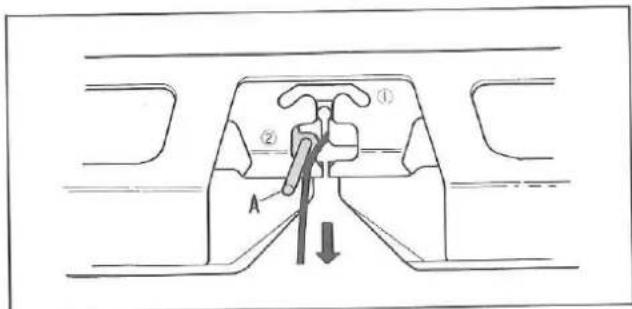
text_image
Technical diagram showing a mechanical component with labeled parts and directional arrow, likely illustrating a motion or assembly.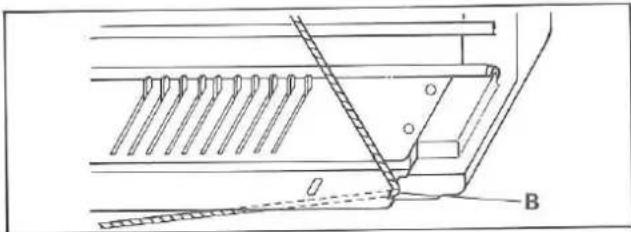
natural_image
Technical line drawing of a mechanical assembly with spring-loaded components and a labeled section B (no text or symbols beyond label)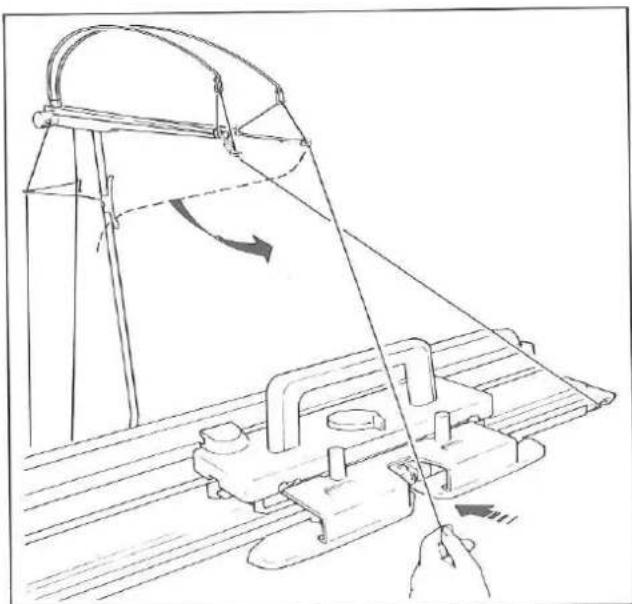
natural_image
Line drawing of a mechanical device with a hand operating it, showing motion lines and components (no text or symbols)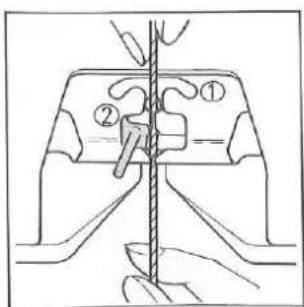
text_image
Technical diagram showing a mechanical assembly with labeled parts, likely illustrating a turning or cutting process.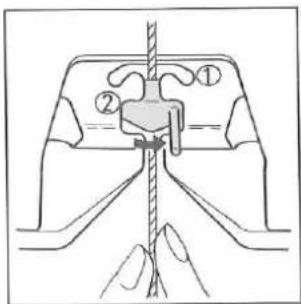
text_image
Technical diagram showing a mechanical assembly with labeled parts ① and ②, likely illustrating a turning or positioning process.KNITTING STRIPE PATTERN
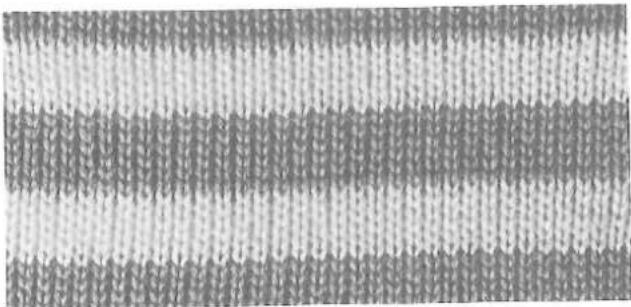
For practice, continue to knit stripe pattern using two different colour yarns alternately in the Yarn Feeder ①.
Stitch Dial....5
Open the Yarn Feeder by moving Yarn Feeder Gate "A" to the left.
Remove main yarn from the Yarn Feeder.
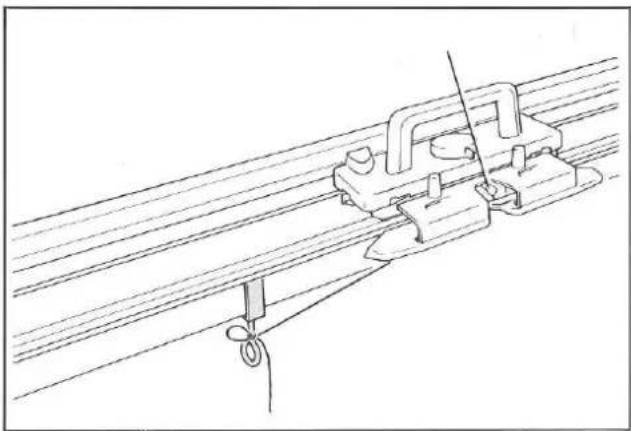
Place the main yarn at the cut-out "B" at the side of Needle Bed.
Remove the second colour yarn from the lower Yarn Clip and pull it down towards the Yarn Feeder.
Hold the second colour yarn with both hands and slide it into the Yarn Feeder.
Close the Yarn Feeder by moving the Yarn Feeder Gate to the right.
natural_image
Technical line drawing of a mechanical clamp or bracket assembly mounted on a rail track (no text or symbols)Fasten the yarn end to either Clamp.
natural_image
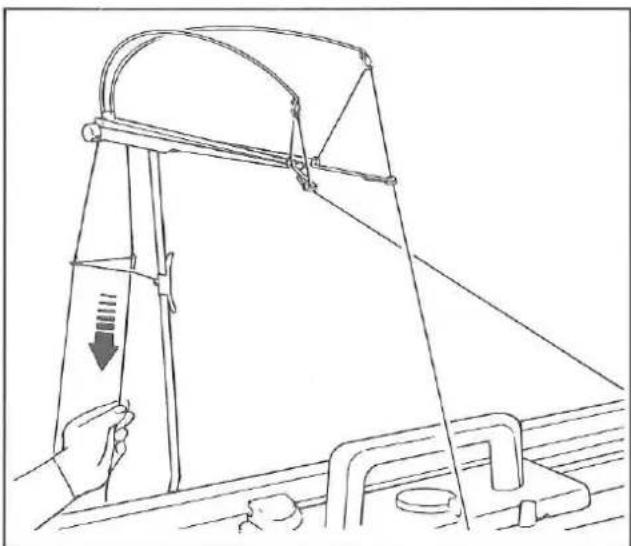
Line drawing of a mechanical device with a hand holding a vertical rod and a downward arrow indicating force or motion (no text or symbols)Eliminate slack yarn by pulling the yarn down at the back of Yarn Rod until the Tension Spring is nearly in the horizontal position.
For practice, knit 6 rows.
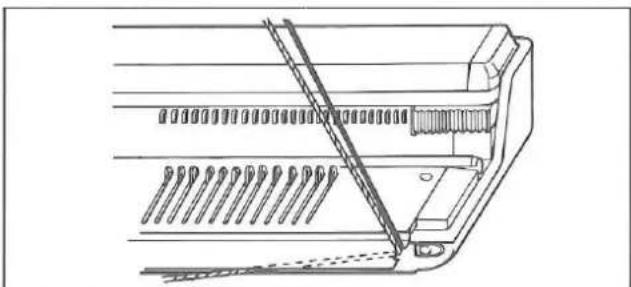
natural_image
Technical line drawing of a mechanical component with internal channels and fasteners (no text or symbols)Remove the second colour yarn from Yarn Feeder ① and place it at the cut-out as done for main yarn.
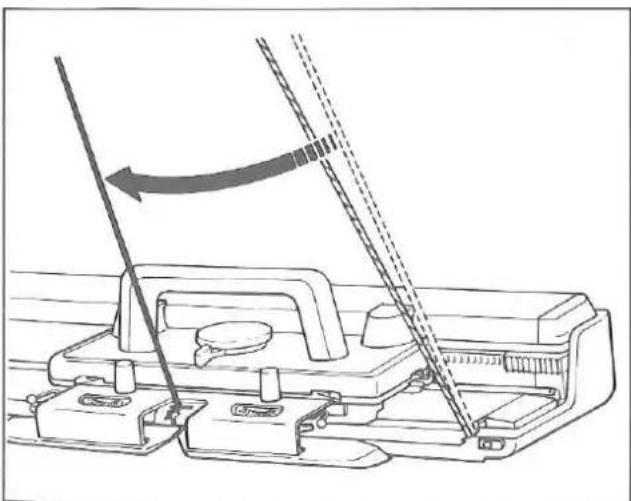
natural_image
Technical line drawing of a mechanical assembly with a tool and directional arrow (no text or symbols)Remove the main yarn from the cut-out and slide it into the Yarn Feeder ① with both hands.
Eliminate slack yarn.
Knit 6 rows.
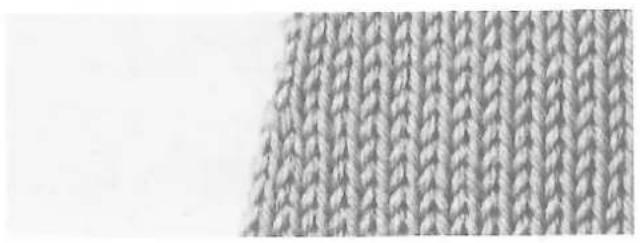
By using two contrasting yarns alternately, a striped pattern can be knitted.
natural_image
Close-up of a knitted fabric with visible weave pattern (no text or symbols)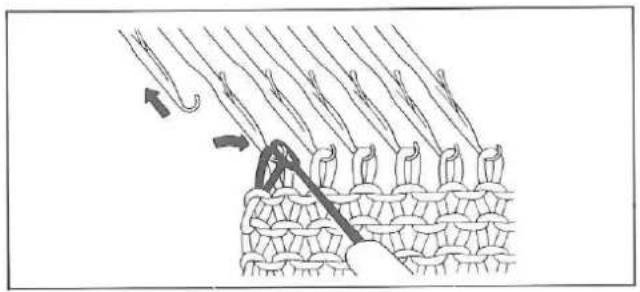
natural_image
Diagram showing a hand inserting a knitted fabric into a mesh structure (no text or symbols)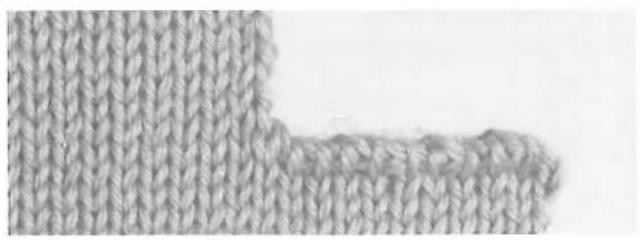
natural_image
Close-up of a knitted fabric with visible weave pattern (no text or symbols)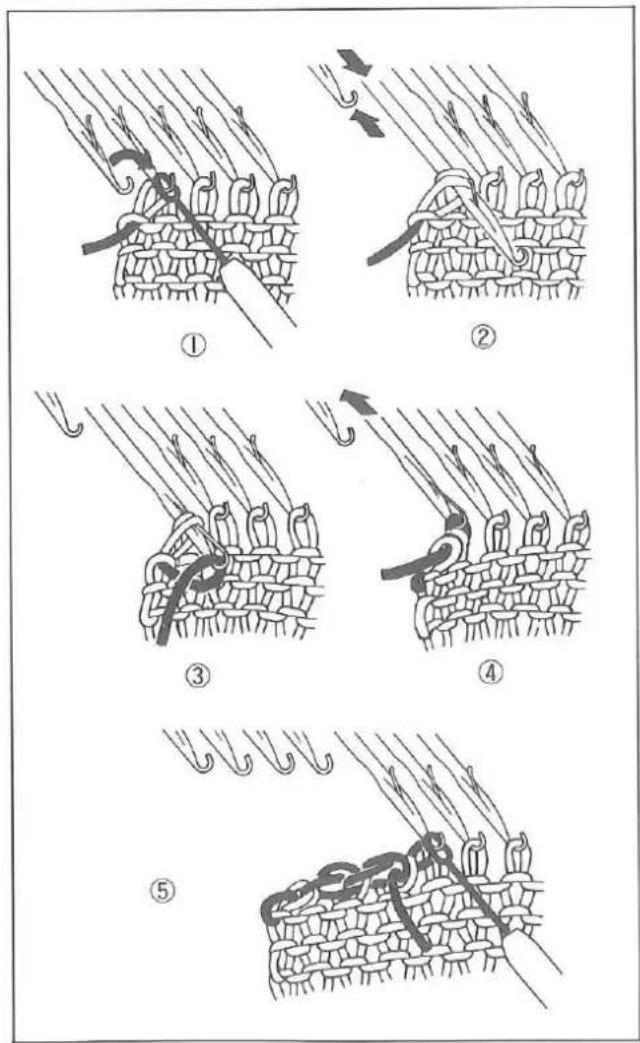
text_image
Diagram illustrating five steps of fabric weaving or textile sewing, labeled ① to ⑤ with Chinese annotations.DECREASING 1 STITCH
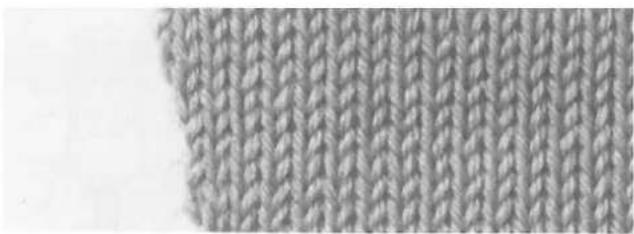
You can decrease 1 stitch on both sides of the row.
Using the Transfer Tool, transfer the end stitch onto its adjacent needle.
Push back the empty needle to A position.
Knit 1 row.
For practice, knit more rows decreasing 1 stitch on both sides of the row.
DECREASING MULTIPLE STITCHES
You can only decrease on the Carriage side.
① On the Carriage side, hold the fabric against the Knitter.
Transfer the end stitch to the adjacent needle.
② Push the empty needle to A position.
Push the second needle to D position until both stitches are behind the latch.
③ Lay yarn from right to left in the open hook of the needle.
④ Hold yarn slightly down and push the needle back to B position.
The two stitches slip off the needle.
⑤ Continue this procedure until the required number of stitches have been decreased.
Place the last decreased stitch onto its adjacent needle.
For practice, decrease four stitches on both sides.
natural_image
Close-up of a knitted fabric with visible pleats and folds (no text or symbols)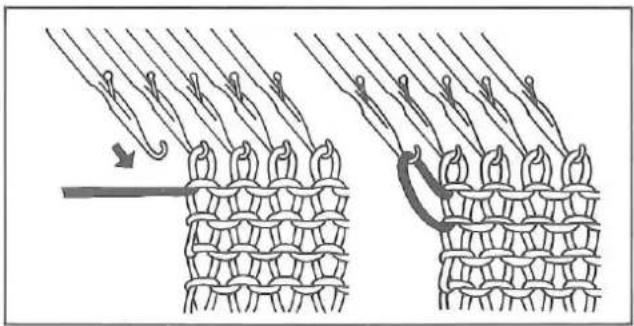
natural_image
Diagram showing two stages of textile weaving or sewing process, with no visible text or symbols
natural_image
Close-up of knitted fabric texture with interwoven strands (no text or symbols)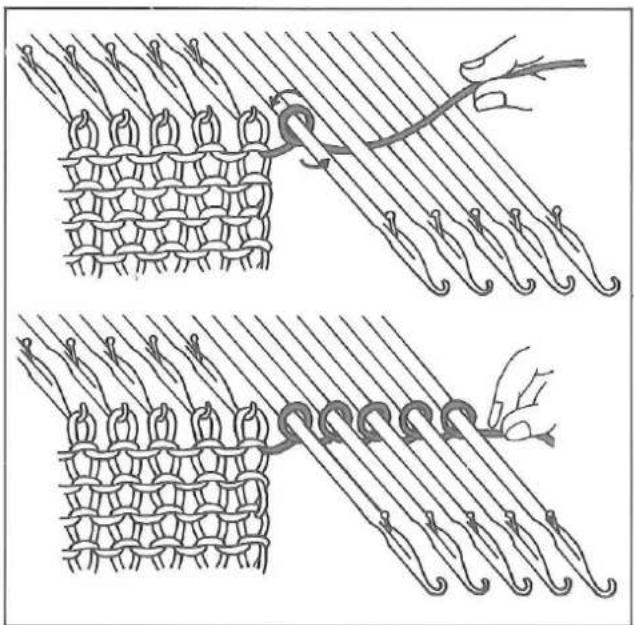
natural_image
Illustration of two techniques for tying a knitted mesh knot, showing rope routing and hooking (no text or symbols)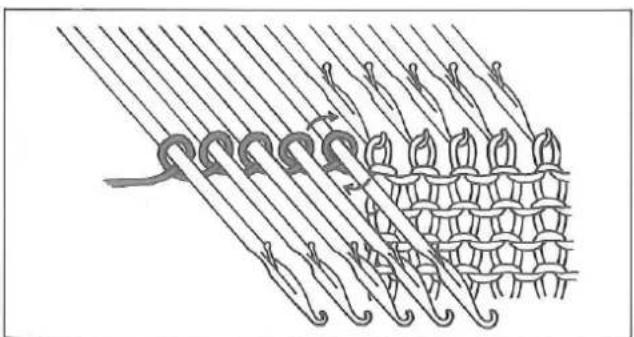
natural_image
Diagram of knitted fabric with coiled threads and interwoven patterns (no text or symbols)INCREASING 1 STITCH
You can increase 1 stitch at a time on the Carriage side.
Push 1 needle on the Carriage side from A to B position.
Knit 1 row.
For practice, knit more rows increasing 1 stitch on the Carriage side on each row.
INCREASING MULTIPLE STITCHES
You can only increase on the Carriage side.
Carriage is on the right side.
- Pull some yarn from the Yarn Feeder.
- Push the required number of needles from A to D position.
- Wind yarn loosely around the empty needles in the anti-clockwise direction.
- Push loops against sinker posts.
- Eliminate slack yarn.
- Continue knitting.
When the Carriage is on the left side, wind yarn around the needles in the clockwise direction.
For practice, increase five stitches on both sides.
natural_image
Close-up of a textured fabric with repeating diamond patterns (no text or symbols)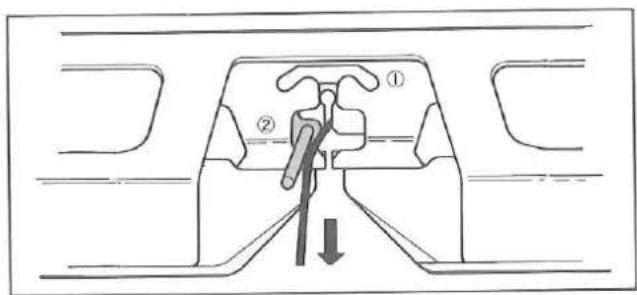
text_image
Technical diagram showing a mechanical assembly with labeled parts ① and ②, and a downward arrow indicating direction.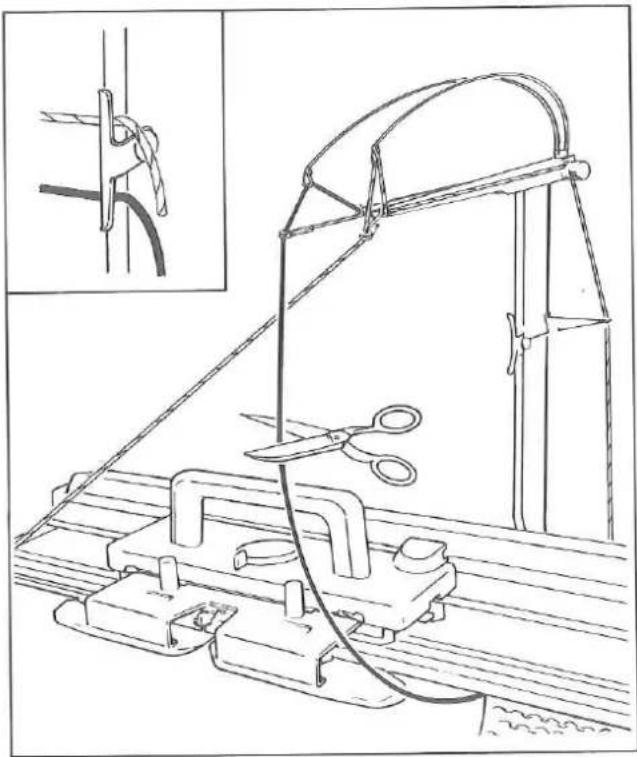
natural_image
Technical line drawing of a mechanical clamp or clamp assembly with scissors and a close-up inset showing a rope knot (no text or symbols present)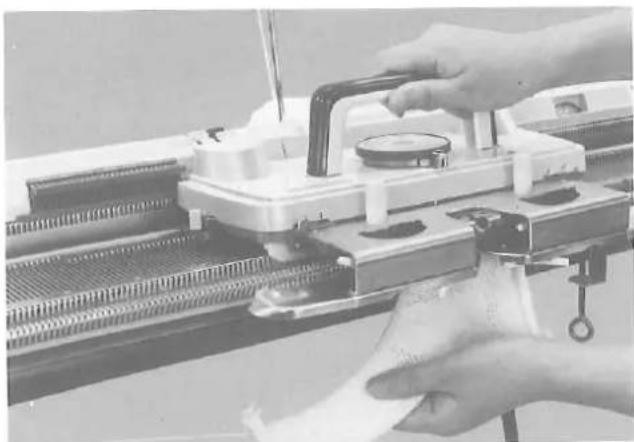
natural_image
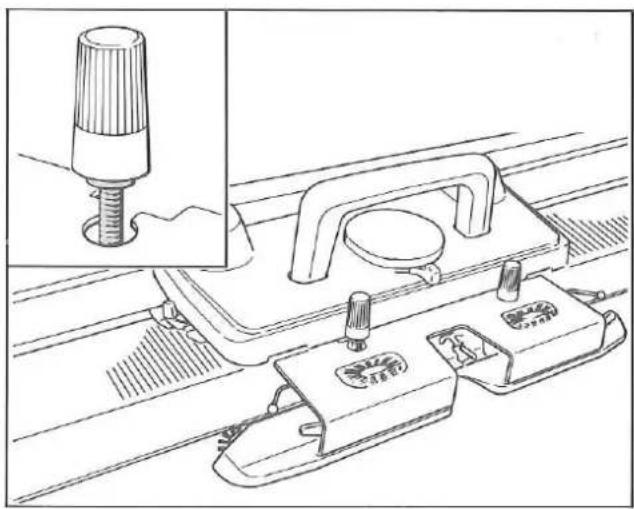
Close-up of hands operating a mechanical device with a handle and control panel (no visible text or symbols)REMOVING KNITTED FABRIC
- without closing end stitches
Open the Yarn Feeder and remove yarn.
Break the main yarn and hook its top end onto the lower Yarn Clip of the Yarn Rod.
Break the second yarn and hook its top end onto the upper Yarn Clip.
Let both bottom yarn ends hang loosely on the side of the fabric.
Cam Lever....^
Move Carriage across the fabric.
The fabric will come off the needles.
natural_image
Technical line drawing of a mechanical assembly with a component inserted into a housing (no text or symbols)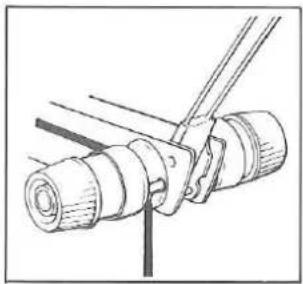
natural_image
Technical line drawing of a mechanical clamp or connector assembly (no text or symbols)
text_image
Technical diagram showing a mechanical assembly with labeled parts ① and ②, likely illustrating a cross-section or assembly.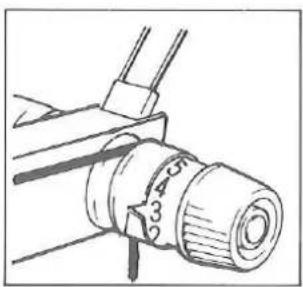
natural_image
Technical line drawing of a mechanical component with no visible text or symbols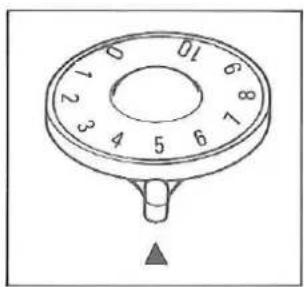
text_image
0 1 2 3 4 5 6 7 8 9 10 ▲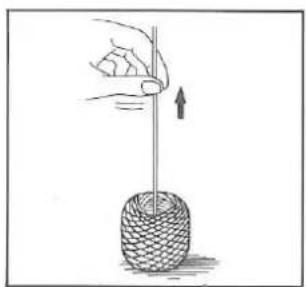
natural_image
Illustration of a hand holding a stick above a cylindrical object with a curved handle, no text or symbols present
natural_image
Hand holding a vertical rod with a downward arrow indicating compression or force (no text or symbols)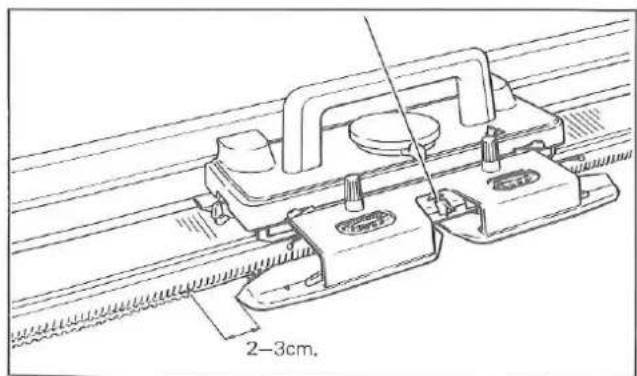
text_image
2-3cm.IMPORTANT
IF YOU HAVE ANY DIFFICULTY IN KNITTING THE FIRST ROW, ENSURE THAT:
Arm is attached to the Carriage correctly.
Yarn is threaded correctly through the Auto Tension and Yarn Feeder.
Tension Dial and Stitch Dial are set correctly.
Yarn is wound correctly.
Slack yarn is eliminated and Tension Spring is nearly in a horizontal position.
Arm has passed the last knitting needles by approximately 2–3cm. before knitting the next row.
PATTERN KNITTING WITH MAIN CARRIAGE
text_image
C A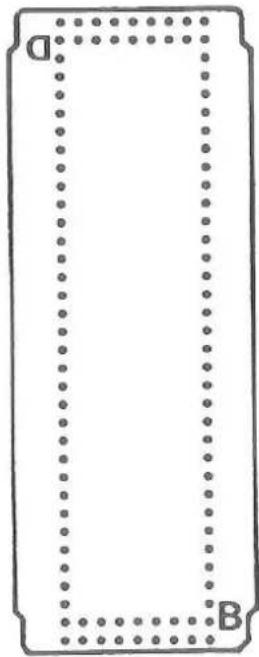
natural_image
Simple rectangular frame with dotted border and corner labels (no text or symbols)STANDARD PUNCH CARDS FOR MAIN CARRIAGE
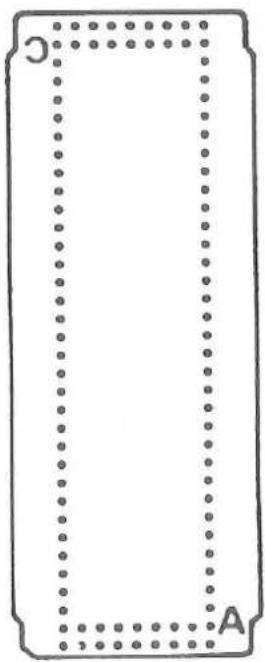
Twenty Punch Cards are numbered No.F-1 - No.F-20.
Each Punch Card can be used in four different ways and is marked "A", "B", "C" and "D"
"A" indicates the basic pattern.
If "B", "C" or "D" side of the Punch Card is inserted into the Pattern Card Panel, direction of pattern can be changed.
IMPORTANT Do not fold or bend the Card.
With the Punch Cards, the following patterns can be produced.
| Card No. | A | B | C | D | E | F | G | H |
| F-1 | ○ | ○ | ○ | ○ | ○ | ○ | ||
| F-2 | ○ | ○ | ○ | ○ | ○ | ○ | ||
| F-3 | ○ | ○ | ○ | ○ | ||||
| F-4 | ○ | ○ | ○ | ○ | ○ | ○ | ||
| F-5 | ○ | ○ | ○ | ○ | ○ | ○ | ○ | |
| F-6 | ○ | ○ | ○ | ○ | ○ | ○ | ||
| F-7 | ○ | ○ | ○ | ○ | ||||
| F-8 | ○ | ○ | ○ | ○ | ||||
| F-9 | ○ | ○ | ○ | ○ | ||||
| F-10 | ○ | ○ | ○ | ○ | ○ | |||
| F-11 | ○ | ○ | ○ | ○ | ||||
| F-12 | ○ | ○ | ○ | ○ | ||||
| F-13 | ○ | ○ | ||||||
| F-14 | ○ | ○ | ||||||
| F-15 | ○ | ○ | ||||||
| F-16 | ○ | |||||||
| F-17 | ○ | ○ | ||||||
| F-18 | ○ | |||||||
| F-19 | ○ | ○ | ||||||
| F-20 | ○ |
A KNIT-IN/FAIR ISLE
B SINGLE MOTIF
C SLIP STITCH PATTERN
D TUCK STITCH PATTERN
E TUCK LACE
F PUNCH LACE
G WEAVING
H WEAVING LACE
natural_image
Line drawing of a hand using a tool to press or install electronic components into a device (no text or symbols present)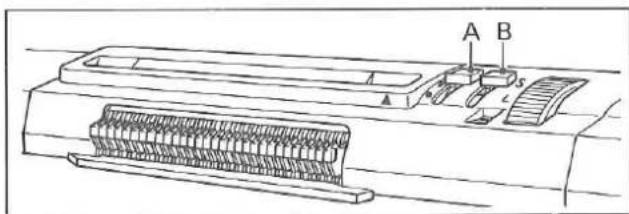
text_image
A B A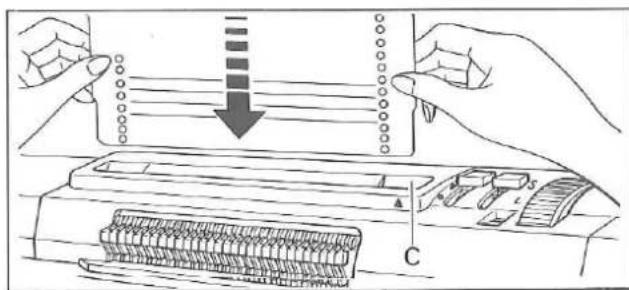
text_image
Diagram illustrating a printer's printing process with labeled parts and a downward arrow indicating motion or compression.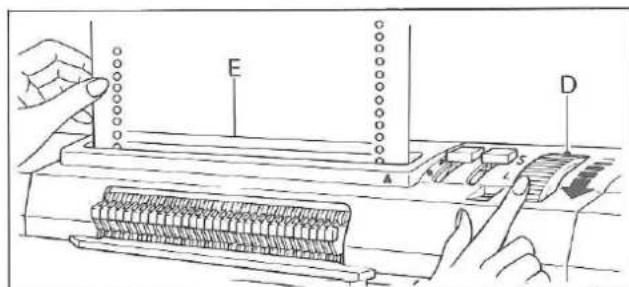
text_image
Technical diagram showing a mechanical assembly with labeled components A, B, C, D, E and a spring-like component below.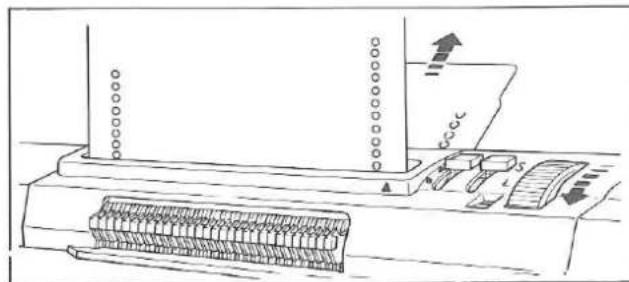
natural_image
Technical line drawing of a mechanical assembly with rollers and gears (no text or symbols)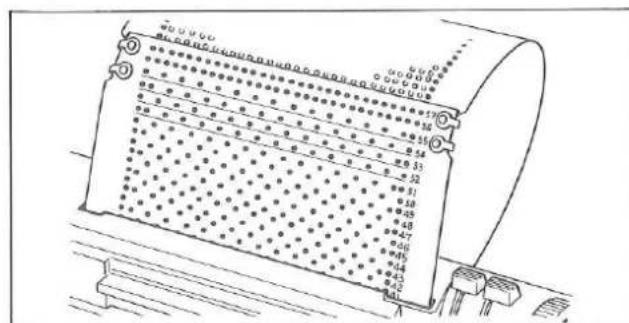
text_image
Technical diagram of a mechanical component with numbered parts and alignment indicatorsINSERTING PUNCH CARD
Prepare two Card Snaps and the Punch Card.
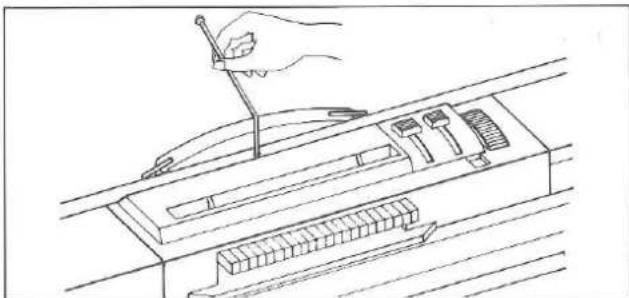
For Model 260K/L, remove the Card Guide from the Accessory Box and insert it vertically into the receiving hole at the back of the casement.
Stop Knob "A" ..... L Knob "B" ..... S
Holding the Punch Card straight with the letter A on the bottom right hand corner facing you, insert it into Punch Card Insertion Slit "C" and push it down slightly.
Turn the Punch Card Feeding Dial "D" towards you and at the same time check that the red horizontal lines "E" on the Punch Card are paralleled with the Punch Card Insertion Slit.
To advance the Punch Card, turn the Punch Card Feeding Dial towards you.
To return the Punch Card, turn the Punch Card Feeding Dial towards the side away from you.
Continue turning the Punch Card Feeding Dial until the Card end comes out from the back of Pattern Card Panel and the front and back edges of the Card are in line.
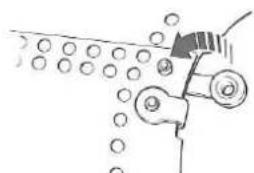
Overlap the ends of the Punch Card with the letter "C" on the top left side of the Card.
Line up the 2 holes on each side.
natural_image
Simple line drawing of a hand pouring liquid into a container with bubbles (no text or symbols)Insert the Card Snap and join the Card ends by pressing the Snap together.
text_image
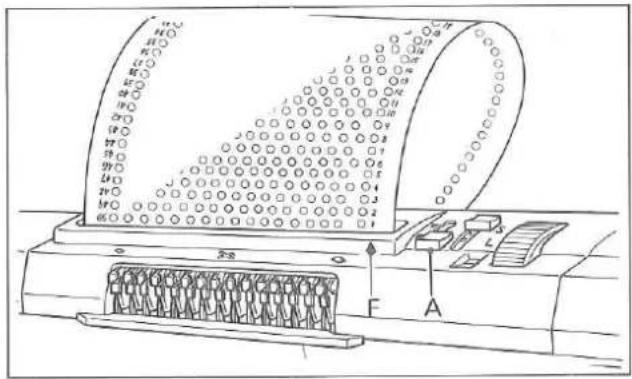
Technical diagram of a computer with labeled components and a paper roll, showing internal structure and control panel.Turn the Punch Card Feeding Dial until Card memory number 1 reaches above the triangle mark "F" on Pattern Card Panel.
No.1 is always the beginning of a pattern.
Stop Knob "A"......
text_image
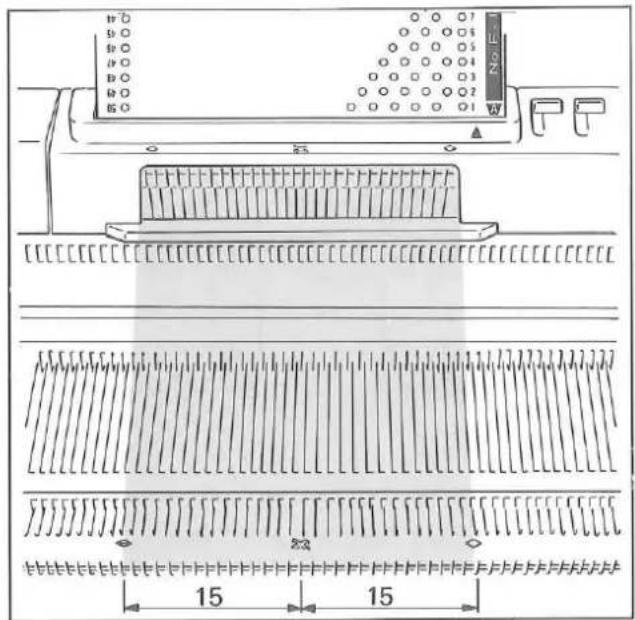
B C D E F No. F. 15 15On the front of the Pattern Card Panel and front edge of the Needle Bed, are markings X and ◇.
X – indicates the centre of a pattern. ◇ – indicate width of pattern.
Between two ◇ markings are 24 needles.
text_image
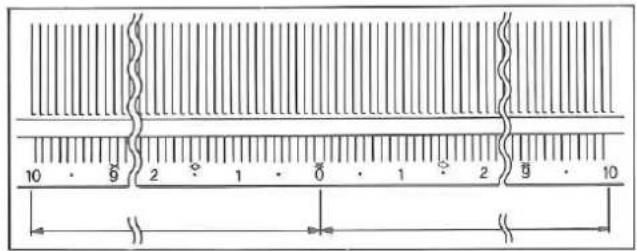
10 5 2 1 0 1 2 9 10The numbers 0–10 on the left and right side of centre(0) indicate the number of needles.
The pattern of the Punch Card is produced on the needles on the left and right sides of centre(0).
text_image
1 2 3 4 5 6 7 6 5 8 9 8 10 11 ↓ S L ① ② = ⑩ I ● S ▼ II ∧ II ▼ ○ ○ ○ ○ A → ⑪ ↘ " " " A " " " " " " A B ⇌ 2 13 12READING OPERATION TABLE
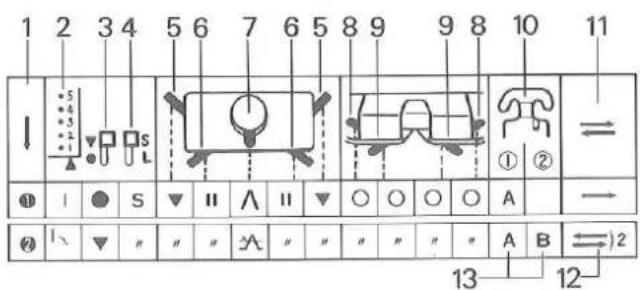
1 - Order
2 - Card Memor Number
3-Stop Knob
4-L Knob
5-Side Levers
6 - Russel Levers
7 - Cam Lever
8 - Weaving Knobs
9 - Tuck Knobs
10 - Yarn Feeder ① and ②. Yarn Feeder ② column also includes Weaving Yarn Holder or Plating Yarn Feeder.
11 - Knitting direction.
12 - The required number of rows should be knitted.
13 - A, B and C stand for different yarns.

text_image
J J J J J J J J J J J J J J J J J J J J J J J J J J J J J J J J J J J J J J J J J J J J J J J J J J J J J J J J J J J J J J J J J J J J J J J J J J J J J J J J J J J J J J J J J J J J J J J J J J J J J 0-Needle arrangement

text_image
30Point Cams M setting
CAUTION ON PATTERN KNITTING
natural_image
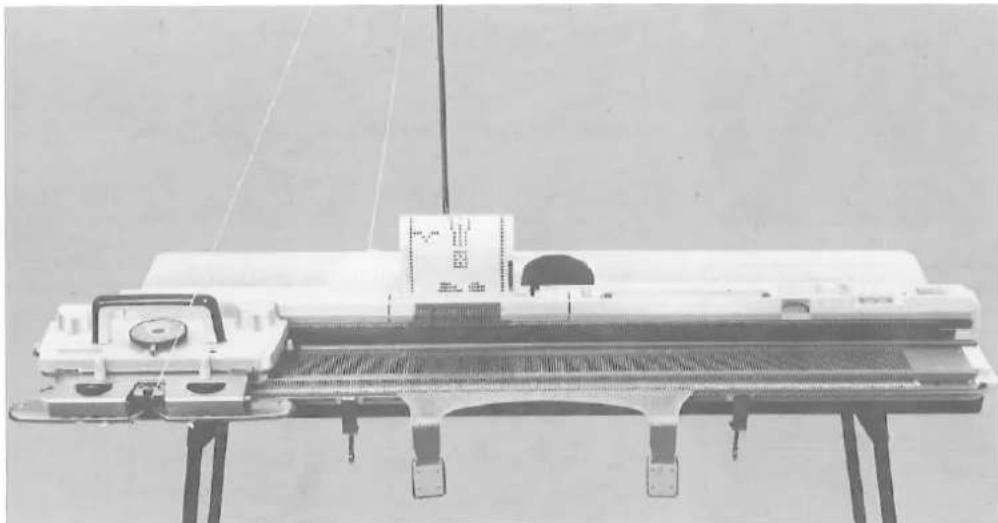
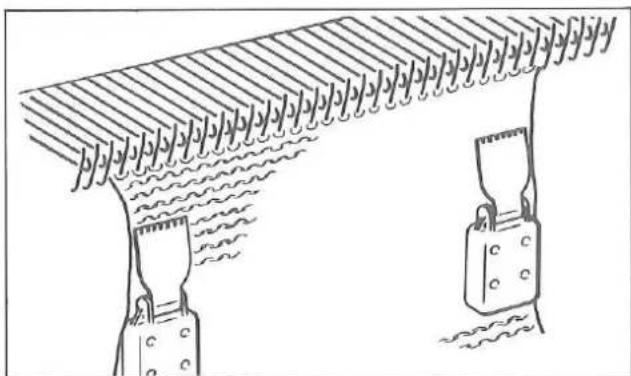
Mechanical device with a cylindrical component and attached mounting bracket, no visible text or symbolsBefore practicing pattern knitting, knit 9–10 rows of stockinet and place the Carriage at the left side of the Needle Bed.
natural_image
Diagram of a mechanical assembly with two clamps and a rack, no text or symbols presentAlways hook the Claw Weights at both edges of the knitting.
Move the Claw Weights up as knitting progresses.
natural_image
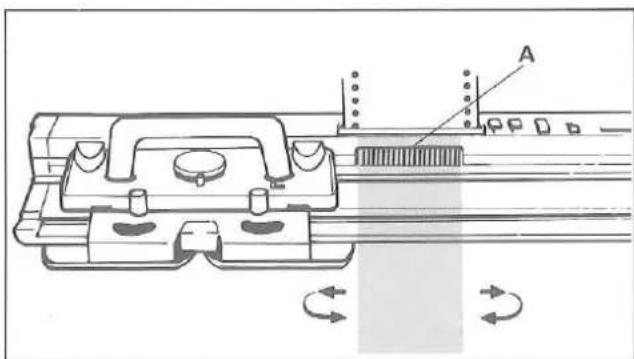
Technical line drawing of a mechanical assembly with rotating components and labeled section A (no text or symbols beyond labels)When moving the Carriage back and forth, ensure that the Carriage has passed the 30 needles corresponding to the Touch Levers "A".
Move the Carriage at an even speed.
natural_image
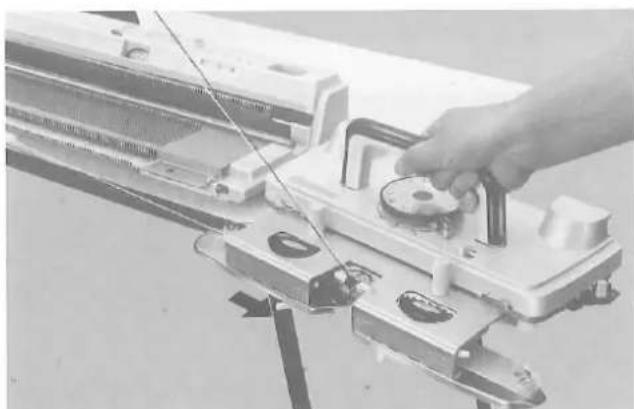
Close-up of a hand operating a mechanical device with wires and clamps (no visible text or symbols)Do not remove the Carriage from the Needle Bed.
If the Carriage has been removed by accident, see page 68 for adjustment.
natural_image
Patterned fabric with diamond and square motifs in grayscale (no text or symbols)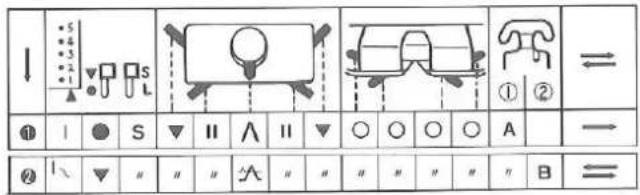
text_image
Diagram showing electrical circuit symbols and component layouts with labeled sections and directional indicators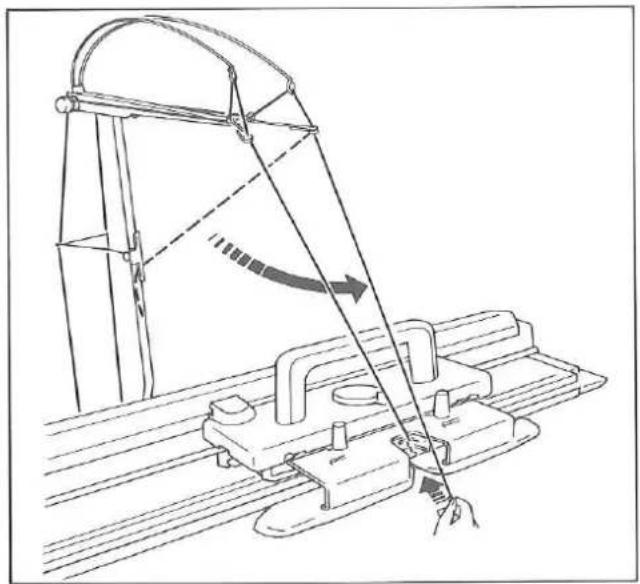
natural_image
Technical line drawing of a mechanical clamp or bracket assembly with a hand operating the lever (no text or symbols present)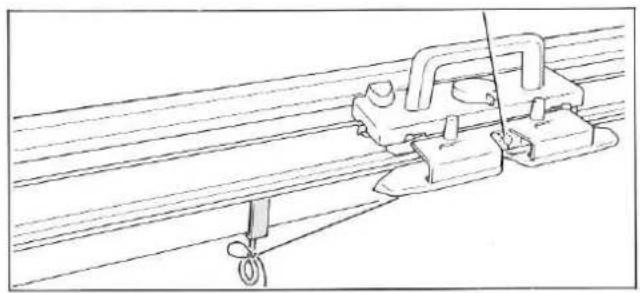
natural_image
Technical line drawing of a mechanical clamp or bracket assembly with diagonal lines and a hook (no text or symbols)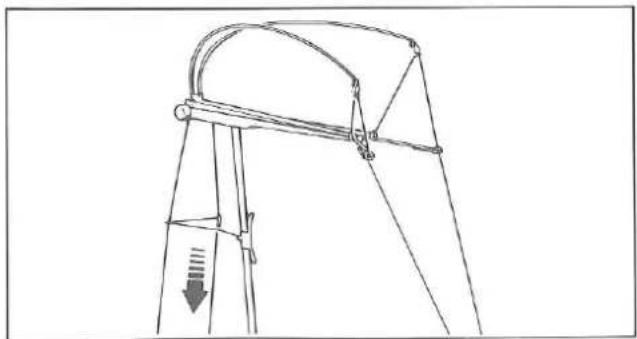
natural_image
Technical line drawing of a mechanical device with a downward arrow indicating force or motion (no text or symbols)FAIR ISLE(KNIT-IN)
Punch Card No.F-16-A
Insert the Punch Card.
Set the Controls as required in ORDER 1.
Knit 1 row from left to right.
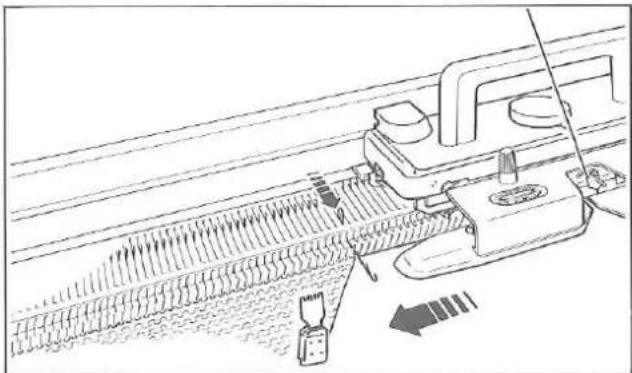
Hang the Claw Weights at both edges of the knitting.
Set the Controls as required in ORDER 2.
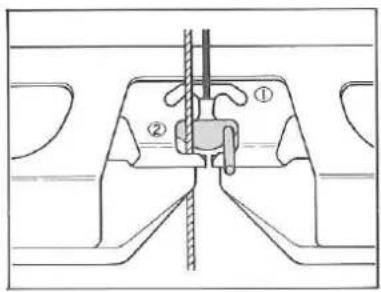
Remove the second yarn end from the Yarn Clip and pull it down towards the Carriage.
Insert the second yarn into the Yarn Feeder ②.
text_image
Technical diagram showing a mechanical assembly with labeled parts ① and ②, likely illustrating a gear or cam mechanism.Fasten the yarn end to the Clamp.
Eliminate slack yarn by pulling yarn down at the back of Yarn Rod until Tension Spring "A" is nearly in the horizontal position.
Knit the required number of rows.
natural_image
Technical line drawing of a mechanical assembly with no visible text or symbols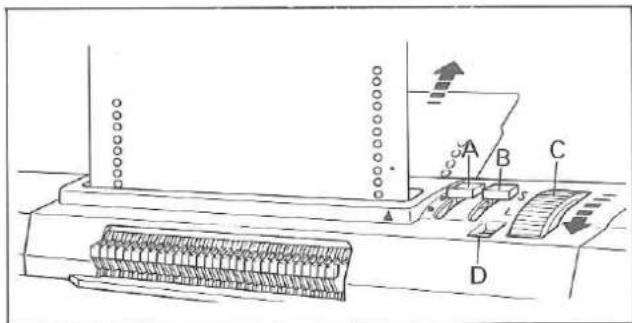
text_image
Technical diagram of a mechanical assembly with labeled components A, B, C, and D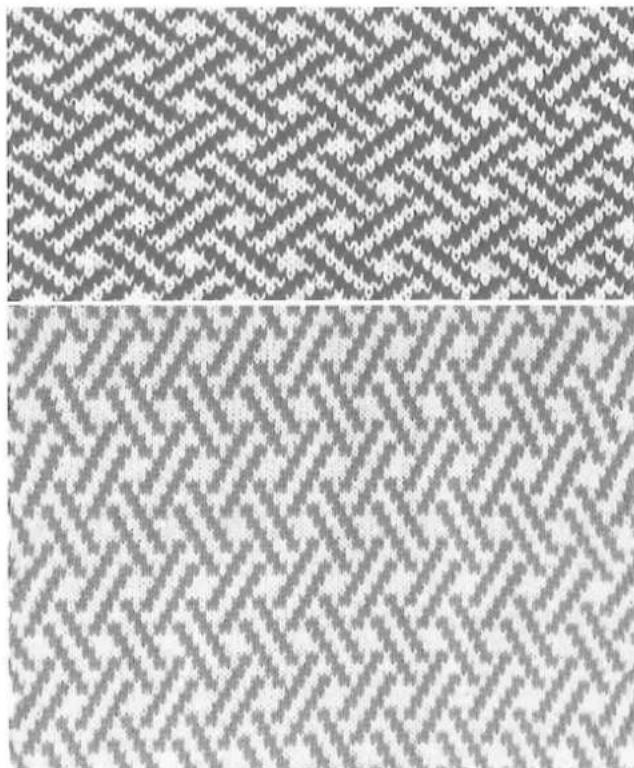
natural_image
Two-panel grayscale patterned textile with repeating zigzag textures (no text or symbols)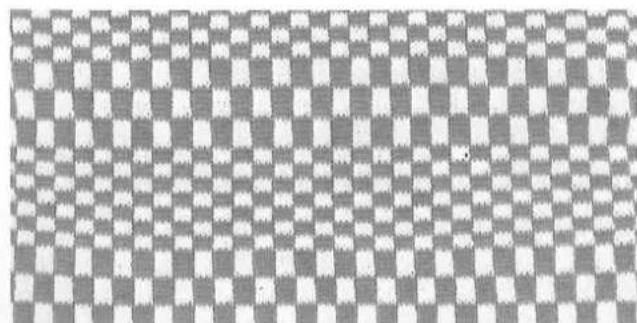
natural_image
Close-up of a checkerboard pattern with repeating white and gray squares (no text or symbols)If the end stitches are not knitted perfectly, push one end needle on the Carriage side to D (or C in partial knitting) position before knitting the next row.
Using the New Magic Cams and the Point Cams E in Fair Isle knitting eliminates the need of your manually pushing the end working needles to D or C position.
(Refer to page 42)
PATTERN CARD PANEL FUNCTION
STOP KNOB
When the Stop Knob "A" is set to ●, the Punch Card is locked and not advanced by the Punch Card Feeding Dial "C" and by the Carriage.
When the Stop Knob "A" is set to ▼, the Punch Card is free and advanced by the Punch Card Feeding Dial "C" and by the Carriage.
L KNOB
When the L Knob "B" is set to S, the Punch Card is advanced every row as the Carriage moves and standard pattern is knitted.
When the L Knob is set to L, the Punch Card is advanced every second row as the Carriage moves, thus producing vertically expanded pattern.
L KNOB INDICATOR
Colours in the L Knob Indicator "D" alternate.
Blue.....the current row is repeated on the next row.
Red.....the Punch Card advances to the next row and a new pattern row is knitted.
HINTS
This L Knob function is mostly used with FAIR ISLE but can be used for other stitch types, if the Punch Card is suitable, such as WEAVING, SLIP STITCH PATTERN, TUCK STITCH PATTERN and PUNCH LACE.
natural_image
Close-up of a woven fabric with repeating wavy patterns (no text or symbols)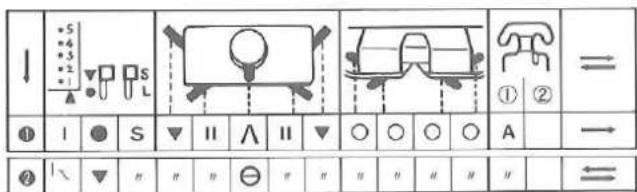
text_image
↓ ① I ● S ▼ II ∧ II ▼ ○ ○ ○ A → ② | \ ▼ " " " ⊖ " " " " " # " " =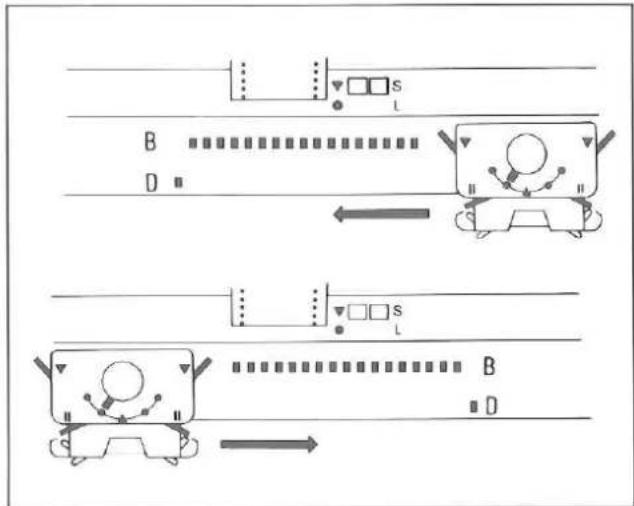
flowchart
graph TD
    A["Top: S L"] --> B["Left: B"]
    B --> C["Right: D"]
    C --> D["Bottom: S L"]
    D --> E["Left: B"]
    E --> F["Right: D"]
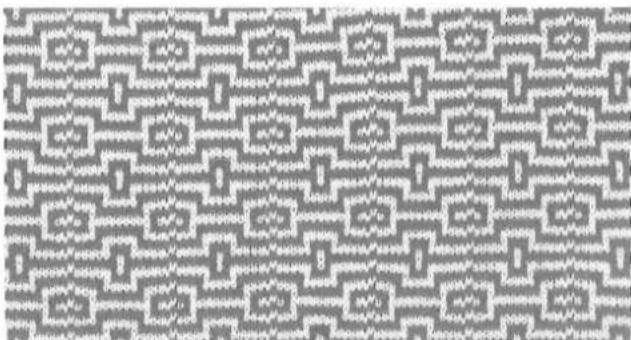
natural_image
Repeating geometric pattern with interlocking shapes (no text or symbols)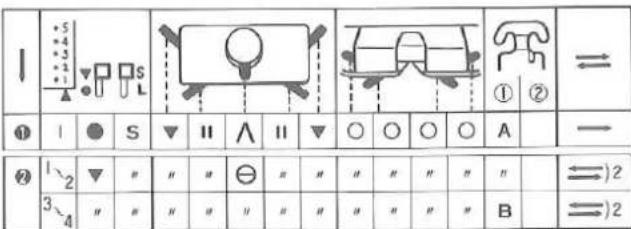
text_image
I 5 4 3 2 1 S ① ② ① | ● S ▼ II ∧ II ▼ ○ ○ ○ ○ A — ② 1/2 ▼ # " # ⊖ " # " # " " " " B ⇌)2 3/4 " # " # " " # " " " B ⇌)2SLIP STITCH PATTERN
Punch Card No.F-11-A
Insert the Punch Card.
Set the Controls as required in ORDER 1.
Knit 1 row from left to right.
Hang the Claw Weights at both edges of the knitting.
Set the Controls as required in ORDER 2.
Set the Stitch Dial 1 number higher than that for stockinet as the fabric of slip stitch pattern is rather tight.
Push one end needle on the side opposite the Carriage to D (or C in partial knitting) position before knitting the next row.
Continue knitting by pushing the end needles on the side opposite the Carriage before knitting the next row.
If the stitches tend to float when you are knitting with medium yarn set the Tuck Lever to □ mark.
(If the yarn tends to entangle with the Round Brushes, set the Separators in place.)
SLIP STITCH PATTERN IN COLOUR
Punch Card No.F-7-A
Insert the Punch Card.
Set the Controls as required in ORDER 1.
Knit 1 row from left to right.
Hang the Claw Weights at both edges of the knitting.
Set the Controls as required in ORDER 2.
Knit 2 rows.
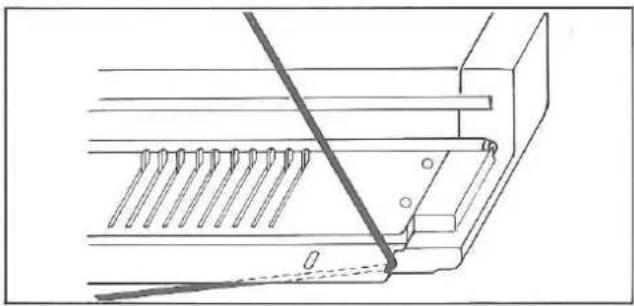
natural_image
Technical line drawing of a mechanical assembly with no visible text or symbolsRemove main yarn from the Yarn Feeder and place it at the cut-out on the side of the Needle Bed.
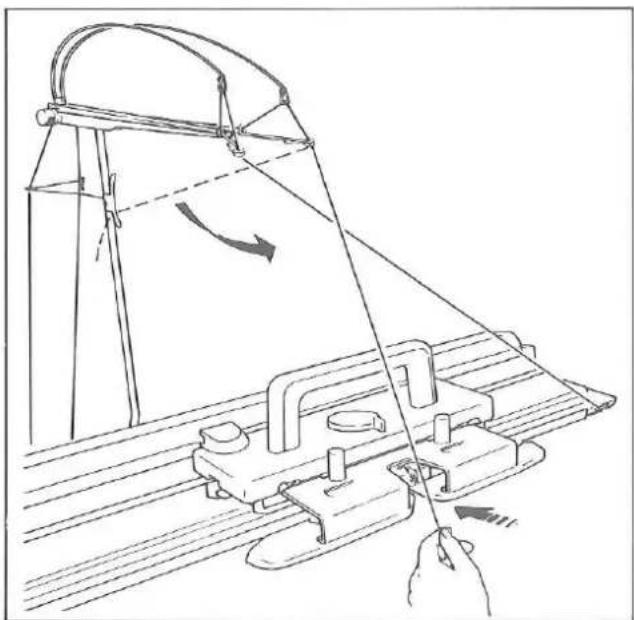
natural_image
Line drawing of a mechanical device with a hand operating it, showing motion direction and rotation arrows (no text or symbols)Remove second yarn from the Yarn Clip.
Insert second yarn into the Yarn Feeder①.
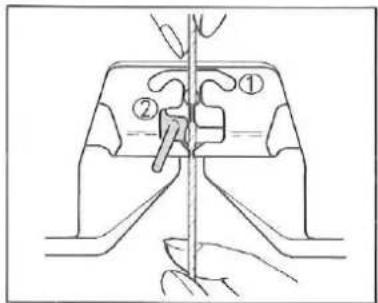
text_image
Technical diagram showing a mechanical assembly with labeled parts ① and ②, likely illustrating a turning or dissection process.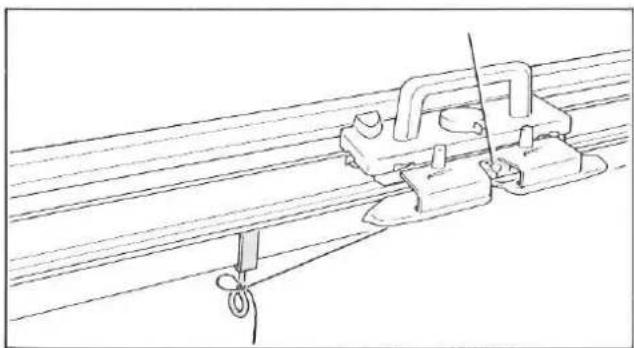
natural_image
Technical line drawing of a mechanical clamp or bracket assembly with wires and a hook (no text or symbols)Fasten the yarn end to either Clamp.
Set the Stitch Dial 1 number higher than that for stockinet as the fabric of slip stitch pattern is rather tight.
flowchart
graph TD
    A["Input Signal"] --> B["S"]
    B --> C["Block B"]
    C --> D["D"]
    D --> E["Output Signal"]
    F["Input Signal"] --> G["S"]
    G --> H["Block H"]
    H --> I["D"]
    I --> J["Output Signal"]
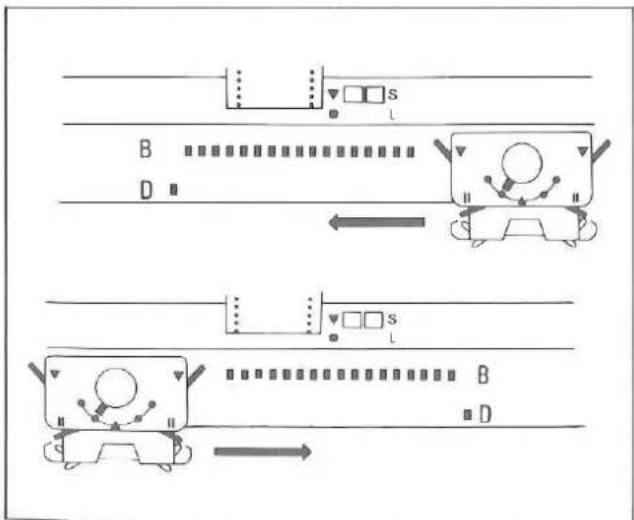
On each row, push one end needle on the side opposite the Carriage to D (or C in partial knitting) position before knitting the next row.
Knit 2 rows with the second yarn.
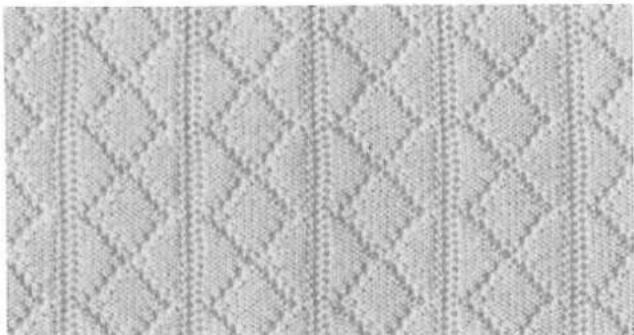
Knit required number of rows using two yarns alternately.
natural_image
Close-up of a woven textile with diamond and dot patterns (no text or symbols)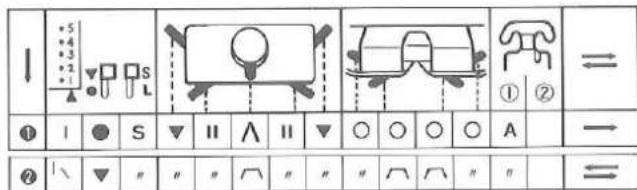
text_image
↓ ① I ● S ▼ II ∧ II ▼ ○ ○ ○ A → ② | \ ▼ " " " ^ " " " ^ ^ " " =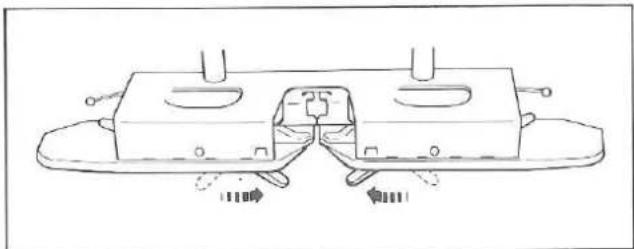
natural_image
Technical line drawing of a mechanical component with mounting holes and internal cavity (no text or symbols)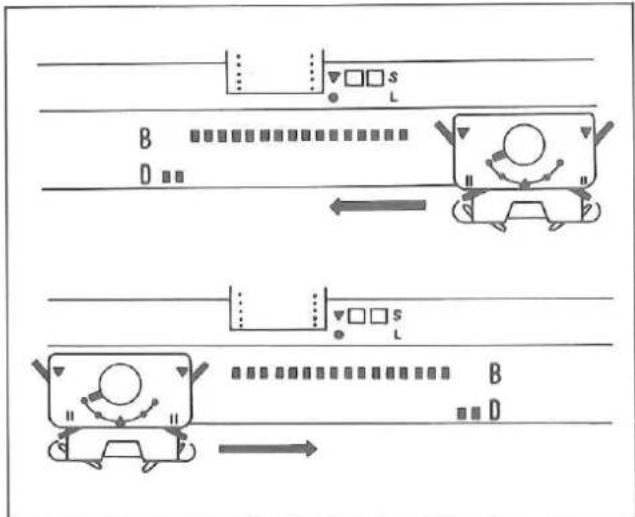
flowchart
graph TD
    A["Input Signal"] --> B{B: Square S}
    B --> C["Output Signal"]
    C --> D["Output Signal"]
    style A fill:#f9f,stroke:#333
    style D fill:#bbf,stroke:#333

natural_image
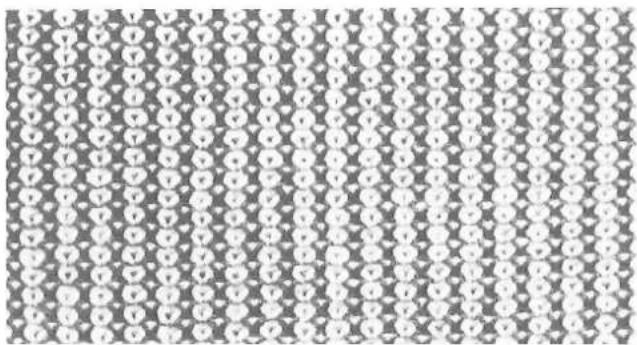
Close-up of a mechanical component with parallel grooves and a propeller, no visible text or symbolsTUCK STITCH PATTERN
Punch Card No.F-7-A
Insert the Punch Card.
Set the Controls as required in ORDER 1.
Knit 1 row from left to right.
Hang the Claw Weights at both edges of the knitting.
Both Tuck Knobs....
Set the other Controls as required in ORDER 2.
Knit the required number of rows.
If the edge stitches are not knitted perfectly, push up two end needles on the side opposite the Carriage to D (or C in partial knitting) before knitting the next row.
If the yarn easily entangles with the Round Brushes in the Arm, set the Yarn Separators at both sides of the knitting needles.
The yarn must pass over separators.
For instruction, see page 38, 39.
natural_image
Repeating pattern of white circular shapes on a gray background, no text or symbols present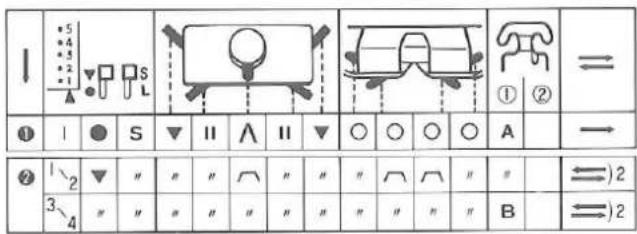
text_image
I 5 4 3 2 1 S L ① ② ① | ● S ▼ II ∧ II ▼ ○ ○ ○ ○ A → ② 1/2 ▼ " " " ↗ " " " ↗ ↗ " " ⇌ 2 3/4 " " " " " " " " " B ⇌ 2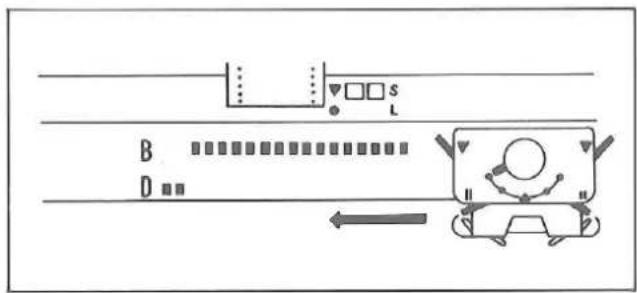
text_image
B D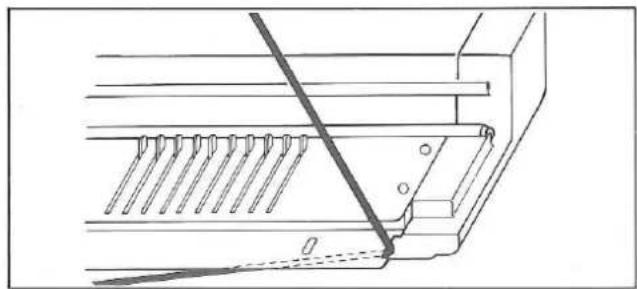
natural_image
Technical line drawing of a mechanical assembly with no visible text or symbols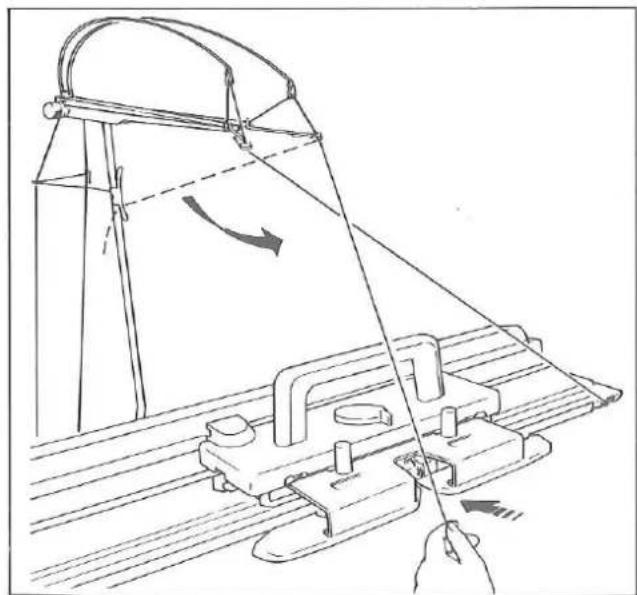
natural_image
Technical line drawing of a mechanical device with a hand operating the lever (no text or symbols present)TUCK STITCH PATTERN IN COLOURS
Punch Card No.F-5-A
Insert the Punch Card.
Set the Controls as required in ORDER 1.
Knit 1 row from left to right.
Hang the Claw Weights at both edges of knitting.
Both Tuck Knobs....
Set the other Controls as required in ORDER 2.
Knit 2 rows.
Remove main yarn from the Yarn Feeder ① and place it at the cut-out on the side of Needle Bed.
Insert second yarn into the Yarn Feeder ①. For instructions, see page 28.
Knit 2 rows with second yarn.
Knit the required number of rows using two yarns alternately.
If the edge stitches are not knitted perfectly, see page 29.
If the yarn easily entangles with the Round Brushes in the Arm, see page 29.
text_image
Grid of handwritten or printed mathematical expressions with equations and symbols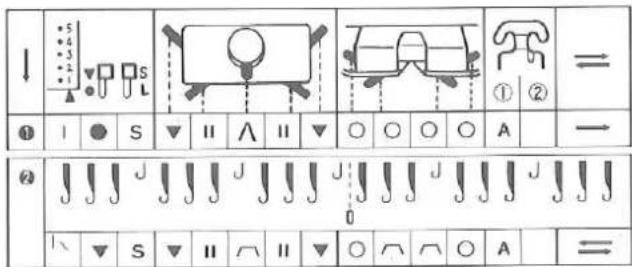
text_image
Cropped image showing two sets of musical notation symbols with corresponding visual representations and labels, likely from a music or folk song.
text_image
S B
text_image
J J J J J O A B O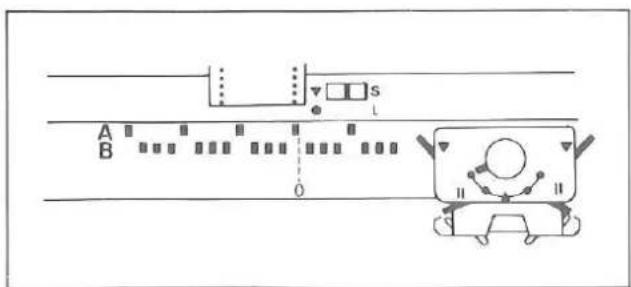
text_image
A B S I OTUCK LACE
Punch Card No.F-5-A.
This is a variation of tuck stitch pattern placing selected needles in A position.
Insert the Punch Card.
Set the Controls as required in ORDER 1.
Knit 1 row from left to right.
Hang the Claw Weithts at both edges of the knitting.
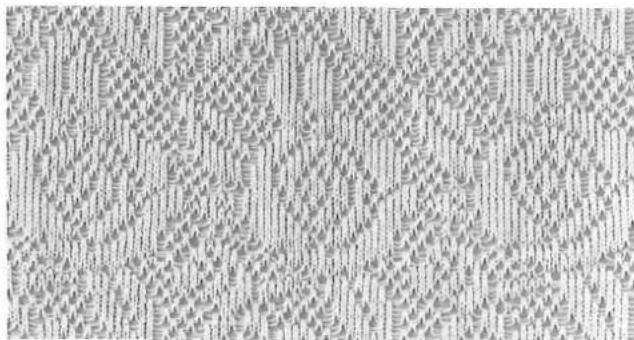
Transfer every fourth stitch to its adjacent needle starting at centre "0" on the Needle Bed as shown.
Push every fourth empty needle to A position.
Set the Controls as required in ORDER 2.
Knit the required number of rows.
If the edge stitches are not knitted perfectly, see page 29.
If the yarn easily entangles around the Round Brushes in the Arm, see page 29.
natural_image
Close-up of a textured fabric with repeating diamond patterns and no visible text or symbols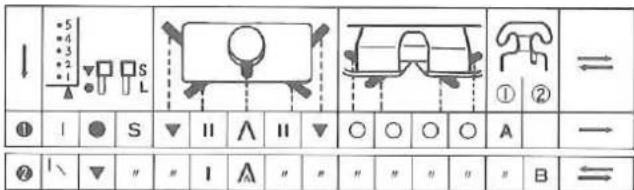
text_image
↓ 5 4 3 2 1 L ① | ● S ▼ II ∧ II ▼ ○ ○ ○ ○ A → ② | √ " " I A " " " " " " " B ⇌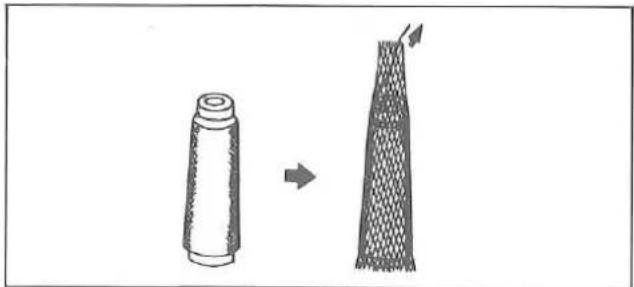
natural_image
Diagram showing a cylindrical object transforming into a meshed structure with an arrow indicating direction (no text or symbols)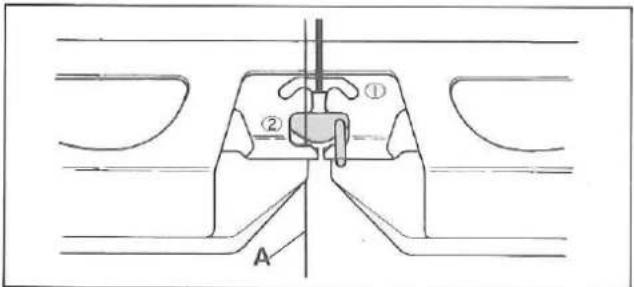
text_image
Technical diagram showing a mechanical or fluidic component with labeled parts ①, ②, and A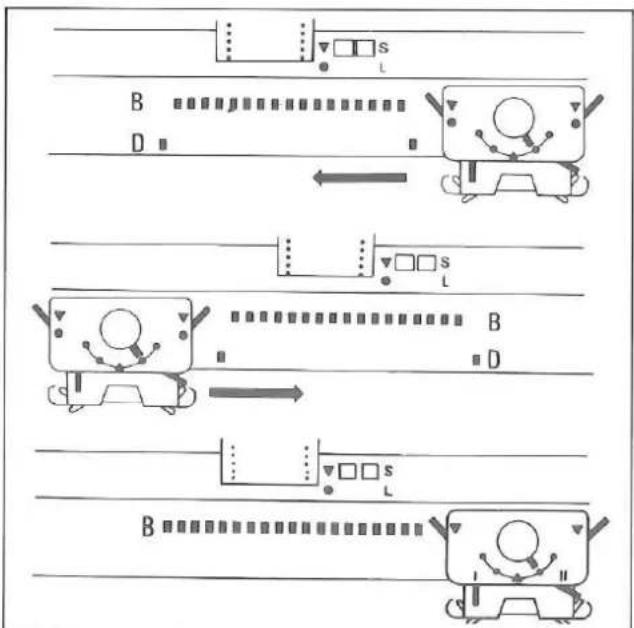
flowchart
graph TD
    A["Input Signal"] --> B{B = Display}
    B --> C["Output Signal"]
    C --> D["Control Signals"]
    D --> E["Output Signal"]
    style A fill:#f9f,stroke:#333
    style E fill:#bbf,stroke:#333
PUNCH LACE
Punch Card No.F-19-A.
A fine transparent nylon thread is used with main yarn.
Insert the Punch Card.
Set the Controls as required in ORDER 1.
Knit 1 row from left to right.
Hang the Claw Weights at both edges of the knitting.
Set the Controls as required in ORDER 2.
Cover spool of nylon thread with Stop Net (an optional accessory) or with a cut-piece of stocking.
Thread nylon thread into one side of the Auto Tension.
Insert the nylon thread "A" into the Yarn Feeder ②.
Fasten the thread end to the Clamp.
Tension Dial for nylon thread....7
Push one end needle at both sides of the knitting to D position.
Knit from right to left.
The end needles will not knit.
Knit from left to right.
The end needles will be knitted back to B position.
Knit the required number of rows.
Do not fail to push the two end needles to D position when you move the Carriage from right to left.
natural_image
Repeating geometric pattern with interlocking diamond shapes (no text or symbols)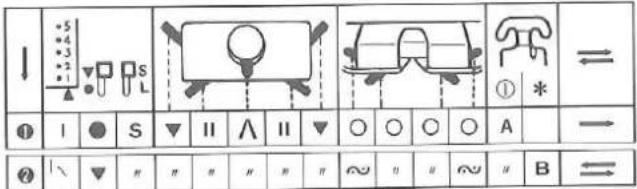
text_image
↓ ① I ● S ▼ II ∧ II ▼ ○ ○ ○ ○ A → ② | \ ▼ " " " " " " ∞ " " ∞ " B ⇌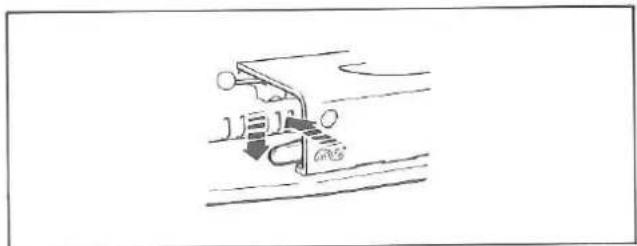
natural_image
Simple line drawing of a mechanical component or tool with no visible text, numbers, or symbols.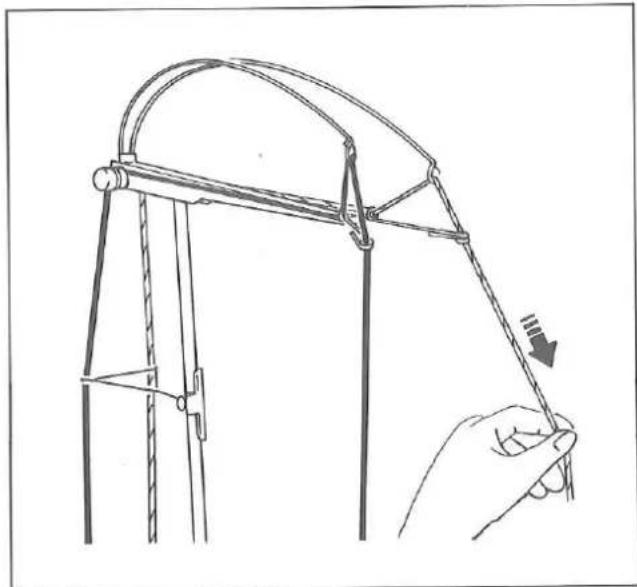
natural_image
Line drawing of a hand holding a rope tied with a curved frame, no text or symbols present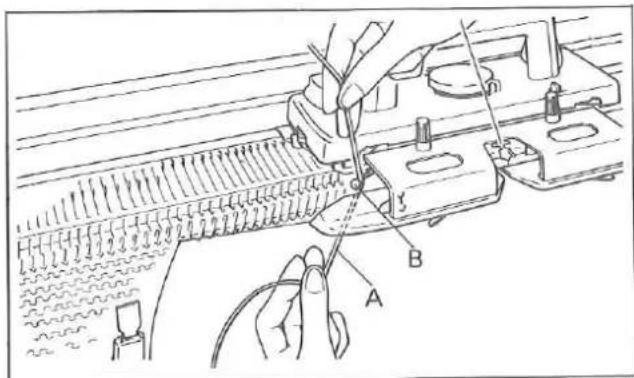
text_image
Technical diagram showing a sewing machine needle stitching with labeled parts A and BWEAVING
Punch Card No.F-6-A
Insert the Punch Card.
Set the Controls as required in ORDER 1.
Knit 1 row from left to right.
Hang the Claw Weights at both edges of the knitting.
Both Weaving Knobs....
To set the Weaving Knob to ∞, slightly push it forward, it will drop into position.
Set the other Controls as required in ORDER 2.
* Weaving Yarn Holder.
Insert second yarn (weaving yarn) into the Auto Tension and pull it down towards the Needle Bed.
Fasten the yarn end to the Clamp.
Set the Tension Dial for weaving yarn as follows:—medium/thick yarn.....2-3
Hook weaving yarn "A" onto the left Weaving Yarn Holder "B". (main yarn is in the Yarn Feeder ①.)
Set the Stitch Dial 1 number higher than that for stockinet.
natural_image
Line drawing of a sewing machine needle stitching fabric, showing mechanical components and fabric arrangement (no text or symbols)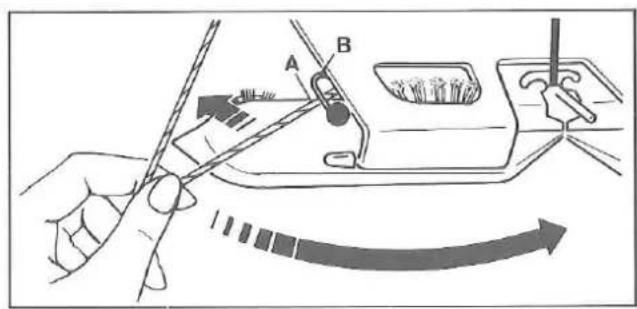
text_image
Diagram illustrating a sewing or sewing process with labeled parts A and B, showing tool path and arc direction
text_image
Technical diagram showing a hand operating a tool with labeled parts A and B, likely illustrating a mechanical or electrical assembly.
natural_image
Technical line drawing of a mechanical assembly with no visible text or symbols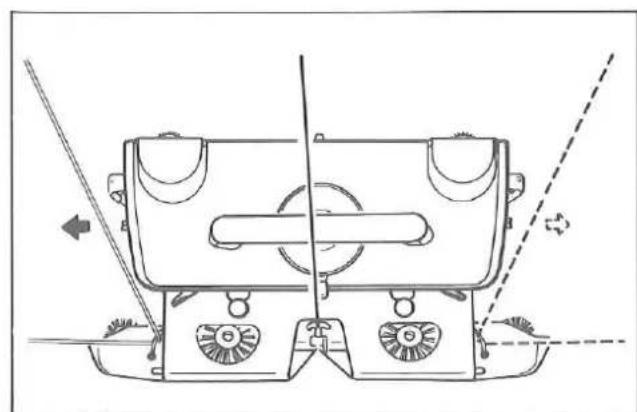
natural_image
Technical line drawing of a mechanical device with no visible text or symbolsPush one end needle on the Carriage side to D (or C in partial knitting) position.
When the Magic Cams and the Point Cams E are installed, you may perform knitting without bringing an end needle on the Carriage side to D or C position. (Refer to page 42)
Remove weaving yarn "A" from the left Weaving Yarn Holder "B".
Bring the weaving yarn underneath the Arm and move it to the right side of the Carriage.
Hook the weaving yarn "A" onto the right Weaving Yarn Holder "B". (main yarn is in the Yarn Feeder ①.)
Push one end needle on the Carriage side to D (or C in partial knitting) position before knitting the next row.
Knit from left to right.
Knit the required number of rows by placing weaving yarn on the leading side of the Carriage alternately.
WEAVING LACE
To knit weaving with selected needles rested in A position as shown on page 26 in Pattern Book, refer to the tuck lace instruction on page 31.
In Lace knitting, rest the needles manually without using the Magic Cams.
natural_image
Close-up of a textured fabric surface with vertical grooves and ridges (no text or symbols)
natural_image
Uniform gray textured surface with no visible text, symbols, or distinct features
natural_image
Technical line drawing of a mechanical component with mounting holes and a central circular feature (no text or symbols)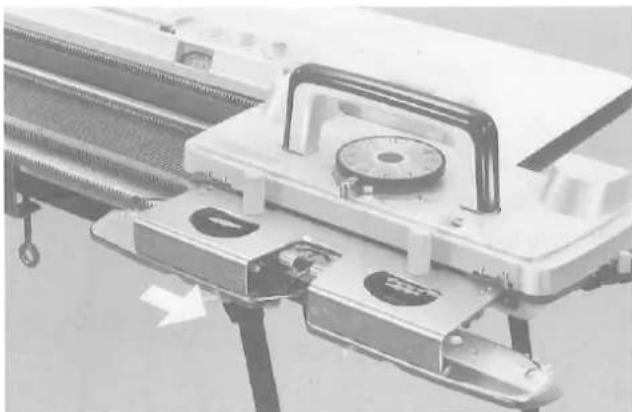
natural_image
Close-up of a mechanical testing setup with rotating components and a scale, no visible text or symbols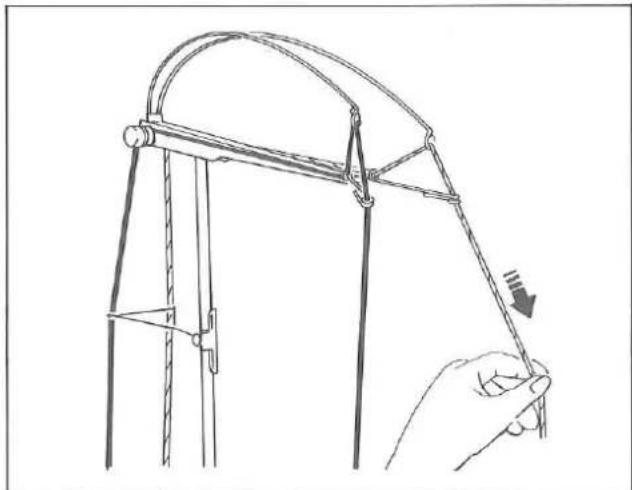
natural_image
Line drawing of a mechanical structure with a hand holding a tool, no text or symbols presentPLATING
← Main yarn
Each yarn appears on the fabric as follows:—
Main yarn......on knit side
Plating yarn......on purl side
← Plating yarn
SETTING CARRIAGE
Stitch Dial....7
Cam Lever....A
Side Levers (left and right)....▼
Russel Levers (left)....I
(right)....II
Weaving Knobs (left and right)......O
Tuck Knobs (left and right)......O
Move the Carriage to the right until the Yarn Feeder has passed the end sinker post.
Hang the Claw Weights at both edges of the knitting.
Remove second yarn (plating yarn) from the Yarn Clip and pull it down towards the Carriage.
natural_image
Technical line drawing of a mechanical component with no visible text or symbols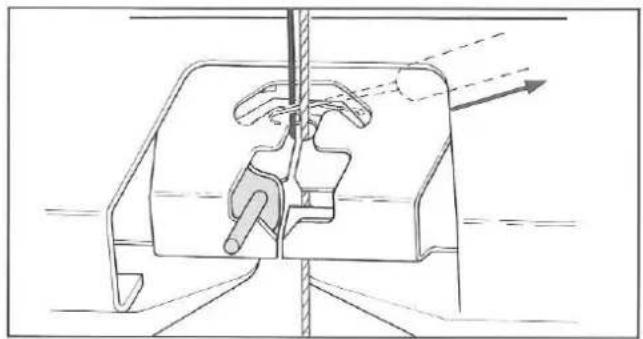
natural_image
Technical line drawing of a mechanical assembly with no visible text or symbols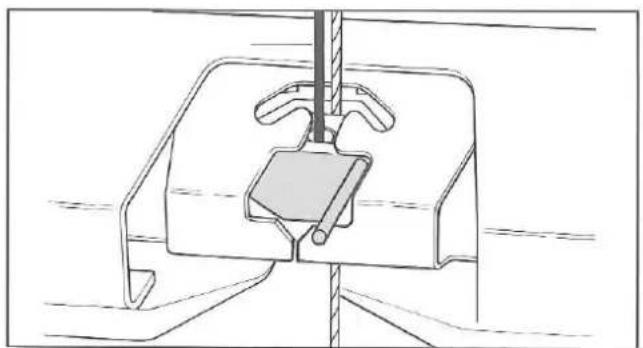
natural_image
Technical line drawing of a mechanical assembly with a central component and support structure (no text or symbols)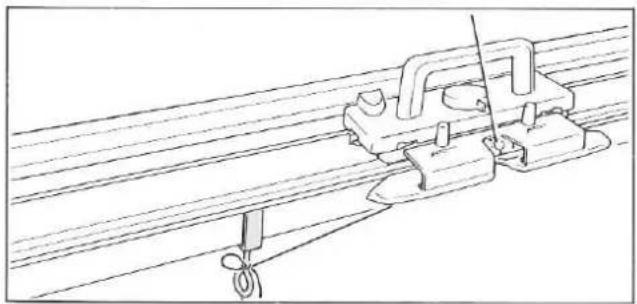
natural_image
Technical line drawing of a mechanical clamp or bracket assembly with wires (no text or symbols)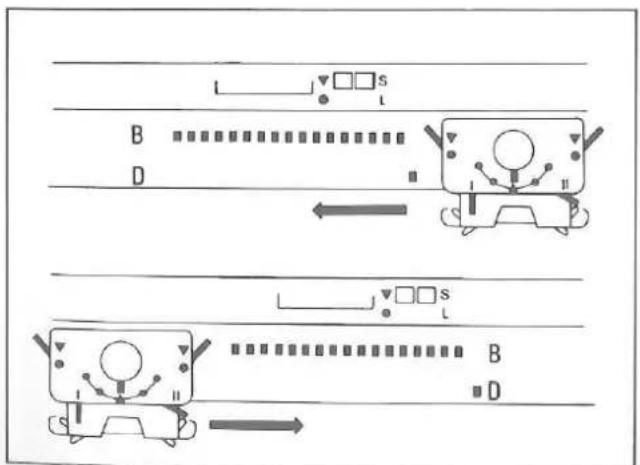
text_image
Diagram illustrating two mechanical or electrical system configurations with labeled components and directional arrows indicating flow or movement.Insert the second yarn into the Yarn Feeder ①.
Main yarn and second yarn are in the Yarn Feeder ①.
Thread the Platting Yarn Feeder as follows:—
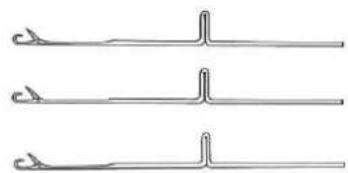
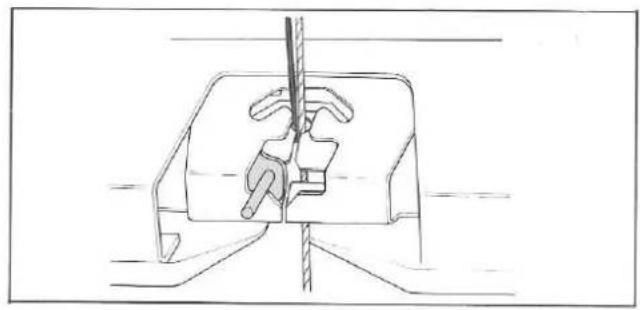
With the right hand, insert the Tappet Tool from underneath the Arm and catch the second yarn (plating yarn) by its hook.
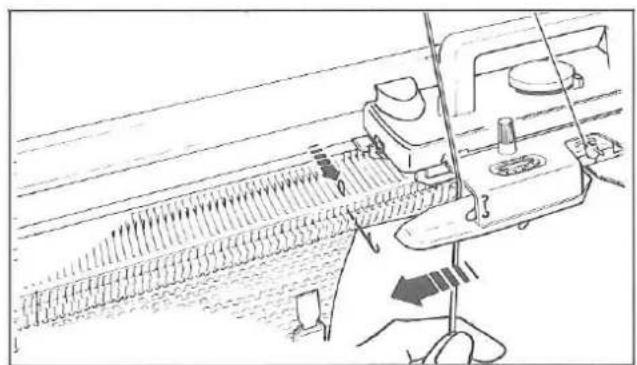
Pull the second yarn away from you and let the yarn end hang underneath the Arm.
Close the Yarn Feeder Gate.
Fasten the yarn end to either Clamp.
Push a right end needle of the knitting to D position.
Knit from right to left.
The end needle will not knit.
Knit from left to right.
The end needle will be knitted back to B position.
Knit the required number of rows.
natural_image
Pixelated illustration of a hot air balloon above a textured fabric background (no text or symbols)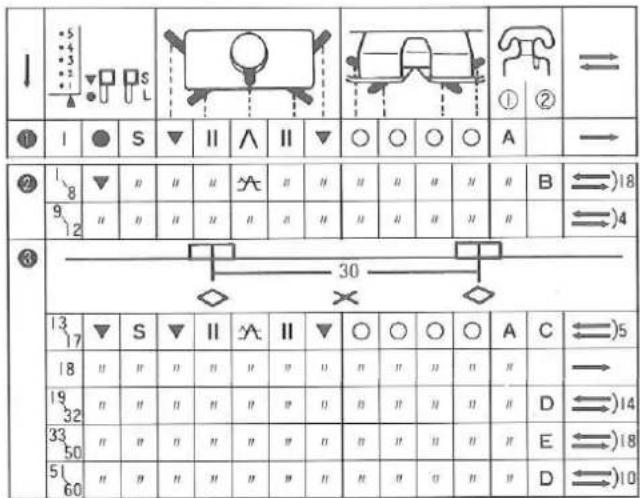
text_image
1 2 3 4 5 6 7 8 9 10 11 12 13 14 15 16 17 18 19 20 21 22 23 24 25 26 27 28 29 30 31 32 33 34 35 36 37 38 39 40 41 42 43 44 45 46 47 48 49 50 51 52 53 54 55 56 57 58 59 60 61 62 63 64 65 66 67 68 69 70 71 72 73 74 75 76 77 78 79 80 81 82 83 84 85 86 87 88 89 90 91 92 93 94 95 96 97 98 99 100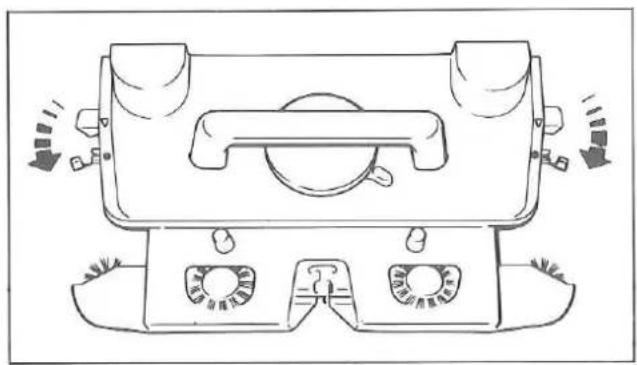
natural_image
Line drawing of a mechanical device with three rotary switches and a central hub (no text or symbols)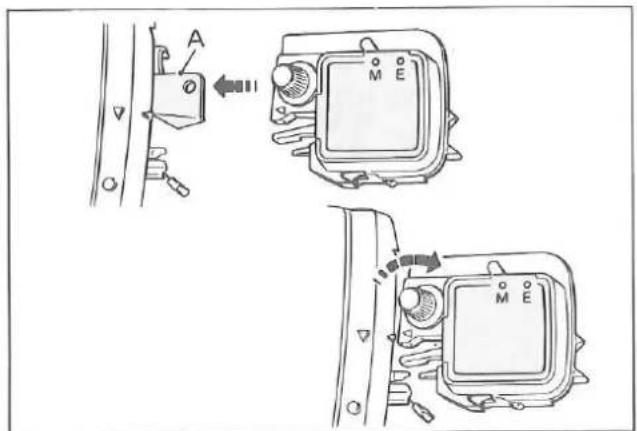
text_image
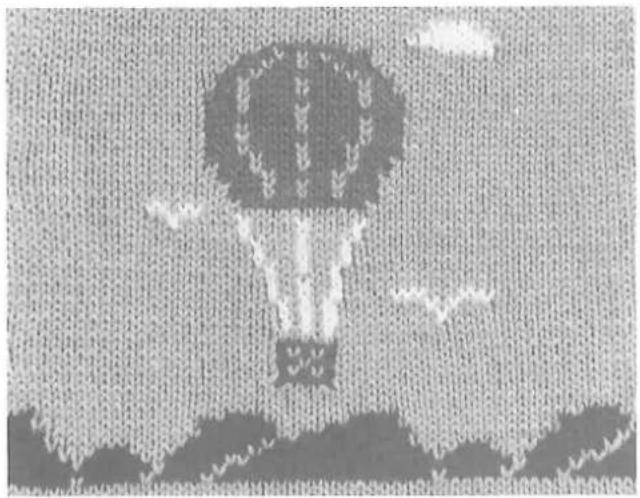
Technical diagram showing mechanical control panel with labeled components and directional arrows indicating movement or adjustment.SINGLE MOTIF
Card No.F-20-A
Insert the Punch Card.
Set the Controls as required in ORDER 1, then follow the operation table opposite.
Remove the left and right Magic Cams from the Accessory Box.
natural_image
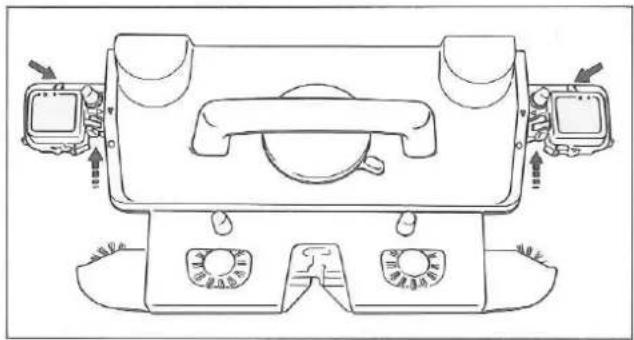
Technical line drawing of two identical mechanical components with labeled ports (E and M), no text or symbols present.Both Side Levers....
Place both Magic Cams onto the extension plates "A" ensuring that the triangle marks on the Magic Cams correspond with triangle marks on the Carriage.
Fasten the Magic Cams to the extension plates by turning the knurled knobs in the clockwise direction.
natural_image
Top-down schematic of a car dashboard with front, side, and top view (no text or labels)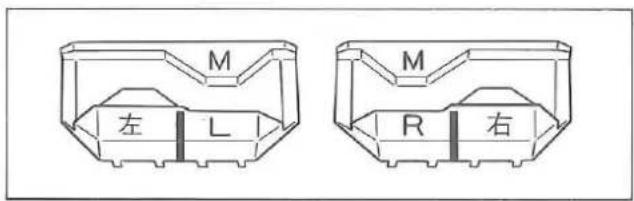
text_image
M 左 L M R 右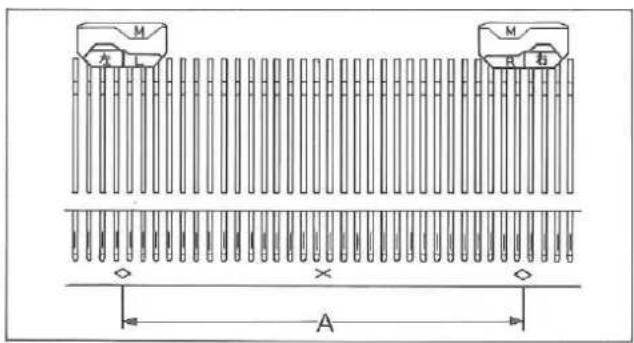
text_image
M 大 X A 右 右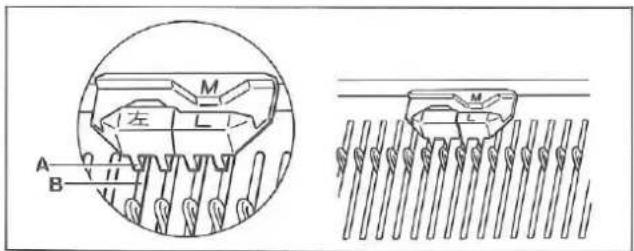
text_image
M 左 L A B M L
natural_image
Two identical mechanical tool holders with curved and straight ends, shown in line drawing style (no text or symbols)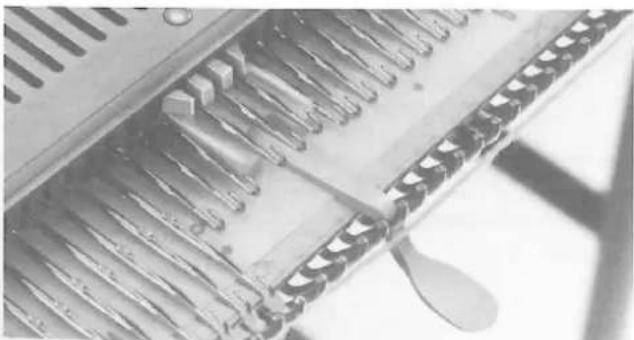
natural_image
Close-up of a mechanical component with multiple blades and a curved blade (no visible text or symbols)Both Side Levers....▼
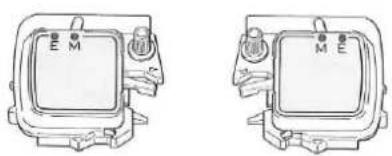
Set the MP Lever of the Magic Cam to M mark. (When moving, lift it slightly.)
Remove the left and right Point Cams M (red) from the Accessory Box.
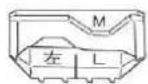
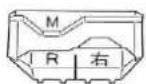
left Point Cam - marked M.L. right Point Cam - marked M.R.
Set both Point Cams M with their division lines are between 15th and 16th needle on both sides of centre(0) of the Needle Bed.
"A" — needles knitting single motif.
Ensure that the four studs "A" of the Point Cam M fit correctly into the needle bed grooves "B" at the rear of the Needle Bed.
Remove two Yarn Separators from the Accessory Box.
Open latches of the 4th, 5th and 6th non-working needle on the left and right side of the knitting.
Insert the Yarn Separators between these three needles and the Needle Bed as far as they will go.
The yarn must pass over the Yarn Separator.
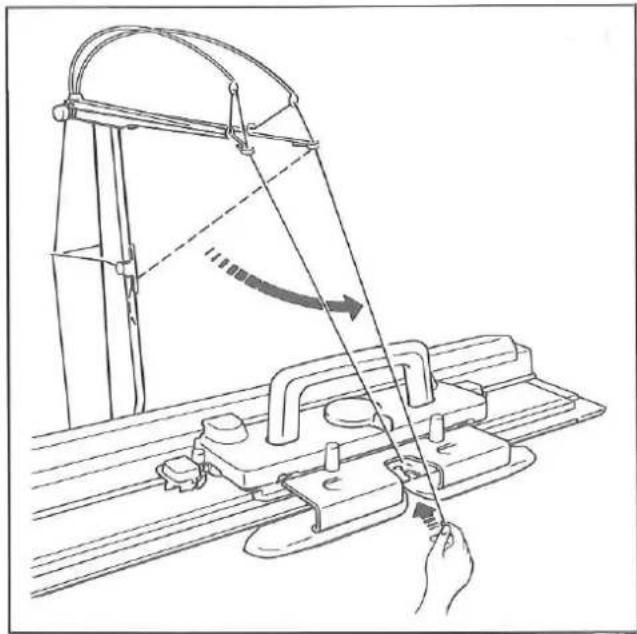
natural_image
Technical line drawing of a mechanical device with a hand operating it, showing motion lines and components (no text or symbols)Remove the second yarn end from the Yarn Clip and pull it down towards the Carriage.
Insert the second yarn into the Yarn Feeder ②. Fasten the yarn end to the Clamp.
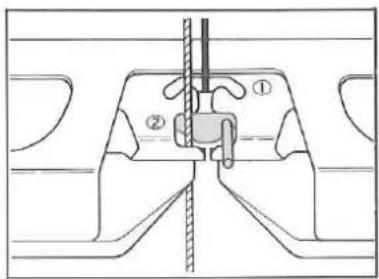
text_image
Technical diagram showing a mechanical assembly with labeled parts ① and ②, likely illustrating a valve or actuator mechanism.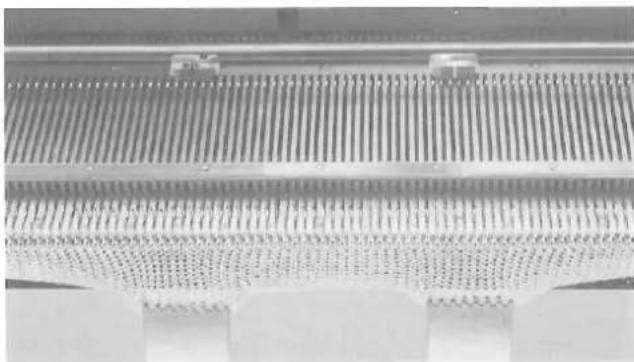
natural_image
Close-up of a corrugated metal structure with vertical slats and horizontal supports (no text or symbols visible)Hang the Claw Weights on the knitting, below the left and right Point Cams M.
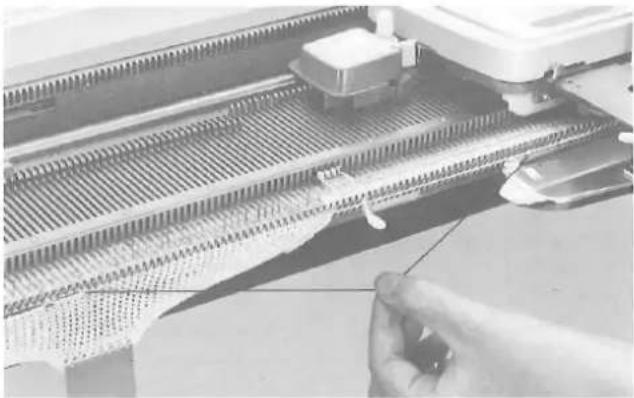
natural_image
Close-up of a hand adjusting a metal strip on a conveyor belt (no visible text or symbols)Set the Controls as required in ORDER 2.
Knit 1 row from right to left.
When knitting single motif, yarns must be arranged as follows:—
main yarn - over Yarn Separator. second yarn - under Yarn Separator.
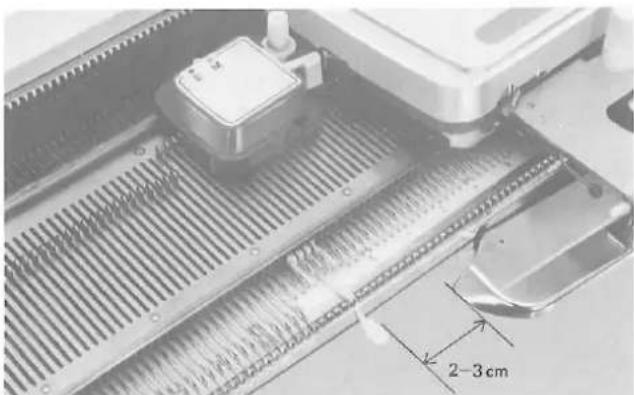
natural_image
Close-up of a mechanical component with ribbed texture and a 2–3 cm dimension label (no readable text or symbols beyond the measurement)Ensure that the Arm has passed the Yarn Separator by approximately 2–3cm. before knitting the next row.
natural_image
Diagram of a plant leaf structure with leaves growing and dispersing, showing root system and leaf arrangement (no text or labels)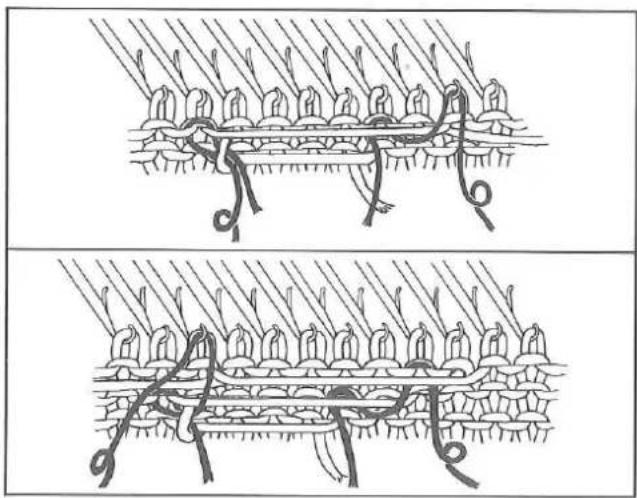
natural_image
Two-panel diagram showing a patterned fabric or textile structure with coiled loops and hanging leaves, no text or symbols present.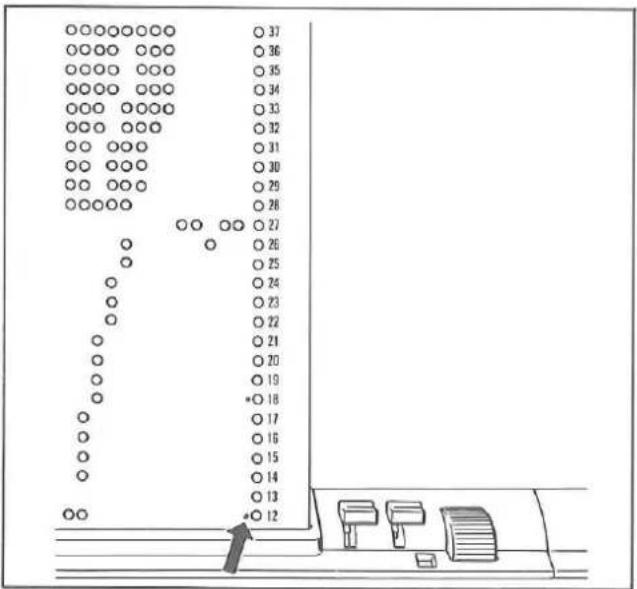
text_image
Diagram showing a vertical sequence of circles with numbers 37 to 12, connected by lines and a directional arrow pointing to the bottom-right corner.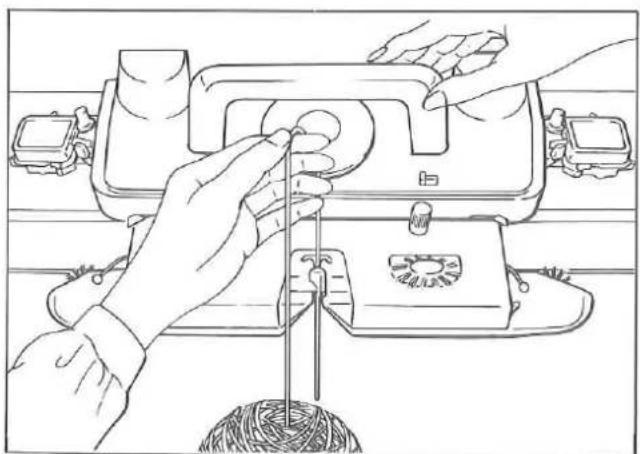
natural_image
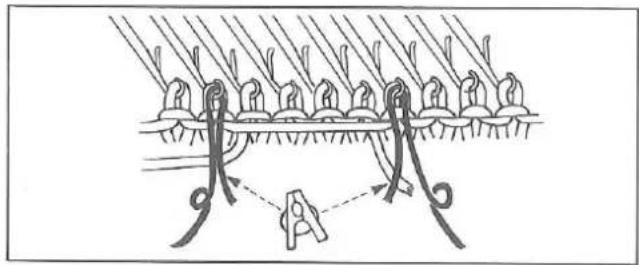
Line drawing of hands operating a sewing machine with yarn spools (no text or symbols)To eliminate separation of contrast yarn and the ground yarn at the edge of the single motif pattern, follow the procedure below on each row.
(1) Knit the first row of the single motif.
(2) Make ready two pieces of yarn of 50–60cm. long, cut from the ground yarn.
Place the yarn in the hook of the needles immediately outside the last needle holding the contrast yarn, on both edge of the single motif.
It is advised to hook a clip on the short end of the yarn.
(3) Knit the next row, and place the yarn in the hook of the needle immediately outside the single motif, to the side with the Carriage, as done in step (2).
(4) Knit the next row, and hook the yarn on the needle outside the contrast yarn, to the side with the Carriage.
(5) Repeat the above steps alternately on each row, on the side with the Carriage.
DOT MARKS ON THE PUNCH CARD
On the punch cards for single motif patterns (No.F-14, 15, 17, 20), dot marks are given alongside the feeding holes.
For the rows with the dot mark, remove the contrast yarn from the Yarn Feeder (2), and knit in the same Carriage settings.
If you knit with more than two yarns, we recommend hand feeding (see page 42) or the purchase of an additional Auto Tension with Yarn Rod.
While working single motif if tension on the second yarn becomes loose, slip the second yarn out of the Yarn Feeder ②, knit to the motif point, slip the second yarn back into the Yarn Feeder ② and complete knitting the motif and the row.
LEARNING SINGLE MOTIF VARIATIONS
2 sets of left and right Point Cams M (red) are included with your Knitter.
You can enjoy a wide variety of single motif knittings by use of these Point Cams M, some are shown below.
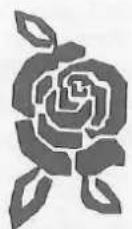
KNITTING 1 ROSE
To knit 1 rose, place the left and right Point Cams M at two nearest ◇ marks. See page 38.

text_image
左 M B 右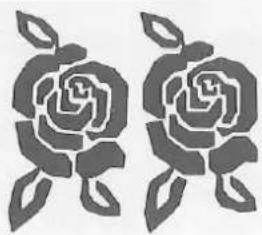
natural_image
Two identical stylized rose illustrations with leaves, no text or symbols presentKNITTING 2 ROSES
To knit 2 roses, move the left or right Point Cam M to adjacent ◇ mark.

text_image
Diagram illustrating a process with labeled components and directional arrow, showing a sequence of nodes and symbols.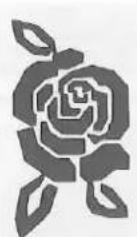

KNITTING 2 ROSES WITH SPACE IN BETWEEN
To knit 2 roses, with a space in between in stockinet, place another set of the left and right Point Cams M at two nearest ◇ marks apart from the first set.

text_image
Diagram showing a road with multiple lanes, marked with symbols like '左' (left) and '右' (right), and directional arrows indicating traffic flow.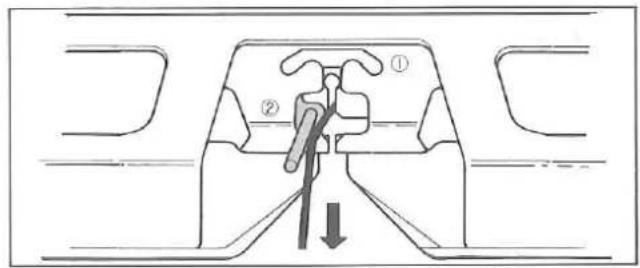
text_image
Technical diagram showing a mechanical assembly with labeled parts and directional arrow indicating motion or force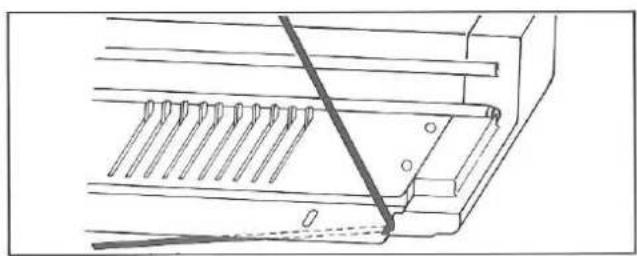
natural_image
Technical line drawing of a mechanical assembly with no visible text or symbols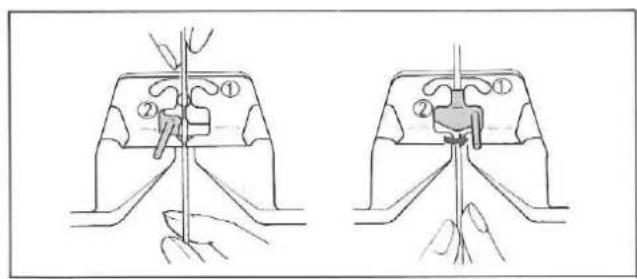
text_image
Technical diagram showing two mechanical assembly steps with labeled components and hand positions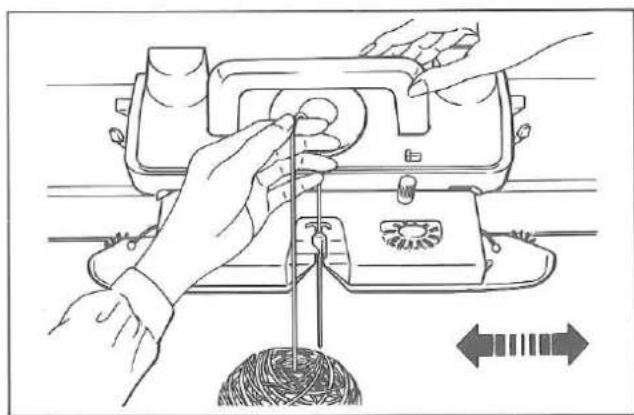
natural_image
Line drawing of hands operating a sewing machine with yarn and a string, showing mechanical components (no text or symbols)PRACTICING HAND FEEDING
Remove yarn from the Yarn Feeder.
Place the yarn at the cut-out on the side of the Knitter.
Thread new yarn into the Yarn Feeder with the yarn end hanging approximately 10cm. below the Yarn Feeder.
Close Yarn Feeder Gate.
Hold the yarn lightly between the thumb and forefinger.
Knit required number of rows.
Hand feeding is useful for the following occasions:—
- When more than two colour yarns are being used for a small area.
- When making a knitted-in hem using the Ravel Cord for separating the main from waste knitting.
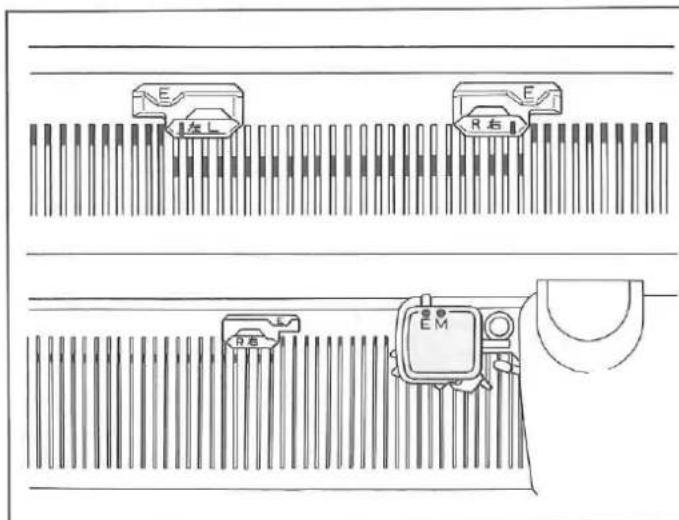
text_image
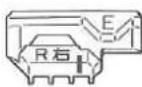
E L左 L R右 E R右 EMHow to use the Point Cam E
(1) Attach the New Magic Cams referring to page 37.
(2) Set MP Lever to E mark.
(3) Place the Point Cams on the Needle Bed so that the division line is between the second to last and last needle of the needles in B position as illustrated.
(4) In increasing or decreasing, move the Point Cam E following the stitches to be increased or decreased.
LACE CARRIAGE
For setting up the Knitter and preparation of yarn before knitting, read the instructions on pages 1–10.
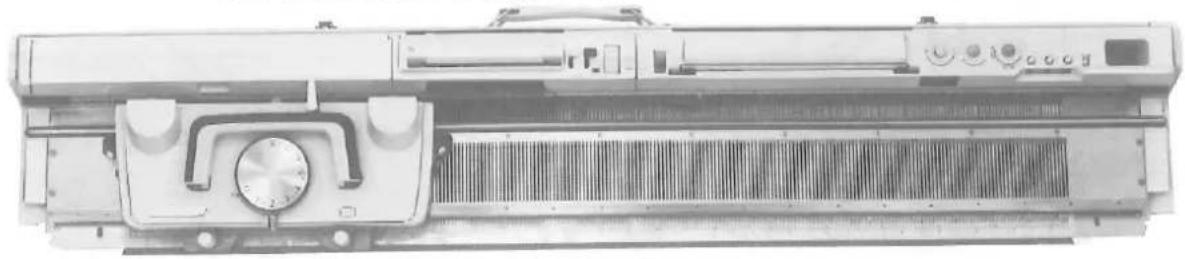
natural_image
Front view of a mechanical device with cooling fins and a central rotary dial (no visible text or symbols)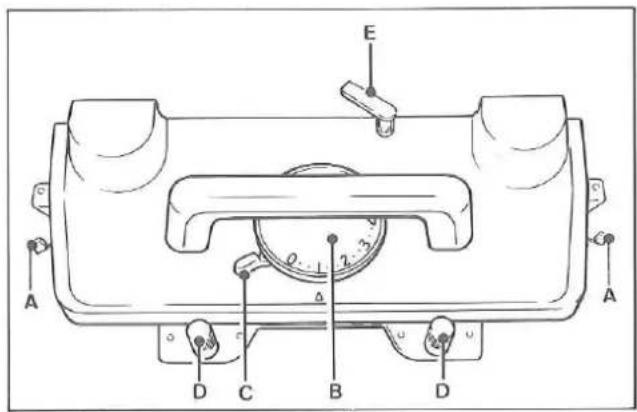
text_image
E A D C B D ACARRIAGE
A - Side Levers
B - Stitch Dial
C - Cam Lever
D - Arm Nuts
E - Row Counter Tripper
ADDITIONAL ACCESSORIES
F - Comb Weight (3) 02470367
G - Claw Weight (3) 07422009
H - Edge Pin (6) 07095276
I - Punch Card (10) 07715279
(To order, specify part name with part number)
F
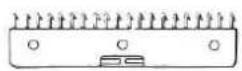
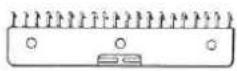
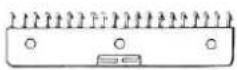
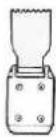
G
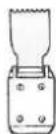
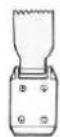
H
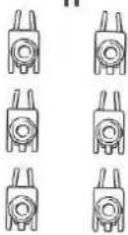
|

text_image
Diagram showing a grid of dots with dashed borders and labels, possibly representing a pattern or data layout.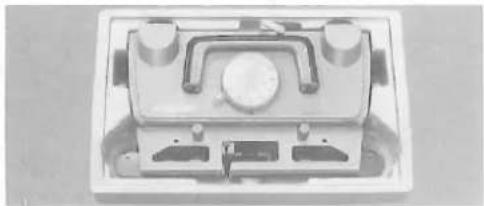
natural_image
Close-up of a mechanical component with mounting holes and a central knob (no visible text or symbols)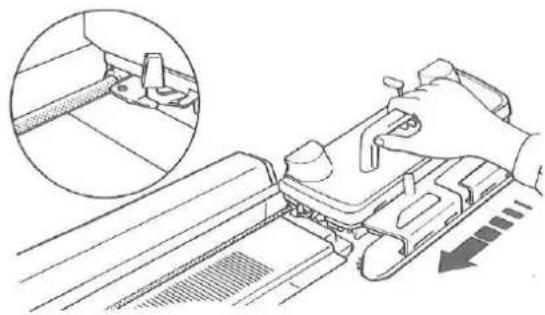
natural_image
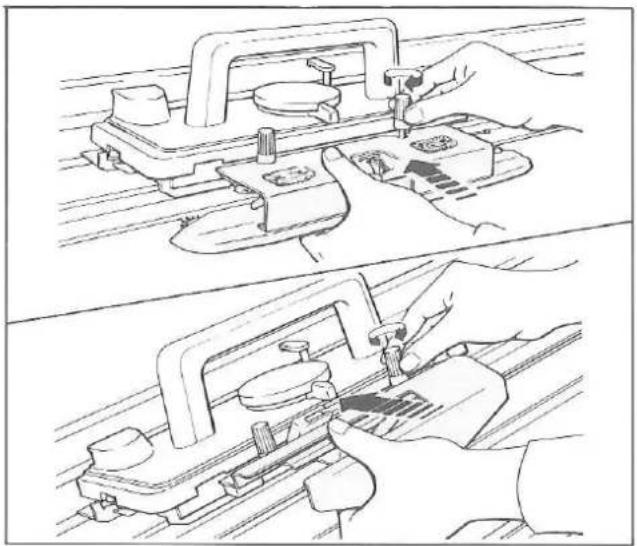
Technical line drawing of a mechanical assembly with an inset showing a close-up of a component (no text or symbols present)Lace Carriage and Arm for 370/270KL has been packed separately in styrofoam packing.
Remove the Lace Carriage with Arm from the packing and raise the Carriage Handle.
Mount the Lace Carriage to the Needle Bed from the right side.
natural_image
Technical line drawing showing hands operating a mechanical device on two views (no text or symbols present)NOTE FOR USING THE LACE CARRIAGE
Do not attach the Main Carriage Arm to the Lace Carriage.
Do not connect the Ribber Arm to the Lace Carriage. The Ribber Arm can only be connected to the Main Carriage.
natural_image
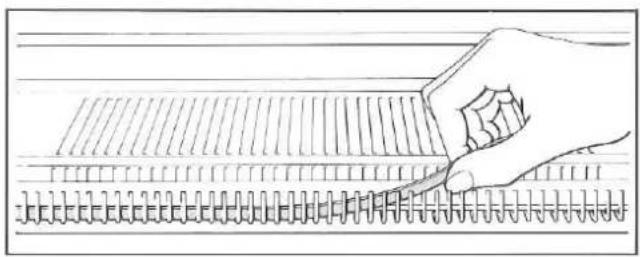
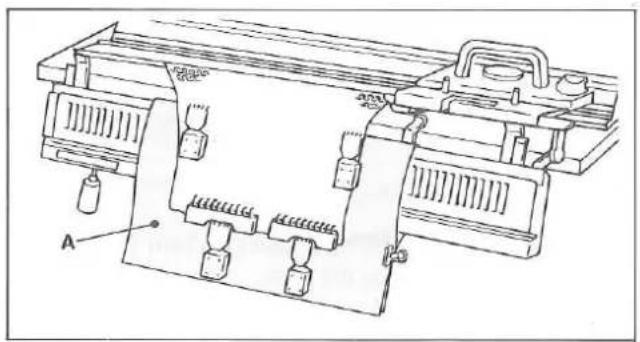
Hand holding a pen writing on a lined notebook (no text or symbols visible)If you knit with the FRP-70 Ribber connected in the lower position, ensure the following:—
- Remove the Close Knit Bar from the Needle Bed, if it is in use.
natural_image
Technical line drawing of a mechanical assembly with spring-loaded components and mounting brackets (no text or symbols)- With hard paper or heavy cloth "A", cover the Ribber needles and sinker posts to bring the knitting in front of the Ribber.
(Optional Plastic Ribber Needle Bed Cover is available.)
natural_image
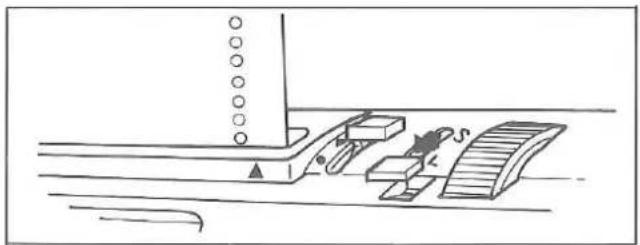
Line drawing of a mechanical device with a person climbing a curved ramp and a triangular component (no text or symbols)Set the L Knob to L position while knitting with the Lace Carriage.
natural_image
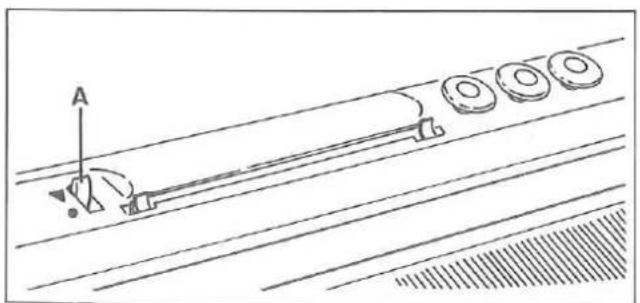
Diagram of a person pulling a long rod on a track with numbered circular elements, no text or symbols presentIf the L Carriage is used on the Model 370 Knitter, be sure to set the Paper Lever "A" of the Knit Contour to ▼ mark, otherwise it will interfere with the Row Counter Tripper.
natural_image
Illustration of a hand using a tool to mark a textured surface with parallel lines (no text or symbols)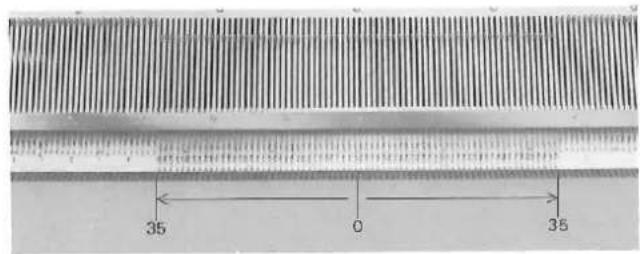
text_image
35 0 35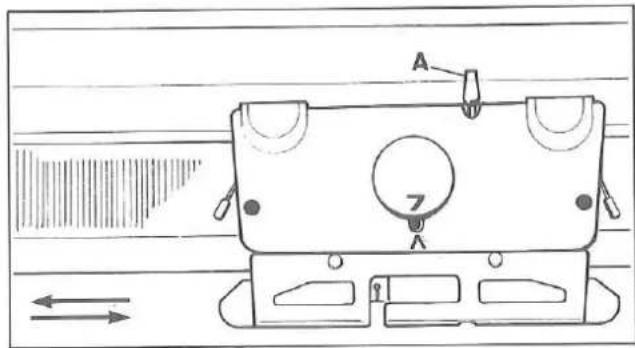
text_image
Technical diagram of a device with labeled components and directional arrows indicating flow or movement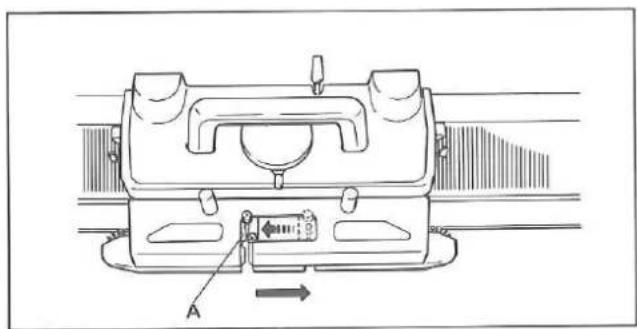
natural_image
Technical line drawing of a mechanical component with labeled parts and directional arrow (no text or symbols)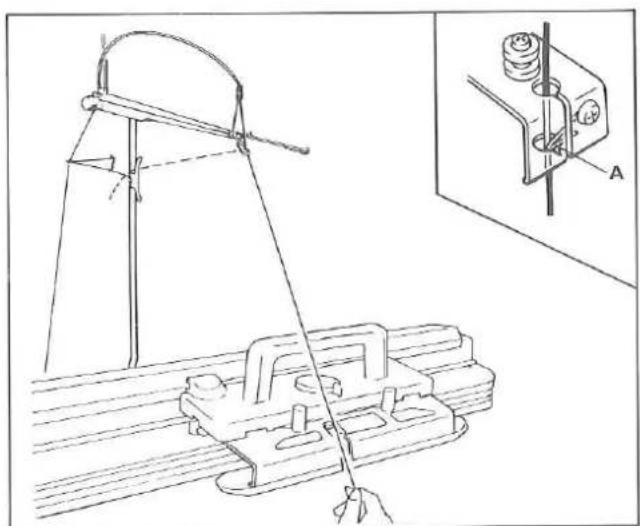
natural_image
Technical line drawing of a mechanical clamp or clamp assembly with an inset showing a spring-loaded component labeled 'A' (no text or symbols present)TO CAST ON
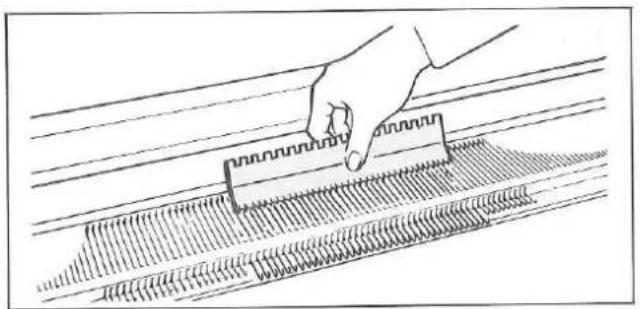
Push 35 needles on the left and right side of centre (0), 70 needles in total, from A position to B using the straight edge of the Needle Pusher.
SETTING CARRIAGE
Stitch Dial....7
Cam Lever....A
Side Levers (left and right)......
The Cam Lever is synchronized with the Row Counter Tripper "A".
Cam Lever position
A.....Row Counter is operated.
.....Row Counter is not operated.
Do not adjust the Row Counter Tripper by hand.
Slowly move the Carriage across the Needle Bed until it has passed all the needles.
Place the Carriage at the right side.
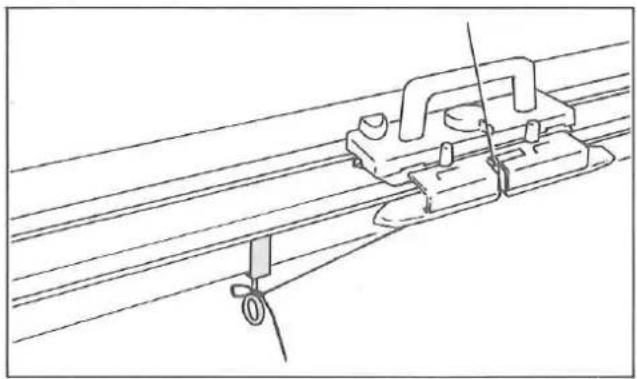
Move the Carriage to the right to allow Yarn Feeder "A" to slide to the left side in the Arm.
For threading or unthreading the Yarn Feeder, it must be at the left side.
Remove the yarn end from Yarn Clip and bring it down to the Carriage.
Hold the yarn with both hands and slide it into the yarn feeder.
The yarn must be pushed behind guide pin "A".
natural_image
Technical line drawing of a mechanical assembly with rods and mounting brackets (no text or symbols)Fasten the yarn end to either Clamp.
natural_image
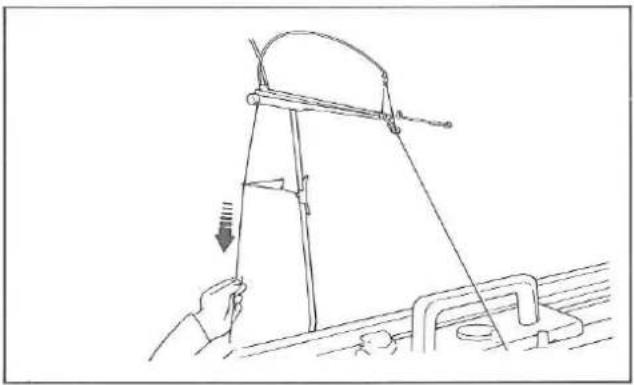
Line drawing of a hand using a lever to lift a beam, with no text or symbols presentEliminate slack yarn by pulling the yarn down at the back of Yarn Rod until the Tension Spring is nearly in the horizontal position.
natural_image
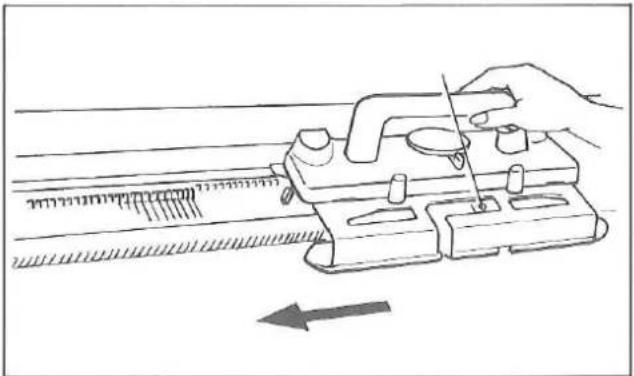
Line drawing of a hand using a tool to measure a mechanical component with a ruler and pointer (no text or symbols)Move the Carriage from right to left, knitting 1 row.
text_image
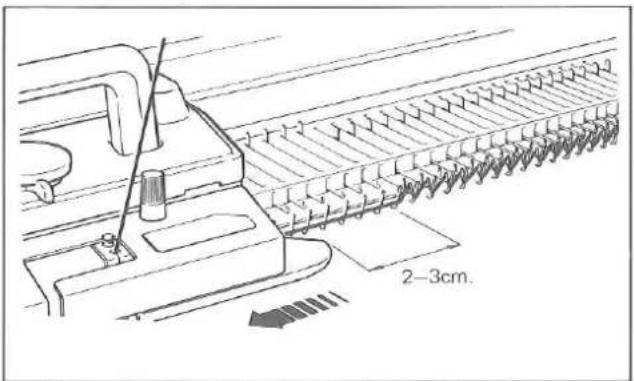
2-3cm.Ensure that the Arm has passed the last knitting needle by approximately 2–3cm. on each row.
natural_image
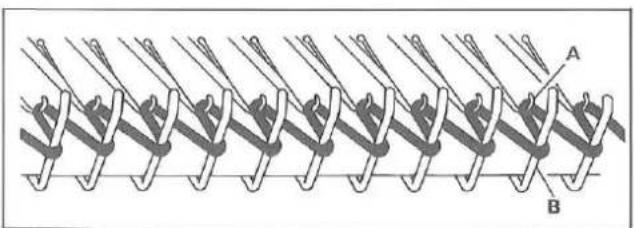
Diagram of a coiled spring or rope structure with labeled points A and B (no text or symbols beyond labels)Even loops have been formed between needle hooks "A" and sinker posts "B".
text_image
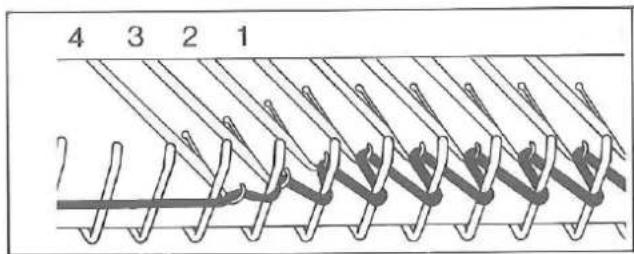
4 3 2 1When knitting the first row, it might happen that the loops get smaller towards the left side on the needle hooks "1", "2", "3" and "4".
To have successful cast on, these smaller loops must be corrected.
natural_image
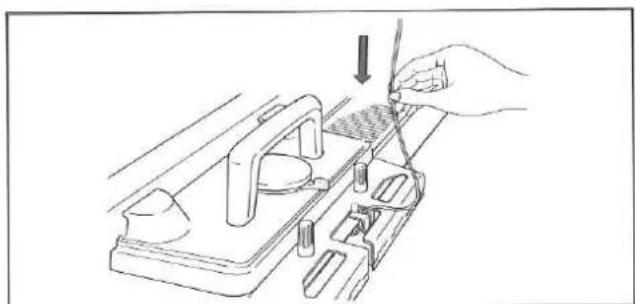
Line drawing of a hand using a tool to adjust or install a mechanical component (no text or symbols present)To correct, hold yarn above the Yarn Feeder and pull it down to allow some slack.
text_image
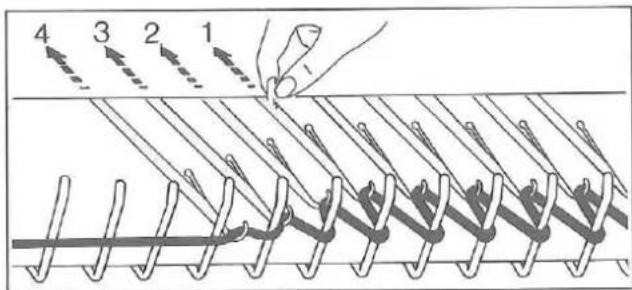
4 3 2 1Starting from the smallest loop furthest away from the Carriage, in this case the loop on the needle "1", push the needles with small loops one by one back to B position.
natural_image
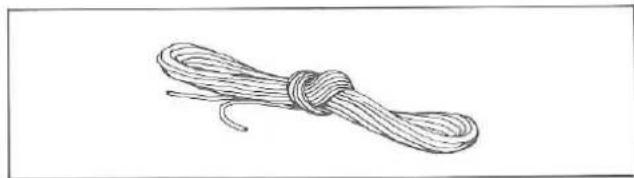
Simple line drawing of a rope tied with a knot (no text or symbols)Remove Ravel Cord from the Accessory Box. Untwist it and check that there are no knots in the Cord before using, otherwise you can not pull it out of the knitting after cast on.

text_image
Technical diagram showing a coiled spring being inserted into a device with labeled parts A and B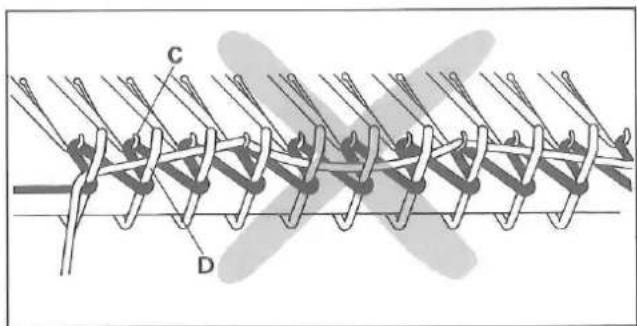
text_image
C DHook the end of the Ravel Cord "A" in the Yarn Holder "B" at the right side of the Needle Bed.
Lay the Ravel Cord across the yarn loops between needle hooks "C" and sinker posts "D". Strain the Ravel Cord with the left hand.
Ensure that the Ravel Cord lies correctly across the loops and will not entangle with needle hooks.
natural_image
Line drawing of a mechanical device with hands operating it, showing motion arrows (no text or symbols)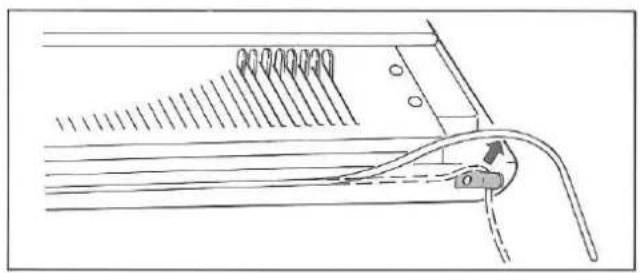
natural_image
Technical line drawing of a mechanical assembly with spring-loaded components and a curved pipe (no text or symbols)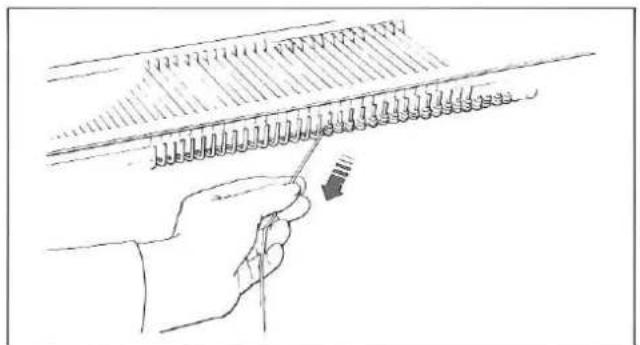
natural_image
Line drawing of a hand holding a pen, writing on a surface with a ruler above (no text or symbols present)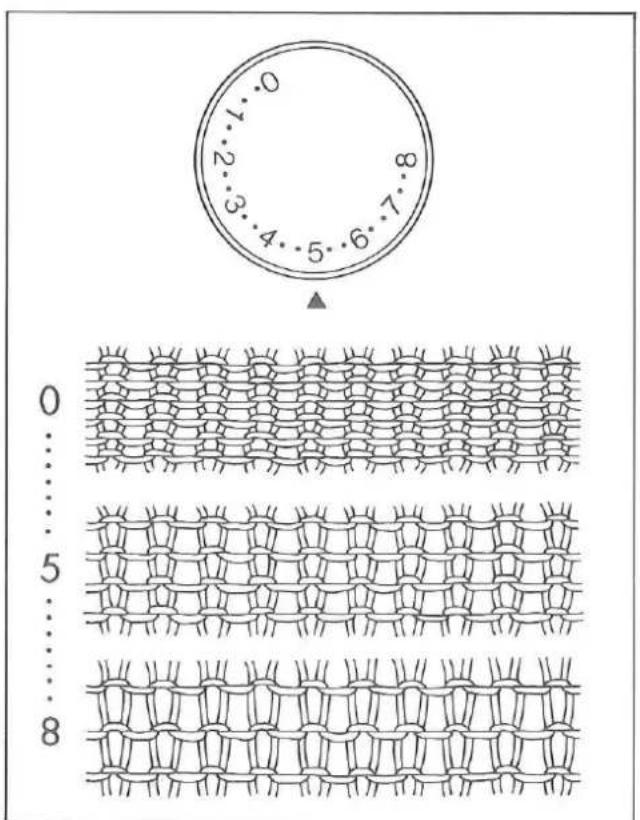
text_image
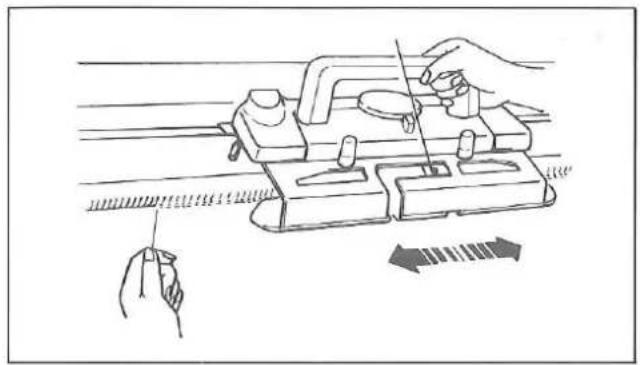
0 1 2 3 4 5 6 7 8 0 ... 5 ... 8Move the Carriage from left to right.
Continue to knit 5–6 rows.
Remove the end of the Ravel Cord from the Yarn Holder at the side of the Needle Bed.
Remove the Ravel Cord by pulling it to the left.
You have finished cast on.
LEARNING ABOUT STITCH SIZE AND YARN
STITCH DIAL
Ensure that the correct Stitch Dial number is always selected for the yarn you will select.
Stitch Dial regulates the size of a stitch.
When the Stitch Dial is set to 0, the tightest stitch size is obtained. (smallest stitch)
When the Stitch Dial is set to 8, the loosest stitch size is obtained. (largest stitch)
To select a number, turn the Stitch Dial until the required number or dot corresponds to ▲.
If the tension is too tight — it will be difficult or even impossible to knit, you will use more yarn and waste money — your garment will be hard and uncomfortable to wear.
If the tension is too loose — your garment will have no shape or will very soon lose its shape.
For practice, continue to knit with different Stitch Dial numbers as follows:—
-
with the Stitch Dial number 3, knit 10 rows - small stitch size is obtained.
-
with the Stitch Dial number 8, knit 10 rows - large stitch size is obtained.
text_image
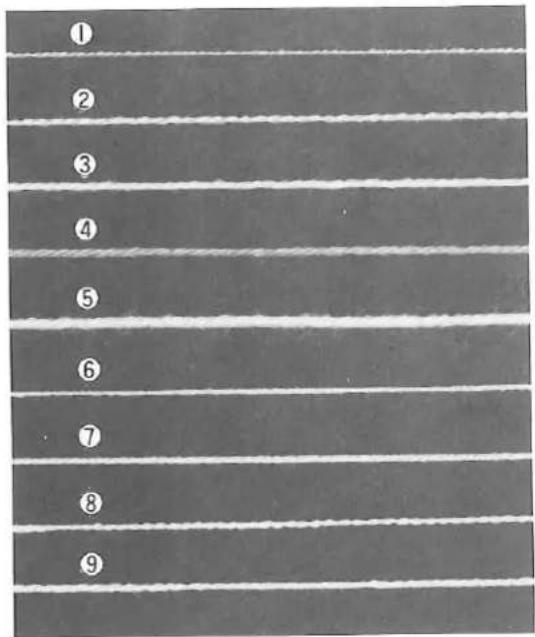
① ② ③ ④ ⑤ ⑥ ⑦ ⑧ ⑨| Type of yarn | Stitch Dial (lace knitting) |
| 1 Super fine yarn | (3) - 4 |
| 2 Extra fine yarn | (4) - 5 |
| 3 Fine yarn | (4) - 5 |
| 4 Medium fine yarn | (5) - 6 |
| 5 Medium yarn | not applicable |
| 6 Cotton yarn (fine) | 5 - 6 |
| 7 Cotton yarn (normal) | (5) - 6 |
| 8 Synthetic yarn (fine) | (4) - 5 |
| 9 Synthetic yarn (normal) | (4) - 5 |
NOTE FOR LACE KNITTING DO NOT ADJUST THE STITCH DIAL TO THE NUMBERS IN PARENTHESISES WHEN THE PUNCH CARDS NO.FL-6 AND FL-7 WHICH PRODUCE MESHLIKE PATTERNS ARE IN USE. DO NOT USE KNOBBLY YARN OR THICK MOHAIR YARN.
natural_image
Simple line drawing of a circular object with an arrow and dashed outline, no text or symbols present.CAM LEVER
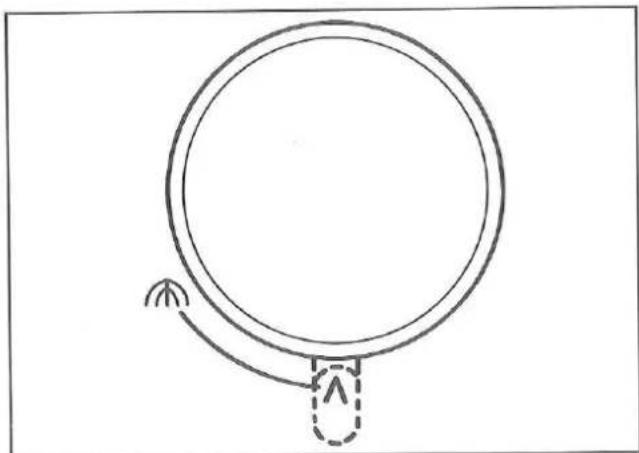
The Cam Lever is given two positions and each position functions as described below.
Λ • Knit stockinet when no punch card is set in the pattern panel. • Knit Plain lace when a punch card is set in the pattern panel.
- Used in knitting fashion lace pattern with a punch card in the pattern panel.
natural_image
Technical line drawing of a mechanical device with labeled parts and directional arrows (no text or symbols)KNITTING STOCKINET
Remove the yarn end from the Clamp.
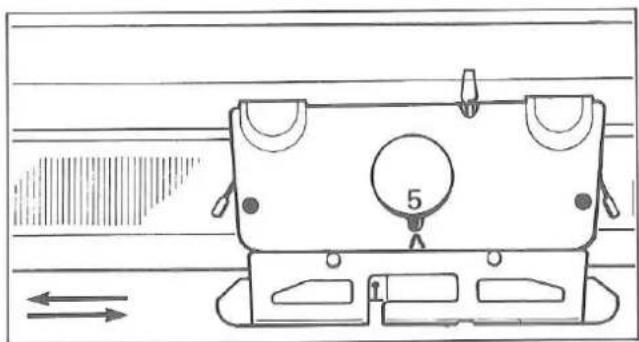
Stitch Dial....5
Cam Lever....A
Both Side Levers....
natural_image
Line drawing of a hand using a tool on a mechanical device with directional arrows indicating movement (no text or symbols)For practice, knit 30 rows.
natural_image
Close-up of a knitted fabric with pleated texture (no text or symbols)
natural_image
Diagram of a knotted fabric with arrows indicating fabric direction (no text or symbols)
natural_image
Close-up of a knitted fabric with visible weave pattern (no text or symbols)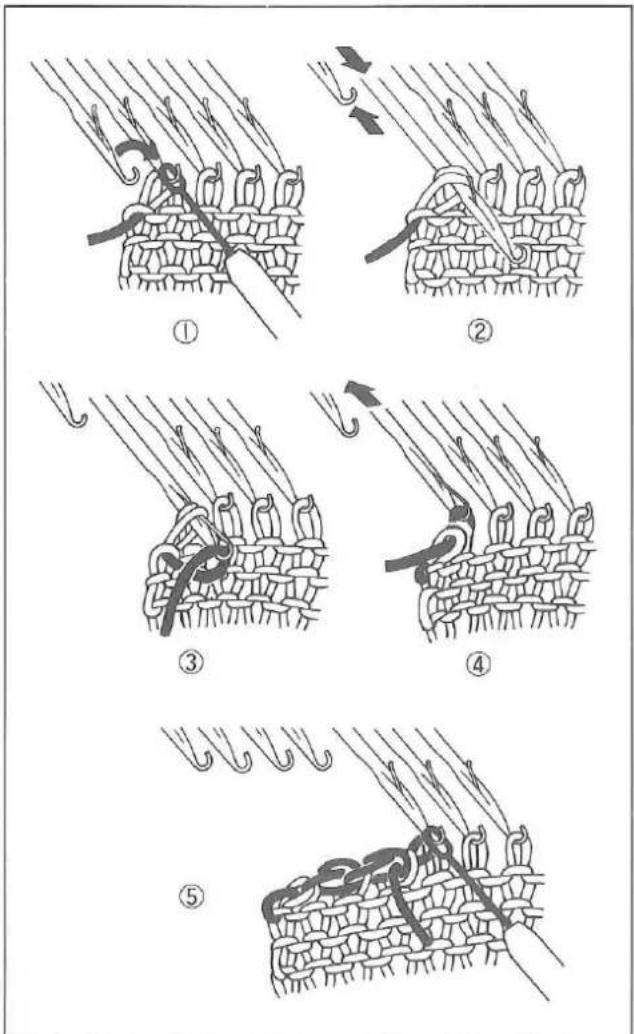
text_image
Diagram illustrating five steps of textile sewing or stitching technique, labeled ① to ⑤ with directional arrows and thread patterns.DECREASING 1 STITCH
You can decrease 1 stitch on both sides of the row.
Using the Transfer Tool, transfer the end stitch onto its adjacent needle.
Push back the empty needle to A position.
Knit 1 row.
For practice, knit more rows decreasing 1 stitch on both sides of the row.
DECREASING MULTIPLE STITCHES
You can only decrease on the Carriage side.
① On the Carriage side, hold the fabric against the Knitter.
Transfer the end stitch to the adjacent needle.
② Push the empty needle to A position.
Push the second needle to D position until both stitches are behind the latch.
③ Lay yarn from right to left on the open hook of the needle.
④ Hold yarn slightly down and push the needle back to B position.
The two stitches slip off the needle.
⑤ Continue this procedure until the required number of stitches have been decreased.
Place the last decreased stitch onto its adjacent needle.
For practice, decrease four stitches on both sides.
natural_image
Close-up of a knitted fabric texture with vertical pleats and ridges (no text or symbols)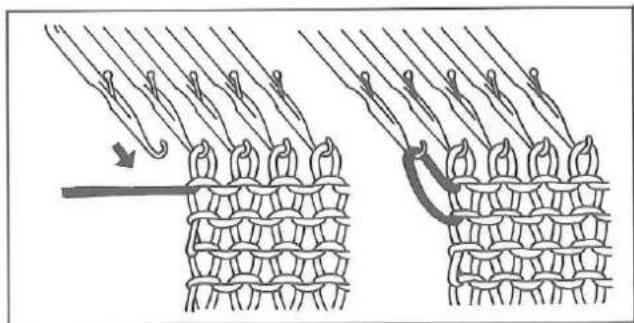
natural_image
Diagram showing two stages of textile weaving or sewing process, with no visible text or symbols
natural_image
Close-up of knitted fabric texture with visible weave pattern (no text or symbols)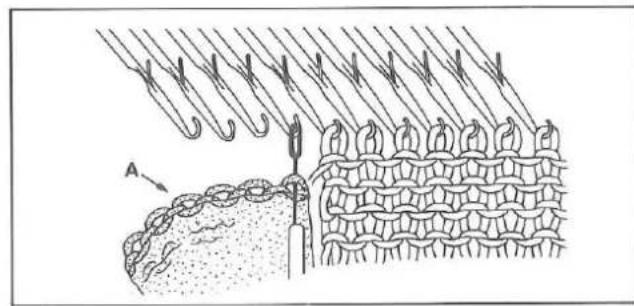
natural_image
Diagram of a knitted fabric with chain and mesh patterns, showing texture and stitching (no text or symbols)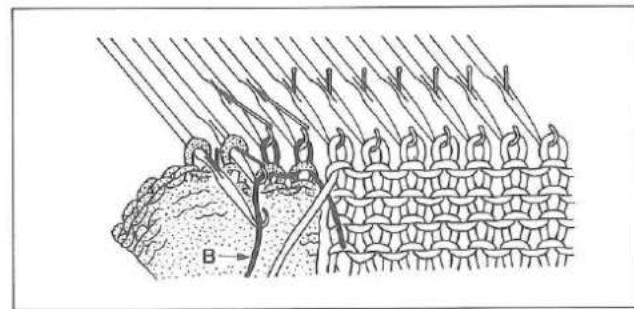
natural_image
Diagram of textile fiber structure with knitted mesh and labeled point B (no text or symbols beyond label)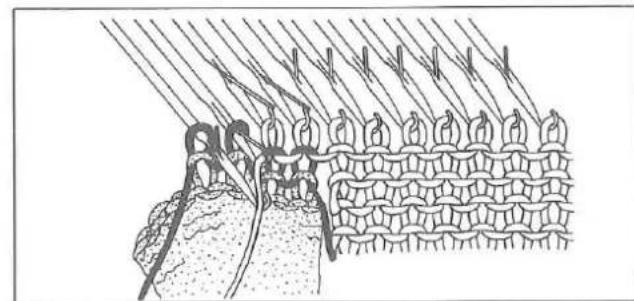
natural_image
Diagram of a knitted fabric with mesh texture and stitching details (no text or symbols)INCREASING 1 STITCH
You can increase 1 stitch at a time on the Carriage side.
Push 1 needle on the Carriage side from A to B position.
Knit 1 row.
For practice, knit more rows increasing 1 stitch on the Carriage side on each row.
INCREASING MULTIPLE STITCHES
You can only increase on the Carriage side.
Push up the required number of needles for increase from A position to B.
Prepare a knitted piece "A", and using the Transfer Tool pick up stitches from it and hook them on the needles.
Hook the Claw Weight onto the knitted piece.
Push up the needles from B position to D and lay the Ravel Cord "B" on needle hooks.
(Stitches of the knitted piece are behind needle latches.)
Push the needles one by one and form loops.
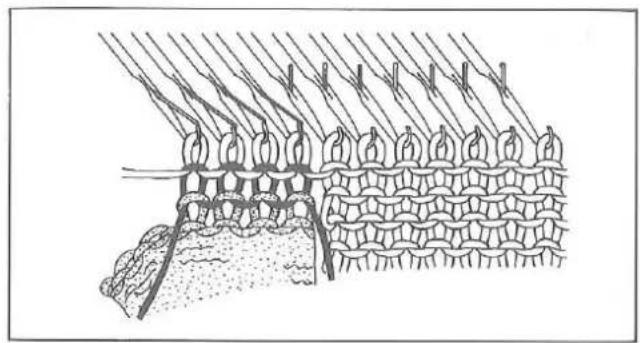
Push up the needles from B position to D and lay main yarn on the needle hooks.
Push the needles one by one and form loops in the same manner as done for the Ravel Cord.
natural_image
Diagram of a woven textile or mesh structure with layered patterns and fibers (no text or symbols)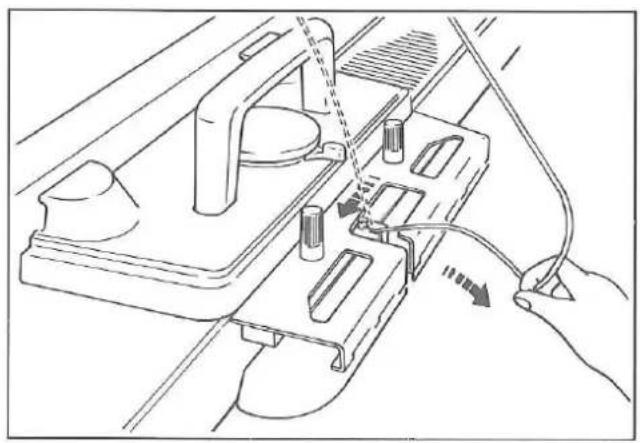
natural_image
Technical line drawing of a mechanical assembly with hands connecting components (no text or symbols)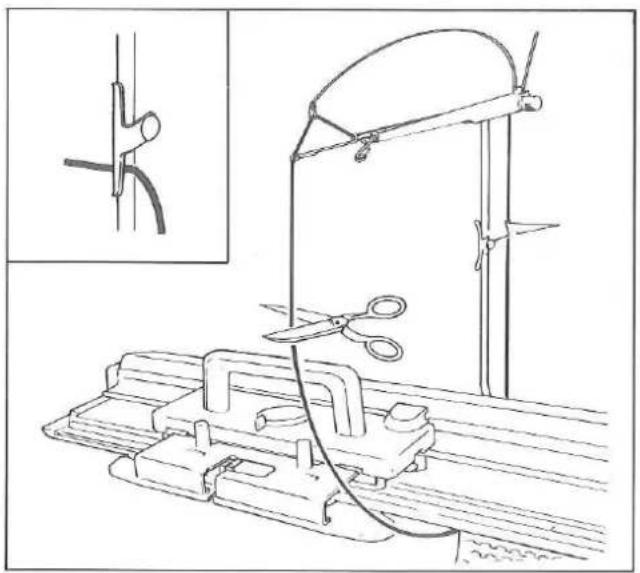
natural_image
Technical line drawing of a mechanical clamp or clamp assembly with scissors and a bracket, shown alongside an inset image of a tool (no text or symbols present)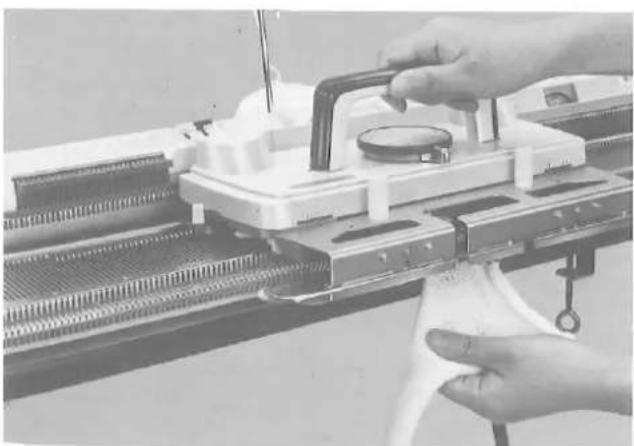
natural_image
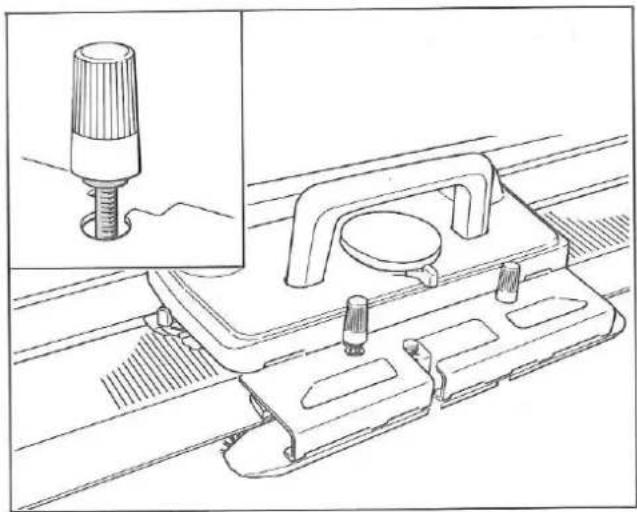
Close-up of hands operating a mechanical device with a tool and a circular component (no visible text or symbols)Knit the required number of rows.
For practice, increase four stitches on both sides.
Close the increased edge of the main knitting using back stitch.
REMOVING KNITTED FABRIC
- without closing end stitches
Place the Yarn Feeder at the left side and remove the yarn. To remove yarn from the Yarn Feeder, pull yarn towards you.
The yarn will then be released from guide pin.
Break the yarn and hook its top end onto the Yarn Clip.
Let bottom yarn end hang loosely on the side of the fabric.
Cam Lever....A
Move the Carriage across the knitting.
The fabric will come off the needles.
PRACTICING HAND FEEDING
If you wish to practice hand feeding on your Lace Carriage, see page 42.
natural_image
Technical line drawing of a mechanical assembly with a highlighted component (no text or symbols)
natural_image
Technical line drawing of a mechanical assembly with no visible text or symbols
natural_image
Technical line drawing of a mechanical clamp or bracket assembly (no text or symbols)
natural_image
Technical line drawing of a mechanical component with no visible text or symbols
natural_image
Simple line drawing of a circular object with a handle and a triangular base (no text or symbols)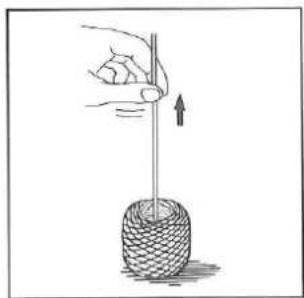
natural_image
Illustration of a hand holding a stick above a woven basket with an upward arrow (no text or symbols)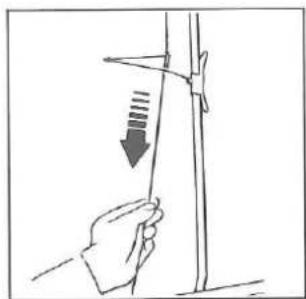
natural_image
Hand holding a vertical object with a downward arrow indicating compression or force (no text or symbols)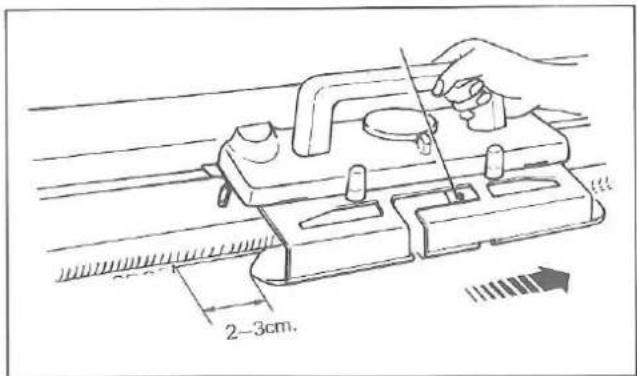
text_image
2-3cm.IMPORTANT
IF YOU HAVE ANY DIFFICULTY IN KNITTING THE FIRST ROW, ENSURE THAT:
Arm is attached to the Carriage correctly.
Yarn is threaded correctly through the Auto Tension and Yarn Feeder.
Tension Dial and Cam Lever are set correctly.
Yarn is wound correctly.
Slack yarn is eliminated and Tension Spring is nearly in a horizontal position.
Arm "A" has passed the last knitting needles by approximately 2–3cm. before knitting the next row.
PATTERN KNITTING WITH LACE CARRIAGE
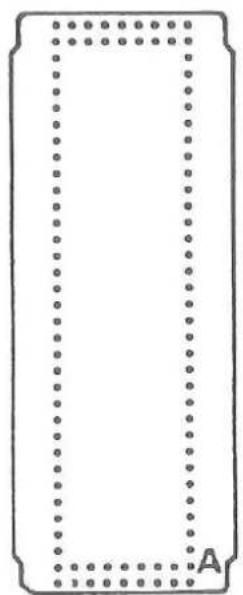
natural_image
Blank rectangular frame with dotted border and corner markers (no text or symbols)
natural_image
Blank rectangular frame with dotted border and corner label B (no text or symbols)STANDARD PUNCH CARDS FOR LACE CARRIAGE
10 Punch Cards are numbered FL-1\~FL-10.
Punch Card No.FL-1\~FL-7 (for plain lace)
Each Punch Card can be used in two ways and is marked "A" and "B".
If "A" or "B" side of Punch Card is inserted into the Pattern Card Panel, direction of pattern can be changed.
Punch Card No.FL-8\~FL-10 (for fashion lace)
Only one side of Punch Card can be used.
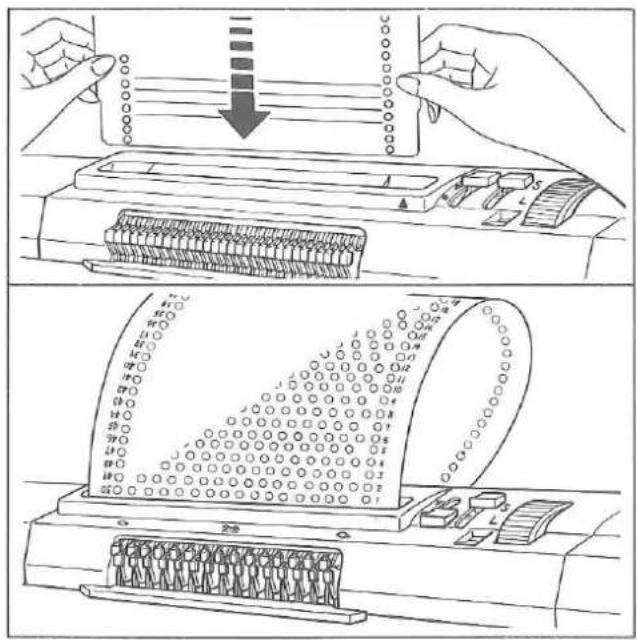
text_image
Technical illustration showing hands operating a printer with a paper strip and a close-up of the printer's internal structure.IMPORTANT: Do not fold or bend the Card.
INSERTING PUNCH CARD
For instruction, see pages 22–23.
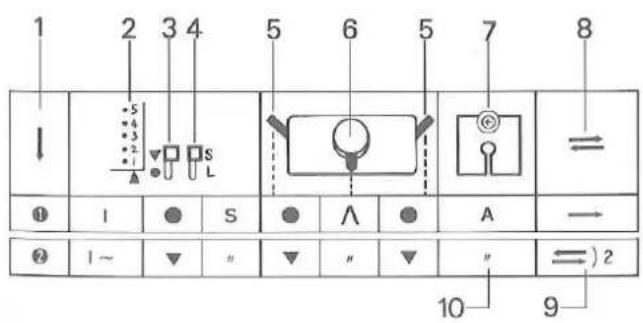
text_image
1 2 3 4 5 6 5 7 8 ↓ s s L A → ① I ● S ● ∧ ● ② 1 ~ ▼ " ▼ " ▼ " ←) 2 10 9READING OPERATION TABLE
1 - Order
2 - Card Memory Number
3 - Stop Knob
4 - L Knob
5 - Side Levers
6 - Cam Lever
7 - Yarn Feeder
8 - knitting direction
9 - the required number of rows shoulde be knitted
10 - A stands for knitting yarn

text_image
34 XPoint Cams M setting
natural_image
Line drawing of a woven fabric or mesh structure with no text or symbols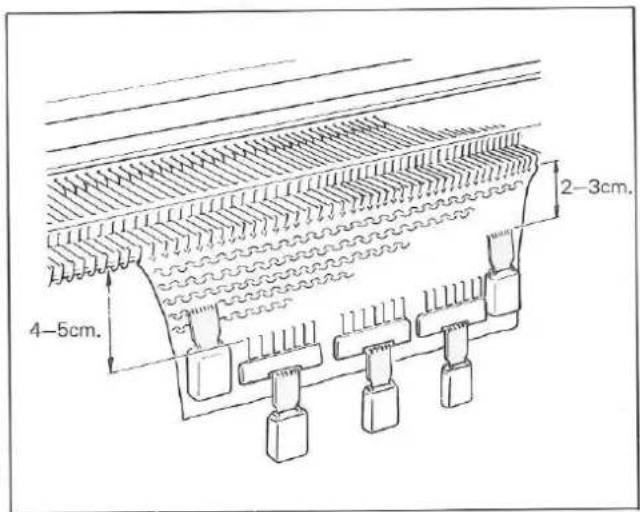
text_image
4-5cm. 2-3cm.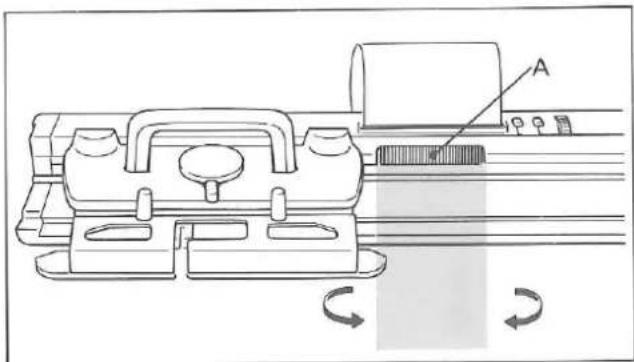
natural_image
Technical line drawing of a mechanical assembly with rotating components and a labeled section A (no text or symbols present)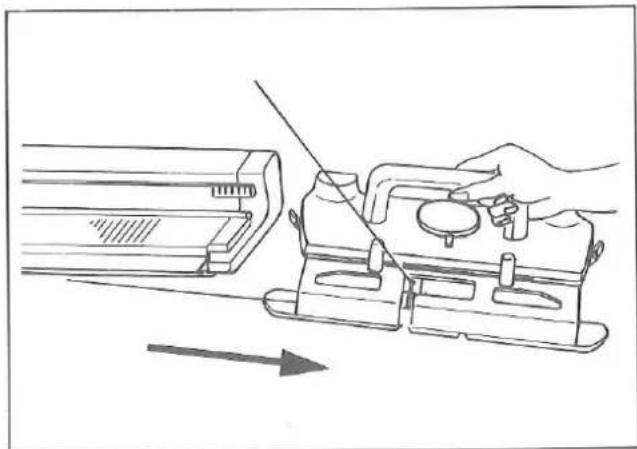
natural_image
Line drawing of a hand using a tool to adjust or install a mechanical component, with an arrow indicating direction (no text or symbols present)CAUTION ON LACE KNITTING
Before practicing lace knitting, knit about 30 rows in stockinet.
When you use A side of the Punch Card, place the Carriage at the left side of the Needle Bed.
Hook the Comb Weights on the knitting approximately 4–5cm, away from the Needle Bed. Hang the Claw Weights on the Comb Weights.
Hook the Claw Weights on both edges of the knitting approximately 2–3cm. away from the Needle Bed.
Move the Weights up after you have knitted about 50 rows.
While lace knitting, do not set the L Knob to L.
When moving the Carriage back and forth, ensure that the Carriage has passed the 30 needles corresponding to the Touch Levers "A".
Move the Carriage at an even speed.
Do not remove the Carriage from the Needle Bed.
If the Carriage has been removed from the Needle Bed by accident, see page 64 for adjustment.
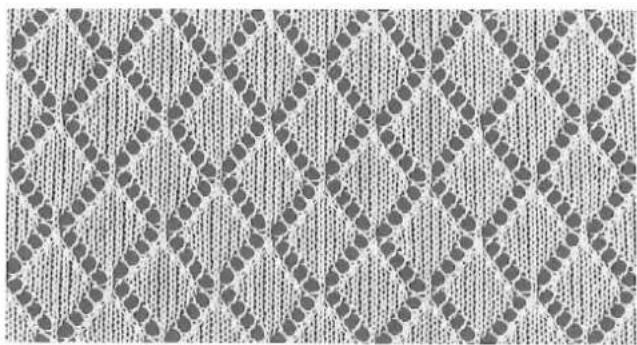
natural_image
Patterned fabric with repeating diamond and circular motifs on a textured background (no text or symbols)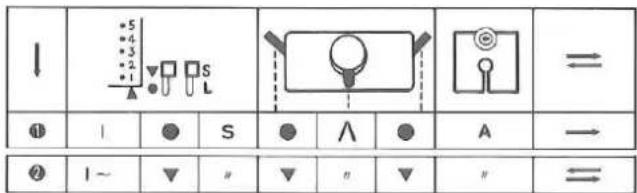
text_image
↓ ① | ● S ● ∧ ● A → ② 1 ~ ▼ " ▼ " ▼ " =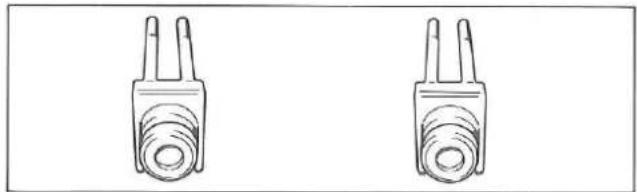
natural_image
Two identical line drawings of a mechanical component with two protruding pins (no text or symbols)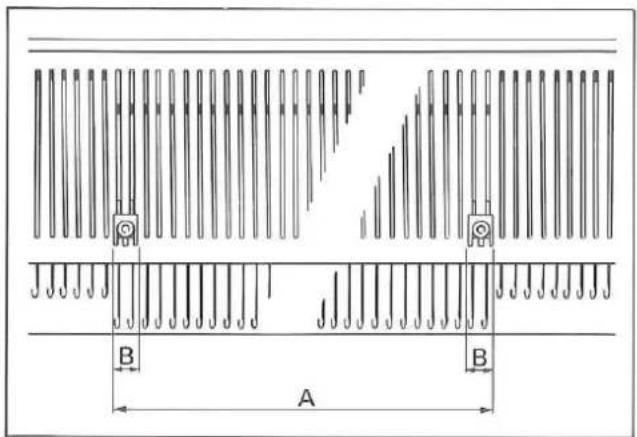
text_image
A B B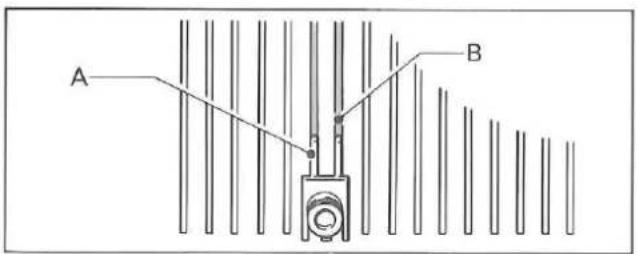
text_image
A B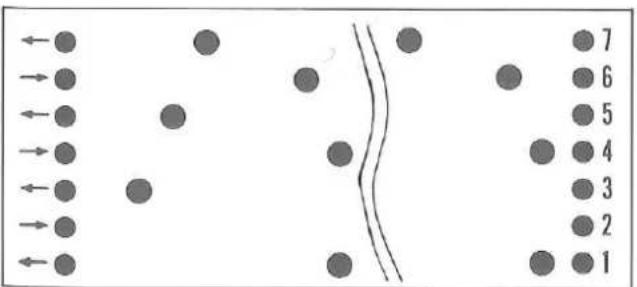
text_image
Diagram showing directional arrows and numbered circles within a divided rectangular region, likely illustrating a physical or mathematical concept.PLAIN LACE
Punch Card No.FL-1-A.
Insert the Punch Card.
Set the Controls as required in ORDER 1.
Knit 1 row from left to right.
Hang the Comb Weights and Claw Weights.
Remove two Edge Pins (yellow) from the Accessory Box.
Set the Edge Pins with their knobs between last two working needles on both sides of the knitting:
A - needles knitting lace in B position
B - 2 needles knitting stockinet
When increasing or decreasing, move the Edge Pin following increased or decreased needles.
Ensure that the two studs "A" of the Edge Pin fit correctly into the needle bed grooves "B" and slide to the front of the Needle Bed.
Set the Controls as required in ORDER 2.
Knit the required number of rows.
Move the Carriage in the directions indicated by arrows at the left side of the Punch Card.
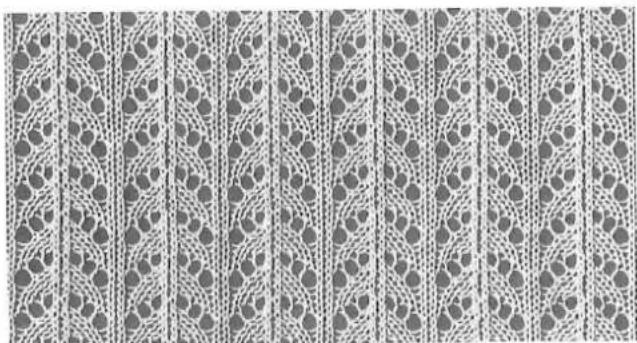
natural_image
Repeating pattern of repeating hexagonal and circular motifs in grayscale (no text or symbols)| ↓ | ⇌ | |||||||
| 1 | 1 | ● | S | ● | ∧ | ● | A | — |
| 2 | 1-2 | ▼ | " | ▼ | " | ▼ | " | ⇌)2 |
| 2-8 | " | " | " | ∧ | " | ⇌)6 | ||
| 3 | 9-10 | " | " | " | ∧ | " | A | ⇌)2 |
| 11~14 | " | " | " | ∧ | " | ⇌)4 | ||
| 4 | 15~16 | " | " | " | ∧ | " | A | ⇌)2 |
| 17~18 | " | " | " | ∧ | " | ⇌)2 | ||
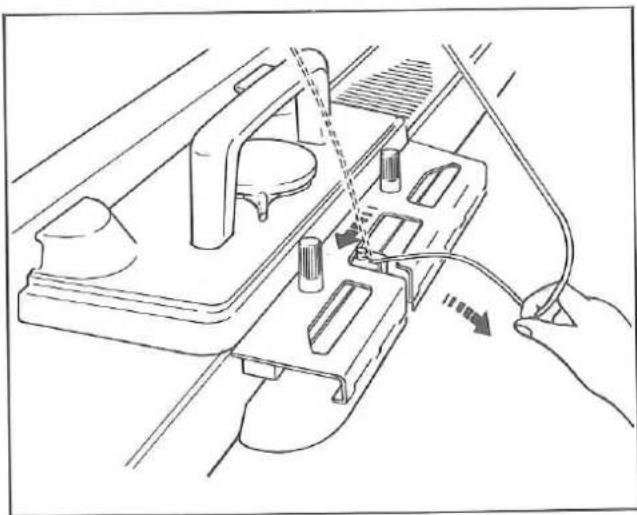
natural_image
Technical line drawing of a mechanical assembly with hands and cables, no visible text or symbols
text_image
15cm.FASHION LACE
Punch Card No.FL-8-A.
Insert the Punch Card.
Set the Controls as required in ORDER 1.
Knit 1 row from left to right.
Hang·the Comb Weights and the Claw Weights.
Set the Edge Pins with their knobs between last two working needles on both sides of the knitting (see page 56).
When increasing or decreasing, move the Edge Pin following increased or decreased needles.
Set the Controls as required in ORDER 2.
Knit 2 rows and place the Carriage at the right side.
Cam Lever....
Remove yarn from the Yarn Feeder.
To remove yarn from the Yarn Feeder, pull yarn towards you. The yarn will then be released from Guide Pin.
With the left forefinger, pull the yarn down approximately 15cm. from the Needle Bed and slightly towards you, giving a sufficient space so that the Carriage is not entangled with the yarn while moving on the Needle Bed without yarn in the Yarn Feeder.
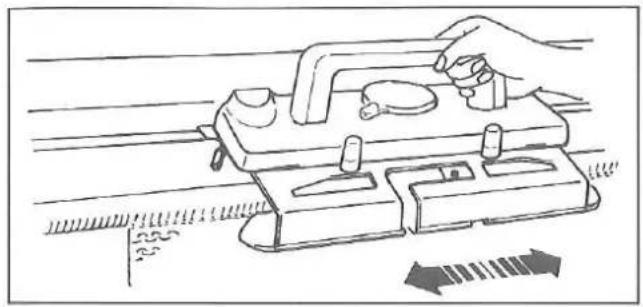
natural_image
Line drawing of a hand using a power tool on a mechanical device, with directional arrows indicating motion (no text or symbols)Move the Carriage 8 times over the marked Card Memory Numbers 3–10, and place the Carriage at the right side of the Needle Bed.
During the Carriage movement, the Carriage does not knit but transfer the required stitches to adjacent needles.
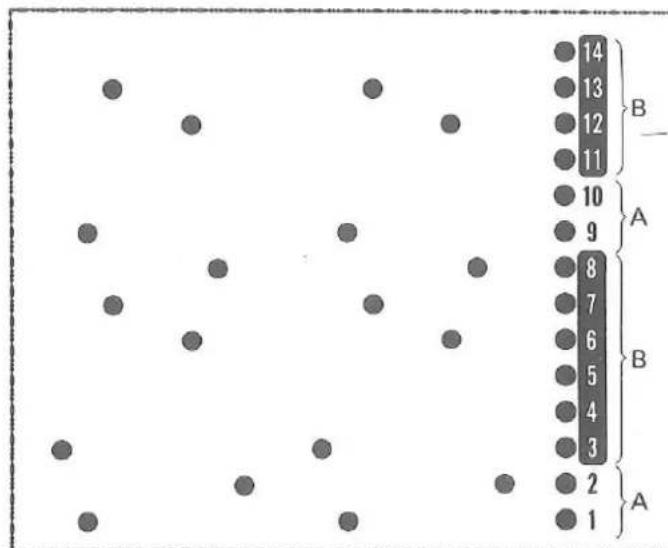
scatter
| Category | Value | | -------- | ----- | | A | 1 | | A | 2 | | A | 3 | | A | 4 | | A | 5 | | A | 6 | | A | 7 | | A | 8 | | A | 9 | | B | 10 | | B | 11 | | B | 12 | | B | 13 | | B | 14 |READING CARD MEMORY NUMBERS
A - Insert yarn into the Yarn Feeder and knit with the Cam Lever at A.
B - Remove yarn from the Yarn Feeder and move the Carriage with the Cam Lever at ⬆.
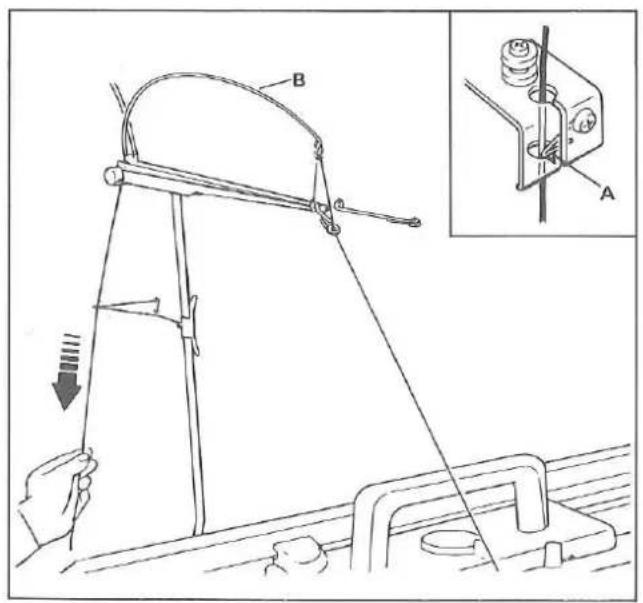
text_image
Technical diagram showing a mechanical device with labeled components A and B, including an inset view of a spring mechanism.Insert yarn back into the Yarn Feeder.
Yarn must be inserted behind the Guide Pin "A".
Eliminate slack yarn by pulling the yarn down at the back of the Yarn Rod until tension spring "B" is nearly in the horizontal position.
Set the Cam Lever to as required in ORDER 3.
Knit 2 rows over the Card Memory Numbers 9–10.
From the Card Memory Number 11 onwards, knit the required number of rows following the instructions for READING CARD MEMORY NUMBERS.
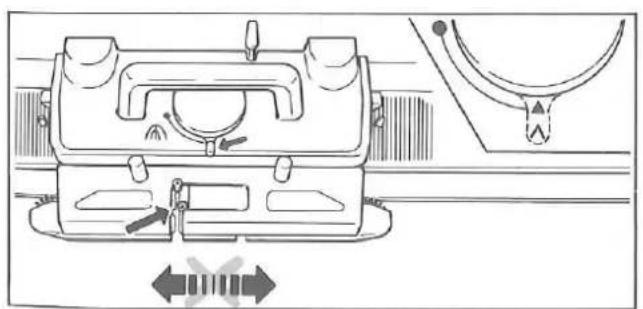
natural_image
Technical line drawing of a mechanical device with directional arrows indicating movement or force (no text or symbols)DO NOT MOVE THE CARRIAGE WHEN YARN IS NOT IN THE YARN FEEDER AND CAM LEVER IS SET TO A, OTHERWISE THE FABRIC WILL DROP FROM THE MACHINE.
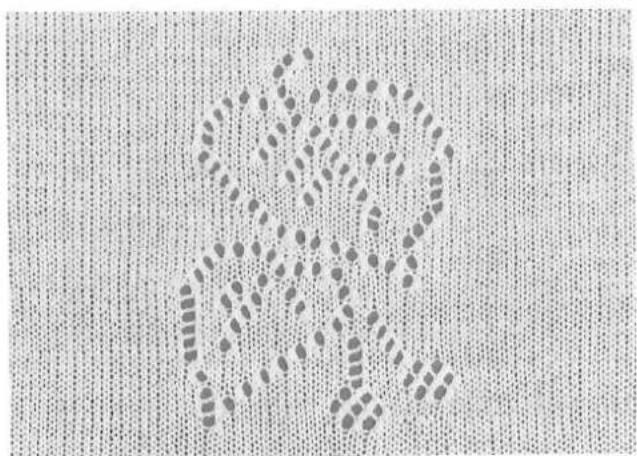
natural_image
Close-up of a textured surface with a dotted pattern resembling a stylized animal or emblem (no text or symbols)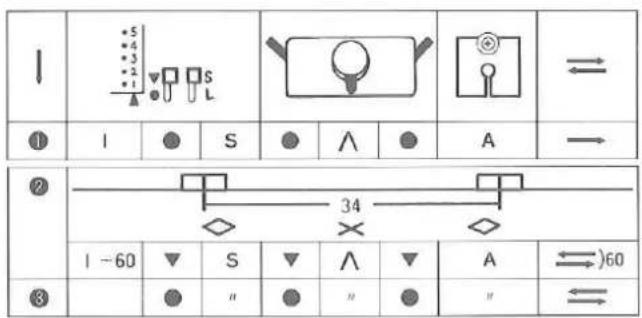
text_image
1 ① I ● S ● ∧ ● A → ② 34 ◇ × ◇ 1 -60 ▼ S ▼ ∧ ▼ A ⇌)60 ③ √ " " " " ⇌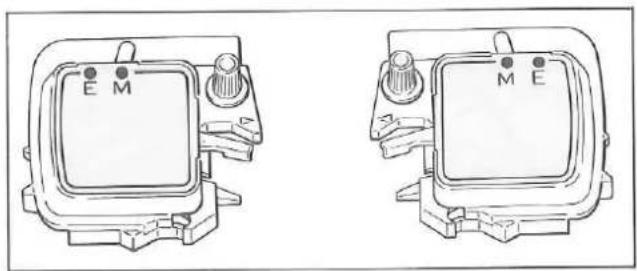
natural_image
Technical line drawings of two identical electrical contactors with labeled terminals (E and M), no text or symbols present.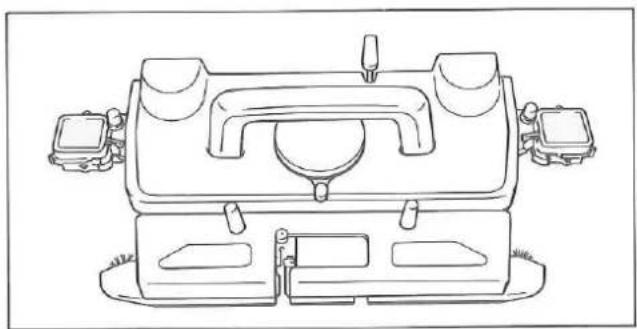
natural_image
Line drawing of a vintage rotary switch device with two side fans and a central handle (no text or symbols)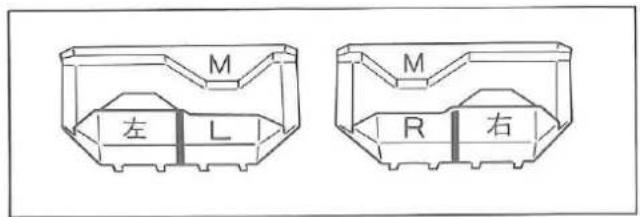
text_image
M 左 L M R 右
natural_image
Two identical line drawings of a cylindrical object with two protruding pins, shown side by side (no text or symbols)SINGLE MOTIF LACE
Punch Card No.FL-5-A.
Insert the Punch Card.
Set the Controls as required in ORDER 1.
Knit 1 row from left to right.
Hang the Comb Weights and Claw Weights.
Remove the left and right Magic Cams from the Accessory Box.
Attach the Magic Cams to the Carriage. For instruction, see pages 37–38.
Remove the left and right Point Cams M (red) from the Accessory Box.
left Point Cam - marked M. L. right Point Cam - marked M. R.
Remove two Edge Pins (yellow) from the Accessory Box.
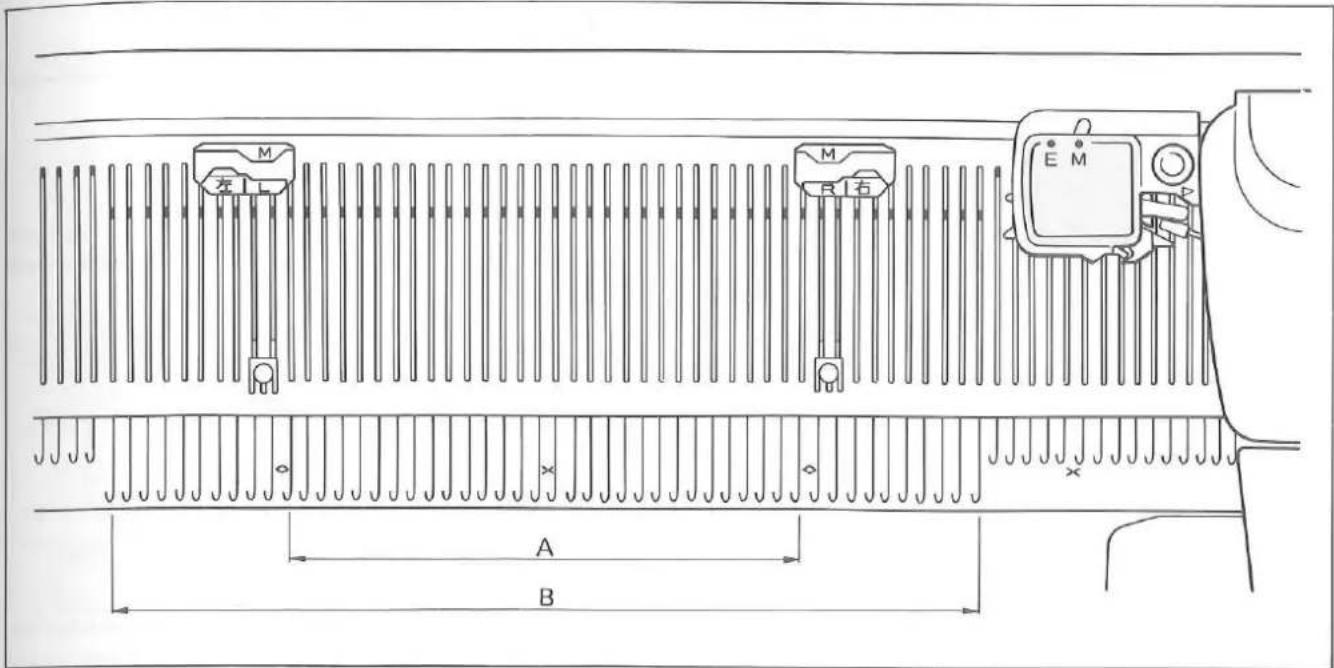
text_image
M 左 L M B 右 E M A B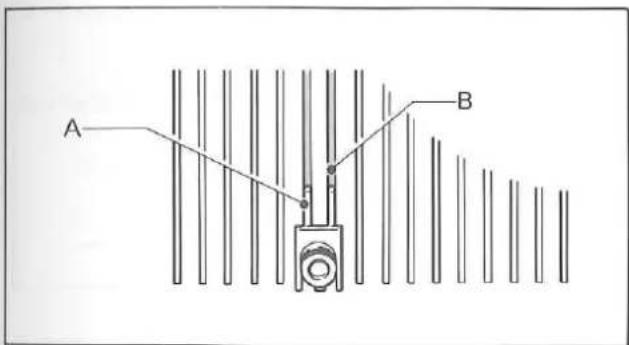
text_image
A BSet the Edge Pins (as shown on page 56) with the Knobs between the first and second needle on both sides of the needles selected for the single motif lace "A".
B - working needles
(in this case the 16th and 17th needles)
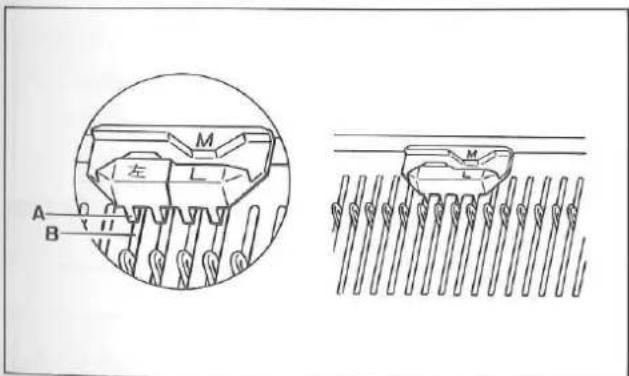
text_image
左 A B M L M LSet the left and right Point Cams M with the division line lying between the second and third needles on both sides of the motif.
(in this case, the 17th and 18th needles)
Ensure that the four studs "A" of the Point Cam M fit correctly into the needle bed grooves "B" at the back of the Needle Bed.

natural_image
Diagram of a vehicle interior with traffic flow indicators and mechanical components (no text or symbols)Set the Controls as required in ORDER 2. Knit 60 rows for single motif lace.
After the single motif lace has been knitted, remove the Magic Cams, Point Cams M and Edge Pins.
Set the Controls as required in ORDER 3.
Continue knitting in stockinet.
HELPFUL HINTS
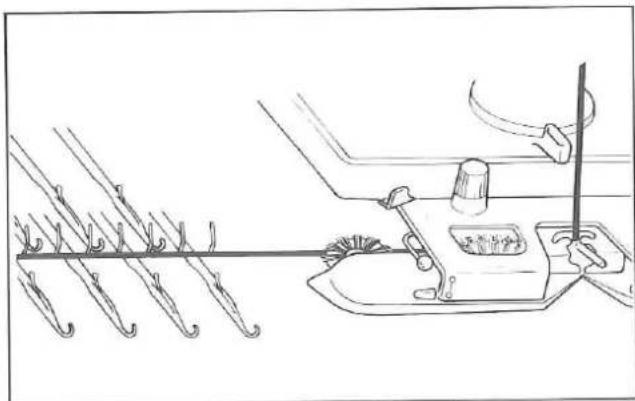
natural_image
Line drawing of a sewing machine needle with hooks and a handle (no text or symbols)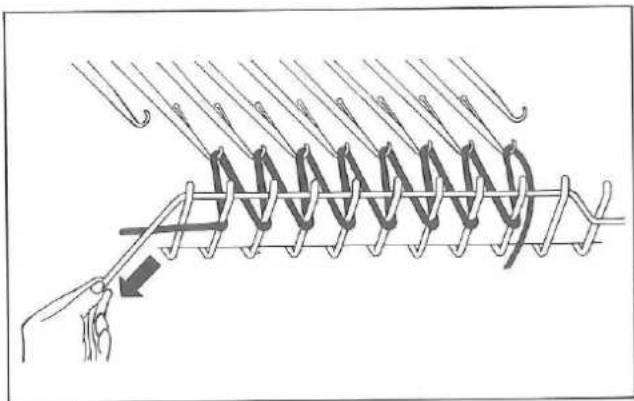
natural_image
Illustration of a hand using scissors to draw a coiled spring or rope knot (no text or symbols present)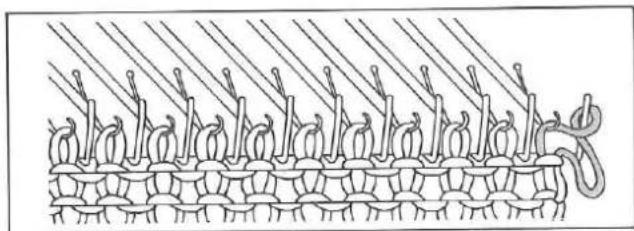
natural_image
Diagram of a knitted fabric pattern with interwoven strands and a coiled cord (no text or symbols)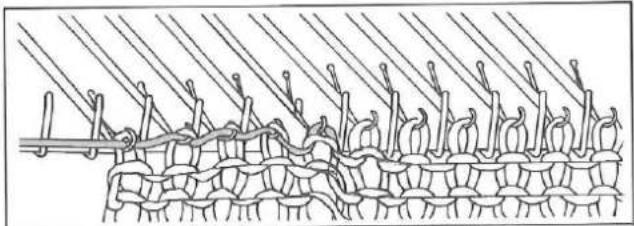
natural_image
Diagram of a knitted fabric pattern with pleated texture and diagonal lines (no text or symbols)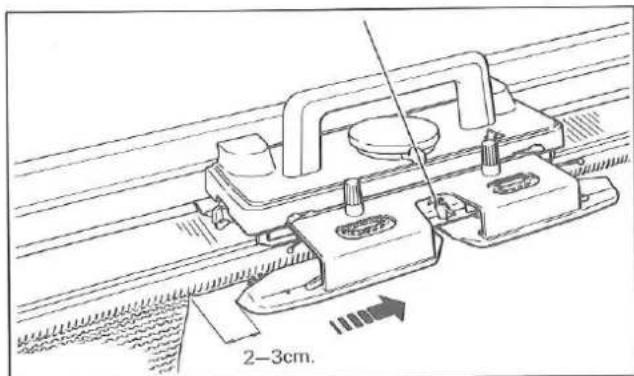
text_image
2-3cm.If cast on row is not knitted...
FOR MAIN CARRIAGE
Ensure that the yarn from the Yarn Feeder extends from underneath of the Plastic Round Brush Cover in the Arm to the needles in D position.
If the yarn is PLACED ON THE ROUND BRUSH, it will entangle with the Brush.
FOR LACE CARRIAGE
Ensure that the Stitch Dial is set to 6 or higher number for the first row. This setting makes large loops between sinker posts and needle hooks, and thus you are able to pull out the Ravel Cord easily. Strain the Ravel Cord laid across big loops before you move the Carriage.
Ensure that the Ravel Cord has been pulled out after knitting 6–7 rows.
If stitches are dropped or knitted incorrectly...
This can be caused by:
- Yarn with knots or incorrectly wound.
- Moving the Carriage too far past the end needle.
- Tension Dial needs adjusting.
- Damaged needle.
Reform dropped stitches using the Transfer Tool (see page 70) or unravel the row incorrectly knitted. (see pages 66, 67)
To continue knitting, ensure that:
- the Carriage has passed the last knitting needle by approximately 2–3cm. before knitting the next row.
- you move the Carriage at an even speed.
- yarn is in good condition (see page 66).
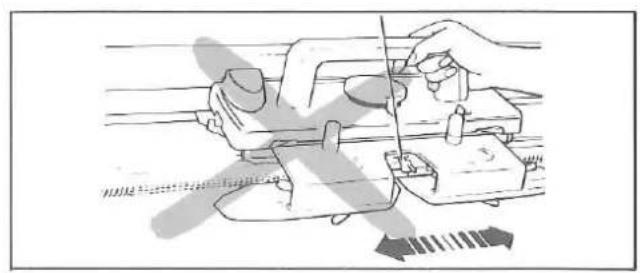
natural_image
Illustration of a sewing machine needle stitching fabric, with no visible text or symbols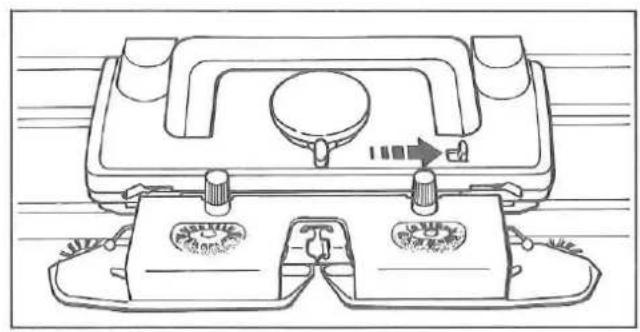
natural_image
Technical line drawing of a mechanical device with two base plates and a central knob (no text or symbols)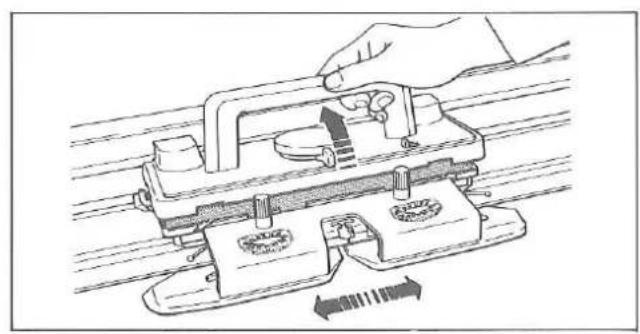
natural_image
Technical line drawing of a hand operating a mechanical clamp or fixture with a ruler, showing no text or symbols.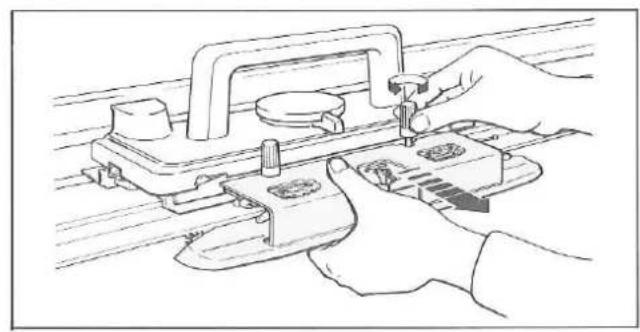
natural_image
Line drawing of hands using a tool to adjust or install a mechanical component (no text or symbols visible)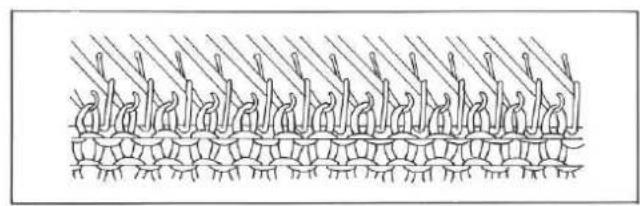
natural_image
Diagram of plant seedling structure showing rows of seedlings under sunlight (no text or labels)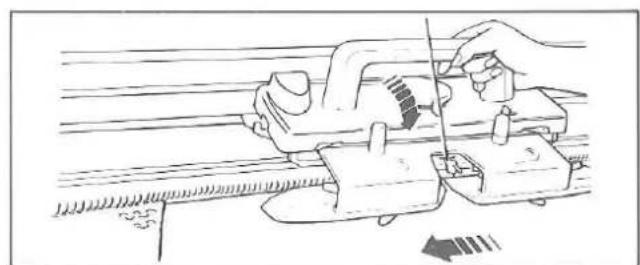
natural_image
Illustration of a hand using a power tool on a cutting board (no text or symbols visible)If Carriage has jammed...
In the middle of a row, do not use force to free the Carriage, but proceed as follows:—
FOR MAIN CARRIAGE
In pattern knitting, set the Stop Knob to ●, and remove the Magic Cams if they are in use, before moving the Carriage.
For Model 260K Carriage, disengage the Row Counter Tripper.
(1) Remove yarn from the Yarn Feeder.
(2) Push the Release Lever in the arrowed direction.
(3) With the Handle lifted, move the Carriage in the proceeding direction until it passes the knitting needles.
If yarn is entangled with the Yarn Feeder or Arm, loosen the Arm Nuts and remove the Arm. Push the Release Lever and move the Carriage.
(4) If stitches have slipped behind the latches of needles, using the Transfer Tool replace these stitches into the needle hooks, unravel the knitted stitches (see page 66, 67) and align the needles in B position.
(5) Move the Carriage to the yarn side without knitting.
If the Punch Card is in use, let the Carriage memorize pattern. (see page 68)
(6) Press down the Carriage Handle.
For Model 270K Carriage, engage the Row Counter Tripper.
(7) Insert yarn and continue knitting.
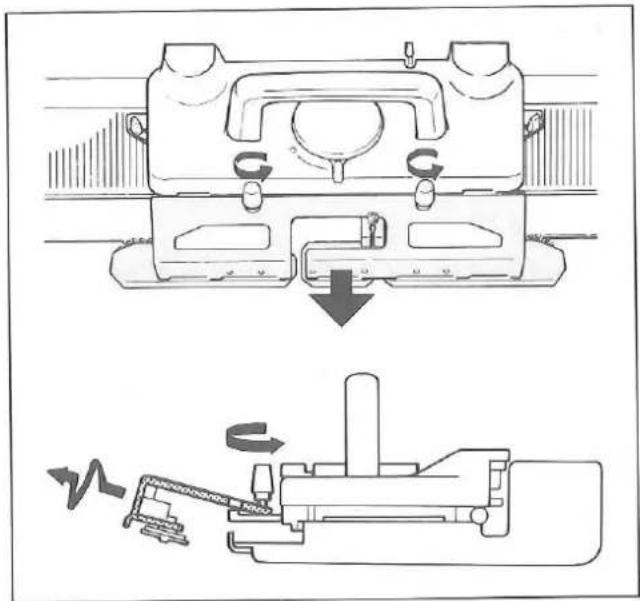
natural_image
Technical line drawing of a mechanical assembly with two views: top shows a component with a downward arrow, bottom shows a mechanical assembly with a rotating tool (no text or symbols)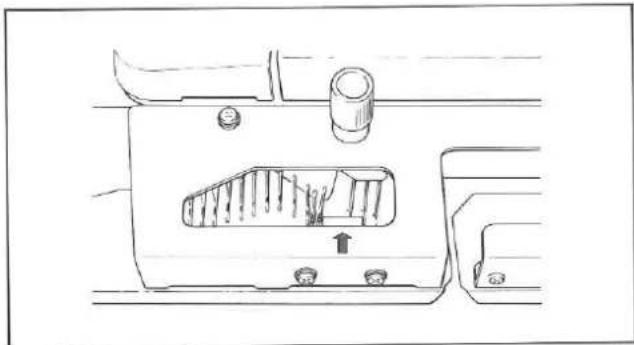
natural_image
Technical line drawing of a mechanical component with internal channels and mounting holes (no text or symbols)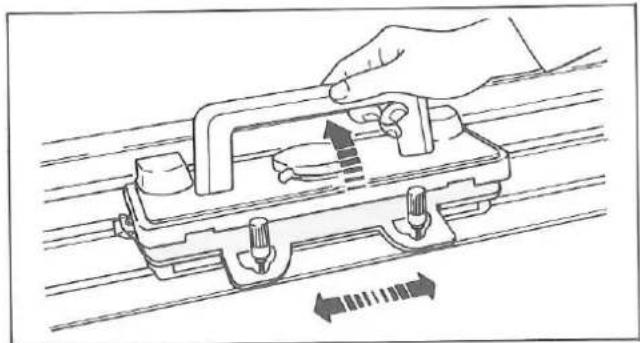
natural_image
Line drawing of a hand adjusting a mechanical component with directional arrows indicating movement (no text or symbols)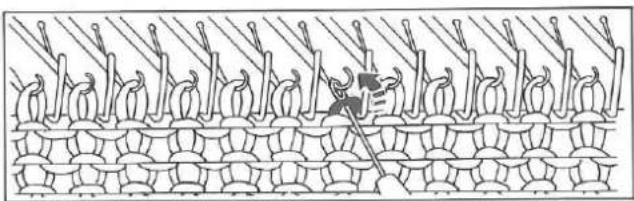
natural_image
Diagram of a woven textile or fabric structure with vertical rods and a central object, no text or symbols present.
natural_image
Line drawing of a hand using a tool to adjust or install a mechanical component, with no visible text or symbols.FOR LACE CARRIAGE
In pattern knitting, set the Stop Knob to ● and remove the New Magic Cams if they are in use, before moving the Carriage.
(1) Remove yarn from the Yarn Feeder.
(2) Loosen the Arm Nuts and pull out the Arm by moving it up and down.
If needle hooks have jammed at the inside of the Arm, remove them using the Transfer Tool.
(3) Cam Lever.....
Both Side Levers.....
(4) With the Carriage Handle lifted, move the Carriage in the proceeding direction until it has passed the knitting needles.
(5) If stitches have slipped behind the latches of needles, using the Transfer Tool replace these stitches into the needle hooks, unravel the knitted stitches (see page 66, 67) and align the needles in B position.
(6) Move the Carriage to the yarn side without knitting.
If the Punch Card is in use, let the Carriage memorize pattern (see page 68).
(7) Press down the Carriage Handle.
Cam Lever.....original position
Both Side Levers.....original position
Stop Knob.....▼
(8) Insert yarn and continue knitting.
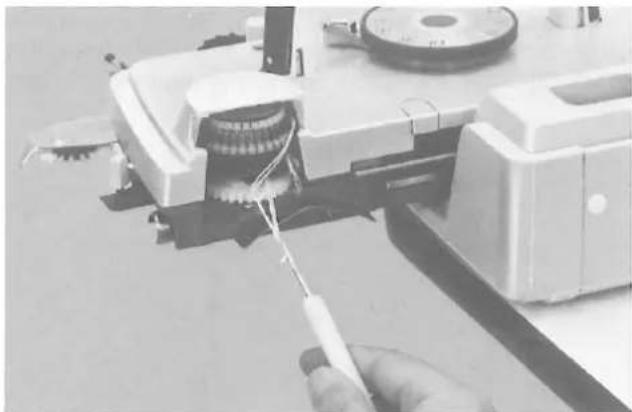
natural_image
Close-up of a hand using a tool to clean or adjust a mechanical device with no visible text or symbols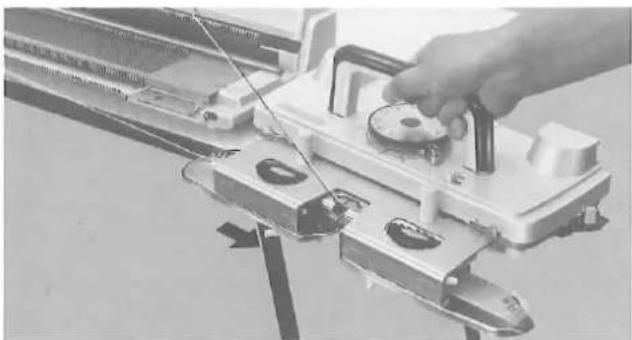
natural_image
Close-up of a hand operating a mechanical device with wires and components (no visible text or symbols)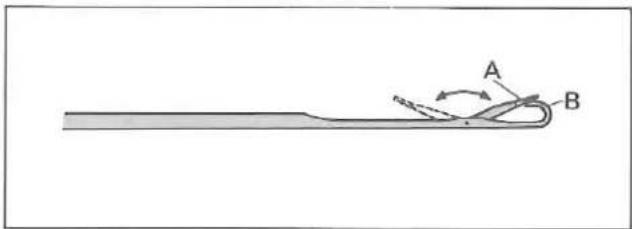
text_image
A B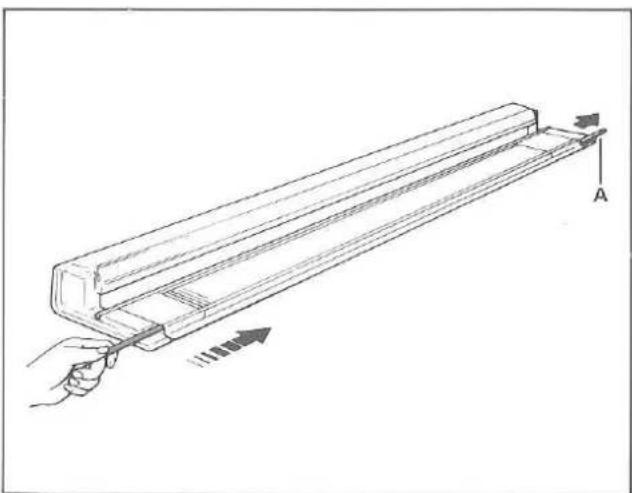
natural_image
Diagram of a mechanical component with force arrows indicating direction, no text or symbols present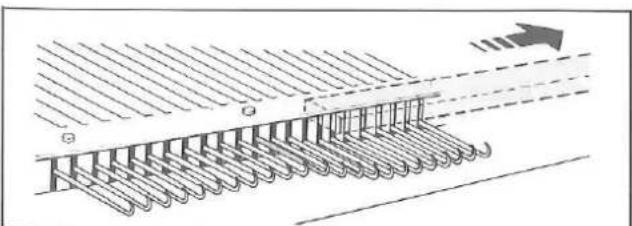
natural_image
Diagram of a mechanical or electrical component with spring-like elements and directional arrows (no text or symbols)If yarn is entangled in Memory Drums...
Ensure that the rear of the Carriage is clear of yarn.
If yarn does become entangled inside the Memory Drums, move the Carriage to the side of the Needle Bed and carefully remove the yarn using the Tappet Tool.
If this happens during pattern knitting, follow the instruction on page 68 for letting the Carriage memorize pattern.
If the Carriage has been pulled out.....
Mount the Carriage to the Needle Bed (see page 43).
If the Punch Card is in use, let the Carriage memorize pattern following instruction on page 68.
If a needle has been damaged...
A needle with a damaged latch or a bent needle will cause incorrect knitting or dropped stitches. The needle latch "A" must move smoothly and lie flat over the hook "B".
At each side of the Needle Bed you can see the Needle Retainer "A".
If the damaged needle is at the left half of the Needle Bed, using the blunt end of a pencil, push the plastic end of the Needle Retainer in at the left.
If the Yarn Separator is in use, remove it before removing the Needle Retainer.
At the right, pull the Needle Retainer out of the Needle Bed until the damaged needle has been cleared.
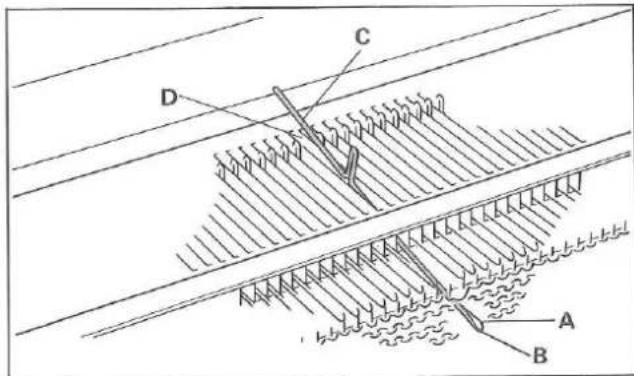
text_image
Technical diagram showing a structural cross-section with labeled components A, B, C, and DPush the damaged needle to D position by pressing its butt. Close the latch "A" and press the hook "B" down. The shank "C" will then come out of the needle bed groove "D".
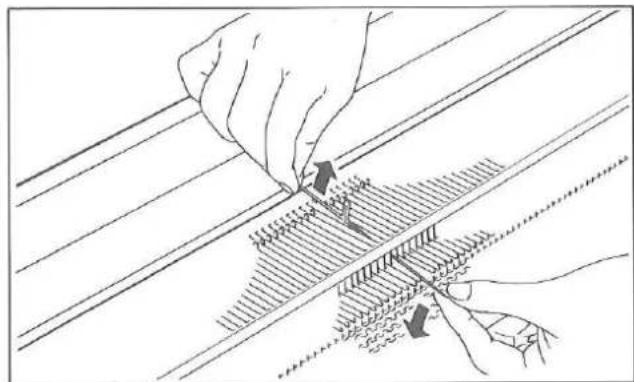
natural_image
Illustration of hands performing a mechanical or structural repair operation on a grid-patterned surface (no text or symbols)Lift up the needle by holding the shank and pull it to remove from the Needle Bed.
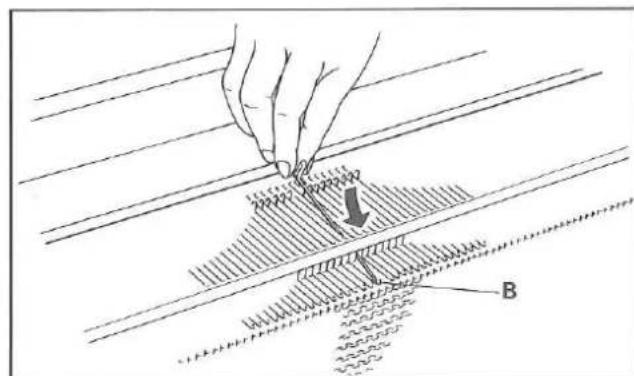
text_image
Technical diagram showing a hand using a tool to mark a component with labeled parts B and an arrow indicating direction.To replace a new needle, open its latch and slide it into the needle bed groove until the hook "B" comes out of the front opening of the Needle Bed. Push the needle back to A position by holding the butt.
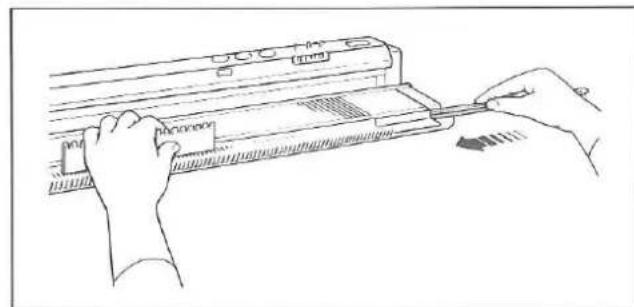
natural_image
Line drawing of hands using a handheld device to press or install a paper sheet (no text or symbols visible)With the Needle Pusher press and hold the needles down against the Needle Bed. From the right, push the Needle Retainer back into position.
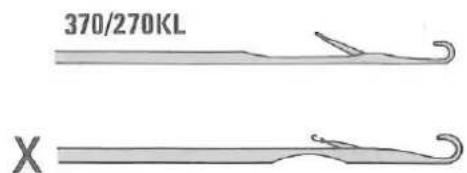
text_image
370/270KL XAs the needle for Model F-370/270 is completely different from those for the other Models in its configuration and dimensions, specify its Model No. and Parts Number (01135268) when ordering the replacement needles.
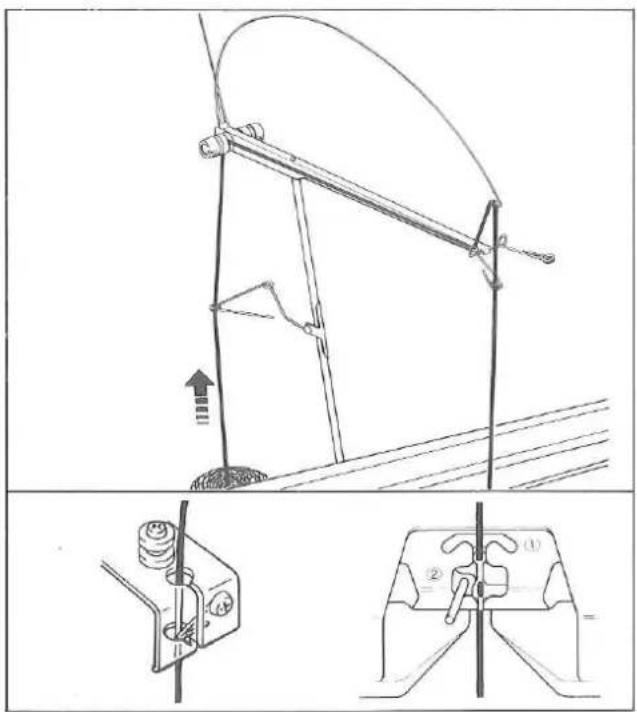
text_image
Technical diagram showing mechanical assembly with labeled parts and directional arrows indicating motion or force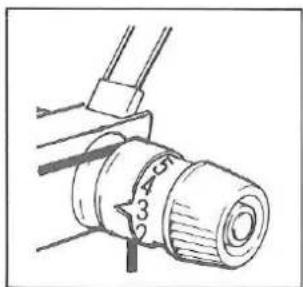
text_image
Technical diagram of a mechanical component with labeled parts and directional arrow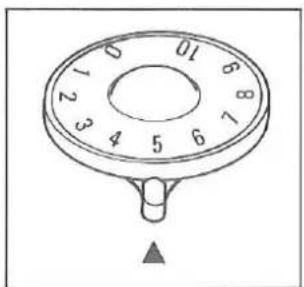
text_image
0 1 2 3 4 5 6 7 8 9 10 ▲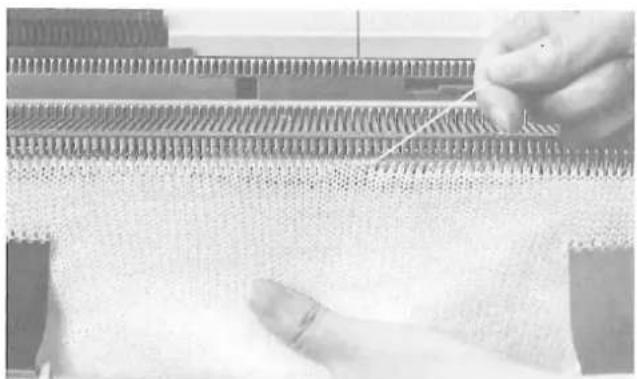
natural_image
Close-up of hands using a sewing machine to spread fabric or threads on a patterned surface (no visible text or symbols)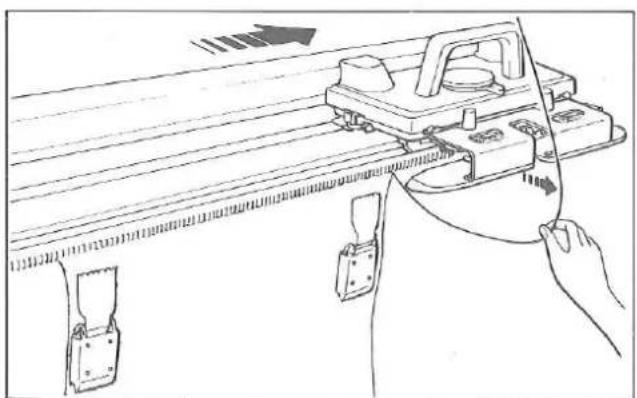
natural_image
Diagram showing hands operating a mechanical device with a bowl, no text or symbols presentChecking yarn condition
Check of yarn is required when:
- cast on row is not knitted.
- stitches have dropped or knitted incorrectly.
- Carriage has jammed.
CHECK THE FOLLOWING POINTS:-
(1) Ensure that yarn is properly threaded into the Auto Tension and Yarn Feeder.
(2) Ensure that the Tension Spring is nearly in the horizontal position.
(3) Ensure that yarn does not have a knot.
(4) Ensure that yarn comes freely from yarn ball.
(5) Ensure that the Tension Dial and Stitch Dial numbers are selected correctly.
To unravel the knitting
Unravelling is required when:
- you have knitted too many rows.
- you have made a mistake in your knitting.
- Carriage has jammed.
- stitches have dropped or knitted incorrectly.
TO UNRAVEL, PROCEED AS FOLLOWS:—
Remove the Carriage from the knitting before you start to unravel. (If the Carriage has jammed, see page 62.)
Remove yarn from the Yarn Feeder.
Hang the Claw Weights on both edges of the knitting.

natural_image
Diagram of a knitted fabric with threads and a hand holding a string (no text or symbols)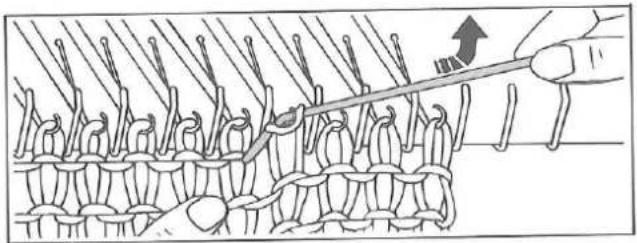
natural_image
Illustration of a hand using a tool to create a knitted fabric pattern (no text or symbols)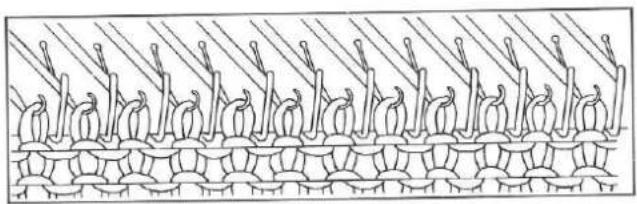
natural_image
Diagram of a woven textile or fabric pattern with repeating geometric shapes and diagonal hatching (no text or symbols)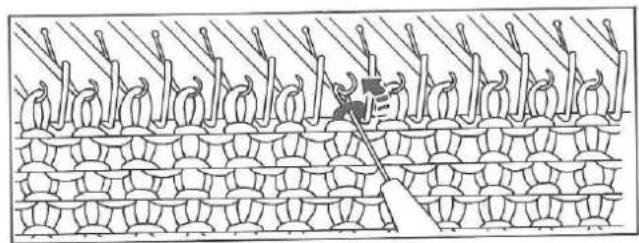
natural_image
Diagram of a woven textile or mesh structure with repeating patterns and no visible text or symbols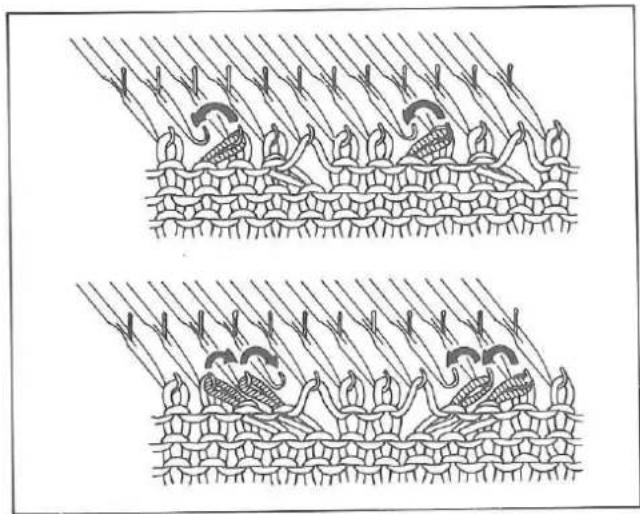
natural_image
Two identical line drawings of a woven textile or mesh structure with abstract patterns and no text or symbols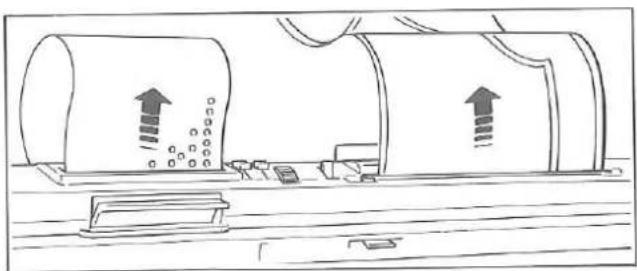
natural_image
Line drawing of two cylindrical tanks with upward arrows indicating flow or movement, no text or symbols presentHolding the knitting downwards with your left hand, pull yarn sideways.
Lift the yarn upwards and very slightly backwards. The stitches of previous row slide back onto needle hooks.
Ensure all stitches are in the needle hooks and the needles are in B position.
If some of stitches are not in needle hooks, place them into the hooks using the Transfer Tool.
Repeat the above procedure until the required number of rows have been unravelled.
NOTES FOR UNRAVELLING
In case of using L KNOB', unravel an even number of rows.
In case of LACE KNITTING, place the transferred stitches back to their original needles before unravelling the row. (Illustration)
NOTES FOR RE-KNITTING
Return the Row Counter by the same number of rows unravelled before re-knitting.
In case of using the PUNCH CARD, return the Card and let the Carriage memorize the pattern before re-knitting. (see page 68).
In case of using the KNIT CONTOUR, return the Pattern Paper before re-knitting. (see page 23 of the Knitting Manual.)
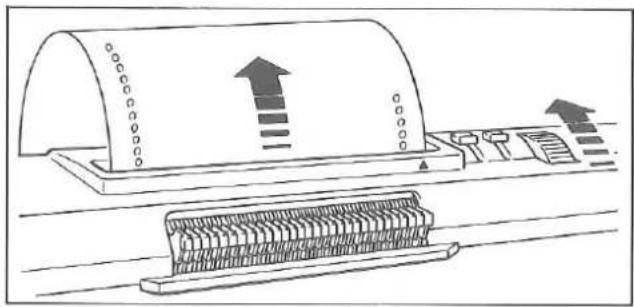
natural_image
Diagram of a mechanical device with directional arrows indicating motion or force (no text or symbols present)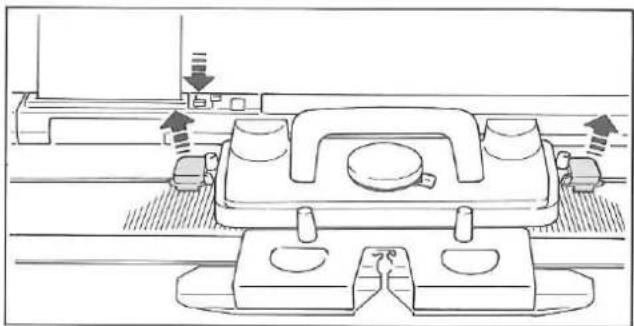
natural_image
Technical line drawing of a mechanical assembly with mounting base and adjustment arrows (no text or symbols)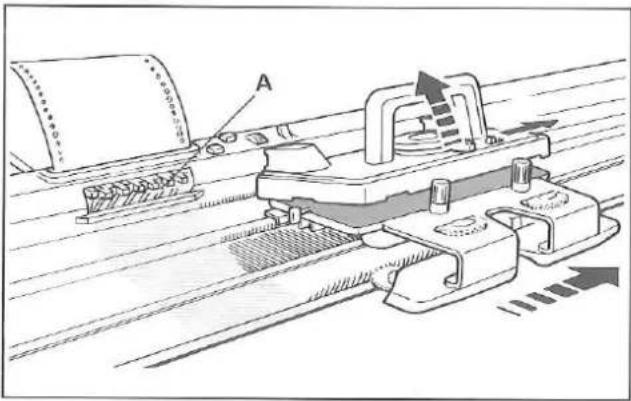
natural_image
Technical line drawing of a mechanical assembly with labeled component A (no text or symbols present)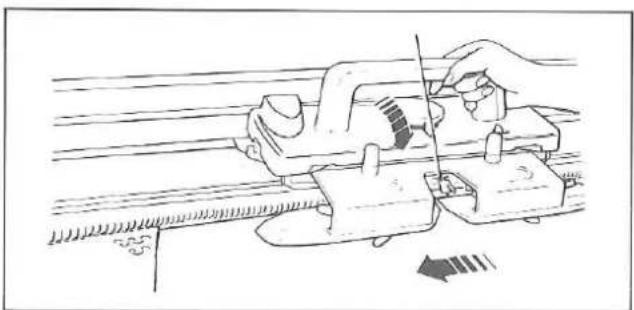
natural_image
Illustration of a hand using a sewing machine to cut or adjust a piece of hair (no text or symbols present)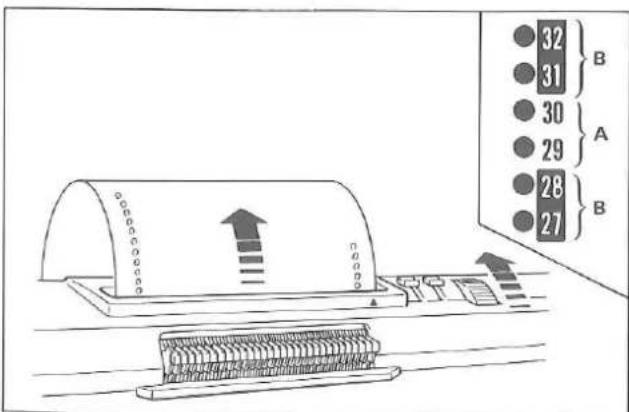
text_image
32 31 30 29 28 27 A BTo memorize the pattern
Memorizing the pattern is required when:
- Carriage has been pulled out from the Needle Bed.
- unravelling has been done.
FOR MAIN CARRIAGE
If unravelling has been done, return the Punch Card and Row Counter by the same number of rows unravelled.
In case of using L KNOB, return the Punch Card ONLY HALF THE NUMBER of rows unravelled.
For example: 3 rows incorrectly knitted.
Unravel 4 rows.
Return the Card only 2 rows.
Set the Stop Knob to ● and remove the New Magic Cams if they are in use.
For Model-270K Carriage, disengage the Row Counter Tripper.
Remove yarn from the Yarn Feeder.
Push the Release Lever to the right and with the Carriage Handle lifted, move the Carriage once or twice across the Needle Bed until it has passed the 30 needles corresponding to the Touch Levers "A" and place it at the side of yarn.
Insert yarn into the Yarn Feeder and set the Controls to their original positions.
Continue to knit.
FOR LACE CARRIAGE
If unravelling has been done, return the Punch Card and Row Counter by the same number of rows unravelled.
When the Punch Card for Fashion Lace (FL-8 \~ FL-10) is in use, return the Card by the same numbers unravelled over the Card Memory Numbers "A" skipping the marked Card Memory Numbers "B". "B" is not knitted rows but rows for transferring stitches.
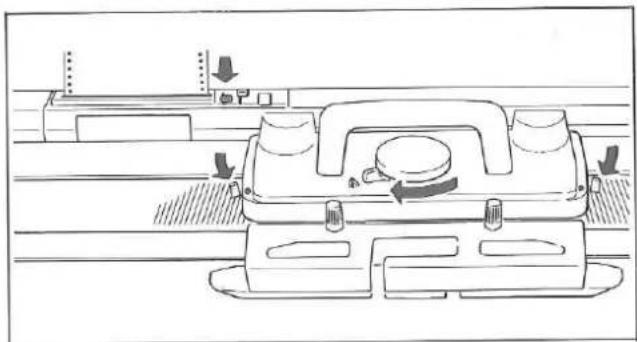
natural_image
Technical line drawing of a mechanical device with adjustment knobs and mounting base (no text or symbols)Stop Knob
Cam Lever....
Both Side Levers....
Remove yarn from the Yarn Feeder.
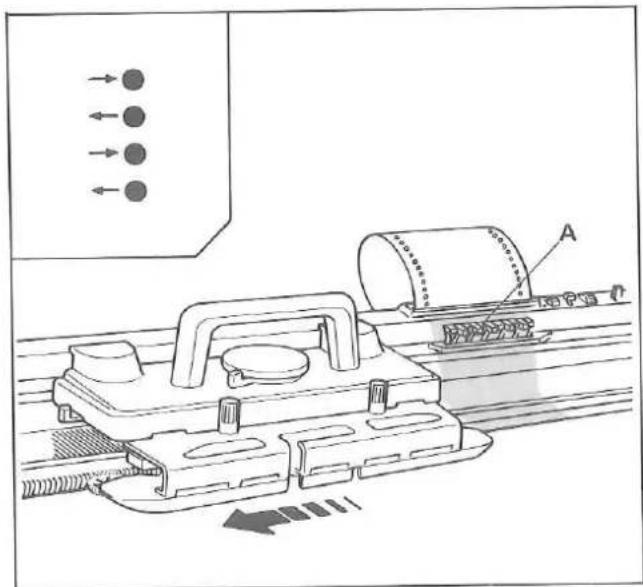
text_image
Technical diagram showing mechanical assembly with labeled components and directional arrows indicating flow or movementMove the Carriage once or twice across the Needle Bed until it has passed the 30 needles corresponding to the Touch Levers "A" and place it at the side of yarn.
NOTE
Ensure that the arrow mark on the Punch Card corresponds with the Carriage proceeding direction.
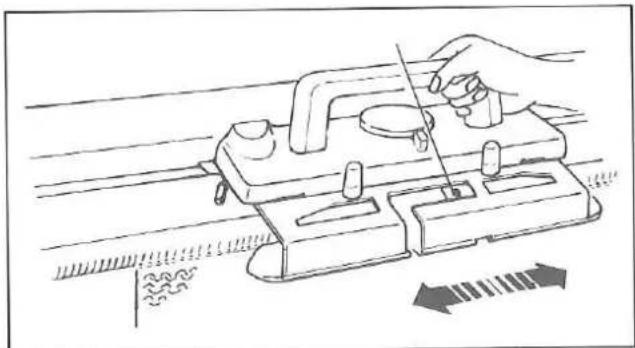
natural_image
Line drawing of a hand using a tool to cut or mark a mechanical component, with no visible text or symbols.Insert yarn into the Yarn Feeder and set the Controls to their original position.
Continue to knit.
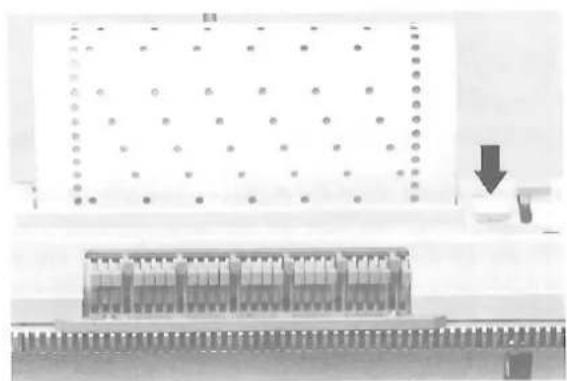
natural_image
Laboratory bench with test tubes and a downward arrow, no visible text or symbolsTO LOCATE PATTERN ON PUNCH CARD
To locate pattern of the Punch Card to be knitted on the next row, set the Stop. Knob to ●.
The Touch Levers are aligned in two positions. upper position .... perforated area lower position.... non-perforated area
To locate the pattern on the last knitted row, return the Punch Card by one row before setting the Stop Knob.
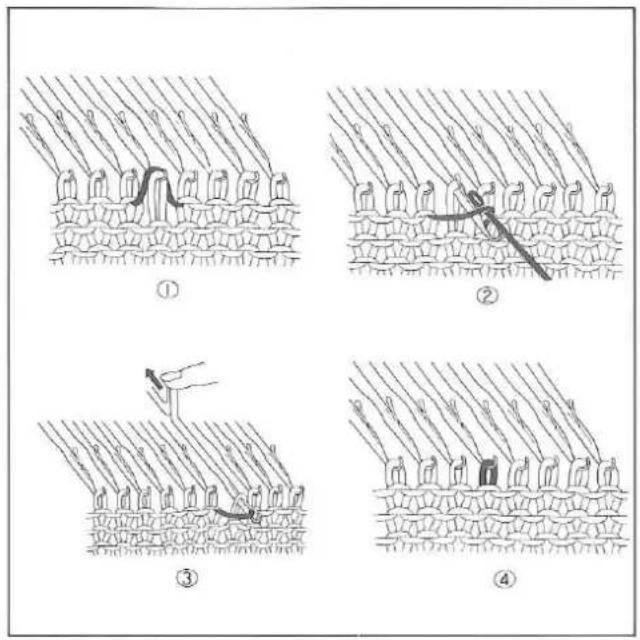
text_image
Diagram illustrating four stages of a plant root system with labeled steps and leaf structures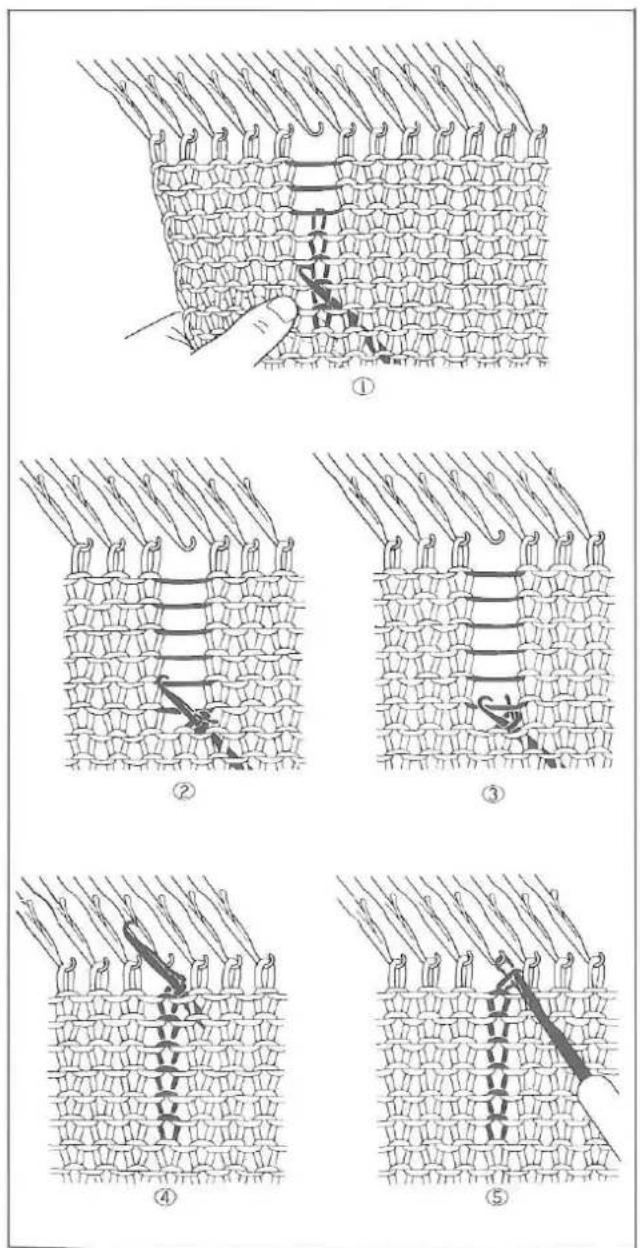
text_image
Diagram illustrating five steps of fabric textile sewing, showing thread application and stitching techniques.To reform stitch
Reforming stitch is required when the stitches have dropped while knitting.
A DROPPED STITCH
(1) Insert the One-Eye Transfer Tool into a stitch below the dropped stitch and replace it into needle hook together with loose yarn.
(2) Slowly pull the needle out until the stitch is behind the open latch leaving the loose yarn in the hook.
(3) Push the needle back so the latch will close and the stitch behind will slide over the hook reforming a stitch.
STITCHES DROPPED IN SEVERAL ROWS
(1) Insert the Tappet Tool into a stitch a few rows below the dropped stitch from the side away from you. Unravel the stitches down to the Tool.
With the other hand, pull the knitting downwards. This makes unravelling easier.
(2) Push the Tool toward you so the stitch will be behind the open latch. Catch the yarn crossing above into the hook.
(3) By pulling the Tool backwards, the latch will close and the loose yarn will be trapped in the hook.
(4) Continue pulling and the old stitch will slide down over the closed latch forming a new stitch in the hook.
(5) Repeat this operation up to the top.
If one or more stitches have dropped or when pattern knitting using the Punch Card, we recommend you to unravel than to reform stitches. (see page 66, 67)
MAINTENANCE
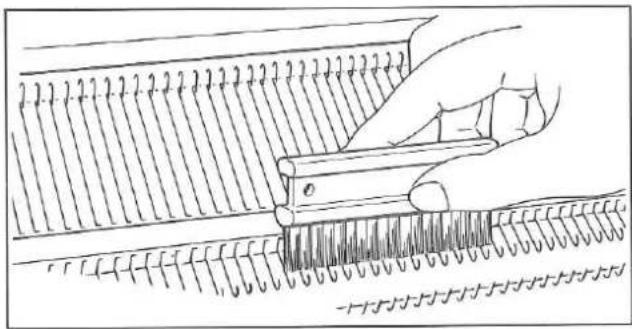
natural_image
Line drawing of a hand operating a mechanical tool with threaded components (no text or symbols)To clean your Knitter, remove the Carriage from the Needle Bed.
NEEDLE BED
Remove all lints using the Cleaning Brush.
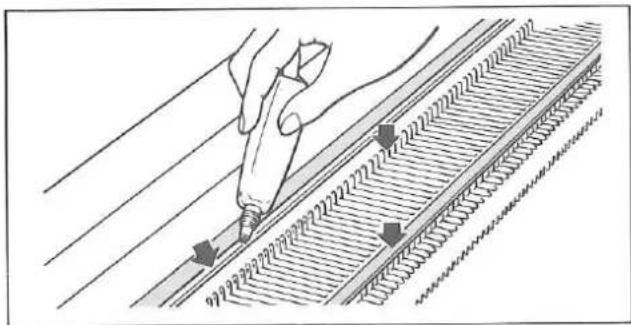
natural_image
Illustration of a hand using a tool to mark a track or track with parallel tracks (no text or symbols)Apply oil along the rail and front guide of the Needle Bed.
With an oiled soft cloth, wipe needle butts.
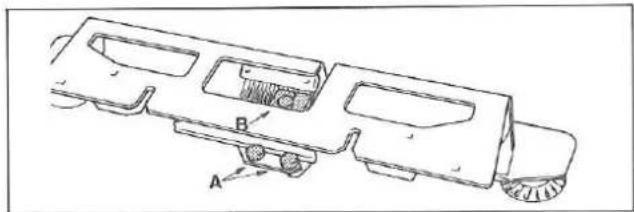
natural_image
Technical line drawing of a vehicle chassis with labeled components A and B (no text or symbols beyond labels)CARRIAGE AND ARM
Remove the Arm from the Carriage.
Remove all lints from the Round Brushes and Plastic Fabric Gears or the Rollers "A" and Yarn Feeder "B" of the Lace Carriage Arm.

natural_image
Technical line drawing of a mechanical component with symmetrical cavities and mounting brackets (no text or symbols)Turn up the Carriage and brush out all fluff and oil the sides of all the metal parts and Runner Rail.
The metal parts "C" of the Lace Carriage Arm must be handled very carefully.
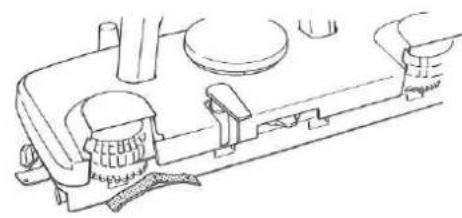
natural_image
Technical line drawing of a mechanical component with no visible text or symbols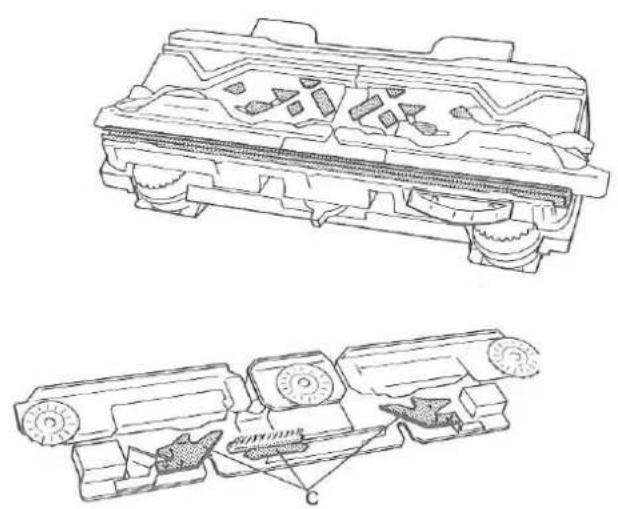
natural_image
Technical line drawings of mechanical components, showing cross-sectional views with no visible text or symbolsREPACKING THE KNITTER
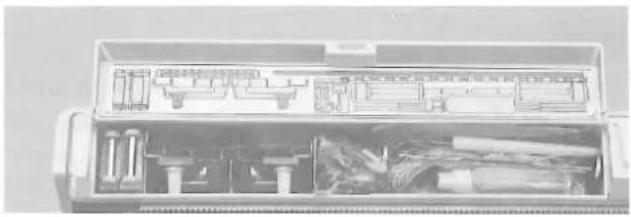
natural_image
Interior view of a mechanical tool kit with open compartments containing tools and components (no visible text or labels)Replace the Accessories in the Accessory Box.
Remove the Punch Card from the Pattern Card Panel. Do not fold or bend it.
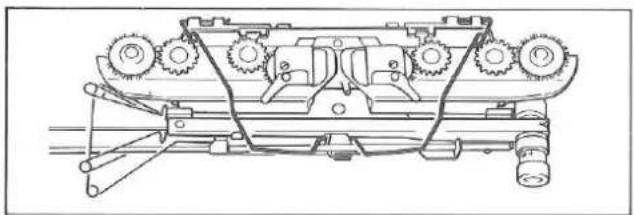
natural_image
Technical line drawing of a mechanical assembly with gears and linkages (no text or symbols)Remove the Auto Tension and Arm from the Knitter and pack them inside the Top Cover.
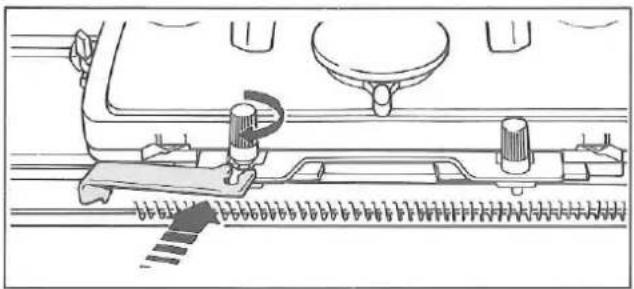
natural_image
Technical line drawing of a mechanical assembly with no visible text or symbolsSecure the Carriage to the Needle Bed with the Carriage Fastener.
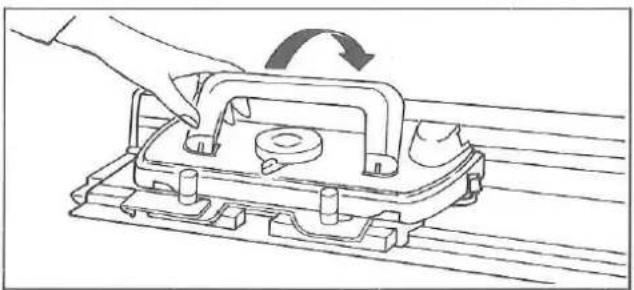
natural_image
Line drawing of a hand pressing down on a mechanical component with an arrow indicating rotation (no text or symbols)Lay the Carriage Handle down.
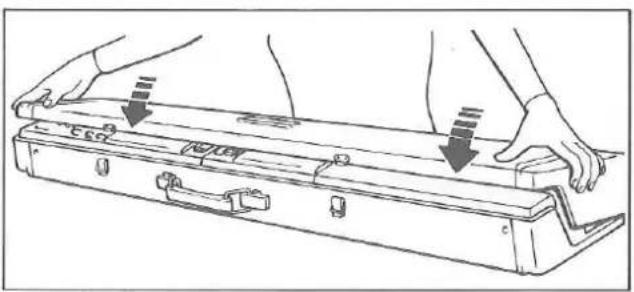
natural_image
Line drawing of a briefcase with hands holding it, showing internal components and motion arrows (no text or symbols)Place the Top Cover onto the Needle Bed.
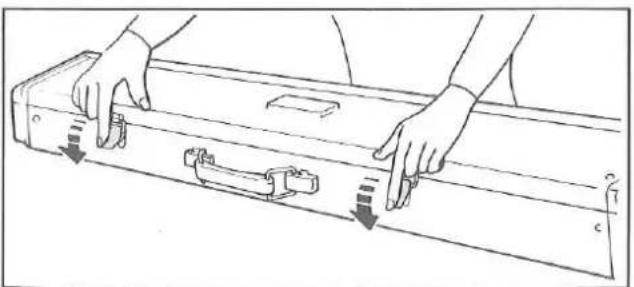
natural_image
Line drawing of hands adjusting a mechanical part with directional arrows indicating movement (no text or symbols)Fasten the latches.
Store the Knitter in a dry place.
INDEX
(M) - Main Carriage (L) - Lace Carriage K/M - Knitting Manual
A
Arm 7(M) 43(L)
Arm Nuts.... 4,7(M) 44(L)
Auto Tension 8
B
Basic knitting techniques. . .15, 16, 17, 18(M) 50, 51(L)
Butt. 10
C
Cam Lever 6,11(M)43,45(L)
Card Memory number 23(M) 54, 58(L)
Card Guide....2,22
Card Snap 2,22
Carriage Fastener....2,4
Cast on 11(M) 45(L)
Clamp 2,7
Claw Weight 2, 24, 39
Cleaning Brush 2,71
Comb Weight....43,55
Crochet Hook 2, K/M
D
Decreasing 17
Dropped stitch 70
E
Edge Pin....43, 56, 59
F
Fair Isle (Knit-in). 25
Fashion Lace. 57
G
Gauge Scale 2, K/M
H
Hand feeding 42
Helpful hints....61
Hook....10
|
Increasing....18(M) 51(L)
Incorrect knitting 66
J
Jam in knitting....62(M) 63(L)
K
Knit Contour (Radar).... 1, K/M
Knit-in....25
Knitting yarns....14(M) 49(L)
L
Lace Carriage 43
Lace knitting 54
Latch needle....10
L Knob 26
L Knob Indicator.... 26
M
Main Carriage 5,6
Main knitting 42
Main yarn. 9
Maintenance 71
Marked card memory number 58
Memorizing pattern 68
Moving Carriage without knitting....68(M) 69(L)
N
Needle arrangement 23, 31
Needle Pusher 2,10
Needle Retainer.... 64
New Magic Cams 2,37,42,59
Nylon thread 32
0
Oil. 2,71
Operation table 23(M) 54(L)
P
Pattern Card Panel.... 26
Pattern knitting.... 21(M) 54(L)
Pattern Paper 2, K/M
Plain lace 56
Platting 35
Platting Yarn Feeder 36
Point Cams M....2,38,59
Point Cams E 2,42
Punch Card.... 21(M) 54(L)
Punch Card Feeding Dial. 22
Punch Lace.... 32
R
Ravel Cord....2,42,47
Reforming stitches....70
Release Lever 5,62,68
Removing fabric .....19(M) 52(L)
Repacking the Knitter 72
Replacing a damaged needle 64
Ribber Needle Bed Cover 44
Row Counter 5,6
Row Counter Set Lever. 5
Row Counter Triper....6
Russel Levers 5,6
s
Second yarn 9
Side Levers....5,6
Single motif 37(M) 59(L)
Sinker post.... 46
Skein Holder....3
Slack yarn 16,20
Slip stitch pattern 27
Stitch Dial 11, 14(M) 45, 48(L)
Stitch Scale 2, K/M
Stitch size 14(M) 48(L)
Stockinet knitting .....11(M) 45(L)
Stop Knob 5
Stop Net 32
Stripe pattern 15
T
Tapestry Needle 2
Tappet Tool 2,70
Tension Dial 9
Threading Auto Tension 9
Threading Yarn Feeder....12(M) 45(L)
Touch Levers 5,6,24,55
Transfer Tool 2,17
Tuck Knob....7,29
Tuck stitch pattern 29
U
Unravelling 66
W
Weaving 33
Weaving Knob....7,33
Weaving Yarn Holder 7,33
Weight....2, 24, 39
Y
Yarn Ball Winder 3
Yarn Clip 9
Yarn Feeder 7(M) 45(L)
Yarn Holders 47
Yarn preparation 3
Yarn Rod....2,8
Yarn Separators.... 2,38
Ribber Needle Bed Cover
This very easy-to-fit plastic cover enables you to operate your Lace Carriage with Ribber attached in the lowest position.
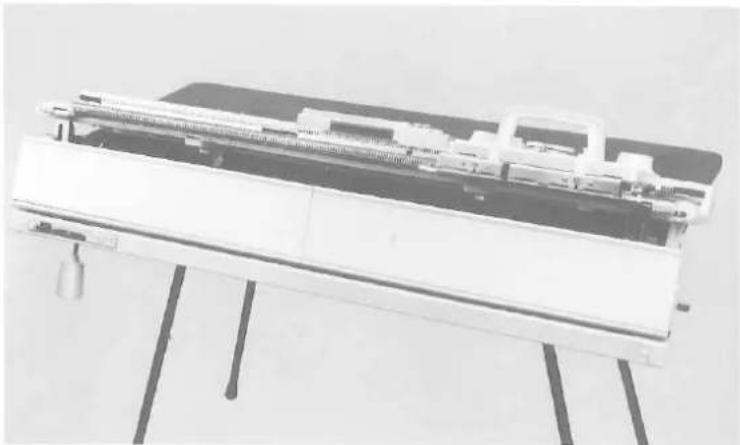
natural_image
Exterior view of a mechanical assembly or printer with no visible text or symbols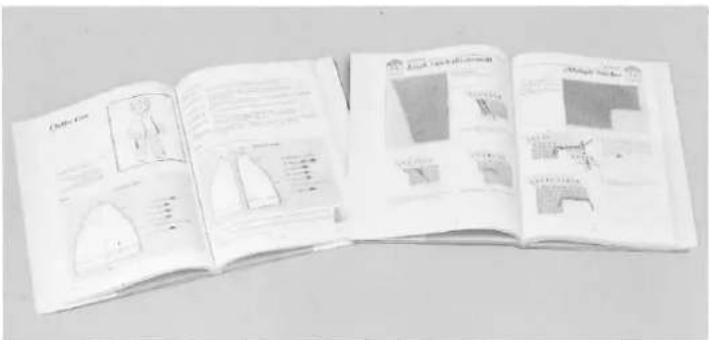
text_image
Open book pages with technical drawings and diagrams, including 3D models and 2D views of a garment or fabric.Knitting Book
Two books make up this set, "How to Knit Garments" and "Guide to Knitting Techniques".
Step-by-step approach guides you through the basics to advanced level of knitting.
Knit Pattern Paper Set
Series 100, 200, 300 and 400 provide a wide selection of pattern styles ranging from infant to adult, in five sizes for each pattern style.
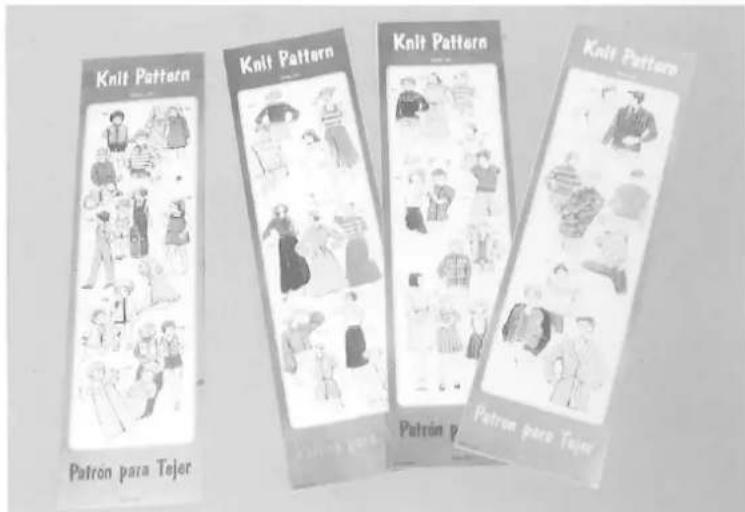
text_image
Knit Pattern Knit Pattern Knit Pattern Patron para Tejer Patron para Tejer
natural_image
Two white rectangular panels with diagonal lines and a small arrow, no visible text or symbols.Blank KR Pattern Paper Set
Yet another aid to the creative knitter. You draw patterns to a 12 size, and these patterns can be used any number of times thereafter.
Blank Tracing Paper Set
Enables you to trace a pattern from knit pattern or magazine, etc. Only guide lines are given.