Vibe-Fixer III 5.25 - Speicherleser Sharkoon - Kostenlose Bedienungsanleitung
Finden Sie kostenlos die Bedienungsanleitung des Geräts Vibe-Fixer III 5.25 Sharkoon als PDF.


Benutzerfragen zu Vibe-Fixer III 5.25 Sharkoon
0 Frage zu diesem Gerät. Beantworten Sie die, die Sie kennen, oder stellen Sie Ihre eigene.
Eine neue Frage zu diesem Gerät stellen
Laden Sie die Anleitung für Ihr Speicherleser kostenlos im PDF-Format! Finden Sie Ihr Handbuch Vibe-Fixer III 5.25 - Sharkoon und nehmen Sie Ihr elektronisches Gerät wieder in die Hand. Auf dieser Seite sind alle Dokumente veröffentlicht, die für die Verwendung Ihres Geräts notwendig sind. Vibe-Fixer III 5.25 von der Marke Sharkoon.
BEDIENUNGSANLEITUNG Vibe-Fixer III 5.25 Sharkoon
HDD VIBE FIXER
Manual
Sharkoon
natural_image
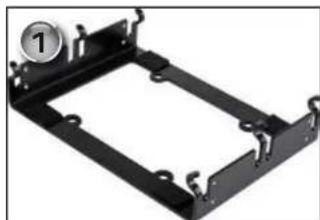
Black metal chassis frame with mounting holes and a circular component labeled '1' (no text or symbols on the frame itself)- Apply the cushion pads to the frame (fig. 1).
natural_image
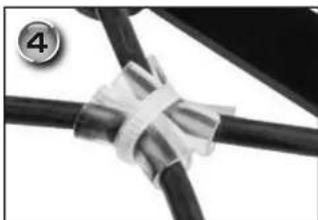
Close-up of black cables wrapped in a white tape, no visible text or symbols- Two silicone covers come with a lengthwise cut. Slide these covers over both inner parts of the rubber bands (fig. 4).
natural_image
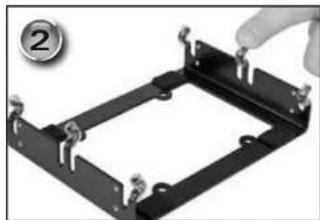
Close-up of a black mechanical bracket with metal fasteners, no visible text or symbols- Slide the silicone covers over the 6 clamps of the frame (fig. 2).
- Fasten the two inner parts of the rubber bands with the included cable tie. Take care to move the cable tie over the silicone covers (fig. 4). Cut the overlaying end of the cable tie with a pair of scissors.
- Place the frame on a flat surface in front of you,
natural_image
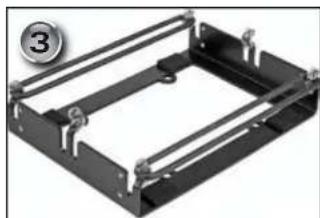
Mechanical assembly frame with metal brackets and mounting holes (no text or symbols visible)- Fasten the rubber bands to the outer clamps of the frame (fig. 3).
natural_image
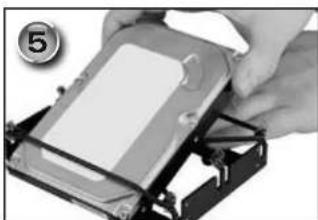
Close-up of hands installing a hard disk drive into a rack (no visible text or symbols)- Pull up the outer string of a rubber band and carefully slide the HDD into the gap (the strings of the rubber bands which are tied together by the cable tie go underneath the HDD) (fig. 5).
Note:
Take care that the rubber bands will not be amazed by the HDD or parts of it.
natural_image
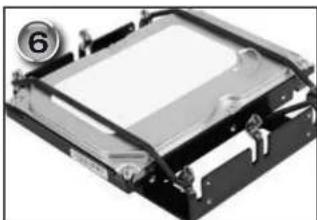
Close-up of a mechanical device with a transparent cover and mounting bracket (no visible text or symbols)- Slide the outer string of the second rubber band over the HDD and center the drive between the rubber bands (fig. 6).
Note:
The rubber bands of the frame are quite sensitive to mechanical damage. Sharp edges of the hard disk may cause small cuts in the rubber, which might go unnoticed but could eventually lead to disruption of the rubber. While inserting the hard disk into the frame this risk is most present. Therefore any sharp edges on the hard disk must be covered using standard isolating tape.
Important:
Never pull or press the rubber bands directly onto any electronics of the hard disk. It is harmless if the rubber bands touch the electronics, yet force must be avoided. Try to avoid placing rubber bands directly across processor chips of the hard disk as they might get hot.
natural_image
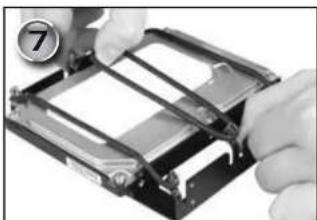
Close-up of hands installing or adjusting a mechanical component with a numbered callout (7), no visible text or symbols.- Fasten the last rubber band to the frame's central hook (fig. 7).
natural_image
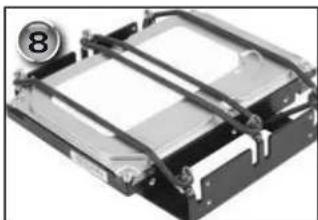
Mechanical assembly with metal frame and mounting bracket (no visible text or symbols)This is how the frame should finally look like (fig. 8).
10. Install the frame with the HDD into the computer case. Secure it with the included screws.
Operating conditions:
Any hard disk of 3.5" width and 1" height can be mounted and operated with the Vibe-Fixer. The operation temperature should not exceed 50°Celsius permanently. For short periods of time, up to 70°Celsius are tolerable for the rubber bands. Keep in mind that the aging process of the rubber is accelerated by heat! The rubber bands must not be exposed to daylight (UV light) for long periods of time.
Transportation note:
Rough handling during transportation may cause some displacement of the hard disk from its rubber suspension. After transportation open the PC, check and correct any possible displacement of the disk to ensure perfect operation of the unit. It is strongly recommended to check the rubber bands prior to any movement/shipment of the computer (see section "Maintenance").
Maintenance:
The rubber bands of the VIBE FIXER are subject to an aging process. Therefore it is required that the rubber bands' condition is checked every 12-18 months and to replace them if needed. Take a very close look at the spots where the rubber is bent the most, at the hooks and at the edges of the hard disk. If cracking shows up, any part of the rubber feels tacky or if the surface of the rubber bands looks distinctively whitish, do not use the unit until the rubbers have been replaced. You can order / purchase substitution rubber bands at support@sharkoon.com.