JQG7501 - Dunstabzugshaube Fotile - Kostenlose Bedienungsanleitung
Finden Sie kostenlos die Bedienungsanleitung des Geräts JQG7501 Fotile als PDF.


Benutzerfragen zu JQG7501 Fotile
0 Frage zu diesem Gerät. Beantworten Sie die, die Sie kennen, oder stellen Sie Ihre eigene.
Eine neue Frage zu diesem Gerät stellen
Laden Sie die Anleitung für Ihr Dunstabzugshaube kostenlos im PDF-Format! Finden Sie Ihr Handbuch JQG7501 - Fotile und nehmen Sie Ihr elektronisches Gerät wieder in die Hand. Auf dieser Seite sind alle Dokumente veröffentlicht, die für die Verwendung Ihres Geräts notwendig sind. JQG7501 von der Marke Fotile.
BEDIENUNGSANLEITUNG JQG7501 Fotile
FOTILE
RANGE HOOD
User Manual | JQG7501
Please read the following safety information clearly before being held and/or stand this experience. We recommend that you keep this manual for future plans and/or in case of transfer of ownership of this range hood.
Thank you!
Dear User, Thank you for purchasing the Fotile Range Hood. At Fotile, we manufacture exquisite appliances that are expertly crafted with the finest materials. Before using the Fotile Range Hood, please take some time to read through this Product Manual (manual). It will familiarize you with important safety, operation and maintenance instructions, as well as help maximize your culinary experience.
Fotile's promise is to "Make Our Home Better" and therefore we ensure the continued dependable and superior performance of all Fotile appliances so as to satisfy your needs. Before using the Fotile Range Hood, you must follow the instructions, as specified in this manual. Any damage resulting from the improper operation and/or maintenance of the appliance may result in the loss of warranty. The warranty will become invalid, and your warranty application, whether direct or indirect, will not be accepted by authorized service center of Fotile. If you require warranty or post-warranty after-sale service, please contact the local authorized service center of Fotile nearest you.
Your satisfaction with the Fotile brand is important to us. Our after-sales service centers provide assistance in resolving issues with Fotile appliances.
If you would like to apply for a warranty, please provide the product's model and serial number, which can be found on the nameplate attached to the upper wall of the range hood.
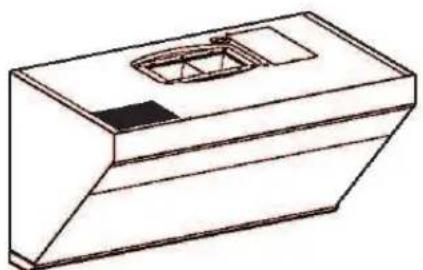
Please refer to illustration below for the location of the nameplate.
(Location of the nameplate)
natural_image
Technical line drawing of a rectangular electronic device with a recessed top and internal slot (no text or symbols)Contents
1 Safety Information 2
2 Product Information 5
3 Operation 5
4 Cleaning and Maintenance 6
5 FAQ 9
6 Service Information 9
7 Installation....10
7.1 Installation Instructions 10
7.2 Product dimensions.... 11
7.3 List of Accessories 12
7.4 Installation Tools....13
7.5 Installation Procedure 13
7.6 Test Run After Installation.... 19
Product features and specifications are subject to change, at any time, without notice. Please visit our website at www.fotileglobal.com for the most up-to-date information.
In order to ensure the safe and efficient use of Fotile appliances, please take note of the following types of highlighted information that will be outlined throughout this manual:
IMPORTANT NOTE highlights information that is particularly important.
CAUTION signals a situation where minor injury or product damage may occur if instructions are not followed.
WARNING states a specific hazard that may cause serious injury or death if precautions are not followed.
SAFETY INFORMATION
In order to prevent accidental damage to the Foble Range Hood and/or bodily injuries as a result of its operation, please read the following safety information:installing and/or using this appliance. Following the instructions carefully will significantly reduce the risk of fire, electric shock and/or bodily injuries to persons. We recommend that you keep this manual for future use and/or in case of transfer of ownership of the range hood
Important Note:
- This appliance is intended for indoor home cooking only; it cannot be used for outdoor cooking.
- Check the appliance for damage after unpacking it. If you detect any obvious damage to the product, do not proceed with the installation. Please contact our authorized service center immediately.
- Avoid placing gypsum powder, construction dust, etc. within close proximity of the range hood.
- Operate the range hood only in the manner outlined in this product manual.
- When operating the range hood, do not leave the appliance unattended. If you have any questions and/or concerns, please contact our authorized service center.
- Operate, clean and maintain the range hood in accordance to the instructions outlined in this manual
- Clean the metal grease filter according to the instructions.
- The range hood's motor has a thermal overload function, which automatically turns off the motor when it overheats. Once the motor cools down, the range hood will automatically restart. If the motor, continually turns off and restarts, please contact our authorized service center.
- If the range hood has not been in operation for an extended period of time, unplug the appliance.
- Please make sure correct installation and
maintenance of the appliance. Installation work and electrical wiring must be done by qualified person(s), in accordance with all applicable codes and standards, including fire-rated construction codes and standards. The installation personnel should be responsible for normal operation of the appliance at the installed position.
- In order to maximize the range hood's ability to ventilate cooking fumes, the bottom of the hood should be installed at a minimum of 12 3/16 inch (308 mm) and a maximum of 15 1/8 inch (383 mm) above the countertop. The hood should be fixed on the wall above the cooktop.
- When operating the range hood in exhaust mode, ensure to install the damper along with the hood.
- For general exhausting only. Do not use this range hood to exhaust hazardous and /or explosive materials or gas.
• In order to reduce the risk of fire, all exhaust pipes, flues and devices should be nonflammable. Use only metal duct cover and metal duct pipes. Never cover the hood with flammable plastic film or paper.
• Services guaranteed under warranty must be performed by Fotile certified service provider or personnel. - Please read the specification label on the range hood for further information and requirements.
Caution:
• The operating temperature of the range hood should not exceed 104 °F (40°C)
- Please do not place any objects on the hood, as items placed on the appliance may fall down.
- Clean the oil cup frequently to prevent overflow. The resulting grease is inedible!
- When applicable local regulations comprise more restrictive installation and/or certification requirements, the aforementioned requirements will prevail, and installation personnel must conform to these requirements.
- When cutting or drilling into the wall or ceiling,
be careful not to damage electrical wiring, water pipes, gas lines, or other hidden utilities.
- Adhere to the heating equipment manufacturer's guidelines and safety standards, such as those published by the National Fire Protection Association (NFPA), the American Society for Heating, Refrigeration and Air Conditioning Engineers (ASHRAE) and the local code authorities. Meanwhile, conform to the safety standards issued by such administrative departments as fire department.
- When gas burners are in operation without any cookware placed on them, they can build up a lot of heat. A ventilation appliance installed above the cooker may become damaged or catch fire. Only operate the gas burners with cookware on them.
- Achere to the voltage and frequency settings listed in this manual to avoid possible damages to the range hood.
- Please use standard accessories provided by our company to prevent the range hood from falling down accidentally (Make sure to use the expansion pipe and expansion bolt provided by our company, in case the range hood falls down accidentally). The hole drilled in the wall should precisely match the size of the expansion pipe, otherwise, the range hood may loose and fall down.
Warning:
Risk of Electric Shock
A defective appliance may cause electric shock. Never switch on a defective appliance. Unplug the appliance from the mains or switch off the circuit breaker in the fuse box in case of problems, and contact our authorized service center.
- The range hood should be connected to a standard power socket with safe grounding. Midway connection, prolonged electric line or multi-socket wiring may cause electric shock, overheating and, in some cases, result in a fire. Installation of the range hood should be performed by professional electricians in
strict accordance with electricity standards and regulations of the local area. Before connecting the rod, turn off the power source and take appropriate measures to prevent auto closing of the power switch.
• In order to prevent electric shock and/or other bodily injuries to persons, do not exceed 120V AC input.
- Do not install the range hood in a bathroom and/or a humid area, as this will significantly increase the risk of electric shock.
- If a wire is damaged or defective, contact an authorized service provider or a qualified technician (provided by Fotile) to replace the wire.
- Do not change, stretch, knot, pressure or squeeze the wire as any resulting damage can result in electrical and/or fire hazards.
- Prevent water from coming into contact with the range hood's electrical components, such as the motor, switch and connector. Do not wash the appliance with water. Do not use the appliance if it is wet, as electric leakage and/or electric shock may occur.
- Do not attempt to change the range hood's internal wiring system. Improper modifications and/or repairs to the internal wiring can result in bodily injuries to persons, electric shock and/or a fire.
• In order to avoid electric shock, remember to turn off the appliance's power source before installation, cleaning and/or maintenance service
- Avoid using high-pressure detergents and/or steam cleaners on the appliance, as they may result in electric shock.
- Do not touch the plug or switch with wet hands, as an electric shock may occur.
Grounding Instructions
- This appliance must be grounded. In the event of an electrical short circuit, grounding reduces the risk of electric shock by providing an escape wire for the electric current. This appliance is equipped with a cord having a grounding wire with
a grounding plug. The plug must be plugged into an outlet that is properly installed and grounded.
- Improper grounding can result in electric shock.
- Consult: a qualified electrician if the grounding instructions are not completely understood, or if doubt exists as to whether the appliance is properly grounded.
- Do not use an extension cord. If the power supply cord is too short, have a qualified electrician install an outlet near the appliance.
Risk of Fire
- In order to reduce the risk of fire and to properly exhaust air, always duct the air outside. Do not vent exhaust air into spaces within walls, ceilings, attics, crawl spaces and/or garages.
- In order to prevent the risk of fire, the range hood should be operated and maintained in accordance to the instructions.
- Hot oils may ignite and burn quickly. Never leave hot oils unattended.
- Clean the hood's oil cup at regular intervals as leftover grease deposits may ignite.
- Never operate the range hood without the oil cup filter attachment.
- Never work with naked flames close to the appliance (e.g. flaming). Do not install the appliance near a heat-producing appliance for solid fuel (e.g. wood or coal). There must be no flying sparks.
- Avoid cooking with food products that produce flames under the range hood.
TO REDUCE RISK OF COOK TOP GREASE FIRE:
A) Never leave surface units unattended at high settings. Boilovers cause smoking and greasy spillovers that may ignite. Heat oils slowly on low or medium settings.
B) Always turn the hood on during cooking.
C) Clean ventilating fans. Grease should not be allowed to accumulate on fan filter or in exhaust ducts.
D) Use proper pan size. Always use cookware
appropriate for the size of the surface element.
TO REDUCE THE RISK OF INJURY TO
PERSONS IN THE EVENT OF A RANGE TOP
GREASE FIRE, OBSERVE THE FOLLOWING:
- Smother flames with close-fitting lid, cookie sheet, or metal tray, then turn off the burner. Be careful to prevent burns. If the flames do not go out immediately, evacuate and call the fire department.
- When the cooking utensil catches fire, switch off the range hood immediately. Effective extinguishing measures must be taken at once, such as covering the open flame with metal cover, turning off the master gas valve and keeping flammable substance from the open flame etc.)
- Never pick up a flaming pan—you may be burned.
- Do not use water, including wet dishcloths or towels—a violent steam explosion will result.
USE AN EXTINGUISHER ONLY IF:
- You know you have a class ABC extinguisher and you already know how to operate it.
• The fire is small and contained in the area where it started.
• The fire department is being called.
• You can fight the fire with your back to an exit
Risk of Injury
- This appliance is not intended for use by persons (including children) with reduced physical, sensory or mental capabilities, or lack of experience and knowledge, unless they have been given supervision or instruction concerning use of the appliance by a person responsible for their safety. Children should be supervised to ensure that they do not play with the appliance.
• The range hood may have sharp edges. Be careful to avoid cuts and abrasions during installation and cleaning. Do wear qualified protective gloves.
• The accessible parts become very hot when in operation. Never touch hot parts. Keep children at a safe distance.
- Do not touch lamps during or soon after operation. Burns may occur.
- Do not insert your limbs and/or foreign objects into the impeller while the range hood is in operation, as that action might cause injury.
- This appliance is not intended for operation with an external clock timer or a remote control.
- Incorrect repairs are dangerous. Repairs may only be carried out and damaged power cables replaced by one of our trained after-sales technicians..
- If any abnormalities and/or defects occur while operating the range hood, immediately turn off the appliance and unplug the appliance from the mains or switch off the circuit breaker in the fuse box. Then, contact our authorized service center. Abnormal operation and defects may cause hazardous situations, such as electric shocks and fires.
Risk of Suffocation:
- Packaging material is dangerous to children. Never allow children to play with packaging material, which may cause suffocation. Keep all packing material out of proximity to children. Please remember that packaging materials should not be treated as toys.
Risk of Death:
- Risk of poisoning from flue gases that are drawn back in.
•Always ensure adequate fresh air in the room if the appliance is being operated in exhaust air mode at the same time as room air-dependent heat-producing appliance is being operated. Exhaust gases through the flue (chimney) of fuel burning equipment to prevent back drafting - Fotile is not responsible for injuries caused by improper and/or incorrect operation of the range hood.
OPERATION
Warning
- Do not use excessive force to press buttons on the control panel.
- Turn off gas burners without any cookware placed on them.
- Do not disassemble the appliance with power on and/or without complying with instructions.
- Clean the oil cup frequently to prevent overflow and a potential fire.
- Disassembly and/or servicing of the range hood must be performed by qualified technicians.
- Do not let the stove fire burn the range hood directly.
Product Information
| Model | JOG7501 |
| Produce size: L*D*H | 29.78×18 1/4 × 17 7/15 inch (758×482×442 mm) |
| Net weight | 58.2 lbs (26.4 Kg) |
| Power/Frequency | 120V/60Hz |
| Rated power input of the range hood | 256 W (light power included 3W×2 ) |
| Max air flow | 850 CFM (24 m3/min) |
| Max noise | 2.84 seconds (54 dB) |
| Max static pressure | 380 Pa |
| Caution: 1. The max air flow is 570CFM(16.1m3/min) in EC testing. 2. Air flow and static pressure: Deviation between express value and measured value is less than 5% of the measured value | |
Operation
- Fotile Range Hood Control Panel
| Ladder | Dolloy | Lighting | Funeral | High | Medium | Low |
| Spearl | Spearl Pair | Spearl Pair | Spearl Pair |
- Operation Procedure
(1) POWER
The POWER button activates the range hood. Once you press the POWER button,
the button will fully illuminate and the other buttons on the control panel will display low illumination. Lightly press the POWER button again to turn off the range hood. Once the range hood is off, all buttons will cease to illuminate and the smoke baffle plate will close automatically. With the exception of the LOCK SCREEN button, the control panel's functions will only work when the POWER button is active.
(2) HIGH-SPEED FAN
The HIGH-SPEED FAN opens the smoke baffle plate and operates the fan on high-speed. Once pressed, the button will fully illuminate. Press the button again and the fan will stop and the button will return to low illumination.
(3) MEDIUM SPEED FAN
The MEDIUM-SPEED FAN opens the smoke baffle plate and operates the fan on medium-speed. Once pressed, the button will fully illuminate. Press the button again and the fan will stop and the button will return to low illumination.
(4) LOW-SPEED FAN
The LOW-SPEED FAN opens the smoke baffle plate and operates the fan on low-speed. Once pressed, the button will fully illuminate. Press the button again and the fan will stop and the button will return to low illumination.
(5) LIGHTING
The LIGHTING button opens the smoke baffle plate and turns on the lights. Once pressed, the button will fully illuminate. Press the button again and the light will turn off and the button will return to low illumination.
(6) DELAY
The DELAY button activates a two-minute delay. Once pressed during operation, the button will fully illuminate. Two minutes later, the range hood stops operating
and the smoke baffle plate closes automatically
If you press the DELAY button once during the two-minute delay, the range hood will resume operating and the DELAY button will return to low illumination.
If you press any other control panel button once during the two-minute delay, the range hood will resume operating and the DELAY button will return to low illumination. The range hood will operate as the pressed button suggests
(7) ALOCK SCREEN
The LOCK SCREEN locks the entire control panel's functionality. Once pressed and held for 2 seconds, you will hear a "beep" sound and the LOCK SCREEN button will illuminate fully. In order to unlock the control panel, you must press and hold the LOCK SCREEN for another 2 seconds. The control panel functionalities will unlock and the button will return to low illumination. LOCK SCREEN cannot be engaged when the fan is in operation. If LOCK SCREEN is pressed at that time, an alarm sound will engage.
CLEANING AND MAINTENANCE
Important Note:
Reattach the grease filter after cleaning and maintenance of the range hood. Do not operate the appliance without the grease filter, as it may cause safety hazards.
Caution:
Risk of demager due to corrosion.
• Always switch on the appliance while cooking to avoid condensation. Condensate can produce corrosion damage.
• Surface damage due to incorrect cleaning
Clean stainless steel surfaces in the direction of the grain only. Do not use any stainless steel cleaners for operator controls.
- Surface damage due to strong or abrasive cleaning agents.
- Replace faulty LED lights to prevent the remaining lights form overloading.
Warning:
- The range hood should only be cleaned as instructed; otherwise, it may ignite.
- Please remember not to wet the motor and/or the control panel, as it may result in damaging the electric circuits or potential hazards.
- Do not clean the appliance with chemical agents, such as gasoline, acids, benzene and solvents.
Risk of Electric Shock:
- Penetrating moisture may result in an electric shock. Prior to cleaning and maintenance, pull out the mains plug or switch off the circuit breaker in the fuse box.
- Do not use any high-pressure cleaners or steam cleaners, which can result in an electric shock.
Risk of Fire:
Grease deposits in the grease filter may catch fire.
Risk of Injury:
- Unplug the appliance from the mains or switch off the circuit breaker in the fuse box before installation, cleaning, maintenance and repair in order to avoid electric shock
• The range hood may have sharp edges. Be careful to avoid cuts and abrasions during installation and cleaning. Do wear qualified protective gloves. - While the range hood is in operation, co not insert your hand into the area housing the fan.
• The appliance will become hot during operation, especially near LED lights. Allow the appliance to cool down before cleaning. Do not touch lamps during or soon after operation. Burns may occur.
- If you would like to schedule a deep cleaning for your appliance, please contact our authorized service center
• Fotile suggests that you clean the surface of the appliance for better use
1) Neutral detergent may be used to clean stains on the range hood. However, avoid touching the control panel. Wipe some detergent on the stains and let the detergent sit. Do not let the detergent sit for an extended period of time, as it can cause damages to the appliance's surface. Then, wipe off the stain with a soft cloth and the left detergent with a slightly wet cloth. Next, use another cloth to dry the appliance.
2) Stains on the range hood should be cleaned within a short time period, as to prevent the stains from becoming permanent.
3) Abrasive detergents, such as a salt solution, disinfectant or bleach powder cannot be used to clean the appliance. Wipe off the detergent with a wet, soft cloth. Next, use another cloth to dry the appliance.
Warning: Do not clean the appliance with abrasive tools, such as steel wool, brushes, and coarse cloths, as these materials will permanently scratch the surface of the hood.
Preparations before Cleaning:
- Unplug the appliance
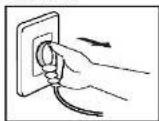
2. Clear the cockware on the burners.
INSTALLATION
7.1 Installation Instructions Important Note:
- Prior to installation, please read the Fotile Range Hood Installation carefully and save it for the local inspector's future reference.
• This appliance must be installed in accordance with National Electrical Codes, as well as all state, municipal and local codes.
• The appliance must be equipped with safe circuit breaker and installed with safe grounding
• The correct voltage, frequency and amperage must be supplied to the appliance according to the proper voltage, frequency and amperage ratings listed on the product rating plate. - This installation must be completed by Fotile authorized service center, or certified installers.
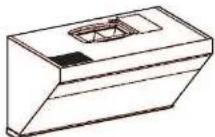
- Please record the model and serial number before installing the range hood. Both numbers are listed on the product rating plate, located on the upper wall of the hood. Refer to the illustration below.
Caution:
- Please carefully read all instructions prior to installation. Please give special consideration to the following items:
-
If you are renovating your kitchen, be careful to not expose the exterior of the range hood. Building materials, dust, paint, coating, and gases will corrode and tamish the surface of the range hood. It is recommended that you install the range hood after all renovations are completed.
-
If you need to remove your gas burner before
installation, please turn off the main gas valve first.
3. Do not connect the range hood duct to a duct used to exhaust hot air or fumes from another appliance.
4. Two installers are recommended due to the large size and heavy weight of the range hood. Since the installation is complex and the appliance is heavy, professional installers are required to install the appliance as outlined in this manual.
5. After the appliance fixed, the plug should be accessible.
6. Make sure to keep the appliance horizontally.
7. Ensure that the appliance functions normally after the installation is complete.
Warning:
- In order to reduce the risk of fire, electric shock, or injury to persons, please carefully read the following:
- The installation and wiring of the appliance should only be carried out by a professional electrician in accordance with current national or local electric safety regulations, including fire-rated construction. Non-professional personnel should not conduct installation.
Proper installation is the responsibility of the installer.
Product failure due to improper installation is not covered under the Fotile warranty. - Please use standard installation equipment and tools provided by Fotile to ensure safe installation. Make sure to use the expansion tube and expansion bolt provided by our company, in case the range hood falls down accidentally. The hole drilled into the wall should precisely match the size of the expansion tube, otherwise the range hood will not be properly secured to the wall and may fall down.
- The range hood should be connected to a standard power socket with safe grounding.
The midway connection, prolonged electric line or multi-socket wiring may cause electric shock, overheating and even fire.
Power off before wiring and make sure proper measures have been taken to avoid unexpected connection.
- During installation, switch off the circuit breaker in the fuse box during installation.
If the supply cord is damaged, it must be replaced by a special cord or assembly available from the manufacturer or its service agent - The appliance should only be installed, removed and maintained by qualified technicians to prevent risks like electric shocks, falling or fires from occurring.
Risk of Injury:
- Unpug the appliance from the mains or switch off the circuit breaker in the fuse box before installation, cleaning, maintenance and repair in order to avoid electric shock.
• The range hood may have sharp edges. Be careful to avoid cuts and abrasions during installation and cleaning. Do wear qualified protective gloves.
Warning Before Installation
- Prior to installation, ensure that the exhaust outlet is free of debris, as they may damage the range hood.
- A straight and short ducting run will ensure a high performance of the range hood.
- A curving and long ducting run should be avoided, as it will lower the performance of the range hood
- Strictly seal the connection between the duct and duct hole with duct tape. Ensure that the connection between the duct and the duct cover is secure, and seal it with aluminum tape.
- A small duct hole will lower the performance of the range hood. Therefore, it is highly
recommended that you cut a duct hole equal to or larger than 6 inch of the size.
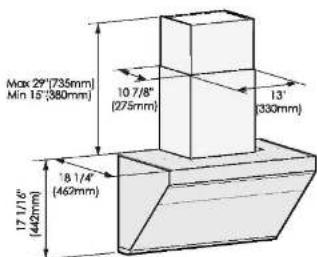
7.2 Product dimensions
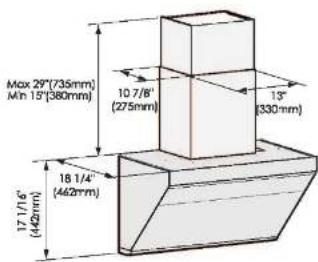
Fotile Range Hood Measurements
text_image
Max 29°(735mm) Min 15°(380mm) 10 7/8" (275mm) 13" (330mm) 18 1/4" (462mm) 17 1/16" (442mm)Wall installation
The wall should be strong enough to support the range hood. As for hollow wall or hollow plate, the thickness of its solid part should be no less than 13/16 inch (30mm). As for concrete wall, the installation can be directly operated. The range hood should be firmly fixed on the wall.
Ductwork installation Risk of Injury:
- Unplug the appliance from the mains or switch off the circuit breaker in the fuse box before installation, cleaning, maintenance and repair in order to avoid electric shock.
• The range hood may have sharp edges. Be careful to avoid cuts and abrasions during installation and cleaning. Do wear qualified protective gloves. - When cutting or drilling into walls or ceilings, do not damage electrical wiring and other hidden utilities.
- Ducted fans must always be vented to the outdoors.
- To reduce the risk of fire and to properly exhaust air, always duct air outside. Do not vent exhaust air into spaces within walls,
ceilings, into attics, crawl spaces or garages.
7.3 List of Accessories:
Packing List
| Standard Configuration | |
| Main Engine | 1 |
| Duct Cover | 1 |
| Gasket | 1 |
| Oil Cup | 1 |
| Product Manual | 1 |
| Installation Paper Template | 1 |
| Warranty Card | 1 |
| Duct Bracket | 1 |
| Bracket Screws ST5×85 | 5 |
| Expansion Tubes φ8×50 | 5 |
| Duct Cover Screws M4×18 | 4 |
| Upper Plate Fastening ScrewsM5×70 | 3 |
| Housing Assembly Accessories (optional) | |
| Blover Housing | 1 |
| Decorative Cover | 1 |
| Decorative Cover Bracket | 1 |
| Safety Buffer Baffle | 1 |
| Duct Cover Screws M4×10 | 4 |
| Base | 2 |
| Base Screws M4×8 | 2 |
| Bracket Screws ST5×65 | 3 |
| Expansion Tubes φ8×50 | 3 |
| Screws ST2.9×19 | 2 |
| Decorative Plate Assembly Accessories (with top cabinet) | |
| 6'or 12'Decorative Plate | 1 |
| Fixed Decorative Plate ScrewsST3.5×35 | 4 |
| Base | 2 |
| Base Screws M4×8 | 2 |
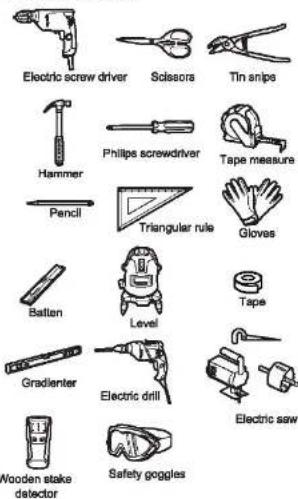
7.4 Installation Tools:
text_image
Electric screw driver Sissors Tin snips Hammer Philips screwdriver Tape measure Pencil Triangular rule Gloves Batten Level Tape Gradienter Electric drill Electric saw Wooden stake detector Safety goggles7.5 Installation Procedure:
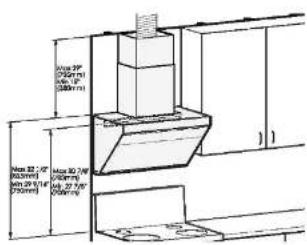
The optimum installation height of the range hood: 29.9/16 inch (750mm)-32 1/2 inch (825mm) from the table to the top of the range hood. It is suggested the height of the range hood is adjusted to the optimum. The gap between the top of the range hood and the bottom of the cabinet can be filled with a decorative plate Caution: one of the screws for duct bracket must be fastened to the wooden batten.
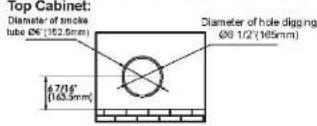
Installation of the Fotile Range Hood with a
text_image
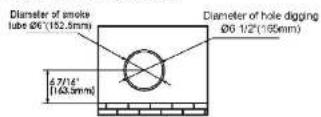
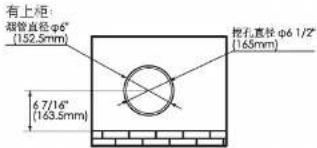
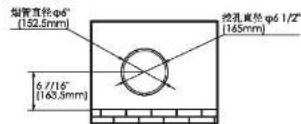
Top Cabinet: Diameter of smoke tube Ø6 (102.5mm) 6.7/16" (163.5mm) Diameter of hole digging Ø8 1/2 (165mm)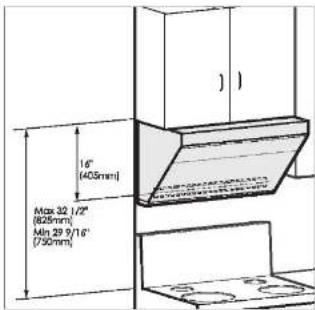
text_image
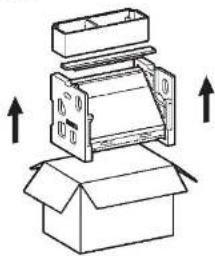
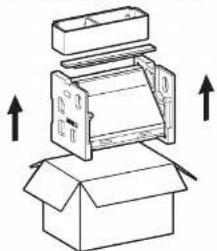
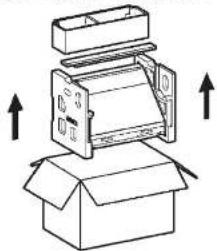
16" (403mm) Max 32 1/2" (825mm) Min 29 9/16" (730mm)- Unpack the appliance and check the List of Accessories
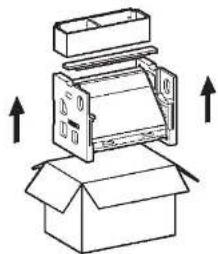
natural_image
Diagram of an open box with internal components and upward arrows indicating motion (no text or symbols)- Locate the wooden batten and mark the location with a pencil. Mark another batten 16' or 24' to either side of this mark.
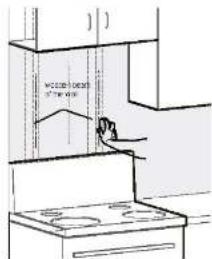
text_image
MOZZLE DOCK ONION ON- Locate the duct bracket. Determine and mark the centerline on the wall where the hood will be installed. Also, mark the point where the central line and the button edge of the cabinet meet. This is the location in which to secure the bracket. Mark screw hole locations on the wall. The distance between the top of the cabinet and the upper edge of the bracket should be 16 inch (405mm).
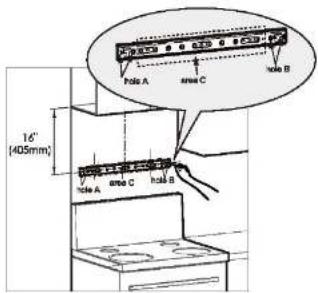
text_image
16" [405mm] Pole A area C hole B Pole A area C hole B- Fasten the bracket: drill ∅8 hole at the screw hole marks with electric drill, embed expansion tubes and fasten the bracket with bracket screws. Use leveling instrument to make sure that the bracket is leveled.
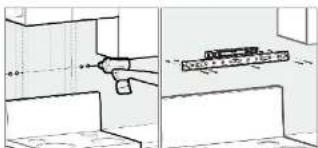
natural_image
Simple line drawing of a cabinet with an open hand and a tray, no text or symbols presentCaution: one of the brackets for main engine must be fastened to the beam. Screws must be fixed at hole A and B in the drawing; also screws must be fixed at bracket bores with corresponding wooden stakes in area C.
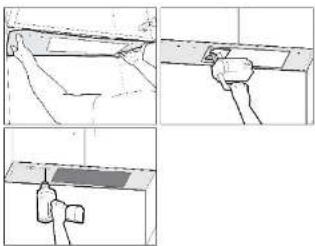
- Attach the paper template onto the bottom of the cabinet to determine and drill the duct cover hole, screw holes, and wire hole.
natural_image
Four-panel diagram showing a mechanical assembly or installation process with no visible text, numbers, or symbols.Caution: Wear safety goggles when drilling in case of batten at the wall facing the bottom plate, the rear wall side of the paper template shall be cut as per the thickness of the batten.
- Remove the protective film of the stainless steel surface and oil cup at both sides of the range hood.
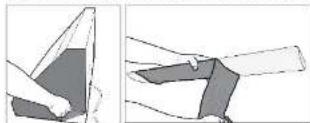
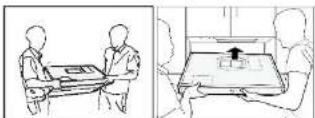
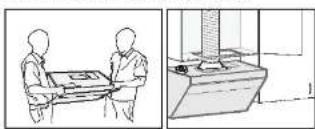
- Lift and position the hood onto the brackets at the bottom of the backside while keeping an angle between the wall and the hood, and then push the hood against the wall tightly.
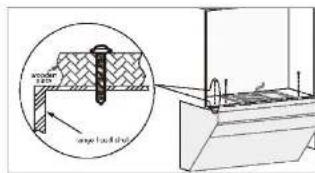
- Secure the hood to the top cabinet with three M5 X 70 fastened screws for top cabinet. The hood will need to be supported before you loose your hands until at least two screws are tightened.
text_image
wonder 10mm angle load rodCaution: Two installers are required to ensure safe installation.
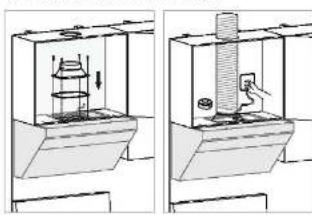
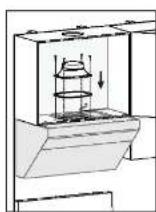
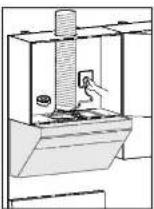
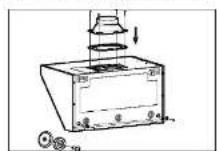
- Place the gasket seal on the hood outlet and fix the duct cover with four screws of outlet housing. Then, secure the duct to the duct cover and seal the connection with aluminum tape.
natural_image
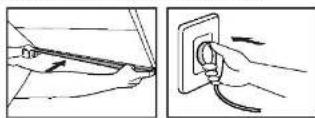
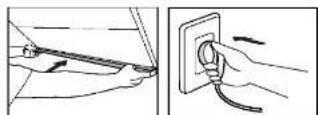
Two schematic diagrams of a mechanical or electrical device with internal components and directional arrows (no text or symbols)- Make sure the hood is leveled. Install the oil cup, and plug in the appliance for a test run.
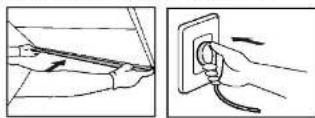
Warning: Please wear the qualified protective gloves in operation
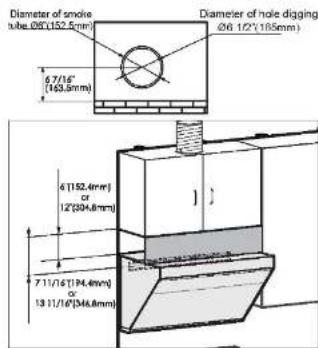
Installation instructions for the decorative plate with top cabinet :
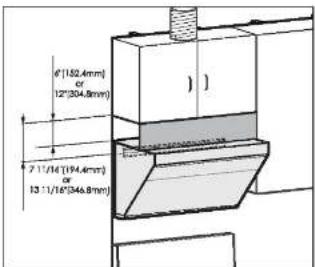
Caution: Please confirm the height of the top cabinet. If the top cabinet is over 32 1/2 inches (825mm) high, 6" or 12" decorative plate is preferred.
text_image
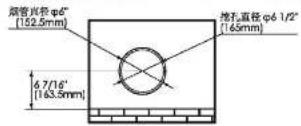
Diameter of smoke tube.06(152.5mm) 6/16" (163.8mm) Diameter of hole digging (26 1/2"(185mm)) 6(152.4mm) or 12"(304.8mm) 7 1/16(194.4mm) or 13 1/16"(344.8mm)1 Unpack the appliance and check the List of Accessories.
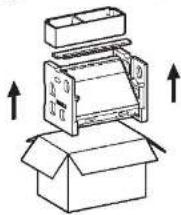
natural_image
Diagram of an open box with internal components and upward arrows indicating motion (no text or symbols)- Locate the wooden batten and mark the location with a pencil. Mark another batten 16" or 24" to either side of this mark.
text_image
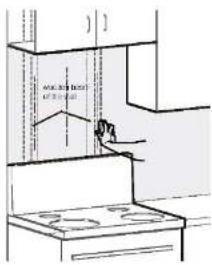
A00.00 A10.00 A20.00- Locate the duct bracket. Determine and mark the centerline on the wall where the hood will be installed. Also, mark the point where the central line and the button edge of the cabinet meet. This is the location, in which to secure the bracket. Mark screw hole locations on the wall. The distance between the top of the cabinet and the upper edge of the bracket should be 7 11/16 inch (194.4 mm)—13 11/16 inch (346.8 mm).
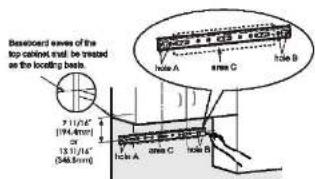
text_image
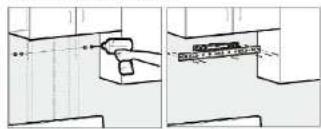
Basicboard windows of the top cabinet wall be treated on the locating beams 7.1/14" (194.4mm) 13.9/14" (546.5mm) Indie A Indie C Indie B- Fasten the bracket drill ∅8 hole at the screw hole marks with electric drill, embed expansion tubes and fasten the bracket with bracket screws. Use leveling instrument to make sure that the bracket is leveled.
natural_image
Two technical diagrams showing a hand pressing a block on a surface, with no visible text or symbols.Caution: one of the brackets for main engine must be fastened to the beam Screws must be fixed at hole A and B in the drawing; also screws must be fixed at bracket bores with corresponding wooden stakes in area C.
5. Attach the paper template onto the bottom of the cabinet to determine and drill the duct cover hole, screw holes, and wire hole (Cution: Wear safety goggles when drilling.) In case of batten at the wall facing the bottom plate, the rear wall side of the paper template shall be cut as per the thickness of the batten.
natural_image
Technical line drawing showing two views of a mechanical component (no text or symbols)Caution: Wear safety goggles when drilling in case of batten at the wall facing the bottom plate, the rear wall side of the paper template shall be cut as per the thickness of the batten.
6. Remove the protective film of the stainless steel surface and oil cup at both sides of the range hood.
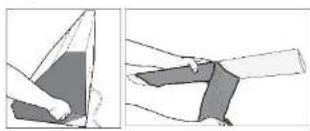
natural_image
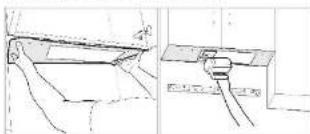
Two-step diagram showing a hand holding a piece of material, with no visible text or symbols- Place the gasket seal on the hood outlet and fix the duct cover with four M4 x 18 screws of outlet housing. Use two M4 x 8 base screws to fix the base in the corresponding location at the bottom of the backside of the main engine.
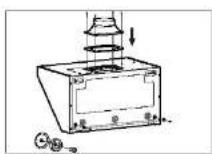
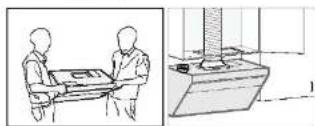
8. Lift and position the hood onto the brackets at the top of the backside while keeping an angle between the wall and the hood, and then push the hood against the wall tightly. Secure the duct to the duct cover and seal the connection with aluminum tape.
natural_image
Two technical line drawings showing a person handling a device and another with a mechanical device (no text or symbols visible)Caution: Two installers are required to ensure safe installation.
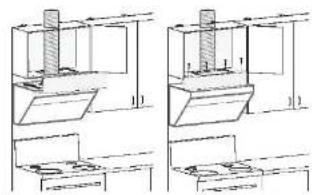
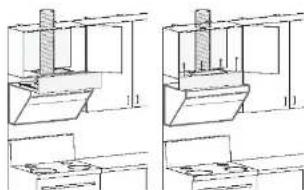
9. Install the decorative plate.
Use four 3.5 x 35 wood screws to fix the decorative plate on to the top cabinet.
natural_image
Technical line drawing of two mechanical assembly steps with no visible text or symbols- Make sure the hood is leveled. Install the oil cup, and plug the appliance for a test run
Installation instructions for the decorative cover without top cabinet
text_image
Max 22.5" (20mm) Max 23.5" (20mm) Max 24.7" (20mm) Max 25.7" (20mm)- Unpack the appliance and check the List of Accessories.
natural_image
Diagram of an open box with a mechanical device and upward arrows indicating motion (no text or symbols)- Locate the wooden batten and mark the location with a pencil. Mark another batten 16" or 24' to either side of this mark.
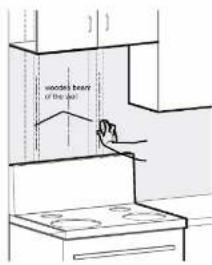
text_image
wonder heart of the bed- Locate the duct bracket, safety buffer baffle and decorative cover bracket:
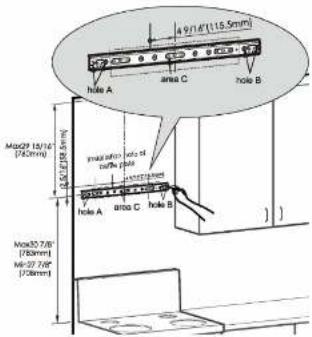
text_image
491.4" (115.5mm) hole A area C hole B Mio2P 18/16" (74.2mm) Mio30 7/8" (70mm) Mio32 7/8" (72mm) hole A area C hole BCaution: one of the brackets for main engine must be fastened to the beam. Screws must be fixed at hole A and B in the drawing; also screws must be fixed at bracket bores with corresponding wooden stakes in area C.
Firstly determine the installation central point of the range hood according to the central point of the cooker, determine the bracket installation location based on cooker table and mark the place for drilling. The cooker table is about 27 7/8 inch (708 mm) to 30 7/8 inch (783 mm) away from the central point of bracket;
The location to install the safety buffer baffle should be 4 9/16 inch (115.5 mm) to the left of the duct bracket and 2 5/16 inch (58.5 mm) straight up.
The location to install the decorative cover bracket should generally be 29 15/16 inch (760 mm) above the central point of the duct bracket. If the distance between the ceiling and duct bracket equals to or is less than the value, secure the decorative cover bracket on the wall right under the ceiling. If the distance is more than the value, taller decorative covers (27 9/16 inch (700 mm) and 35 7/16 inch (900 mm) in height respectively) need to be bought separately.
Drill ∅8 hole at the screw hole marks with electric drill and embed expansion tubes.
- Secure the duct bracket and decorative cover bracket to the wall with corresponding screws and tighten the screws. Make sure the bracket is leveled.
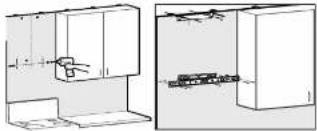
natural_image
Two technical diagrams showing a mechanical assembly or assembly process with no visible text, numbers, or symbols.Caution: one of the brackets for main engine must be fastened to the beam.
- Fasten the gasket seal and duct cover to the range hood outlet with four M4 x 18 screws and set four cover screws at the corresponding places. Fix two bases at corresponding positions on the back of the range hood with base screws.

natural_image
Technical line drawing of a rectangular electronic device with mounting holes and a circular button (no text or symbols)-18-
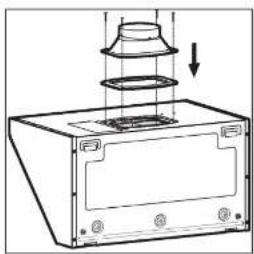
natural_image
Diagram of a speaker emitting sound waves into a rack, showing no text or symbols- Remove the protective film of the stainless steel surface and oil cup at both sides of the range hood.
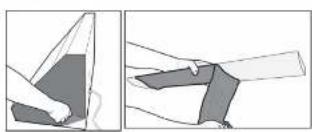
natural_image
Two-step diagram showing a hand pressing down on a piece of fabric, with no visible text or symbols.- Lift and position the hood onto the mounting screws. Make sure the hood is stable and leveled by using a spirit level. Install the safety buffer baffle above the hood.
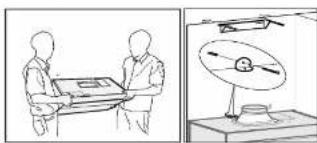
natural_image
Illustration showing two figures interacting with a table and a magnifying glass (no text or symbols)Caution: Two installers are required to ensure safe installation.
- Secure the duct to the duct cover and seal the connection with aluminum tape.
Make sure the hood is leveled. Install the oil cup, and plug the appliance for a test run.
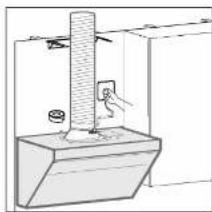
natural_image
Technical line drawing of a mechanical assembly with a cylindrical component and a base (no text or symbols)- Tear off the protective film over the decorative cover and the blower housing; then install the decorative cover onto the brackets. Push the blower housing downward and lock it to the cover screws.
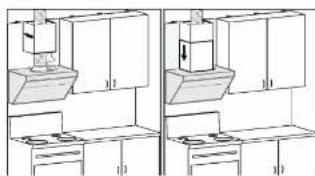
natural_image
Two identical line drawings of a kitchen setup with cabinets and drawers, no text or symbols present.- Install the oil cup.
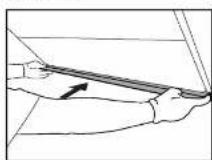
Warning: Please wear the qualified protective gloves in operation
7.6 Test Run after Installation:
-
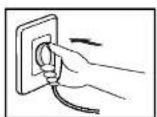
Lightly press the POWER button. Next, lightly press the LIGHTING button. At this time, the smoke baffle plate and lights should work normally.
-
Lightly press the fan buttons to check the motor. If any of the following malfunctions occurs, unplug
the hood immediately and re-check the installation process. (If the malfunction continues, contact our authorized service center as soon as possible.)
(1) The hood vibrates violently
(2) The impeller does not work
(3) The impeller grates while rotating.
(4) The motor makes strange sounds.
- Lightly press the POWER button again to turn off the fan and close the smoke baffle plate.
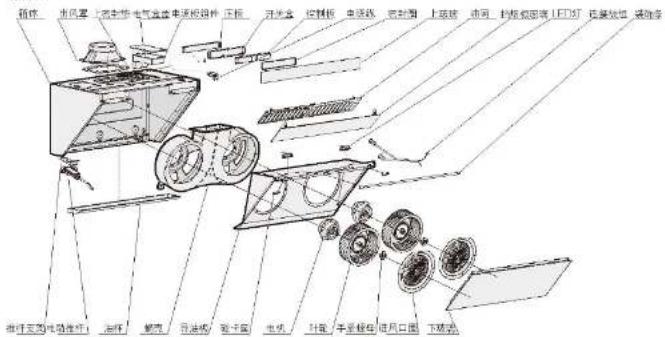
Explosive View
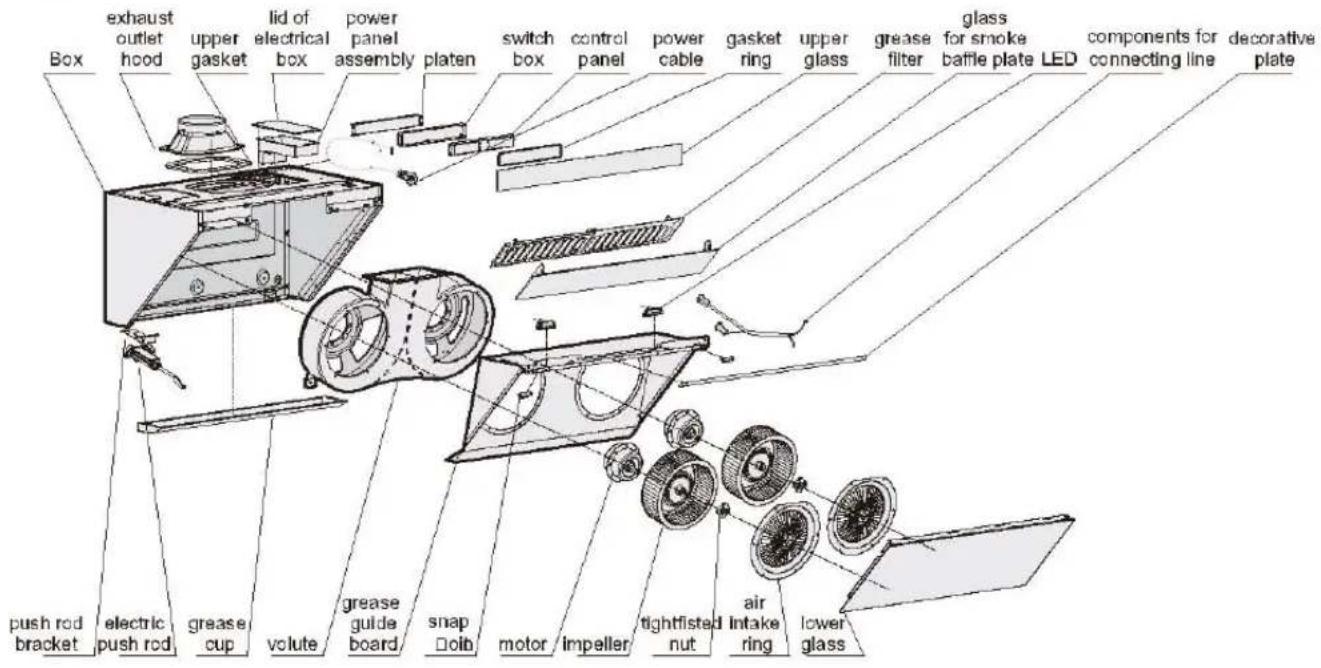
text_image
Box exhaust outlet hood upper gasket lid of electrical box power panel assembly platen switch box control panel power cable gasket ring upper glass grease filter glass for smoke baffle plate LED components for connecting line decorative plate push rod bracket electric push rod grease cup volute grease guide board snap dolb motor impeller tightflated nut air Intake ring lower glassElectrical Block Diagram

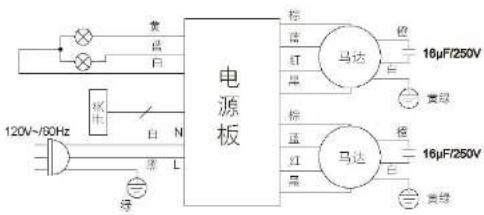
flowchart
graph TD
    A["Switch"] --> B["White N"]
    B --> C["Black L"]
    C --> D["Green"]
    E["120V~60Hz"] --> F["Switch"]
    G["Yellow"] --> H["Power supply board"]
    I["Blue"] --> H
    J["White"] --> H
    K["Brown"] --> L["Motor"]
    M["Blue"] --> L
    N["Red"] --> L
    O["Black"] --> L
    P["Orange"] --> Q["16μF/250V"]
    R["White"] --> S["Yellow and green"]
    T["Blue"] --> U["Motor"]
    V["Red"] --> U
    W["Black"] --> U
    X["Orange"] --> Y["16μF/250V"]
    Z["White"] --> AA["Yellow and green"]
FOTILE方太
吸油烟机
使用安装说明书 | JQG7501
在井岩安装和使用断开回喷砂机安装以喷粉。
- 招商银行成功申请,以外币汇款和政策通知使用。
感谢您!
尊敬的用户,您好!感谢您选购方太公司为您精心制造的方太系列产品。使用前请通读本《使用安装说明书》(以下简称说明书),此说明书将有利于您熟悉油烟机安全信息、操作和保养维修等,并让您享受到全新的下厨乐趣。
方太对您的承诺是“让家的感觉更好”。我们有责任使您对方太产品感到满意。请您在使用前务必认真阅读说明书,并遵从说明书要求进行使用。本说明书的操作说明对于维持产品的良好工作状况十分重要,若因使用不当造成产品故障,您将丧失免费保修的权利,任何直接或间接的免费保修申请将不被本公司各地售后服务中心所接受。同时我们建议您在质量保证期内及保证期后,如有需要维修时请与方太公司当地售后服务中心联系,这对您和我们都是非常重要的。
我们的售后服务中心将为您提供方太公司专业的零部件及技术支持,使您的产品得到优质快捷的维修保障,同时让您得到最轻松细心的服务。
如果您需要服务,您将需要提供位于产品左侧铭牌上的产品型号和序列号。铭牌位置请参考以下图示说明。
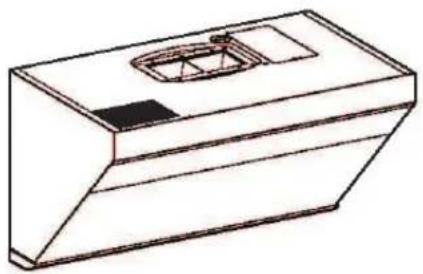
natural_image
Simple line drawing of a rectangular box with a recessed top and a small inset square (no text or symbols)目录
安全信息....2
操作....4
一、产品信息……4
二、操作....4
清洁保养....5
常见问题解答....7
售后服务....7
安装....7
一、安装须知....7
二、产品尺寸 8
三、零配件一览表....9
四、安装工具....10
五、安装步骤....10
六、安装后调试....16
产品特征和参数会在无通知情况下随时更改。请访问我们的官网 www.fotileglobal.com,获取最新信息。
为确保方太产品的安全和高效使用,请注意产品说明书中以下突出显示信息:
重要提示——强调非常重要的信息。
注意一一表示如不遵守指导说明则可能出现轻微人身伤害或产品损坏。
警告——标明如不遵守预防措施则可能导致严重人身伤害或死亡等危险。
安全信息
为避免任何对油烟机的意外风险和损害,请在开始安装和使用前仔细阅读此产品说明书。只有这样您才能安全正确地操作此产品,降低火灾、电击或者人身伤害等风险,请保留此产品说明书,以供今后使用或后续用户使用。
重要提示
● 本产品仅用于家庭室内使用,不可用于室外。
- 使用此新产品之前请开封检查此产品是否受损,如果发现此产品有明显的损坏,请勿安装使用,请您立即联系方太授权的服务中心。
- 请保持此油烟机远离石膏板粉末、建筑尘埃等物质。
- 请仅以本说明书指定的方式使用,请不要在无人看管情况下运行此产品。如有疑问,请联系方太授权的服务中心。
- 作为使用者,您对家中的油运机负有清洁保养和正确使用的责任。
- 根据实际条件清理金属油网。
- 油烟机电机有热过载功能,此功能在电机过热时会自动关闭电机,当电机冷却下来后会重新启动。如果电机不断关闭、重启,请联系方太授权的服务中心。
- 油烟机若长期不用,请拨下电源插头。
请确保此产品正确的安装和维修。此产品必须符合所有适用的规范和标准,包括防火建筑的规范和标准,由合格技师进行正确安装和接地。安装人员负责确保此产品在其安装位置正常工作。
- 为最大限度保证吸油烟效果,此油烟机底部和灶台的的距离应在最低12.3/16 inch(308mm)到最高15.1/8inch(383mm)之间;此产品应在灶台上方的墙面固定。
- 当烟机处于排气模式时,请确保烟机安装止通风。
- 仅用于一般排气使用。请不要使用此油烟机排放有害或爆炸性材料和气体。
- 为降低火灾危险,所有排烟管、烟道和设备应是不可燃的,请仅使用金属管道。绝不用可燃塑料或纸张覆盖油烟机。
● 保修服务须由方太公司认可的服务机构或人员执行,
- 请阅读油烟机上的规格标签,以便了解更多信息和要求。
注意:
- 油烟机使用环境的温度不能超过104°F (40°C).
- 产品上放置的东西可能跌落,请不要在此产品上放置任何物品。
- 请及时清理油杯中的废油,防止溢出、油杯中所收集的废油清勿食用!
- 若当地适用的法规包含更为严格的安装和认证要求。上述要求优先于此文档中相应的要求,并且安装人员同意遵守这些要求。
- 当在墙上或天花板上开凿或钻孔时,请注意不要损坏电线、水管、燃气管道以及其他隐蔽的设备。
请遵照加热设备厂商的指导方针和安全标准,如美国消防协会、美国采暖、制冷和空调工程师协会和地方法规指定当周发布的指导方针和安全标准。同时要遵照消防等管理部门颁布的安全标准。当燃气灶在空烧时,会产生大量热量,安装在其上方的油烟机可能会受损或着火,请仅在右锅具时操作燃气灶。
● 为避免任何可能对产品的损害,请确保实际电压和频率与本说明书中阐明的一致。
请确保使用我司提供的标准配件,以防油烟机意外跌落;墙上开的洞应精准符合形眼管的尺寸,否则,油烟机可能松动跌落。
警告:
触电危险
有缺陷的产品可能引起电击,绝不启动有缺陷的产品。如发现问题请将此产品从电源上按下或切断总电源,并请联系方太授权的服务中心。
■此产品应使用专用电源插座,并且专用电源插座应有可靠接地,因为电源线中连接,使用延长线以及多口配线器时易发生触电、插头插座发热以及火灾。请确保由专业电工在严格按照所在国家和地方的电力法规进行操作,接线以前,请先关闭电源并采取合理措施防止电源开关自动闭合。
■ 禁上使用 125V 以上的交流电,以免引起危险。
■ 禁止将此产品安装在浴室或温度高的场所,这样容易造成触电。
■ 如果电源线损坏,请联系授权服务提供商或
合格技术人员进行刚换。
■ 请不要对电源线进行改制、拉伸结扣以及施加重物、挤压等,否则易导致电源线破损而发生触电和火灾。
■ 严禁电机、开关、接插件等电器部件活水,禁止用水冲洗油烟机。油烟机被水淋湿后,请不要使用,如果使用会导致漏电、触电。
■ 禁止私自改动产品内部布线,否则有可能发生异常动作导致人体受伤,不当修理可能发生触电、火灾等危险。
■ 在清洗产品、提供安装或维修服务之前,必须切断电源,以免触电。
■请不要使用任何可能导致电击的高压清洁剂或蒸汽清洗器。
■ 请不要用潮湿的手触接电源插头电器部件以及操作电源开关,否则易发生触电。
- 接地说明
■此产品必须接地。如果发生短路,接地可以降低电击的危险,此产品配有接地插头的接地线。插头必须插在合理安装并接地的电源插座上。
■不合理接地会导致电击危险。
■ 如并未完全理解接地说明或者对产品是否已合理接地存在疑虑,请咨询合格电工。
■ 请不要使用延长线,如果电源线过短,请合格电工在产品附近安装电源插座。
- 火灾危险
■为降低火灾危险并合理排气,请总是外排,请不要将废气拌到墙体、天花板、阁楼、窄小空间或车库中。
■ 如果不按本说明书规定的方法清洗,油烟机有起火的危险。
■ 热油和油脂会快速点燃,绝不让热油或油脂处于无人看管状态。
■ 油网中油脂沉淀物可能着火,请定期清洗油网。 ■ 请勿在无油网的情况下操作此产品。
■ 油网中的油脂沉淀物可能着火,绝不在此产品附近使用明火。请不要在使用固体燃料(比如木头或煤)的加热设备附近安装此产品。禁止有飘飞的火花。
■ 请避免在燃机下方使用产生火焰的食品。
■为降低灶台油灾风险
- 绝不使灶台表面的器具在无人看管下高档位运行,溢锅造成冒烟和可能起火的油脂外溢。
请在低档或中档设置下缓慢加热油脂。
-
烹饪时请总是开启烟机。
-
请清洁油烟机、风扇、烟网上或在排烟管道里不应积油。
-
请使用合适尺寸的锅具。请总是使用与灶台表面的器具尺寸吻合的炊具。
■为降低烧烤一体机上方油火对人身伤害的危险,请遵守以下说明:
用合身的锅盖、烤板或金属托盘扑灭火焰,然后关闭灶具。注意谨防烫伤,如果火焰未立即熄灭,请疏散并报火警。
-
油锅着火时,请立即关闭油烟机(油烟机的运行会助燃火势)。立即采用有效的灭火措施,如用金属封盖直住明火、关闭燃气总阀、使易燃物远离明火等。
-
绝不拿起着火的锅具,您可能被烫伤。
-
请勿用水,包括湿抹布或毛巾灭火,这样会导致猛烈的蒸汽喷发。
■仅在以下条件使用灭火器
-
当您上过基础的灭火备课程,并且已经知道如何操作:
-
当火较小并且控制在火源处:
-
当您已打火警电话
-
当您背向出口时可救火。
- 人身伤害危险
■此产品不适用于(包括儿童在内)身体、感知或精神能力减弱或缺乏经验或知识的人群,除非在对其安全负责的人监督或指导如何安全使用此产品的情况下,孩童感受监管,确保其不玩弄此产品。
■油烟机可能有非常锋利的边,在进行安装、清洁或修理时,谨防被油烟机内金属板快口等划伤和擦伤。应佩戴合格的防护手套。
操作中可能及部分会变得很烫。绝不触摸变烫的部分。保持儿童在安全距离以外。
■ 请勿触摸已经开启或刚关闭不久的灯,以免烫伤。
■ 油烟机叶轮运转时,禁止将手指或其他物品放入其中,以免造成伤害。
■此产品不应和外部钟表计时器或遥控器配合使用。
■ 不正确的维修很危险。仅合格的售后服务技师才可进行维修。
■出现异常现象时,请关闭产品电源,拨下电源
- 安装完毕,请确认油烟机运转无异常现象。
警告:
● 为降低火灾、电击或人身伤害危险,请注意以下事项:
1. 油烟机的安装以及电路的设置必须要由有经验的专业人员进行。非专业人员请勿安装,在安装时要遵守所有相关的法规、标准,包括与火灾有关的说明。合适安装是安装人员的责任,由于安装不当导致的产品故障不包括在方太保修范围内。
2. 为确保安全和安装顺利,请使用随机附件进行安装;安装膨胀管时,膨胀管与墙孔的配合一定要紧密,严禁钻孔过大,以免膨胀管松动,造成意外跌落!
3. 油磨机应使用专用电源插座,并且专用电源插座应有可靠接地,因电源线中途连接、使用延长线以及多口配线器时易发生触电、插头插座发热以及火灾。装中线前请切断电源,请确保采取合理措施避免意外电源接通。
4. 安装时不能接通电,应在主电源箱中关闭电源。如果电源线损坏,必须由制造厂商或其服务代理提供的单独特配电源线或套件进行替换。
5. 用户自行安装易发生触电、脱落、起火等危险,非专业人员请勿拆卸、安装及维修油烟机。
人身伤害危险
- 在移动油烟机进行安装、清洁或者修理前,务必切断电源,以免触电。
- 油烟机可能有非常锋利的边,在进行安装、清洁或修理时,应佩戴合格的防护手套,以防被油烟机内金属板快二等划伤和擦伤。
安装前的警告
- 为了不对油烟机造成损害,请确保不要让杂物等进入排风口。
- 直线、较短的出风音布置将使得油烟机的排烟更加顺畅。
- 尽量避免使用过长以及有较多弯道的出风管,使用这些管道将影响油烟机的排烟效果。
- 出风管与墙孔的连接处使用管道胶严格进行密封,必须确保出风管与出风罩连接牢固,并用钻箱胶带密封。
墙洞过小会影响排烟效果,在保证安全的前提下,建议扩孔至6 inch或以上。
二、产品尺寸
油烟机尺寸
text_image
Max 29" (735mm) Min 15" (380mm) 10.7/8" (275mm) 13" (330mm) 17 1/16" (442mm) 8 1/4" (462mm)墙面安装
安装油烟机的墙壁要有足够的支撑强度,对于中空墙壁,中空板实心层的厚度必须大于1.3"6inch(30mm)以上,对于混凝土墙壁可直接打安装孔。整机必须牢固安装在墙壁上。
安装烟管
- 人身伤害危险:在油烟机进行安装、清洁或者修理前,务必切断电源,以免触电。油烟机可能有非常锋利的边,在进行安装、清洁或修理时,应佩戴合格的防护手套,以防被油烟机内金属板快口等划伤和损伤。
- 当在墙上或天花板上开凿或钻孔时,请注意不要损坏电线以及其他隐藏的产品。
- 安装管道的烟机必须总是外排。
为了避免火灾的发生,请将废气排到室外。请不要将废气排到墙面或天花板内空间,或者阁楼、密小空间或车库中,
三、零配件一览表
装箱单
| 标准配置 | |
| 1台 | |
| 1个 | |
| 1个 | |
| 1个 | |
| 1本 | |
| 1张 | |
| 1张 | |
| 1个 | |
| 挂钩螺钉 ST6×65 | 5套 |
| 湿胀管 8×50 | 5个 |
| 出风剪螺钉 M4×18 | 4套 |
| 上柜板固定紧钉 M5×70 | 3架 |
| 外罩装配件(套配) | |
| 1个 | |
| 1个 | |
| 1个 | |
| 1个 | |
| 外罩螺钉M4×10 | 4项 |
| 2个 | |
| 垫钉螺钉M4×8 | 2项 |
| 挂钩焊钉ST5×65 | 3项 |
| 倒齿膏φ8×50 | 3个 |
| 螺钉ST2.9×19 | 2项 |
| 装饰板装配件(套配) | |
| 6”或12”装饰板 | 1块 |
| 固定装饰板大螺钉ST3.5×55 | 4项 |
| 2个 | |
| 垫脚螺钉M4×5 | 2项 |
四、安装工具
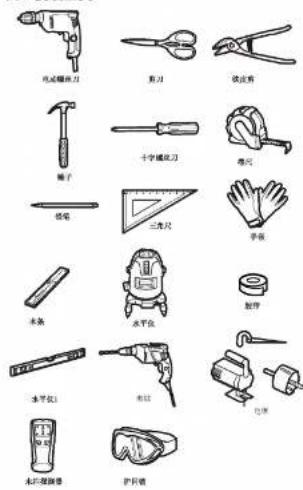
text_image
电动螺丝刀 剪刀 铣皮剪 帽子 十字螺丝刀 卷尺 锁笔 三光尺 手架 木条 水平仪 扳手 水平仪1 车轮 包环 水印螺旋器 护具镜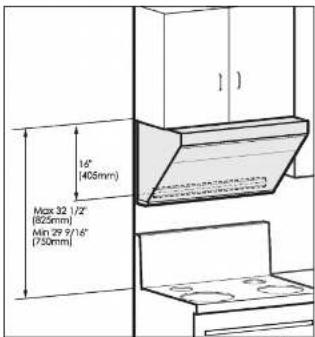
text_image
14" (405mm) Max 32 1/2" (825mm) Min 29 9/16" (750mm)- 打开包装箱拿出主机,清点附件清单。
natural_image
Illustration of a mechanical device with arrows indicating upward motion, no text or symbols present五、安装步骤
油烟机安装最佳高度:从台面到油烟机顶部为29.9/16inch(750mm)-32 1/2inch(825mm)。建议将油烟机的安装高度调整到最佳。以此产生与上柜的间隙我们有装饰板来做装饰。
注意:主机挂钩必须有一个螺钉要固定在木梁上。
text_image
有上框: 钢管直径φ6" (152.5mm) 挖孔直径φ6 1/2" (169mm) 6.7/16" (163.5mm)- 在安装位置找到固定挂钩的木条并用铅笔做好标记。在相邻的距离 16inch 或 24inch 做上相应的标志。
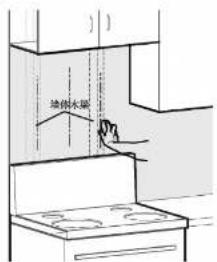
text_image
地倒水堤- 确认固定主机挂钩的位置:首先确认油烟机安装中心点画一条垂直的中心线,然后以上柜板底部为基准确认挂钩安装位置,做好打孔标志。尺寸为:上柜板到挂钩孔中心距18inch(405mm)
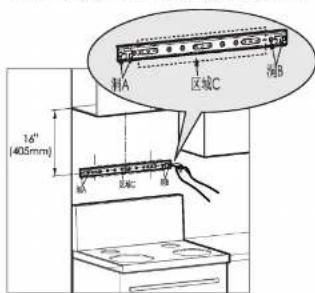
text_image
1.6" (405mm) 测A 区域C 测B 断面 支座C 端- 固定挂钩:在打孔标志处用电钻打 8 孔,并埋设膨胀管,用挂钩螺钉固定挂钩,并用水平尺确保挂钩水平。
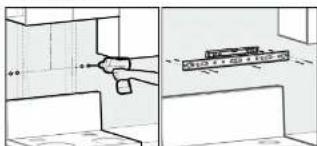
text_image
Technical diagram showing a hand operating a tool in a room with a labeled component box and directional arrows注意:主机挂钩必须有一个螺钉要固定在木架上。图上洞A、洞B必须固定螺钉,区域C挂钩孔位能对应木柱部分必须固定螺钉。
- 把安装尺寸纸按文字面朝下贴在上柜板底部,然后按安装纸上要求开孔。
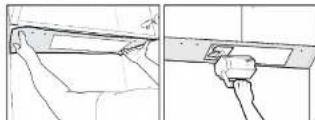
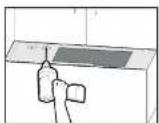
注意:开孔要带上防护眼镜。
如遇底板靠墙一侧有水条,安装纸 Rear wall 侧按此水条厚度裁剪。
- 把整机两侧不锈钢表面和油杯保护膜撕掉。
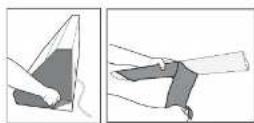
- 抬起主机倾斜着将背底部挂钩孔挂上挂钩,再将烟机推上去靠紧墙壁。
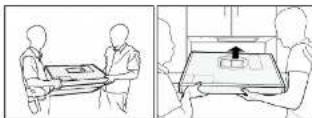
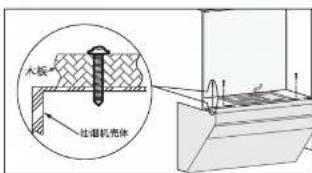
- 用 3 颗 M5 x 70 上柜板固定螺钉固定主机,至少固定两颗螺钉后才能松手。
text_image
大板 注塑机壳体注意:为了安全你需要两个人来安装这个油烟机。
- 在主机出风口放好密封垫,用 4 颗螺钉固定好出风罩。再把烟管固定在出风罩上用铝箔胶带做好密封。
10. 整机必须保持水平。再把油杯安装上去并插上电源试机。
- 打开包装箱拿出主机,清点附件清单。
natural_image
Diagram of an open box with internal components and upward arrows indicating motion (no text or symbols)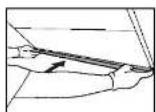
警告:请载防护手套操作
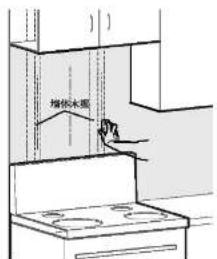
- 在安装位置找到固定挂钩的木条并用铅笔做好标记。在相邻的距离 16inch 或 24inch 做上相应的标志。
text_image
增供水泵有上柜加装饰板
注意:请先确认上柜高度,如果超过32 1/2inch (825mm),则参考选配6inch或12inch装饰板
text_image
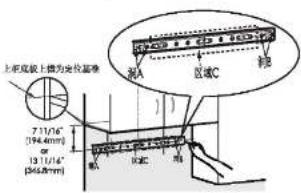
d' (152.4mm) or 12" (304.8mm) 7 1/1/14" (194.4mm) or 13 1/1/16" (346.8mm)- 确认固定主机挂钩的位置:首先确认油烟机安装中心点画一条垂直的中心线,然后以上柜底板底部为基准确认挂钩安装位置。做好打孔标志,尺寸为上柜底板上檐为定位基准到挂钩孔中心点距里为(7 11/16 inch/194.4mm)—(13 11/16 inch/346.8mm)
text_image
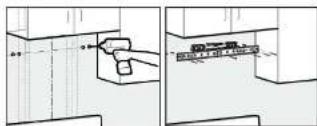
上层底板上墙为定位基座 7.1/16" [194.4mm] 13 1/14" [364.8mm] A B C 地- 固定挂钩:在打孔标志处用电钻钉 8 孔,并埋设膨胀管,用挂钩螺钉固定挂钩,并用水平尺确保挂钩水平。
text_image
Technical diagram showing a hand operating a doorbell with a ruler inserted, alongside a separate view of the doorbell interior.注意:主机挂钩必须有一个螺钉要固定在木梁上。图上洞A、洞B必须固定螺钉,区域C挂钩孔位能对应木柱部分必须固定螺钉。
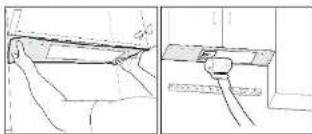
- 把安装尺寸纸按文字面朝下贴在上排板底部,然后按安装纸上要求开孔。
natural_image
Technical line drawing showing two views of a mechanical component, one with a handle and the other with a curved handle (no text or symbols)注意:开扎要带上防护眼镜。
如遇底板靠墙一侧有木条,安装纸 Rear wall 侧按此木条厚度裁剪。
-
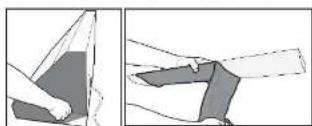
把整机两侧不锈钢表面和油杯保护度维护。
-
在主机出风口放好密封垫,用4颗M4×18的螺钉固定好出风罩。用2颗M4×8垫脚螺钉,将垫脚固定于主机背部下侧相应位置。
-
拾起主机将背上部挂钩孔挂上挂钩,再把烟管固定在出风罩上用铅箔胶带做好密封。
natural_image
Two technical line drawings showing a person exchanging a document and another with a mechanical device (no text or symbols visible)注意:为了安全你需要两个人来安装这个油烟机。
9 安装装饰板
用 3.5 x 35 的 4 赖木螺钉,把装饰板固定在上框板上。
natural_image
Technical line drawing of mechanical assembly or assembly steps (no text or symbols)- 整机必须保持水平,再把油杯安装上去并插上电源试机。
无上柜加装饰罩
- 安装上油杯。
警告:请戴防护手套操作
7.6 安装后调试
- 轻触电源键,再轻触灯键,检查“隔烟屏”是否正常打开,检查照明灯是否正常;
- 轻航风量键,检测电机转动是否正常,如出现下列异常情况,应立即切断电源,停止运转,并检查是否安装事故(若确定油烟机发生故障,请尽快与本公司当地售后服务中心联系)。
(1) 机体震动剧烈
(2) 叶轮不转动
(3) 叶轮转动时明显的摩擦声
(4) 电机出现异常声响 - 轻触电源开关,风机停止转动,隔烟屏关闭。
爆炸图
text_image
插座 电风扇 上交流件 电气盒盒 电源板组件 压板 开关盒 控制板 电源路 容配圈 上连接 逆向 电控板固定 LED灯 电感线缆 装除器 推杆支架 电动盘杆 油杆 贻亮 可动线 镀卡窗 电机 打开 千套现有 通风口扇 下移动电路图